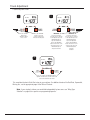
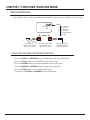
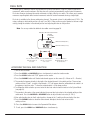
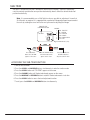
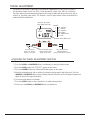
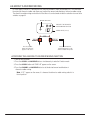
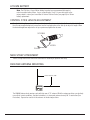
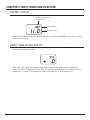
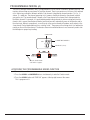
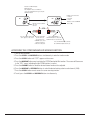
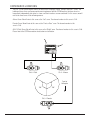
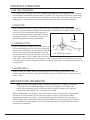
1
6-Channel, 10-Model Memory DSM Parkflyer and Micro Helicopter System Welcome to the World of Spektrum Technology No longer will you have to wait for an open frequency or struggle with interference caused by noisy motors, speed controllers or metal-to-metal noise. Gone are concerns of being shot down by someone inadvertently turning on on your frequency. With Spektrum™—when you’re ready, just turn on and fly! Your DX6 transmits on the 2.4GHz band and utilizes DSM™ Digital Spread Spectrum Modulation, making it impervious to interference. The system features patented DuaLink™ (pat pend) technology that actually transmits and receives on two frequencies simultaneously, offering multi-path security. Parkflyers Only The DX6 system is designed for parkflyer type aircraft only. This includes all forms of compact electric and non-powered airplanes as well as micro electric helicopters. While the system has more than adequate range for these types of aircraft, it is imperative that the system not be used in larger aircraft that could exceed the range. How DSM Works Transmitter When the transmitter is turned on, the system scans the 2.4GHz band, finds an open channel and locks on that channel. Next the transmitter scans for a second open channel and, when found, transmits on that second open channel. The system is now transmitting simultaneously on two 2.4GHz channels, giving two paths of security. Receiver Each AR6000 receiver features patented DuaLink (pat pend) technology and is actually two receivers in one, hence the dual antennas. When turned on, the first receiver scans the 2.4GHz band until it finds the specific transmitter’s code (called GUID) that it has been programmed to recognize (see binding page 24) and locks on that signal. Then the second receiver scans the 2.4GHz band, finds the second transmitted code that it’s been programmed to recognize and locks on that signal. This whole process takes less than 5 seconds. The receiver is then locked to that transmitter via two independent channels, and is virtually immune to model generated or outside interference. Thanks for joining the Spektrum family and have fun flying! Spektrum Development Team 2 SPEKTRUM DX6 • INTRODUCTION Alternate Languages ITALIAN: Per la versione italiana di questo manuale vi preghiamo di vistare il sito www.spektrumrc.com FRENCH: Pour consulter ce manuel en français, visiter le site www.spektrumrc.com GERMAN: Zur Ansicht der Bedienunsanleitung in den Deutsch besuchen Sie bitte www.spektrumrc.com SPANISH: Para ver este manual en Español entra en www.spektrumrc.com Table of Contents Welcome to the World of Spektrum™ Technology ..................................................................2 Parkflyers Only........................................................................................................................2 How DSM™ Works .................................................................................................................2 Transmitter..............................................................................................................2 Receiver ..................................................................................................................2 Alternate Languages................................................................................................................3 Aircraft Quick Start: 4-Channel Airplane w/Single Rates .........................................................6 Binding ...................................................................................................................6 Model Type Selection .............................................................................................6 Digital Trim Settings ...............................................................................................7 Servo Reversing .....................................................................................................7 Travel Adjustment ...................................................................................................8 Helicopter Quick Start: 5-Channel Mechanical Mix Helicopters ..............................................9 Binding ...................................................................................................................9 Model Type Selection .............................................................................................9 Digital Trim Settings .............................................................................................10 Servo Reversing ...................................................................................................10 Travel Adjustment .................................................................................................11 Pitch Curve ...........................................................................................................12 Throttle Curve .......................................................................................................13 Important Gyro Information...................................................................................14 User Guide ............................................................................................................................14 System Features ...................................................................................................14 Airplane Specific Features ....................................................................................14 Helicopter Specific Features .................................................................................15 AR6000 Receiver ..................................................................................................15 Receiver Specifications .........................................................................................15 Servo Specifications .............................................................................................16 Charging the Transmitter.......................................................................................................17 Transmitter............................................................................................................17 Important ..............................................................................................................17 Trainer System ......................................................................................................................18 Operating the Trainer System ................................................................................18 Control Identification and Location - Airplane.......................................................................19 SPEKTRUM DX6 • TABLE OF CONTENTS 3 Aircraft Programming Guide CHAPTER 1: TRANSMITTER CONTROLS .............................................................................21 Digital Trim Levers................................................................................................21 Receiver Channel Assignment ..............................................................................21 Transmitter Throttle Alt .........................................................................................21 Lithium Battery .....................................................................................................22 Control Stick Length Adjustment ..........................................................................22 Neck Strap Attachment..........................................................................................22 Receiver Antenna Mounting ..................................................................................22 Range Testing .......................................................................................................23 Binding .................................................................................................................24 Smart Fail-Safe .....................................................................................................24 CHAPTER 2: CONNECTIONS ................................................................................................25 Connections .........................................................................................................25 CHAPTER 3: KEY INPUT AND DISPLAY ...............................................................................26 Key Input and Display ...........................................................................................26 CHAPTER 4: BATTERY ALARM AND DISPLAY .....................................................................26 Throttle Cut...........................................................................................................26 CHAPTER 5: INPUT MODE AND FUNCTION ........................................................................27 Normal Display .....................................................................................................27 Direct Trim Access Display ...................................................................................27 System Mode........................................................................................................28 Function Mode .....................................................................................................29 CHAPTER 6: FUNCTIONS (SYSTEM MODE) ........................................................................30 Model Type Selection ...........................................................................................30 Data Reset.............................................................................................................31 Dual Rate Switch Selection ...................................................................................32 Wing Type Selection .............................................................................................33 Flaperon Setup .....................................................................................................33 V-Tail ....................................................................................................................34 Delta-Wing Mixing ...............................................................................................35 Model Selection....................................................................................................36 Model Name Entry ................................................................................................37 CHAPTER 7: FUNCTIONS (FUNCTION MODE) ....................................................................38 Servo Reversing ...................................................................................................38 Dual Rate ..............................................................................................................39 Exponential ...........................................................................................................40 Sub-Trim ..............................................................................................................41 Travel Adjustment .................................................................................................42 Aileron-to-Rudder Mixing.....................................................................................43 Aileron-to-Rudder Mixing Switch Selection..........................................................44 Elevator-to-Flap Mixing ........................................................................................45 Elevator-to-Flap Mixing Switch Selection .............................................................46 Differential ............................................................................................................47 Flap-to-Elevator Offset Trim ..................................................................................48 Programmable Mixing (A, B, C)............................................................................49 Offset ....................................................................................................................52 Programming a Rudder Dual Rate.........................................................................53 CHAPTER 8: DATA SHEET ....................................................................................................55 4 SPEKTRUM DX6 • TABLE OF CONTENTS Helicopter Programming Guide CHAPTER 1: TRANSMITTER CONTROLS .............................................................................57 Digital Trim Levers................................................................................................57 Receiver Channel Assignment ..............................................................................57 Transmitter Throttle Alt .........................................................................................57 Lithium Battery .....................................................................................................58 Control Stick Length Adjustment ..........................................................................58 Neck Strap Attachment..........................................................................................58 Receiver Antenna Mounting ..................................................................................58 Range Testing .......................................................................................................59 Binding .................................................................................................................60 Smart Fail-Safe .....................................................................................................60 CHAPTER 2: CONNECTIONS ................................................................................................61 Connections .........................................................................................................61 CHAPTER 3: KEY INPUT AND DISPLAY ...............................................................................62 Key Input and Display ...........................................................................................62 CHAPTER 4: BATTERY ALARM AND DISPLAY .....................................................................62 Throttle Cut...........................................................................................................62 CHAPTER 5: INPUT MODE AND FUNCTION ........................................................................63 Normal Display .....................................................................................................63 Direct Trim Access Display ...................................................................................63 System Mode........................................................................................................64 Function Mode .....................................................................................................65 CHAPTER 6: FUNCTIONS (SYSTEM MODE) ........................................................................66 Model Type Selection ...........................................................................................66 Data Reset.............................................................................................................67 Dual Rate Switch Selection ...................................................................................68 Gear/Gyro Switch Selection ..................................................................................69 Important Gyro Information...................................................................................69 Model Selection....................................................................................................70 Model Name Entry ................................................................................................71 CHAPTER 7: FUNCTIONS (FUNCTION MODE) ....................................................................72 Servo Reversing ...................................................................................................72 Dual Rate ..............................................................................................................73 Exponential ...........................................................................................................74 Sub-Trim ..............................................................................................................75 Travel Adjustment .................................................................................................76 Throttle Hold.........................................................................................................77 Pitch Curve ...........................................................................................................78 Throttle Curve .......................................................................................................80 Revolution Mixing ................................................................................................82 Programmable Mixing (A) ....................................................................................83 Offset ....................................................................................................................86 Programming a Rudder Dual Rate.........................................................................87 CCPM Swashplate Mixing ....................................................................................88 CCPM Servo Locations ........................................................................................90 CCPM Servo Connections ....................................................................................91 Important Gyro Information...................................................................................91 CHAPTER 8: DATA SHEET ....................................................................................................92 Warranty One Year Warranty ................................................................................................................93 FCC Information ...................................................................................................................94 Notes ....................................................................................................................................95 SPEKTRUM DX6 • TABLE OF CONTENTS 5 Aircraft Quick Start: 4-Channel Airplane w/Single Rates Binding Binding is the process of programming the receiver to recognize the code of a single specific transmitter. In order for the receiver to operate it must be bound to the transmitter. Note: Your receiver was bound to the transmitter during manufacturing and is ready to install with the fail-safe positions set to low throttle during the binding process. If you wish to change these fail-safe positions after the Quick Start Setup see page 24 for binding details. Important: Remove the bind plug after binding. Model Type Selection Selecting the Airplane Mode � � ����������������������������� ������������������������������� ��������������������������������� ����������������������������� ���������������������������� � � � ������������������������������������������� �������������������������������������� �������������������������������������������� ���������������������������������������� ������������������������������������� ���������������������������������������������� 6 SPEKTRUM DX6 • INTRODUCTION Digital Trim Settings Centering the Digital Trims If necessary move the throttle, aileron, elevator, and rudder trims to neutral by moving each trim lever while noting the trim position on the screen. The throttle, aileron, elevator and rudder trims should all be set to 0. Servo Reversing Establishing Servo Direction � � − − �������� �������� ����������������������������� ������������������������������� ��������������������������������� ���������������������������������� ��������������������������� ����������������������������� �������������� � � − �������� �������������������������������������� ��������������������������� ����������� SPEKTRUM DX6 • AIRCRAFT QUICK START GUIDE − �������� ����������������� ���������������� ��������������� ���������������� ��������������������� ������������������ ������������������������ ������������������������� 7 Travel Adjustment Establishing Servo Travel � � �������� �������� � � ���������������� ������������ ����������������� �������������� ����������������� �������������������� �������������������� ������������������������� � �������� ����������������������� ����������������������������� ��������������������������� ������������������ ������������������������ �������������������� ������������������������ ���������������������������� ������������������ ����������������������� �������� ����������������������� ����������������������������� ��������������������������� ������������������ ������������������������ �������������������� ������������������������ ���������������������������� ������������������ ���������� ������������ �������� � ������������������������������������� �������������������������������������������� ���������������������������������� This completes the basic Quick Start setup for your airplane. For additional features like Dual Rate, Exponential, Mixing, etc., see the appropriate pages in the Table of Contents. Note: If your airplane’s ailerons are controlled independently by two servos see “Wing Type Selection” on page 33 for specifics on programming flaperons. 8 SPEKTRUM DX6 • AIRCRAFT QUICK START GUIDE Helicopter Quick Start: 5-Channel Mechanical Mix Helicopters Binding Binding is the process of programming the receiver to recognize the code of a single specific transmitter. In order for the receiver to operate it must be bound to the transmitter. Note: Your receiver was bound to the transmitter during manufacturing and is ready to install with the fail-safe positions set to low throttle during the binding process. If you wish to change these fail-safe positions after the Quick Start Setup, see page 60 for binding details. Important: Remove the bind plug after binding. Model Type Selection Selecting the Helicopter Mode. � � ����������������������������� ������������������������������� ��������������������������������� ����������������������������� ���������������������������� � � � ������������������������������������������� �������������������������������������� ������������������������������������������� ���������������������������������������� ������������������������������������� ���������������������������������������������� SPEKTRUM DX6 • AIRCRAFT QUICK START GUIDE 9 Digital Trim Settings Centering the Digital Trims If necessary move the throttle, aileron, elevator, and rudder trims to neutral by moving each trim lever while noting the trim position on the screen. The throttle, aileron, elevator and rudder trims should all be set to 0. Servo Reversing Establishing Servo Direction � � − − �������� �������� ����������������������������� ������������������������������� ��������������������������������� ���������������������������������� ��������������������������� ����������������������������� �������������� � − �������� �������������������������������������� ��������������������������� ����������� 10 SPEKTRUM DX6 • HELICOPTER QUICK START GUIDE Travel Adjustment Establishing Servo Travel � � �������� �������� � � ���������������� ������������ ����������������� �������������� ����������������� �������������������� �������������������� ������������������������� � �������� ����������������������� ����������������������������� ��������������������������� ������������������ ������������������������ �������������������� ������������������������ ���������������������������� ������������������ ����������������������� �������� ����������������������� ����������������������������� ��������������������������� ������������������ ������������������������ �������������������� ������������������������ ���������������������������� ������������������ ���������� ������������ �������� � ������������������������������������� �������������������������������������������� ���������������������������������� SPEKTRUM DX6 • HELICOPTER QUICK START GUIDE 11 Pitch Curve Adjusting the Normal Pitch Curves The DX6 offers three independent pitch curves with three adjustable points per curve. This function allocates a separate pitch curve setting during Normal, Stunt, and Throttle Hold modes to maximize flight performance. Once the pitch curves are established, each can be activated in flight, using the two-position flight mode switch and the throttle hold switch. Each of the three points on the pitch curve are independently adjustable from 0–100%. These three points correspond to the low, middle, and high positions of the throttle stick (collective). The factory preset values for all three pitch curves are: Low 0%, Middle 50%, and High 100%. See page 78 for more information regarding the Pitch Curve function. � ��������� ��������� ������ �������������� ������������ ��������������� ������������� ��������������� �������������� ���������� ������������������ ������������������ ������������������� ��������������������� ��������������� � �������������� ���������������� ������� ���������� �������� ������������� ������ ������� �������� 12 ������������������� �������������� ������������������������������������ ��������������������������������������������� ������������ ������������ ������������ SPEKTRUM DX6 • HELICOPTER QUICK START GUIDE Throttle Curve Adjusting the Normal Throttle Curve Adjustment of the throttle curve is very similar to the pitch curve adjustment described in the preceding section. Two throttle curves are available—normal and stunt. The normal or hover throttle curve has three points (L,2, H) and the stunt or flight throttle curve has two points (L and 2). The two throttle curves are activated by the flight mode switch located on the top left rear corner of the transmitter. The throttle curve is in the normal mode when the flight mode switch is in the back position. The throttle curve is in the stunt mode when the flight mode switch is in the forward position. See page 80 for more information regarding the Throttle Curve function. � ��������� ��������� ������ �������������� ������������ ��������������� ������������� ��������������� �������������� ���������� ������������������ ������������������ ������������������� ��������������������� ��������������� � �������������� ���������������� ������� ���������� �������� ������������� ������ ������� �������� This completes the basic Quick Start setup for your helicopter. For additional featues like additional pitch and throttle curves, throttle hold, remote gyro gain, etc., see the appropriate pages in the Table of Contents. Note: For CCPM helicopter setup see page 88. SPEKTRUM DX6 • HELICOPTER QUICK START GUIDE 13 Important Gyro Information Note: After flight trimming the helicopter, or anytime the rudder trim is changed, It is important to rebind the system (see Binding page 60) to set the fail-safe position to the rudder’s true neutral. With many types of gyros, each time the radio is turned on the gyro senses the servo output position and establishes this as the center for that flight. When the DX6 receiver is first turned on, the servos are driven to their fail-safe positions until the receiver connects to the DX6 transmitter. This can take several seconds. If the fail-safe position for rudder is different than the rudder trim position, it is possible that the gyro will establish the fail-safe position as neutral instead of the trimmed neutral position. By making the rudder trim position and the fail-safe position the same, this is prevented from happening. In summary, after the helicopter is trimmed rebind the system to prevent the tail from drifting. User Guide This user guide is divided into two main sections: airplanes and helicopters. Blank data sheets are included at the end of each section. Once you have input all the necessary data for a particular model, it is recommended that you record that information on a data sheet. This insures that, in the rare case of a memory failure, you will not lose the data. Note: Data sheets are available online that allow you to input, store and print data sheets for your convenience. System Features • • • • • • • • • • • Digital DSM™ Spread Spectrum Modulation 10-model memory Dual rates on aileron and elevator Exponential rates on aileron and elevator Dual and exponential rates can be combined on one switch Trainer system compatible with Spektrum™ and JR® radio systems. Adjustable stick length Throttle trim only affects idle position Two-speed scrolling Throttle-smart fail-safe system Digital trims for precise adjustment Airplane Specific Features • • • • • • • • 14 Aileron to rudder mixing Elevator-to-flap mixing Flap-to-elevator mixing Flaperon mixing Delta wing mixing Aileron differential V-tail mixing Three programmable mixes SPEKTRUM DX6 • HELICOPTER QUICK START GUIDE Helicopter Specific Features • Two 3-point throttle curves • Three 3-point pitch curves • Flight mode switch can combine throttle curves, pitch curves, dual and expo rates, and gyro sensitivity • Throttle hold • Revolution mixing up and down • One programmable mix • Supports 120° CCPM mixing • Independent digital trim setting for each flight mode AR6000 Receiver • • • • • • DuaLink™ (pat pending) incorporates two receivers in one Ultralight 7 grams Compact design 39 x 39 x 9mm Smart fail-safe prevents motor start up if Tx is off and gives low throttle if signal is lost Short 3.75” antennas for mounting convenience Easy bind plug Receiver Specifications • Model#: AR6000 • Type: 6-channel parkflyer only • Dimensions: 39 x 39 x 9mm • Weight: 7 grams • Frequency: 2.400–2.485 • Receiver antennas: 3.75” ����������������������������� ������� SPEKTRUM DX6 • SPECIFICATIONS 15 Servo Specifications • Model #: SPMS75 • Dimensions: (LxWxH) 23 x 12 x 24mm • Weight: 7.5 grams • Torque: 17.2 oz @4.8V • Speed: .12 sec @4.8V • Operating voltage: 3.2–6.0V • Motor type: Coreless 16 SPEKTRUM DX6 • SPECIFICATIONS Charging the Transmitter Transmitter It is important to fully charge the transmitter battery prior to each flying session. The charger supplied with the system (SPM7105) is designed to recharge your transmitter battery at a rate of 50mA. For the initial charge, or if the transmitter hasn’t been used for several months, it’s important to charge the transmitter battery for 24 hours to achieve a full charge. Subsequent charges of 10–12 hours (approximately overnight) are recommended. Many modelers fast-charge their batteries. The DX6 does not have a charging diode in the circuit and will allow most fast chargers to be used, however, it is imperative to understand that all Spektrum™ transmitters have a center pin negative charge connector. When using an aftermarket charger, the charge plug must have the correct center pin negative polarity or damage can occur. �������������������������������������������� ����������������� ��������������� ���������������������������� Important The center pin on the DX6 transmitter is negative. Beware of improper connections based on “color code” ��������������������������������������������� wire leads, as they do not apply in this instance. When using aftermarket chargers, you must make certain that the center pin of your Spektrum transmitter is always connected to the negative polarity for correct hookup or damage can result. ������������������������� ���������� ����������� ������������������� SPEKTRUM DX6 • INTRODUCTION 17 Trainer System The DX6 features a built-in trainer system. The transmitter can be used as either a master (trainer) or as a slave (trainee). The DX6 is compatible with all other Spektrum™ and JR® radios that have built-in trainer systems. An optional Trainer Cord (SPM6805) is needed. ������ ������������ ����� �������������� �������� ������������ ��������� ��������� ��������������� �������� ���������������� Operating the Trainer System 1. Match the servo reversing and trims of the master transmitter to the slave transmitter. 2. Plug the optional trainer cord into both transmitters. 3. Turn on the master transmitter. Note: The slave radio must be left off. 4. Test all the control functions on your aircraft with the master radio. 5. Push the trainer button on the master transmitter and check all the control functions with the slave radio. 18 SPEKTRUM DX6 • INTRODUCTION Control Identification and Location - Airplane ������� ���������� ������������� ������������� ��������������� ������������������� �������������� ��������� ����������� ����������������� ������������������ ��������������������� ����������������� ����������� ���������������������� ������������ ������������ ���������� SPEKTRUM DX6 • INTRODUCTION 19 20 CHAPTER 1: TRANSMITTER CONTROLS DIGITAL TRIM LEVERS The DX6 features four digital trim levers with a direct trim display feature for ultra precise adjustments. When a trim input is given, the display screen will automatically change to show the trim value for current channel being adjusted. Once the trim change has been completed, the screen will automatically return to the previous screen display after 2–3 seconds. A significant feature found only with Digital Trims is the ability for the DX6 to automatically store the trim values in system memory. This eliminates the need for previously found software functions like Trim Offset Memory (airplane), or Rudder Offset Memory and Stunt Trims (heli). In Heli mode, the DX6’s digital trims provide a separate set of trim values for each Flight mode (Normal, Stunt, and Throttle Hold), which takes the place of the previously needed Stunt Trim function. With this feature, the trim levers are active and independent in all flight modes, and will store the trim values for each mode independently. This feature also takes the place of the previously needed rudder offset function, since there is now a completely separate set of trim settings for the Throttle Hold mode. RECEIVER CHANNEL ASSIGNMENT ���������������������������� ���������������� ��������������������������� ������������ ������������������ ����������������� ������������������ ������������������������������� ���������������� �������������� ������������������������� TRANSMITTER THROTTLE ALT The Throttle ALT function makes the throttle stick trim active only when the throttle stick is less than half throttle. This gives easy, accurate idle adjustments without affecting the mid to high throttle position. SPEKTRUM DX6 • DX6 AIRCRAFT PROGRAMMING GUIDE 21 LITHIUM BATTERY Note: The DX6 has a 5-year lithium battery to protect your programmed data against main transmitter battery failure. If your system displays “error” or your data resets to the factory defaults, return your transmitter to Horizon Service Center (see page 93) for lithium battery replacement. CONTROL STICK LENGTH ADJUSTMENT To adjust stick length, use a 2mm Allen wrench to loosen the setscrew located inside the end of the stick. Turn the setscrew counterclockwise to loosen then turn the knurled portion of the stick tip to adjust its length. When the desired length been adjusted to suit your preference, tighten the setscrew. �������� ������ ������� NECK STRAP ATTACHMENT There is an eye hook on the front of the transmitter for attaching an optional neck strap. RECEIVER ANTENNA MOUNTING ������������������������ The AR6000 features dual receivers each with their own 3.75” antenna. While the antenna positions are relatively non-critical in most conditions, the ideal orientation is to have each antenna at nearly 90º to each other (see illustration). Tape can be used to fix the antennas in the desired positions. 22 SPEKTRUM DX6 • AIRCRAFT PROGRAMMING GUIDE RANGE TESTING ������������������ ������������������������������ Before each flying session, and especially with a new model, it is important to perform a range check. The DX6 incorporates a system which, when the bind button on the back of the transmitter is pressed, the output power reduces allowing for a range check. HOW TO RANGE TEST THE SYSTEM 1. With the model resting on the ground, stand 30 paces (approx. 90 feet) away from the model. 2. Face the model with the transmitter in your normal flying position and depress and hold the bind button on the back of the transmitter. This causes reduced power output from the transmitter. 3. You should have total control of the model with the button depressed at 30 paces. 4. If control issues exist call the Spektrum™ Service Center at 1-877-504-0233 SPEKTRUM DX6 • DX6 AIRCRAFT PROGRAMMING GUIDE 23 BINDING ����������� ����������������� ����������������������������� ������� ������ Each Spektrum™ transmitter has a GUID (Globally Unique Identifier) code. Binding is the process of programming the receiver to recognize the GUID of a single specific transmitter. Binding teaches the receiver the specific GUID of that transmitter, so that the receiver will only listen to the information from its previously bound transmitter and ignores everything else. With over 4.2 billion GUID codes the chances of having interference from another transmitter is virtually impossible. Fail-safe positions are set during binding, and usually it is only necessary to bind the receiver to the transmitter once. The only time it is necessary to rebind is if you wish to use a different transmitter or to change the fail-safe positions. Your AR6000 was bound to the transmitter during manufacturing however, if you wish to change to a different transmitter or change the throttle fail-safe position, the following process is necessary. HOW TO BIND 1. With the power off, plug the bind plug into the BAT port. 2. Power on the receiver by connecting the battery to any unused port. The blue LED should be blinking. 3. Position the throttle stick in the desired fail-safe position (normally low throttle). 4. Press and hold the bind button on back of the transmitter while turning on the transmitter. The button should flash for about 5 seconds, then both LED’s (transmitter and receiver) will go solid green. Important: Remove the bind plug after binding. SMART FAIL-SAFE In case of loss of signal, the throttle will go to the preset position stored during binding. The other channels will hold last position. If the receiver is turned on before the transmitter, all channels but throttle will go to the fail-safe positions stored during binding, while the throttle will not generate a pulse so as not to affect the Electronic Speed Control. 24 SPEKTRUM DX6 • AIRCRAFT PROGRAMMING GUIDE CHAPTER 2: CONNECTIONS CONNECTIONS ����������������� ������������������ ������� �������� ����� ������������������������������� ��������������������������������������� �������������������������������� ������������������� �������������������������������������������������� ��������������������������������� ������������������������ ����������������������������������� ��������� ����� 25 SPEKTRUM DX6 • DX6 AIRCRAFT PROGRAMMING GUIDE ����� ������� ����������������������������������� ���������������������������������������������� ������������������������� ������������������������ ���������������� CHAPTER 3: KEY INPUT AND DISPLAY Two input keys are located at the lower faceplate of the DX6 transmitter. The keys are used to access and program the transmitter. Each key can be moved up or down using your thumbs ����������������� ������������������������������������������ ������������������ ��������������������������������������������� ���������������������� �������������������� ��������������������������������������������� ���������������������� ������������������� ���������������������������������������������� ������������������������������� CHAPTER 4: BATTERY ALARM AND DISPLAY When the transmitter battery drops below 9.0 volts, the display will start to flash “BAT” and an audible alarm will sound eight times. This warning indicates a low battery condition and you should land your aircraft immediately. �������� � Note: During the period that the battery alarm is flashing, the input buttons will not function. If you are currently in the function mode, the transmitter will exit automatically and return to the normal display. THROTTLE CUT Your DX6 incorporates a special THROTTLE CUT function. The throttle cut button is located on the upper right face of the transmitter. This feature is designed primarily for glow-powered aircraft and is designed to shut off the engine when pressed without affecting the throttle trim position. With the throttle stick in the low position, pressing the throttle cut button with drive the throttle servo to its programmed low throttle, low trim endpoint adjusted in travel adjust. This will not be a commonly used feature for parkflyer aircraft. Note: The Throttle Cut function is designed to function only when the throttle stick is below the 1/2 position. 26 SPEKTRUM DX6 • AIRCRAFT PROGRAMMING GUIDE CHAPTER 5: INPUT MODE AND FUNCTION NORMAL DISPLAY ������������������������ ��������������� ������������ � ��������������� When the power switch is turned on, the screen will read as shown in the diagram. This screen is referred to as the normal display. DIRECT TRIM ACCESS DISPLAY The Direct Trim function of the DX6 can be accessed through the use of any of the four digital trims levers (throttle, aileron, elevator, or rudder). When a trim input is given, the screen will automatically change to show the trim value for that particular channel. Once the trim adjustment has been made, the screen will automatically return to the previous screen setting after 2–3 seconds. The maximum trim value for each channel is +/- 40 in increments of 2. SPEKTRUM DX6 • DX6 AIRCRAFT PROGRAMMING GUIDE 27 SYSTEM MODE To enter system mode, press the SCROLL and INCREASE buttons simultaneously upward while turning on the transmitter. You can now select any of 6 system mode functions shown here in the flow chart. Press the SCROLL button upward to move through the system mode functions. Information for each function is located on the page number listed next to the function name. To exit the system mode, press the SCROLL and INCREASE buttons upward simultaneously or turn off the transmitter. �������������������� ������� ���������� ������� ��������� ���������������� ��� ������� ������������������� ������� ��� ��������������� ������� ���������������� ������� 28 SPEKTRUM DX6 • AIRCRAFT PROGRAMMING GUIDE FUNCTION MODE To enter the Function mode, turn on the transmitter. Press the SCROLL and CHANNEL buttons simultaneously upward until a beep is heard. The display will change accordingly and show the last active function. Press the Scroll button to scroll through the functions one by one as shown in the flowchart below. Once the appropriate function is selected, press the CHANNEL button downward to select the appropriate channel. Use the INCREASE and DECREASE buttons to adjust the values displayed on the screen. ��������������������� ��������������� ������� ��������� ��� − �������� � ��������������������� ��� ������� ��� � � �������� ��� ��� � � ������� ������� ����������������� ��� �������� � � ����������������� ������ ������� ������� ���������������� ����������� ������ ������� ������� ������� ��������������������� ����������� ������� ������� + ��� � SPEKTRUM DX6 • DX6 AIRCRAFT PROGRAMMING GUIDE + ��� ������������ ��������������������������� ������������������������ ������� ���������������� ������ ������� 29 CHAPTER 6: FUNCTIONS (SYSTEM MODE) MODEL TYPE SELECTION Two types of aircraft programming are available with the DX6, airplane (AC) and helicopter (HE). When entering the model type selection function, the current model type will appear on the screen. (This will be the current model type set as the factory default or the last model used.) When you press the INCREASE or DECREASE button to change the model type, the new model type indicated on the screen will flash. For example, if the current model type is AC and you change to HE, “HE” will flash on the screen. The flashing alerts you to the change of model type and will stop once you move to the next function or exit the system mode. �������������������� ������������������ ���������� ������������� ��������������� ����������������������� ���������������������� ����������� ������������������������������������� ��������������������������������������� ���������������������� Note: When changing model types all programming will be reset to factory default settings. ACCESSING THE MODEL TYPE SELECTION FUNCTION 1. Press the SCROLL and INCREASE buttons simultaneously and hold. 2. Turn on the transmitter to enter the system mode. 3. Press the SCROLL button until “TYP” appears on the screen. 4. Press the INCREASE or DECREASE button until the desired model type appears on the screen (AC = airplane HE = helicopter). 5. Press the SCROLL button to access the Data Reset function. 6. To exit, press the SCROLL and INCREASE buttons simultaneously. 30 SPEKTRUM DX6 • AIRCRAFT PROGRAMMING GUIDE DATA RESET The data reset function allows you to reset all the programming in the current model selected (1–10) to the factory default settings. Before using the Data Reset function, it is important to enter the model selection function and select the desired model number (1–10) for which you want to reprogram to the factory settings. The model selection function is described on page 36. ����������������������������� ��������������������� ��������������������� ����������������������� ������������������������� ����������� ����������������������������� ���������������������� �������������������������������� �������������������� ACCESSING THE DATA RESET FUNCTION 1. Press the SCROLL and INCREASE buttons up simultaneously and hold. 2. Turn on the transmitter to enter the System mode. 3. Press the SCROLL button up until “RST” appears on the screen. 4. Press the CHANNEL and INCREASE buttons simultaneously to reset the data. (To confirm that the selected model’s programming has been reset, a beep will sound and the model number will momentarily disappear from the screen.) 5. Press the SCROLL button to access the Model Select function. 6. To exit, press the SCROLL and INCREASE buttons up simultaneously. SPEKTRUM DX6 • DX6 AIRCRAFT PROGRAMMING GUIDE 31 DUAL RATE SWITCH SELECTION The dual rate switch position is selectable and the elevator and aileron dual rates can be combined on one switch. This allows a single switch to be used when moving from high rates to low rates. Exponential Rate (EXP) is also available for both aileron and elevator and works in conjunction with the dual rate function to provide reduced sensitivity movements around neutral while allowing maximum servo travel. This reduces sensitivity in the middle portion of the stick control and still allows full travel at the end of the stick control. Refer to page 40 for exponential rate adjustment. ��� ����������������������������������� ������������������������� ����������������������������������������������� ������������������������������������������������������������������������������ ������������������������������������������������������������������������������� ������������������������������������������������������������������������������������� ����������������������� ������������������������� ����������� ������������������������������������� ��������������������������������� ���������������������� Note: For an easy method to add dual rate rudder, see Programming a Rudder Dual Rate page 53. Refer to page 40 for exponential rate adjustment. ACCESSING THE DUAL RATE SWITCH SELECTION FUNCTION 1. Press the SCROLL and INCREASE buttons simultaneously and hold. 2. Turn on the transmitter to enter the system mode. 3. Press the SCROLL button until “D/R SW” appears on the screen. 4. Press the INCREASE or DECREASE button until the desired switch position appears on the screen. (E.A, A., E. or CF) 5. Press the SCROLL button to access the Wing Type selection function. 6. To exit, press the SCROLL and INCREASE buttons simultaneously. 32 SPEKTRUM DX6 • AIRCRAFT PROGRAMMING GUIDE WING TYPE SELECTION Flaperon, V-tail, and Delta Mixing are available for aircraft that require these functions. The flaperon feature is used when two servos are located in the wing, one to control each aileron plus this function allows the ailerons to be drooped or raised while still functioning fully as ailerons. V-Tail Mixing combines rudder and elevator for V-Tail operations. The Delta Wing function allows the aileron to also act as the elevator, while retaining independent use of both functions. The Delta Wing function allows the ailerons to also act as the elevator, while retaining independent use of both functions. ���������������������������� ��� �������� ������� ���������������� ������������ ������������������ �������������� ����������������� ���������������� ������������������ �������������������� ���������������� ��������������� �������������� �������������������������� ��������������������� ����������������������������� ������������������������������ �������������������� ACCESSING THE WING TYPE SELECTION FUNCTION 1. Press the SCROLL and INCREASE buttons up simultaneously and hold. 2. Turn on the transmitter to enter the System mode. 3. Press the SCROLL button until the “MIX WNG” appears on the screen. 4. Press the CHANNEL button to select either the Wing Type (WNG) or V-Tail (VTL) mode. 5. Press the SCROLL button to access the Model Name function. 6. To exit, press the SCROLL and INCREASE buttons up simultaneously. FLAPERON SETUP Flaperon mixing is used with airplanes that have independant servos operating each of the two ailerons. When using flaperon mixing, two servos (one for each aileron) must be used. Once FPN is selected in wing type the following will help in setting up flaperons. • Connect the left aileron servo to channel #6 (AUX) and the right aileron servo to channel #2 (AILE) in the receiver. • In the travel adjust mode (see page 42) adjust the travel adjust values for flap to 0% in both directions. This will effectively turn off the flap switch for now, preventing the flaperons (both ailerons combined) from moving up or down when the flap switch is flipped. Latter by assigning a value in either direction the flap switch can be used to raise or lower the flaps. Note: Individual functions (e.g., servo reversing, sub-trims, dual rates, etc.) are still available for each of the aileron and flap channels. Use sub-trims for individual neutral adjustment. Adjust the ailerons travel values by increasing or decreasing the aileron travel adjust. D/R and expo values, as well as differential, are also available in the appropriate screens. SPEKTRUM DX6 • DX6 AIRCRAFT PROGRAMMING GUIDE 33 WING TYPE SELECTION (CONTINUED) ��� �������� ������� ������������������������������ ���������������������������� ��������������������������� ���������������������������� ���������������������������� TO ACTIVATE FLAPERON (FPR) MIXING (WING TYPE MODE) 1. In System Setup mode, press the SCROLL button until “MIX WNG” appears on the screen. 2. Press the INCREASE button to activate Flaperon Mixing. V-TAIL V-Tail Mixing requires two servos, each connected to the right and left tail control surfaces. Connect the left tail servo to channel #3 (ELE) and the right tail servo to channel #4 (RUD) in the receiver. Individual functions (e.g., servo reversing, sub-trims, etc.) are available for each servo. Use sub-trims for individual neutral adjustments and to vary the up and down travel as desired by using the dual rate function to adjust elevator vs. rudder travel independently. ��� ������������������������ ���������������� ���������������������� ���������������������� ��� �������������������� ��������������������� ������������������������� ��������������������������������� ��������������������������� ����������������������� TO ACTIVATE V-TAIL (VTL) MIXING 1. In System Setup mode, press the SCROLL button until “MIX WNG” appears on the screen. 2. Press the CHANNEL button once to access the V-Tail Mixing screen. 3. Next press either the INCREASE or DECREASE buttons once to activate V-Tail Mixing. Note: It is also possible to activate both the Flaperon (FPR) and V-Tail (VTL) functions to work simultaneously. While it is unlikely to have an aircraft that would require both, it is possible. 34 SPEKTRUM DX6 • AIRCRAFT PROGRAMMING GUIDE WING TYPE SELECTION (CONTINUED) DELTA-WING MIXING Delta or Elevon Mixing is designed for flying wing type airplanes and employs two servos in the wing to control two trailing edge control surfaces for pitch and roll control. Elevator stick inputs will cause the two wing servos to function in conjunction with one another in the same direction to create an up/down movement of both surfaces to control pitch. The aileron stick control movements will cause the two wing servos to move in opposite directions to function as ailerons for roll control. Connect the left tail servo to channel #3 (ELE) and the right tail servo to channel #2 (AILE) in the receiver. Individual functions (e.g., servo reversing, sub-trims, etc.) are available for each servo. Use sub-trims for individual neutral adjustments and using the dual rate function to vary the elevator vs. rudder travel can be independently adjusted. ��� ��� ������������������������������ ���������������������������� ��������������������������� ���������������������������� ������������������������������ TO ACTIVATE DELTA-WING (DLT) MIXING (WING TYPE MODE) 1. In System Setup mode, press the SCROLL button until “MIX WNG” appears on the screen. 2. Press the DECREASE button to activate Delta-Wing Mixing. SPEKTRUM DX6 • DX6 AIRCRAFT PROGRAMMING GUIDE 35 MODEL SELECTION The DX6 has memory for ten models. It can store the settings for ten airplanes, ten helicopters, or any combination of both types of models. ��������������������������� ����������������������������� ���������������������� ��������������������� ������������������������� ������������������ ACCESSING THE MODEL SELECTION FUNCTION 1. Press the SCROLL and INCREASE buttons upward simultaneously and hold. 2. Turn on the transmitter to enter the system mode. 3. Press the SCROLL button until “MDL” appears on the screen. 4. Press the INCREASE or DECREASE button to select model number 1 through 10. 5. Press the SCROLL button to access the Model Name entry function. 6. To exit, press the SCROLL and INCREASE buttons simultaneously. 36 SPEKTRUM DX6 • AIRCRAFT PROGRAMMING GUIDE MODEL NAME ENTRY The DX6 allows a three-digit name to be input for each of the ten models available. The current model will be displayed in the normal display. This feature helps identify different aircraft types or model setups. ��������������������� ����������������������� ���������������������������� ���������������������� ����������������� �������������������� ��������������� ������������������ ��������������������� ������������������� ������������������ ��������������������������� ACCESSING THE MODEL NAME ENTRY FUNCTION 1. Press the SCROLL and INCREASE buttons simultaneously and hold. 2. Turn on the transmitter to enter the System mode. 3. Press the SCROLL button until the current model or “AC1” appears on the screen. 4. Press the INCREASE or DECREASE buttons to select the correct letter/number for the first character (flashing). 5. To adjust the remaining two characters, press the CHANNEL button until the desired character to be adjusted is flashing. 6. Press the SCROLL button to access the Modulation Select function. 7. To exit, press the SCROLL and INCREASE buttons simultaneously. SPEKTRUM DX6 • DX6 AIRCRAFT PROGRAMMING GUIDE 37 CHAPTER 7: FUNCTIONS (FUNCTION MODE) SERVO REVERSING Servo reversing is a convenient function used in the setup of a new aircraft. It is used to change the direction of servo rotation in relation to the corresponding stick movement. Servo reversing is available for all six channels. ������� �������������������� ������������������� �������������������� ����������������� ����������������������� ���������������� − �������� ���������������� ����������������������� ���������������������� ������������������������ ������������������������� ���������������������� ��������������������� ������������������ ��������������������������� ACCESSING THE SERVO REVERSING FUNCTION 1. Turn on the transmitter. 2. Press the SCROLL and INCREASE buttons simultaneously to enter the function mode. 3. Press the SCROLL button until “REV-NORM” appears on the screen. 4. Press the CHANNEL button until the desired channel appears on the screen. 5. Press the INCREASE or DECREASE button to change the servo direction. 6. Press the SCROLL button to access the Dual Rate function. 7. To exit, press the SCROLL and CHANNEL buttons simultaneously. 38 SPEKTRUM DX6 • AIRCRAFT PROGRAMMING GUIDE DUAL RATE Different types of maneuvers require varying amounts of control movements. Snap rolls require large control movements, while smooth maneuvers like long slow rolls are best performed with smaller control movements. Dual rates allow you to change the control movements in flight at the flip of a switch. This allows you to execute maneuvers requiring both radical control movements and small control movements during a single flight. Dual rate is available for the aileron and elevator channels. The amount of travel is adjustable from 0-125%. The factory settings for both switch positions (0 and 1) are 100%. Either position may be selected as the low or high rate by placing the switches in the desired position and adjusting the value for that position. Note: For an easy method to add dual rate rudder see mixing page 53. �������������������������������� ������� ������������ ������������� ��� ������������������������ � ����������������������� ���������������������� ����������� ������������������������ �������������������������� �������������� ������������������������ ��������������������� ������������������������� �������������������� ACCESSING THE DUAL RATE FUNCTION 1. Turn on the transmitter. 2. Press the SCROLL and INCREASE buttons simultaneously to enter the function mode. 3. Press the SCROLL button until “D/R” appears on the screen. 4. Press the CHANNEL button until the desired channel appears on the screen (AI = Aileron or EL = Elevator). 5. The number that appears directly to the right of the selected channel is the switch position. There are two switch positions, 0 and 1, for each of the channels. A “0” will appear when the selected dual rate switch is in the uppermost position and a “1” when the selected switch is in the lower position. 6. To change the switch selection you must enter the dual rate switch selection function in the System Mode (see page 32). 7. The number in the center of the screen indicates the current dual rate value for the selected switch position and channel. Press the INCREASE or DECREASE button to adjust the dual rate value (0–125%). 8. After adjusting the value for the 0-switch position, change to the 1-switch position and adjust the rates. 9. Press the CHANNEL button to select the other channel and adjust the dual rate value for both switch positions. 10. Press the SCROLL button to access the Exponential Rate feature. 11. To exit, press the SCROLL and INCREASE buttons simultaneously. SPEKTRUM DX6 • DX6 AIRCRAFT PROGRAMMING GUIDE 39 EXPONENTIAL Programmable exponential adjustments are offered on the aileron and elevator channels on the DX6 system. Exponential is a function that allows you to tailor the response rate of the controls as compared to the stick inputs. The purpose of exponential is to reduce the sensitivity in the middle portion of stick movement, while still allowing full travel at the end of the stick movement. The adjustable range of the Exponential function is from 0–100%. Zero percent (0%) is linear stick control which means that the response rate is equal throughout the stick control. One hundred percent (100%) is full exponential. The larger the exponential value, the less servo action, or sensitivity, you will notice around the neutral setting. Note: The Exponential function operates in conjunction with the Dual Rate function. It is imperative to understand the Dual Rate function prior to adjusting the exponential values. Exponential may be selected independently for either the high or low rate (position 0 or 1) or both. ��� � ���������������� ������������������ ������������������� ������������������� ����������������� ����������������������� ������������������� ������������ ��������������� ������������ ������������� ����������������� ���������������������� ������������������� ��������������������� ��������������������������� ACCESSING THE EXPONENTIAL FUNCTION 1. Turn on the transmitter. 2. Press the SCROLL and INCREASE buttons simultaneously to enter the Function mode. 3. Press the SCROLL button until “EXP” appears at the left side of the screen. 4. Press the CHANNEL button until the desired channel appears on the screen (AI or EL). 5. Using the appropriate dual rate switch, select the correct position to be adjusted (0 or 1). 6. Press the INCREASE or DECREASE buttons to INCREASE/DECREASE the exponential value. 7. Press the SCROLL button to access the Sub-Trim function. 8. To exit, press the SCROLL and INCREASE buttons simultaneously. 40 SPEKTRUM DX6 • AIRCRAFT PROGRAMMING GUIDE SUB-TRIM Sub-trim is an electronic trim that is available for each of the six channels. Sub-trim is particularly useful to precisely neutralize the servo position electronically, when it difficult to achieve the desired position mechanically. Note: It is recommended to use as little Sub trim value as possible for adjustment. If more that 20–30 points are required, it is suggested that a mechanical linkage adjustment be performed at the servo by rotating the servo horn to the next spline and re-adjusting the linkage. ������������� ����������������� ������� ������� �������������������� ������������������� �������������������� ����������������� ����������������������� ���������������� ��������������������� ���������������� ���������������������� ���������������������� ������������������������ ������������������������� ���������������������� ��������������������� ������������������ �������������������������� ACCESSING THE SUB-TRIM FUNCTION 1. Turn on the transmitter. 2. Press the SCROLL and INCREASE buttons simultaneously to enter the function mode. 3. Press the SCROLL button until “SB-TRIM” appears on the screen. 4. Press the CHANNEL button until the desired channel appears on the screen. 5. Press the INCREASE or DECREASE button to establish the desired amount of sub-trim. 6. Press the SCROLL button to access the travel adjustment function. 7. To exit, press the SCROLL and INCREASE buttons simultaneously. SPEKTRUM DX6 • DX6 AIRCRAFT PROGRAMMING GUIDE 41 TRAVEL ADJUSTMENT The amount of servo travel is adjustable in each direction independently for each of the six channels. The adjustment range is from 0% to 150%. Travel adjustment is factory set at 100% for all channels. The travel adjustment value direction displayed on the screen coincides with the position of the stick or switch (e.g., flap switch, gear switch). This function is useful to adjust control surface travel without the need for mechanical adjustment. �������������������� ������������������� �������� � ������� �������������������� ������������������� �������������������� ����������������� ����������������������� ���������������� ����������������������� ���������������� ���������������������� ���������������������� ������������������������ ������������������������� ���������������������� ��������������������� ������������������ ����������������������������������� ACCESSING THE TRAVEL ADJUSTMENT FUNCTION 1. Turn on the transmitter. 2. Press the SCROLL and INCREASE buttons simultaneously to enter the function mode. 3. Press the SCROLL button until “TRV ADJ.” appears on the screen. 4. Press the CHANNEL button until the desired channel appears on the screen. 5. Move the selected channel stick or switch in the direction that you want to adjust the travel. Press the INCREASE or DECREASE button to achieve the desired travel. Move the stick in the opposite direction to adjust the travel in the opposite direction. 6. The same may be done for all channels. 7. Press the SCROLL button to access the aileron- to-rudder mixing function. 8. To exit, press the SCROLL and INCREASE buttons simultaneously. 42 SPEKTRUM DX6 • AIRCRAFT PROGRAMMING GUIDE AILERON-TO-RUDDER MIXING On some types of aircraft, it is desirable to mix aileron and rudder to make coordinated turns. The DX6 allows the mixing of aileron-to-rudder and allows you to adjust the amount and direction of aileron to rudder mixing. The aileron-to-rudder mixing can be left on all the time or it can be turned off with the selection of one of three switches on page 32. ���������������� + ������������������������ ���������������������� ��� � ���������������� ���������������������� ���������������������� �������������������� ��������������������� �������������������������� ������������������������������� ACCESSING THE AILERON-TO-RUDDER MIXING FUNCTION 1. Turn on the transmitter. 2. Press the SCROLL and INCREASE buttons simultaneously to enter the Function mode. 3. Press the SCROLL button until “MIX A-R” appears on the screen. 4. Press the CHANNEL and INCREASE button to set the desired amount and direction of aileron-to-rudder mixing. Note: If “OF” appears on the screen, it is because the aileron to rudder mixing switch is in the off position. SPEKTRUM DX6 • DX6 AIRCRAFT PROGRAMMING GUIDE 43 AILERON-TO-RUDDER MIXING SWITCH SELECTION ��� ������������������������ ����������������������������� ������������� ������������������������������� ������������������ ������������������������������� ����������������� ���������������� ���������������������� ���������������������� ������������������������������ ����������������������������������������� ���������������������� ACCESSING THE AILERON-TO-RUDDER MIXING SWITCH FUNCTION 1. Press the CHANNEL button until “MIX ARS” appears on the screen. 2. Press the INCREASE or DECREASE button until the desired switch selection appears on the screen. 3. Press the SCROLL button to access the elevator-to-flap mixing function. 4. To exit, press the SCROLL and INCREASE buttons simultaneously. 44 SPEKTRUM DX6 • AIRCRAFT PROGRAMMING GUIDE ELEVATOR-TO-FLAP MIXING Elevator-to-flap mixing in opposite directions (elevator up and flaps down) is commonly used to increase the pitch rate of an aircraft. This is commonly used in fun fly airplanes. Mixed in the same direction (elevator up, flaps up) it prevents tip stalling in high alpha maneuvers. This is very popular with 3D airplanes. This function can be always be left on, or turned off and on, via one of three selectable switches. See page 46 for more on Elevator-to-Flap mixing. ���������������� + �������������������������� �������������������� ��� � ���������������� ���������������������� ���������������������� �������������������� ��������������������� �������������������������� ����������������������������� ACCESSING THE ELEVATOR-TO-FLAP MIXING FUNCTION 1. Turn on the transmitter. 2. Press the SCROLL and INCREASE buttons simultaneously to enter the function mode. 3. Press the SCROLL button until “MIX E-F” appears on the screen. 4. Press the CHANNEL and INCREASE buttons simultaneously to set the elevator-to-flap mixing direction. 5. Press the INCREASE or DECREASE button to set the elevator-to-flap mixing value. SPEKTRUM DX6 • DX6 AIRCRAFT PROGRAMMING GUIDE 45 ELEVATOR-TO-FLAP MIXING SWITCH SELECTION ��� �������������������������� ��������������������������� ������������� ������������������������������� ������������������ �������������������������������� ����������������� ���������������� ������������������ ���������������������� ������������������������������ ����������������������������������������� ���������������������� ACCESSING THE ELEVATOR-TO-FLAP MIXING SWITCH FUNCTION 1. Press the CHANNEL button until “MIX EFS” appears on the screen. 2. Press the INCREASE or DECREASE button until the desired switch designation appears on the screen. 3. Press the SCROLL button to access the differential function if flaperons or delta-wing types are activated in the system mode. If flaperons are not activated, pressing the SCROLL button will access the flap-to-elevator offset function. 4. To exit, press the SCROLL and INCREASE buttons simultaneously. 46 SPEKTRUM DX6 • AIRCRAFT PROGRAMMING GUIDE DIFFERENTIAL Aileron differential is used to correct roll to yaw coupling and adverse yaw characteristics during rolling maneuvers. In order to activate differential, the flaperon or Delta wing type must be selected in the system mode (see page 35). Also, each aileron control surface must have its own servo with the right aileron servo plugged into the aileron channel (#2) on the receiver and the left aileron servo plugged into the Flap Aux 1 channel (#6) on the receiver. ������������� ��������������������� ��� � ��������������������������� ����������������������������� �������������������������������� ������������������������������ ���������������������������������������� ACCESSING THE DIFFERENTIAL FUNCTION • FLAPERON/DELTA MODE ONLY 1. Turn on the transmitter. 2. Flaperon wing type must be selected (see page 33). 3. Press the SCROLL and INCREASE buttons simultaneously to enter the function mode. 4. Press the SCROLL button until “MIX DIF” appears on the screen. 5. Press the INCREASE or DECREASE button to adjust the differential mixing value. 6. Press the SCROLL button to access the flap-to-elevator offset trim function. 7. To exit, press the SCROLL and INCREASE buttons simultaneously. SPEKTRUM DX6 • DX6 AIRCRAFT PROGRAMMING GUIDE 47 FLAP-TO-ELEVATOR OFFSET TRIM When the flaps are deployed, most airplanes exhibit pitching tendencies (most pitch nose up with down flap). Elevator offset trim is designed to prevent this pitching. Flap-to-elevator offset trim automatically changes the elevator trim to a preset value when the flap switch is activated. Note: Flap-to-elevator offset trim is also useful as a dual elevator trim even for airplanes without flaps. This is especially helpful for sailplanes that require one trim setting for launch and another trim setting for flight. ������ �������������������������� �������������������� ��������������� ������������� ����������������������������� ����������������������������������� ������������������������������������� ���������������������������������������� ACCESSING THE FLAP-TO-ELEVATOR OFFSET TRIM FUNCTION 1. Turn on the transmitter. 2. Press the SCROLL and INCREASE buttons simultaneously to enter the function mode. 3. Press the SCROLL button until “OFFSET F-E” appears on the screen. 4. Press the INCREASE or DECREASE button to set the desired amount and direction of the elevator offset. Note: It is helpful to have the flap switch on when making this adjustment. 5. Press the SCROLL button to access the Programmable Mix function. 6. To exit, press the SCROLL and INCREASE buttons simultaneously. 48 SPEKTRUM DX6 • AIRCRAFT PROGRAMMING GUIDE PROGRAMMABLE MIXING (A, B, C) In airplane mode, the DX6 offers three programmable mixes (A, B, and C) allowing numerous mixing options. This function allows mixing any one channel to any other channel. The mix can remain ON at all times, or be switched ON/ OFF in flight using a number of different switches. Each channel is identified by channel numbers 1-6 (i.e., 2 = aileron, 4 = rudder, etc.). The channel appearing first is known as the “master channel,” or the channel to which you want to mix. The second channel is known as the “slave channel” or the channel that is being mixed into the master channel. For example, “2/4” would indicate aileron-to-rudder mixing. Each time the aileron stick is moved, the aileron will deflect, and the rudder will automatically move in the direction and to the value input that is programmed. Mixing is proportional, so small inputs of the master channel will produce small outputs of the slave channel. Each programmable mix has a mixing “offset.” The purpose of the mixing offset is to redefine the neutral position of the slave channel. ����������� �������������������� ��� � ����������������� ����������������������� ������������������������ ACCESSING THE PROGRAMMABLE MIXING FUNCTION 1. Turn on the transmitter. 2. Press the SCROLL and INCREASE buttons simultaneously to enter the Function mode. 3. Press the SCROLL button until “MIX A11” appears at the top right corner of the screen. This is Program Mix A. Pressing the SCROLL button again will select mixes B and C. SPEKTRUM DX6 • DX6 AIRCRAFT PROGRAMMING GUIDE 49 PROGRAMMABLE MIXING (A, B, C) (CONTINUED) ��� ������ ������� ����� ������� �������������� ���������������� ���������������� ����������������� ����������������������� �������� �������������������� ������������������� �������������������� ����������������� ����������������������� ���������������� �������������� ��������������� ���������������� ASSIGNING CHANNELS 1. Press the channel button twice until “MIX A CH” appears on the screen. 2. Press the INCREASE button to select the desired Master Channel (1-6). 3. Press the DECREASE button to select the desired Slave Channel (1-6). �������������� ��� ������������������������ ������������������������ �������������� ���������������� ���������������������������� ����������������������������� �������������������������������������� �������������������������������������������� SWITCH SELECTION 1. Press the CHANNEL button once until “MIX ASW” appears. 2. Press the INCREASE or DECREASE button to select the switch to be used to activate the mixing, or leave on if a constant mix is desired. 50 SPEKTRUM DX6 • AIRCRAFT PROGRAMMING GUIDE PROGRAMMABLE MIXING (A, B, C) (CONTINUED) ����������� �������������� ������������� ��� � ����������������� ������������������������� ����������������������� �������������������� ������������������������������������� ������������������������������������������ MIXING VALUE ADJUSTMENT 1. Press the CHANNEL button once until “MIX A” appears, with the mixing value located at the bottom of the screen. 2. To set the slave channel’s mixing value, move and hold the master channel control stick to the direction to be adjusted (up/down—left/right), then press the INCREASE key to add positive mixing value, or the DECREASE key to add negative mixing value (+/–125%). When the master channel’s stick is moved, the display will automatically show the mixing value for the current stick direction. Note: If a mix switch position other than “ON” is selected, it will be necessary to move the selected switch to the on (or active) position to adjust the mixing value. “OF” will appear on the screen if the selected mixing switch is in the off position. SPEKTRUM DX6 • DX6 AIRCRAFT PROGRAMMING GUIDE 51 OFFSET MIXING OFFSET ADJUSTMENT The purpose of the mixing offset feature is to redefine the neutral position of the slave channel to be mixed. Any desired position may be selected for the offset reference point. To set the offset position, Place the master channel’s stick to the desired position and press either the INCREASE or DECREASE keys. This position is now stored in the memory and its offset value from the neutral position of the master channel is indicated numerically on the LCD display. Then, the mixing value at the determined offset position is now set at 0. ��� ������ �������������������� ������������������������������ ������������������������������� ���������������������������� ����������������������������� ���������������� ACCESSING THE OFFSET FUNCTION 1. Press the CHANNEL button once until Mix Offset appears in the center of the screen. 2. Place the master channel stick to the desired offset position, then press either the INCREASE or DECREASE button to store the offset. The offset value will be displayed. 3. Press the SCROLL button once to access Program Mix B, press twice to access program MIX C, and a third time for servo reversing. 4. To exit the Function mode, press the SCROLL and INCREASE buttons simultaneously. Note: If a mix switch position other than on has been selected, it will be necessary to move the selected switch to the on or active position to set the offset value. “OF” will appear on the screen if the selected mixing switch is in the off position. 52 SPEKTRUM DX6 • AIRCRAFT PROGRAMMING GUIDE PROGRAMMING A RUDDER DUAL RATE Programmable mixing is a powerful feature that offers many creative options. As an example, a dual rate rudder can be easily added and turned on/ off via a selected switch. By mixing rudder-to-rudder, (4-4) selecting the desired switch to turn on/off the mix and by assigning positive values to increase the rudder travel, or negative values to reduce the travel a rudder dual rate is added that offers independent throw values in each direction. Following are the steps to add a rudder dual rate: ����������� �������������������� ��� � ����������������� ������������������������������� ������������������������������� ����������������������� ������������������������ ������������������������������� �������������������������������� PROGRAMMING A RUDDER DUAL RATE 1. Turn on the transmitter. 2. Press the SCROLL and INCREASE buttons simultaneously to enter function mode. 3. Press the SCROLL button until mix “A11” appears at the top right corner of the screen. 4. Press the INCREASE button until 4 (rudder) appears on the screen as the master channel. 5. Press the DECREASE button until 4 (rudder) appears on the screen as the slave channel. 6. Move the rudder stick in the desired direction and press the INCREASE or DECREASE button to set the desired rudder dual rate travel. Note: A positive value increases the rudder travel, while a negative value decreases the rudder travel. 7. Move the rudder stick in the opposite direction to adjust that direction’s value. SPEKTRUM DX6 • DX6 AIRCRAFT PROGRAMMING GUIDE 53 �������������� ��� ������������������������ ������������������������ �������������� ���������������� ���������������������������� ����������������������������� �������������������������������������� �������������������������������������������� SWITCH SELECTION 1. Press the CHANNEL button once until “MIX ASW” appears. 2. Press the INCREASE or DECREASE button to select the switch to be used to activate the mixing, or leave on if a constant mix is desired. 54 SPEKTRUM DX6 • AIRCRAFT PROGRAMMING GUIDE CHAPTER 8: Data Sheet ������������ ���������� �������� �������� ������� ������� �������� ������� �������� ���������� ���� � ��� ���� � ��� ���� � ��� ���� � ��� ���� � ��� ���� � ��� ���������������� ���������������� ���������������� ���������������� ���������������� ���������������� ���������������� ���������������� ���������������� ���������������� ���������������� ���������������� �������� ������������� ��������� � ������ �������������� ������������������� ��������� � ��� � ������ � � � ��� � � ��� � � ��� � � ��� �������������� ������������� � �������������� ������������� � ������� ������������� ���������� � ������������� � ������������� � ������������� SPEKTRUM DX6 • DX6 AIRCRAFT PROGRAMMING GUIDE ��������� ��� ������ �������� ������������ ����� ����� ���� � �������� � ����� ��������� ��������� ��������� ������ ����� ����� 55 56 SPEKTRUM DX6 • AIRCRAFT PROGRAMMING GUIDE CHAPTER 1: TRANSMITTER CONTROLS DIGITAL TRIM LEVERS The DX6 features four digital trim levers with a direct trim display feature for ultra precise adjustments. When a trim input is given, the display screen will automatically change to show the trim value for current channel being adjusted. Once the trim change has been completed, the screen will automatically return to the previous screen display after 2–3 seconds. A significant feature found only with Digital Trims is the ability for the DX6 to automatically store the trim values in system memory. This eliminates the need for previously found software functions like Trim Offset Memory (airplane), or Rudder Offset Memory and Stunt Trims (Heli). In Heli mode, the DX6’s digital trims provide a separate set of trim values for each Flight mode (Normal, Stunt, and Throttle Hold), which takes the place of the previously needed Stunt Trim function. With this feature, the trim levers are active and independent in all flight modes, and will store the trim values for each mode independently. This feature also takes the place of the previously needed rudder offset function, since there is now a completely separate set of trim setting for the Throttle Hold mode. RECEIVER CHANNEL ASSIGNMENT ���������������������������� ���������������� ��������������������������� ������������ ������������������ ����������������� ������������������ ������������������������������� ���������������� ������������������� ��������������� TRANSMITTER THROTTLE ALT The Throttle ALT function makes the throttle stick trim active only when the throttle stick is less than half throttle. This gives easy, accurate idle adjustments without affecting the mid to high throttle position. SPEKTRUM DX6 • DX6 HELICOPTER PROGRAMMING GUIDE 57 LITHIUM BATTERY Note: The DX6 has a 5-year lithium battery to protect your programmed data against main transmitter battery failure. If your system displays “error” or your data resets to the factory defaults, return your transmitter to Horizon Service Center (see page 93) for lithium battery replacement. CONTROL STICK LENGTH ADJUSTMENT To adjust stick length, use a 2mm Allen wrench to loosen the setscrew located inside the end of the stick. Turn the setscrew counterclockwise to loosen then turn the knurled portion of the stick tip to adjust its length. When the desired length been adjusted to suit your preference, tighten the setscrew. �������� ������ ������� NECK STRAP ATTACHMENT There is an eye hook on the front of the transmitter for attaching an optional neck strap. RECEIVER ANTENNA MOUNTING ������������������������ The AR6000 features dual receivers each with their own 3.75” antenna. While the antenna positions are relatively non-critical in most conditions, the ideal orientation is to have each antenna at nearly 90° to each other (See illustration). Tape can be used to fix the antennas in the desired positions. 58 SPEKTRUM DX6 • HELICOPTER PROGRAMMING GUIDE RANGE TESTING ������������������ ������������������������������ Before each flying session and especially with a new model, it is important to perform a range check. The DX6 incorporates a system which when the bind button on the back of the transmitter is pressed, the output power is reduced allowing for a range check. HOW TO RANGE TEST THE SYSTEM 1. With the model resting on the ground, stand 30 paces (approx. 90 feet) away from the model. 2. Face the model with the transmitter in your normal flying position and depress and hold the bind button on the back of the transmitter. This causes reduced power output from the transmitter. 3. You should have total control of the model with the button depressed at 30 paces. 4. If control issues exist call the Spektrum™ service center at 1-877-504-0233. SPEKTRUM DX6 • DX6 HELICOPTER PROGRAMMING GUIDE 59 BINDING ����������� ����������������� ����������������������������� ������� ������ Each Spektrum™ transmitter has a GUID (Globally Unique Identifier) code. Binding is the process of programming the receiver to recognize the GUID of a single specific transmitter. Binding teaches the receiver the specific GUID of that transmitter so that the receiver will only listen to the information from its previously bound transmitter and ignores everything else. With over 4.2 billion GUID codes the chances of having interference from another transmitter is virtually impossible. Fail-safe positions are set during binding and usually it is only necessary to bind the receiver to the transmitter once. The only time it is necessary to re-bind is if you wish to use a different transmitter or to change the fail-safe positions. Your AR6000 was bound to the transmitter during manufacturing, however, if you wish to change to a different transmitter or change the throttle fail-safe position the following process is necessary. HOW TO BIND 1. With the power off, plug the bind plug into the BAT port. 2. Power on the receiver by connecting the battery to any unused port. The blue LED should be blinking. 3. Position the throttle stick in the desired fail-safe position (normally low throttle). 4. Press and hold the bind button on back of the transmitter while turning on the transmitter. The button should flash for about 5 seconds then both LED’s (transmitter and receiver) will go solid green. Important: Remove the bind plug after binding. SMART FAIL-SAFE In case of loss of signal, the throttle will go to the preset position stored during binding. The other channels will hold last position. If the receiver is turned on before the transmitter, all channels but throttle will go to the failsafe positions stored during binding while the throttle will not generate a pulse so as not to affect the Electronic Speed Control. 60 SPEKTRUM DX6 • HELICOPTER PROGRAMMING GUIDE CHAPTER 2: CONNECTIONS CONNECTIONS ����������������� ������������������ ������� �������� ����� �������������������������������� ������������������� �������������������������������������������������� ��������������������������������� ������������������������ ����������������������������������� ��������� ����� 61 SPEKTRUM DX6 • DX6 HELICOPTER PROGRAMMING GUIDE ����� ������� ��������������� ���������������������������������������������� ���������������� ������������������������ ������������������������������� ��������������������������������������� ��������� ���� ������������������������� CHAPTER 3: KEY INPUT AND DISPLAY KEY INPUT AND DISPLAY Two input keys are located at the lower faceplate of the DX6 transmitter. The keys are used to access and program the transmitter. Each key can be moved up or down using your thumbs ����������������� ������������������������������������������ ������������������ ��������������������������������������������� ���������������������� �������������������� ��������������������������������������������� ���������������������� ������������������� ���������������������������������������������� ������������������������������� CHAPTER 4: BATTERY ALARM AND DISPLAY When the transmitter battery drops below 9.0 volts, the display will start to flash “BAT” and an audible alarm will sound eight times. This warning indicates a low battery condition and you should land your aircraft immediately. �������� � Note: During the period that the battery alarm is flashing, the input buttons will not function. If you are currently in the function mode, the transmitter will exit automatically and return to the normal display. THROTTLE CUT Your DX6 incorporates a special THROTTLE CUT Function. The throttle cut button is located on the upper right face of the transmitter. This feature is designed primarily for glow-powered aircraft and is designed to shut off the engine when pressed without affecting the throttle trim position. With the throttle stick in the low position, pressing the throttle cut button with drive the throttle servo to its programmed low throttle, low trim endpoint adjusted in travel adjust. This will not be a commonly used feature for parkflyer aircraft. Note: The Throttle Cut function is designed to function only when the throttle stick is below the 1/2 position. 62 SPEKTRUM DX6 • HELICOPTER PROGRAMMING GUIDE CHAPTER 5: INPUT MODE AND FUNCTION NORMAL DISPLAY ������������������������ ��������������� ������������ � ��������������� When the power switch is turned on, the screen will read as shown here in the diagram. This screen is referred to as the normal display. DIRECT TRIM ACCESS DISPLAY The Direct Trim function of the DX6 can be accessed through the use of any of the four digital trims levers (throttle, aileron, elevator, or rudder). When a trim input is given, the screen will automatically change to show the trim value for that particular channel. Once the trim adjustment has been made, the screen will automatically return to the previous screen setting after 2–3 seconds. The maximum trim value for each channel is +/- 40 in increments of 2. SPEKTRUM DX6 • DX6 HELICOPTER PROGRAMMING GUIDE 63 SYSTEM MODE To enter system mode, press the SCROLL and INCREASE buttons simultaneously upward while you turn on the transmitter. You can now select any of 6 system mode functions shown here in the flow chart. Press the SCROLL button upward to move through the system mode functions. Information for each function is located on the page number listed next to the function name. To exit the system mode, press the SCROLL and INCREASE buttons upward simultaneously or turn off the transmitter. �������������������� ������� ���������� ������� ��������� ���������������� ��� ������� �������������� ���������������� ������� ��������������� ������� ���������������� ������� 64 SPEKTRUM DX6 • HELICOPTER PROGRAMMING GUIDE FUNCTION MODE To enter the Function mode, turn on the transmitter. Press the SCROLL and CHANNEL buttons simultaneously upward until a beep is heard. The display will change accordingly and show the last active function. Press the SCROLL button to SCROLL through the functions one by one as shown in the flowchart below. Once the appropriate function is selected, press the CHANNEL button downward to select the appropriate channel. Use the INCREASE and DECREASE buttons to adjust the values displayed on the screen. ��������������� ������������ ������� ��������� ��� − �������� ������������������� ��� ������� ������� ��� � � ����������� ������� �������� ����������������� ��� � � ������� �������������������� ������� ������� � ����������������� ������� ������� ������� ��������������������� �������� � � ������������� ������� ������� ����������������� � ������� ������������������ � SPEKTRUM DX6 • DX6 HELICOPTER PROGRAMMING GUIDE ������� 65 CHAPTER 6: FUNCTIONS (SYSTEM MODE) MODEL TYPE SELECTION Two types of aircraft programming are available with the DX6, airplane (AC) and helicopter (HE). When entering the model type selection function, the current model type will appear on the screen. (This will be the current model type set as the factory default or the last model used.) When you press the INCREASE or DECREASE button to change the model type, the new model type indicated on the screen will flash. For example, if the current model type is AC and you change to HE, “HE” will flash on the screen. The flashing alerts you to the change of model type and will stop once you move to the next function or exit the system mode. �������������������� ������������������ ���������� ������������� ��������������� ����������������������� ���������������������� ����������� ������������������������������������� ��������������������������������������� ���������������������� Note: When changing model type the programming will be reset to the factory default settings. ACCESSING THE MODEL TYPE SELECTION FUNCTION 1. Press the SCROLL and INCREASE buttons simultaneously and hold. 2. Turn on the transmitter to enter the system mode. 3. Press the SCROLL button until “TYP” appears on the screen. 4. Press the INCREASE or DECREASE button until the desired model type appears on the screen (AC = airplane HE = helicopter). 5. Press the SCROLL button to access the Data Reset function. 6. To exit, press the SCROLL and INCREASE buttons simultaneously. 66 SPEKTRUM DX6 • HELICOPTER PROGRAMMING GUIDE DATA RESET The data reset function allows you to reset all the programming in the current model selected (1–10) to the factory default settings. Before using the Data Reset function, it is important to enter the model selection function and select the desired model number (1–10) for which you want to reprogram to the factory settings. The model selection function is described on page 70. ����������������������������� ��������������������� ��������������������� ����������������������� ������������������������� ����������� ����������������������������� ���������������������� �������������������������������� �������������������� ACCESSING THE DATA RESET FUNCTION 1. Press the SCROLL and INCREASE buttons up simultaneously and hold. 2. Turn on the transmitter to enter the System mode. 3. Press the SCROLL button up until “RST” appears on the screen. 4. Press the CHANNEL and INCREASE buttons simultaneously to reset the data. (To confirm that the selected model’s programming has been reset, a beep will sound and the model number will momentarily disappear from the screen.) 5. Press the SCROLL button to access the Model Select function. 6. To exit, press the SCROLL and INCREASE buttons up simultaneously. SPEKTRUM DX6 • DX6 HELICOPTER PROGRAMMING GUIDE 67 DUAL RATE SWITCH SELECTION The dual rate switch position is selectable and the elevator and aileron dual rates can be combined on one switch. This allows a single switch to be used when moving from high rates to low rates. Exponential Rate (EXP) is also available for both aileron and elevator and works in conjunction with the dual rate function to provide reduced sensitivity movements around neutral while allowing maximum servo travel. This reduces sensitivity in the middle portion of the stick control and still allows full travel at the end of the stick control. Refer to page 74 for exponential rate adjustment. ��� ����������������������������������� ������������������������� ����������������������������������������������� ������������������������������������������������������������������������������ ������������������������������������������������������������������������������� ������������������������������������������������������������������������������������������� ����������������������� ������������������������� ����������� ������������������������������������� ��������������������������������� ���������������������� Note: For an easy method to add dual rate rudder see mixing page 87. Refer to page 74 for exponential rate adjustment. ACCESSING THE DUAL RATE SWITCH SELECTION FUNCTION 1. Press the SCROLL and INCREASE buttons simultaneously and hold. 2. Turn on the transmitter to enter the system mode. 3. Press the SCROLL button until “D/R SW” appears on the screen. 4. Press the INCREASE or DECREASE button until the desired switch position appears on the screen. (E.A, A., E. or CF) 5. Press the SCROLL button to access the Wing Type selection function. 6. To exit, press the SCROLL and INCREASE buttons simultaneously. 68 SPEKTRUM DX6 • HELICOPTER PROGRAMMING GUIDE GEAR/GYRO SWITCH SELECTION The DX6 gear/gyro switch selection function enables the dual rate values of the gyro to be combined with one of four switches (flight mode, throttle hold, aileron dual rate, elevator dual rate). This feature is for use with gyros that offer a dual rate sensitivity adjustments.. The most common use for this feature would be to combine the gyro dual rate adjustment with the flight mode switch. This would then automatically alter the gyro sensitivity from normal (hover) to stunt (3D) when the flight mode switch is in use. ������������������� ������������������������ ��������������� ���������������������������� ����������������������������� ���������������������� ����������������������������� ���������������������������� ������������������������������������� ���������������������������������������������� ������������������������������������������ ACCESSING THE GEAR/GYRO SWITCH SELECTION FUNCTION 1. Press the SCROLL and INCREASE buttons simultaneously and hold. 2. Turn on the transmitter to enter the system mode. 3. Press the SCROLL button until “GER” appears on the screen. 4. Press the INCREASE or DECREASE button to select the switch you prefer to use for the operation of the gyro sensitivity. 5. Press the SCROLL button to access the Model Selection function. 6. To exit, press the SCROLL and INCREASE buttons simultaneously. Note: The remote gain lead from the gyro should be plugged into channel 5 (gear) of the receiver. To adjust the Gyro gain use sub-trim (gear) and travel adjust (gear). Press the SCROLL button until “GER” appears on the screen. Press either the INCREASE or DECREASE buttons to select the switch you prefer to use for the operation of the gyro sensitivity. IMPORTANT GYRO INFORMATION Note: After flight trimming the helicopter, or anytime the rudder trim is changed, It is important to rebind the system (see binding page 60) to set the fail-safe position to the rudders true neutral. With many types of gyros, each time the radio is turned on the gyro senses the servo output position and establishes this as the center for that flight. When the DX6 receiver is first turned on, the servos are driven to their fail-safe positions until the receiver connects to the DX6 transmitter. This can take several seconds. If the fail-safe position for rudder is different than the rudder trim position, it is possible that the gyro will establish the fail-safe position as neutral instead of the trimmed neutral position. Making the rudder trim position and the fail-safe position the same prevents this from happening. In summary, after the helicopter is trimmed rebind the system to prevent the tail from drifting. SPEKTRUM DX6 • DX6 HELICOPTER PROGRAMMING GUIDE 69 MODEL SELECTION The DX6 has memory for ten models. It can store the settings for ten airplanes, ten helicopters, or any combination of both types of models. ��������������������������� ����������������������������� ���������������������� ��������������������� ������������������������� ������������������ ACCESSING THE MODEL SELECTION FUNCTION 1. Press the SCROLL and INCREASE buttons upward simultaneously and hold. 2. Turn on the transmitter to enter the system mode. 3. Press the SCROLL button until “MDL” appears on the screen. 4. Press the INCREASE or DECREASE button to select model number 1 through 10. 5. Press the SCROLL button to access the Model Name entry function. 6. To exit, press the SCROLL and INCREASE buttons simultaneously. 70 SPEKTRUM DX6 • HELICOPTER PROGRAMMING GUIDE MODEL NAME ENTRY The DX6 allows a three-digit name to be input for each of the ten models available. The current model will be displayed in the normal display. This feature helps identify different aircraft types or model setups. ��������������������� ����������������������� �������������������������� ���������������� ����������� ����������������� �������������������� ��������������� ������������������ ��������������������� ������������������� ������������������ ��������������������������� ACCESSING THE MODEL NAME ENTRY FUNCTION 1. Press the SCROLL and INCREASE buttons simultaneously and hold. 2. Turn on the transmitter to enter the System mode. 3. Press the SCROLL button until the current model or “HE1” appears on the screen. 4. Press the INCREASE or DECREASE buttons to select the correct letter/number for the first character (flashing). 5. To adjust the remaining two characters, press the CHANNEL button until the desired character to be adjusted is flashing. 6. Press the SCROLL button to access the Modulation Select function. 7. To exit, press the SCROLL and INCREASE buttons simultaneously. SPEKTRUM DX6 • DX6 HELICOPTER PROGRAMMING GUIDE 71 CHAPTER 7: Function Mode SERVO REVERSING Servo reversing is a convenient function used in the setup of a new aircraft. It is used to change the direction of servo rotation in relation to the corresponding stick movement. Servo reversing is available for all six channels. ������� �������������������� ������������������� �������������������� ����������������� ���������������������������� ������������������ − �������� ���������������� ����������������������� ���������������������� ������������������������ ������������������������� ���������������������� ��������������������� ������������������ ��������������������������� ������� ��������������������� ���� ����� �������������������� ������������������������������ ��������������� ����������������� ���� ������� ���� ����� ������������������������������� ������������������ �������������� ������������������ ����������������� ��������������� ��������������� ���� ACCESSING THE SERVO REVERSING FUNCTION 1. Turn on the transmitter. 2. Press the SCROLL and INCREASE buttons simultaneously to enter the function mode. 3. Press the SCROLL button until “REV-NORM” appears on the screen. 4. Press the CHANNEL button until the desired channel appears on the screen. 5. Press the INCREASE or DECREASE button to change the servo direction. 6. Press the SCROLL button to access the Dual Rate function. 7. To exit, press the SCROLL and CHANNEL buttons simultaneously. 72 SPEKTRUM DX6 • HELICOPTER PROGRAMMING GUIDE DUAL RATE Dual rate is available for the aileron and elevator channels. The purpose of this function is to allow for in-flight selection of two preset servo travels for each of these channels. The amount of travel is adjustable from 0-125%. The factory settings for both switch positions (0 and 1) are 100%. Either position may be selected as the low or high rate by placing the switches in the desired position and adjusting the value for that position. Operation of these switches is described on page 68. Note: For an easy way to add dual rate rudder see Programming a Rudder Dual Rate on page 87. �������������������������������� ������� ������������ ������������� ��� ������������������������ � ����������������������� ���������������������� ����������� ������������������������ �������������������������� �������������� ������������������������ ��������������������� ������������������������� �������������������� ACCESSING THE DUAL RATE FUNCTION 1. Turn on the transmitter. 2. Press the SCROLL and INCREASE buttons simultaneously to enter the function mode. 3. Press the SCROLL button until “D/R” appears on the screen. 4. Press the CHANNEL button until the desired channel appears on the screen (AI = aileron or EL = elevator). 5. The number that appears directly to the right of the selected channel is the switch position. There are two switch positions, 0 and 1, for each of the channels. A “0” will appear when the selected dual rate switch is in the uppermost position and a “1” when the selected switch is in the lower position. 6. To change the switch selection you must enter the dual rate switch selection function in the system mode (see page 68). 7. The number in the center of the screen indicates the current dual rate value for the selected switch position and channel. Press the INCREASE or DECREASE button to adjust the dual rate value (0–125%). 8. After adjusting the value for the 0-switch position, change to the 1-switch position and adjust the rates. 9. Press the CHANNEL button to select the other channel and adjust the dual rate value for both switch positions. 10. Press the SCROLL button to access the Exponential Rate feature. 11. To exit, press the SCROLL and INCREASE buttons simultaneously. SPEKTRUM DX6 • DX6 HELICOPTER PROGRAMMING GUIDE 73 EXPONENTIAL Programmable exponential adjustments are offered on the aileron and elevator channels on the DX6 system. Exponential is a function that allows you to tailor the response rate of the controls as compared to the stick inputs. The purpose of exponential is to reduce the sensitivity in the middle portion of stick movement, while still allowing full travel at the end of the stick movement. The adjustable range of the Exponential function is from 0–100%. Zero percent (0%) is linear stick control which means that the response rate is equal throughout the stick control. One hundred percent (100%) is full exponential. The larger the exponential value, the less servo action, or sensitivity, you will notice around the neutral setting. Note: The Exponential function operates in conjunction with the Dual Rate function. It is imperative to understand the Dual Rate function prior to adjusting the exponential values. Exponential may be selected independently for either the high or low rate (position 0 or 1) or both. ��������������� ������������ ������������� ��� � ���������������� ������������������ ������������������� ������������������� ����������������� ����������������������� ������������������� ������������ ����������������� ���������������������� ������������������� ��������������������� ��������������������������� ACCESSING THE EXPONENTIAL FUNCTION 1. Turn on the transmitter. 2. Press the SCROLL and INCREASE buttons simultaneously to enter the Function mode. 3. Press the SCROLL button until “EXP” appears at the left side of the screen. 4. Press the CHANNEL button until the desired channel appears on the screen (AI or EL). 5. Using the appropriate dual rate switch, select the correct position to be adjusted (0 or 1). 6. Press the INCREASE or DECREASE buttons to increase or decrease the exponential value. 7. Press the SCROLL button to access the Sub-Trim function. 8. To exit, press the SCROLL and INCREASE buttons simultaneously. 74 SPEKTRUM DX6 • HELICOPTER PROGRAMMING GUIDE SUB-TRIM Sub-trim is an electronic trim that is available for each of the six channels. Sub-trim is particularly useful to precisely neutralize the servo position electronically, when it difficult to achieve the desired position mechanically. Note: It is recommended to use minimal sub trim values as possible for adjustment. If more that 20–30 points are required, it is suggested that a mechanical linkage adjustment be performed at the servo by rotating the servo horn on the spline and adjusting the linkage. ������������� ����������������� ������� ������� �������������������� ������������������� �������������������� ����������������� ���������������������������� ������������������ ��������������������� ���������������� ���������������������� ���������������������� ������������������������ ������������������������� ���������������������� ��������������������� ������������������ �������������������������� ACCESSING THE SUB-TRIM FUNCTION 1. Turn on the transmitter. 2. Press the SCROLL and INCREASE buttons simultaneously to enter the function mode. 3. Press the SCROLL button until “SB-TRIM” appears on the screen. 4. Press the CHANNEL button until the desired channel appears on the screen. 5. Press the INCREASE or DECREASE button to establish the desired amount of sub-trim. 6. Press the SCROLL button to access the travel adjustment function. 7. To exit, press the SCROLL and INCREASE buttons simultaneously. SPEKTRUM DX6 • DX6 HELICOPTER PROGRAMMING GUIDE 75 TRAVEL ADJUSTMENT The amount of servo travel is adjustable in each direction independently for each of the six channels. The adjustment range is from 0% to 150%. Travel adjustment is factory set at 100% for all channels. The travel adjustment value direction displayed on the screen coincides with the position of the stick or switch (e.g., flap switch, gear switch). This function is useful to adjust control surface travel without the need for mechanical adjustment. �������������������� ������������������� ������� �������������������� ������������������� �������������������� ����������������� ���������������������������� ����������������� �������� � ����������������������� ���������������� ���������������������� ���������������������� ������������������������ ������������������������� ���������������������� ��������������������� ������������������ ����������������������������������� ACCESSING THE TRAVEL ADJUSTMENT FUNCTION 1. Turn on the transmitter. 2. Press the SCROLL and INCREASE buttons simultaneously to enter the function mode. 3. Press the SCROLL button until “TRV ADJ.” appears on the screen. 4. Press the CHANNEL button until the desired channel appears on the screen. 5. Move the selected channel stick or switch in the direction that you want to adjust the travel. Press the INCREASE or DECREASE button to achieve the desired travel. Move the stick in the opposite direction to adjust the travel in the opposite direction. 6. The same may be done for all channels. 7. Press the SCROLL button to access the aileron- to-rudder mixing function. 8. To exit, press the SCROLL and INCREASE buttons simultaneously. 76 SPEKTRUM DX6 • HELICOPTER PROGRAMMING GUIDE THROTTLE HOLD The throttle hold function enables the throttle to be held in a specific location, while allowing the remaining channels to function normally. The purpose of this function is for autorotation landings, however, many pilots find throttle hold useful as an arming switch for electric helicopters to prevent the motor from accidentally running if the sticks or switches are bumped, or in the wrong position. When the throttle hold function is activated, a third adjustable pitch curve is available in the pitch curve screen. The throttle hold switch is located on the top right rear corner of the transmitter. Throttle hold is on when the switch is in the forward position. � ������������������������������������ ��������������������������������������������������� ������������������������������ ������������������������������� �������� ���������������� ������������������ ���������������������� ������������������������������ ������������������������������������ ��������������������������������� ACCESSING THE THROTTLE HOLD FUNCTION 1. Turn on the transmitter. 2. Press the SCROLL and INCREASE buttons simultaneously to enter the Function mode. 3. Press the SCROLL button until “HLD” appears on the screen. 4. The factory setting for the Throttle Hold function is off. Note: When the Throttle Hold function is off, the throttle hold pitch curve will not appear in the pitch curve function. Press the INCREASE or DECREASE button to activate the Throttle Hold function. The throttle hold pitch curve will now appear in the pitch curve function. To inhibit the Throttle Hold function, press the CHANNEL and INCREASE buttons simultaneously. 5. Using the INCREASE or DECREASE button, adjust the throttle hold value to the desired position, the normal range of throttle hold is from -2 (1/2 trim) to +15 (full high trim). 6. Press the SCROLL button to access the pitch curve function. 7. To exit, press the SCROLL and INCREASE buttons simultaneously. SPEKTRUM DX6 • DX6 HELICOPTER PROGRAMMING GUIDE 77 PITCH CURVE The DX6 offers three independent pitch curves with three adjustable points per curve. This function allocates a separate pitch curve setting during Normal, Stunt, and Throttle Hold modes to maximize flight performance. Once the pitch curves are established, each can be activated in flight using the two-position flight mode switch and the throttle hold switch. Each of the three points on the pitch curve is independently adjustable from 0–100%. These three points correspond to the low, middle, and high positions of the throttle stick (collective). The factory preset values for all three pitch curves are: Low 0%, Middle 50%, and High 100%. ���������������������������� ���������� �������������� ������������ � ���������������������������������������������������������� ��������� ��������� ������������������������������������������������������ �������������������������� ����������������������� ���������������������� �������������������������� ������������������������� 78 ������������������������ ��������������������������� ����������������������� ��������������������� ������������������ ����������������������������� ����������� ������������������ ������������������ ����������� ������������������ ����������������� ����������� ������������������ ������������������ ����������� ������������������ ����������������� ����������� ������������������� ������������������ ����������� ������������������� ����������������� SPEKTRUM DX6 • HELICOPTER PROGRAMMING GUIDE ACCESSING THE PITCH CURVE FUNCTION 1. Turn on the transmitter. 2. Press the SCROLL and INCREASE buttons simultaneously to enter the Function mode. 3. Press the SCROLL button until “PLN” appears on the screen. The letter to the far right indicates the specific pitch curve section that you are in (N, S or H). The letter in the center indicates the point that is selected. 4. Press the CHANNEL button to select the pitch point of the pitch curve you want to change. 5. Press the INCREASE or DECREASE button to change the value of the current reference point. The range of each point is adjustable from 0–100% in 1% intervals. 6. To set the pitch curve for the stunt (flight) mode, press the SCROLL button once to access PLS. Repeat Step 5 and Step 6 to adjust. 7. To set the pitch curve for the throttle hold mode, press the SCROLL button once to access PLH. Repeat Step 5 and Step 6 to adjust. 8. Press the SCROLL button to access the throttle curve function. Note: If throttle hold is not activated, the Throttle Curve function will be accessed. 9. To exit, press the MODE and CHANNEL buttons simultaneously. SPEKTRUM DX6 • DX6 HELICOPTER PROGRAMMING GUIDE 79 THROTTLE CURVE Adjustment of the throttle curve is very similar to the pitch curve adjustment described in the preceding section. Two throttle curves are available—normal and stunt. The normal or hover throttle curve has three points (L,2, H) and the stunt or flight throttle curve has two points (L and 2). The two throttle curves are activated by the flight mode switch located on the top left rear corner of the transmitter. The throttle curve is in the normal mode when the flight mode switch is in the back position. The throttle curve is in the stunt mode when the flight mode switch is in the forward position. Note: In Stunt mode (S), the high position of the throttle curve is preset to 100%, and is not adjustable. ���������������������������� ���������� �������������� ������������ ������������������������������������������������������������������������ ��������� ��������� ������������������������������������������������������ � ����������������������������� ��������������������������� ����������������������������� ������������������������ ���������������������������� ����������������������� ������������������������������������������ ��������� 80 ��������������������� ������������������������� ������������������������� �������������� ������������������ ������������������ �������������� ������������������ ����������������� �������������� ������������������ ������������������ �������������� ������������������ ����������������� �������������� ������������������� ������������������ �������������� ������������������� ����������������� SPEKTRUM DX6 • HELICOPTER PROGRAMMING GUIDE ACCESSING THE THROTTLE CURVE FUNCTION 1. Turn on the transmitter. 2. Press the SCROLL and INCREASE buttons simultaneously to enter the function mode. 3. Press the SCROLL button until “TLN” appears on the screen. The letter to the far right indicates the specific throttle curve mode that you are in (N, S, or H). The letter in the center indicates the throttle point that you can adjust. 4. Press the CHANNEL button to select the throttle point of the throttle position that you have selected (L, 2, or H). 5. Press the INCREASE or DECREASE button to change the value of the current reference point. The range of each point is 0–100% in 1% intervals. 6. To set the throttle curve for the stunt (flight) mode, press the SCROLL button once. Then, repeat Steps 5 and 6 to adjust. 7. Press the SCROLL button once to access the Revolution Mixing function. 8. To exit, press the SCROLL and INCREASE buttons simultaneously. SPEKTRUM DX6 • DX6 HELICOPTER PROGRAMMING GUIDE 81 REVOLUTION MIXING Revolution Mixing is only used with conventional (non-heading hold) gyros. The Revolution Mixing function combines tail rotor input with the throttle/collective function to counteract the torque created by the engine. When properly adjusted, the helicopter will climb and descend without a tendency to yaw in either direction. Revolution mixing is for use with non-heading lock gyros only. Since the torque created by the main rotor blades varies with different throttle/pitch settings, it is necessary for the tail rotor blades to change pitch in unison. The “U” or up mixing adjusts the tail rotor compensation from the mid to high throttle stick setting. The “D” or down mixing adjusts the tail rotor compensation from the mid to the low throttle stick setting. REVOLUTION MIXING SET-UP PROCEDURE 1. Set up the helicopter so that it will maintain a stable hover with the tail rotor trim in the center position. Next, bring the helicopter into a steady vertical climb. The body of the helicopter will move in the opposite direction to the main rotor rotation. Increase the “U” or up mixing until the helicopter climbs without the tendency to rotate. 2. At a safe altitude, reduce the throttle. The helicopter will descend, and the body will turn in the same direction as the main rotor blades. Increase the “D” or down mixing until the helicopter descends without the tendency to rotate. ������������� �������������������������� ���������������� ����������������� ���������������� ����������������������� ���������������������� ����������� ��������������� ������������������������������������������� ����������������������������������������������� ��������������������������������������� ������������������������������������������������� � �������������������������������� ������������������������ ������������������������ ���������������� ��������������������� ������������������������� ���������������������������� ACCESSING THE REVOLUTION MIXING FUNCTION 1. Turn on the transmitter. 2. Press the SCROLL and INCREASE buttons simultaneously to enter the Function mode. 3. Press the SCROLL button until “RVU” appears on the screen. 4. Press the CHANNEL button to select the up or down Mixing function. 5. Press the INCREASE or DECREASE button to adjust the mixing value of the applicable function. Press the CHANNEL and INCREASE buttons simultaneously to reset the mixing value to 0%. To change the mixing direction, press the CHANNEL and INCREASE buttons simultaneously again. 6. Press the SCROLL button to access the Programmable Mix A function. 7. To exit, press the SCROLL and INCREASE buttons simultaneously. 82 SPEKTRUM DX6 • HELICOPTER PROGRAMMING GUIDE PROGRAMMABLE MIXING (A) The DX6 in Helicopter mode offers one (1) programmable mix to be used for a number of different purposes. The functions allow mixing any one channel to any other channel. The mix can remain on at all times or be switched off in flight using a number of different switches. Each channel is identified by channel numbers 1-6 (i.e., 2 = aileron, 4 = rudder, etc. The channel appearing first is known as the Master channel or the channel to which you want to mix. The second channel is known as the Slave channel or the channel that is being mixed into the Master channel. For example, 3-2 would indicate would indicate elevator-to-aileron mixing each time the elevator stick is moved, the elevator will deflect, and the aileron will automatically move in the direction and to the value input. Mixing is proportional, so small inputs of the master channel will produce small outputs of the slave channel. Each programmable mix has a mixing “offset.” The purpose of the mixing offset is to redefine the neutral position of the slave channel. The elevator-aileron mix mentioned above is most commonly used to trim the helicopter for proper loop tracking. ����������� �������������������� ��� � ����������������� ����������������������� ������������������������ ACCESSING THE PROGRAMMABLE MIXING FUNCTION 1. Turn on the transmitter 2. Press the SCROLL and INCREASE buttons simultaneously to enter the Function mode. 3. Press the SCROLL button until “MIX A32” appears at the top right corner of the screen. This is program mix A. SPEKTRUM DX6 • DX6 HELICOPTER PROGRAMMING GUIDE 83 ��� ������ ������� ����� ������� ����������������� ����������������������� �������� �������������� ���������������� ���������������� �������������������� ������������������� �������������������� ����������������� ���������������������������� ����������������� �������������� ��������������� ���������������� ASSIGNING CHANNELS 1. Press the CHANNEL button twice until “MIX A CH” appears on the screen. 2. Press the INCREASE button to select the desired “Master channel” (1-6). 3. Press the DECREASE button to select the desired “Slave channel” (1-6). �������������� ��� ������������������������ ������������������������ �������������� ��������������������������������� ��������������������������������� �������������� �������������������������������������� �������������������������������������������� SWITCH SELECTION 1. Press the CHANNEL button once until “MIX ASW” appears. 2. Press the INCREASE or DECREASE button to select the desired switch to be used to activate the mixing, or leave on if a constant mix is desired. 84 SPEKTRUM DX6 • HELICOPTER PROGRAMMING GUIDE �������������� ������������� ��� � ����������������� ������������������������� ����������������������� �������������������� ������������������������������������� ������������������������������������������ MIXING VALUE ADJUSTMENT 1. Press the CHANNEL button once until “Mix A” appears, with the mixing value located at the bottom of the screen. 2. To set the slave channels mixing value, move and hold the master channel control stick to the direction to be adjusted (up/down—left/right), then press the INCREASE key to add positive mixing value or the DECREASE key to add negative mixing value (+/–125%). When the master channels stick is moved, the display will automatically show the mixing value for the current stick direction. Note: If a mix switch position other than “ON” is selected, it will be necessary to move the selected switch to the on, or active, position to adjust the mixing value. “OF” will appear on the screen if the selected mixing switch is in the off position. SPEKTRUM DX6 • DX6 HELICOPTER PROGRAMMING GUIDE 85 OFFSET MIXING OFFSET ADJUSTMENT The purpose of the mixing offset feature is to redefine the neutral position of the slave channel to be mixed. Any desired position may be selected for the offset reference point. To set the offset position, Place the master channel’s stick to the desired position and press either the INCREASE or DECREASE keys. This position is now stored in the memory and its offset value from the neutral position of the master channel is indicated numerically on the LCD display. Then, the mixing value at the determined offset position is now set at 0. ��� ������ �������������������� ������������������������������ ������������������������������� ���������������������������� ����������������������������� ���������������� ACCESSING THE OFFSET FUNCTION 1. Press the CHANNEL button once until Mix Offset appears in the center of the screen. 2. Place the master channel stick to the desired offset position, then press either the INCREASE or DECREASE button to store the offset. The offset value will be displayed. 3. Press the SCROLL button once to access Program Mix B, press twice to access program MIX C, and a third time for servo reversing. 4. To exit the Function mode, press the SCROLL and INCREASE buttons simultaneously. Note: If a mix switch position other than on has been selected, it will be necessary to move the selected switch to the on or active position to set the offset value. “OF” will appear on the screen if the selected mixing switch is in the off position. 86 SPEKTRUM DX6 • HELICOPTER PROGRAMMING GUIDE PROGRAMMING A RUDDER DUAL RATE Programmable mixing is a powerful feature that offers many creative options. As an example a dual rate rudder can be easily added and turned on/ off via a selected switch. By mixing rudder to rudder, (4-4) selecting the desired switch to turn on/off the mix and by assigning positive values to increase the rudder travel, or negative values to reduce the travel, a rudder dual rate is added that offers independent throw values in each direction. Following are the steps to add a rudder dual rate: ����������� �������������������� ��� � ����������������� ������������������������������� ������������������������������� ����������������������� ������������������������ ������������������������������� �������������������������������� PROGRAMMING A RUDDER DUAL RATE 1. Turn on the transmitter. 2. Press the SCROLL and INCREASE buttons simultaneously to enter function mode. 3. Press the SCROLL button until mix A11 appears at the top right corner of the screen. 4. Press the INCREASE button until 4 (rudder) appears on the screen as the master channel. 5. Press the DECREASE button until 4 (rudder) appears on the screen as the slave channel. 6. Move the rudder stick in the desired direction and press the INCREASE or DECREASE button to set the desired rudder dual rate travel. Note: A positive value will increase the rudder travel, while a negative value will decrease the rudder travel. 7. Move the rudder stick in the opposite direction to adjust that direction’s value. SPEKTRUM DX6 • DX6 HELICOPTER PROGRAMMING GUIDE 87 CCPM SWASHPLATE MIXING CCPM (Cyclic Collective Pitch Mixing) mixing is used for helicopters that utilize a 120° CCPM swashplate control system. CCPM is a type of mixing where three servos are connected to the swashplate and operate in unison and independently to control pitch and cyclic inputs. Refer to the diagram below for proper 120° Three Servo-CCPM identification and connection. THREE-SERVO (120 DEGREES) CCPM MIXING ������������� ��������������� �������� ���������� ���� ���� ���������������������������������������������������������� ���������������������������������������������������������� ����������������������������������������������������� ����������������������������������������������������������� �������������������������������������������������������� ��������������� ���������������� �������������������� Note: The CCPM Swashplate Mixing function is designed for use only with helicopters that incorporate the 120° three-servo CCPM control system. 88 SPEKTRUM DX6 • HELICOPTER PROGRAMMING GUIDE ������������������������� ��������������� �������������������������������������� �������������������������������������������� ���������������� ��� ��� � ���������������������������� �������� ������� �������������������������� ����������� ������������ ��������� �������������������������� ������������ ��������������������� ����������������������������� ������������������ ����������������� ������������������������������ ���������������������������� ������������������� �������������������������������� ��������������������� ���������������������������������� ������������������� ���������������������������������� ���������������������� ACCESSING THE CCPM SWASHPLATE MIXING FUNCTION 1. Turn on the transmitter. 2. Press the SCROLL and INCREASE buttons simultaneously to enter the function mode. 3. Press the SCROLL button until “CCP” appears on the screen. 4. Press the INCREASE button once to activate the CCPM Swashplate Mix function. The screen will then move to the “CP2” screen, indicating that the CCPM function is now on. 5. Press the CHANNEL button to select the desired channel number to be adjusted. 6. Press the INCREASE or DECREASE buttons to select the desired mixing value for each channel (+100). 7. Press the SCROLL button once to access the servo reversing function. 8. To exit, press the SCROLL and INCREASE buttons simultaneously. SPEKTRUM DX6 • DX6 HELICOPTER PROGRAMMING GUIDE 89 CCPM SERVO LOCATIONS The 120° CCPM system requires the use of three servos to operate, Aileron, Elevator, and AUX 1 (Pitch). The labeling of these servos can become quite confusing because with the CCPM function, the three servos no longer work independently, but rather as a team, and their functions are now combined. For this reason, we will refer to the three servos in the following manner: Aileron Servo: We will refer to this servo as the “Left” servo. The channel number for this servo is CH2. Elevator Servo: We will refer to this servo as the “Front or Rear” servo. The channel number for this servo is CH3. AUX 1 (Pitch) Servo: We will refer to this servo as the “Right” servo. The channel number for this servo is CH6. Please refer to the CCPM connections chart below for clarification. ������������� ��������������� �������� ���������� ���� ���� ���������������� 90 SPEKTRUM DX6 • HELICOPTER PROGRAMMING GUIDE CCPM SERVO CONNECTIONS HOW 120 CCPM WORKS 120° Three-Servo CCPM relies on the radio’s special programming rather than a mechanical mixer to operate the swashplate to achieve pitch and cyclic control. The radio’s 120° Three-Servo CCPM function automatically mixes the three servos to provide the correct mixing inputs for aileron (roll), elevator (fore and aft pitch), and collective pitch. The following is an example of how each control input affects the servo’s movement: 1. COLLECTIVE When a collective pitch input is given, all three servos move simultaneously in the same direction, at equal amounts, to raise and lower the swashplate while keeping the swashplate level. During this function, all three servos travel in the same direction at the same value so � that the swashplate can remain level during the increase and decrease in pitch. This mixing of the three servos is achieved through the transmitter’s programming. �������� ���������� 2. ELEVATOR (PITCH) When an elevator input is given, all three servos must move to tilt the swashplate fore and aft. Two servos (aileron and �������� � pitch) move the swashplate in the same direction, while the � ���� elevator servo moves in the opposite direction such that ������������������������ the swashplate will tilt fore or aft. During this function, the elevator servo travels at 100%, while the other two servos travel at 50% (1/2 the travel value). This difference in travel is necessary due to the fact that the position of the front control ball is two times the distance of the two rear control ball positions, as measured from the center of the swashplate. 3. AILERON (ROLL) When an aileron (roll) input is given, the aileron and pitch servos travel in opposite directions, while the elevator servo remains motionless, tilting the swashplate right or left. The travel value for each of the two rear servos is 100%. IMPORTANT GYRO INFORMATION Note: After flight trimming the helicopter, or anytime the rudder trim is changed, it is important to rebind the system (see Binding page 60) to set the fail-safe position to the rudder’s true neutral. With many types of gyros, each time the radio is turned on, the gyro senses the servo output position and establishes this as the center for that flight. When the DX6 receiver is first turned on, the servos are driven to their fail-safe positions until the receiver connects to the DX6 transmitter. This can take several seconds. If the fail-safe position for rudder is different than the rudder trim position, it is possible that the gyro will establish the fail-safe position as neutral instead of the trimmed neutral position. Making the rudder trim position and the fail-safe position the same prevents this from happening. In summary, after the helicopter is trimmed, rebind the system to prevent the tail from drifting. SPEKTRUM DX6 • DX6 HELICOPTER PROGRAMMING GUIDE 91 CHAPTER 8: Data Sheet ������������ ���������� �������� �������� ������� ������� �������� ������� �������� ���������� ���� � ��� ���� � ��� ���� � ��� ���� � ��� ���� � ��� ���� � ��� ���������������� ���������������� ���������������� ���������������� ���������������� ���������������� ���������������� ���������������� ���������������� ���������������� ���������������� ���������������� �������� ������������� ��������� � ������ ��������������� ������� ������������� ��������� ����� ��������� � ��� ����� ����� �������� �������� ��� � � ��� � � ��� � � ��� � � � � �������� ���� ��������� ��������� � � ������ � �������� � ����������� �������� � � ���������� ������������� � � � � �������� � � � � ����������� ������������� � ������� ������� ��������� ������������� � ���������������� ���������������� ���������������� ������������� � ���������������� ���������������� ���������������� ������� ������������� ���������� ��������������� ������ ����� ����� ��������� � 92 SPEKTRUM DX6 • HELICOPTER PROGRAMMING GUIDE One Year Warranty This Spektrum™ product is guaranteed against workmanship and manufacturing defects for a period of 1 year from the original date of purchase. This warranty is limited to the original purchaser and cannot be transferred. Warranty repair will cover all units except those that have been modified, misused, improperly installed, or serviced by an unauthorized service center. As with all fine electronics, avoid exposing your equipment to extreme temperatures, humidity, moisture, or exposure to direct sunlight for long periods of time. Horizon Hobby, Inc. reserves the right to inspect any and all equipment involved in a warranty claim. Repair or replacement decisions are determined exclusively by Horizon Hobby, Inc. This warranty does NOT cover consequential, incidental or collateral damage under any circumstances. In no case shall Horizon Hobby’s liability exceed the original cost of the purchased kit. Due to the nature of this product and its use, by the act of using the product the user accepts all resulting liability. If you have any questions about the operation or installation of this product, please feel free to call a product support representative at 1-877-504-0233. If your equipment needs to be repaired, ship it to: Horizon Service Center ATTN: Spektrum Service 4105 Fieldstone Road Champaign, IL 61822 Include your complete name and address information inside the carton and clearly write it on the outer label/ return address area. Include a brief summary of the problem. Date your correspondence and be sure that your name and address appear on this enclosure. To receive warranty service, you must include your original sales receipt verifying the proof-of-purchase date. Providing warranty conditions have been met, your equipment will be repaired at no charge or replaced at the discretion of Horizon Hobby. SPEKTRUM DX6 • WARRANTY 93 FCC Information This device complies with part 15 of the FCC rules. Operation is subject to the following two conditions: (1) This device may not cause harmful interference, and (2) this device must accept any interference received, including interference that may cause undesired operation. Caution: Changes or modifications not expressly approved by the party responsible for compliance could void the user’s authority to operate the equipment. This product contains a radio transmitter with wireless technology which has been tested and found to be compliant with the applicable regulations governing a radio transmitter in the 2.400GHz to 2.4835GHz frequency range. 94 USA Canada Belgium Denmark France Finland Germany Italy Netherlands Spain Sweden UK SPEKTRUM DX6 • WARRANTY Notes SPEKTRUM DX6 • WARRANTY 95 © 2005 Horizon Hobby, Inc. 4105 Fieldstone Road Champaign, Illinois 61822 (877) 504-0233 horizonhobby.com SPMM** #8259