1
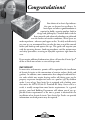
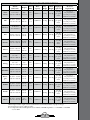
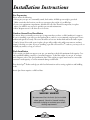
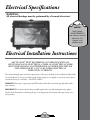
O w n e r ’s
Manual
International
engineered for the world ’s harshest climates®...
(wherever you happen to live)
Congratulations!
Your choice of an Arctic Spa indicates
that you are devoted to excellence. At
Arctic Spas® we believe a good foundation is
required to build a superior product, both in
design and philosophy. Canadian built with the
finest materials and advanced technology to withstand
even the harshest of weather conditions, Arctic Spas® are
made to perform... wherever you happen to live. To safely and effectively
use your spa, we recommend that you take the time to read this manual
before you hook-up and operate the spa. This guide will acquaint you
with the operating features, hook-up procedures, and the maintenance
and safety procedures, ensuring an enjoyable experience right from the
start.
If you require additional information, please call your local Arctic Spas®
dealer or check our website at www.arcticspas.com.
IMPORTANT!
In most cities and counties, permits will be required for the installation
of electrical circuits or the construction of exterior surfaces (decks and
gazebos). In addition, some communities have adopted residential barrier codes which may require fencing and/or self-closing gates on the
property to prevent unsupervised access to a pool or (spa) by children
under 5 years of age. Your Arctic Spa is equipped with a locking cover
that meets the ASTM F1346-91 Standard for Safety Covers and as a
result, is usually exempt from most barrier requirements. As a general
practice, your local Building Department will inform you of any applicable barrier requirements at the time a permit is obtained for the
installation of an electrical circuit. Your Arctic Spa Dealer can provide
information on which permits may be required.
1
Contents
Important Safety Instructions ............................................................ 3
Hyperthermia ...................................................................................... 5
Spa Specifications.............................................................................. 6
Installation Instructions ...................................................................... 7
Electrical Specifications ....................................................................... 8
Electrical Installation Instructions .................................................... 8
Startup Procedures ............................................................................ 9
Spa Overview ................................................................................... 11
Arctic Chiller .................................................................................... 11
Jets .................................................................................................... 12
Topside Control Panel ...................................................................... 13
Spa Care and Maintenance ................................................................ 18
Water Maintenance ........................................................................... 22
Common Spa Water Problems ~ Cause & Remedy ........................... 27
Troubleshooting Spa Problems ......................................................... 29
CAUTION!
Indicates a situation
in which damage to
equipment or material
may occur.
DANGER!
Indicates risk of injury.
2
WARNING!
Indicates information
of critical importance.
Read and Follow
All Instructions
It is important to
inform occasional
users of the spa
about the DANGERS,
WARNINGS, and
CAUTIONS listed in
this manual before
they use the spa.
Important Safety Instructions:
READ AND FOLLOW ALL INSTRUCTIONS CAREFULLY
When installing and using this electrical equipment, basic safety precautions should
always be followed, including:
1) WARNING: Do not use spa if power supply cable has been damaged.
2) WARNING: To reduce the risk of injury, do not permit children or infirm persons to use this product unless they are closely supervised at all times.
3) DANGER: Risk of Accidental Drowning. Extreme caution must be exercised to prevent
unauthorized access by children. To avoid accidents, ensure that children cannot use this
hot tub unless they are supervised at all times.
4) Use the hot tub straps and clip tie downs to secure the cover when not in use. This will help to discourage unsupervised children from entering the hot tub. There is no representation that the cover,
clip tie downs, or actual locks will prevent access to the hot tub.
5) DANGER: Risk of Injury. The suction fittings in this hot tub are sized to match the specific water flow created by the pump. Should the need arise to replace the suction fittings or the pump,
be sure that the flow rates are compatible. Never operate the hot tub if the suction fittings
are broken or missing. Consult your local dealer for assistance in choosing an
appropriate replacement suction fitting.
IMPORTANT!
This manual was
6) DANGER: Risk of Electric Shock. Install at least 1.5 m, from all metal
written to
ensure
surfaces. As an alternative, a hot tub may be installed within 1.5 m of metal surthe proper use and infaces if each metal surface is permanently connected (bonded) by a minimum
stallation of any
8.4 mm2 solid copper conductor attached to the wire connector on the grounding
lug, inside the equipment compartment on the equipment box.
Arctic Spa. Any
modifications
to the
7) DANGER: Risk of Electric Shock. All controls or devices accessible from the spa
procedures outlined
must be powered by a maximum of 12 vdc. Do not permit any electrical applimay result in
ances powered by 12 vdc or more within 1.5 m of a hot tub.
your warranty
8) ELECTRICAL SUPPLY: The electrical supply for this product must include a being voided.
suitable circuit breaker to open all ungrounded supply conductors. The disconnect Please read
this
must be readily accessible and visible to the hot tub occupant but installed at least manual to avoid
any
1.5 m from the hot tub water.
unnecessary damage
9) WARNING: To Reduce the Risk of Injury:
to your spa and
a) The water in a hot tub should never exceed 40°C. Water temperatures
equipment.
between 38°C and 40°C are considered safe for a healthy adult. Lower water
temperatures are recommended for young children and when hot tub use
exceeds 10 minutes. 3
b) Since excessive water temperatures have a high potential for causing fetal damage during
the early months of pregnancy, pregnant or possibly pregnant women should limit hot tub
water temperatures to 38°C. If pregnant, please consult your physician before using a hot tub.
c) Before entering the hot tub, the user should measure the water temperature with an accurate
thermometer since the tolerance of water temperature regulating devices may vary as much
as +/- 2°C.
d) The use of alcohol, drugs, or medication before or during hot tub use may lead to
unconsciousness with the possibility of drowning.
e) Persons suffering from obesity or a medical history of heart disease, low or high blood
pressure, circulatory system problems, or diabetes should consult a physician before using
a hot tub.
f ) Persons using medication should consult a physician before using a hot tub since some
medication may induce drowsiness, while other medication may affect heart rate, blood
pressure, and circulation.
10) All field-installed metal components such as rails, ladders, drains or other similar hardware within 3 m of the hot tub shall be bonded to the equipment grounding buss with copper
conductors not smaller than 8.4 mm2.
SAVE THESE INSTRUCTIONS
WARNINGS!
WARNING: Children should not use hot tubs without adult supervision.
WARNING: Do not use hot tubs unless all suction guards are installed to prevent body and hair
entrapment.
WARNING: People with infectious diseases should not use a hot tub.
WARNING: To avoid injury, exercise care when entering or exiting the hot tub.
WARNING: Do not use drugs or alcohol before or during the use of a hot tub to avoid unconsciousness
and possible drowning.
WARNING: Pregnant or possibly pregnant women should consult a physician before using a hot tub.
WARNING: Water temperature in excess of 38°C may be injurious to your health.
WARNING: Before entering the hot tub, measure the water temperature with an accurate thermometer.
WARNING: Do not use a hot tub immediately following strenuous exercise.
WARNING: Prolonged immersion in a hot tub may be injurious to your health.
CAUTION: Maintain water chemistry in accordance with manufacturer’s instructions.
WARNING: The use of alcohol or drugs can greatly increase the risk of fatal hyperthermia in hot tubs
4
WARNING: People using medications and / or having an adverse medical history should consult
a physician before using a spa or hot tub.
Hyperthermia
Prolonged immersion in hot water may induce hyperthermia.
Hyperthermia occurs when the internal temperature of the body reaches a level several
degrees above the normal body temperature of 37°C. The symptoms of hyperthermia
include drowsiness, lethargy, and an increase in the internal temperature of the body.
WARNING!
The effects of hyperthermia include:
Unawareness of impending hazard;
Failure to perceive heat;
Failure to recognize the need to exit hot tub;
fatal hyperthermia in
Physical inability to exit hot tub;
hot tubs or spas.
Fetal damage in pregnant women; and
Unconsciousness and danger of drowning.
The use of alcohol
or drugs can greatly
increase the risk of
In order to avoid the possibility of hyperthermia (heat stress) occurring it is
recommended that the average temperature of spa-pool water should not exceed 40oC.
5
INTERNATIONAL SPA SPECIFICATIONS
Outside
Dimensions
Heights
Heater
(KW)
Arctic
Ocean
171” x 94.5”
434 cm x 240 cm
50.5”
128.5 cm
3.6 /
7.2
Cub
85 3/4” x 85 3/4”
217 cm x 217 cm
41”
104 cm
3.6 /
7.2
Ellesmere
87” Round
221 cm Round
40”
100 cm
3.6 /
7.2
Fox
85 3/4” x 68 3/4”
217 cm x 174 cm
38.75”
98 cm
3.6 /
7.2
Frontier
85 3/4” x 92 3/4”
217 cm x 235 cm
38 3/4”
98 cm
3.6 /
7.2
Glacier
85 3/4” x 85 3/4”
217 cm x 217cm
41”
104 cm
3.6 /
7.2
Husky
71” x 81”
180 cm x 206 cm
31.5”
80 cm
3.6 /
7.2
Iceberg
89” x 93”
226 cm x 236 cm
37.5”
95.25 cm
3.6 /
7.2
Klondiker
92 3/4” x 92 3/4”
235 cm x 235 cm
38.75”
98 cm
3.6 /
7.2
Norwegian
92 3/4” x 92 3/4”
235 cm x 235 cm
38.75”
98 cm
3.6 /
7.2
Summit
92 3/4” x 92 3/4”
235 cm x 235 cm
38.75”
98 cm
3.6 /
7.2
Tundra
92 3/4” x 92 3/4”
235 cm x 235 cm
38.75”
98 cm
3.6 /
7.2
Yukon
85 3/4” x 85 3/4”
217 cm x 217 cm
41”
104 cm
3.6 /
7.2
Water
Capacity
6090 Litres
1700 Litres
1351 Litres
1300 Litres
1960 Litres
1630 Litres
652 Litres
1753 Litres
1810 Litres
2280 Litres
1880 Litres
2280 Litres
1850 Litres
Dry
Weight
866 Kg
327 Kg
225 Kg
308 Kg
424 Kg
337 Kg
160 Kg
320 Kg
435 Kg
458 Kg
439 Kg
458 Kg
340 Kg
Filled
Weight*
Weight per
square foot
Electrical
Requirements
7439 Kg
630 Kg
per square
meter
230 Volt, 32
Amp Single Phase or
2-16 Amp or 3-16 Amp
RCD Protected Circuits
2427 Kg
512 Kg
per square
meter
230 Volt, 32
Amp Single Phase or
2-16 Amp or 3-16 Amp
RCD Protected Circuits
2310 Kg
603 Kg
per square
meter
230 Volt, 32
Amp Single Phase or
2-16 Amp or 3-16 Amp
RCD Protected Circuits
1926 Kg
508 Kg
per square
meter
230 Volt, 32
Amp Single Phase or
2-16 Amp or 3-16 Amp
RCD Protected Circuits
2865 Kg
591 Kg
square
meter
230 Volt, 32
Amp Single Phase or
2-16 Amp or 3-16 Amp
RCD Protected Circuits
2369 Kg
498 Kg
per square
meter
230 Volt, 32
Amp Single Phase or
2-16 Amp or 3-16 Amp
RCD Protected Circuits
1131 Kg
388 Kg
per square
meter
230 Volt, 32
Amp Single Phase or
2-16 Amp or 3-16 Amp
RCD Protected Circuits
2523 Kg
472 Kg
per square
meter
230 Volt, 32
Amp Single Phase or
2-16 Amp or 3-16 Amp
RCD Protected Circuits
2724 Kg
488 Kg
per square
meter
230 Volt, 32
Amp Single Phase or
2-16 Amp or 3-16 Amp
RCD Protected Circuits
3218 Kg
577 Kg
per square
meter
230 Volt, 32
Amp Single Phase or
2-16 Amp or 3-16 Amp
RCD Protected Circuits
2800 Kg
503 Kg
per square
meter
230 Volt, 32
Amp Single Phase or
2-16 Amp or 3-16 Amp
RCD Protected Circuits
596 Kg
per square
meter
230 Volt, 32
Amp Single Phase or
2-16 Amp or 3-16 Amp
RCD Protected Circuits
581 Kg
per square
meter
230 Volt, 32
Amp Single Phase or
2-16 Amp or 3-16 Amp
RCD Protected Circuits
3289 Kg
2751 Kg
*Filled weight includes weight of water and maximum recommended number of people in the spa.
Average weight per person = 80 kg (176 lbs)
Note: 8’ Epic Series Electrical Requirements are 240 Volt, 40 AMP Single Phase or 2-20 AMP or 3-20 AMP
or 3-16 AMP
6
Installation Instructions
Site Preparation
Please ensure the following:
• Always put your spa on a structurally sound, level surface. A filled spa can weigh a great deal. Make certain that the location you choose can support the weight of your filled spa.
• Locate your equipment compartment, which houses all of the electrical components, in a place where you will have easy access for periodic spa care and maintenance.
• Allow adequate access to all other doors for service.
Outdoor Ground Level Installation
No matter where you install your new spa, it’s important that you have a solid foundation for support.
If you are installing a spa with a wooden pedestal floor outdoors, we recommend you place patio stones
underneath spaced out evenly. The stones should be at least two inches thick and twelve inches square
(5 cm by 30 cm). Even with stones in place, the spa will possibly settle and become uneven, and may
require re-leveling over time. If you are installing a spa with a Forever Floor® outdoors, you may set it on
virtually any surface, as long as it is level.
Deck Installation
To be certain your deck can support your spa, you must know the deck’s maximum load capacity. Consult a qualified building contractor or structural engineer. To find the weight of your spa, its contents
and occupants, refer to the Spa Specification chart. This weight per square meter must not exceed the
structure’s rated capacity, or serious structural damage could result.
Your Arctic Spas® Dealer can help you with local information such as zoning regulations and building
codes.
Arctic Spas Ocean requires a solid level base.
WARNING! WARNING!
We recommend that the Arctic Spa be installed
above ground. Consult a licensed building
contractor to design or evaluate your custom
decking requirements.
7
Electrical Specifications
WARNING!
All electrical hookups must be performed by a licensed electrician!
DANGER!
Shock Hazard.
DO NOT PROCEED if
you are not a licensed
electrician. This
diagram is for
reference only!
Electrical Installation Instructions
ARCTIC SPAS® MUST BE WIRED IN ACCORDANCE WITH ALL
APPLICABLE LOCAL ELECTRICAL CODES. ALL ELECTRICAL WORK
SHOULD BE DONE BY AN EXPERIENCED, LICENSED ELECTRICIAN
AND APPROVED BY A LOCAL BUILDING/ELECTRICAL
INSPECTION AUTHORITY.
The electrical supply must satisfy the requirements of the spa as marked on the certification label which
is located adjacent to the spa controller (pack). If the ratings are not legible or cannot be found, please
contact the factory for assistance. - DO NOT GUESS!
WARNING: Removing or bypassing any RCD breaker will result in an unsafe spa and will void the
spa’s warranty.
IMPORTANT: Your Arctic Spa has been carefully engineered to provide maximum safety against
electric shock. Remember, connecting the spa to an improperly wired circuit will negate many of its
safety features.
8
Startup Procedures
IMPORTANT:
Your Arctic Spa has been thoroughly tested during the manufacturing process to
ensure reliability and long-term customer satisfaction. Before filling the spa, wipe
the spa shell clean with a soft rag.
The following instructions must be read and followed exactly to ensure a successful start-up or refill.
1) Ensure the electrical connections have been made in accordance with this manual and that the
supply cable has not been damaged in any way.
2) Ensure all O-Rings have been installed into unions and unions have been tightened sufficiently.
3) Ensure all ball valves are open, and the drain has been closed.
4) Using a garden hose with a pre-filter, fill the spa with pre-filtered water to the bottom of
the pillows.
5) Once the spa is filled to the proper level, turn the power to the spa on, by turning on the RCD breaker in your panel.
6) The jet pump, heating system and all internal plumbing will achieve a partial prime as the spa is
filled. To check the operation of the jet system and to remove any remaining air from the
plumbing system, follow these steps:
a) All Models: Push the Pump 1 button twice to turn the pump to high speed. Allow to run for 1
minute.
b) Signature, Ultra, and Legend series: Push Pump 2 button also. This pump runs at high
speed only. Run for one minute.
c) Legend series only: Push Pump 3 button also. This pump runs at high speed only. Run for one minute.
Once the jet system is fully operational (as indicated by strong, non-surging
CAUTION!
jets), priming of the spa is complete. Push each Pump button once to turn the
pumps off.
Do Not turn
on power
d) Epic Series ONLY - Press Pump 4, or 5 also.
to the spa until the
IMPORTANT: Weak or surging jets are an indication of a low water, a clogged
spa is filled to the
filter cartridge, or an improperly adjusted filter weir.
required level. Running
7) Adjust the chemicals and balance the water according to your dealer’s
the spa pump without
instructions. A guideline is also included in this manual, under the Water
water could cause imMaintenance Section.
mediate damage and in8) Set the temperature control to the desired temperature (between 38°C and
validate your warranty!
40°C or 100ºF and 104ºF), then place the insulated cover on the spa and allow
9
the water temperature to stabilize (approximately 16 hours). Make sure you secure the cover
in place using the cover locks. Periodically check the spa water temperature. When the water temperature climbs above 29°C, proceed to the next step.
9) Test and Adjust Sanitizer level (Chlorine ideal 1 - 3 ppm or Bromine ideal 3 - 5 ppm).
10) You can set the temperature (between 38°C and 40°C, 100°F to 104°F) by pressing the
TEMP ( + ) and TEMP ( - ) buttons on the control panel. The spa will normally come
up to temperature within 16 to 24 hours. Replace the spa cover while the temperature is
reaching the set point.
IMPORTANT: For safety, you can lock your desired temperature setting. Refer to the Topside Control Panel section for details.
10
Spa Overview
Arctic Chiller
The arctic chiller has no Freon, compressors, pumps or refrigeration mechanics.
1. Remove one access panel and attach the chiller in its place.
2. Lower the temperature on your spa to the desired setting.
Note: Do not leave the cover off of the spa in direct sunlight, this can lead to heat distress
and void your warranty.
11
Jets
Single
Pulse
Five Inch (5”) Jets
The five-inch Hydro-massage jets give a wide circular massage. These jets are adjustable by turning the
face of the jet clockwise for a stronger flow and counter-clockwise for a softer flow and eventually off.
Single
Neck Jet
Pulse
Three Inch (3”) Jets
The three-inch Hydro-massage jets have three nozzle options: The Turbo Single Pulse the directional
jets and neck jets. The Turbo single jets give a wide circular massage. The 3-inch jets are designed for a
thorough massage of the muscles in your upper back, shoulders and neck. These jets are adjustable by
turning the face of the jet clockwise for a stronger flow and counter-clockwise for a softer flow and eventually off.
Titanium Jet Option Package
The titanium jets are made from rust resistant titanium; however improper water chemistry may cause
rusting. Same great massage quality in a nicer looking package.
Monsoon Jet (certain models)
The Monsoon Jet is a large orifice Hydro-massage jet designed to maximize massaging action on a specific area of the body. It is located in the lower part of the spa to allow easy access for massaging feet, legs,
hips and lower back. The intensity of the Monsoon Jet can be altered using one of the FusionTM Diverters (the location varies depending on spa model). Consult your local dealer regarding which diverter
lever or just jump in and experiment for yourself.
Therapy Air Jets (Available on Designer, Ultra, and Legend Extreme series only)
When the Therapy Air System is turned on (see spa control functions), soft air bubbles all around you
for an exhilarating massage.
SuperJet(s) (Available on Designer series only)
There is an option to have an air blower installed in the plumbing system to force air through the ventri
system, boosting performance
12
Topside Control Panel
Your spa control has been specifically designed so that by simply connecting the spa to a
properly grounded source, and following the start-up procedures in this manual, the spa
will automatically heat to the set temperature. Many other functions, such as filtration,
safety checks and maintenance reminders have been automated so that your spa experience
will be as carefree as possible.
But you’re in charge! The topside control (TSC) panel allows you to set the temperature,
initiate the filtration cycle, control the lights, and activate or deactivate the pump(s) and
blower. The TSC display responds to let you know you have pressed a button, and that
the selected function has been performed.
Power-Up Detection
After a power-up, on the first 10 seconds the display will alternate between the software
number and revision, the display will then blink until somebody presses a key. This feature
lets you know that a power failure has occurred and all settings have returned to default.
13
Setting the Water Temperature:
Use the Up or Down arrow key to regulate the water temperature. The temperature setting will be
displayed for 5 seconds to confirm your new selection
The “Set Point” symbol indicates the desired temperature, NOT the current water
temperature!
The water temperature can be adjusted by 1 degree increments from 59 to 104ºF
(15 to 40ºC)
Starting Pump 1:
Press the Pump 1 key to turn Pump 1 on at low speed. Press a second time to turn
Pump 1 to high speed. A third time turns Pump 1 off. A built-in timer automatically turns
Pump 1 off after 20 minutes, unless it has been manually shut off.
The “Pump 1” indicator lights up when Pump 1 is running at high speed. It flashes when Pump 1 is
on at low speed.
Note: Pushing and holding the Pump 1 button will lock the panel. See the section “Panel Lock” for
details.
Starting Pump 2 (Optional):
Press the Pump 2 key to turn Pump 2 on. A second time turns Pump 2 off.
A built-in timer automatically turns Pump 2 off after 20 minutes, unless it has been
manually shut off..
The “Pump 2” indicator lights up when Pump 2 is running at high speed.
Starting Pump 3(Optional):
Press the Pump 3 key to turn Pump 3 on. Press a second time to turn Pump
3 off. A built-in timer will automatically shut Pump 3 off after 20 minutes,
unless it has been manually shut off.
Note: If Pump 3 is not present, then this switch is used only for the Standby mode. (Use this when
you’re checking inside the equipment bay, or while you’re changing a filter.)
Standby Mode:
A long press (5 seconds) on Pump 3 key/ Pump 4 on Epic Series puts the system on standby. In
Standby mode, the display shows “OFF” for at least 10 seconds and all outputs are turned off for 30
minutes. If the heater is on when the system is put on standby Pump 1 will continue to circulate for
60 seconds. The filter cycle, the Smart Winter mode and the heater can not be activated during this
time. All keys are disabled except the On/Off key. A second long press (5 seconds) will restart the
system before the 30 minutes ends.
When power is first applied to the spa, it is “On” by default.
14
Starting the Therapy Air / Super Jet (Optional):
Press the Therapy Air key to turn TA Blower on. A second press will turn the SuperJet
Blower on. A third press turns the TA Blower off, and a forth press turns the SuperJet Blower off. The built in timer automatically turns Blower off after 20 minutes, unless it has been manually deactivated.
The “Therapy Air” indicator lights up when TA or SuperJet is on.
Note: Therapy Air will start automatically when low level CC (cooling cycle) is activated. This
will happen if water temp is 2º above set point.
Turning the Lights ON:
Press the Light button to toggle the light(s) on and off. If the lights are left on, they
will automatically turn off after 2 hours, unless it has been manually deactivated.
If the spa is equipped with Northern Lights, Northern Lights Deluxe, or Ultimate
Lighting the different lighting sequences can be cycled by pressing the light key on and
off repeatedly.
The “Light” indicator is displayed when the light is on.
Programming the Filter Cycle Duration:
The system will automatically perform four one-hour filtration cycles per day.
During a filter cycle:
* Pump 2, Pump 3, Pump 4, Pump 5 and Blower(s) run for 30 seconds, then
* Pump 1 runs at low speed for the programmed number of hours (see below), and
* The Ozonator is turned on.
To Access Settings Menu:
Hold down Filter Key / Pump 5 until “SETT” is displayed.
Press Filter Key / Pump 5 to scroll to next setting.
Press Pump 3 / Pump 4 to go back to one setting.
Press Pump 1 to escape settings without starting the next sequence immediately.
Scroll through to end to start next sequence immediately.
SETT
On Epic
15
O3 00
Peak II Onzen
Adjustable from 0-24 hours/day.
On 00
P
F 06
On Epic
Onzen
Adjustable from 0-24 hours/day.
Press the Filter key or Pump 5. The display will
show Fd XX with XX representing currently set
filter cycle duration in hours.
Use the Up & Down arrow keys to change settings
(from 0 to 6).
00 = no filtration
01 = 1 hour/cycle
02 = 2 hour/cycle etc.
FF04
When the desired setting is displayed, press
Filter again. The display will show FFxx, with “xx”
representing the filter cycle frequency per day.
Use Up or Down arrow keys to change
setting (from 0-4). When the desired
setting is displayed, press Filter to confirm.
A filter cycle will start immediately. The
“Filter Cycle” indicator lights up when a
filter cycle is on. Pump 2, 3, 4, 5 and Blower
will only run once per day.
16
Filter Cycle Time-out:
During a Filter cycle, if an accessory (a pump, the blower, or the light) is used manually, the
Filter cycle is suspended the time the accessories are used. Once all accessories are turned off
(whether manually or by built-in timer), the Filtration cycle will begin at its next
expected time.
Panel Lockout:
It is possible to lock out all the keys. This feature is helpful when young children could have
access to the keypad. To lock/unlock the keypad, simply press on the Pump #1 key for at
least 5 seconds.
There are 2 modes you can choose from, full lock, or the partial lock. Full lock means ALL
keypad functions are locked. Partial lock means only the basic functions of the spa remain
usable. (pumps, blower and light)
Locking Your Digital Control Pad:
Press and hold the Pump 1 key for 5 seconds. At that point the display will show, “LocP”
with the “P” representing Partial Lock. Keep key pressed for 5 more seconds, if you want to
be in Full Lock mode. The “LocF” message will be displayed.
When the Control is locked, all automatic functions of the system run as usual. However,
when a locked key is pressed, a “LocP” or “LocF” message will then be displayed for 1
second. To unlock the keypad, simply press and hold Pump 1 key again for 5 seconds.
Inverting The Display
Press the TA (Pump 3 button on Epic) for 20 seconds to invert the display.
Turning Waterfall ON/OFF (Peak II Models only)
To turn the waterfall on/off manually, press and hold the Therapy Air Key (or Pump 3 on an
Epic Model) for 5 seconds.
Temperature displayed in Fahrenheit or Celsius:
The temperature can be displayed in Fahrenheit or Celsius. Press and hold Light key for five
seconds, to toggle between ºF and ºC. Note that after a power-up the system always returns
to default Fahrenheit display.
Boost Filtration mode:
Press and hold the Pump 2 key for 5 seconds to enable the Boost Filtration mode, Pump 1
high speed and the ozonator will fun for 45 minutes. When enabled, the “BOO” message is
displayed. This mode is used to speed-up filtration after intensive use of the spas or to help
mix chemical just added in the spa.
17
Spa Care and Maintenance
Your Arctic Spa is manufactured from the highest quality, most durable materials available. Even so, the
spa care and maintenance program you develop will ultimately determine how long your spa and its
individual components will last. Regular maintenance following the advice in this section will help you
to protect your investment.
IMPORTANT: Before performing any maintenance on your spa, make a visual inspection of the spa to
get an understanding of what condition it may be in and if anything looks out of the ordinary. If any
part appears to be damaged, loose or missing, do not proceed. Contact your Factory Authorized Dealer
immediately.
Draining the Water
Detergent residues and dissolved solids from bathing suits and chemicals will gradually accumulate in
your spa’s water. Normally, in about three to four months the water will become difficult to balance and
should be replaced. Showering without using soap prior to entering the spa or using only the rinse cycle
when laundering your bathing suit will help to reduce detergent residue in the spa water. However, foam
problems are more likely to be caused by a build up of organic pollutants in the spa-mostly by body oils.
If you’re using your spa frequently with a high bather load the water will need to be replaced more often.
Spa water gradually loses quality because of build ups of unfilterable pollutants.
IMPORTANT: Remember to change your water every three to four months.
To Drain Your Spa:
1. Shut off the RCD breaker located in the sub panel or the quick disconnect.
2. Locate the main drain valve for the spa, on the outside of the cabinet to the right of the
equipment compartment. Attach the male threaded end of a garden hose to the drain valve, and route the other end of the hose to an appropriate draining area.
3. Open the valve by turning the large outside ring counterclockwise. The spa will drain by
gravitational flow.
Note: All Arctic Spas® models will drain through the floor drain. Equipment such as the pump(s) and heater will drain. All models will leave a small amount of water in the footwell. Any water remaining in the plumbing or equipment after draining will only need to be removed if the spa is being winterized.
4. When empty, inspect the spa shell and clean as required.
5. Close the drain valve.
6. Refill the spa BEFORE restoring power.
IMPORTANT: With reusable filters, it is necessary to rinse the filter cartridges weekly. Every month,
and each time the spa is drained for cleaning, clean the cartridges in filter cleaner. (With Arctic Spas®
disposable filters, simply replace the cartridge whenever the spa is drained, or about every three months).
Filtration System
IMPORTANT: The use of Clarifiers and Foam inhibitors is not recommended with Arctic Pure®
disposable filters!
18
Arctic Spas® are equipped with balanced filtration, meaning that the filter cartridges are sized to meet the
needs of the pump system. As with any water filtering system, the filter cartridge may become clogged,
resulting in reduced water flow. It is important to maintain a clean, unobstructed filter system. We recommend that your filter cartridge be replaced with a Arctic Pure® disposable filter cartridge every three (3)
months.
Filter Cartridge Removal and Installation
1. Put the spa in Standby mode using the on/off button on the topside control panel.
2. Remove the telescoping filter cylinder
3. Unscrew the filter cartridge and either clean the reusable filter or discard the disposable filter.
4. Re-thread the clean or new filter.
5. Replace the telescoping filter cylinder.
Care of Spa Pillows
The spa pillows used in many of the Arctic Spas® models will provide years of comfort if treated with
care. They have been positioned above the water level to minimize the bleaching effects of chlorinated
water and other spa water chemicals. To extend their life, whenever the spa shell is being cleaned, the spa
pillows should be removed and cleaned. Body oils can be removed with a mild soap and water solution.
ALWAYS rinse off the spa pillows thoroughly to remove any soap residue. The pillows can be conditioned with Arctic Pure® Cover Renew cleaner after cleaning. If the spa is not going to be used for a long
period of time (that is, during a vacation or if the spa is being winterized), or when the spa water is being
super-chlorinated, the spa pillows should be removed until the next use of the spa.
To remove and replace the spa pillows:
1. Pull the pillow directly upwards until it is fully extended. Next to the acrylic of the shell, there is
a button that you press to allow you to pull the pillow upwards and out completely.
2. To reinstall the spa pillow, push the button and carefully insert pillow.
Care of the Spa Shell
Your Arctic Spa has a fiberglass reinforced, Lucite® cast acrylic shell. Stains and dirt generally will not
adhere to your spa’s surface. A soft cloth or sponge should easily remove most dirt. Most
household chemicals are harmful to your spa’s shell.
Sodium bicarbonate (baking soda) or vinegar can be used for minor surface cleaning. Always thoroughly
rinse off any spa shell cleaning agent with fresh water.
Service Notes:
1. Iron and copper in the water can stain the spa shell if allowed to go unchecked. Your Arctic Spas® Dealer stocks Arctic Pure® Best Defence to use if your spa water has a high concentration of
dissolved minerals.
2. The use of alcohol or any household cleaners other than those listed to clean the spa shell surface is NOT recommended. DO NOT use any cleaning products containing abrasives or solvents since they may damage the shell surface. Damage to the shell by the use of harsh chemicals is not covered under the warranty.
19
MANUAL SAFETY COVER
MANUAL SAFETY COVER
MANUFACTURING DATE:
CONTROL NO.
RISING DRAGON
!
WARNING
AVOID
DROWNING
RISK
KEEP CHILDREN AWAY. CHILDREN
OR OBJECTS CANNOT BE SEEN
UNDER COVER.
REMOVE COVER COMPLETELY
BEFORE ENTRY - BATHERS
ENTRAPMENT POSSIBLE.
NON-SECURED OR IMPROPERLY
SECURED COVERS ARE A HAZARD.
FAILURE TO FOLLOW ALL
INSTRUCTIONS MAY RESULT IN
INJURY OR DROWNING.
CLASSIFIED TO
ASTM F1346-91
!
AVERTISSEMENT
ÊVITEZ
DE NOYER
LE RISQUE
ENFANTS DE SUBSISTANCE PARTIS. DES
ENFANTS OU LES OBJETS NE PEUVENT PAS
ÊTRE VUS SOUS LA COUVERTURE.
ENLEVEZ LA COUVERTURE COMPLÊTEMENT
AVANT L'BAIGNEUR - OCCLUSION D'ENTREE
POSSIBLE.
LES COUVERTURES NON-FIXÊES OU
INCORRECTEMENT FIXÊES SONT UN RISQUE.
LE MANQUEDE SUIVRE TOUTES LES
INSTRUCTIONS PEUT AVOIR COMME
CONSÊQUENCE LES DOMMAGES OU LA NOYADE.
Care of the Spa Cover
WARNING: The cover is a manual safety cover that meets or exceeds all prevailing requirements of
ASTM Standards for spa safety covers when installed and used correctly as of the date of manufacture.
Non-secured or improperly secured covers are a hazard. Open the cover to its fully open position before
use. Be sure to inspect the cover for premature wear or deterioration. Over time, with use, there is a
chance of normal cover wear and deterioration. To properly maintain your cover see directions below.
Vinyl Cover
The vinyl spa cover is an attractive, durable foam insulation product. Monthly cleaning and
conditioning is recommended to maintain its beauty.
To clean and condition the vinyl cover:
1. Remove the cover from the spa and gently lean it against a wall or fence.
2. With a garden hose, spray the cover to loosen and rinse away dirt or debris.
3. Using a large sponge and/or a soft bristle brush, and using a very mild soap solution or baking soda, scrub the vinyl top in a circular motion. Do not let the vinyl dry with a soap film on it before it can be rinsed clean.
4. Scrub the cover’s perimeter and side flaps. Rinse clean with water.
5. Rinse off the underside of the cover with water only (use no soap), and wipe it clean with a dry rag.
6. To condition the cover after cleaning, apply a thin film of Arctic Pure® Cover Renew to the
vinyl surface and buff.
Care of the Spa Cabinet
Cedar Cabinet: When properly cared for, the wood cabinet of your spa will maintain its beauty for
many years. Your Arctic Spa cabinet has been specially treated with Olympic Maximum Wood Stain. Use
this stain or a similar product on a regular basis to protect the wood of the cabinet and keep your spa
looking great for years to come.
Forever FlexTM Cabinet: Wash with soap and water. (no harsh chemicals)
20
LED Light Replacement
All Arctic Spas® come equipped with two 12 volt blue LED
underwater lights for night use. The Northern Lights™
option uses two multicoloured LED assemblies. The
Northern Lights™ Deluxe option comes with five lights.
Should you need to change any light, follow these simple steps:
1. Make sure the lighting is turned off, by checking the
topside be sure the light icon is not showing.
2. Remove the screws securing the equipment access doors; remove the doors.
3. Locate the reflector, which is secured into the light housing. Carefully rotate the reflector
counter-clockwise until it comes off the light housing.
4. Carefully disconnect any cables (note the location of the cable(s), as the LED assembly has two
sockets) and remove the light assembly from its socket or slot.
5. Install the new LED assembly in its slot or socket, then reconnect the cables.
6. To reinstall the underwater light, rotate the lamp assembly clockwise onto the light housing
until secure.
If your Ultimate Lights quit working call your closest authorized service provider.
Vacation Care Instructions
If you plan to be away from home for 7 - 14 days, follow these instructions to ensure that the water
quality of your spa is maintained.
1. Adjust pH as needed.
2. Ensure you have sufficient sanitizer to last until you return.
3. Shock the spa with Arctic Pure® Spa Boost or Refresh.
4. Activate economy mode (see pg 17)
Upon your return:
1. Shock the spa with Arctic Pure® Spa Boost or Refresh.
2. Ensure you have sufficient sanitizer for regular use.
3. Return the temperature to its original setting. You can use your spa once the residual sanitizer level
falls within the ideal range.
Note: If you will not be using your spa for more then 14 days and a neighbor, friend or an outside
maintenance service is not available to check and balance the water chemistry, draining or
winterizing (for winter only) the spa is recommended.
Winterizing Your Spa
If you plan to leave your spa unused for a long period of time in severely cold weather, you should drain
the spa to avoid accidental freezing due to a power or equipment failure.
We recommend your local authorized dealer winterize your spa. Freezing can severely damage your spa.
Improper winterizing of your spa can void your warranty.
Aquatremor®, Aquatemor® Deluxe or WetTunes® Stereo (Optional)
With the new Eco-Pak which has both Bluetooth® connectivity. All of your music can now stream
from a Bluetooth-enabled device such as any Smartphone to your spa.
21
Water Maintenance
It’s important to have clean water. Water maintenance is one of the least understood, but very important
areas of spa ownership. Your dealer can guide you through the process of achieving and maintaining
perfect water in your spa, given your local conditions. Your program will depend on your water’s mineral
content, how often you use your spa, and how many people use it. Here is our suggested step-by-step
program:
General Information
There are three fundamental areas of water maintenance. They are (1) Water Filtration, (2) Water Sanitation, and (3) Chemical Balance/pH Control.
Before you even begin it is highly recommended to use the pre-filter when filling your spa, because tap
water is not really pure water. By starting with water that is already filtered clean you will find that you
have fewer problems maintaining crystal clear water.
Although your spa’s filter system is working several hours a day to remove particles from your water, it
does not remove bacteria or viruses. Water sanitation is the responsibility of the spa owner. It can be
achieved through the regular and periodic (daily, if necessary) addition of an approved sanitizer. The
sanitizer will chemically control the bacteria and viruses present in the spa water. Bacteria and viruses can
grow quickly in under sanitized spa water. The water’s chemical balance and pH control are also the responsibility of the spa owner. You will have to add chemicals to maintain proper levels of Total Alkalinity
(TA) and pH. Proper water balance and pH control will minimize scale buildup and corrosion of metals,
extend the life of the spa, and allow the sanitizer to work at maximum efficiency.
For Onzen System: Please refer to your Onzen User Guide for direction in water maintenance.
Methods For Testing The Spa Water
Accurate water testing and analysis are an important part of effectively maintaining your spa water. To
follow the Arctic Spas® recommended program, you must have the ability to test for:
• Total Alkalinity (TA)
• pH
• Sanitizer
• Calcium Hardness
Although reagent liquid test kits provide the highest level of accuracy, Test Strips are the most convenient
testing method used by many spa owners. Keep in mind that test strips are susceptible to heat and moisture contamination, which will result in inaccurate readings. Very high sanitizer levels will also render
test strips unreliable.
IMPORTANT: Always read and carefully follow the directions included with the Test Kit or Test Strips
to ensure the accuracy of the test results.
Hints For Successful Water Testing
When using the reagent test kit:
• Always take water samples 30-45 cm (12” - 18”) below the water surface.
22
• Rinse the test cells before and after each use.
• Do not dispose of test samples into the spa water.
• When adding drops of chemicals from the kit (the reagents) into the test block, hold the bottle vertically and add the drops slowly to be sure the correct quantity is used.
• The reagents should be replaced on a yearly basis to maintain the accuracy of the test results.
Basic Chemical Safety
When using chemicals, read the labels carefully and follow directions precisely. Though chemicals protect you and your spa when used correctly, they can be hazardous in concentrated form. Always observe
the following guidelines:
• ALWAYS KEEP CHEMICALS OUT OF CHILDREN’S REACH.
• NEVER MIX CONCENTRATED CHEMICALS TOGETHER.
• ALWAYS THOROUGHLY RINSE ANY CONTAINER USED TO MIX CHEMICALS
AFTER USE.
• ALWAYS RINSE OUT ANY EMPTY CHEMICAL STORAGE CONTAINER BEFORE
DISPOSAL.
• Accurately measure the quantities specified. Do not overdose your spa. Amount required
will vary depending on water condition, quantities to be used are only guidelines.
• Store chemicals in a cool, dry, well ventilated place.
• Always keep chemical containers closed when not in use.
• Don’t inhale fumes or allow chemicals to come in contact with your eyes, nose, or mouth. Wash your hands immediately after use.
• Follow the emergency advice on the product label in case of accidental contact.
• Never smoke around chemicals. Some fumes can be flammable.
• Don’t store any chemicals in the spa equipment compartment.
Adding Chemicals to the Spa
Most chemicals (does not include any slow dissolving chemicals) can be added directly to the spa while
the pump(s) is running on high speed, for a minimum of 10 minutes.
IMPORTANT WHEN USING ARCTIC PURE® BOOST OR REFRESH TREATMENT
NOTE: After administering a super chlorination treatment or non-chlorine shock to your spa, leave
the cover open for a minimum of 20 minutes to allow the oxidized gas to vent. A high concentration of
trapped oxidizer gas which may exist as a result of the shock treatment (not daily sanitation) may eventually cause discoloration or vinyl degradation to the bottom of the cover. This type of damage is considered chemical abuse and is not covered under warranty.
The Arctic Pure® Water Maintenance Program
Following the Arctic Pure® water maintenance program will save you time and frustration and ensure
clear, clean spa water.
Remove Excess Minerals
Most tap water has minerals such as Calcium, Copper, Iron, Manganese and Sodium in it, and the
23
circulation of water can cause the erosion of metals from spa equipment which can present possible
scaling and staining problems in your spa. Cases of source water with high minerals (such as some well
water):
1. We recommend you add 3 1/2 tablespoons (48 grams) of Arctic Pure® Best Defense per 1000
litres (265 gallons) of water while filling your spa.
2. Also, as water evaporates from your spa and new water is added, the amount of dissolved
minerals will increase. The spa water may eventually become “hard” (Calcium Hardness too high)
enough to damage the heater by calcifying its surface. To protect against these problems add 1
tablespoon (14 grams) per 1000 litres (265 gallons) of Arctic Pure® Best Defense weekly.
Balance the Total Alkalinity (TA)
1. The recommended Total Alkalinity (TA) for your spa water is 80-120 ppm.
2. Total Alkalinity is a measure of the total levels of carbonates, bicarbonates, hydroxides, and other alkaline substances in the water. TA is referred to as the water’s “pH buffer”. In other words, it’s a measure of the ability of the water to resist changes in pH level.
3. If the TA is too low, the pH level will fluctuate widely from high to low. Fluctuations in pH can
cause corrosion or scaling of the spa components. Low TA can be corrected by adding Arctic
PureTM Perfect Balance.
4. If the Total Alkalinity is too high, the pH level will tend to be high and may be difficult to bring down. The pH can be lowered by using Arctic Pure® Adjust Down.
5. Once the TA is balanced, it normally remains stable, although some sanitizers, and the addition of more water with a high or low alkalinity will raise or lower the TA reading of the water.
6. When the Total Alkalinity is within the recommended range, proceed to the next step.
Balancing the pH
1. We recommended a pH range for your spa water of; 7.2-7.6.
2. The pH level is the measure of acidity and alkalinity. Values above 7 are alkaline; those below 7 are acidic. Maintaining the proper pH level is extremely important for:
• Optimizing the effectiveness of the sanitizer.
• Maintaining water that is comfortable for the user.
• Preventing equipment deterioration.
• Preventing cloudy or odorous water.
3. If the spa water’s pH level is too low, the following may result:
• The sanitizer will dissipate rapidly.
• The water may become irritating to spa users.
•The spa’s equipment may corrode.
If the pH is too low, it can be increased by adding Arctic Pure® Adjust Up to the spa water.
4. If the pH level is too high, the following may result:
• The sanitizer is less effective.
• Scale will form on the spa shell surface and the equipment.
•The water may become cloudy.
24
If the pH is too high, it can be decreased by adding Arctic Pure® Adjust Down to the spa water.
5. It is important to check the pH on a regular basis. The pH will be affected by the bather load, the addition of new water, the addition of various chemicals, and the type of sanitizer used.
6. When the pH is within the recommended range, proceed to the final step.
Calcium Hardness (CH)
1. Most spa manufacturers recommend a Calcium Hardness (CH) level for your spa of 150-200 ppm.
However, we do not recommend adding calcium to your spa if your spa water is above 100
PPM, or if your incoming water has a very low level of calcium hardness.
2. Calcium Hardness is a measure of the total amount of dissolved calcium in the water. It is
believed that calcium helps control the corrosive nature of water. Calcium has a tendency to
precipitate (fall out of suspension) in high temperatures and high pH levels.
Warning: When calcium falls out of suspension it can collect on the heater and pump, and
shorten their life.
3. Any natural corrosiveness in the water can be combatted by maintaining a slightly higher Total Alkalinity Level.
Sanitize the Spa
Sanitizer is extremely important for killing algae, bacteria and viruses, and preventing unwanted organisms from growing in the spa. At the same time, you don’t want too high a sanitizer level, or it can
irritate your skin, lungs and eyes.
1. Always maintain the sanitizer level in your spa at the recommended level for each type of
sanitizer.
2. We recommend the following sanitizers:
Chlorine System:
• Arctic Pure® Chlorine Tablets
• Arctic Pure® Refresh
• Arctic Pure® Boost
Bromine System:
• Arctic Pure® Brominating Tablets
• Arctic Pure® Refresh
• Arctic Pure® Peak Boost
Important: Sanitizers are acidic and will decrease the Total Alkalinity. Regular testing and balancing of
TA & pH is extremely important with these products.
Important: Always remove the floating dispenser while the spa is in use. Remove dispensers with a
plastic bucket (keeping submerged) and store out of reach of children until spa use has
ended.
Using Chlorine System
CAUTION: The use of personal protective equipment (rubber/latex/vinyl gloves, eye protection) is
recommended while handling the dispenser or the pucks.
25
Start-up:
1. Add pucks to floating dispenser and open to setting 4.
2. Add 7 tablespoons (100 grams) of Arctic Pure® Refresh per 1500 litres (396 gallons) of water.
3. Add 1 tablespoon (14 grams) of Arctic Pure® Boost per 1000 litres (265 gallons) of water.
4. Test the Chlorine level. Once the chlorine reads within the ideal range (1-3 ppm) turn tablet
dispenser down to 1 - 2 (more or less according to bather load).
5. Start the Boost Filtration mode to circulate the chemicals and do not use spa for two hours
after the mode ends.
Note: The above example is for a spa without an ozone system. If your spa is equipped with an ozone
system please contact your dealer for proper Chlorine levels.
Weekly:
1. Add pucks to floating dispenser and reset the setting if necessary.
2. Add 7 tablespoons (100 grams) of Arctic Pure® Refresh per 1500 litres (396 gallons) of water.
3. Wait at least one hour and add 1 tablespoon (14 grams) of Arctic Pure® Best Defence per
1000 litres (265 gallons) of water.
IMPORTANT: Arctic Pure® Refresh significantly reduces pH and TA. One hour after adding Arctic
Pure® Refresh test and adjust TA and pH as needed.
Bromine Tablet System:
Note: If you are planning to use your new spa right away, Peak Boost must be added first. Follow directions for
adding Peak Boost from this page.
1. Fill floating dispenser with pucks and open to setting 7.
2. Add 7 tablespoons (100 grams) of Arctic Pure® Refresh per 1000 litres (396 gallons) of water.
3. Add 2 1/2 tablespoons (35 grams) of Arctic Pure® Peak Boost per 1000 litres (265 gallons) of
water, to establish a Bromide reserve.
4. Test the Bromine level. Once bromine reads within the ideal range (3-5 ppm) turn tablet
dispenser down to 2 or 3 (more or less according to bather load).
Note: The above example is for a spa without an ozone system. If your spa is equipped with an ozone
system please contact your dealer for proper Bromine levels.
Weekly
1. Twice a week test and adjust Total Alkalinity, pH and Chlorine or Bromine levels.
In extreme cases of source water with high minerals (such as some well water), add
1 tablespoon (14 grams) per 1000 litres (265 gallons) of Arctic Pure® Best Defence weekly.
IMPORTANT: Arctic Pure® Refresh significantly reduces pH and TA. One hour after adding Arctic
Pure® Refresh test and adjust TA and pH as needed.
The use of Clarifiers and Foam inhibitors is not recommended with Silver Sentinel
Disposable filters!
IMPORTANT: Chemical doses given in this manual are for reference ONLY. ALWAYS refer to
product label for instructions.
26
Common Spa Water Problems~Cause & Remedy
PROBLEM
POSSIBLE CAUSES
A. Poor Filtration
CLOUDY WATER
B. Suspended particles
C. Organic contaminants build up
D. pH high
E. Total alkalinity high
F. Combined chlorine in the water
G. High dissolved solids
H. Hardness too high
COLOURED WATER
A. Dissolved metals from water source
B. Low chlorine/bromine levels
C. Fragrance
FOAMING
SCALE DEPOSITS
ODOR
A. High concentration of oils and organics being agitated by the jets and/or Therapy Air
A. High Calcium level, high pH, high alkalinity
A. High level of organic contaminants, combined with chlorine
EYE/SKIN IRRITATION A. pH too low
B. Combined chlorine due to high concentration of organic contaminants
C. Allergic reaction to sanitizer
D. Bacterial contamination
NO CHLORINE/
BROMINE READING
A. High concentration of contaminants using up sanitizers
B. Test kit reagents ineffective
27
SOLUTIONS
A. Dirty filter, clean with Arctic Pure® Filter Restore (not with disposable filter). Increase Filter cycle.
B. Add Arctic Pure® Easy Clear
C. Shock treatment with Arctic Pure® Refresh
D. Add Arctic Pure® Adjust Down until level reads 7.2-7.6
E. Add Arctic Pure® Adjust Down to adjust TA level to 100-130 ppm
F. Shock treatment until combined chlorine is eliminated (see container instructions)
G. Empty spa and refill
H. Add Arctic Pure® Best Defence until level reads 100-280 ppm
A. Use Arctic Pure® Best Defence and have your dealer check your water balance
B. Add Arctic Pure® Boost treatment to raise chlorine levels and test chlorine levels or for Bromine system add
Peak Boost & test Bromine levels
C. Stop the use of fragrance
A. Squirt Foam DissolveTM on foam. Refer to pg 20 for more information. (not with disposable filter)
A. Drain partially, add Arctic Pure® Best Defence, correct pH level to 7.2 - 7.6 and alkalinity to 100-130 ppm.
A. Check pH and adjust as required.
B. Shock with Arctic Pure® Refresh, add Boost or Peak Boost dependent on whether you have a chlorine or
bromine system
C. Dilution of water will reduce contaminants and odor.
D. Check any ozone system is operational
A. Add Arctic Pure® Adjust Up until level reads 7.2 - 7.6 ppm
B. Add Arctic Pure® Refresh, add Boost or Peak Boost.
C. Change from Bromine to Chlorine or vice versa.
D. Drain and refill spa.
A. Add sanitizers until levels are up to the recommended levels
B. Replace test kits at least once a year
C. Chlorine/Bromine level very high and is bleaching test reagent, Allow sanitizer levels to recede by
opening cover and running jets.
28
Troubleshooting Spa Problems
1. Nothing functions: The RCD Breaker has tripped or there is a power failure. Test RCD Breaker.
Turn breaker back on and see if spa powers up, if not contact your factory authorized dealer.
2. Spa does not heat: Check to see if the heat indicator is on or there are any error messages on the topside control panel. If the heat indicator is on and no error message appears contact your
factory authorized dealer.
3. Poor Jet Pressure: First check to see that the jet(s) are turned on fully. Check your filter to see
if it’s clogged or dirty. Next, check to see if the jet(s) are obstructed or if the venturi air dial is turned on. Finally, check to see if the jet(s) are surging. If so, your pump is cavitating (sucking in air). This usually occurs when the water level is too low and can be solved by adding water to the spa. If the problem still persists, contact your factory authorized dealer.
4. Light is not functioning: Follow the LED replacement section.
5. Spa comes on by itself: This function is normal when heating and filtering. No action required.
6. Spa doesn’t drain completely: The spa is drained by gravity. It will not always drain fully. It is not necessary to drain the spa in its entirety except when winterizing the spa. If you wish to remove the last little bit of water, we recommend you vacuum it out with a wet/dry vacuum.
29
Important
This manual and its contents are subject to change without notice. Although Blue Falls Manufacturing
has prepared this manual as accurately and precisely as possible, Blue Falls Manufacturing will not be liable for loss, injury or damages caused by improper servicing or by use of spa (improper or otherwise).
Arctic Spas® are Canadian built with the finest materials and advanced technology to withstand the
harshest weather conditions. Performance and Reliability is the Arctic Spas® Customer Guarantee. If
your spa cannot be repaired under our extensive warranty, Arctic Spas® will provide a replacement spa
equal in value to the original purchase price of the defective spa. Our philosophy Guarantees you
Customer Satisfaction. These are words we will stand behind in writing.
30
11.01
engineered for the wor ld ’s harshest climates®...
(wherever you happen to live)
w w w.arc ticspas.com