1
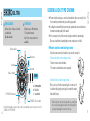
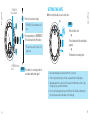
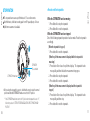
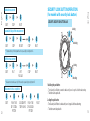
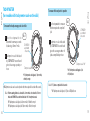
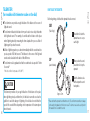
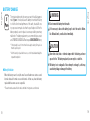
Cal. 7T04 INSTRUCTIONS (P. BEDIENUNGSANLEITUNG (S. 21) 3) INSTRUCTIONS (P. 39) ISTRUZIONI (P. 57) INSTRUCCIONES (P. 75) INSTRUÇÕES (P. 93) ИНСТРУКЦИИ (P. 111) 用法説明 (129頁 ) English Sie sind jetzt Besitzer einer SEIKO Analog-Quarzuhr Kal. 7T04. Bitte lesen Sie diese Bedienungsanleitung vor Verwendung der Uhr sorgfältig durch und heben Sie sie gut auf. Vous voici l’heureux propriétaire d’une montre quartz analogique SEIKO Cal. 7T04. Pour obtenir d’excellentes performances de cet article SEIKO, veuillez lire attentivement cette brochure que vous conserverez pour toute référence ultérieure. Siete ora in possesso di un orologio SEIKO Analogico al Quarzo Cal. 7T04. Per ottenere i migliori possibili risultati dal Vostro orologio, leggere attentamente le istruzioni di questo manuale prima di utilizzare il Vostro orologio SEIKO analogico al quarzo. Conservare poi il manuale stesso per ogni qualsiasi eventuale futuro riferimento. Enhorabuena por su adquisición de un reloj SEIKO analógico de cuarzo Cal. 7T04. Para óptimo resultado, lea detenidamente las instrucciones de este folleto antes de usar el reloj. Guarde este manual para consulta posterior. Você pode sentir-se orgulhoso de possuir um Relógio SEIKO Quartz Análogo Cal. 7T04. Para obter os melhores resultados, leia atentamente as instruções contidas neste opúsculo antes de usar o seu Relógio SEIKO Quartz Análogo. Queira conservar este manual para referências futuras. Теперь Вы являетесь обладателем часов Аналоговые Кварцевые часы Калибра 7T04. Перед использованием их, для достижения лучших результатов, пожалуйста, внимательно ознакомьтесь с данной инструкцией и обязательно сохраните ее. CONTENTS Page SCREW LOCK TYPE CROWN.................................................................................... ENGLISH You are now the proud owner of a SEIKO Analogue Quartz Watch Cal. 7T04. For best results, please read the instructions in this booklet carefully before using your SEIKO Analogue Quartz Watch. Please keep this manual handy for ready reference. 5 SETTING THE TIME AND ADJUSTING THE STOPWATCH HAND POSITION.................................................... 6 SETTING THE DATE................................................................................................... 9 STOPWATCH.............................................................................................................. 10 SECURITY LOCK BUTTON OPERATION.................................................................... 13 TACHYMETER............................................................................................................ 14 TELEMETER............................................................................................................... 16 BATTERY CHANGE.................................................................................................... 18 SPECIFICATIONS....................................................................................................... 20 IFor the care of your watch, see “TO PRESERVE THE QUALITY OF YOUR WATCH” in the attached Worldwide Guarantee and Instruction Booklet. English n TIME/CALENDAR 24-hour, hour, minute, and small second hands Big date calendar n STOPWATCH Measures up to 60 minutes in 1/5 second increments. Split time measurement is available. l How to use the screw lock type crown Big date calendar Minute hand Hour hand A 24-hour hand Small second hand CROWN a STOPWATCH minute hand b B c a: Normal position b: First click c: Second click STOPWATCH 1/5-second hand u Some models may have a screw-lock mechanism that can securely lock the crown by screw when they are not being operated. u Locking the crown will help to prevent any operational errors and enhance the water resistant quality of the watch. u It is necessary to unlock the screw lock type crown before operating it. Once you have finished operating the crown, make sure to relock it. English SCREW LOCK TYPE CROWN CAL. 7T04 * Some models may have a screw lock type crown. If your watch has a screw lock type crown, refer to “ SCREW LOCK TYPE CROWN”. Keep the crown securely locked unless you need to operate it. [How to unlock the screw lock type crown] Turn the crown counterclockwise. The crown is unlocked and can be operated. [How to lock the screw lock type crown] Once you have finished operating the crown, turn it clockwise while gently pressing it in toward the watch body until it stops. * When locking the crown, turn it slowly with care, ensuring that the screw is properly engaged. Be careful not to forcibly push it in, as doing so may damage the screw hole in the case. English lThis watch is designed so that the following adjustments are all made with the crown at the second click position: 1)time setting 2)stopwatch hand position adjustment Once the crown is pulled out to the second click, be sure to check and adjust 1) and 2) at the same time. CROWN Pull out to second click when the small second hand is at the 12 o'clock position. 2. The 24-hour hand moves correspondingly with the hour hand. 3. It is recommended that the hands be set to the time a few minutes ahead of the current time, taking into consideration the time required to adjust the STOPWATCH hand position if necessary. 4. The moment the date changes is midnight. When setting the hour hand, make sure to check that AM/PM is correctly set by using the 24 hour hand as an AM/PM indicator. 5. When setting the minute hand, first advance it 4 to 5 minutes ahead of the desired time and then turn it back to the exact minute. 2. STOPWATCH HAND POSITION ADJUSTMENT STOPWATCH 1/5-second hand 1. TIME SETTING Hour hand 1. When the stopwatch is or has been measuring, if the crown is pulled out to the second click, it will automatically reset the STOPWATCH hands to “ 0”. Minute hand CROWN Turn to set the hour and minute hands. IIf the STOPWATCH hands are not in the "0" position, follow the procedure below to set them to the "0" position. A A t B Small second hand 24-hour hand English SETTING THE TIME AND ADJUSTING THE STOPWATCH HAND POSITION B STOPWATCH minute hand t Press for 2 seconds or longer. * STOPWATCH minute hand turns a full circle. Press repeatedly to set STOPWATCH minute hand to the "0" position. * The hand moves quickly if button B is kept pressed. English A A t B Press for 2 seconds or longer. * STOPWATCH 1/5-second hand turns a full circle. Press repeatedly to set STOPWATCH 1/5-second hand to the "0" position. * The hand moves quickly if button B is kept pressed. B STOPWATCH minute hand SETTING THE DATE t t CROWN Push back in to normal position in accordance with a time signal. lBefore setting the date, be sure to set the time. Date CROWN English STOPWATCH 1/5-second hand Pull out to first click. t Turn clockwise until the desired date appears. t Push back in to normal position. 1. Date setting should always be carried out after the time is correctly set. 2. Turn the crown gently and slowly to set the date, especially when the tenth digit changes. 3. Manual date adjustment is required on the first day after a month that has less than 31 days: February, April, June, September and November. 4. Do not set the date during any time between 9:00 P.M. and 1:00 A.M. Date setting during this time period may cause failure of date change on the following day. English <How to reset the stopwatch> lThe stopwatch can measure up to 60 minutes in 1/5-second increments. lAfter 60 minutes, it will start counting again from "0" repeatedly up to 12 hours. lSplit time measurement is available. While the STOPWATCH hands are moving 1. Press Button A to stop the stopwatch. 2. Press Button B to reset the stopwatch. English STOPWATCH While the STOPWATCH hands are stopped A STOPWATCH minute hand B STOPWATCH 1/5-second hand IBefore using the stopwatch, be sure to check that the crown is set at the normal position and that the STOPWATCH hands are reset to the "0" position. * If the STOPWATCH hands do not return to the“0” position when the stopwatch is reset to “0”, follow the procedure in “ SETTING THE TIME AND ADJUSTING THE STOPWATCH HAND POSITION”. 10 One of the following stopwatch operations has been made. Reset the stopwatch accordingly. [When the stopwatch is stopped] 1. Press button B to reset the stopwatch. [When the split time measurement is displayed while the stopwatch is measuring] 1. Press button B to release the split time display. The stopwatch hands move quickly, and then indicate the measurement in progress. 2. Press button A to stop the stopwatch. 3. Press button B to reset the stopwatch. [When the split time measurement is displayed and the stopwatch is stopped] 1. Press button B to release the split time display. The stopwatch hands move quickly, and then stop. 2. Press button B to reset the stopwatch. 11 A B t t English A START STOP SECURITY LOCK OF PUSH-BUTTON A & B RESET START STOP RESTART A A B t A t A t A t Accumulated elapsed time measurement STOP English SECURITY LOCK BUTTON OPERATION (for models with security lock button) Standard measurement Locking Unlocking RESET * Restart and stop of the stopwatch can be repeated by pressing button A. START SPLIT SPLIT RELEASE A B t B t B t A t Split time measurement STOP Locking RESET * Measurement and release of split time can be repeated by pressing button B. START 12 FINISH TIME OF 1ST COMPETITOR 2ND COMPETITOR FINISHES B FINISH TIME OF 2ND COMPETITOR t A t t t B Unlocking Unlocking the push-button Measurement of two competitors A B B RESET - Turn Security Lock Button counterclockwise until you no longer feel the threads turning. - The button can be pushed in. Locking the push-button - Turn Security Lock Button clockwise until you no longer feel the threads turning. - The button cannot be pushed in. 13 English To measure the hourly average speed of a vehicle 1 2 Use the stopwatch to determine how many seconds it takes to go 1 km or 1 mile. Ta c hy me ter s c ale indic a te d by STOPWATCH second hand gives the average speed per hour. To measure the hourly rate of operation 1 Ex. 1 STOPWATCH second hand: 40 seconds 2 Use the stopwatch to measure the time required to complete 1 job. English TACHYMETER (for models with tachymeter scale on the dial) Ex. 1 STOPWATCH second hand: 20 seconds Ta c hyme ter s c ale indic a te d by STOPWATCH second hand gives the average number of jobs accomplished per hour. Tachymeter scale: "180" Tachymeter scale: "90" “180” (tachymeter scale figure) x 1 job = 180 jobs/hour “90” (tachymeter scale figure) x 1 (km or mile) = 90 km/h or mph lTachymeter scale can be used only when the time required is less than 60 seconds. Ex. 2: If the measuring distance is extended to 2 km or miles or shortened to 0.5 km or miles and STOPWATCH second hand indicates “90” on tachymeter scale: Ex. 2: If 15 jobs are completed in 20 seconds: "180" (tachymeter scale figure) x 15 jobs = 2700 jobs/hour "90" (tachymeter scale figure) x 2 (km or mile) = 180 km/h or mph "90" (tachymeter scale figure) x 0.5 (km or mile) = 45 km/h or mph 14 15 English HOW TO USE THE TELEMETER Before beginning, check that the stopwatch has been reset. l The telemeter can provide a rough indication of the distance to the source of light and sound. l The telemeter indicates the distance from your location to an object that emits both light and sound. For example, it can indicate the distance to the place where lightning struck by measuring the time elapsed after you see a flash of lightning until you hear the sound. l A flash of lightning reaches you almost immediately while the sound travels to you at a speed of 0.33 km/second. The distance to the source of the light and sound can be calculated on the basis of this difference. l The telemeter scale is graduated so that the sound travels at a speed of 1 km in 3 seconds.* START (Flash of light) English TELEMETER (for models with telemeter scale on the dial) 1 Press button A to start the stopwatch as soon as you see the light. STOP 2 When you hear the sound, press button A to stop the stopwatch. (Crash of thunder) *Under the condition of temperature of 20° C(68° F) 3 Read the telemeter scale that the stopwatch second hand points to. CAUTION 16 The telemeter provides only a rough indication of the distance to the place where lightning struck, and therefore, the indication cannot be used as the guideline to avoid the danger of lightning. It should also be noted that the speed of the sound differs depending on the temperature of the atmosphere where it travels. Approx. 3 km *Please note that the stopwatch second hand moves in 1/5 second increments and does not always point exactly to the graduations of the telemeter scale. The telemeter scale can be used only when the measured time is less than 60 seconds. 17 English The miniature battery which powers your watch should last approximately 5 years. However, because the battery is inserted at the factory to check the function and performance of the watch, its actual life once in your possession may be less than the specified period. When the battery expires, be sure to replace it as soon as possible to prevent any malfunction. For battery replacement, we recommend that you contact an AUTHORIZED SEIKO DEALER and request SEIKO SR927SW battery. * If the stopwatch is used for more than 2 hours a day, the battery life may be less than the specified period. * After the battery is replaced with a new one, set the time/calendar and adjust the stopwatch hand position. l Battery life indicator WARNING l Do not remove the battery from the watch. English BATTERY CHANGE l If it is necessary to take out the battery, keep it out of the reach of children. If a child swallows it, consult a doctor immediately. CAUTION l Never short-circuit, heat or otherwise tamper with the battery, and never expose it to fire. The battery may burst, become very hot or catch fire. l The battery is not rechargeable. Never attempt to recharge it, as this may cause battery leakage or damage to the battery. When the battery nears its end, the small second hand moves at two-second intervals instead of normal one-second intervals. In that case, have the battery replaced with a new one as soon as possible. * The watch remains accurate while the small second hand is moving at two-second intervals. 18 19 English SPECIFICATIONS 1 Frequency of crystal oscillator ................... 32,768 Hz (Hz = Hertz … Cycles per second) 2 Loss/gain (monthly rate) ............................ ±15 seconds at normal temperature range (between 5° C and 35° C) 3 Operational temperature range ................. Between –10° C and +60° C 4 Driving system............................................ Step motor, 3 pieces 5 Display system Time/calendar........................................ 24-hour, hour, minute and small second hands Date is displayed in numerals Stopwatch............................................. Stopwatch minute and 1/5-second hands 6 Battery........................................................ SEIKO SR927SW, 1 piece 7 IC (Integrated Circuit) . ............................... C-MOS-IC, 1 piece * The specifications are subject to change without prior notice for product improvement. 20