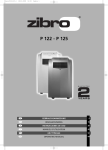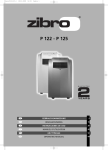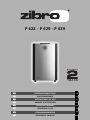
1
P 622 - P 629 - P 639
2
BEDIENUNGSANLEITUNG
4
6
BRUGSANVISNING
18
5
INSTRUCCIONES DE USO
32
3
MANUEL D'UTILISATION
46
4
OPERATING MANUAL
60
>
ISTRUZIONI D’USO
74
1
GEBRUIKSAANWIJZING
88
:
INSTRUKCJA OBSŁUGI
102
2
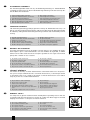
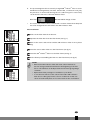
ALLGEMEINE SICHERHEIT
Aus Sicherheitsgründen bitten wir Sie, die Bedienungsanleitung vor Inbetriebnahme
sorgfältig zu lesen! Personen, die mit der Bedienungsanleitung nicht vertraut sind, dürfen das Gerät nicht bedienen.
A.
B.
C.
D.
E.
F.
6
Kein beschädigtes Kabel verwenden.
Kabel nicht zusammendrücken oder knicken.
Unbedingt waagerecht aufstellen.
Nicht vor geöffneten Fenstern aufstellen.
Nicht mit Chemikalien in Kontakt bringen.
Nicht bei Wärmequellen aufstellen.
G.
H.
I.
J.
K.
L.
Nicht in Wasser eintauchen.
Kein Flüssigkeiten verschütten.
Keine Gegenstände in das Gerät stecken.
Kein Verlängerungskabel verwenden.
Außer Reichweite von Kindern halten.
Nicht selbst reparieren.
A
SIKKERHED GENERELT
Læs denne brugsanvisning grundigt igennem af hensyn til sikkerheden! Personer, som
ikke er fortrolige med brugsanvisningens indhold, må ikke anvende dette klimaanlæg.
Vi anbefaler, at De gemmer denne brugsanvisning et sikkert sted med henblik på senere brug.
A.
B.
C.
D.
E.
F.
5
Brug ikke beskadigede kabler.
Kabel må ikke sættes i klemme eller knækkes.
Anbringes på et plant gulv.
Må ikke anbringes ved et åbent vindue.
Må ikke komme i kontakt med kemikalier.
Må ikke anbringes ved en varmekilde.
G.
H.
I.
J.
K.
L.
Må ikke sænkes ned i vand.
Pas på med at spilde.
Der må ikke stikkes noget ind i apparatet.
Der må ikke bruges kabeltrommel.
Bruges uden for børns rækkevidde.
De må ikke selv reparere apparatet.
MEDIDAS DE SEGURIDAD
¡Consulte atentamente el modo de empleo y preste atención a las medidas de seguridad! Aquellos que no estén familiarizados con estas medidas de seguridad, no deben
utilizar este acondicionador de aire. Aconsejamos guardar en sitio seguro este manual
para poder consultar en caso necesario.
A.
B.
C.
D.
E.
F.
3
No utilizar un cable deteriorado.
No averiar o doblar el cable.
Colocar en superficie llana
No colocar delante de ventana abierta.
No poner en contacto con productos químicos.
No poner en contacto con fuente de calor.
G.
H.
I.
J.
K.
L.
C
No sumergir en líquidos.
No verter líquidos.
No introducir objetos en el aparato.
No utilizar cable de extensión.
Poner fuera del alcance de los niños.
No hacer reparaciones.
SÉCURITÉ GÉNÉRALE
Par mesure de sécurité, consulter attentivement ce manuel d’instructions! Les personnes qui ne sont pas familiarisées avec ce manuel d’instructions, ne doivent pas utiliser
ce climatiseur. Nous vous conseillons de ranger ce manuel d’instructions à un endroit
sûr pour pouvoir le consulter ultérieurement.
Ne pas utiliser de câble endommagé.
Ne pas serrer ou plier le câble.
Placer sur une surface plane.
Ne pas placer devant une fenêtre ouverte.
Ne pas mettre en contact avec des produits chimiques.
F. Ne pas placer auprès d’une source de chaleur.
A.
B.
C.
D.
E.
4
B
G.
H.
I.
J.
K.
L.
D
Ne pas immerger.
Ne pas renverser.
Ne rien introduire dans l’appareil.
Ne pas utiliser de câble de rallonge.
A tenir hors de portée des enfants.
Ne pas réparer soi-même.
E
GENERAL SAFETY
For safety reasons, please read this manual carefully before operating. Persons who are
not familiar with this manual must not use this air conditioner. We strongly recommend
keeping this manual in a safe place for future reference.
A.
B.
C.
D.
E.
F.
Do
Do
Do
Do
Do
Do
2
not
not
not
not
not
not
use a damaged cable.
clamp or bend the cable.
place unevenly.
place in front of an open window.
bring in contact with chemicals.
place near a heat source.
G.
H.
I.
J.
K.
L.
Do not immerse in water.
Do not spill.
Do not insert anything.
Do not use an extension cord.
Keep out of the reach of children.
Do not repair.
F
>
SICUREZZA
Per motivi di sicurezza, si raccomanda di leggere attentamente il manuale prima di utilizzare l’apparecchio. Le persone che non conoscono il funzionamento del climatizzatore non devono usarlo. Si raccomanda di riporre il manuale in un luogo sicuro per
future referenze.
A.
B.
C.
D.
Non usare il cavo, se danneggiato.
Non bloccare o piegare il cavo.
Collocare l’apparecchio su una superficie piana.
Non collocare l’apparecchio davanti alla finestra
aperta.
E. Non porlo a contatto con prodotti chimici.
F. Non posizionarlo vicino ad una fonte di calore.
G
1
G.
H.
I.
J.
K.
Non immergerlo nell’acqua.
Non versare liquidi sull’apparecchio.
Non inserire alcun oggetto nell’apparecchio.
Non usare prolunghe.
Tenere l’apparecchio lontano dalla portata dei
bambini.
L. Non cercare di riparare l’apparecchio.
VEILIGHEID ALGEMEEN
Bestudeer voor de veiligheid deze gebruiksaanwijzing zorgvuldig! Personen, die met
de gebruiksaanwijzing niet vertrouwd zijn, mogen deze airconditioner niet gebruiken.
Wij raden u aan deze gebruiksaanwijzing op een veilige plaats te bewaren voor latere
raadpleging.
H
A.
B.
C.
D.
E.
F.
:
Gebruik geen beschadigde kabel.
Kabel niet afklemmen of knikken.
Plaats op een vlakke ondergrond.
Niet voor een open raam plaatsen.
Niet met chemicaliën in contact brengen.
Niet bij een warmtebron plaatsen.
G.
H.
I.
J.
K.
L.
Niet onderdompelen.
Niets morsen.
Niets in het apparaat steken.
Geen verlengkabel gebruiken.
Buiten bereik van kinderen houden.
Niet zelf repareren.
OGóLNE ZASADY BEZPIECZEńTWA
Dla własnego bezpieczeństwa przeczytaj dokładnie treść instrukcji obsługi klimatyzatora!
Osobom, które nie zapoznały się z instrukcją obsługi niniejszego urządzenia, zabrania się z
niego korzystać. Radzimy przechowywać instrukcję obsługi w bezpiecznym miejscu, aby w
razie potrzeby móc skorzystać z niej w przyszłości.
I
A.
B.
C.
D.
E.
F.
Nie używać uszkodzonego przewodu zasilającego.
Nie uciskać ani nie zginać przewodu.
Urządzenie umieścić na płaskim podłożu.
Nie umieszczać urządzenia przed otwartym oknem.
Nie stosować żadnych środków chemicznych.
Nie umieszczać w bezpośrednim sąsiedztwie źródeł
ciepła.
G.
H.
I.
J.
K.
L.
Nie zanurzać w wodzie.
Nie rozlewać cieczy.
Nie wtykać obcych przedmiotów do aparatu.
Nie używać przedłużacza.
Trzymać z daleka od dzieci.
Nie próbować naprawiać klimatyzatora samodzielnie.
J
TR
GENEL GÜVENL‹K
Güvenlik aç›dan çal›flt›rmaya bafllamadan önce lütfen kullanma talimat›n› dikkatlice okuyunuz!
Kullanma talimat›n› bilmeyen kiflilerin aleti kullanmas› yasakt›r.
A.
B.
C.
D.
E.
F
Hasar görmüfl kablo kullanmay›n›z.
Kabloyu ezmeyiniz ve katlamay›n›z.
Mutlaka yatay kurunuz.
Aç›k pencerelerin önüne kurmay›n›z.
Kimyasal maddelerle temas ettirmeyiniz.
Is› kaynaklar›n bulundu¤u yerlere kurmay›n›z.
G.
H.
I.
J.
K.
L.
Suya bat›rmay›n›z.
Üzerine s›v› dökmeyiniz.
Aletin içine cisim sokmay›n›z.
Uzat›c› kablo kullanmay›n›z.
Çocuklar›n eriflemeyece¤i yerelerde muhafaza ediniz.
Kendiniz tamir etmeyiniz.
K
9
SEGURANÇA GERAL
Leia atentamente as instruções de segurança fornecidas no presente manual! O aparelho de ar condicionado não deve ser utilizado por pessoas que não se tenham previamente familiarizado com o manual de instruções. Recomendamos que guarde este
manual de instruções num local seguro, para uma futura consulta.
L
A. Não utilize cabos danificados.
B. Não aperte nem dobre o cabo.
C. Coloque o aparelho numa superfície plana.
D. Não coloque o aparelho em frente a uma janela aberta.
E. Não deixe o aparelho entrar em contacto com produtos químicos.
F. Não coloque junto a uma fonte de calor.
G. Não introduza o aparelho dentro de água.
H. Não entorne nada no aparelho.
I. Não insira objectos no aparelho.
J. Não utilize extensões.
K. Mantenha fora do alcance das crianças.
L. Não efectue reparações pelos seus próprios meios.
3
B
IMPORTANT
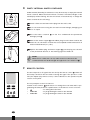
COMPONENTS
A
Control Panel
B
Air outlet
C
Carrying handle
4
Caster wheels
E
Water container
F
Air filter
G
Air inlet
H
Exhaust air outlet
I
Cord storage
1
3
4
7
6
J
Water stopper /
drainage point
8
K
Hose
9
L
Hose connector
(optional)
M
J
Hose adapter
(optional)
N
Caps for hose
5
K
O
P
Q
adapter (optional)
O
Remote control
P
Slidebar connector
(optional)
Q
Telescopic slidebar
L
M
2x
1. READ THE DIRECTIONS FOR USE FIRST.
2. IN CASE OF ANY DOUBT, CONTACT YOUR DEALER.
4
60
N
2x
Dear Sir, Madam,
Congratulations on the purchase of your air conditioner. In addition to air cooling, this air
conditioner has three other functions: air dehumidification, air circulation and air filtration.
The mobile air conditioner is easy to operate and move. You have acquired a high quality
product that will provide you with many years of pleasure, on condition that you use it
responsibly. Reading these instructions for use before operating your air conditioner will
optimise its life span.
We wish you coolness and comfort with your air conditioner.
Yours sincerely,
PVG International B.V.
Customer service department
4
61
A
SAFETY INSTRUCTIONS
Install the device only when it complies with local regulations, by-laws and
standards. The unit is only suitable for use in dry locations, indoors. Check the
mains voltage and frequency. This unit is only suitable for earthed sockets,
G
connection voltage 220-240 V. / 50 Hz.
IMPORTANT
The device MUST always have an earthed connection. If the power
supply is not earthed, you may not connect the unit. The plug must
always be easily accessible when the unit is connected. Read these
instructions carefully and follow the instructions.
Before connecting the unit, check the following:
•
The voltage supply must correspond with the mains voltage stated on the
rating label.
•
The socket and power supply must be suitable for the current stated on the
rating label.
•
The plug on the cable of the device must fit into the wall socket.
•
The device must be placed on a flat and stable surface.
The electricity supply to the device must be checked by a recognised professional
if you have any doubts regarding the compatibility.
•
This device is manufactured according to CE safety standards. Nevertheless,
•
Do not cover the air inlet and outlet grill.
•
Empty the water reservoir before moving the unit.
•
Never allow the device to come into contact with chemicals.
•
Never spray the unit with or submerge in water
•
Do not insert objects into the openings of the unit.
•
Always remove the plug from the electric power supply before cleaning or
you must take care, as with any other electrical device.
replacing the unit or components of the unit.
•
Never use an extension cable to connect the device to the electric power
supply. If there is no suitable, earthed wall socket available, have one
installed by a recognised electrician.
•
For safety reasons take care when children are in the surrounding of the
device, as with any other electrical device.
•
Have any repairs only carried out by a recognised service engineer or your
supplier. Follow the instructions for use and maintenance as indicated in the
user manual of this device.
•
Always remove the plug of the unit from the wall socket when it is not in use.
•
A damaged power cord or plug must always be replaced by a recognised
electrician or your supplier.
4
62
B
G
ATTENTION!
G
WARNING
G
• Never use the device with a damaged power cord, plug, cabinet or
control panel. Never trap the power cord or allow it to come into
contact with sharp edges.
• Never seal the room - where this device will be used - completely
airtight. This will prevent under pressure in this room. Under
pressure can disrupt the safe operation of geysers, ventilation
systems, ovens, etc.
• Failing to follow the instructions may lead to nullification of the
guarantee on this device.
Don’t lift, or move by pushing, the air conditioner at the back side, but
always at the front side (see pictures).
INSTALLATION
WARNING
Before using the air conditioner it should be left in an upright position
for at least 2 hours.
This unit is portable and can easily be moved from one room to another. In doing
so keep this in mind:
1 Ensure that the unit is positioned upright and on a level surface.
2 Place the loose filters in the filter holder.
•
Take the filter holder out of the air conditioner
•
Open the filter holder and place the active carbon filter (black) and 3MTM
FiltreteTM filter (white) in the filter holder.
•
Place the filter fixing component back in the holder.
•
Place the filter holder back in the air conditioner.
3 Do not operate the unit inside the bathroom, shower, or in any other very
50 cm
50 cm
humid environment.
4 Please keep a distance of 50 cm between the unit and the wall or other
objects to ensure proper air circulation.
5 Connect the hose K to the unit by turning it clockwise (at least 5 turns).
6 Connect the hose K to the slidebar connector P as far as possible.
4
63
7 Fit the telescopic slide bar Q to the window and adjust the length. Put the
slidebar connector P{ in the opening in the telescopic slide bar. Close the
window or door as much as possible to prevent outside air entering the
G
room. Ensure that the slidebar connector P has a free flow outside.
C
IMPORTANT
The flexible exhaust hose can be extended from 500 to 1500 mm for
mounting.This length has been designed especially according to the
specifications of the air conditioner. Do not use an extension or
exchange for a different hose as that may lead to malfunctioning. The
exhaust air must flow freely, any blockage can lead to overheating of
the air conditioner. Take care to prevent any sharp bow or bend in the
exhaust (see pictures).
OPERATION
1. CONNECTING TO THE MAIN
Insert the plug in the wall socket. Then press
to switch the unit on or off. A
buzzer will beep, and the LCD will display 12:00 o’clock as default.
2. SETTING THE CLOCK
88::88
88:88
1 Press the
push button for 3 seconds to set the clock. The 2 left digits of the
4 digits on the LCD-display will flash.
2 Press
or
3 Press
momentarily, the 2 right digits of the 4 digits will flash.
4 Press
or
5 Press the
to adjust the hour.
to adjust the minutes of the clock.
push button for 3 seconds again to activate the clock.
3. TEMPERATURE SETTING UP/DOWN
If you want to change the set temperature press
G
or
to set the temperature.
The 2 digit display will indicate the set temperature.
4
64
NOTE
Reaching the set temperature is up to surrounding room conditions.
4. MODE SWITCH
Push the
button successively until the icon representing the desired mode is
appearing (=> Cool => Fan => Cool => etc).
On the LCD-display you will see:
Cooling
Fan only
Each time the unit starts, it starts operating in coolmode with a set temperature
of 22°C. The fan speed will be selected automatically.
5. FAN SPEED SETTING
If you prefer a constant fan speed instead of the auto fan speed, push the
push button successively; the fan icon
on the LCD-display will rotate
accordingly.
•
Fast
- for the turbo speed
•
Normal
- for the medium speed
•
Slow
- for the slow speed
•
Alternating
- for the auto fan speed (In the cooling mode only!)
6. TIMER SETTING
The timer can be set in the following configurations:
ON
Programming the timer for ON - when the unit is OFF.
88::88
1 Press the
are flashing.
2 Press
88:88
push button; the 2 left digits of the 4 digits on the LCD display
or
3 Press the
4 Press
to adjust the hour.
push button again, the 2 right digits of the 4 digits are flashing.
or
to adjust the minutes of the clock in intervals of 5 minutes.
The timer is set. After 10 seconds the time display returns.
The circular time scale will be on between the ON programmed times until 24:00.
The flashing bar on the time scale indicates the real time and moving a phase
every 30 minutes ahead until it reaches the ON timer time, then the black
segments in the circular time scale will disappear.
4
65
OFF
Programming the timer for OFF - when the unit is running.
88::88
1 Press the
push button; the 2 left digits of the 4 digits on the LCD display
are flashing.
2 Press
88:88
or
3 Press the
4 Press
to adjust the hour.
push button again, the 2 right digits of the 4 digits are flashing.
or
to adjust the minutes of the clock in intervals of 5 minutes.
The timer is set. After 10 seconds the time display returns.
The circular time scale will be on between the present time to the OFF
programmed time. The flashing bar on the time scale indicates the real time and
moving a phase every 30 minutes ahead until it reaches the OFF timer time, then
the black segments in the circular time scale will disappear.
Repeat OFF & ON
Programming the timer for repeat OFF & ON - when the unit is running.
88::88
1 Press the
push button; the 2 left digits of the 4 digits on the LCD display
are flashing.
2 Press
88:88
or
3 Press the
4 Press
to adjust the hour.
push button again, the 2 right digits of the 4 digits are flashing.
or
to adjust the minutes of the clock in intervals of 5 minutes.
The timer is set. After 10 seconds the time display returns.
5 Repeat the above procedure while the digits are still flashing for setting the
ON.
The circular time scale will be on between the 00:00 time to the timer time off,
off
on
and from the time on till 24:00. The flashing bar on the time scale indicates the
real time and moving a phase every 30 minutes ahead. The unit will operate
according to the timer setting daily.
Repeat ON & OFF
Programming the timer for repeat ON & OFF - when the unit is not running.
88::88
4
66
1 Press the
are flashing.
push button; the 2 left digits of the 4 digits on the LCD display
2 Press
88:88
or
3 Press the
4 Press
to adjust the hour.
push button again, the 2 right digits of the 4 digits are flashing.
or
to adjust the minutes of the clock in intervals of 5 minutes.
The timer is set. After 10 seconds the time display returns.
5 Repeat the above procedure while the digits are still flashing for setting the
OFF.
The circular time scale will be OFF between the 00:00 time to the timer time ON,
and from the time OFF until 24:00. The flashing bar on the time scale indicates the
real time and moving a phase every 30 minutes ahead. The unit will operate
according to the timer setting daily.
After a power failure (e.g. after plug out of the wall socket) you have to program
the timer setting again.
7. CANCELLING THE TIMER FUNCTION
In order to cancel the timer programming press the
push button momentarily,
then it will return to the time display. The daily mode will be cancelled as well.
The black segments in the circular time scale will disappear.
8. AIRFLOW
Direct the airflow by adjusting the grill on top of the air conditioner. Move the
grill, by pushing or pulling, in the middle (see illustration). This to avoid a false
position of the grill. Adjusting the airflow is as well possible by moving the
direction of the vertical louvers.
9. SLEEP MODE FUNCTION
The sleep mode function adjusts the set temperature of the unit to the thermal
needs of the body falling asleep as follow:
•
In the COOL or AUTO COOL mode
The set temperature will increase 1ºC after 1 hour and a further 1ºC after 2
hours.
•
No FAN mode under SLEEP mode operation
•
Default fan speed: LOW
1 Press the
push button to operate the sleep mode.
2 Press the
push button again in order to cancel the sleep mode.
4
67
10. DEHUMIDIFICATION
If the unit will be used mainly as dehumidifier, do not connect the exhaust hose
and let the warm air return in the room. Continuous drainage is then necessary
and more efficient.
For continuous drainage:
1 Switch off the unit and remove the plug from the mains
2 Remove the water stopper and rubber plug J.
3 Connect a drain tube (ø 20 mm inner dimension) onto the water outlet and
extend with extra water tube if needed.
4 Place the other end in a normal drain. Make sure that the tube is free from
twists and bends. The tube must decline over its entire length.
D
AIR FILTER
This air-conditioner is equipped with a 3 layer filter to clean the circulated room
air.
a.
Screen filter; to remove bigger dust particles.
b.
3MTM FiltreteTM filter; to remove unhealthy particles from the air such as
pollen, bacteria, animal dander and dust.
G
c.
Active carbon filter; to remove odours.
NOTE!
The active carbon filter and the 3MTM FiltreteTM filter are delivered in a
plastic packaging. Don’t forget to install these filters. These filters take
away unhealthy particles out of the room environment.
The filter frame on the backside of the unit can be opened. The active carbon
filter and 3MTM FiltreteTM filter can be installed or removed. The screen filter is part
of the filter frame (see illustration).
a.
The screen filter has to be cleaned regularly with a vacuum cleaner to avoid
blocking of the air flow.
4
68
b.
The positive/negative electrostatically charged 3MTM FiltreteTM filter is recommended to be changed every 3 months. Unusual dirt, construction work, pets,
the presence of smoke and running the air-conditioning unit continuously
can shorten the life time of the 3MTM FiltreteTM filter.
New filter
c.
Recommended change of filter
The active carbon filter can be cleaned with a vacuum cleaner when dusty but
has to be changed at the same time as the 3MTM FiltreteTM filter.
Filter installation:
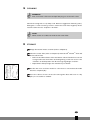
1 Slide out the filter frame from the unit.
2 Separate the filter fixer from the filter frame (see fig. 1).
fig. 1
3 Remove the active carbon filter and the 3MTM FiltreteTM filter from its plastic
bag.
4 Insert the active carbon filter into the filter frame (see fig. 2).
fig. 2
5 Insert the 3MTM FiltreteTM filter into the filter frame (see fig. 3).
G
6 Fix the filter by reassembling the fixer into the filter frame (see fig. 4).
fig. 3
fig. 4
NOTE!
• Remove the 3MTM FiltreteTM filter and active carbon filter before
seasonal storage and install new filters at the beginning of the new
season. The old filters can be disposed in the ‘Non-biological garbage
container’.
• Replacement filter packages are available at your dealer.
• To run the unit without active carbon filter and/or 3MTM FiltreteTM
filter does not bring any harm to the air conditioner. In that case
odours and unhealthy dust are not removed from the circulated air.
4
69
E
EMPTY INTERNAL WATER CONTAINER
Under extreme (humidity) circumstances it may be necessary to empty the internal
water container. When the internal water container is full the backlight on the
LCD-display will be flashing. The unit will switch off automatically. To empty the
water container do the following:
1 Switch off the unit and remove the plug from the wall socket.
2 Do not move the unit. Doing this can result in water leakage, damaging your
floor or carpet.
3 Place the water container 5 on the floor underneath the permanent
drainage point J.
4 Remove the water stopper J and rubber plug from the drain and let the
water run out. The water container has to be emptied several times before all
water will be drained (ca. 1,5 ltrs).
5 Replace the rubber plug and water stopper J, put the plug into the wall
G
socket, and switch the unit on. The warning signal should be off.
F
NOTE!
When the air conditioner is in use, under normal circumstances the
condensed water will be discharged through the hot air outlet-hose K.
REMOTE CONTROL
The unit responds to all signals that are sent by the remote control O. There will
be a beep sound from the unit after receiving the signal. The operation of the
unit (see chapter C) by remote control, is almost identical to the operation by the
circular control panel.
The only exception is the clock function.
Instead of the common
push button for setting the actual time and for pro-
gramming the timer, there are 3 push buttons on the remote control as follows:
•
4
70
- for setting the actual time
•
TIMER ON
- for programming the time for the unit ON
•
TIMER OFF
- for programming the time for the unit OFF
G
G
CLEANING
WARNING!
First of all switch off the unit and pull the plug out of the wall socket.
Clean the housing with a soft, damp cloth. Never use aggressive chemicals, petrol,
G
detergents or other cleansing solutions. Clean the screen filter regularly with a
vacuum cleaner. See also chapter D “Air filter”.
H
NOTE!
Never use the air conditioner without the screen filter.
STORAGE
1 Empty the internal water container (refer to Chapter E).
2 Clean the screen filter (refer to Chapter G). Remove 3MTM FiltreteTM filter and
Active carbon filter.
•
Remove the 3MTM FiltreteTM filter and Active carbon filter before seasonal
storage and install new filters at the beginning of the new season. The
old filters can be disposed in the ‘Non-biological garbage container’.
•
Replacement filter packages are available at your dealer.
3 Put the unit in air circulation mode for a few hours to ensure that the inside
becomes completely dry.
4 Store the cable as shown. Protect the unit against dust and store in a dry
place, not accessible to children.
4
71
I
TROUBLE SHOOTING
Problem
Cause
Solution
No power supply.
Connect to a functioning outlet
and switch on.
Is the LCD light flashing.
Empty the internal water
container (refer to Chapter E).
Timer function is active.
De-activate Timer function (refer
to Chapter C).
Internal watertank is full.
Empty internal watertank (refer
to Chapter E).
In direct sunlight.
Close curtains.
Windows or doors open, many
people or heat sources in room.
Close doors and windows, or
place an extra air conditioner.
Dirty filter.
Clean or replace filter (refer to
Chapter D).
Air inlet or air outlet blocked.
Remove blockage.
Room temperature lower than
selected value.
Change temperature selection.
The unit does
not function.
The unit does
not seem to
perform.
The unit is noisy. Unit stands uneven.
Place on even surface (less
vibrations).
The compressor Overheat protection probably
does not work. activated.
Wait 3 minutes until the
temperature has decreased, and
turn on the unit again.
Distance too big.
Remote control
does not
function.
Remote control signal not
detected by control panel.
Batteries empty.
Make sure the remote control is
correctly aimed at the control
panel.
Replace the batteries.
Never try to repair or dismantle the air conditioner yourself. Incompetent repairs
result in loss of warranty and can endanger the user.
J
GUARANTEE CONDITIONS
The air conditioner is supplied with a 24-month guarantee, commencing on the
date of purchase. All material and manufacturing defects will be repaired or
replaced free of charge within this period. The following rules apply:
1.
We expressly refuse all further damage claims, including claims for collateral
damage.
2.
Repairs to or replacement of components within the guarantee period will
not result in an extension of the guarantee.
3.
The guarantee is invalidated if any modifications have been made, non
genuine parts are fitted or repairs are carried out by third parties.
4
72
4.
Components subject to normal wear, such as the filter, are not covered by the
guarantee.
5.
The guarantee is valid only when you present the original, dated purchase
invoice and if no modifications have been made.
6.
The guarantee is invalid for damage caused by neglect or by actions that
deviate from those in this instruction booklet.
7.
Transportation costs and the risks involved during the transportation of the
air conditioner or air conditioner components shall always be for the account
of the purchaser.
To prevent unnecessary expense, we recommend that you always first carefully
consult the instructions for use. Take the air conditioner to your dealer for repairs
if these instructions do not provide a solution.
K
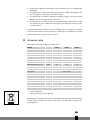
TECHNICAL DATA
To be used as indication, subject to modifications
Model
Cooling capacity*
P 622
P 629
P 639
2.2
2.9
3.9
2.8
2.6
3.0
kW
0.8
1.1
1.3
A
3.9
5.0
6.0
kW
EER*
Power consumption
Current
Mains
V/Hz/PH
220 - 240 / 50 / 1
Air delivery max.
m3/h
450
490
530
Dehumidification max.**
L/24h
20
26
36
75
90
120
For rooms up to
3
m
Compressor model
Rotary
Fan speeds
3 (2+1 turbo)
Thermostatic range
°C
18 - 32
Noise level
dB
49 / 60
Protection class
Refrigerant charge
IP 21
type/gr
Dimensions (w x h x d)
mm
Net weight
Kg
R407C / 480
Fuse rating
*
R407C / 580
R407C / 720
540 x 800 x 480
32
34
39
F2A 250V
conform EN 14511.
** moisture removal at 32°C, 80% RH.
Waste electrical products should not be disposed with household waste. Please
recycle where facilities exist. Check with your local authority or retailer for
recycling advice.
4
73
DISTRIBUTED IN EUROPE BY PVG INTERNATIONAL B.V.
2 DEUTSCHLAND
PVG Deutschland GmbH
Beiersdorfstraße 4
46446 EMMERICH
tel:
+49 2821 76713
fax:
+31 412 622 893
email: [email protected]
6 DANMARK
PVG Scandinavia A/S
Niels Bohrsvej 10
6100 HADERSLEV
+45 73 53 02 02
tel:
fax:
+45 73 53 02 04
email: [email protected]
5 ESPAÑA
PVG España S.A.
Pol. Ind. San José de Valderas II
Comunidad ”La Alameda”
C/ Aurora Boreal, 19
28918 LEGANÉS (Madrid)
+34 91 611 31 13
tel:
fax:
+34 91 612 73 04
email: [email protected]
3 FRANCE
PVG France SARL
4, Rue Jean Sibélius
B.P. 185
76410 SOTTEVILLE SOUS LE VAL
+33 2 32 96 07 47
tel:
fax:
+33 0 820 34 64 84
email: [email protected]
u NORGE
Sunwind - Gylling A/S
Rudsletta 71-75 / P.O. Box 64
N-1309 RUD
tel:
+47 67 17 13 70
fax:
+47 67 17 13 80
email: [email protected]
1 NEDERLAND
PVG International B.V.
P.O. Box 96
5340 AB OSS
tel:
+31 412 694 694
fax:
+31 412 622 893
email: [email protected]
man_P622-629-639
q SCHWEIZ
PVG Schweiz AG
Genuastrasse 15
4142 MÜNCHENSTEIN
tel:
+41 61 337 26 51
fax:
+41 61 337 26 78
email: [email protected]
> ITALIA
PVG Italy SRL
Via Niccolò Copernico 5
50051 CASTELFIORENTINO (FI)
+39 571 628 500
tel:
fax:
+39 571 628 504
email: [email protected]
9 PORTUGAL
Gardena, Lda
Recta da Granja do Marquês
ALGUEIRÃO
2725-596 MEM MARTINS
tel:
+ 35 21 92 28 530
fax:
+ 35 21 92 28 536
email: [email protected]
: POLSKA
PVG Polska Sp. z. o. o.
ul. Kościelnej 110
26-800 Białobrzegi
+48 48 613 00 70
tel:
fax:
+48 48 613 00 70
email: [email protected]
TR
TURKEY
PVG Is›tma Klima So¤utma Ltd.fiti.
Atatürk Cad. No 380 Ak Iflhani Kat 6
35220 Alsancak
IZMIR - TURKEY
tel:
+ 90 232 463 33 72
fax:
+ 90 232 463 69 91
email: [email protected]
avg©060728
e BELGIË
PVG Belgium NV/SA
Industrielaan 55
2900 SCHOTEN
tel:
+32 3 326 39 39
+32 3 326 26 39
fax:
email: [email protected]
4 UNITED KINGDOM
Lister Gases
Bridge Street
Holloway Bank, Wednesbury
West Midlands WS10 OAW
+44 121 506 1818
tel.:
+44 121 505 1744
fax:
email: [email protected]
PVG Traffic
i ÖSTERREICH
PVG Austria VertriebsgmbH
Salaberg 49
3350 HAAG
tel:
+43 7434 44867
+43 7434 44868
fax:
[email protected]
email: