1
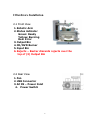
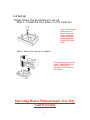
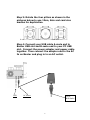
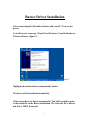
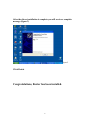
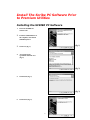
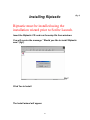
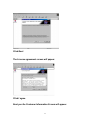
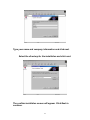
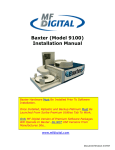
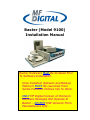
Baxter (Model 9100)
Installation Manual
Baxter Hardware Must Be Installed Prior
To Software Installation.
Once Installed, Riptastic and Backup
Platinum MUST Be Launched From
Scribe Premium Utilities Tab To Work.
ONLY MF Digital Version of Premium
igsitaW
l.cilol m
SoftwarewPwaw
c.kmafgde
Operate In
Baxter – DO NOT USE Versions From
Manufacturers Site …
Quick Setup
Step 1. Install the four pillars on the Input Bin
Note: There are two different sets of pillars, large and small
connectors. Place the similar pillars diagonally across from
each other.
Step 2. Attach the Input Bin to Baxter
Step 3. Attach USB Cable to Baxter and your PC.
Step 4. Connect the power adapter to Baxter and
Plug in to outlet. Turn Baxter on.
Step 5. Turn PC on.
Step 6. Install Baxter Drivers
Step 7. Install Scribe PC Software
Step 8. Install Premium Utilities of your choice.
2
1 Getting Started
Baxter is the world’s smallest automated desktop loading
system that could fit perfectly in any office space. Its
patented tray enables users to duplicate 12cm, 8cm and
business-card discs with one easy turn of the disc pillars.
1.1 What’s In The Box
Please ensure that carton is not damaged and the
following items are included.
Baxter
Input bin
Output bin
USB cable
Power Cable
Power Adapter
Installation Disc
3 Baxter Software CDs
Remember to save all packing materials for future
use.
1.2 System Requirement
Microsoft® Windows XP
Pentium III 500Mhz (Minimum)
64 MB RAM
700 MB free disk space for CD, and 9 GB free
disk space for DVD.
At least 800x600 display with at least 16 Bit
colors
CD/DVD drive for installation
Required USB 2.0 interface
3
2 Hardware Installation
2.1 Front View
1. Robotic Arm
2. Status indicator
Green: Ready
Yellow: Burning
Red: Error
3. Output Bin
4. CD/DVD Burner
5. Input Bin
6. Rejects – Baxter discards rejects over the
top of (3) Output Bin
2.2 Rear View
1. Fan
2. USB Connector
3. AC IN – Power Inlet
4. Power Switch
4
2.3 Set Up
Please follow the procedures to set up:
Step 1: Install the four pillars on the Input bin
Note: There are two
different sets of
pillars, large and
small connectors.
Place the similar
pillars diagonally
across from each
other.
Step 2: Attach the Input bin to Baxter
Note: Before turning on the
power, please make sure
that you have tightly
compressed the Input bin
onto Baxter
Operating Baxter Without Input Tray May
Void Warranty
5
Step 3: Rotate the four pillars as shown in the
pictures below to use 12cm, 8cm and card size
medias for duplication.
8 cm
12 cm
Card Size
Step 4: Connect your USB cable A-male end to
Baxter USB slot and B-male end to your PC USB
slot. Connect the power adapter and power cable
together. Then connect the adapter end to the AC
In on Baxter and plug in to an AC outlet.
USB
AC Power
To AC
Wall Outlet
6
Baxter Driver Installation
After connecting the USB cable to Baxter and your PC, Turn on the
power.
You will receive a message “Found New Hardware” and the Hardware
Wizard will start. (figure 1)
figure 1
Highlight the install software automatically button.
The driver will be installed automatically.
If the wizard does not find it automatically, You will be asked to point
to the install file on the Baxter Installation CD. Select the file x:\Baxter
usb driver \MFD_Baxter.inf
7
After the driver installation is complete you will receive a complete
message (figure 2)
figure 2
Click Finish.
Congratulations, Baxter has been installed.
8
Install The Scribe PC Software Prior
to Premium Utilities
Installing the SCRIBE PC Software
1.
Insert the SCRIBE PC
software CD.
2. From the CD ROM drive of
the computer, click Install
SCRIBE Software.
(fig. 1)
3. Click Next (fig. 1).
4.
Accept the license
agreement and click Next
(fig. 2).
(fig. 2)
5.
Click Install (fig. 3).
(fig. 3)
6.
Click Finish (fig. 4).
9
(fig. 4)
Installing Riptastic
Riptastic must be installed using the
installation wizard prior to Scribe Launch.
Insert the Riptastic CD. and run the setup file from windows.
You will receive the message “ Would you like to install Riptastic
now? (fig1)
fig 1
Click Yes to Install.
The Install wizard will appear.
10
Click Next.
The License agreement screen will appear.
Click I agree.
Next you the Customer Information Screen will appear.
11
Type your name and company information and click next.
Select the directory for the installation and click next.
The confirm installation screen will appear. Click Next to
continue.
12
After the program installs, you will receive an Installation
Completed message.
Click the close button.
The Riptastic Installation is complete. Launch Riptastic via
Scribe Launch Tab. At startup install the supplied License
number and Riptastic is ready to use.
Software Questions Related to Riptastic
Software, Please Visit
http://www.riptastic.com/support/faq.htm
Installing The Backup Platinum Software
13
Insert the Backup Platinum and run the setup file from windows.
Backup Platinum must be installed using the
installation wizard prior to Scribe Launch.
The Welcome To Backup Platinum screen will appear.
Click the Next button.
You will receive the Read Me Screen.
14
After reading, click the Next button.
The license Agreement screen will appear.
Highlight the I accept this agreement and click Next.
The Choose Destination Folder will appear.
15
Select the directory that you want to install Backup Platinum to
and click next.
The Start Installation Screen will appear.
Click the Next button to continue.
You will receive the Installation Complete message.
16
Backup Platinum Has Been Installed.
Launch Backup Platinum via Scribe Launch Tab. At startup
install the supplied License number and Backup Platinum is
ready to use.
Software Questions Related to Backup Platinum
Software, Please Visit
http://www.backup-platinum.com/help.shtml
17
Troubleshooting
1. The Scribe PC program did not recognize Baxter.
a. Check the power cable on the back of the Baxter.
b. Make sure the power switch on Baxter is turned ON.
c. Check the USB cable connection between Baxter loader and the host PC
(page # 5).
2. Scribe PC program did not recognize the drive.
a. Press the eject button on the drive to check for power to the drives.
b. Check the power cable connection on the back of the drive bay.
c. Check if the Windows operating system recognized the drives by going to
My Computer or Device Manager. Windows operating system must
initialize the drives prior to executing the Scribe PC program.
3. Failed to pick Discs. Sticky Discs
Baxter will have difficulty picking discs that are stuck
together static or discs of inferior quality.
a. Fan Discs
b. Use Discs not prone to stickiness
18