1
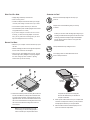
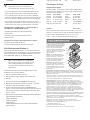
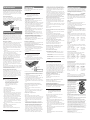
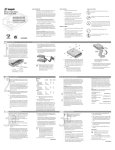
USING DISCWIZARD MEDALIST PRO HARD DRIVE INSTALLATION GUIDE Medalist Pro 6450 (ST36450A) Medalist Pro 6451 (ST36451A) for ATA (IDE)-Compatible PCs DiscWizard is a revolutionary new Windows program that makes it easy to install your new Seagate drive. DiscWizard helps you configure your new drive and your computer. It analyzes your system, lets you select various installation options and creates customized step-by-step instructions. It also allows older computers to access the full capacity of your drive. You can run DiscWizard to install your new hard drive if: • You already have an existing, bootable hard drive in your computer with at least 3 Mbytes of available disc space and • You are running Windows 3.x or Windows 95. If you can run DiscWizard, you do not have to read this installation guide. Instead, before you install your new drive, follow the instructions on the DiscWizard diskette to install your drive. DiscWizard provides all the information you need to install your new drive. If you cannot run DiscWizard, follow the instructions in this installation guide to install and configure your new drive. For additional information and troubleshooting tips, see the back of this sheet. This symbol: indicates that additional information on a topic appears on the back of this sheet. 1 1. ONE DRIVE OR T WO? ATTACHING CABLES AND MOUNTING THE DRIVE If your new Seagate® Medalist ®Pro drive will be the only drive in your computer, you do not have to change any jumper settings. In this case, skip ahead to “Attaching Cables and Mounting the Drive.” 1 If you are installing a new ATA interface cable, attach one end of the cable to the interface connector on your computer or host adapter. The ATA cable must be no more than 18 inches long. If you already have one hard drive in your computer and you are installing a second drive, you must configure one drive as a master and the other as a slave. The master drive will be the “boot” drive (drive C), from which the computer loads system software when it first starts up. To configure your new Seagate drive as the master, slide a jumper onto pins 7 and 8 (see below). To configure the drive as a slave, slide a jumper onto pins 5 and 6 only. The jumper on pins 6 and 8 is a spare and does not affect drive operation. If you need to change the jumpers on your existing hard drive, see the Disk Manager online manual, or contact the drive manufacturer. 2 Thread the interface cable through the drive bay and attach the connector at the end of the interface cable to your new drive. If you have two drives, attach the second drive to the second connector. pin 1 4-pin power connector 2 4 6 8 1 3 5 7 One drive only Drive is Master with an ATAcompatible slave Drive is slave Spare jumper Pin 1 40-pin ATA interface connector Master/slave jumper block ! Caution. Make sure to align pin 1 on the computer or host adapter interface connector with pin 1 on your drive or drives. Pin 1 on the interface cable is usually indicated by a stripe along the edge of the cable. W HAT YOU WILL NEED • Straight-edge and Phillips screwdrivers • Drive mounting screws HANDLE WITH CARE! Disc drives are extremely fragile. Do not drop or jar your drive. • An ATA host adapter and interface cable (max. length: 18 inches) with enough connectors for all your drives • An unused drive power cable for your new drive • A bootable DOS system diskette (Seagate recommends using DOS Version 5.0 or later.) • If you are mounting this 3.5-inch drive in a 5.25-inch drive bay, you need a mounting adapter or frame kit. Also, you may need drive mounting rails if your drive bay is not designed for direct mounting. B EFORE YOU BEGIN • Make sure your computer is turned off before you open the case. Keep the drive in its antistatic bag until you are ready to install it. Protect your drive from static discharge by making sure you are well-grounded before touching the drive. We recommend wearing a grounded wrist strap throughout the installation process. Do not touch the connectors or any part of the printed circuit board. Always handle the drive by its edges or frame. • Read the handling precautions at the right and inspect the drive to make sure that it is not damaged. • Save your foam-lined Seagate disc drive box. This box has been approved by Seagate for shipping a Seagate disc drive. Using any other container or packing material voids your drive warranty. Do not apply pressure or attach labels to the circuit board or the top of the drive. Power connector Interface connector Pin 1 3 Slide the drive carefully into the drive bay. Secure the drive with four 6-32 UNC-2A mounting screws in either the sidemounting holes or the bottom-mounting holes. Do not overtighten the screws. The screws should be inserted no more than 0.22 inch into the bottom mounting holes and no more than 0.14 inch into the side mounting holes. Do not use metric screws. Note. If you are mounting the drive in a 5.25inch drive bay, you need a mounting adapter or frame kit. Contact your computer dealer. Some computers also require drive mounting rails, which can be obtained from your distributor or computer manufacturer. 4 Attach a power cable to each drive. If your computer does not have an unused power connector, you can purchase a Y-shaped power cable from your computer dealer. 5 Check all cable connections and then replace your computer cover. Continue to step 2 below. 2 2. CONFIGURING YOUR COMPUTER Before you format or partition your new drive, you must configure your computer’s BIOS so that the computer can recognize your new drive. 1 Turn your computer on. As your computer starts up, watch the screen for a message describing how to run the system setup program (sometimes called BIOS or CMOS setup). This is usually done by pressing a special key, such as DELETE, ESC, or F1, during startup. See your computer manual for details. Press the appropriate key to run the system setup program. 2 Enable LBA mode if it is available. Many BIOS use the logical block addressing (LBA) mode to access drives with capacities greater than 528 Mbytes. 3 If your BIOS provides automatic drive detection (an “Auto” drive type), select this option. This allows your computer to configure itself automatically for your new drive. If your BIOS does not provide automatic drive detection, select “User-defined” drive settings. If your computer supports LBA addressing, enter the LBA cylinder, head and sector values for your drive from the table at the top of the next column. If your computer does not support LBA addressing, enter the CHS values from the table. a 3 BIOS Settings for the ST36450A and ST36451A Drive Cylinders Heads Sectors ST36450A LBA addressing CHS addressing 833 13,328 240 15 63 63 ST36451A LBA addressing CHS addressing 833 13,328 240 15 63 63 Note. This drive does not use the write precomp or landing zone parameters. Set these parameters to zero. 4 Save the settings and exit the System Setup program (your computer will automatically reboot). After you configure your computer, we recommend that you use Disk Manager to partition and format your drive. If your computer was built before mid-1994, you probably will not be able to access the full capacity of your new drive unless you use Disk Manager. For instructions, see Section 3A, “Installation Using Disk Manager,” below. If you do not want to use Disk Manager, you can use the standard DOS commands to partition and format your drive, as described in Section 3B. 3A. INSTALLATION USING DISK MANAGER 1 Boot your computer from a bootable DOS diskette (use MS DOS Version 5.0 or later). Booting from a diskette ensures that the Disk Manager installation does not conflict with any terminate-and-stay-resident (TSR) programs. 2 Insert your DiscWizard diskette. The Disk Manager software is stored on this diskette. 3 At the DOS prompt, type DM and press ENTER. 4 Follow the onscreen instructions until you see the Select an Installation Option menu. 5 Select either (E)asy Disk Installation or (A)dvanced Disk Installation. Because DOS computers cannot access partitions larger than 2.1 Gbytes, Disk Manager may have to divide your hard drive into multiple partitions. If you select (E)asy Disk Installation, Disk Manager creates one partition of 2.1 Gbytes and creates multiple partitions using the remainder of your hard disc. However, if most of your files are smaller than 50 Kbytes, you may want to create several smaller partitions to make more efficient use of your hard disc space. To create smaller partitions, select (A)dvanced Disk Installation from the Disk Manager main menu. 6 At this point, Disk Manager lists all the hard drives that it can recognize. You should see your new Seagate drive and your existing hard drive, if any. If any hard drive is not recognized, exit Disk Manager and turn off your computer. Check all cables, jumpers and BIOS settings. Then start at step 1 to run Disk Manager again. 7 If Disk Manager recognizes all your drives, select the drive you want to install and press ENTER. Disk Manager partitions and formats the drive. If your new drive is the master drive (Drive C), Disk Manager also configures the drive so that you can boot from it. Note. If your computer cannot accommodate hard drives with capacities greater than 528 Mbytes, Disk Manager installs a Dynamic Drive Overlay (DDO) on your hard disc. If this driver has been installed, you should see a blue Disk Manager banner each time you boot your computer. See the Disk Manager online manual for details. 8 Follow the instructions in the post-installation screens. YOU’RE DONE! ADDRESSING DRIVE-CAPACITY LIMITATIONS Some DOS-based computers and operating systems are not designed to accommodate large hard disc drives. The three most common system limitations are listed below, along with methods for overcoming these limitations. See your system manual to determine which (if any) of these limitations applies to your computer. 528-Mbyte limit: The BIOS in some older computers cannot accommodate drives with capacities greater than 528 Mbytes. Seagate provides free Disk Manager software with your drive to overcome this limitation. Alternatively, you can purchase a hard drive controller or a BIOS upgrade that supports drives with capacities greater than 528 Mbytes. The 32-bit disk access feature in Windows 3.1 does not work with drives that have capacities greater than 528 Mbytes. If you want to use 32-bit disk access with Windows 3.1, install the Seagate replacement 32-bit access driver, SEG32BIT.386, as described on the back of this sheet. 4,096-cylinder limit: The BIOS in some computers cannot support drives that have more than 4,096 cylinders. If you install a drive that has more than 4,096 cylinders in one of these computers, the computer may “freeze” or fail to boot. If this occurs, see “Advanced Troubleshooting” on the back side of this sheet. b 3 Partition-size limit: DOS/Windows and Windows 95 cannot access drive partitions larger than 2.147 Gbytes. You can overcome this limitation using the Disk Manager software or the DOS FDISK command to divide your drive into several smaller partitions. Each partition acts as a separate logical drive, with its own drive letter. If most of your files are smaller than 50 Kbytes, you should divide your drive into partitions of 1 Gbyte or less to make the most efficient use of your disc space. BIOS Upgrades: If you need to upgrade your BIOS, contact the appropriate BIOS manufacturer listed below. American Megatrends (AMI): 1-800-828-9264 [email protected] Award Software International, Inc.: 1-415-968-4433 [email protected] Microid Research / Mr. BIOS: 1-800-451-1943 [email protected] Phoenix Technologies Ltd.: 1-800-767-5465 [email protected] SystemSoft: Contact your computer manufacturer 3B. STANDARD DOS INSTALLATION ! Caution. Partitioning or formatting a drive erases all data on it. Seagate assumes no liability if you erase your data. Drive Partitioning Partitioning a hard drive divides it into sections (partitions) that function as separate logical drives (labeled C, D, E, etc.). Because DOS computers cannot access partitions larger than 2.1 Gbytes, you must divide large-capacity hard drives into multiple partitions. In creating partitions, keep in mind that the larger the partition, the more drive space is taken up in unused clusters. For this reason, if most of your files are smaller than 50 Kbytes, you should use partitions of 1 Gbyte or less. To partition your new drive: 1 Insert a bootable DOS diskette in your diskette drive and restart your computer. 2 Insert a DOS program diskette that contains the FDISK.EXE and FORMAT.COM programs into your diskette drive. At the A: prompt, type FDISK and press ENTER. 3 If you have two hard drives installed, the FDISK menu displays five options. Option five allows you to select the drive you want to partition. Make sure that your new drive is selected. 4 Select “Create DOS partition or logical DOS drive” by pressing 1. Then press ENTER. 5 Select “Create primary DOS partition” by pressing 1 again. Then press ENTER. Create your first drive partition. If you are creating a partition that will be used to boot your computer (drive C), make sure that the partition is marked active. 6 Create an extended partition and additional logical drives, as necessary, until all the space on your new hard drive has been partitioned. 7 When the partitioning is complete, reboot your computer. Drive Formatting At the A: prompt, type format x: /s, where x is the letter of your first new partition. Repeat this process for all the new partitions you have created. ! Caution. Make sure to use the correct drive letters so that you do not format a drive that already contains data. After you format your drive, it is ready to use. YOU’RE DONE! Cable Select Jumper Basic Troubleshooting Some computers differentiate between master and slave drives using specially designed interface cables that have the line to pin 28 (the Cable Select pin) removed or cut at one connector. The connector that has pin 28 disabled is used for the slave drive. See your computer manual to determine whether your computer supports this feature. To configure your Seagate drive for cable select, place a jumper on pins 5 and 6 and pins 7 and 8 as shown below. If you have installed your drive and it does not function properly, perform the following basic checks: Warning. Always turn off the computer before changing jumpers or unplugging cables and cards. Wear a ground strap or take other antistatic precautions while working on your computer or handling your drive. Remote LED Connection You can connect a remote LED to pins 3 (–) and 4 (+) as shown in the figure below. Do not install a jumper on these pins. Because the jumper block uses a 0.1-inch connector, you may need to replace the current connector. Use Seagate connector part number 10562-001 or equivalent. • Verify compatibility. Verify that the host adapter and drive are appropriately matched to each other and to your computer. Refer to the relevant documentation for details. • Check all cards. Verify that all cards are seated in their slots on the motherboard and secured with mounting screws. • Check all connectors and cables. Make sure all ribbon and power cables 2 4 6 8 1 3 5 7 Master/slave jumper block Enable Cable Select Remote LED connection are securely connected. Ribbon cables are easily damaged, especially at the connector. Try a new cable known to be good. Make sure no connector pins are bent. Verify that pin 1 on the interface cable is aligned with pin 1 on the drive and host adapter (see figures and instructions on the front of this sheet). • Verify jumper settings. Review the instructions on this sheet and in your host adapter installation guide. Make sure all appropriate jumpers are installed or removed as necessary. • Check your power-supply specifications. Each time you add a new device to your computer, make sure your computer’s internal power supply can support the total power demand. If necessary, consult your dealer for a new power supply. The Disk Manager Online Manual Disk Manager contains an extensive online manual. This manual includes detailed installation instructions, troubleshooting and a list of master/ slave jumper settings for many popular hard drives. To view the Disk Manager online manual, insert the Disk Manager diskette into drive A and type A:\DM /H. Then press ENTER. You can also view the online manual from within Disk Manager by selecting (V)iew/Print Online Manual in the main menu. If Disk Manager installs the dynamic drive overlay (DDO) to access the full capacity of your drive, the DDO must load into memory before the operating system loads. This occurs automatically when you boot from your hard drive (drive C). However, if you boot from a diskette, the DDO will not be loaded and you will not be able to access your hard drive. The following procedure allows you to boot from a diskette and still access your hard drive. 2 Boot the computer from the hard disc (with no diskette in the diskette drive). When the Disk Manager banner appears on the screen, immediately press the SPACEBAR (you have about 2 seconds). 3 Insert your boot diskette and press the type settings in the system BIOS must not exceed the physical specifications of your drive. Also, the settings must not exceed the limitations set by the operating system and BIOS. • Check for viruses. Before you use someone else’s diskette in your system for the first time, scan the diskette for viruses. Advanced Troubleshooting Booting from a Diskette 1 • Verify the drive-type settings in the system setup program. The drive- SPACEBAR again. If you boot from a diskette regularly, you can create a Dynamic Drive Overlay boot diskette. It loads DDO into memory, then loads the operating system. See the Disk Manager online manual for more information about creating a dynamic drive overlay boot diskette. Supported Operating Systems The Disk Manager dynamic drive overlay provides support for drives If you have performed the preceding basic checks but the problem persists, follow these guidelines for troubleshooting specific cases. After you install your new drive, your computer will not boot, and no error message shows on the screen. • Check your computer manual or BIOS manufacturer to determine whether your BIOS supports drives that have more than 4,096 cylinders. If your system has this limitation, use the following procedure to configure your computer: 1 Turn off your computer, open the case, and remove your new Seagate drive. ! Caution. To avoid electrostatic discharge damage to your computer or hard drive, make sure you are well-grounded before touching the drive, cable, connector or jumpers. 2 Place a jumper on pins 1 and 2 on the master/slave jumper block as shown below. This enables the alternate capacity option that causes the drive to appear to your BIOS as having a 2.1-Gbyte capacity. video card and host adapter. If the computer recognizes the drive when you reboot the computer, turn off the computer. Reinstall the other peripheral cards, one at a time, until the conflict reoccurs. After you have isolated the source of the address conflict, you can resolve the conflict by changing the I/O address of the peripheral that appears to cause the conflict. • If Disk Manager has installed the DDO on your hard drive and you have booted directly from a diskette, the information in the boot record for the drive may not have been loaded. Make sure there is no diskette in Drive A and reboot. If you want to boot from the diskette, follow the “Booting with a Diskette” instructions under “Advanced Disk Manager Options.” The dealer partitioned and formatted the drive for you in the store, but the drive does not respond when you install it. • Reboot the computer and make sure the drive spins up. Check all cables. • Make sure the power supply is adequate for system needs. • Make sure the DOS version the dealer used to partition and format the drive is the same version you have installed in your computer. If it isn’t, see your dealer. • Verify the drive-type values in the system setup program. You must install the drive using the same drive-type values your dealer used to partition the drive. • Check for I/O address conflicts between peripheral cards. • Check for viruses. The system hangs in FDISK or fails to create or save the partition record. • Check all cables. • Your DOS diskette may be corrupted. Try using a backup DOS diskette. • Make the partitions smaller. • Change the interrupt jumper setting on the host adapter. • Some BIOS have a Track 0 protection feature that protects Track 0 from viruses. This may cause FDISK to hang the system. You must disable this feature in the system setup program before you can use FDISK. See your computer reference guide for assistance. Be sure to re-enable this important feature when FDISK is done. The system error message, “Drive not Ready,” appears. • Check all cable connections. Make sure pin 1 of the drive is connected to pin 1 of the hard-disc controller or host adapter. If you need assistance installing your drive, consult your dealer. Dealers are familiar with their unique system configurations and can help you with system conflicts and other technical issues. If you need additional assistance with your Seagate drive or other Seagate products, use one of the Seagate technical support services listed below. SeaFONE® 1-800-SEAGATE Seagate’s 800 number (1-800-732-4283) allows toll-free access to automated self-help services, providing answers to commonly asked questions, troubleshooting tips and specifications for disc drives and tape drives. This service is available 24 hours daily and requires a touch-tone phone. International callers may reach this automated self-help service by dialing 408-456-4496. Online Services SeaNET You can obtain technical information about Seagate products over the Internet from Seagate’s World Wide Web home page (http://www.seagate.com) or Seagate’s ftp server (ftp://ftp.seagate.com). You can also send e-mail with your technical questions to DiscSupport @ Seagate.com. Seagate CompuServe Forum Online technical support for Seagate products is available on CompuServe. To access our technical support forum, type go seagate. This forum provides information similar to that found on SeaBOARD. In addition, you can type questions or browse through previous questions and answers on the forum messages. SeaBOARD® SeaBOARD is a computer bulletin board system that contains information about Seagate disc and tape drive products and is available 24 hours daily. Set your communications software to eight data bits, no parity and one stop bit (8-N-1). Location Australia England France Germany Phone number 61-2-9756-2359 44-1628-478011 33 1-48 25 35 95 49-89-140-9331 Location Taiwan Thailand USA Phone number 886-2-719-6075 662-531-8111 408-434-1080 • Make sure the power supply is adequate for system needs. • Reboot the computer and make sure the drive spins up. FAX Services The FDISK error message, “No Fixed Disk Present,” appears. You can use a touch-tone telephone to access Seagate’s automated FAX system to receive technical support information by return FAX. This service is available 24 hours daily. • Make sure the power supply is adequate for system needs. • Verify the drive-type values in the system setup program. • Check for I/O address conflicts. The drive does not format to full capacity. • Verify the drive-type values in the system setup program. One of the following problems may have occurred: – The values may be set with an incorrect translation characteristic. – You may have entered a parameter value that exceeds the physical capacity of the drive. – You entered a translation characteristic that does not take advantage of the drive’s full capacity. – The drive’s physical specifications exceed the translation limits imposed by the BIOS. SeaFAX® Location Australia England Phone number 61-2-9756-5170 44-1628-894084 Location USA USA Phone number 1-800-SEAGATE or 408-456-4496 Seagate Technical Support FAX You can FAX questions or comments to technical support specialists 24 hours daily. Responses are sent during business hours. Location Phone number Location Phone number Australia 61-2-9725-4052 Japan 81-3-5462-2979 England 44-1628-890660 Korea 82-2-556-7294/4251 France 33 1-46 04 42 50 Singapore 65-488-7528 Germany 49-89-1430-5100 Taiwan 886-2-715-2923 Hong Kong 852-2368 7173 USA 408-944-9120 Supported Operating Systems The Disk Manager dynamic drive overlay provides support for drives that have capacities greater than 528 Mbytes under MS-DOS, Windows 3.x, Windows 95, Windows NT 3.51, Window NT 3.50 (requires DM upgrade drivers), OS/2 V3.0 (Warp full pack), and OS/2 V2.0–3.0 (requires DM upgrade drivers). Disk Manager does not support 32-bit FAT in Windows 95. shown below. This enables the alternate capacity option that causes the drive to appear to your BIOS as having a 2.1-Gbyte capacity. Before you install a non-DOS operating system on the drive, install DOS and Disk Manager and make sure that the drive is bootable. Instructions for running the dynamic drive overlay with other operating systems are available in the Disk Manager online manual. 2 4 6 8 1 3 5 7 Alternate capacity jumper Removing the Dynamic Drive Overlay If Disk Manager installs a dynamic drive overlay (DDO) and you do not need this software to access the full capacity of your drive, you can remove the dynamic drive overlay without losing your data. However, you will lose access to the full capacity of your drive unless you have another method for accessing high-capacity drives (see Addressing Drive-Capacity Limitations on the front side of this sheet). Follow the instructions below to remove a DDO from a drive. ! Caution. Before you attempt to remove a DDO, make a backup copy of all the data on your hard disc. Also, run CHKDSK, SCANDISK or a thirdparty equivalent to detect and repair any damaged files before you follow the procedure below. If the DDO migration program encounters a serious file problem or is interrupted by a power loss or hardware failure, the migration will fail and your data will be lost. 1 Boot the computer to Drive C. 2 Insert your DiscWizard diskette into Drive A. 3 Type A:\dm to start Disk Manager. 4 Select the Select Installation Options Menu. 5 Select (M)aintenance Menu. 6 Select (M)igrate Dynamic Drive. This program moves the data on your drive so that it can be accessed without the DDO. The migration may take up to an hour to complete, depending on the size of your drive. 7 When the migration program has finished, exit Disk Manager. 8 Remove the diskette and reboot the computer. Enter your system setup program (see your system manual for details). 9 Configure the hard drive with the Cylinder/Head/Sector parameters shown for your drive in the table in Section 2, “Configuring Your Computer,” on the front side of this sheet. Save your changes and exit the system setup program. 10 When your computer has rebooted, insert the DiscWizard diskette into drive A. 11 Type A:\dm and choose the Maintenance Menu . 12 Select Uninstall (D)isk Manager. 13 Select the correct drive to uninstall. 14 When the uninstall is complete, exit Disk Manager and reboot. Master/slave jumper block Limit capacity to 2.1 Gbytes (4,092 cylinders) 3 Remount your drive in the computer and replace the computer cover. 4 Insert a bootable DOS diskette into drive A and turn on the computer. It should boot from drive A and automatically detect the new drive as a 2.1-Gbyte drive. 5 Insert your DiscWizard diskette into drive A and type A:\DM. Then press ENTER. This runs the Disk Manager program. 6 Follow the Disk Manager instructions to install the dynamic drive overlay and to partition and format your new drive to its full capacity. 7 After Disk Manager is done, reboot your system. You should see the Disk Manager banner and be able to access the full capacity of your new drive. The screen remains blank when you power up the system. If the steps listed above do not remedy this problem, try the following: • Make sure the monitor is plugged in and turned on. • Check all cards. • Make sure the video card is seated in its slot and secured with mounting screws. • Turn off the computer and remove the drive host adapter. If the screen turns on after you reboot, the host adapter may be incompatible or defective. If so, see your dealer. The system does not recognize the drive. • Check all cables. • Make sure the power supply is adequate for system needs. • Reboot the computer and listen to make sure the drive motor starts up. If the drive is very quiet, it may be difficult to hear its discs reach operating speed. If the drive motor does not start up, recheck all drive cables. • Verify that for each drive, a drive-type is listed in the system setup program. • Try rebooting your computer by pressing the CTRL, ALT and DELETE keys simultaneously. If the drive is recognized after you reboot the system, the computer BIOS test may be completing before the drive is ready. One solution is to slow the processor speed during startup. If your computer has a turbo switch, set it to slow speed before turning the computer on. If there is no turbo switch, you may be able to use keyboard commands; see your computer manual for details. After the computer is up and running, return the processor to the fast speed. Another solution is to warm-boot your computer after every power-on. Note. Disk Manager can also remove a drive overlay placed by the EZ-Drive program. Select (C)onvert Drive Format from the Maintenance Menu. • Check for I/O address conflicts. To isolate the conflict, verify that the drive and host adapter are compatible with your computer. Turn off the computer and remove all the peripheral adapter cards except for the by the BIOS. ! Caution. If you change the drive-type values in the system setup program, you must partition and format the drive again. This erases data on the drive. • If you have partitioned the drive into individual logical drives, you may need to make the partitions smaller to access the full drive capacity. • If your computer supports LBA mode, you may need to enable LBA mode in the system setup program to access the full capacity of the drive. Refer to your computer’s reference guide to find out how to enable LBA. • Your computer may not support drives that have more than 4,096 cylinders. Follow the instructions for After you install your new drive, your computer will not boot, and no error message shows on the screen. The DOS messages “Disk Boot Failure,” “Non-System Disk” or “No ROM Basic – SYSTEM HALTED” appear. • Reinstall the DOS system files using the DOS SYS utility. • Check all cables. • Use FDISK to verify that the primary partition is active. • Check for viruses. Hong Kong 852-2368 7173 USA 408-944-9120 Direct-Support Services Seagate Technical Support For one-on-one help, you can talk to a technical support specialist during local business hours. Before calling, note your system configuration and drive model number (STxxxxxx). Location Phone number Location Phone number Australia 61-2-9725-3366 Korea 82-2-556-8241 England 44-1628-894083 Singapore 65-488-7584 France 33 1-41 86 10 86 Taiwan 886-2-514-2237 Germany 49-89-140-9332 USA 1-800-SEAGATE or Hong Kong 852-2368 9918 USA 408-456-4496 SeaTDD™ 408-944-9121 Using a telecommunications device for the deaf (TDD), you can send questions or comments 24 hours daily and exchange messages with a technical support specialist between 6:00 A.M. to 11:15 A.M. and 12:30 P.M. to 5:00 P.M. (Pacific time) Monday through Friday. The system error message, “HDD controller failure” appears. • Confirm the jumper settings on the drive. • Verify the drive-type settings in the system setup program. 32-bit Disk Access under Windows 3.1. The 32-bit disk access feature in Windows 3.1 does not work with drives that have capacities greater than 528 Mbytes. If you want to use 32-bit disk access under Windows 3.1, install the Seagate replacement 32-bit access driver, SEG32BIT.386, located on your DiscWizard diskette. Note. If you install Windows 3.1 on a high-capacity hard drive, the first time you start Windows you may see a message suggesting that you disable 32-bit disk access. Choose to disable 32-bit disk access to open Windows. Use the following procedure to install the Seagate 32-bit disk access replacement driver (from within Windows). 1 Insert your DiscWizard diskette into Drive A. 2 Open the Windows Program Manager menu and select File. 3 Select Run. 4 In the command line box, type a:\stsetup and then press ENTER. 5 Read the license agreement that appears on the screen. If you agree to the terms, select Accept Agreement to continue. 6 The next screen lists the features that the SEG32BIT.386 driver supports. If your computer supports these features, they will be active in 32-bit disk access mode for all drives that support them. Select Install Driver to continue. 7 Enable the 32-bit disk access option in the Windows control panel as follows: a) Open the Windows Control Panel. b) Select 386 Enhanced. c) Select Virtual Memory. d) Select Change>>. e) Select Use 32-Bit Disk Access (an X in the box enables the feature). f) Save the change. Keep your original box and packing materials for storing or shipping your drive. The box has a Seagate Approved Package label. Shipping a drive in an unapproved container voids the warranty. Call your authorized Seagate distributor to purchase additional boxes. The Foam figure to the right shows how a drive fits in an Antistatic bag approved single-pack box, including the Drive packing materials. Warranty. See your authorized Seagate distributor or dealer. Preinstalled or bundled software is provided “as is.” There are no warranties of merchantablity or fitness for a particular purpose. All such warranties are expressly and specifically disclaimed. Foam Maintenance and repair. Seagate drives do not require maintenance. The head/disc assembly is sealed; a broken seal voids the warranty. Seagate customer-service centers are the only facilities authorized to repair Seagate drives. Electromagnetic Compliance for the European Union. This model complies with the European Union requirements of the Electromagnetic Compatibility Directive 89/336/ EEC of 03 May 1989 as amended by Directive 92/31/EEC of 28 April 1992 and Directive 93/68/EEC of 22 July 1993. Compliance of this drive, as a system component, was confirmed with a test system. We cannot guarantee that your system will comply. The drive is not meant for external use (without properly designed enclosure, shielded I/O cable, etc.). Sicherheitsanleitung 1. Das Gerrät ist ein Einbaugerät, das für eine maximale Umgebungstemperatur von 55°C vorgesehen ist. 2. Zur Befestigung des Laufwerks werden 4 Schrauben 6-32 UNC-2A benötigt. Bei seitlicher Befestigung darf die maximale Länge der Schrauben im Chassis nicht mehr als 3,3 mm und bei Befestigung an der Unterseite nicht mehr als 5,08 mm betragen. 3. Als Versorgungsspannugen werden benötigt: +5V ± 5% 0,6A; +12V ±% 0,8A (1,9A fur ca. 30 Sek. fur ± 10%) 4. Die Versorgungsspannung muss SELV entsprechen. 5. Alle Arbeiten auf dem Festplatte dürfen nur von Ausgebildetem Servicepersonal durchgeführt werden. Bitte entfernen Sie nicht die Aufschriftenschilder des Laufwerkes. 6. Der Einbau des Laufwerkes muss den Anforderungen gemäss DIN IEC 950 VDE 0805/05.90 entsprechen. Seagate, Seagate Technology, and the Seagate logo are registered trademarks of Seagate Technology, Inc. SeaFAX, SeaFONE, SeaBOARD, SeaNET, SeaTDD, Medalist, the Medalist logo and DiscWizard are either trademarks or registered trademarks of Seagate Technology, Inc. or one of its subsidiaries. All other trademarks or registered trademarks are the property of their respective owners. Seagate reserves the right to change, without notice, product offerings or specifications. No part of this publication may be reproduced in any form without written permission from Seagate Technology, Inc. © 1997 Seagate Technology, Inc. 920 Disc Drive, Scotts Valley, CA 95066, USA Publication Number: 32656-001, Rev. B, July 1997, Printed in USA U SING DISCWIZARD MEDALIST PRO HARD DRIVE INSTALLATION GUIDE Medalist Pro 6450 (ST36450A) Medalist Pro 6451 (ST36451A) for ATA (IDE)-Compatible PCs WHAT Y OU WILL NEED DiscWizard is a revolutionary new Windows program that makes it easy to install your new Seagate drive. DiscWizard helps you configure your new drive and your computer. It analyzes your system, lets you select various installation options and creates customized step-by-step instructions. It also allows older computers to access the full capacity of your drive. • Straight-edge and Phillips screwdrivers You can run DiscWizard to install your new hard drive if: • A bootable DOS system diskette (Seagate recommends using DOS Version 5.0 or later.) • You already have an existing, bootable hard drive in your computer with at least 3 Mbytes of available disc space and • You are running Windows 3.x or Windows 95. If you can run DiscWizard, you do not have to read this installation guide. Instead, before you install your new drive, follow the instructions on the DiscWizard diskette to install your drive. DiscWizard provides all the information you need to install your new drive. If you cannot run DiscWizard, follow the instructions in this installation guide to install and configure your new drive. For additional information and troubleshooting inditips, see the back of this sheet. This symbol: cates that additional information on a topic appears on the back of this sheet. 1 1. O NE DRIVE OR TWO? Disc drives are extremely fragile. Do not drop or jar your drive. • An ATA host adapter and interface cable (max. length: 18 inches) with enough connectors for all your drives • An unused drive power cable for your new drive • If you are mounting this 3.5-inch drive in a 5.25-inch drive bay, you need a mounting adapter or frame kit. Also, you may need drive mounting rails if your drive bay is not designed for direct mounting. B EFORE Y OU BEGIN • Make sure your computer is turned off before you open the case. Keep the drive in its antistatic bag until you are ready to install it. Protect your drive from static discharge by making sure you are well-grounded before touching the drive. We recommend wearing a grounded wrist strap throughout the installation process. Do not touch the connectors or any part of the printed circuit board. Always handle the drive by its edges or frame. • Read the handling precautions at the right and inspect the drive to make sure that it is not damaged. • Save your foam-lined Seagate disc drive box. This box has been approved by Seagate for shipping a Seagate disc drive. Using any other container or packing material voids your drive warranty. Do not apply pressure or attach labels to the circuit board or the top of the drive. ATTACHING C ABLES AND MOUNTING THE DRIVE If your new Seagate® Medalist ®Pro drive will be the only drive in your computer, you do not have to change any jumper settings. In this case, skip ahead to “Attaching Cables and Mounting the Drive.” 1 If you are installing a new ATA interface cable, attach one end of the cable to the interface connector on your computer or host adapter. The ATA cable must be no more than 18 inches long. If you already have one hard drive in your computer and you are installing a second drive, you must configure one drive as a master and the other as a slave. The master drive will be the “boot” drive (drive C), from which the computer loads system software when it first starts up. To configure your new Seagate drive as the master, slide a jumper onto pins 7 and 8 (see below). To configure the drive as a slave, slide a jumper onto pins 5 and 6 only. The jumper on pins 6 and 8 is a spare and does not affect drive operation. If you need to change the jumpers on your existing hard drive, see the Disk Manager online manual, or contact the drive manufacturer. 2 Thread the interface cable through the drive bay and attach the connector at the end of the interface cable to your new drive. If you have two drives, attach the second drive to the second connector. pin 1 4-pin power connector 40-pin ATA interface connector 2 4 6 8 Master/slave jumper block Power connector Interface connector Pin 1 Pin 1 Caution. Make sure to align pin 1 on the computer or host adapter interface connector with pin 1 on your drive or drives. Pin 1 on the interface cable is usually indicated by a stripe along the edge of the cable. ! 1 3 5 7 One drive only Drive is Master with an ATAcompatible slave 2 • Drive mounting screws HANDLE WITH CARE! 3 Slide the drive carefully into the drive bay. Secure the drive with four 6-32 UNC-2A mounting screws in either the sidemounting holes or the bottom-mounting holes. Do not overtighten the screws. The screws should be inserted no more than 0.22 inch into the bottom mounting holes and no more than 0.14 inch into the side mounting holes. Do not use metric screws. Note. If you are mounting the drive in a 5.25inch drive bay, you need a mounting adapter or frame kit. Contact your computer dealer. Some computers also require drive mounting rails, which can be obtained from your distributor or computer manufacturer. 4 Attach a power cable to each drive. If your computer does not have an unused power connector, you can purchase a Y-shaped power cable from your computer dealer. 5 Check all cable connections and then replace your computer cover. Continue to step 2 below. Drive is slave Spare jumper 2. CONFIGURING Y OUR C OMPUTER Before you format or partition your new drive, you must configure your computer’s BIOS so that the computer can recognize your new drive. 1 Turn your computer on. As your computer starts up, watch the screen for a message describing how to run the system setup program (sometimes called BIOS or CMOS setup). This is usually done by pressing a special key, such as DELETE, ESC , or F1, during startup. See your computer manual for details. Press the appropriate key to run the system setup program. 2 Enable LBA mode if it is available. Many BIOS use the logical block addressing (LBA) mode to access drives with capacities greater than 528 Mbytes. 3 If your BIOS provides automatic drive detection (an “Auto” drive type), select this option. This allows your computer to configure itself automatically for your new drive. If your BIOS does not provide automatic drive detection, select “User-defined” drive settings. If your computer supports LBA addressing, enter the LBA cylinder, head and sector values for your drive from the table at the top of the next column. If your computer does not support LBA addressing, enter the CHS values from the table. a 3 ADDRESSING DRIVE -CAPACITY LIMITATIONS BIOS Settings for the ST36450A and ST36451A Drive Cylinders Heads Sectors ST36450A LBA addressing CHS addressing 833 13,328 240 15 63 63 ST36451A LBA addressing CHS addressing 833 13,328 240 15 63 63 Note. This drive does not use the write precomp or landing zone parameters. Set these parameters to zero. 4 Save the settings and exit the System Setup program (your computer will automatically reboot). After you configure your computer, we recommend that you use Disk Manager to partition and format your drive. If your computer was built before mid-1994, you probably will not be able to access the full capacity of your new drive unless you use Disk Manager. For instructions, see Section 3A, “Installation Using Disk Manager,” below. If you do not want to use Disk Manager, you can use the standard DOS commands to partition and format your drive, as described in Section 3B. 3A. INSTALLATION U SING D ISK M ANAGER 1 Boot your computer from a bootable DOS diskette (use MS DOS Version 5.0 or later). Booting from a diskette ensures that the Disk Manager installation does not conflict with any terminate-and-stay-resident (TSR) programs. 2 Insert your DiscWizard diskette. The Disk Manager software is stored on this diskette. 3 At the DOS prompt, type DM and press ENTER. 4 Follow the onscreen instructions until you see the Select an Installation Option menu. 5 Select either (E)asy Disk Installation or (A)dvanced Disk Installation. Because DOS computers cannot access partitions larger than 2.1 Gbytes, Disk Manager may have to divide your hard drive into multiple partitions. If you select (E)asy Disk Installation, Disk Manager creates one partition of 2.1 Gbytes and creates multiple partitions using the remainder of your hard disc. However, if most of your files are smaller than 50 Kbytes, you may want to create several smaller partitions to make more efficient use of your hard disc space. To create smaller partitions, select (A)dvanced Disk Installation from the Disk Manager main menu. Some DOS-based computers and operating systems are not designed to accommodate large hard disc drives. The three most common system limitations are listed below, along with methods for overcoming these limitations. See your system manual to determine which (if any) of these limitations applies to your computer. 528-Mbyte limit: The BIOS in some older computers cannot accommodate drives with capacities greater than 528 Mbytes. Seagate provides free Disk Manager software with your drive to overcome this limitation. Alternatively, you can purchase a hard drive controller or a BIOS upgrade that supports drives with capacities greater than 528 Mbytes. The 32-bit disk access feature in Windows 3.1 does not work with drives that have capacities greater than 528 Mbytes. If you want to use 32-bit disk access with Windows 3.1, install the Seagate replacement 32-bit access driver, SEG32BIT.386, as described on the back of this sheet. 4,096-cylinder limit: The BIOS in some computers cannot support drives that have more than 4,096 cylinders. If you install a drive that has more than 4,096 cylinders in one of these computers, the computer may “freeze” or fail to boot. If this occurs, see “Advanced Troubleshooting” on the back side of this sheet. b 3 Partition-size limit: DOS/Windows and Windows 95 cannot access drive partitions larger than 2.147 Gbytes. You can overcome this limitation using the Disk Manager software or the DOS FDISK command to divide your drive into several smaller partitions. Each partition acts as a separate logical drive, with its own drive letter. If most of your files are smaller than 50 Kbytes, you should divide your drive into partitions of 1 Gbyte or less to make the most efficient use of your disc space. BIOS Upgrades: If you need to upgrade your BIOS, contact the appropriate BIOS manufacturer listed below. American Megatrends (AMI): 1-800-828-9264 [email protected] Award Software International, Inc.: 1-415-968-4433 [email protected] Microid Research / Mr. BIOS: 1-800-451-1943 [email protected] Phoenix Technologies Ltd.: 1-800-767-5465 [email protected] SystemSoft: Contact your computer manufacturer 3B. S TANDARD DOS I NSTALLATION 6 At this point, Disk Manager lists all the hard drives that it can recognize. You should see your new Seagate drive and your existing hard drive, if any. If any hard drive is not recognized, exit Disk Manager and turn off your computer. Check all cables, jumpers and BIOS settings. Then start at step 1 to run Disk Manager again. 7 If Disk Manager recognizes all your drives, select the drive you want to install and press ENTER. Disk Manager partitions and formats the drive. If your new drive is the master drive (Drive C), Disk Manager also configures the drive so that you can boot from it. Note. If your computer cannot accommodate hard drives with capacities greater than 528 Mbytes, Disk Manager installs a Dynamic Drive Overlay (DDO) on your hard disc. If this driver has been installed, you should see a blue Disk Manager banner each time you boot your computer. See the Disk Manager online manual for details. 8 Follow the instructions in the post-installation screens. YOU’RE DONE! ! Caution. Partitioning or formatting a drive erases all data on it. Seagate assumes no liability if you erase your data. Drive Partitioning Partitioning a hard drive divides it into sections (partitions) that function as separate logical drives (labeled C, D, E, etc.). Because DOS computers cannot access partitions larger than 2.1 Gbytes, you must divide large-capacity hard drives into multiple partitions. In creating partitions, keep in mind that the larger the partition, the more drive space is taken up in unused clusters. For this reason, if most of your files are smaller than 50 Kbytes, you should use partitions of 1 Gbyte or less. To partition your new drive: 1 Insert a bootable DOS diskette in your diskette drive and restart your computer. 2 Insert a DOS program diskette that contains the FDISK.EXE and FORMAT.COM programs into your diskette drive. At the A: prompt, type FDISK and press ENTER. 3 If you have two hard drives installed, the FDISK menu displays five options. Option five allows you to select the drive you want to partition. Make sure that your new drive is selected. 4 Select “Create DOS partition or logical DOS drive” by pressing 1. Then press ENTER. 5 Select “Create primary DOS partition” by pressing1 again. Then press ENTER. Create your first drive partition. If you are creating a partition that will be used to boot your computer (drive C), make sure that the partition is marked active. 6 Create an extended partition and additional logical drives, as necessary, until all the space on your new hard drive has been partitioned. 7 When the partitioning is complete, reboot your computer. Drive Formatting At the A: prompt, type format x: /s, where x is the letter of your first new partition. Repeat this process for all the new partitions you have created. ! Caution. Make sure to use the correct drive letters so that you do not format a drive that already contains data. After you format your drive, it is ready to use. YOU’RE DONE! Cable Select Jumper Basic Troubleshooting Some computers differentiate between master and slave drives using specially designed interface cables that have the line to pin 28 (the Cable Select pin) removed or cut at one connector. The connector that has pin 28 disabled is used for the slave drive. See your computer manual to determine whether your computer supports this feature. To configure your Seagate drive for cable select, place a jumper on pins 5 and 6 and pins 7 and 8 as shown below. If you have installed your drive and it does not function properly, perform the following basic checks: • If Disk Manager has installed the DDO on your hard drive and you have Warning. Always turn off the computer before changing jumpers or unplugging cables and cards. Wear a ground strap or take other antistatic precautions while working on your computer or handling your drive. Remote LED Connection You can connect a remote LED to pins 3 (–) and 4 (+) as shown in the figure below. Do not install a jumper on these pins. Because the jumper block uses a 0.1-inch connector, you may need to replace the current connector. Use Seagate connector part number 10562-001 or equivalent. • Verify compatibility. Verify that the host adapter and drive are appropriately matched to each other and to your computer. Refer to the relevant documentation for details. • Check all cards. Verify that all cards are seated in their slots on the motherboard and secured with mounting screws. • Check all connectors and cables. Make sure all ribbon and power cables are securely connected. Ribbon cables are easily damaged, especially at the connector. Try a new cable known to be good. Make sure no connector pins are bent. Verify that pin 1 on the interface cable is aligned with pin 1 on the drive and host adapter (see figures and instructions on the front of this sheet). 2 4 6 8 1 3 5 7 Master/slave jumper block Enable Cable Select Remote LED connection • Verify jumper settings. Review the instructions on this sheet and in your host adapter installation guide. Make sure all appropriate jumpers are installed or removed as necessary. • Check your power-supply specifications. Each time you add a new device to your computer, make sure your computer’s internal power supply can support the total power demand. If necessary, consult your dealer for a new power supply. The Disk Manager Online Manual Disk Manager contains an extensive online manual. This manual includes detailed installation instructions, troubleshooting and a list of master/ slave jumper settings for many popular hard drives. To view the Disk Manager online manual, insert the Disk Manager diskette into drive A and type A:\DM /H. Then press ENTER . You can also view the online manual from within Disk Manager by selecting (V)iew/Print Online Manual in the main menu. • Verify the drive-type settings in the system setup program. The drivetype settings in the system BIOS must not exceed the physical specifications of your drive. Also, the settings must not exceed the limitations set by the operating system and BIOS. • Check for viruses. Before you use someone else’s diskette in your system for the first time, scan the diskette for viruses. If Disk Manager installs the dynamic drive overlay (DDO) to access the full capacity of your drive, the DDO must load into memory before the operating system loads. This occurs automatically when you boot from your hard drive (drive C). However, if you boot from a diskette, the DDO will not be loaded and you will not be able to access your hard drive. The following procedure allows you to boot from a diskette and still access your hard drive. diskette drive). 2 When the Disk Manager banner appears on the screen, immediately press the SPACEBAR After you install your new drive, your computer will not boot, and no error message shows on the screen. • Check your computer manual or BIOS manufacturer to determine whether your BIOS supports drives that have more than 4,096 cylinders. If your system has this limitation, use the following procedure to configure your computer: 1 Turn off your computer, open the case, and remove your new Seagate drive. SPACEBAR again. ! If you boot from a diskette regularly, you can create a Dynamic Drive Overlay boot diskette. It loads DDO into memory, then loads the operating system. See the Disk Manager online manual for more information about creating a dynamic drive overlay boot diskette. Supported Operating Systems The Disk Manager dynamic drive overlay provides support for drives that have capacities greater than 528 Mbytes under MS-DOS, Windows 3.x, Windows 95, Windows NT 3.51, Window NT 3.50 (requires DM upgrade drivers), OS/2 V3.0 (Warp full pack), and OS/2 V2.0–3.0 (requires DM upgrade drivers). Disk Manager does not support 32-bit FAT in Windows 95. Caution. Before you attempt to remove a DDO, make a backup copy of all the data on your hard disc. Also, run CHKDSK, SCANDISK or a thirdparty equivalent to detect and repair any damaged files before you follow the procedure below. If the DDO migration program encounters a serious file problem or is interrupted by a power loss or hardware failure, the migration will fail and your data will be lost. 1 Boot the computer to Drive C. 2 Insert your DiscWizard diskette into Drive A. 3 Type A:\dm to start Disk Manager. 8 Remove the diskette and reboot the computer. Enter your system setup program (see your system manual for details). 9 Configure the hard drive with the Cylinder/Head/Sector parameters shown for your drive in the table in Section 2, “Configuring Your Computer,” on the front side of this sheet. Save your changes and exit the system setup program. Master/slave jumper block 1 3 5 7 Alternate capacity jumper Limit capacity to 2.1 Gbytes (4,092 cylinders) 3 Remount your drive in the computer and replace the computer cover. 4 Insert a bootable DOS diskette into drive A and turn on the computer. It should boot from drive A and automatically detect the new drive as a 2.1-Gbyte drive. 5 Insert your DiscWizard diskette into drive A and type A:\DM. Then press ENTER. This runs the Disk Manager program. 6 Follow the Disk Manager instructions to install the dynamic drive overlay and to partition and format your new drive to its full capacity. viruses. This may cause FDISK to hang the system. You must disable this feature in the system setup program before you can use FDISK. See your computer reference guide for assistance. Be sure to re-enable this important feature when FDISK is done. The system error message, “Drive not Ready,” appears. The drive does not format to full capacity. • Verify the drive-type values in the system setup program. One of the – The values may be set with an incorrect translation characteristic. – You may have entered a parameter value that exceeds the physical capacity of the drive. – You entered a translation characteristic that does not take advantage of the drive’s full capacity. – The drive’s physical specifications exceed the translation limits imposed by the BIOS. Caution. If you change the drive-type values in the system setup program, you must partition and format the drive again. This erases data on the drive. • If your computer supports LBA mode, you may need to enable LBA mode in the system setup program to access the full capacity of the drive. Refer to your computer’s reference guide to find out how to enable LBA. • Your computer may not support drives that have more than 4,096 cylinders. Follow the instructions for After you install your new drive, your computer will not boot, and no error message shows on the screen. The DOS messages “Disk Boot Failure,” “Non-System Disk” or “No ROM Basic – SYSTEM HALTED” appear. mounting screws. the drive is very quiet, it may be difficult to hear its discs reach operating speed. If the drive motor does not start up, recheck all drive cables. • Verify that for each drive, a drive-type is listed in the system setup program. • Try rebooting your computer by pressing the CTRL, ALT and DELETE keys simultaneously. If the drive is recognized after you reboot the system, the computer BIOS test may be completing before the drive is ready. One solution is to slow the processor speed during startup. If your computer has a turbo switch, set it to slow speed before turning the computer on. If there is no turbo switch, you may be able to use keyboard commands; see your computer manual for details. After the computer is up and running, return the processor to the fast speed. 11 Type A:\dm and choose the Maintenance Menu . 12 Select Uninstall (D)isk Manager. 13 Select the correct drive to uninstall. 14 When the uninstall is complete, exit Disk Manager and reboot. Another solution is to warm-boot your computer after every power-on. • Check for I/O address conflicts. To isolate the conflict, verify that the drive and host adapter are compatible with your computer. Turn off the computer and remove all the peripheral adapter cards except for the SeaBOARD® SeaBOARD is a computer bulletin board system that contains information about Seagate disc and tape drive products and is available 24 hours daily. Set your communications software to eight data bits, no parity and one stop bit (8-N-1). Location Australia England France Germany Phone number 61-2-9756-2359 44-1628-478011 33 1-48 25 35 95 49-89-140-9331 Location Taiwan Thailand USA Phone number 886-2-719-6075 662-531-8111 408-434-1080 SeaFAX ® Location Australia England Phone number 61-2-9756-5170 44-1628-894084 Location USA USA Phone number 1-800-SEAGATE or 408-456-4496 Seagate Technical Support FAX You can FAX questions or comments to technical support specialists 24 hours daily. Responses are sent during business hours. Location Phone number Location Phone number Australia 61-2-9725-4052 Japan 81-3-5462-2979 England 44-1628-890660 Korea 82-2-556-7294/4251 France 33 1-46 04 42 50 Singapore 65-488-7528 Germany 49-89-1430-5100 Taiwan 886-2-715-2923 Hong Kong 852-2368 7173 USA 408-944-9120 Direct-Support Services Seagate Technical Support For one-on-one help, you can talk to a technical support specialist during local business hours. Before calling, note your system configuration and drive model number (STxxxxxx). Location Phone number Location Phone number Australia 61-2-9725-3366 Korea 82-2-556-8241 England 44-1628-894083 Singapore 65-488-7584 France 33 1-41 86 10 86 Taiwan 886-2-514-2237 Germany 49-89-140-9332 USA 1-800-SEAGATE or Hong Kong 852-2368 9918 USA 408-456-4496 SeaTDD™ 408-944-9121 The system error message, “HDD controller failure” appears. The 32-bit disk access feature in Windows 3.1 does not work with drives that have capacities greater than 528 Mbytes. If you want to use 32-bit disk access under Windows 3.1, install the Seagate replacement 32-bit access driver, SEG32BIT.386, located on your DiscWizard diskette. • Check all cables. • Make sure the power supply is adequate for system needs. • Reboot the computer and listen to make sure the drive motor starts up. If Online technical support for Seagate products is available on CompuServe. To access our technical support forum, type go seagate. This forum provides information similar to that found on SeaBOARD. In addition, you can type questions or browse through previous questions and answers on the forum messages. Using a telecommunications device for the deaf (TDD), you can send questions or comments 24 hours daily and exchange messages with a technical support specialist between 6:00 A. M. to 11:15 A. M. and 12:30 P. M. to 5:00 P.M . (Pacific time) Monday through Friday. • Reinstall the DOS system files using the DOS SYS utility. • Check all cables. • Use FDISK to verify that the primary partition is active. • Check for viruses. 32-bit Disk Access under Windows 3.1. The system does not recognize the drive. SeaNET You can obtain technical information about Seagate products over the Internet from Seagate’s World Wide Web home page (http://www.seagate.com) or Seagate’s ftp server (ftp://ftp.seagate.com). You can also send e-mail with your technical questions to DiscSupport @ Seagate.com. You can use a touch-tone telephone to access Seagate’s automated FAX system to receive technical support information by return FAX. This service is available 24 hours daily. • Make sure the power supply is adequate for system needs. • Verify the drive-type values in the system setup program. • Check for I/O address conflicts. If the steps listed above do not remedy this problem, try the following: turns on after you reboot, the host adapter may be incompatible or defective. If so, see your dealer. Online Services The FDISK error message, “No Fixed Disk Present,” appears. The screen remains blank when you power up the system. • Turn off the computer and remove the drive host adapter. If the screen 1-800-SEAGATE Seagate’s 800 number (1-800-732-4283) allows toll-free access to automated self-help services, providing answers to commonly asked questions, troubleshooting tips and specifications for disc drives and tape drives. This service is available 24 hours daily and requires a touch-tone phone. International callers may reach this automated self-help service by dialing 408-456-4496. FAX Services • Confirm the jumper settings on the drive. • Verify the drive-type settings in the system setup program. • Make sure the monitor is plugged in and turned on. • Check all cards. • Make sure the video card is seated in its slot and secured with SeaFONE® • Make sure the power supply is adequate for system needs. • Reboot the computer and make sure the drive spins up. 7 After Disk Manager is done, reboot your system. You should see the Disk Manager banner and be able to access the full capacity of your new drive. 10 When your computer has rebooted, insert the DiscWizard diskette into drive A. Note. Disk Manager can also remove a drive overlay placed by the EZ-Drive program. Select (C)onvert Drive Format from the Maintenance Menu. • Check all cables. • Your DOS diskette may be corrupted. Try using a backup DOS diskette. • Make the partitions smaller. • Change the interrupt jumper setting on the host adapter. • Some BIOS have a Track 0 protection feature that protects Track 0 from need to make the partitions smaller to access the full drive capacity. 2 4 6 8 If you need assistance installing your drive, consult your dealer. Dealers are familiar with their unique system configurations and can help you with system conflicts and other technical issues. If you need additional assistance with your Seagate drive or other Seagate products, use one of the Seagate technical support services listed below. Seagate CompuServe Forum The system hangs in FDISK or fails to create or save the partition record. • If you have partitioned the drive into individual logical drives, you may 5 Select (M)aintenance Menu. 7 When the migration program has finished, exit Disk Manager. the drive using the same drive-type values your dealer used to partition the drive. • Check for I/O address conflicts between peripheral cards. • Check for viruses. ! 4 Select the Select Installation Options Menu . 6 Select (M)igrate Dynamic Drive . This program moves the data on your drive so that it can be accessed without the DDO. The migration may take up to an hour to complete, depending on the size of your drive. • Verify the drive-type values in the system setup program. You must install 2 Place a jumper on pins 1 and 2 on the master/slave jumper block as shown below. This enables the alternate capacity option that causes the drive to appear to your BIOS as having a 2.1-Gbyte capacity. Removing the Dynamic Drive Overlay ! drive is the same version you have installed in your computer. If it isn’t, see your dealer. Caution. To avoid electrostatic discharge damage to your computer or hard drive, make sure you are well-grounded before touching the drive, cable, connector or jumpers. Before you install a non-DOS operating system on the drive, install DOS and Disk Manager and make sure that the drive is bootable. Instructions for running the dynamic drive overlay with other operating systems are available in the Disk Manager online manual. If Disk Manager installs a dynamic drive overlay (DDO) and you do not need this software to access the full capacity of your drive, you can remove the dynamic drive overlay without losing your data. However, you will lose access to the full capacity of your drive unless you have another method for accessing high-capacity drives (see Addressing Drive-Capacity Limitations on the front side of this sheet). Follow the instructions below to remove a DDO from a drive. • Reboot the computer and make sure the drive spins up. Check all cables. • Make sure the power supply is adequate for system needs. • Make sure the DOS version the dealer used to partition and format the following problems may have occurred: (you have about 2 seconds). 3 Insert your boot diskette and press the The dealer partitioned and formatted the drive for you in the store, but the drive does not respond when you install it. pin 1 of the hard-disc controller or host adapter. If you have performed the preceding basic checks but the problem persists, follow these guidelines for troubleshooting specific cases. 1 Boot the computer from the hard disc (with no diskette in the booted directly from a diskette, the information in the boot record for the drive may not have been loaded. Make sure there is no diskette in Drive A and reboot. If you want to boot from the diskette, follow the “Booting with a Diskette” instructions under “Advanced Disk Manager Options.” • Check all cable connections. Make sure pin 1 of the drive is connected to Advanced Troubleshooting Booting from a Diskette video card and host adapter. If the computer recognizes the drive when you reboot the computer, turn off the computer. Reinstall the other peripheral cards, one at a time, until the conflict reoccurs. After you have isolated the source of the address conflict, you can resolve the conflict by changing the I/O address of the peripheral that appears to cause the conflict. Note. If you install Windows 3.1 on a high-capacity hard drive, the first time you start Windows you may see a message suggesting that you disable 32-bit disk access. Choose to disable 32-bit disk access to open Windows. Use the following procedure to install the Seagate 32-bit disk access replacement driver (from within Windows). 1 Insert your DiscWizard diskette into Drive A. 2 Open the Windows Program Manager menu and select File. 3 Select Run. 4 In the command line box, type a:\stsetup and then press ENTER. 5 Read the license agreement that appears on the screen. If you agree to the terms, select Accept Agreement to continue. 6 The next screen lists the features that the SEG32BIT.386 driver supports. If your computer supports these features, they will be active in 32-bit disk access mode for all drives that support them. Select Install Driver to continue. 7 Enable the 32-bit disk access option in the Windows control panel as follows: a) Open the Windows Control Panel. b) Select 386 Enhanced. c) Select Virtual Memory. d) Select Change>>. e) Select Use 32-Bit Disk Access (an X in the box enables the feature). f) Save the change. Keep your original box and packing materials for storing or shipping your drive. The box has a Seagate Approved Package label. Shipping a drive in an unapproved container voids the warranty. Call your authorized Seagate distributor to purchase additional boxes. The Foam figure to the right shows how a drive fits in an Antistatic bag approved single-pack box, including the Drive packing materials. Warranty. See your authorized Seagate distributor or dealer. Preinstalled or bundled software is provided “as is.” There are no warranties of merchantablity or fitness for a particular purpose. All such warranties are expressly and specifically disclaimed. Foam Maintenance and repair. Seagate drives do not require maintenance. The head/disc assembly is sealed; a broken seal voids the warranty. Seagate customer-service centers are the only facilities authorized to repair Seagate drives. Electromagnetic Compliance for the European Union. This model complies with the European Union requirements of the Electromagnetic Compatibility Directive 89/336/ EEC of 03 May 1989 as amended by Directive 92/31/EEC of 28 April 1992 and Directive 93/68/EEC of 22 July 1993. Compliance of this drive, as a system component, was confirmed with a test system. We cannot guarantee that your system will comply. The drive is not meant for external use (without properly designed enclosure, shielded I/O cable, etc.). Sicherheitsanleitung 1. Das Gerrät ist ein Einbaugerät, das für eine maximale Umgebungstemperatur von 55°C vorgesehen ist. 2. Zur Befestigung des Laufwerks werden 4 Schrauben 6-32 UNC-2A benötigt. Bei seitlicher Befestigung darf die maximale Länge der Schrauben im Chassis nicht mehr als 3,3 mm und bei Befestigung an der Unterseite nicht mehr als 5,08 mm betragen. 3. Als Versorgungsspannugen werden benötigt: +5V ± 5% 0,6A; +12V ±% 0,8A (1,9A fur ca. 30 Sek. fur ± 10%) 4. Die Versorgungsspannung muss SELV entsprechen. 5. Alle Arbeiten auf dem Festplatte dürfen nur von Ausgebildetem Servicepersonal durchgeführt werden. Bitte entfernen Sie nicht die Aufschriftenschilder des Laufwerkes. 6. Der Einbau des Laufwerkes muss den Anforderungen gemäss DIN IEC 950 VDE 0805/05.90 entsprechen. Seagate, Seagate Technology, and the Seagate logo are registered trademarks of Seagate Technology, Inc. SeaFAX, SeaFONE, SeaBOARD, SeaNET, SeaTDD, Medalist, the Medalist logo and DiscWizard are either trademarks or registered trademarks of Seagate Technology, Inc. or one of its subsidiaries. All other trademarks or registered trademarks are the property of their respective owners. Seagate reserves the right to change, without notice, product offerings or specifications. No part of this publication may be reproduced in any form without written permission from Seagate Technology, Inc. © 1997 Seagate Technology, Inc. 920 Disc Drive, Scotts Valley, CA 95066, USA Publication Number: 32656-001, Rev. B, July 1997, Printed in USA