1
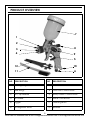
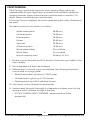
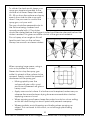
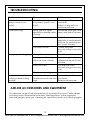
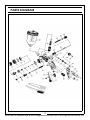
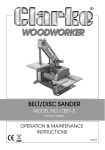
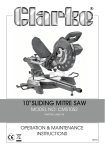
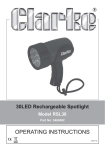
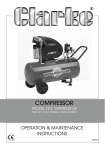
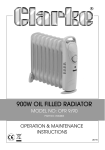
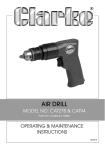
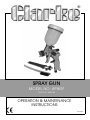
SPRAY GUN
MODEL NO: AP8GF
PART NO: 3082130
OPERATION & MAINTENANCE
INSTRUCTIONS
GC0813
INTRODUCTION
Thank you for purchasing this CLARKE Spray Gun.
Before attempting to use this product, please read this manual thoroughly and
follow the instructions carefully. In doing so you will ensure the safety of yourself
and that of others around you, and you can look forward to your purchase
giving you long and satisfactory service.
GUARANTEE
This product is guaranteed against faulty manufacture for a period of 12
months from the date of purchase. Please keep your receipt which will be
required as proof of purchase.
This guarantee is invalid if the product is found to have been abused or
tampered with in any way, or not used for the purpose for which it was
intended.
Faulty goods should be returned to their place of purchase, no product can
be returned to us without prior permission.
This guarantee does not effect your statutory rights.
2
Parts & Service: 020 8988 7400 / E-mail: [email protected] or [email protected]
GENERAL SAFETY RULES
Before using this equipment it is in your own interest to read and pay attention
to the following safety rules.
1. Keep the work area clean. Cluttered areas invite injuries. Keep work area
well lit.
2. Keep children away. Children must never be allowed in the work area.
3. Store idle equipment. When not in use, tools should be locked up in a dry
location. Always lock up tools and keep out of reach of children.
4. Use eye protection. Always wear approved safety goggles.
5. Stay alert. Watch what you are doing, use common sense. Do not operate
any tool when you are tired.
6. Check for damaged parts. Before using any tool, any part that appears
damaged should be carefully checked to determine that it will operate
properly and perform its intended function.
7. Do not operate any tool if under the influence of alcohol or drugs. If there is
any doubt, do not operate the tool.
COMPRESSED AIR EQUIPMENT
1. Compressed air can be dangerous. Ensure that you are thoroughly familiar
with all precautions relating to the use of compressors and a compressed
air supply.
2. Never direct a jet of compressed air at people or animals.
3. Always ensure that the equipment being used has a safe working pressure
exceeding the output pressure of the compressor that it is connected to.
4. Always ensure that the air supply is turned off at the tool outlet and vent all
compressed air from within the air hose and the equipment attached to it,
before disconnecting air hoses or other equipment from your compressor.
5. Ensure all fixed airline connections are properly sealed using teflon tape or
pipe sealant.
6. Never exceed the operating pressure of 50 psi.
PAINT SPRAYING EQUIPMENT
We strongly recommend that paint spraying equipment be used in
conjunction with appropriate eye and face protecting goggles, glasses or
spray masks available from most DIY and hardware stores.
1. Always keep the equipment perfectly clean. This will not only prolong its life
but will also ensure you get the best results. See Maintenance.
3
Parts & Service: 020 8988 7400 / E-mail: [email protected] or [email protected]
2. Always ensure there is adequate ventilation. Do not spray or handle paint
in enclosed areas.
3. Never spray close to any source of heat or flame.
4. Always wear a suitable approved breathing mask when spraying, to
protect against inhalation of paint spray or fumes. An air feed mask may
be required when sprayingsome toxic types of paint. If in doubt, check
with the paint manufacturer.
5. Always check the manufacturer’s data sheets for the paint products being
sprayed for any particular hazards and follow the manufacturer’s
instructions. Take particular care if spraying isocyanate paints. Products
used in a spray gun may be covered by COSHH Regulations.
6. Always disconnect the spray gun from the air supply when it is not in use
and before any disassembly.
7. Never spray paint towards people or animals.
8. In the case of injury, seek expert medical advice immediately. Never
smoke while spraying or preparing paints, or spray near a naked flame,
heat source and electrical sparks. Many paints are flammable.
9. Never tamper with the product or modify it in any way, as this could prove
to be dangerous and will invalidate the guarantee. Only use the product
for the purpose for which it is intended.
10. When replacing parts, only use those supplied by Clarke International as
per the parts list.
4
Parts & Service: 020 8988 7400 / E-mail: [email protected] or [email protected]
PRODUCT OVERVIEW
7
1
2
3
8
4
9
5
NO
12
10
11
6
DESCRIPTION
NO
DESCRIPTION
1
Locking Ring
7
Paint Container
2
Side Wings
8
Fluid Flow Control Knob
3
Air Cap Needle
9
Spray Patten Control Knob
4
Air Nozzle
10
Airline Connection
5
Trigger
11
Cleaning Brush
6
Air Regulator Knob
12
Spanner
5
Parts & Service: 020 8988 7400 / E-mail: [email protected] or [email protected]
SPECIFICATION
Container Volume
100 ml
Air Inlet Connection
1/4” BSP
Minimum Compressor Size
3 HP
Typical Operating Pressure
30-43 psi
Maximum Operating Pressure
50 psi
Paint Delivery
65-100 ml/min
Weight
373 g
Depth x Width x Height
245 x 125 x 65m
Air Consumption
80 l/min
Nozzle Size
0.8 mm
AIR SUPPLY
For best results, the air supply to the spray gun must be clean and dry, with no
oil or water contamination. Follow the air compressor manufacturer’s
guidelines on installation and operation to ensure that your air supply is as
clean as possible.
The compressed air supply line to the spray gun must be fitted with a filter
capable of removing any oil or water together with a suitable pressure
regulator.
Higher pressure and contaminated air will shorten the spray gun life due to
faster wear and could become a safety hazard.
Water in the air line will also cause damage and may contaminate the paint
being used. Therefore ensure the air supply is properly filtered.
Line pressure, or supply hose inside diameter, should be increased to
compensate for unusually long air hoses (over 10 m). Minimum hose diameter
should be 6mm (¼") ID, and fittings should have the same inside dimensions.
The air inlet used for connecting air supply has a standard ¼” BSP thread.
6
Parts & Service: 020 8988 7400 / E-mail: [email protected] or [email protected]
OPERATION
The AP8GFM spray gun is fed with paint by gravity from the paint container.
The air-flow through the air cap draws paint into the nozzle assembly, where it
is atomised and sprayed forward.
The AP8GFM spray gun is supplied with one nozzle size, (0.8 mm). Ensure your
spray gun is matched to the capacity of your compressor.
Connect the air supply hose to the air inlet, (using a suitable in-line connector
if required).
PREPARATION BEFORE PAINTING
Mix the paint to the correct viscosity for spraying according to the
manufacturer’s instructions and strain it into the paint container through a fine
mesh filter. When mixing the paint, make sure that you have enough thinners
left to clean the spray gun after use.
Do not fill the paint container more
than 3/4 full. Make sure that the
threaded joint between the
container and the gun are clean and
before screwing the container on the
gun. Always clean around the
container sealing lip and keep the
container vent clear.
Remember that some modern paints
require specialist respiratory
protection...always consult the paint
manufacturers instructions.
WARNING: NEVER ATTEMPT TO SPRAY UNLESS YOU ARE WEARING
SUITABLE, APPROVED RESPIRATORY AND EYE PROTECTION.
Ensure that the area in which you will be spraying is clean and dust free. To
obtain best results, it is vital that the surface to be sprayed is well prepared. It
must be clean and dry, and free from dust, dirt oil or grease. Mask any area
that is not to be sprayed and cover adjacent equipment to protect from
overspray.
Check the paint manufacturer’s instructions for any special surface
preparation required.
REMEMBER - TIME SPENT PREPARING SAVES TIME SPENT FINISHING.
7
Parts & Service: 020 8988 7400 / E-mail: [email protected] or [email protected]
PAINT THINNING
Paint thinning is particularly important when spraying. Many paints are
supplied ready for brush application and need to be sufficiently diluted for
spraying purposes. Always follow the paint manufacturers instructions. If in
doubt, always consult the paint manufacturer.
A Viscosity Cup (not supplied), will assist in determining the correct thickness of
the paint.
The ideal viscosity for most paints is as follows:
Water based paints
35-45 secs
Oil based paints
15-25 secs
Enamel paints
15-25 secs
Primers
20-30 secs
Varnishes
20-25 secs
Aluminium paints
15-25 secs
Wood preservatives
Do not dilute
Wood Stains
Do not dilute
Smooth masonry paint
Dilute by 10-15 %
1. Dip the cup into the paint and fill to the brim. Time how long it takes for the
cup to empty.
2. Thin as required until times are achieved.
3. Alternatively if a viscosity cup is not available, the following information
can be used as a rough guide.
• Water based paints (emulsions) 10-20% water.
• Oil based paints (gloss) up to 10% thinners.
• Cellulose paints up to 50 % cellulose thinners.
If in any doubt, contact the paint manufacturer.
4. Having mixed the paint thoroughly in a separate container, pour into the
spray gun paint container through a fine filter.
• DO NOT OVERFILL PAINT CONTAINER - never more than three
quarters full.
8
Parts & Service: 020 8988 7400 / E-mail: [email protected] or [email protected]
ADJUSTMENTS OF THE SPRAY GUN
ADJUSTING THE PAINT FLOW
1. Set the Paint Flow Adjustment knob (8) according to the paint in use and
the spray pattern required. (anticlockwise to increase, clockwise to reduce
flow).
ADJUSTING THE SPRAY PATTERN
1. Turn the Pattern Adjustement knob (9) anticlockwise to give a fan shaped
spray pattern, turning clockwise to give a circular spray pattern.
2. You can adjust the orientation of the fan either vertically or horizontally to
suit your requirements by turning the side wings (2) to the desired position.
• As the width of the spray is increased, paint flow will also need to be
increased.
ADJUSTING THE AIR FLOW
1. To increase the air flow, turn the Airflow Adjustment knob anticlockwise to
increase and clockwise to decrease the air pressure.
• The air flow needed will vary according to the paint in use, with
thicker paints needing more air.
SPRAYING TECHNIQUES
Practice spraying on a piece of material with the same type of surface as the
article you wish to spray, eg. metal for a car body panel, wood for a piece of
furniture etc.
Always make adjustments to the spray pattern according to the
conditions.You may need to increase the paint and air flow when using a
wider fan setting.
To reduce overspray, always use the lowest possible air pressure that produces
an acceptable spray pattern.
• If the gun is too far from the surface or the paint is too thin, the paint
will start to dry before hitting the surface, resulting in a rough, sandy
finish. Allowing overspray to fall on a finished area will also result in a
rough finish. Too much paint feed or holding the gun too close to the
work will lead to runs and sagging.
• The paint should be agitated by gentle shaking at regular intervals
during use to ensure consistancy and avoid colour difference due to
the paint settling in the container.
9
Parts & Service: 020 8988 7400 / E-mail: [email protected] or [email protected]
To obtain the best results, keep your
spray gun level and parallel to the
surface at all times. Keep the nozzle
23 - 30 cm from the surface and spray
evenly from side to side or up and
down. Use your arm to control the
spray gun, not your wrist.
The gun should be perpendicular to
the surface being covered and
moved parallel with it. The stroke
should be started before the trigger is pulled and likewise released before the
stroke is ended. This gives accurate control of the gun and material.
Do not spray at an angle as this will
lead to paint runs on the surface.
Always use smooth and even strokes.
When spraying large areas, using a
criss-cross pattern as shown.
Never start or stop the spray gun
while it is aimed at the surface to be
sprayed. Evenly control the speed of
movement of the spray gun.
• Moving quickly over the
surface will give a thin coat
and slow movement will give a
heavy coat.
• Apply one coat at a time. If a further coat is required, make sure you
observe the manufacturers drying time recommendations before
applying a second coat.
• When spraying small areas, keep the output control on a low setting
as this will avoid using too much paint and prevent overspray.
• Where possible, avoid stopping and starting when spraying an
object. This can lead to too much, or not enough paint being
applied.
10
Parts & Service: 020 8988 7400 / E-mail: [email protected] or [email protected]
• The material deposited should always be even and wet. Lap each
stroke over the preceding stroke to obtain a uniform finish.
• To ensure the edges are covered, start spraying just to the side of the
area being sprayed and do not stop until the spray has gone past
the opposite edge.
• Damage to the needle or nozzle, or any of the air ports, will result in a
faulty spray pattern. Take care when cleaning or assembling these
components.
MAINTENANCE
It is essential that the spray gun is kept clean. Dried paint in the nozzle
assembly or airways will stop the gun from working. For the gun to perform at
its best it must be thoroughly cleaned after every use.
CLEANING PROCEDURE
1. After use, empty any remaining paint from the paint container, wipe the
container clean with a dry, lint free rag, and fill with thinner. Spray the
thinners through the spray gun until it is clean.
2. Residue from dirty solvent may clog the narrow air passages in the gun. Use
a cleaning brush and solvent to wash off accumulated paint.
3. Wipe down the outside of the gun with a solvent dampened cloth.
• DO NOT poke any of the holes in the air cap or nozzle with metal
instruments. These holes are precision drilled and can be damaged
by probing with anything harder than a wooden toothpick.
4. Make sure that the air inlet vent to the paint container is kept clean.
Blockages in this vent will prevent an even material flow through the gun.
• Component parts of spray guns are supplied in matched sets and
should only be used together.
• Do not overtighten components, and be careful not to cross thread
any parts on assembly.
• Never use silicon based lubricants as this may cause paint finish
defects.
5. Check the air supply hose regularly for any signs of damage and replace it
if necessary. Do not use damaged or leaking hoses.
• Finally, empty the spray gun and dry all components thoroughly.
Store in a clean, dry place.
11
Parts & Service: 020 8988 7400 / E-mail: [email protected] or [email protected]
TROUBLESHOOTING
Problem
Cause
Atomisation is poor
(paint comes out in
blobs).
Paint volume adjustment Add thinners to paint
is incorrect (paint is too
and re-fill.
thick).
Adjust air regulator to
increase pressure.
Over-painting.
Spray gun not clean,
resulting in needle valve
sticking.
Dismantle spray gun and
clean with paint thinners.
Too much paint.
Adjust the volume
regulator to reduce paint
volume. Try spraying two
thin coats of paint.
Viscosity too low.
Check the paint
viscosity using a viscosity
cup.
Wrong thinner used.
Use different thinner
Spray gun held wrong
distance from surface.
Hold spray gun at
different distance to the
surface.
Paint too thick.
Thin the paint/test
viscosity using a viscosity
cup.
Air pressure too high.
Reduce air pressure.
Orange peel or fogging.
Rough texture as if paint
is drying before hitting
surface.
Solution
Paint is too thin.
Add more paint to
Air pressure could be too container.
high.
Reduce air pressure.
AIRLINE ACCESSORIES AND EQUIPMENT
An extensive range of airline equipment is available from your Clarke dealer
including hoses, retractable hose reels, filter/regulators, in-line regulators,
pressure gauges, spray gun cleaning kit, respiratory masks and safety goggles.
12
Parts & Service: 020 8988 7400 / E-mail: [email protected] or [email protected]
PARTS DIAGRAM
13
Parts & Service: 020 8988 7400 / E-mail: [email protected] or [email protected]
PARTS LIST
ID
DESCRIPTION
ID
DESCRIPTION
1
Gun Body
24 Trigger Pin Gasket
2
Sealing Gasket
25 Trigger
3
Needle Sealing Spring
26 Trigger Pin
4
Gasket Needle
27 Fulcrum Pin
5
Needle Sealing Sheath
28 Trigger Gasket
6
Sealing Screw
29 Sealing Gasket
7
Airflow Separating Ring
30 Pattern Adjustment Seat
8
Material Nozzle
31 Pattern Adjustment Stem
9
Locknut
32 Patern Adjusting Knob
10 Sealing Gasket
33 Bolt M2.5 x 4
11 Air Cap
34 Steel Ball 4 mm
12 Air Nozzle
35 Needle Adjusting Seat
13 Air Valve Spring
36 Needle Sub-assembly
14 Air Valve Stem
37 Needle Adjust Spring
15 Sealing Gasket
38 Needle Spring Seat
16 Air Valve Body
39 Needle Adjusting Knob
17 Sealing Screw
40 Paint Passage Connector
18 Opening Stopper
41 Trap Valve A
19 Airflow Adjusting Seat
42 Cup Sub-assembly
20 Airflow Adjusting Knob
43 Spanner
21 Sealing Ring
44 Cleaning Brush
22 Air Joint
45 User Manual
23 Circlip
14
Parts & Service: 020 8988 7400 / E-mail: [email protected] or [email protected]
DECLARATION OF CONFORMITY
15
Parts & Service: 020 8988 7400 / E-mail: [email protected] or [email protected]