1
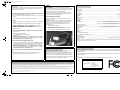
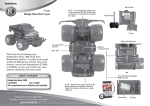
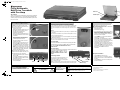
42-7012.fm Page 1 Thursday, April 22, 2004 1:38 PM
Fully-Automatic
Belt Drive Turntable
with Pre-Amp
Rubber mat
42-7012
45 RPM adapter
Thank you for buying the RadioShack LAB-1200 Fully-Automatic
Belt Drive Turntable. This is a high quality stereo turntable with
sensitive pickup and a built-in pre-amp that delivers great sound
from your records.
Assemble Your Turntable
Connect Your Turntable
Use Your Turntable
Note: The LIN (lead in), RET (auto return),
and SW (tone arm switch) screws on the
bottom of the turntable are set at the factory
and should not be adjusted.
1. Open the dust cover.
2. Rotate the turntable’s platter until one of
the platter’s two larger holes is above
the drive motor spindle on the
turntable’s upper left side.
3. Remove the tape and two ribbons from
the rubber drive belt. Be sure the belt is
not twisted.
4. Using your fingers, securely seat the
belt on the center of the drive motor’s
spindle (against the lower rim).
5. Plug the turntable’s power cord into a
standard AC outlet.
6. Remove the wire tie from the tone arm,
then press CUE to raise the tone arm.
7. Press PLAY and let the motor rotate the
turntable six or seven times, then press
STOP and check the location of the belt
on the spindle. If the belt is not securely
seated around the spindle, reposition it
properly and repeat Step 6.
Note: If the belt slips off the spindle, do not
attempt to remove the platter. Take it to your
local RadioShack store for assistance.
8. Unplug the turntable’s power cord from
the AC outlet.
9. Connect the turntable’s ground wire to
the amplifier’s/receiver’s GND or earth
terminal to avoid hum.
10. Place the rubber mat, ridged side down,
on top of the platter.
Connecting Your Turntable to a Receiver/Amplifier
Note: Depending on if your sound system has
PHONO jacks or not, be sure to set
LINE OUT ON/ PHONO OUT OFF as described in
“Connect Your Turntable”.
1. Open the dust cover.
2. Remove the stylus cover.
3. If you are playing a 331/3 RPM record, place it
directly over the spindle. If you are playing a 45
RPM record, place the supplied 45 RPM
adapter over the turntable spindle, then place
the record over the adapter.
4. Press SPEED in or out to set the turntable’s
speed (331/3 or 45 RPM).
5. Press PLAY. The turntable starts to rotate and
the tone arm moves to the beginning of the
record, lowers to the record, then starts to play.
6. At the end of the record, the tone arm
automatically returns to the tone arm rest and
the turntable stops. To stop playing the record
sooner, press STOP. If the tone arm does not
automatically return when it reaches the end of
the record, press STOP to reset the
mechanism.
What’s Included
User’s Guide - Turntable
Rubber Turntable Mat - 45 RPM adapter
You can connect your LAB-1100 to a receiver/amplifier (or stereo audio
mixer) that has low-level phono inputs (such as left and right PHONO
jacks) or line-level inputs (such as left and right AUX, TV, TAPE, or CD
jacks).
Cautions:
• Do not connect the turntable to AC power until you complete all other
connections.
• Do not place the turntable on top of the receiver/amplifier or on any
other component that gets hot.
• To avoid possible damage to your receiver/amplifier, turn it off before
making the connections.
Note: If you are not sure which type of input your receiver/amplifier has,
check your receiver’s/amplifier’s owner’s manual.
Low Level Inputs
To connect the turntable to a low-level phono input, plug the white
and red plugs into the receiver’s/amplifier’s left and right PHONO
jacks. Then set LINE OUT ON/PHONO OUT OFF to
PHONO OUT OFF.
Line Level Inputs
To connect the turntable to a line-level input, plug the white and red
plugs into the receiver’s/amplifier’s left and
right AUX, TV, TAPE, or CD jacks. Then set
LINE OUT ON/PHONO OUT OFF to LINE
OUT ON.
PLAY
STOP
CUE
WARNING: To reduce the risk of fire or shock hazard, do not
CAUTION: TO REDUCE THE
CAUTION
RISK OF ELECTRIC SHOCK,
DO NOT REMOVE COVER OR
BACK. NO USERSERVICEABLE PARTS INSIDE.
REFER SERVICING TO
QUALIFIED PERSONNEL.
expose this product to rain or moisture.
RISK OF ELECTRIC SHOCK
DO NOT OPEN
!
!
Tone arm
Stylus cover
Rear View
Using The Cue Button
1.
2.
Connecting to Power
Once you have connected the turntable to your
receiver/amplifier, plug the turntable’s power
cord into an AC outlet on your receiver/amplifier
or into a standard AC outlet.
Caution: To prevent electric shock, the plug’s blades are polarized and
fit only one way. If the plug does not fit easily, turn it over and try again.
Dust cover
Power Cord
Ground Cable
3.
Press CUE to raise the tone arm.
Push the tone arm to a spot directly over the
desired part of the record. The turntable starts
to rotate.
Press CUE again. The tone arm slowly lowers
and the record plays.
SPEED
Phono Plugs
The exclamation symbol is intended to inform you that
important operating and maintenance instructions are
included in the literature accompanying this product.
The lightning symbol is intended to alert you to the presence of
uninsulated dangerous voltage within this product’s enclosure
that might be of sufficient magnitude to constitute a risk of
electric shock. Do not open the product’s case.
©2004 RadioShack Corporation
All Rights Reserved.
RadioShack and RadioShack.com are trademarks
used by RadioShack Corporation.
42-7012
Printed in China
04A04
42-7012.fm Page 2 Thursday, April 22, 2004 1:38 PM
FAQ
Care
Specifications
If your turntable is not working as it should, these suggestions might help you solve
the problem. If the turntable still does not operate properly, take it to your local
RadioShack store for assistance.
Keep the turntable dry. If it gets wet, wipe it dry immediately.
Use and store the turntable only in normal temperature environments.
To protect the stylus from damage, we recommend you replace the
stylus cover when you are not using the turntable.
Handle the turntable gently and carefully. Don’t drop it. Keep the
turntable away from dust and dirt. Wipe the turntable with a damp
cloth occasionally to keep it looking new.
Turntable Platter
Type .............................................................................................................................................................................................. Plastic
Outer Diameter.................................................................................................................................................. 1113/16 Inches (300 mm)
Drive System............................................................................................................................................................................ Belt Drive
Motor Type ............................................................................................................................................................................... DC Motor
Turntable Type ............................................................................................................................................................. Automatic Return
Rotation Speed ........................................................................................................................................... 2-Speed 331/3 and 45 RPM)
Tone Arm
Type ............................................................................................................................................................................. Dynamic Balance
Effective Length..................................................................................................................................................... 11/16 Inches (195 mm)
Overhang...................................................................................................................................................................... 9/16 Inch (15 mm)
Tracking Error..................................................................................................................................................................... Less Than 4°
Cartridge
Output Voltage ...................................................... 2.5 mv at 1 kHz (with LINE OUT ON/PHONO OUT OFF set to PHONO OUT OFF)
450 mv at 1 kHz (with LINE OUT ON/PHONO OUT OFF set to LINE OUT ON)
Frequency Response ...................................................................................................................................................... 20–20,000 Hz
Channel Separation (1 kHz)......................................................................................................................................... More Than 15 dB
Load Resistance .............................................................. 47 kohm (with LINE OUT ON/PHONO OUT OFF set to PHONO OUT OFF)
Tracking Force ................................................................................................................................................................. 3.5 ±1.0 Gram
Stylus
Tip .................................................................................................................................................................................. Diamond Stylus
Replacement ........................................................................................................................................................................ AT3600LAX
General
Signal-to-Noise Ratio (DIN-B)..................................................................................................................................................... > 50 dB
Wow and Flutter (JIS WARMS) at 3 kHz ................................................................................................................................... < 0.25%
Power Source ...........................................................................................................................................................AC 120 Volts 60 Hz
Power Consumption .................................................................................................................................................................... 3 Watts
Dimensions (HWD).................................................................................................. 313/16 x 141/4 x 1315/16 Inches (98 x 360 x 349 mm)
Weight .................................................................................................................................................................... 5 lbs 4 oz (2.38 kgs)
Specifications are typical; individual units might vary. Specifications are subject to change and improvement without notice. Actual product
may vary from the product images in this document.
My turntable does not work even though plugged into an AC outlet.
•
•
•
Turn on the connected receiver/ amplifier.
Check the rubber drive belt. It may have slipped, broken, or was not mounted
properly.
Check the power cord and the AC outlet for a power problem.
No sound
•
•
•
The receiver/amplifier volume is set to minimum. Adjust the receiver/amplifier
volume.
Check to see if the turntable is connected correctly to receiver/ amplifier.
LINE OUT ON/PHONO OUT OFF is set to PHONO OUT OFF and the
turntable is connected to the receiver’s/amplifier’s line level input jacks. Set
LINE OUT ON/PHONO OUT OFF to LINE OUT ON.
•
Replace the stylus.
Cleaning/Replacing the Stylus
A dirty or worn stylus causes rough, distorted sound and could
damage your records.
Caution: Do not touch the stylus while cleaning or installing it. If the
stylus gets dirty or dusty, use a soft brush to gently clean it. If the
stylus is worn, follow these steps to replace it. You can order a
replacement stylus assembly AT3600LAX through your local
RadioShack store.
1. Turn your receiver/amplifier off.
2. Remove the stylus assembly from the cartridge by gently
grasping its sides and pulling it down.
3. Insert a new stylus assembly and gently snap it into place.
The sound from the turntable is unclear or scratchy during play.
•
•
•
•
•
Clean the record.
Clean the stylus with a soft brush.
Check the stylus and reinstall it if necessary.
Replace the stylus.
LINE OUT ON/PHONO OUT OFF is set to LINE OUT ON and the turntable is
connected to the receiver’s/amplifier’s lowlevel phono input jacks. Set LINE
OUT ON/PHONO OUT OFF to PHONO OUT OFF.
There is a hum from the turntable during play.
•
•
•
The stylus is improperly installed. Check the stylus and reinstall it if necessary.
The turntable is picking up induction hum from other components. Check the
ground terminal and reposition the turntable away from other components.
LINE OUT ON/PHONO OUT OFF is set to LINE OUT ON and the turntable is
connected to the receiver’s/amplifier’s lowlevel phono input jacks. Set LINE
OUT ON/PHONO OUT OFF to PHONO OUT OFF.
There is feedback or a howling sound from the turntable during
play.
•
The turntable is picking up the sound pressure of vibrations from the
speakers. Reposition the turntable away from the speakers.
FCC Information
Service & Repair
If your turntable is not performing as it should, take it to your local
RadioShack store for assistance. To locate your nearest
RadioShack, use the store locator feature on RadioShack's website
(www.radioshack.com), or call 1-800-The Shack (843-7422) and
follow the menu options. Modifying or tampering with the turntable's
internal components can cause a malfunction and might invalidate its
warranty and void your FCC authorization to operate it.
This device complies with Part 15 of the FCC Rules. Operation is subject to the following two conditions: (1) this device may not
cause harmful interference, and (2) this device must accept any interference received, including interference that may cause
undesired operation.
Changes or modifications not expressly approved by RadioShack may cause interference and void the user’s authority to
operate the equipment.
Your turntable conforms to NRTL standards and meets all applicable FCC requirements.
Product:
Limited 90 Days Warranty
This product is warranted by RadioShack against manufacturing defects in material and workmanship under normal use for ninety (90) days from the date of purchase from RadioShack company-owned stores and authorized RadioShack franchisees and dealers. EXCEPT AS
PROVIDED HEREIN, RadioShack MAKES NO EXPRESS WARRANTIES AND ANY IMPLIED WARRANTIES, INCLUDING THOSE OF MERCHANTABILITY AND FITNESS FOR A PARTICULAR PURPOSE, ARE LIMITED IN DURATION TO THE DURATION OF THE WRITTEN
LIMITED WARRANTIES CONTAINED HEREIN. EXCEPT AS PROVIDED HEREIN, RadioShack SHALL HAVE NO LIABILITY OR RESPONSIBILITY TO CUSTOMER OR ANY OTHER PERSON OR ENTITY WITH RESPECT TO ANY LIABILITY, LOSS OR DAMAGE CAUSED
DIRECTLY OR INDIRECTLY BY USE OR PERFORMANCE OF THE PRODUCT OR ARISING OUT OF ANY BREACH OF THIS WARRANTY, INCLUDING, BUT NOT LIMITED TO, ANY DAMAGES RESULTING FROM INCONVENIENCE, LOSS OF TIME, DATA, PROPERTY,
REVENUE, OR PROFIT OR ANY INDIRECT, SPECIAL, INCIDENTAL, OR CONSEQUENTIAL DAMAGES, EVEN IF RadioShack HAS BEEN ADVISED OF THE POSSIBILITY OF SUCH DAMAGES.
Some states do not allow limitations on how long an implied warranty lasts or the exclusion or limitation of incidental or consequential damages, so the above limitations or exclusions may not apply to you.
In the event of a product defect during the warranty period, take the product and the RadioShack sales receipt as proof of purchase date to any RadioShack store. RadioShack will, at its option, unless otherwise provided by law: (a) correct the defect by product repair without charge
for parts and labor; (b) replace the product with one of the same or similar design; or (c) refund the purchase price. All replaced parts and products, and products on which a refund is made, become the property of RadioShack. New or reconditioned parts and products may be used
in the performance of warranty service. Repaired or replaced parts and products are warranted for the remainder of the original warranty period. You will be charged for repair or replacement of the product made after the expiration of the warranty period.
This warranty does not cover: (a) damage or failure caused by or attributable to acts of God, abuse, accident, misuse, improper or abnormal usage, failure to follow instructions, improper installation or maintenance, alteration, lightning or other incidence of excess voltage or current;
(b) any repairs other than those provided by a RadioShack Authorized Service Facility; (c) consumables such as fuses or batteries; (d) cosmetic damage; (e) transportation, shipping or insurance costs; or (f) costs of product removal, installation, set-up service adjustment or
reinstallation.
This warranty gives you specific legal rights, and you may also have other rights which vary from state to state
RadioShack Customer Relations, 200 Taylor Street, 6th Floor, Fort Worth, TX 76102
12/99
Model:
Responsible Party:
Phone:
Lab 1200 Fully-Automatic
Belt Drive Turntable
42-7012
RadioShack
100 Throckmorton
Fort Worth, TX 76102
817-415-3200