1
www.blaupunkt.com
Radio CD MP3 WMA
Toronto 400 BT
7 649 035 110 / 7 649 036 010
www.blaupunkt.com
Bedienungs- und Einbauanleitung
Operating and installation instructions
Mode d’emploi et de montage
Istruzioni d’uso e di installazione
Gebruiksaanwijzing en inbouwhandleiding
Bruks- och monteringsanvisning
Instrucciones de manejo e instalación
Instruções de serviço e de montagem
Betjenings- og monteringsvejledning
Instrukcja obsługi i montażowa
Návod k obsluze a k montáži
Käyttö- ja asennusohje
Kezelési és beszerelési útmutató
Инструкция по эксплуатации и установке
Οδηγίες τοποθέτησης και χρήσης
01_Toronto400BT_de.indd 1
20.01.2009 14:30:45 Uhr
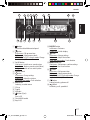
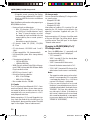
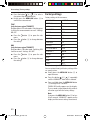
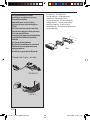
Controls
2
18 17
16
3
4
5
6
7
8
9
10
ENGLISH
1
MIC
1
2
3
4
5
6
7
8
9
:
;
<
15
14
13
button
Unlock the detachable control panel
button
In the menu: Call up menu item
Radio mode: Select memory bank
MP3/WMA/C‘n‘C/CD changer mode: Change
to next folder / CD
On/Off button
Short press: Switch on car sound system
In operation: Mute car sound system (Mute)
Long press: Switch off car sound system
Volume control
button
In the menu: Change settings
Radio mode: Adjust the stations
Other operating modes: Track selection
SRC button
Selecting an audio source
CD tray
Display
USB port
button (Eject)
Eject a CD
Front AUX-IN socket
Keys 1 - 5
12
11
= DIS/ESC button
In the menu: Exit menu
In operation: Switch display
> button
In the menu: Change settings
Radio mode: Adjust the stations
Other operating modes: Track selection
? MENU•OK button
Short press: Call up menu, confirm settings
Long press: Start scan function
@ button
In the menu: Call up menu item
Radio mode: Select memory bank
MP3/WMA/C‘n‘C/CD changer mode: Change
to previous folder / CD
A
button
Ending/rejecting a phone call
B
button
Answering a call, speed dial
27
02_Toronto400BT_gb.indd 27
03.02.2009 16:04:20 Uhr
Contents
Safety notes .............................................29
Symbols used ........................................29
Road safety ...........................................29
General safety notes ...............................29
Declaration of conformity ........................29
Cleaning notes..........................................30
Disposal notes ..........................................30
Scope of delivery ......................................30
Optional equipment
(not part of the scope of delivery) .............30
Placing the device in operation ..................31
Attaching/detaching the control panel .......31
Setting the tuner region ...........................31
Switching on/off ....................................31
Volume .................................................32
Switching demo mode on/off ...................32
Displaying version numbers .....................32
Traffic information....................................32
Radio mode ..............................................33
RDS .....................................................33
Changing to radio mode ..........................33
Selecting the memory bank .....................33
Tuning into a station ................................33
Storing stations/Calling stored stations......34
Scanning stations ...................................34
Storing stations automatically (Travelstore) ...34
PTY ......................................................34
Configuring the display............................35
CD/MP3/WMA/C‘n‘C/CD changer mode .....35
Basic information ...................................35
Changing to CD/MP3/WMA/C‘n‘C/
CD changer mode ...................................36
Inserting a CD ........................................37
Ejecting a CD .........................................37
Connecting/removing a USB data carrier ...37
Selecting tracks .....................................37
Select a folder/CD (only in MP3/WMA/
C‘n‘C or CD changer mode) ......................37
Fast searching........................................38
Interrupting playback ..............................38
Playlist mode (only in MP3/WMA mode) ....38
Scanning all tracks..................................38
Playing tracks in random order .................38
Repeatedly playing individual tracks,
CDs or directories ..................................39
Configuring the display............................39
Bluetooth® ...............................................39
Bluetooth® menu ....................................40
Registering and connecting a device ..........40
Telephone functions ...............................41
Bluetooth® streaming mode .....................42
Additional functions in the Bluetooth®
menu ....................................................43
External audio sources ..............................44
Front AUX-IN socket ................................44
Rear AUX input.......................................44
Sound settings .........................................45
Calling and exiting the audio menu ............45
Performing settings in the audio menu .......45
Calling and exiting the enhanced audio
menu ....................................................46
Performing settings in the enhanced
audio menu ...........................................46
User settings ............................................47
Calling and exiting the user menu ..............47
Performing settings in the user menu ........47
Factory settings........................................50
Useful information ....................................51
Warranty ...............................................51
Service .................................................51
Technical data ..........................................51
Installation instructions ..........................381
28
02_Toronto400BT_gb.indd 28
03.02.2009 16:04:21 Uhr
Safety notes
The car sound system was manufactured according to the state of the art and established safety
guidelines. Even so, dangers may occur if you
do not observe the safety notes in these instructions.
These instructions contain important information to easily and safely install and operate the car
sound system.
• Read these instructions carefully and completely before using the car sound system.
• Keep the instructions at a location so that they
are always accessible to all users.
• Always pass on the car sound system to third
parties together with these instructions.
In addition, observe the instructions of the devices used in conjunction with this car sound
system.
Symbols used
These instructions employ the following symbols:
DANGER!
Warns about injuries
CAUTION!
Warns about damaging the CD drive
• Remove or attach the control panel only
while the vehicle is standing an.
• Always listen at a moderate volume to protect your hearing and to be able to hear acoustic warning signals (e.g. police sirens). During
mute phases (e.g. when changing the audio
source), changing the volume is not audible.
Do not increase the volume during this mute
phase.
General safety notes
Observe the following notes to protect yourself
against injuries:
• Do not modify or open the device. The device
contains a Class 1 laser that can cause injuries
to your eyes.
• Do not increase the volume during mute
phases, e.g. when changing the audio source.
Changing the volume is not audible during a
mute phase.
Use as directed
This car sound system is intended for installation
and operation in a vehicle with 12 V vehicle system voltage and must be installed in a DIN slot.
Observe the performance limits in the technical data. Repairs and installation, if necessary,
should be performed by a specialist.
• Identifies a listing
Installation instructions
You may only install the car sound system yourself if you are experienced in installing car sound
systems and are very familiar with the electrical
system of the vehicle. For this purpose, observe
the installation instructions at the end of these
instructions.
Road safety
Declaration of conformity
Observe the following notes about road safety:
• Use your device in such a way that you can
always safely control your vehicle. In case of
doubt, stop at a suitable location and operate
your device while the vehicle is standing.
The Blaupunkt GmbH declares that the car sound
system Toronto 400 BT complies with the basic
requirements and the other relevant regulations
of the directive 1999/5/EG.
The CE mark confirms the compliance
with EU directives.
쏅 Identifies a sequencing step
ENGLISH
Safety notes
29
02_Toronto400BT_gb.indd 29
03.02.2009 16:04:21 Uhr
Cleaning notes | Disposal notes | Scope of delivery
Cleaning notes
Solvents, cleaning and scouring agents as well as
dashboard spray and plastics care product may
contain ingredients that will damage the surface
of the car sound system.
• Use only a dry or slightly moistened cloth for
cleaning the car sound system.
• If necessary, clean the contacts of the control
panel regularly using a soft cloth moistened
with cleaning alcohol.
Disposal notes
Do not dispose of your old unit in the household trash!
Use the return and collection systems available to
dispose of the old device.
Optional equipment
(not part of the scope of delivery)
Contact your Blaupunkt specialised dealer or visit
us on the Internet under www.blaupunkt.com for
information about optional equipment, such as:
• The steering wheel or handheld remote control
from Blaupunkt for safe and convenient operation of the basic functions (switching on/off
not possible with the remote control)
• The C‘n‘C-ready interfaces from Blaupunkt
(C‘n‘C = Command and Control) for connecting additional data carriers and devices (e.g.
via the iPod®/USB interface)
• Blaupunkt CD changer
• Blaupunkt or Velocity amplifier
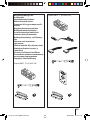
Scope of delivery
The scope of delivery includes:
1 Car sound system
1 Operating/installation instructions
1 Case for the control panel
1 Support frame
1 Set of small parts
2 Disassembly tools
1 USB connecting cable
Extended scope of delivery
(for 7 649 036 010 only):
1 Connecting cable chamber A (power supply)
1 Connecting cable chamber B (loudspeaker)
1 Connecting cable chamber C1 (Line-Out)
1 Antenna connection adapter
1 Handheld remote control
2 Batteries (type AAA)
Note:
We recommend the use of original Blaupunkt
accessories (www.blaupunkt.com).
30
02_Toronto400BT_gb.indd 30
03.02.2009 16:04:21 Uhr
Placing the device in operation
Attaching/detaching the control panel
The car sound system is equipped with a detachable control panel (release panel) to protect your
equipment against theft. In the delivery state, the
control panel is in the supplied case. To start operating the radio after installation, you must first
attach the control panel (see the section "Attaching the control panel" in this chapter).
Always take the control panel with you when leaving the vehicle. The car sound system is worthless
to a thief without this control panel.
Caution
Damage to the control panel
Never drop the control panel.
Transport the control panel so that it is protected
against impacts and the contacts cannot become
dirty.
Do not expose the control panel to direct sunlight
or another heat source.
Avoid direct skin contact with the control panel’s
electrical contacts.
Attaching the control panel
쏅 Push the control panel into the bracket at the
right edge of the device.
쏅 Push the control panel carefully into the left
bracket until it clicks into place.
Removing the control panel
쏅 Press the
button 1 to unlock the control
panel.
The left side of the control panel detaches
from the device and is secured by a latch
against falling out.
쏅 Grasp the control panel at the left side and
pull it beyond the resistance of the latch and
straight out of the bracket.
Note:
The car sound system automatically switches
off as soon as the control panel is removed.
Setting the tuner region
This car sound system is designed for operation in
different regions with different frequency ranges
and station technologies. It is factory set to the
tuner region "EUROPE". Other available tuner
regions include "USA", "THAI" (Thailand) and
"S AMERICA" (South America). If you operate the
car sound system outside of Europe, you may first
have to set a suitable tuner region:
쏅 Switch off the car sound system if it is not
already turned off.
ENGLISH
Placing the device in operation
쏅 Press and hold the buttons MENU•OK ?
and 4 < at the same time and press the On/
Off button 3.
The car sound system switches on. The currently set tuner region appears on the display.
쏅 Press the button @ / 2 repeatedly
until the desired tuner region is displayed.
쏅 Press the MENU•OK button ?.
Switching on/off
Switching on/off with the On/Off button
쏅 For switch-on, press the On/Off button 3.
The car sound system switches on.
쏅 To switch off the device, press and hold down
the On/Off button 3 for longer than 2 seconds.
The car sound system switches off.
Note:
If you switch on the car sound system while
the vehicle ignition is switched off, it automatically switches off after 1 hour to preserve
the vehicle battery.
Switching on/off via vehicle ignition
The car sound system will switch off/on simultaneously with the ignition if the device is correctly
connected to the vehicle’s ignition as shown in the
installation instructions and you did not switch the
device off by pressing the On/Off button 3.
31
02_Toronto400BT_gb.indd 31
03.02.2009 16:04:21 Uhr
Placing the device in operation | Traffic information
Volume
Adjusting the volume
You can adjust the volume in steps from 0 (off) to
50 (maximum).
쏅 Turn the volume control 4 to change the
volume.
Note:
If a telephone or navigation system is connected with the car sound system as described in
the installation instructions, the car sound
system is muted in case of a telephone call
or navigation announcement so that you can
hear the playback of the telephone or navigation system undisturbed. While it is muted,
the display shows "TELEPHONE".
Muting the car sound system (Mute)
You can quickly reduce the volume to a preset
level.
쏅 Briefly press the On/Off button 3 to mute
the car sound system or to reactivate the previous volume.
While it is switched low, the display shows
"MUTE".
To adjust the mute volume, please read the section "Performing settings in the user menu", "Mute
LVL" menu item in the chapter "User settings".
Switching demo mode on/off
The demo mode shows the functions of the car
sound system as scrolling text on the display. You
can turn the demo mode on or off:
쏅 Switch off the car sound system if it is not
already turned off.
쏅 Press and hold the buttons MENU•OK ?
and 2 < at the same time and press the On/
Off button 3.
The car sound system switches on. The display briefly shows "DEMO MODE" if you
switched on the demo mode. By pressing any
button, the demo mode is interrupted and
you can operate the device.
Displaying version numbers
You can display the version numbers of the different device components.
쏅 Switch off the car sound system if it is not
already turned off.
쏅 Press and hold the buttons MENU•OK ?
and 1 < at the same time and press the On/
Off button 3.
The car sound system switches on. The display shows the version number of the first
component. The first character identifies the
component: P = CPU, E = EPROM, A = Accordo, B = Bluetooth®.
쏅 Press the button 5 / > to display the
version number of the other components.
쏅 Press the MENU•OK button ? to return to
the previously played audio source.
Traffic information
In the tuner region "EUROPE", an FM station can
identify traffic reports by means of an RDS signal. If the priority for traffic announcements is
switched on, a traffic announcement is automatically switched through, even if the car sound system is currently not in radio mode or if a station of
the wavebands MW or LW is set.
If priority is switched on, the display shows the
traffic jam symbol (
). "TRAFFIC" is displayed
during a switched-through traffic announcement.
To switch the priority on and off, please read the
section "Performing settings in the user menu",
"TRAF" menu item in the chapter "User settings".
Notes:
• The volume is increased for the duration
of the switched-through traffic announcement. You can adjust the minimum volume for traffic announcements (see the
ch. "User settings", section "Performing
settings in the user menu", "TA VOLUME"
menu item).
32
02_Toronto400BT_gb.indd 32
03.02.2009 16:04:21 Uhr
Traffic information | Radio mode
Radio mode
RDS
Many FM stations broadcast an RDS (Radio Data
System) signal in addition to their programme in
the tuner region "EUROPE" that allows the following additional functions:
• The station name is shown on the display.
• The car sound system recognises traffic announcements and news broadcasts and can
automatically switch them through in any operating mode (e.g. in CD mode).
• Alternate frequency: If RDS is activated, the
car sound system automatically selects the
best receivable frequency for the station that
is currently set.
• Regional (REG): At certain times, some radio
stations divide their programme into regional
programmes providing different content. If the
REG function is activated, the car sound system changes only to those alternate frequencies on which the same regional programme is
being broadcast.
To switch the RDS or REG function on or off, please
read the section "Performing settings in the user
menu" in the chapter "User settings" (menu items
"RDS", "REG").
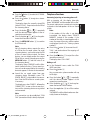
Changing to radio mode
쏅 Press the SRC button 6 repeatedly until
"TUNER" is displayed:
The current memory bank appears once as
scrolling text on the display.
Selecting the memory bank
The following memory banks are available in the
different tuner regions:
Region
EUROPE
Memory banks
FM1, FM2, FMT, MW, LW
USA
FM1, FM2, FMT, AM, AMT
THAI
FM1, FM2, FMT, AM
S AMERICA
FM1, FM2, FMT, AM, AMT
ENGLISH
• To cancel a switched-though traffic announcement, press the DIS/ESC button
=.
쏅 Press the button @ / 2 repeatedly
until the desired memory bank is displayed.
Note:
Up to 5 stations can be stored in each memory bank.
Tuning into a station
There are various ways of tuning into a station:
Tuning into stations manually
쏅 Briefly press the button 5 / > once
or several times to change the frequency in
increments, or long to quickly change the
frequency.
Notes:
• For the tuner region "EUROPE": In the FM
waveband, the next station of the broadcasting network is automatically tuned into
if the RDS function is switched on.
• For the tuner regions "EUROPE", "USA" and
"S AMERICA": In the FM waveband, the current selected programme type is displayed
and can be changed if the PTY function is
activated (see the ch. "PTY").
Starting station seek tuning
쏅 Press the button 5 / > for approx.
2 seconds to start station seek tuning.
The radio tunes into the next receivable station.
33
02_Toronto400BT_gb.indd 33
03.02.2009 16:04:21 Uhr
Radio mode
Notes:
• For the tuner region "EUROPE": In the FM
waveband, only traffic information stations
are tuned into if the priority for traffic infor) is switched on.
mation (
• For the tuner regions "EUROPE", "USA"
and "S AMERICA": In the FM waveband,
the next station with the currently selected
programme type is tuned into if the PTY
function is activated (see the ch. "PTY").
• The sensitivity of seek tuning can be adjusted (see the chapter "User settings",
section "Performing settings in the user
menu", menu item "SENS").
Storing stations/Calling stored
stations
쏅 Select the desired memory bank.
쏅 If necessary, set the desired station.
쏅 Press the station button 1 - 5 < for approx.
2 seconds to store the current station under
the button.
- or 쏅 Briefly press the station button 1 - 5 < to
call up the stored station.
Scanning stations
The scan function is used to scan every receivable
station of the current waveband.
쏅 Press the MENU•OK button ? for approx.
2 seconds to start the scan, or long to continue playing the currently set station.
During the scan, the display alternately displays "SCAN" and the current frequency as
well as memory bank or station name.
Storing stations automatically
(Travelstore)
With Travelstore, you can automatically search for
and store the 5 FM stations offering the strongest
reception in the region in one memory bank, Any
previously stored stations in this memory bank
are deleted in the process.
In the tuner regions "EUROPE" and "THAI", you
can store 5 FM stations in the FMT memory bank
with Travelstore. In the tuner regions "USA" and
"S AMERICA", you can also store 5 AM stations in
the AMT memory bank.
쏅 Select a memory bank of the desired waveband, e.g. FM1 or AM.
쏅 Press the button
2 seconds.
@/
2 for approx.
The tuner starts the automatic station seek
tuning; the display shows "FM TSTORE" or
"AM TSTORE". After the storing is completed,
the radio plays the station at memory location
1 of the FMT or AMT level.
Note:
For the tuner region "EUROPE": If the priority
for traffic information is switched on (
),
only traffic information stations are stored.
PTY
In the tuner regions "EUROPE", "USA" and "S
AMERICA", an FM station can transmit its current programme type, e.g. CULTURE, POP, JAZZ,
ROCK, SPORT or SCIENCE. Hence, the PTY function allows a targeted search for broadcasts of a
certain programme type, e.g. for rock or sports
broadcasts. Note that PTY is not supported by all
stations.
Note:
For radio mode, you can adjust the scan time
for each station (see the ch. "User settings",
section "Performing settings in the user
menu", "SCAN TIME" menu item).
34
02_Toronto400BT_gb.indd 34
03.02.2009 16:04:22 Uhr
Note:
To use the PTY function, you must activate
it separately in the menu (see the ch. "User
settings", section "Performing settings in the
user menu", "PTY" menu item).
Selecting a programme type
Note:
In the tuner region "EUROPE", you can adjust
the language in which the programme types
are displayed (see the ch. "User settings",
section "Performing settings in the user
menu", "PTY LANG" menu item).
쏅 Briefly press the button
5/
>.
The currently selected programme type is
briefly displayed, and you can select a different programme type.
쏅 If necessary, press the button 5 / >
repeatedly until the desired programme type
is selected.
Searching for stations
쏅 Press the button 5 /
2 seconds.
> for approx.
As soon as the seek tuning starts, the display
briefly shows "SEARCH". Afterwards, the current programme type is displayed.
As soon as a station is found, "PTY FOUND"
is briefly shown. As long as the programme
type of the adjusted station corresponds to
the currently selected programme type, the
display alternately shows the programme
type and the station name or frequency.
Notes:
• If no station with the selected programme
type is found, "NO PTY" is briefly displayed
and a beep sounds. The radio will then
retune to the station that it played last.
• If the tuned radio station or another station
on the broadcasting network broadcasts
your selected programme type at a later
point in time, the car sound system will automatically switch from the currently tuned
station or from the current audio source
(e.g. CD) to the station whose programme
type matches the one you selected. Note
that this function is not supported by all
stations.
ENGLISH
Radio mode | CD/MP3/WMA/C‘n‘C/CD changer mode
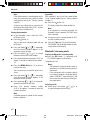
Configuring the display
쏅 Press the DIS/ESC button = to change between these two displays:
Display
Meaning
Station name
ABCDEF
or
or
FM1 102.90 memory bank/frequency
FM1 11:32 Memory bank/time
CD/MP3/WMA/C‘n‘C/
CD changer mode
Basic information
CD/MP3/WMA mode
This car sound system can be used to play audio
CDs (CDDA) and CD-R/RWs with audio, MP3 or
WMA files as well as MP3 or WMA files on USB
data carriers.
Risk of severe damage to the CD drive!
Noncircular contoured CDs (shape CDs)
and CDs with a diameter of 8 cm (mini
CDs) must not be used.
We accept no responsibility for any damage to the
CD drive that may occur as a result of the use of
unsuitable CDs.
Notes:
• To ensure proper functioning, use only CDs
with the Compact-Disc logo.
35
02_Toronto400BT_gb.indd 35
03.02.2009 16:04:22 Uhr
CD/MP3/WMA/C‘n‘C/CD changer mode
• Blaupunkt cannot guarantee the flawless
function of copy-protected CDs and all CD
blanks and USB data carriers available on
the market.
Note the following information when preparing an
MP3/WMA data carrier:
• Naming of tracks and directories:
– Max. 16 characters (CD) or 24 characters (USB) incl. the file extension ".mp3"
or ".wma" (if more characters are used,
the number of tracks and folders that are
recognisable by the car sound system is
reduced)
– No umlauts or special characters
• CD formats: Audio CD (CDDA), CD-R/RW,
Ø: 12 cm
• CD data formats: ISO 9669 Level 1 and 2,
Joliet
• CD burn speed: Max. 16x (recommended)
• USB format/file system: Mass storage device/
FAT32
• File extension of audio files:
– .MP3 for MP3 files
– .WMA for WMA files
• WMA files only without Digital Rights Management (DRM) and created with Windows Media
Player version 8 or later
• MP3 ID3 tags: Version 1 and 2
• Bitrate for creating audio files:
– MP3: 32 to 320 kbps
– WMA: 32 to 192 kbps
• Max. number of tracks: 20,000
C‘n‘C mode
The C'n'C interface from Blaupunkt (C'n'C = Command and Control) allows an even more convenient control of devices and data carriers that are
connected to the car sound system via a C'n'Cready Blaupunkt interface.
Before connecting a C'n'C-ready Blaupunkt interface, check the mode of the rear AUX input. For
further details, please read the section "Rear AUX
input" in the chapter "External audio sources".
CD changer mode
You can connect the following CD changers to the
car sound system:
• Blaupunkt CDC A03
• Blaupunkt CDC A08
• Blaupunkt IDC A09
Information on handling CDs, inserting CDs and
operating the CD changer can be found in the
operating instructions supplied with your CD
changer.
Before connecting a CD changer, check the mode
of the rear AUX input. For further details, please
read the section "Rear AUX input" in the chapter
"External audio sources".
Changing to CD/MP3/WMA/C‘n‘C/
CD changer mode
쏅 Press the SRC button 6 repeatedly until
the desired audio source is displayed:
• "CD": Inserted CD.
• "MP3": Inserted CD that has already been
recognised as MP3 CD.
• "USB": Connected USB data carrier.
• Name of the device connected via C‘n‘C
• "CDC / AUX": Connected CD changer (if no
other external audio source is connected).
Notes:
• The respective audio source can be selected only if a corresponding CD is inserted or
a corresponding device (e.g. a USB data
carrier or CD changer) is connected.
• If the car sound system first has to read
the data of a connected device or data carrier before the playback, the display shows
"READING". For large data volumes, this
may take up to 1 minute. If the device or
data carrier is defective or the transferred
data cannot be played back, a corresponding message appears on the display (e.g.
"ERROR" or "USB ERROR").
36
02_Toronto400BT_gb.indd 36
03.02.2009 16:04:22 Uhr
CD/MP3/WMA/C‘n‘C/CD changer mode
Inserting a CD
Note:
You must not hinder or assist the drive as it
automatically draws in the CD.
쏅 Insert the CD with its printed side up into the
CD tray 7 until you feel a slight resistance.
The CD is automatically pulled in and its data
are checked (the display shows "READING"
during this time). Afterwards, the playback
starts in CD or MP3 mode. If a CD is inserted,
the display shows the CD symbol.
Note:
If the inserted CD cannot be played back, "CD
ERROR" is briefly displayed and the CD is automatically ejected after approx. 2 seconds.
Ejecting a CD
To be able to connect a USB data carrier, the supplied USB cable must be connected to the car
sound system (see Installation Instructions).
쏅 Switch of the car sound system so that the
data carrier will be correctly registered and
unregistered.
쏅 Connect the USB data carrier to the USB
cable or pull it off.
If a USB data carrier is connected, the display
shows the USB symbol. If the USB data carrier is initially selected as audio source after
connecting it or after switching on the car
sound system, the data are read in first (the
display shows "READING" during this time).
Notes:
• If the connected USB data carrier cannot be
seen, "USB ERROR" is briefly displayed.
• The time required for reading in the data
depends on the design and size of the USB
data carrier.
Selecting tracks
Notes:
• If a CD is ejected and not removed, the
drive will automatically draw it back in
again after approx. 10 seconds.
• You can also eject CDs while the car sound
system is switched off or whilst another audio source is activated.
쏅 Press the
CD.
Connecting/removing a USB data
carrier
ENGLISH
• If the connected CD changer first acquires
the inserted CDs (e.g. after an interruption
of the power supply or a change of the magazine), "MAG SCAN" is displayed. If the CD
changer does not contain any CDs or magazine, "NO DISC" is displayed.
button : to eject an inserted
5/
쏅 Briefly press the button
change to the previous/next track.
> to
Note:
If the current track plays longer than 3 seconds, pressing 5 once restarts the track.
Select a folder/CD (only in MP3/
WMA/C‘n‘C or CD changer mode)
쏅 Press the button @ / 2 to change to
the previous/next folder or CD.
Note:
This also allows you to change between
playlists of a device connected via C‘n‘C.
37
02_Toronto400BT_gb.indd 37
03.02.2009 16:04:22 Uhr
CD/MP3/WMA/C‘n‘C/CD changer mode
Fast searching
Scanning all tracks
쏅 Press and hold down the button 5 / >
until the desired position has been reached.
The scan function scans all available tracks.
쏅 Press the MENU•OK button ? for approx.
2 seconds to start the scan, or long to continue playing the currently scanned track.
Interrupting playback
쏅 Press the button 3 < to interrupt the
playback ("PAUSE") or to continue.
Playlist mode (only in MP3/WMA
mode)
The car sound system can play playlists that were
created with an MP3 manager, such as WinAmp
or Microsoft Media Player. The playlists must be
stored in the root folder of the CD or USB data carrier. The following playlist formats can be recognised: M3U, PLS.
Selecting tracks in Playlist mode
쏅 Press the 2 button < for approx. 2 seconds
to change to the Playlist mode:
"LIST MODE" briefly appears on the display.
The first track of the first playlist is played.
During the scan, the display alternately displays "SCAN" and the current track number
or file name.
Notes:
• In the CD changer mode, the scan time per
track is approx. 10 seconds. For all other
operating modes, you can adjust the scan
time for each track (see the ch. "User settings", section "Performing settings in the
user menu", "SCAN TIME" menu item).
• In the Playlist mode (MP3 mode), only the
tracks of the current playlist are scanned.
Playing tracks in random order
쏅 Press the 5 MIX button < to change between the playback modes:
Opera- Display
tion
CD
MIX ALL
Note:
If the data carrier does not contain any
playlists, "NO LIST" is briefly displayed.
쏅 Briefly press the button
5 / > to
change to the previous/next track of the current playlist.
MP3/
WMA/
C‘n‘C 1
쏅 Press the button @ / 2 to change to
the previous/next playlist.
"LIST OFF" briefly appears on the display. The
current track continues playing.
MIX ALL 2
MIX CD
The display briefly shows the name of the
selected playlist, and the first track of the
playlist is being played.
Exiting the Playlist mode
쏅 Press the 2 button < for approx. 2 seconds:
MIX DIR 2
CDC
MIX ALL
Gen.
MIX OFF
Meaning
Mixing tracks
Mixing tracks of the
current folder
Mixing tracks of the
data carrier
Mixing tracks of the
current CD
Mixing tracks of
all CDs
Regular playback
1
In C‘n‘C mode, additional playback modes
may be available depending on the connected device
2
Not in MP3 Playlist mode
If the MIX function is active, the MIX symbol
appears on the display.
38
02_Toronto400BT_gb.indd 38
03.02.2009 16:04:22 Uhr
CD/MP3/WMA/C‘n‘C/CD changer mode | Bluetooth®
쏅 Press the 4 RPT button < to change between the playback modes:
Opera- Display
tion
CD
RPT TRACK
MP3/
RPT TRACK
WMA/
RPT DIR 2
C‘n‘C 1
CDC
Gen.
Meaning
Repeating tracks
Repeating tracks
Repeating folders
RPT TRACK Repeating tracks
RPT DISC Repeating a CD
RPT OFF
Regular playback
1
In C‘n‘C mode, additional playback modes
may be available depending on the connected device
2
Not in MP3 Playlist mode
If the RPT function is active, the RPT symbol
appears on the display.
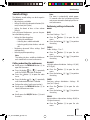
Configuring the display
쏅 Press the DIS/ESC button = once or several
times to change between these displays:
Operation
Display
01 ABC
Track number
and playing time
Track number
and time
File name
ABCDEF
Artist 1
ABCDEF
Album name 1
PLAY 02:15
Playing time
T 01 02:15
CD
T 01 18:33
MP3/
WMA/
C‘n‘C
CLK 18:33
T 01 02:15
CDC
Meaning
T 01 18:33
CD 02T 03
Time
Track number
and playing time
Track number
and time
CD number and
track number
1
Artist and album name must be stored as
ID3 tag and are displayed only for approx.
10 seconds and perhaps as scrolling text;
otherwise, the file name is displayed.
Note
You can switch the display of CD text of an
audio CD on and off (see the ch. "User settings", section "Performing settings in the
user menu", "CD TEXT" menu item). If CD text
is switched on, the corresponding CD text is
displayed once as scrolling text at the start of
a track.
ENGLISH
Repeatedly playing individual tracks,
CDs or directories
Bluetooth®
You can connect the car sound system via Bluetooth® with other Bluetooth®-ready devices, such
as cell phones or MP3 players. This allows you
to use the car sound system with its integrated
microphone as hands-free system for connected cell phones and control the audio output of
other Bluetooth® devices and play them back via
the loudspeakers of the car sound system (Bluetooth® streaming).
Bluetooth® technology is a wireless connection of
short range. For this reason, Bluetooth® devices
must be located near the car sound system (in the
vehicle) to establish and maintain a connection.
To establish a Bluetooth® connection, you must
first register the car sound system and the Bluetooth® device. When you register the devices, a
Bluetooth® connection is subsequently established automatically. This connection remains in
effect as long as the Bluetooth® device is within
range. If the connection is interrupted, e.g. because you moved the cell phone outside the range,
the connection is automatically re-established as
soon as you are back within range.
You can connect only one cell phone and streaming device with the car sound system at a time.
If you connect a new device with the car sound
system, the connection to a currently connected
device may automatically be interrupted. However, the car sound system leaves up to 5 different Bluetooth® devices registered, and you can
quickly and easily connect any of these devices
39
02_Toronto400BT_gb.indd 39
03.02.2009 16:04:22 Uhr
Bluetooth®
with the car sound system again. If you register a
sixth one, the Bluetooth® device registered first is
unregistered.
Bluetooth® menu
Registering and connecting a device
Registering and connecting a cell phone
쏅 In the Bluetooth® menu, select the "PAIR"
menu item.
In the Bluetooth® menu, you find all the functions
for registering, connecting and managing Bluetooth® devices.
쏅 Press the
menu.
Calling the Bluetooth® menu
쏅 Press the MENU•OK button ?.
쏅 Press the
phone.
쏅 Press the button @ to select the "BLUETOOTH" menu item.
쏅 Press the button > to open the Bluetooth® menu.
쏅 Press the button @ / 2 repeatedly
until the desired menu item is selected.
Notes:
• The Bluetooth® menu is automatically exited approx. 30 seconds after the last button activation and you are returned to the
display of the current audio source.
• If a Bluetooth® process is running (e.g.
re-establishing the connection to the last
connected device), the functions of the
Bluetooth® menu are blocked. If you attempt to open the Bluetooth® menu during
this time, "LINK BUSY" appears on the display. To return to the current audio source,
press the DIS/ESC button =. To cancel
the Bluetooth® process and open the Bluetooth® menu, press the
button A.
Exiting the Bluetooth® menu
쏅 Briefly press the DIS/ESC button = to exit
the Bluetooth® menu.
button > to open the sub-
The "PHONE" menu item is selected.
button > to register a cell
The display shows "PAIRING" and the Bluetooth® symbol is flashing. The car sound system can now be recognised by a Bluetooth®
cell phone for approx. 2 minutes and connected.
쏅 Search the car sound system from your
cell phone (Bluetooth® name: "TORONTO
400 BT").
As soon as the car sound system is found
by the cell phone and should be connected,
"ENTER PIN" appears on the display and the
PIN "1234".
쏅 Establish the connection from your cell
phone. Enter the PIN displayed by the car
sound system.
The display may show "PAIRED", followed
by "CONNECTED", as soon as the car sound
system and the cell phone are registered and
connected.
Note:
If no connection can be established, "CON
FAIL" (connection failed) is briefly displayed.
Registering and connecting a Bluetooth®
streaming device
쏅 In the Bluetooth® menu, select the "PAIR"
menu item.
쏅 Press the
menu.
button > to open the sub-
The "PHONE" menu item is selected.
40
02_Toronto400BT_gb.indd 40
03.02.2009 16:04:23 Uhr
쏅 Press the button @ to select the "STREAMING" menu item.
Telephone functions
쏅 Press the button > to register a streaming device.
Answering/rejecting an incoming phone call
With an incoming call, the display alternately
shows "INCOMING" and the number of the caller.
The current audio source is muted and a ring tone
is played via the loudspeakers of the car sound
system.
The display shows the currently stored PIN
(default "1234"). If required, enter the PIN of
the streaming device:
쏅 Press the button @ / 2 repeatedly
until the desired number appears at the respective current location.
쏅 Press the button 5 / > to change between the 4 locations of the PIN.
쏅 Press the MENU•OK button ? to confirm
the PIN entered.
Note:
Not all streaming devices require the entry
of a PIN on the car sound system. For some
streaming devices, you have to enter the PIN
of the car sound system instead. For those
devices, you can simply confirm the current
PIN of the car sound system by pressing the
MENU•OK button ? and then enter it on
the streaming device.
The display shows "PAIRING" and the Bluetooth® symbol is flashing. The car sound system can now be recognised by the streaming
device for approx. 2 minutes and connected.
쏅 Search the car sound system from your
streaming device (Bluetooth® name: "TORONTO 400 BT") and establish the connection. Enter the PIN of the car sound system,
if necessary.
The display may show "PAIRED", followed by
"CONNECTED", as soon as the car sound system and the streaming device are registered
and connected.
Note:
If no connection can be established, "CON
FAIL" (connection failed) is briefly displayed.
Note:
If the number of the caller is not being
transmitted, the display shows "PRIVATE
NUMBER" instead of the number. If the
number of the caller is stored together with a
name, the name of the entry and the number
are displayed (see the ch. "Storing a phone
number").
쏅 Press the
ENGLISH
Bluetooth®
button B to answer the call.
"CALL" and the duration of the ongoing call
are displayed.
쏅 Press the
button A to reject the call or
to end the current call.
The display shows "CALL END".
Making a call
쏅 In the Bluetooth® menu, select the "DIAL
NEW" menu item.
쏅 Press the
button >.
You can now enter a phone number with up
to 20 digits:
쏅 Press the button @ / 2 repeatedly
until the desired number appears at the
respective current location.
쏅 Press the button 5 / > to change between the locations of the number.
쏅 Press the
entered.
button B to call the number
"OUTGOING" and the dialed number are alternately shown on the display.
41
02_Toronto400BT_gb.indd 41
03.02.2009 16:04:23 Uhr
Bluetooth®
Note:
If the dialed number is stored together with a
name, the name of the entry and the number
are displayed (see the ch. "Storing a phone
number").
Speed dial
With speed dial, you can call the number dialed
last or a stored number (see ch. "Storing a phone
numbers").
button B.
쏅 Press the
As soon as your calling party answers the call,
the display alternately shows "CALL" and the
time of the current phone call.
The display shows the number dialed last.
Storing phone numbers
쏅 In the Bluetooth® menu, select the "DIAL
NEW" menu item.
쏅 Press the
button >.
You can now enter a phone number with up
to 20 digits:
쏅 Press the button @ / 2 repeatedly
until the desired number appears at the
respective current location.
쏅 Press the button 5 / > to change
between the locations of the number.
쏅 Press the desired memory button 1 - 5 < for
approx. 2 seconds to store only the number.
- or 쏅 Press the MENU•OK button ? to enter a
name for the entry.
You can now enter a name with up to 9 characters:
쏅 Press the button @ / 2 repeatedly
until the desired character appears at the
respective current location.
쏅 Press the button 5 / > to change between the locations of the name.
쏅 Press the desired memory button
1 - 5 < for approx. 2 seconds to store the
number and name.
Note:
If no cell phone is currently connected, the
Bluetooth® menu is opened. The "PAIR" menu
item is selected.
쏅 If necessary, press a memory button 1 - 5 <
to call the number stored.
쏅 Press the
button B to call the number.
"OUTGOING" and the dialed number are alternately shown on the display.
Bluetooth® streaming mode
Starting the Bluetooth® streaming mode
쏅 Press the SRC button 6 repeatedly until
"BT STREAM" appears on the display.
The playback starts.
Notes:
• The Bluetooth® streaming mode can be selected only if a suitable streaming device is
connected.
• If the connection to the streaming device
is lost during playback, the display briefly
shows "CON LOST" (connection lost) and
the car sound system changes to the previous audio source.
Selecting tracks
쏅 Briefly press the button
5/
change to the previous/next track.
> to
Note:
A number previously stored on the memory
button is replaced.
42
02_Toronto400BT_gb.indd 42
03.02.2009 16:04:23 Uhr
Bluetooth®
Changing the Bluetooth® PIN
The factory-set Bluetooth® PIN of the car sound
system is "1234"; e.g. it must be entered on the
cell phone when registering a cell phone. This PIN
can be changed.
쏅 In the Bluetooth® menu, select the "PIN EDIT"
menu item.
쏅 Press the
menu.
button > to open the sub-
쏅 Press the button @ / 2 repeatedly
until the desired number appears at the
respective current location.
쏅 Press the button 5 / > to change
between the 4 locations of the PIN.
쏅 Press the MENU•OK button ?.
Managing registered devices
In the Bluetooth® menu, you can manage the
registered Bluetooth® devices (cell phones and
streaming devices such as MP3 player).
The registered devices are displayed in the device
lists for cell phones ("PHN LIST") and streaming
devices ("STR LIST"). You can do the following:
• Disconnecting the connection to the currently
connected Bluetooth® device
• Establishing a connection to one of the registered Bluetooth® devices
• Unregistering a Bluetooth® device
쏅 In the Bluetooth® menu, select the menu item
"PHN LIST" or "STR LIST".
쏅 Press the
menu.
button > to open the sub-
The first device on the list is displayed.
쏅 If necessary, press the button @ / 2
repeatedly until the desired device is displayed.
You have the following options:
button B to connect the
쏅 Press the
device displayed.
The display shows "CONNECTNG". As soon
as the device is connected, "CONNECTED"
is briefly displayed and you are returned to
the Bluetooth® menu. If the device is already
connected, "CON EXIST" (connection exists)
is briefly displayed and you are returned to
the list of registered cell phones or streaming
devices.
ENGLISH
Additional functions in the
Bluetooth® menu
button A to disconnect the
쏅 Press the
connection to the device displayed.
The display briefly shows "DISCONNTD" and
you are returned to the Bluetooth® menu.
If the device was not connected, "NO CONNCT" (no connection) is briefly displayed and
you are returned to the list of registered cell
phones or streaming devices.
button A for approx. 2 sec쏅 Press the
onds to unregister the displayed device.
The display briefly shows "DELETED" and you
are returned to the Bluetooth® menu.
Unregistering all registered devices
쏅 In the Bluetooth® menu, select the "DELETE
ALL" menu item.
쏅 Press the button > to unregister all registered devices.
The display shows "CONFIRM".
쏅 Press the
button > again.
The display briefly shows "DELETED".
Note:
If no device is registered, "EMPTY" is briefly
displayed.
43
02_Toronto400BT_gb.indd 43
03.02.2009 16:04:23 Uhr
External audio sources
External audio sources
Front AUX-IN socket
Danger! Increased risk of injury
from connector.
In case of an accident, the protruding
connector in the front AUX-IN socket may cause
injuries. The use of straight plugs or adapters
leads to an increased risk of injury.
For this reason, we recommend using angled
jack plugs, e.g. the Blaupunkt accessories cable
(7 607 001 535).
As soon as an external audio source, such as a
portable CD/MiniDisc or MP3 player is connected
to the Front-AUX-IN socket, it can be selected with
the SRC button 6. "FRONT AUX" then appears
on the display.
Rear AUX input
Different external audio sources can be connected to the car sound system via the rear AUX input
(Rear-AUX-IN):
• C‘n‘C-ready devices from the Blaupunkt accessories programme (e.g. a C‘n‘C-ready
Bluetooth®/USB or iPod®/USB interface;
C‘n‘C = Command and Control).
• CD changer
• Other external audio sources, such as portable
CD players, MiniDisc players, MP3 players or a
non-C‘n‘C-capable Blaupunkt interface.
Note:
An adapter cable is needed to connect an
external audio source via the rear AUX input.
You can obtain this cable (Blaupunkt no.:
7 607 897 093) from your Blaupunkt dealer.
Before you connect a certain device, first check
the mode of the rear AUX input and, if necessary, change the setting (see ch. "User settings",
section "Performing settings in the user menu",
"CDC" menu item). Ensure that you change the
setting only as long as no device is connected
to the rear AUX input. If necessary, remove connected devices first while the car sound system is
switched off.
Starting C'n'C mode
쏅 Press the SRC button 6 repeatedly until
the name of the device connected via C'n'C
appears on the display.
The playback starts.
Notes:
• The C'n'C mode can be selected only if a
suitable device is connected via a C'n'Cready interface.
• To operate the radio in C‘n‘C mode, please
read the chapter "CD/MP3/WMA/C‘n‘C/CD
changer mode".
• When using suitable adapter cables, you
can connect up to 3 C'n'C-ready Blaupunkt
interfaces to the car sound system. For the
car sound system to distinguish the different interfaces, you can assign an individual
device number to every interface (see ch.
"User settings", section "Performing settings in the user menu", "C‘N‘C" menu
item).
Starting AUX mode
쏅 Press the SRC button 6 repeatedly until
"CDC / AUX" appears on the display.
The playback starts.
Note:
You can enter a separate name for the rear
AUX input that is shown on the display in
AUX mode if you selected the connected audio source (see ch. "User settings", section
"Performing settings in the user menu", "AUX
EDIT" menu item).
44
02_Toronto400BT_gb.indd 44
03.02.2009 16:04:24 Uhr
Sound settings
The following sound settings can be changed in
the Audio menu:
• Adjusting bass and treble
• Setting the left/right volume distribution (Balance) or front/rear (Fader)
• Setting the boost of bass at low volume
(X-Bass).
In the Enhanced Audio menu, you can also perform the following settings:
• Setting the 3-band equalizer:
– Setting the middle level
– Selecting bass, middle and treble
– Adjusting quality factor for bass and middle
• Performing advanced X-Bass settings (level
and frequency)
• Selecting equalizer presettings
Note:
The settings for bass, middle and treble are
each stored for the current audio source.
Calling and exiting the audio menu
쏅 Briefly press the MENU•OK button ? to
open the User menu.
쏅 Press the button @ / 2 repeatedly
until the "AUDIO" menu item is selected.
쏅 Press the
menu.
button > to open the audio
쏅 Press the button @ / 2 repeatedly
until the desired menu item is selected.
쏅 Perform the setting (see the next section).
쏅 Briefly press the MENU•OK button ? to
select a different menu item.
- or 쏅 Briefly press the DIS/ESC button = to exit
the menu.
Note:
The menu is automatically exited approx.
15 seconds after the last button activation
and you are returned to the display of the current audio source.
ENGLISH
Sound settings
Performing settings in the audio
menu
BASS
Bass level. Settings: -7 to +7.
쏅 Press the button > to open the submenu.
쏅 Press the button
the setting.
@/
2 to perform
TREBLE
Treble. Settings: -7 to +7.
쏅 Press the button > to open the submenu.
쏅 Press the button
the setting.
@/
2 to perform
BALANCE
Left/right volume distribution. Settings: L9 (left)
to R9 (right).
쏅 Press the button > to open the submenu.
쏅 Press the button
the setting.
@/
2 to perform
FADER
Front/rear volume distribution. Settings: R9
(rear) to F9 (front).
쏅 Press the button > to open the submenu.
쏅 Press the button
the setting.
@/
2 to perform
X-BASS
Increase of bass at low volume. Settings: 0 (off) to
3 (highest increase).
쏅 Press the button > to open the submenu.
45
02_Toronto400BT_gb.indd 45
03.02.2009 16:04:24 Uhr
Sound settings
쏅 Press the button
the setting.
@/
2 to perform
쏅 Press the button 5 / > to change between the available settings of the submenu.
쏅 Press the button > to open the ENHANCED menu.
E-MIDDLE
Setting the middle level and frequency as well
as quality factor. Settings:
• Middle level: -7 to +7
• Centre frequency: 0.5/1.0/1.5/2.5 kHz
• Quality factor: 0.5/0.75/1.0/1.25
쏅 Press the button @/
2 repeatedly
until the desired menu item is selected.
쏅 Press the button > to open the E-MIDDLE
submenu.
쏅 Perform the setting (see the next section).
쏅 Press the button @ / 2 to change between the submenus "GAIN" (level), "FREQ"
(frequency) and QFAC (quality factor).
Calling and exiting the enhanced
audio menu
쏅 In the audio menu, select the "ENHANCED"
menu item.
쏅 Briefly press the MENU•OK button ? to
select a different menu item.
- or 쏅 Briefly press the DIS/ESC button = to exit
the menu.
Performing settings in the enhanced
audio menu
E-BASS
Adjusting bass frequency and quality factor. Settings:
• Bass frequency: 60/80/100/200 Hz
• Quality factor: 1.0/1.25/1.5/2.0
쏅 Press the
submenu.
button > to open the E-BASS
쏅 Press the button @ / 2 to change between the submenus "FREQ" (frequency) and
"QFAC" (quality factor).
쏅 Press the button 5 / > to change between the available settings of the submenu.
E-TREBLE
Setting the treble frequency. Settings:
10/12.5/15/17.5 kHz.
쏅 Press the button > to open the E-TREBLE
submenu.
쏅 Press the button 5 / > to change between the available settings of the submenu.
E-XBASS
Setting the X-bass level and frequency. Settings:
• X-bass level: 0 (off) to 3
• X-bass frequency: 30/60/100 Hz
쏅 Press the button > to open the E-XBASS
submenu.
쏅 Press the button @ / 2 to change
between the submenus "GAIN" (level) and
"FREQ" (frequency).
쏅 Press the button 5 / > to change between the available settings of the submenu.
PRESETS
Selecting equalizer presettings. Settings: POP,
ROCK, CLASSIC, P-EQ OFF (no presetting).
쏅 Press the button > to open the PRESETS
submenu.
쏅 Press the button @ /
tween the settings.
2 to change be-
46
02_Toronto400BT_gb.indd 46
03.02.2009 16:04:24 Uhr
User settings
button > to open the sub-
User settings
쏅 Press the
menu.
Calling and exiting the user menu
쏅 Press the button @ /
interface ("DEV 1 - 3").
쏅 Press the button @ / 2 repeatedly
until the desired menu item is selected.
쏅 Perform the setting (see the next section).
쏅 Briefly press the MENU•OK button ? to
select a different menu item.
- or 쏅 Briefly press the DIS/ESC button = to exit
the menu.
Note:
The menu is automatically exited approx.
15 seconds after the last button activation
and you are returned to the display of the current audio source.
Performing settings in the user menu
CDC
Setting the rear AUX input mode Settings: ON (to
connect a CD changer or another external audio
source), OFF (to connect a C‘n‘C-ready Blaupunkt
interface).
쏅 Press the button > to open the submenu.
쏅 Press the button > to change between
the settings.
쏅 Briefly press the MENU•OK button ? to
confirm the selected setting.
The car sound system automatically switches
off and on again with the selected setting.
C‘N‘C
Assigning an individual device number to connected C‘n‘C-ready interfaces (C‘n‘C = Command
and Control). Length: 4 digits, characters: 0-9,
A-F (hexadecimal).
쏅 Press the
number.
2 to select the
button > to change the device
쏅 Press the button 5 /
between the positions.
> to change
ENGLISH
쏅 Briefly press the MENU•OK button ? to
open the menu.
The character at the selected position flashes
if selected.
쏅 Press the button @ / 2 to select a
character at the selected location.
쏅 Briefly press the MENU•OK button ? to
confirm the device number entered.
CDTEXT
Switching the display of CD text on or off. Settings: ON, OFF.
쏅 Press the button > to open the submenu.
쏅 Press the button > to change between
the settings.
쏅 Briefly press the MENU•OK button ? to
confirm the selected setting.
TA VOLUME
(only for tuner region "EUROPE")
Setting the minimum volume for traffic announcements. Settings: 1 - 50.
쏅 Press the button > to open the submenu.
쏅 Press the button @ / 2 or turn the
volume control 4 to perform the setting.
SENS
Only possible in FM radio mode: Setting the sensitivity of station seek tuning. Settings: LO1 (lowest) – HI6 (highest).
쏅 Press the button > to open the submenu.
쏅 Press the button
the setting.
@/
2 to perform
47
02_Toronto400BT_gb.indd 47
03.02.2009 16:04:24 Uhr
User settings
SCAN TIME
Setting the scan time in 5-second increments.
Settings: 5 – 30.
쏅 Press the button > to open the submenu.
쏅 Press the button
the setting.
@/
2 to perform
CLOCK SET
Setting the time.
쏅 Press the button > to open the submenu.
쏅 Press the button 5 / > to change
between minutes and hours.
The minute or hour display flashes if it is
selected.
쏅 Press the button @ /
minutes or hours.
2 to adjust the
쏅 Briefly press the MENU•OK button ? to
confirm the time entered.
Note:
In 12-hour mode (12H MODE), an "A" is displayed after the time for the time before noon
or a "P" for the time after noon.
12H/24H MODE
Selecting the 12 or 24-hour time. Settings: 12H,
24H.
쏅 Press the button > to open the submenu.
쏅 Briefly press the MENU•OK button ? to
confirm the selected setting.
BEEP
Switching the confirmation beep on or off. Settings: ON, OFF.
쏅 Press the button > to open the submenu.
쏅 Press the button > to change between
the settings.
쏅 Briefly press the MENU•OK button ? to
confirm the selected setting.
MUTE LVL
Setting the volume for low volume. Settings: 0 50.
쏅 Press the button > to open the submenu.
쏅 Press the button @ / 2 or turn the
volume control 4 to perform the setting.
ON VOLUME
Setting the power-on volume Settings: 0 – 50 or
LAST VOL (volume set last before switching off
the car sound system). With the "LAST VOL" setting, the power-on volume is limited to max. 25.
쏅 Press the button > to select the setting
"LAST VOL".
- or 쏅 Press the button 5 to set the power-on
volume between 0 and 50.
쏅 Press the button > to change between
the settings.
쏅 Press the button @ / 2 or turn the
volume control 4 to perform the setting.
CLOCK
Switching the display of time on or off with radio
and vehicle ignition switched off. Settings: ON,
OFF.
쏅 Press the button > to open the submenu.
REG
(only for tuner region "EUROPE")
Only possible in FM radio mode: Switching REG
function on or off. Settings: ON, OFF.
쏅 Press the button > to open the submenu.
쏅 Press the button > to change between
the settings.
쏅 Press the button > to change between
the settings.
48
02_Toronto400BT_gb.indd 48
03.02.2009 16:04:25 Uhr
User settings
쏅 Press the button @ /
tween the settings.
2 to change be-
PTY
(only for tuner regions "EUROPE", "USA",
"S AMERICA")
Only possible in FM radio mode: Switching PTY
function on or off. Settings: ON, OFF.
쏅 Press the button > to open the submenu.
쏅 Press the button > to change between
the settings.
DISP COL
Mixing the colour for the display illumination from
the basic colours Red, Green and Blue (RGB). Settings: For R, G and B each 0 to 16.
쏅 Press the button 5 to select the "4096
COL" submenu (setting R, G and B) or
the button > to select the "256 COL"
submenu (setting R and G, B remains unchanged).
쏅 Press the
menu.
button > to open the sub-
쏅 Press the button 5 /
between the colours.
> to change
The value of the selected colour flashes.
쏅 Press the button @ / 2 to adjust the
value of the selected colour.
쏅 Briefly press the MENU•OK button ? to
confirm the selected setting.
SCAN
Switching the constant colour change of the display illumination on or off. Settings: ON, OFF.
쏅 Press the button > to open the submenu.
쏅 Press the button > to change between
the settings.
쏅 Briefly press the MENU•OK button ? to
confirm the selected setting.
If the constant colour change is switched on, the
colour of the display illumination changes constantly across the colour spectrum.
COL SCAN
Selecting the colour of the display illumination
during a colour seek.
쏅 Press the button > to start the colour
seek.
ENGLISH
PTY LANG
(only for tuner region "EUROPE")
Only possible in FM radio mode: Selecting the
language for the display of programme types. Settings: ENGLISH, FRANCAIS, DEUTSCH.
쏅 Press the button > to open the submenu.
The display alternately shows "SCANNING"
and "OK (MENU)" and the colour of the display illumination changes constantly.
쏅 Briefly press the MENU•OK button ? to select the currently set colour.
DIM DAY/DIM NIGHT
Setting the display brightness for the day (DIM
DAY) or the night (DIM NIGHT). Settings: 1 – 16.
쏅 Press the button > to open the submenu.
쏅 Press the button
the setting.
@/
2 to perform
If your car sound system is installed as described
in the installation instructions and your vehicle
features the corresponding connection, the display brightness for day and night is switched by
switching the vehicle lighting on or off.
AUX EDIT
Entering names for the rear AUX input in AUX
mode. Length: 9 digits; characters: A-Z, 0-9.
쏅 Press the button > to open the submenu.
쏅 Press the button 5 /
tween the positions.
> to change be-
The character at the selected position flashes
if selected.
49
02_Toronto400BT_gb.indd 49
03.02.2009 16:04:25 Uhr
User settings | Factory settings
쏅 Press the button @ / 2 to select a
character at the selected location.
쏅 Briefly press the MENU•OK button ? to
confirm the name entered.
Factory settings
Factory settings in the user menu:
ON VOLUME
LAST VOL
TRAF
(only for tuner region "EUROPE")
Only possible in FM radio mode: Switching priority for traffic announcements on or off. Settings:
ON, OFF.
쏅 Press the button > to open the submenu.
MUTE LVL
0
SENS
HI6
SCAN TIME
10
쏅 Press the button > to change between
the settings.
DIM DAY
15
DIM NIGHT
12
RDS
(only for tuner region "EUROPE")
Only possible in FM radio mode: Switching RDS
function on or off. Settings: ON, OFF.
쏅 Press the button > to open the submenu.
CDTEXT
OFF
12H/24H MODE
24H
쏅 Press the button > to change between
the settings.
CLOCK
OFF
BEEP
ON
CLOCKSET
00:00
TA VOL
20
RDS*
ON
REG*
ON
TRAF*
OFF
* Only in tuner region "EUROPE"
You can restore the original factory settings of the
car sound system:
쏅 Briefly press the MENU•OK button ? to
open the menu.
쏅 Press the button @ / 2 repeatedly
until the "NORMSET" menu item is selected.
쏅 Press and hold down the MENU•OK button
? for longer than 4 seconds.
"NORM ON" briefly appears on the display.
The car sound system automatically switches
off and on again with the factory settings.
Note:
If you press the MENU•OK button ? for less
than 4 seconds, "NORM OFF" appears on the
display and the current settings are retained.
50
02_Toronto400BT_gb.indd 50
03.02.2009 16:04:25 Uhr
Useful information | Technical data
Warranty
We provide a manufacturer's warranty for products bought within the European Union. For devices purchased outside the European Union, the
warranty terms issued by our respective responsible domestic agency are valid.
The warranty terms can be called up under
www.blaupunkt.com or requested directly from:
Blaupunkt GmbH
Hotline
Robert-Bosch-Str. 200
D-31139 Hildesheim
Service
In some countries, Blaupunkt offers a repair and
pick-up service.
Information about the availability of this service in
your country can be found at www.blaupunkt.com.
If you want to take advantage of this service, you
may request a pick-up service for your car sound
system via the Internet.
Technical data
Voltage supply
Operating voltage:
10.5 - 14.4 V
Current consumption
In operation:
10 A
10 sec. after switch-off: < 3.5 mA
Amplifier
Output power:
4 x 26 watts sine at
14.4 V at 4 ohms.
Tuner
Wavebands in Europe/Thailand:
FM:
87.5 - 108 MHz
AM (MW):
531 - 1,602 kHz
LW (Europe only):
153 - 279 kHz
Wavebands in the US:
FM:
AM (MW):
ENGLISH
Useful information
87.7 - 107.9 MHz
530 - 1,710 kHz
Wavebands in South America:
FM:
87.5 - 107.9 MHz
AM (MW):
530 - 1,710 kHz
FM frequency response:
30 - 15,000 Hz
CD
Frequency response:
20 - 20,000 Hz
Pre-amp out
4 channels:
2V
Input sensitivity
Rear-AUX-IN:
Front-AUX-IN:
Tel/Navi input:
1.2 V / 10 kΩ
500 mV / 6 kΩ
10 V / 1 kΩ
Dimensions and weight
W x H x D (mm):
182 x 53 x 155
Weight:
approx. 1.30 kg
4 x 50 watts max.
power
Subject to changes
51
02_Toronto400BT_gb.indd 51
03.02.2009 16:04:25 Uhr
Einbauanleitung • Installation instruction
DE – Einbauanleitung
Sicherheitshinweise
GB – Installation instructions
Safety instructions
Für die Dauer der Montage und des
Anschlusses beachten Sie bitte folgende
Sicherheitshinweise.
When carrying out installation work and
making connections please observe the following safety instructions:
• Minuspol der Batterie abklemmen! Dabei die
• Disconnect the negative terminal of the bat-
Sicherheitshinweise des Kfz- Herstellers beachten.
tery! When doing so, please observe the vehicle manufacturer’s safety instructions.
• Beim Bohren von Löchern darauf achten,
• Make sure you do not damage vehicle compo-
dass keine Fahrzeugteile beschädigt werden.
• The cross sections of the positive and nega-
• Der Querschnitt des Plus- und Minuskabels
darf 1,5 mm2 nicht unterschreiten.
• Fahrzeugseitige Stecker nicht an das
Radio anschließen!
Die für Ihren Fahrzeugtyp erforderlichen
Adapterkabel erhalten Sie im BLAUPUNKTFachhandel.
• Je nach Bauart kann Ihr Fahrzeug von dieser
nents when drilling any holes.
tive cables must not be less than 1.5 mm2.
• Do not connect the vehicle’s plug connectors to the radio!
You can obtain the adapter cable required for
your vehicle type from any BLAUPUNKT dealer.
• Depending on the model, your vehicle may
Beschreibung abweichen. Für Schäden durch
Einbau- oder Anschlussfehler und für Folgeschäden übernehmen wir keine Haftung.
differ from the description provided here.
We accept no responsibility for any damages
due to incorrect installation or connection or
for any consequential damages.
Sollten die hier aufgeführten Hinweise für
Ihren Einbau nicht passen, so wenden Sie
sich bitte an Ihren Blaupunkt-Fachhändler,
Ihren Fahrzeughersteller oder unsere TelefonHotline.
If the information provided here is not suitable for your specific installation requirements, please contact your Blaupunkt dealer,
your vehicle manufacturer or our telephone
hotline.
Bei Einbau eines Amplifier oder Changers müssen
unbedingt erst die Gerätemassen angeschlossen
werden, bevor die Stecker für die Line-In- oder
Line-Out-Buchse kontaktiert werden.
When installing an amplifier or changer, you
must first connect the device earth connections
before connecting the plugs for the line-in or lineout jacks.
Fremdgerätemassen dürfen nicht an der
Autoradiomasse (Gehäuse) angeschlossen
werden.
Earth connection of external devices may not
be connected to earth of car sound system
(housing).
381
16_EA_Toronto_400BT.indd 381
04.02.2009 9:33:44 Uhr
Notice de montage • Istruzioni di installazione
FR – Notice de montage
Consignes de sécurité
IT – Istruzioni di installazione
Note di sicurezza
Respecter les consignes de sécurité
suivantes pendant la durée du montage et du
branchement.
Durante il montaggio e l’allacciamento
osservate per favore le seguenti istruzioni
sulla sicurezza.
• Débrancher le pôle (-) de la batterie !
• Staccate il polo negativo della batteria! Nel
Respecter les consignes de sécurité du
constructeur automobile !
fare ciò osservate le istruzioni di sicurezza
del fabbricante d’auto.
• Veiller à n’endommager aucune pièce du vé-
• Quando praticate dei fori, fate attenzione a
hicule en perçant des trous.
• La section du câble (+) et (-) ne doit pas dépasser 1,5 mm².
• Ne pas brancher les connecteurs du véhicule sur la radio !
Les câbles d’adaptation nécessaires pour le
type de véhicule sont disponibles auprès des
revendeurs BLAUPUNKT.
• En fonction du modèle, votre véhicule peut
différer de cette description. Nous déclinerons toute responsabilité en cas de dommages causés par des erreurs de montage ou de
connexion et en cas de dommages consécutifs.
Si les indications décrites ici ne s’appliquent
au montage que vous voulez effectuer, adressez-vous à votre revendeur Blaupunkt, votre
constructeur automobile ou notre service
d’assistance téléphonique.
Pour le montage d’un amplificateur ou changeur, les masses d’appareil doivent être
d’abord connectées avant de connecter les
fiches pour les connecteurs Line In ou Line
Out.
Les masses des appareils externes ne doivent
pas être raccordées à la masse de l'autoradio
(boîtier).
non danneggiare nessuna parte dell’autovettura.
• La sezione dei cavi positivi e negativi non
deve essere mai inferiore a 1,5 mm².
• Non collegate alla radio le spine in dotazione
di autovettura!
• Richiedete ad un negoziante specializzato in
articoli BLAUPUNKT il cavo di adattamento
richiesto per il vostro modello di autovettura.
• A seconda del modello il Suo veicolo può differire da questa descrizione. Non forniamo
garanzia per danni derivanti da errori di montaggio o di collegamento e per danni conseguenti.
• Se le indicazioni qui elencate non sono adatte al Suo montaggio, La preghiamo di rivolgersi al Suo rivenditore Blaupunkt, al fabbricante dell’auto o alla nostra hotline telefonica.
Quando vengono montati un amplificatore o
un multilettore CD, bisogna innanzi tutto allacciare le masse degli apparecchi prima di
eseguire la connessione delle spine con le
prese line-in e line-out.
Le masse di altri apparecchi non devono essere collegate alla massa dell'autoradio (involucro).
382
16_EA_Toronto_400BT.indd 382
04.02.2009 9:33:45 Uhr
Inbowhandleiding • Monteringsvejledning
NL – Inbowhandleiding
Adviezen voor de
veiligheid
Wilt u dedurende het monteren en aansluiten de volgende veiligheidsadviezen in acht
nemen.
• De minpool van de batterij afklemmen! De
veiligheidsadviezen van de fabrikant in acht
nemen.
• Bij het gaten boren erop letten dat geen voertuigonderdelen worden beschadigd.
• De dwarsdoorsnede van de plus- en minkabel mag niet minder dan 1,5 mm² zijn.
SW – Monteringsanvisning
Skyddsanvisningar
Vänligen beakta följande skyddsanvisningar under pågående montage och
anslutning.
• Lossa polskon från batteriets minuspol! Följ
därvid fordonstillverkarens skyddsanvisningar.
• Se till att inga av fordonets komponenter skadas i samband med borrning av hål.
• Plus- och minuskabelns ledningsarea måste
vara minst 1,5 mm².
• Fordonets stickkontakt får inte anslutas
radio aansluiten!
De voor uw voertuig vereiste adapterkabel is
bij de BLAUPUNKT-vakhandel verkrijgbaar!
till radion!
Din BLAUPUNKT fackhandel tillhandahåller
för resp fordonstyp erforderlig adapterkabel.
• Afhankelijk van de uitvoering kan uw auto af-
• Beroende på konstruktionstyp kan fordonet
• Stekker aan de voertuigkant niet aan de
wijken van deze beschrijving. Voor schade
door fouten in montage of aansluiting en
schade als gevolg daarvan aanvaarden wij
geen aansprakelijkheid.
Mochten de hier vermelde aanwijzingen voor
de montage voor u niet van toepassing zijn,
dan kunt u contact opnemen met uw
Blaupunkt-vakhandel, uw autofabrikant of
onze telefoon-hotline.
Bij inbouw van een versterker of cd-wisselaar
moeten eerst de massacontacten van de apparaten worden verbonden voordat de stekkers voor de line-in- of line-out-bussen worden aangesloten.
avvika från denna beskrivning. Vi frånsäger
oss allt ansvar för skada eller följdskada pga.
felaktig montering eller anslutning.
Om här givna monteringsanvisningar ej stämmer överens med faktiska förhållanden, vänligen kontakta Blaupunkt fackhandel, representant för fordonets tillverkare eller vår telefonkundtjänst.
Vid montering av förstärkare eller cd-växlare
måste först apparatstommen jordas, innan
stickpropparna ansluts till in- eller utgångarna (hylstag line-in resp line-out).
Jord från andra apparater får inte anslutas till
bilradions jord (höljet).
De massa van andere apparaten mag niet aan
de massa van de autoradio (huis) worden aangesloten.
383
16_EA_Toronto_400BT.indd 383
04.02.2009 9:33:46 Uhr
Instrucciones de instalación • Instruções de montagem
ES – Instrucciones de
instalación
PT – Instruções de montagem
Instruções de segurança
Normas de seguridad
Durante el montaje y la conexión es imprescindible observar las siguientes normas de
seguridad.
• Desemborne el polo negativo de la batería.
Durante a montagem e a ligação do aparelho, queira respeitar as seguintes instruções
de segurança.
• Separar o pólo negativo da bateria! Respeitar
ao mesmo tempo as instruções de segurança
do fabricante do automóvel.
Observe las normas de seguridad dadas por
el fabricante del vehículo.
• Quando se procede à furagem de buracos,
• Al perforar agujeros, asegúrese de no dañar
prestar atenção para não serem danificadas
quaisquer partes do veículo.
ninguna pieza del vehículo.
• La sección transversal del cable positivo y
• As secções transversais dos cabos positivo e
del cable negativo no debe ser menor de
1,5 mm².
negativo não devem ser inferiores a
1,5 mm².
• ¡No conecte a la radio los conectores ubi-
• Não ligar as fichas existentes do lado do
cados en el vehículo!
Los cables adaptadores necesarios para su
vehículo los encontrará en el comercio especializado en artículos de la marca
BLAUPUNKT.
• O seu veículo pode divergir desta descrição
• Dependiendo del modelo, es posible que su
vehículo varíe un poco con respecto a la descripción aquí dada. Tenga en cuenta que no
asumimos ninguna responsabilidad por los
daños debidos a un montaje o conexión incorrectos ni por los daños resultantes.
Si las instrucciones aquí dadas no son aptas
para el montaje en su vehículo, póngase en
contacto con su proveedor de artículos
Blaupunkt o con el fabricante del vehículo, o
llame a nuestro teléfono de atención al cliente.
En caso de montar un amplificador o un cambiadiscos, es necesario conectar la puesta a tierra
de las unidades antes de establecer el contacto
de los conectores para las hembrillas Line-In y
Line-Out.
automóvel ao auto-rádio
Os cabos adaptadores necessários para o
seu automóvel podem ser adquiridos nos revendedores da BLAUPUNKT.
em função do modelo. Não assumimos qualquer responsabilidade por erros de montagem ou de ligação nem por danos daí decorrentes.
Caso as presentes instruções não sejam adequadas para a montagem no seu veículo, dirija-se ao revendedor da Blaupunkt, ao fabricante do seu veículo ou à nossa linha verde.
No caso de montagem de um amplificador ou leitor multi-CD, é imprescindível ligar primeiro os
aparelhos à terra antes de se conectar as fichas
às tomadas Line In ou Line Out.
A massa de aparelhos externos não deve ser
ligada à massa do auto-rádio (caixa).
No deben conectarse masas de otros equipos
a la masa de la radio (carcasa).
384
16_EA_Toronto_400BT.indd 384
04.02.2009 9:33:46 Uhr
Monteringsvejledning • Instrukcja montażowa
DK – Monteringsvejledning
Sikkerhedshenvisninger
Under monteringen og tilslutningen skal
følgende sikkerhedshenvisninger iagttages.
• Batteriets negative pol skal afbrydes! Herved
skal bilfabrikantens sikkerhedshenvisninger
iagttages.
• Vær opmærksom på, at ingen bildele ødelægges under boringen af huller.
• Tværsnittet af plus- og minuskablet må ikke
underskride 1,5 mm².
• Bilens stik må ikke tilsluttes radioen!
De nødvendige adapterkabler til din biltype
kan købes hos BLAUPUNKT-specialforretningen.
• Alt efter konstruktion kan bilen afvige fra
denne beskrivelse. For skader på grund af
monterings- eller tilslutningsfejl og for følgeskader overtager vi intet ansvar.
Hvis de her anførte henvisninger til monteringen ikke skulle passe, kontakt din Blaupunktspecialforretning, bilfabrikanten eller vor telefon-hotline.
Ved montering af en forstærker eller et Multi CDapparat skal apparaternes stel først tilsluttes, før
stikkene for tilslutningerne Line-In eller Line-Out
sættes i.
Eksterne enheders stelforbindelse må ikke
sluttes til bilradioens stelforbindelse (kabinet).
PL – Instrukcja montażowa
Wskazówki bezpieczeństwa
Podczas montażu i podłączania należy
przestrzegać poniższych wskazówek bezpieczeństwa.
• Odłączyć biegun ujemny akumulatora!
Przestrzegać wskazówek bezpieczeństwa
producenta pojazdu.
• Przy wierceniu otworów uważać, aby nie
uszkodzić któregoś z urządzeń pokładowych
pojazdu.
• Przekrój kabla plusowego i minusowego nie
może być mniejszy niż 1,5 mm².
• Nie podłączać wtyczek samochodu do radia!
Odpowiedni dla danego typu pojazdu przewód-adapter można nabyć u autoryzowanego sprzedawcy produktów BLAUPUNKT.
• Zależnie od marki i modelu, konstrukcja
Państwa pojazdu może niekiedy odbiegać od
podanego tu opisu. Firma Blaupunkt wyklucza
wszelką odpowiedzialność za szkody spowodowane błędnym montażem i instalacją urządzenia.
W przypadku, gdy podane tu wskazówki nie
znajdują zastosowania w Państwa pojeździe,
prosimy skontaktować się z autoryzowanym
sprzedawcą produktów Blaupunkt, producentem pojazdu lub zadzwonić do naszej infolinii.
Przy montażu wzmacniacza lub zmieniarki należy
koniecznie najpierw podłączyć masy urządzeń,
zanim połączona zostanie wtyczka do gniazda
Line-In lub Line-Out.
Do masy radioodtwarzacza (obudowa) nie
wolno podłączać masy obcych urządzeń.
385
16_EA_Toronto_400BT.indd 385
04.02.2009 9:33:46 Uhr
Návod k montáži • Asennusohjeet
CZ – Návod k montáži
Bezpečnostní pokyny
SF – Asennusohjeet
Turvallisuusohjeita
Během montáže a připojení dodržujte
prosím následující bezpečnostní pokyny.
Noudata asennus- ja liitäntätöiden yhteydessä seuraavia turvallisuusohjeita.
• Odpojte záporný pól akumulátoru! Přitom
• Irrota akun miinusnapakytkennät! Noudata
dodržujte bezpečnostní pokyny výrobce vozidla.
• Reikiä poratessasi huolehdi siitä, etteivät ajo-
• Při vrtání otvorů dbejte na to, abyste nepoškodili žádné díly vozidla.
• Průřez kabelu plus a minus pólu musí být
minimálně 1,5 mm².
• Konektory od vozidla nepřipojujte k
rádiu!
Adaptérový kabel potřebný pro vaše vozidlo
obdržíte ve specializované prodejně
BLAUPUNKT.
• V závislosti na konstrukci se může postup u
vašeho vozidla od zde popsaného postupu
lišit. Za škody způsobené montáží nebo připojením nepřebíráme žádné ručení.
Pokud zde uvedené pokyny pro montáž neodpovídají vašemu vozidla, obraťte se na specializovaného prodejce Blaupunkt, výrobce
vozidla nebo naši horkou linku.
Při montáži zesilovače nebo měničů, předtím
než budou konektory zapojeny do zdířek Line-in
nebo Line-out, musí být nejprve bezpodmínečně
připojeny kostry přístrojů.
ajoneuvon valmistajan antamia turvaohjeita.
neuvon osat vahingoitu.
• Plus- ja miinuskaapelin poikkipinta ei saa alittaa 1,5 mm2 mittaa.
• Älä kytke auton pistoketta radioon!
Saat autoosi sopivan
BLAUPUNKT-kauppiaaltasi.
sovitinjohdon
• Autosi saattaa poiketa tästä kuvauksesta.
Emme vastaa asennus- tai kytkentävirheiden
aiheuttamista vaurioista tai niiden seurauksista.
Jos tässä annetut ohjeet eivät sovellu asennustilanteeseen, käänny Blaupunkt-kauppiaan, ajoneuvon valmistajan tai puhelinpalvelumme puoleen.
Jos asennetaan vahvistin tai CD-vaihtaja, tällöin
on ehdottomasti kytkettävä ensin laitteiden maadoitukset, ennen kuin linjatulo- tai linjalähtöliitäntöjen pistokkeet liitetään paikoilleen.
Muiden laitteiden maadoituksia ei saa kytkeä
autoradion maadoitukseen (kotelo).
Kostry jiných přístrojů nesmí být připojeny na
kostru autorádia (kryt přístroje).
386
16_EA_Toronto_400BT.indd 386
04.02.2009 9:33:46 Uhr
Beszerelési útmutató • Инструкция по установке
HU – Beszerelési útmutató
RU – Инструкция по
установке
Biztonsági előírások
A beszerelési és csatlakoztatási műveletek során kérjük, tartsa be az alábbi biztonsági
utasításokat:
• Csatlakoztassa le az akkumulátor negatív kábelét! Ennek végrehajtása közben vegye figyelembe a jármű gyártójának biztonsági utasításait.
• Ügyeljen arra, hogy a furatok készítésekor ne
rongálja meg a jármű alkatrészeit.
• A pozitív és negatív kábelek keresztmetszete
ne legyen kisebb, mint 1,5 mm2.
• Ne használja a jármű csatlakozóit a rádióhoz!
Bármely BLAUPUNKT kereskedőnél beszerezheti a jármű típusának megfelelő illesztőkábelt.
• A modelltől függően, az Ön járműve eltérhet
az itt szereplő leírástól. Nem vállalunk felelősséget a nem megfelelő beszerelésből vagy
csatlakoztatásból fakadó vagy egyéb ebből
következő bármilyen károsodásért.
Ha az itt leírt információk nem felelnek meg
az Ön egyedi beszerelési igényeinek, akkor
vegye fel a kapcsolatot Blaupunkt márkakereskedőjével, a jármű gyártójával vagy hívja
telefonos ügyfélszolgálatunkat.
• Erősítő vagy CD-váltó beszerelésekor előbb a
készülék test csatlakozásait kell csatlakoztatni, majd csak ezután a bemeneti és kimeneti
csatlakozódugókat.
A külső eszközök test csatlakozásait nem
lehet az autós hangsugárzó rendszer testhez
(házhoz) csatlakoztatni.
Указания по технике
безопасности
Во время монтажа и подсоединения соблюдайте, пожалуйста, следующие указания по
технике безопасности.
• Отсоедините минусовую клемму аккумулятора! Соблюдайте при этом правила техники безопасности завода-изготовителя
Вашего автомобиля.
• При сверлении отверстий следите за тем,
чтобы не повредить компоненты автомобиля.
• Сечение плюсового/минусового кабелей
должен быть не меньше 1,5 мм².
• Не включайте в аудиосистему автомобильные штекеры!
Необходимые для Вашего типа автомобиля адаптерные кабели Вы можете приобрести в авторизованном сервисном центре Blaupunkt.
• Ваш автомобиль может - в зависимости от
конструкции - отклоняться от данного описания. Завод-изготовитель аудиосистемы
не несет ответственности за повреждения
и-за ошибок при монтаже или подключении, а также за косвенный ущерб.
• Если перечисленные здесь указания для
Ваших условий монтажа не подходят, то
обратитесь, пожалуйста, в авторизованный сервисный центр Blaupunkt или продавцу Вашего автомобиля.
При установке усилителя перед соединением штекеров гнезд линейного входа и выхода
сначала нужно в обязательном порядке подключить массы устройств.
Запрещается подключение масс посторонних устройств к массе аудиосистемы (корпусу).
387
16_EA_Toronto_400BT.indd 387
04.02.2009 9:33:46 Uhr
Οδηγίες Εγκατάστασης
GR – Οδηγίες Εγκατάστασης
Οδηγίες Ασφαλείας
Όταν εκτελείται εργασία εγκατάστασης
και κάνετε τις συνδέσεις, παρακαλούµε παρατηρήστε τις ακόλουθες οδηγίες ασφαλείας:
• Αποσυνδέστε το αρνητικό τερµατικό από την
µπαταρία! Όταν γίνεται αυτό, παρακαλώ παρατηρήστε τις οδηγίες ασφαλείας του κατασκευαστή του αυτοκινήτου.
• Σιγουρευτείτε ότι δεν κάνετε ζηµιά στα
εξαρτήµατα του αυτοκινήτου όταν ανοίγετε
τρύπες.
• Οι διατοµές των θετικών και αρνητικών καλωδίων δεν πρέπει να είναι µικρότερες από
1,5 mm2.
• Mην συνδέετε τα βύσµατα του οχήµατος µε
το ραδιόφωνο!
Μπορείτε να λάβετε ένα καλώδιοπροσαρµογέα που χρειάζεται για το όχηµά σας
από έναν αντιπρόσωπο της BLAUPUNKT.
• Ανάλογα µε το µοντέλο, το όχηµά σας µπορεί
να διαφέρει από την περιγραφή που παρέχεται
εδώ. ∆εν δεχόµαστε καµία ευθύνη για οποιεσδήποτε ζηµιές που οφείλονται σε λανθασµένη
εγκατάσταση ή σύνδεση ή για οποιεσδήποτε
άλλες ζηµιές.
Εάν οι πληροφορίες που παρέχονται εδώ, δεν
είναι οι κατάλληλες για τις συγκεκριµένες
απαιτήσεις εγκατάστασης, παρακαλούµε επικοινωνήστε µε τον αντιπρόσωπο της
Blaupunkt, τον κατασκευαστή του οχήµατος ή
την τηλεφωνική µας γραµµή.
Όταν εγκαθιστάτε έναν ενισχυτή ή εναλλαγέα,
πρέπει πρώτα να συνδέσετε τις συνδέσεις της γείωσης πριν συνδέσετε τα βύσµατα για τις εισόδους
ή εξόδους.
Σύνδεση γείωσης των εξωτερικών συσκευών
µπορεί να µην συνδεθεί στη γείωση του ηχητικού συστήµατος του αυτοκινήτου (τοποθέτηση).
388
16_EA_Toronto_400BT.indd 388
04.02.2009 9:33:46 Uhr
Mitgelieferte Montage- und
Anschlussteile
Supplied Mounting Hardware
Materiel de montage fourni
Componenti di fissaggio comprese nella
fornitura
Meegeleverde montagematerialen
Medföljande monteringsdetaljer
Ferretería de montaje suministrada
Elementos de fixação fornecidos
Medleverede monterings- og tilslutningsdele
Dołączone części montażowe i
połączeniowe
Přiložené montážní díly a přípojné svorky
Toimitukseen kuuluvat asennus- ja
kytkentäosat
A csomag részét képező szerelőkeret
Поставляемые в комплекте компоненты
для установки и подсоединения
Παρεχόµενο Υλικό Τοποθέτησης
Toronto 400 BT (7 649 036 010)
Toronto 400 BT (7 649 035 110)
389
16_EA_Toronto_400BT.indd 389
04.02.2009 14:37:17 Uhr
Als Sonderzubehör erhältlich
Available as an optional accessory
Disponible en option
Reperibili come accessori extra
Als speciale accessoire verkrijgbaar
Tillval
De venta como accesorios especiales
Disponíveis como acessórios opcionais
Fås som specialtilbehør
Dostępne jako wyposażenie dodatkowe
Jako zvláštní příslušenství můžete
obdržet
Saatavana lisätarvikkeena
Kiegészítő tartozékként beszerezhető
Поставляется как дополнительная
принадлежность
∆ιατίθεται ως προαιρετικό άξεσουάρ
Einbausätze • Installation kits •
Kits de montage • Set di montaggio •
Inbouwsets • Monteringssatser •
Juegos de montaje • Kits de montagem •
Indbygningssæt • Zestawy montażowe •
Montážní soupravy • Asennussarjat •
Beépítő-készlet • Установочные комплекты •
Κιτ εγκατάστασης
7 608 . . . . . .
Preamp./Sub./Center - out cable
A
7 607 001 512
7 607 621 . . .
390
16_EA_Toronto_400BT.indd 390
04.02.2009 9:33:47 Uhr
1.
4.
182
165
53
1-20
12V
A
2.
0°- 30°
+/– 10°
+/– 10°
3.
Antenna
Antenna connection
391
16_EA_Toronto_400BT.indd 391
04.02.2009 9:33:47 Uhr
5. Ausbau • Removal • Démontage •
Smontaggio • Demontage • Urmontering •
Desmontaje • Desmontagem •
Udbygning • Demontaż • Demontáž •
Irrotus • Eltávolítás• Демонтаж •
Aφαίρεση
1.
6.
12V
2.
1.
2.
3.
392
16_EA_Toronto_400BT.indd 392
04.02.2009 9:33:47 Uhr
C-1
1
C-2
7 10
4
6
3
2
C-3
9 12
8 11
5
Aut. antenna
13 16 19
C
15 18
14 17 20
1
3
5
7
2
4
6
8
1
3
5
7
2
4
6
8
B
*
10 Ampere
max. 150 mA
A
A
B
1
2
3
4
5
6
7
NC
Radio Mute
NC
Permanent +12V
Aut. antenna *
Illumination
Kl.15/Ignition
1
2
3
4
5
6
7
Speaker out RR+
Speaker out RR–
Speaker out RF+
Speaker out RF–
Speaker out LF+
Speaker out LF–
Speaker out LR+
8
Masse/GND
8
Speaker out LR–
1
2
3
4
5
Line Out LR
Line Out RR
Line Out / Ground
Line Out LF
Line Out RF
SW Supply +12V
Amp. *
C1
6
FB +12V / RC +12V
+12V Amplifier
C2
C3
7
8
9
10
11
NC
NC
Radio Mute
SW Supply - RC +12V *
Remote Control
13
14
15
16
17
CDC-Data In
CDC-Data Out
Permanent +12V
SW Supply +12V *
Bus - Masse/GND
12
RC - GND
18
CDC/AUX1 Audio IN-GND
19
CDC/AUX1 Audio IN-L
20
CDC/AUX1 Audio IN-R
CD-Changer / AUX IN
Amplifier
393
16_EA_Toronto_400BT.indd 393
04.02.2009 9:33:48 Uhr
Preamp - Out cable
Relais
7
1 35
6 8
2 4
Radio Mute
LR
F LF
RR R
+
+
+
+
-
4 Ohm
4 Ohm
4 Ohm
4 Ohm
12V
Änderungen vorbehalten! • Subject to changes! • Sous réserve de modifications! •
Modifiche riservate! • Wijzigingen voorbehouden! • Ändringar förbehålles! • Modificaciones reservadas!
•Sob reserva de alterações! • Ret til ændringer forbeholdes! • Zmiany techniczne zastrzeżone! • Změny
vyhrazeny! • Oikeus muutoksiin pidätetään! • Podložno promjenama! • Завод-изготовитель оставляет за
собой право на внесение изменений! • Μπορεί να αλλάξει!
394
16_EA_Toronto_400BT.indd 394
04.02.2009 9:33:48 Uhr
© 2008 All rights reserved by Blaupunkt. This material may be reproduced, copied or distributed for personal
use only.
This product is protected by certain intellectual property rights of Microsoft. Use or distribution of such technology
outside of this product is prohibited without a license from Microsoft.
395
16_EA_Toronto_400BT.indd 395
04.02.2009 9:33:48 Uhr
Fax:
WWW:
(D)
(A)
(DK)
(FIN)
(GB)
(GR)
(IRL)
(I)
(L)
(N)
(P)
(E)
(S)
(CH)
(CZ)
(H)
(PL)
(TR)
(USA)
0180-5000225
01-610 39 0
44 898 360
09-435 991
01-89583 8880
210 94 27 337
01-46 66 700
02-369 62331
40 4078
+47 64 87 89 60
2185 00144
902 52 77 70
08-7501850
01-8471644
02-6130 0446
76 889 704
0800-118922
0212-335 07 23
800-950-2528
05121-49 4002
01-610 39 391
44-898 644
09-435 99236
01-89583 8394
210 94 12 711
01-46 66 706
02-369 62464
40 2085
+47 64 87 89 02
2185 00165
91 410 4078
08-7501810
01-8471650
02-6130 0514
–
022-8771260
0212-346 00 40
708-6817188
http://www.blaupunkt.com
(BR)
0800 7045446
+55-19 3745 2773
(MAL) +604-6382 474
+604-6413 640
(DE, GB, FR, IT, NL, SW, ES, PT, DK, PL, CZ, SF, HU, RU, GR)
Germany
Austria
Denmark
Finland
Great Britain
Greece
Ireland
Italy
Luxembourg
Norway
Portugal
Spain
Sweden
Switzerland
Czech. Rep.
Hungary
Poland
Turkey
USA
Brasil
(Mercosur)
Malaysia
(Asia Pacific)
Phone:
01/09 - CM-BP/PRM-CR
Country:
Name:
.............................................................................
Type:
7 649 . . .
.............................................................................
Serial no.:
BP ........................................................................
8622406373
Passport
Blaupunkt GmbH, Robert-Bosch-Straße 200, D-31139 Hildesheim
396
16_EA_Toronto_400BT.indd 396
04.02.2009 9:33:48 Uhr