1
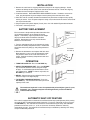
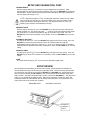
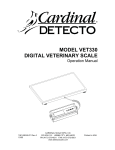
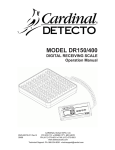
DIGITAL PORTION SCALE
PS-5
OWNER’S Manual
8528-M013-O1 Rev G
09/00
CARDINAL SCALE MFG. CO.
PO BOX 151 • WEBB CITY, MO 64870
PH (417) 673-4631 • FAX (417) 673-5001
Web Site - http://www.detectoscale.com
0
Printed in USA
2
TABLE OF CONTENTS
INTRODUCTION
The PS-5 Digital Portion Scale is a compact
solid scale, designed to fill a variety of
weighing needs. Please read this manual
before attempting to put scale into use and
keep it handy for future reference.
Specifications - - - - - - - - - - - - - - - - - - - - - - - 1
FCC COMPLIANCE STATEMENT
Display Codes - - - - - - - - - - - - - - - - - - - - - - 3
Setup and Calibration - - - - - - - - - - - - - - - - - 3
Installation - - - - - - - - - - - - - - - - - - - - - - - - - 2
Battery Replacement - - - - - - - - - - - - - - - - - - 2
Operation - - - - - - - - - - - - - - - - - - - - - - - - - - 2
Automatic Shut-Off Feature - - - - - - - - - - - - - 2
WARNING! This equipment generates, uses
and can radiate radio frequency and if not
installed and used in accordance with the
instruction manual, may cause interference to
radio communications. It has been tested and
found to comply with the limits for a Class A
computing device pursuant to Subpart J of Part
15 of FCC rules, which are designed to provide
reasonable
protection
against
such
interference when operated in a commercial
environment. Operation of this equipment in a
residential area may cause interference in
which case the user will be responsible to take
whatever measures necessary to correct the
interference.
Setup Review - - - - - - - - - - - - - - - - - - - - - - - 4
SPECIFICATIONS
Dimensions - - - 7 1/2" W x 7" D x 2 3/4" H
Weight - - - - - - - 4 lb (without batteries)
Construction - - - Steel enclosure with 304
stainless steel tray
Power - - - - - - - 6 VDC four AA alkaline
batteries 115 VAC 50/60 Hz
with optional AC adapter
Display - - - - - - - 3 1/2 digits in an LCD display
with low battery indication and
LED capacity indicators
All rights reserved. Reproduction or use,
without expressed written permission, of
editorial or pictorial content, in any manner, is
prohibited. No patent liability is assumed with
respect to the use of the information contained
herein. While every precaution has been taken
in the preparation of this manual, the Seller
assumes no responsibility for errors or
omissions. Neither is any liability assumed for
damages resulting from use of the information
contained herein. All instructions and diagrams
have been checked for accuracy and ease of
application; however, success and safety in
working with tools depend to a great extent
upon the individual accuracy, skill and caution.
For this reason the Seller is not able to
guarantee the result of any procedure
contained herein. Nor can they assume
responsibility for any damage to property or
injury to persons occasioned from the
procedures. Persons engaging the procedures
do so entirely at their own risk.
Capacity - - - - - - Dual key-selectable
capacities:
70 x 0.1 oz/1998 x 2g
Zero - - - - - - - - - Established during power-on
lamp test and maintained
automatically by zero-tracking
circuitry
Tare - - - - - - - - Key actuated full capacity tare
feature
CAUTION!!
This sensitive weighing instrument is equipped
with a precision transducer. Properly handled, it
will provide years of accurate weighing
operation. Although this instrument is protected
against
moderate
overloads,
extreme
overloading, dropping the instrument, or
subjecting it to physical shock or abuse may
damage or destroy the instrument.
PRECAUTIONS
Serial Number _______________________
Before using this instrument, read this
manual and pay special attention to all
"WARNING" symbols:
Date of Purchase_____________________
Purchased From _____________________
___________________________________
IMPORTANT
___________________________________
RETAIN THIS INFORMATION FOR FUTURE USE
1
ELECTRICAL
WARNING
INSTALLATION
1. Remove the scale from its shipping container and inspect it for shipping damage. Should
evidence of damage be found, the carrier should be contacted at once. Retain the shipping
container for future storage or shipment of the scale.
2. Install the batteries. Refer to BATTERY REPLACEMENT section. If batteries are not to be
used, plug the optional AC power adapter into the power jack on the back of the scale.
3. Place the scale on a stable, vibration-free location away from direct sunlight and any rapidly
moving air source. If the AC power adapter is being used, make certain the cord is stored out of
the way of normal traffic.
4. Plug the optional AC power adapter (if used) into a 115 VAC 50/60 HZ grounded wall outlet.
5. The scale is now ready for use.
BATTERY REPLACEMENT
This instrument is designed for operation from either four
(4) AA Alkaline batteries or an optional AC power
adapter. A low battery signal is provided in the weight
display to indicate when the batteries should be
replaced. Remember to use only size AA Alkaline
batteries in the instrument.
1. Turn the scale bottom side up and remove the single
screw from the battery compartment cover. Remove the
cover from the base by lifting up and pulling outward as
shown.
2. Remove the old batteries and replace with fresh ones.
Make certain the + and - ends of the batteries match
the positions shown on the scale circuit boards as
shown. Replace the battery compartment cover and
retaining screw.
Battery
Compartment
Cover
Pull cover
out and up
OPERATION
1. TURN THE SCALE ON - Press the ON-TARE key.
2. SELECT THE WEIGHING UNIT - Press the WT-UNIT
key to alternate between ounces and gram weight
displays. A red indicator light will illuminate to show
the selected units. NOTE! In Grams only mode, the
WT-UNIT key is disabled.
Batteries
3. WEIGH - Place the item to be weighed on the tray and
read the weight in the digital display.
4. TO RE-ZERO THE WEIGHT DISPLAY - Press the
ON-TARE key. The instrument will zero up to the full
capacity of the scale.
The membrane keyboard is not to be operated with pointed objects (pencils, pens,
fingernails, etc). Damage to keyboard resulting from this practice will NOT be
covered under warranty.
AUTOMATIC SHUT-OFF FEATURE
This scale is equipped with an automatic shut-off feature that helps prolong battery life by turning
the scale off after a predetermined period of inactivity. To turn the scale back on you must press
the ON-TARE key. The automatic shut-off feature is activated during the setup and calibration
procedure and can be set for 1, 2, 5, 10, or 15 minutes of inactivity before the scale will
automatically shut off. The automatic shut-off feature may be disabled by selecting OFF during
setup and calibration procedure.
2
DISPLAY CODES
CAL
OC
CALIBRATION REQUIRED - Indicates improper stored calibration data, calibration
is necessary.
OVER CAPACITY - Indicates a weight exceeding the capacity of scale has been
placed on the scale tray.
ERROR - NOV-RAM test failure.
Err
ErA
ANALOG FAILURE - This could mean a damaged or defective load cell, a failed
component in the analog circuity of the scale or the platform isn't on or is on
incorrectly.
SETUP AND CALIBRATION
Your scale has been thoroughly tested and calibrated before being shipped to you and should not
require adjustment. In the event the scale should need re-calibration, the following calibration
procedure should be performed. To maintain the scale's high degree of accuracy, it is
recommended that a qualified technician with certified test weights re-calibrate the scale.
In order to perform Setup and Calibration, it is necessary to remove the "Do Not Remove" sticker
from the lower right side of the scale. With the sticker removed, locate the Setup and Calibration
switch in the opening closest to the front of the scale. Refer to the figure on the next page.
NOTE: If operating from batteries, install the batteries making certain that they are
positioned in accordance with the drawing on the circuit board. If using the
optional AC power adapter, insert the plug into the jack on the back of the scale.
BEGIN SETUP and CALIBRATION
1. Making certain the scale tray is empty, press and hold the setup and calibration switch located
on the lower right side of the scale. Refer to the figure on the next page.
2. Press the ON/TARE key to turn the scale on. Release the setup and calibration switch when
the display is showing SCA.
SCA
SCALE MODEL
The display will show SCA.
SCA Press the WT/UNIT key to display the current setting. For a PS-5
the display should show P - 5 . Press the WT/UNIT key until P - 5 is displayed. Press the
ON/TARE key to save the setting.
CALIBRATION
The display will show CAL.
CAL Press the WT/UNIT key to display the current setting. To calibrate
the scale, press the WT/UNIT key until YES is displayed, then press the ON/TARE key. The
display will change to LOd.
LOd
To skip calibration, press the WT/UNIT key until no is displayed, then press the ON/TARE key
to continue the setup.
LOAD WEIGHT
With the display will showing LOd,
LOd place a (2) lb certified test weight on the scale tray. Allow
approximately five seconds for the scale to stabilize. Press the ON/TARE key to start the
calibration. Dashes will be displayed from the left to the right of the display momentarily, then
the display will change to uLd.
uLd
3
SETUP AND CALIBRATION, CONT.
UNLOAD WEIGHT
With the display showing uLd,
uLd remove the 2 lb test weight from the scale tray. Allow
approximately five seconds for the scale to stabilize, then press the ON/TARE key to continue
the calibration. Dashes will be displayed from the left to the right of the display momentarily,
then the display will change to unt.
unt
If ErA is displayed during the LOd or uld calibration sequence, remove the test weight
from the scale and verify that it is the correct weight (2 lbs) or insure that the scale is
empty and nothing is touching the scale tray. The display will return to LOd or uld
allowing you to continue with calibration and setup.
WEIGHING UNITS
With the display showing unt,
unt press the WT/UNIT key to display the current setting for the
default weighing unit. The display will show - - - and turn on the red indicator for the weight
unit (oz or gm) or 1 and the red indicator for (gm) for the "Grams only" mode. Press the
WT/UNIT key until the desired weight unit is indicated. Press the ON/TARE key to save the
setting.
AUTOMATIC SHUTOFF
The display will show ASH.
ASH Press the WT/UNIT key to display the current setting. Press the
WT/UNIT key until the desired number of minutes of inactivity before the scale will
automatically shutoff is displayed. Values of 1, 2, 5, 10, or 15 minutes or OFF are available.
Selecting OFF will disable the automatic shutoff feature. Press the ON / TARE key to save the
setting.
POWER UP ZERO
The display will show PuO.
PuO Press the WT/UNIT key to display the current setting. Press the
WT/UNIT key to select YES to enable or no to disable. Press the ON / TARE key to save the
setting.
DONE
The scale will briefly display dnE,
dnE then reset to the Operation weight mode.
SETUP REVIEW
The Setup Review mode allows you to review and change several operational parameters as
desired without having to enter the setup and calibration mode. To enter the setup review mode,
you need to turn the scale off by pressing the WT/UNIT and ON-TARE keys simultaneously and
then pressing and holding the ON-TARE key until the red indicator of the selected weight units
begins to flash. After the red indicator begins to flash, release the ON-TARE key. The display will
show unt,
unt the prompt for the weighing units. Refer to the instructions listed in the Setup and
Calibration section for information on how to change these parameters. The parameters in the
setup review that can be change are as follows:
WEIGHING UNITS
AUTOMATIC SHUTOFF
Location of
Calibration
Switch
4
2
GNED
I
S
E
D
TURED
AC
&
M ANUF
.
A
I N U .S .