1
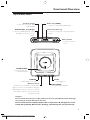
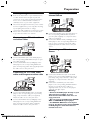
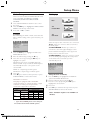
DVP 320
Downloaded From Disc-Player.com Philips Manuals
General Information
Since it is usual for DVD movies to be released at
different times in different regions of the world, all
players have region codes and discs can have an
optional region code. If you load a disc of a
different region code to your player, you will see
the region code notice on the screen. The disc
will not playback, and should be unloaded.
3
Laser safety
This unit employs a laser. Due to the risk of eye
injury, only a qualified service person should
remove the cover or attempt to service this
device.
USE OF CONTROLS OR
ADJUSTMENTS OR PERFORMANCE OF
PROCEDURES OTHER THAN THOSE
SPECIFIED HEREIN MAY RESULT IN
HAZARDOUS RADIATION EXPOSURE.
4
LASER
Type
Semiconductor laser GaAlAs
Wave length
650 nm (DVD)
780 nm (VCD/CD)
Manufactured under license from Dolby
Laboratories. “Dolby” and the double-D symbol are
trademarks of Dolby Laboratories.
CAUTION
(WARNING LOCATION: ON THE
BOTTOMPLATE OF SET)
CAUTION
VISIBLE AND INVISIBLE LASER RADIATION
WHEN OPEN. DO NOT STARE INTO BEAM.
THE BEAM IS LOCATED INSIDE, NEAR THE
DECK MECHANISM.
NEVER MAKE OR CHANGE
CONNECTIONS WITH THE POWER
SWITCHED ON.
For Customer Use:
Read carefully the information located at the
rear panel of your DVD VIDEO player and enter
below the Serial No.Retain this information for
future reference.
Model No. DVP 320
Serial No. __________________________
2
Downloaded From Disc-Player.com Philips Manuals
Important Note:
Due to the numerous versions of new CDAudio copy protection or enhanced CD-Audio
protection recently available on certain discs,
PHILIPS is unable to guarantee that this DVD
player is fully compatible with such new discs.
Should you have difficulty playing any such
CD-Audio discs, kindly refer them to your CDAudio disc retailer.
Contents
Introduction
Picture CD & MP3 CD Playback
Environmental Information .......................................4
Supplied accessories ..................................................4
Safety Information ......................................................4
Symbols Used in this Booklet ..................................4
General Operation...................................13
MP3 & JPEG Navigator...........................................13
Play Mode.................................................................13
Special JPEG Features..............................14
Function Introduction............................................14
Preview Function.....................................................14
Zoom picture ..........................................................14
Playback with multi-angles ...................................14
Wipe Type.................................................................14
Special MP3 Features..............................14
Function Introduction............................................14
JPEG and MP3 Simultaneous Playback...14
Functional overview
Top and Rear Panel ....................................................5
Remote Control .........................................................6
Preparation
Before you begin ........................................................7
Connecting to a TV with audio and video cables...7
Connecting to a TV with audio cable and
component video cable..............................................7
Connecting to a TV and a two-channel
Stereo.............................................................................7
Connecting to a TV and a Stereo.............................7
Replacing battery (lithium CR2025) into the
remote control...........................................................8
Using the Remote Control ......................................8
Connecting the Power Supply...................................8
Switching On ...............................................................8
Smart Power On/Off..................................................8
Operation
Basic Playback ..............................................9
General Operation ......................................9
Video control during playback .................................9
Audio control during playback ................................9
Repeat/Shuffle ..............................................................9
Repeat A-B .............................................................10
Virtual Remote Control.........................................10
5 disc Resume .........................................................10
OSD (On-Screen Display).....................................10
Zoom ........................................................................11
Special DVD Features .............................11
Playing a Title .........................................................11
Playing a Chapter ...................................................11
Smart Play....................................................................11
Camera Angle .........................................................11
Changing the Audio Language ...........................11
Subtitles ....................................................................11
Special VCD & SVCD Features ...........11-12
Playback Control (PBC) ...................................11
Preview Function ...................................................12
Setup menu
General Setup menu ...............................15
OSD language .........................................................15
Program ..............................................................15-16
Disc Lock .................................................................16
Screen Saver ............................................................16
Analog Audio Setup menu ......................17
DOWNMIX.............................................................17
D.R.C ........................................................................17
SOUND MODE .....................................................17
3D SOUND.............................................................18
Digital Audio Setup menu........................18
Digital Output..........................................................18
LPCM Output..........................................................18
Video Setup menu....................................19
TV Type .....................................................................19
TV Display ...............................................................19
Closed Captions......................................................20
Smart Picture..........................................................20
Picture Setting..........................................................20
Preference Setup menu ..........................21
Audio language .......................................................21
Subtitle language .....................................................21
Disc Menu language ...............................................22
Password ..................................................................22
Parental Control ....................................................23
Default Setup...........................................................23
MP3/JPEG Navigator .............................................23
Specifications
Specifications ...........................................................24
Maintenance
Maintenance ........................................................ 24
Language Codes
Language Codes.................................................25-26
Troubleshooting
Troubleshooting ....................................................27
3
Downloaded From Disc-Player.com Philips Manuals
Introduction
Thank you for purchasing this Philips DVD player.
This Owner’s Manual explains the basic operation
of this DVD player.
Environmental Information
All unnecessary packaging has been omitted. We
have tried to make the packaging easy to separate
into three materials: cardboard (box), polystyrene
foam (buffer) and polyethylene (bags, protective
foam sheet).
Your DVD player consists of materials which can
be recycled and reused if disassembled by a
specialized company. Please observe the local
regulations regarding the disposal of packaging
materials, exhausted batteries and old equipment.
Package Contents
–
–
–
–
–
–
DVD-Video player
Remote control with lithium battery
One set of audio cables (red/white)
One set of video cable (yellow)
Mains Cord
Owner’s Manual
Safety Information
● Before operating the DVD player, check that the
operating voltage indicated on the typeplate is
identical with the voltage of your local power
supply. If not, please consult your dealer.
● Place the DVD player on a flat, hard and stable
surface.
● Allow about one inch of space around the Player
for ventilation. Leave room above the Player for
the Disc compartment lid to open completely.
● In a cabinet, allow about 2.5cm (1 inch) of free
space all around the player for adequate
ventilation.
● Always close the Disc compartment lid on top of
the Player to keep dust off the lens (which is
inside the Disc compartment).
● Do not touch the lens inside the Player’s Disc
compartment. A damaged lens could hinder Disc
playability. Electrostatic discharge could damage
the unit permanently.
4
Downloaded From Disc-Player.com Philips Manuals
● When you open the Disc compartment lid, the
Disc will continue to spin for a few seconds. Do
not allow children to remove the Disc. Wait for
the Disc to stop spinning completely before you
reach to remove the Disc or touch the Disc.
● Do not expose your player to extremes of
temperature or humidity.
● If the DVD player is brought directly from a cold
to a warm location, or is placed in a very damp
room, moisture may condense on the lens of the
disc unit inside the DVD player. Should this occur,
the DVD player would not operate normally.
Leave the power on for about one hour with no
disc in the DVD player until normal playback is
possible.
● The mechanical parts of the set contain selflubricating bearings and must not be oiled or
lubricated.
● When the DVD player is switched to Standby
mode, it is still consuming some power. To
disconnect the system from the power supply
completely, remove the plug from the AC Outlet.
Symbols Used in this Booklet
The below symbols appear in some headings and
notes with the following meanings:
Helpful Hints!
● Some discs limit certain functions during
playback (eg fast forward is not working at
the beginning of certain discs). This is
nomal behaviour because the disc
determines the way in which you can
interact with its content.
Functional Overview
Top and Rear Panels
Coaxial output
– connect to a receiver with
coaxial inputs
Video out (CVBS)
– connect to a TV with CVBS inputs
AUDIO OUT (Left/Right)
– connect to AUDIO inputs of an
amplifier, receiver or stereo
system
L
Video out (Y P b P r)
– connect to a TV with component video
inputs
R
A
U
D
I
COAXIAL O
VIDEO
Y
Pb
Pr
V
I
D
E
O
Mains Socket
– connect to power
cord
OPEN/CLOSE
– open/close the disc
compar tment lid
POWER
– switch DVD on or off
Remote sensor
Receive the commands from the DVD
Player’s remote control. When using the
DVD Player’s remote control to operate
the Player, point the remote here (not
toward your TV).
STOP
– stop playback
PLAY/PAUSE
– star t/interrupt playback
Caution:
Do not touch the inner pins of the sockets on the rear panel. Electrostatic discharge
may cause permanent damage to the unit.
Do not touch the lens inside the Player’s Disc compartment. A damaged lens could
hinder Disc playability. Electrostatic discharge could damage the unit permanently.
5
Downloaded From Disc-Player.com Philips Manuals
Functional Overview
Remote Control
RETURN / TITLE
Press to go to a previous Disc
menu or to access a DVD’s Title
menu. These options are not
available with all Discs.
POWER B
Press to switch Standby mode.
DISC MENU
Press to access menu of a DVD
disc /switch PBC on or off for
VCD disc
0-9 numerical key pad
Press to select numbered items in a
menu. Press to select a Chapter,
Title, or Track to play.
OK
Press to approve a menu selection.
1 2 3 4
Press to select items in a menu.
Press 1 or 2 for fast searching.
Press 3 or 4 for slow motion.
S
Press to go to the beginning of the
current Chapter or Track or to
the previous Chapter or Track.
Press and hold to display the
Vir tual Remote on screen.
STOP ( 9 )
Press to stop Disc playback.
PLAY ( B )
Press to begin Disc playback
SUBTITLE
Press to select subtitle language
ANGLE
Press to select a camera angle
during DVD play.
REPEAT
Press to play a Chapter, Title, Track,
or Disc repeatedly. Details are
on Page 10.
REPEAT (A-B)
Press to set up Repeat A-B
playback, in which a cer tain
segment of the Disc plays
repeatedly.
6
Downloaded From Disc-Player.com Philips Manuals
DISPLAY
Press during playback to see
current disc information on the TV
screen.
SYSTEM MENU
Press to access or remove the
Setup Menu of the DVD Player.
T
Press to skip to the next Chapter or
Track. Press and hold to activate the
Smar t Play function.
PAUSE ( ; )
Press to pause play or to advance a
paused picture one frame at a time.
AUDIO
Press to select a different audio
language or soundtrack during
DVD playback. With some Video
CDs, Super Video CDs, and Audio
CDs, press AUDIO to choose an
audio channel.
ZOOM
Press to reduce or enlarge the
picture during playback.
MUTE
Press to silence or restore the
volume.
PREVIEW
Press to enter the Preview menu
for a Video CD or Super Video
CD. Or, press to play the first
several seconds of each Track on
an Audio CD.
Preparation
Before you begin...
● Refer to the instructions of your TV, VCR, Stereo,
or other devices. Note the style of jacks and
connectors on the other equipment. Determine
how to choose different Audio and Video In
channels/sources on your other equipment.
● Disconnect all equipment from the power outlets.
Connect equipment to power only after hooking
up everything. Never make or change
connections with equipment connected to power.
● Please refer to the below choices we introduce
to you and select either one of them.
Connecting to a TV with audio
and video cables
Back of TV
LEFT AUDIO IN
RIGHT AUDIO IN
VIDEO IN
LEFT AUDIO IN
Connecting to a TV and a twochannel Stereo
Stereo
Back of TV
VIDEO IN
RIGHT AUDIO IN
VIDEO IN
LEFT AUDIO IN
L
R
A
U
D
I
COAXIAL O
VIDEO
Y
Pb
V
I
D
E
O
Pr
● Connect the VIDEO jack on the DVD player to
the corresponding CVBS VIDEO IN jack on
your TV (cable supplied) or component video
cable (not supplied).
● Connect the AUDIO OUT (Left/Right) on the
DVD player to the corresponding AUDIO IN
jacks on stereo system by using audio cables
(supplied). Match the cable colors to the jack
colors.
RIGHT AUDIO IN
VIDEO IN
Connecting to a TV and a
Stereo
L
R
A
U
D
I
COAXIAL O
VIDEO
Y
Pb
Pr
V
I
D
E
O
● Connect the VIDEO jack on the DVD player to
the corresponding CVBS VIDEO IN jack on your
TV (cable supplied).
● Connect the AUDIO OUT (Left/Right) on the
DVD player to the corresponding AUDIO IN
jacks on TV by using audio cable (supplied). Match
the cable colors to the jack colors.
AV Receiver
Back of TV
LEFT
AUDIO IN
Pr/Cr
RIGHT
AUDIO IN
Pb/Cb
Y
LEFT
AUDIO IN
Pr/Cr
RIGHT
AUDIO IN
Pb/Cb
Y
L
R
A
U
D
I
COAXIAL O
VIDEO
Y
Pb
Pr
V
I
D
E
O
● Connect the Y/Pb/Pr VIDEO OUT on the DVD
player to the corresponding jack on your TV by
using component video cable (not supplied).
Match the cable colors to the jack colors.
● Connect the AUDIO OUT (Left/Right) on the
DVD player to the corresponding AUDIO IN
jacks on TV by using audio cables (supplied).
Match the cables color to the jack colors.
Downloaded From Disc-Player.com Philips Manuals
)
VIDEO IN
COAXIAL
DIGITAL
AUDIO IN
L
Connecting to a TV with audio
cable and component video cable
Back of TV
(
R
A
U
D
I
COAXIAL O
VIDEO IN
VIDEO
Y
Pb
Pr
V
I
D
E
O
● Connect the VIDEO OUT jack on the DVD
player to the corresponding VIDEO IN jack on
your TV by using composite video cable (cable
supplied) or component video cable (not
supplied).
● Connect the COAXIAL jack of the DVD
player to the corresponding DIGITAL AUDIO
IN jack on your AV Receiver (cable not
supplied). In this case, do not use the player's
audio left and right output.
Warning!
– Connect the DVD player directly to your
TV, instead of eg. a VCR, to avoid
distortion because DVD video discs are
copy protected.
– Do not connect the DVD player AUDIO
OUT to PHONO IN of your player.
– Set DIGITAL OUTPUT correctly. See
page 19. The Stereo must support MPEG2
or Dolby DigitalTM. Check the Stereo’s
manual to be sure.
7
Preparation
Replacing battery (lithium
CR2025) into the remote control
2
Pull out the lithium battery
compartment A.
Replace a new battery and fully insert
the battery compartment back to the
original position.
DC - - - 3V CR2025
LITHIUM BATTERY
CR
2025
+
3V
+
CAUTION!
– Insert the plastic protective sheet if they
are exhausted or not to be used for a long
time.
– Batteries contain chemical substances,
so they should be disposed off properly and
kept away from children.
DC - - - 3V CR2025
LITHIUM BATTERY
Connecting the Power Supply
2
Plug the female end of the power cable supplied
into the power connector on the rear of the
player.
Plug the male end of the cord into an AC outlet.
Note: When the DVD player is switched to
Standby mode, it is still consuming some power. If
you wish to disconnect your player completely from
the mains, withdraw the plug from the AC Outlet.
8
Downloaded From Disc-Player.com Philips Manuals
4
Be sure that the DVD player has been correctly
connected to the TV and audio equipment.
Switch on the TV and DVD player.
Set the TV to the correct Video In channel. (eg.
EXT1, EXT2, AV1, AV2, AUDIO/VIDEO, etc.
Please refer to your TV owner's manual for
details.)
➜ The player display lights and the default screen
appears on the TV.
If you are using an external equipment (eg. audio
system or receiver), turn it on and select the
appropriate input source for the DVD player
output. Refer to the equipment owner’s manual
for detail.
Smart Power On/Off
Using the Remote Control
● Pull out the plastic protective sheet
which is used to keep the lithium
battery fresh.
● Direct the remote control at the
remote sensor of the DVD player.
● Do not drop or give the remote
control a shock.
● Do not leave the remote control in extremely
hot or humid places.
● Do not spill water or put anything wet on the
remote control.
1
2
3
CR2025
1
Switching On
1
When in STOP or NO DISC mode, the DVD
player will switch to standby mode after 15
minutes without any operations for saving energy.
It is easily reactivated by pressing the POWER or
PLAY key on the remote control or the PLAY
button on the front panel.
Operation
Basic Playback
1
2
3
4
Press POWER on the top panel to turn on the
DVD player. Turn on your TV. Set it to the correct
Video In channel.
Press OPEN/CLOSE on the top panel to open
the disc compartment.
Place the Disc on the Disc hub, with the label
facing up and then press down.
➜ After recognizing the disc, the player will start
to playback automatically.
Wait for the Disc to stop spinning completely
before you reach to remove the Disc or touch
the Disc.
Notes:
– DVDs may have a region code.Your player will
not play discs that have a region code different
from the region code of your player.
– If ‘Disc Lock’ is set to LOCK and the disc
inserted is not authorized, the 6-digit code must be
entered and/or the disc must be authorized (see
‘Disc Lock’).
1
2
3
Audio control during playback
1
2
1
2
3
Note: All instructions set out below refer to the
remote control, unless otherwise stated.
Video control during playback
1
2
3
1
2
3
1
2
3
STOP/PLAY
If you press the STOP key once, you can later
resume from the point at which you stopped by
pressing the PLAY key. If you pressed the STOP
key twice, the player will start from the beginning
of the disc.
PAUSE
To get a still picture, press PAUSE key during
playback.
To step forward to the next frame picture, press
PAUSE key again. (This is not available for CD.)
To resume normal playback, press PLAY.
SEARCH
To search the contents in fast speed, press the 2
or 1 for fast forward/backward searching.
To select different searching speeds, press the 2
or 1 again.
Press PLAY to return to normal playback.
Slow Motion
To get a slow motion effect during playback, press
3 or 4.
To select different searching speeds, press 3 or 4
repeatedly.
Press PLAY to return to normal play back.
Downloaded From Disc-Player.com Philips Manuals
MUTE
Press the MUTE key to disable the sound output.
Press the MUTE key again to deactivate mute.
Audio channel selection
General Operation
1
To get a slow motion effect during playback, press
4.
To select different searching speeds, press 4 again.
Press the PLAY key to return to normal play back.
NOTE:
- The SLOW BACKWARD function is not available
for Super VCD/VCD discs.
Super VCD has two stereo audio channels which
are used for the audio language selection.
Press the AUDIO key on the remote control to
select the audio channels you want.
VCD has only one stereo audio channel, you can
select STEREO, LEFT MONO, RIGHT MONO or
MIX-MONO by pressing the AUDIO key on the
remote control.
➜ STEREO: Output the left and right audio
channels of the disc through the left and right
audio sockets accordingly.
➜ MONO LEFT: Output the left audio channels
of the disc through the left and right audio
sockets.
➜ MONO RIGHT: Output the right audio
channels of the disc through the left and right
audio sockets.
➜ MIX MONO: each of the audio sockets can
output the same audio effect as stereo.
Note: If you choose digital audio output and set
DIGITAL OUTPUT to ALL, you can not select LEFT
MONO and RIGHT MONO with the AUDIO key.
Repeat/Shuffle
1
2
You may play a Chapter, Track, Title, or entire Disc
repeatedly.
During disc playback, press REPEAT to choose a
Repeat option.
➜ DVD disc: You can choose TITLE or CHAPTER,
which means repeat playing the Title or Chapter.
➜ VCD disc: You can choose TRACK or ALL,
which means repeat playing the Track or the
whole disc.
Press REPEAT to choose SHUFFLE or SHUFFLE
REPEAT. The Tracks, Chapters, and/or Titles will
play in random order (SHUFFLE) instead of the
order recorded (1, 2, 3, etc.). If you choose
SHUFFLE REPEAT, all the Tracks, Chapters, and/or
Titles will play in random order repeatedly.
9
Operation
3
To cancel repeat or shuffled playback, press
REPEAT until all the repeat and shuffle modes
disappear from the TV screen.
Note: If you want to use this funciton in VCD discs,
please set PBC off firstly.
OSD (On-Screen Display)
This function will provide some information about
your playing disc on the screen.
0 Press DISPLAY key on the remote control.
Repeat A-B
1
2
3
DVD-Video Discs: repeat a sequence in a
title or chapter
Video and Audio CDs: repeat a sequence in a
track
Press REPEAT A- B at your chosen starting point.
Press REPEAT A- B again at your chosen end
point.
➜ The section A and B can be set only within the
same chapter/track.
➜ The section will now repeat continuously.
To resume normal playback, press REPEAT A-B
again.
1
2
3
1
Virtual Remote Control
Frame-by-Frame
Reverse Slow
Motion
Previous
Chapter/Track
Reverse Search
Audio language
Subtitles
Next Chapter/
Track
Forward Search
Pause
Camera Angles
5 Disc Resume
1
2
This player can resume playback of the last 5
discs, even if the disc was ejected or the DVD
player is in Standby mode.
Load one disc, which is one of the last 5 discs.
Press PLAY when DVD player is recognizing the
disc. If the information of this disc has been
stored in the memory of DVD player, it will be
played back from the stop point last time.
10
Downloaded From Disc-Player.com Philips Manuals
Time Search
Press 3 4 to select TIME DISP. Press OK. Press
3 4 to highlight a display type, then press OK.
➜ The selected display type and its counter will
appear at the bottom of the display.
➜ The following display types will be available,
depending on the Disc in the Player.
For DVD discs:
CHAPTER ELAPSED - elapsed playing time of
current Chapter;
CHAPTER REMAIN - remaining playing time of
current Chapter;
TITLE ELAPSED - elapsed playing time of current
Title;
TITLE REMAIN - remaining playing time of
current Title.
Forward
Slow Motion
0 Press and hold ¡1 key during playback. Then a
Virtual Remote will be displayed at the down left
corner of the screen. Press 341 2 to select a
button in the virtual remote, and then press OK
in the real remote to activate the button’s
function.
➜ When you activate Virtual Remote Control,
you also can use the real remote control to do
any operation.
➜ When you activate Virtual Remote Control,
341 2 keys will not be used to search time.
Title/Chapter/Track Selection
Press 3 4 to select TITLE, CHAPTER or
TRACK.
Press OK.
Press the numerical keys to enter the Title,
Chapter, or Track number you want.
➜ DVD player will playback selected title.
2
3
For VCD/SVCD discs:
TOTAL ELAPSED - elapsed playing time of
current Disc;
TOTAL REMAIN - remaining playing time of
current Disc;
SINGLE ELAPSED - elapsed playing time of
current Track;
SINGLE REMAIN - remaining playing time of
current Track.
Press OK to select the time counter beside TT
TIME, CH TIME, TRACK TIME or DISC TIME.
Press the numerical keys to enter the elapsed
playing time at which you want to resume
playback.
➜ Enter the time in hours, minutes, and seconds.
Play will start at that point.
➜ Press 1 to quit and reselect TT TIME, CH TIME,
TRACK TIME or DISC TIME.
Operation
Camera Angle
Zoom
1
2
You can reduce or enlarge the video image during
playback.
Press ZOOM repeatedly during Disc playback to
make the picture two, three, or four times larger.
Or, keep pressing ZOOM to reduce the picture
to 1/2, 1/3, or 1/4 its normal size.
➜ Press 341 2 to move around in the enlarged
picture.
To return the picture to regular size, press ZOOM
until the picture returns to its normal size.
NOTE: This function is NOT available for some
DVD discs.
Some discs contain scenes which have been shot
simultaneously from various angles.
This DVD player allows you to select the desired
camera angle.
0 Press the ANGLE key on your remote control.
NOTE: The function is available only for the DVD
discs which have several angles recorded .
Changing the Audio Language
0 Press AUDIO repeatedly to select the different
languages.
NOTE: The function will be activated only if the
DVD is recorded with multi-language audio tracks.
Special DVD Features
Playing a Title
A DVD disc may have one or more titles. This
depends on the content (a movie, video clips, a
drama series, etc.) on the disc.
0 After you load a disc, information about the
content shows on the screen waiting for your
selection. You can also press the TITLE key on the
remote control to turn back to the title menu
during playback.
➜ Press the appropriate numerical key or 341
2 keys on the remote control to highlight your
selection.
➜ Press the OK key to confirm.
Subtitles
0 Press SUBTITLE repeatedly to select the different
subtitles.
0 Press SUBTITLE for about 2 seconds to switch
subtitle on or off.
NOTE: The function will be activated, only if the
DVD or Super VCD is recorded with multi-subtitles.
Special VCD & SVCD Features
Playback Control (PBC)
Playing a Chapter
When you have selected a title, it may include
one or more chapters.
0 Any time you want to watch another chapter
during playback, press DISC MENU key to turn
back to the chapter menu (If disc has chapter
menu).
➜ Press the appropriate numerical key or 341
2 keys on the remote control to highlight your
selection.
➜ Press the OK key to confirm.
➜ After a chapter has been selected, you also can
press the ¡1 or 2™ key to make a change.
1
2
3
NOTE:
- The content of the index menu depends on the
disc. Please refer to the disc’s instructions for
details.
- If the disc doesn't include the PBC information,
this function will have no effect.
Smart Play
Some DVDs start play with movie previews,
advertisements, or other theatrical trailers. To skip
these and play the main feature, use Smart Play.
0 After one DVD disc is loaded and the DVD
VIDEO is displayed on the screen, press and hold
the 2™ key until the SMART PLAY is displayed.
➜ The movie content will be played back directly.
Note: Some DVD discs will not be available for this
function.
PBC function allows you to enter the index menu
which is used to select a track after loading the
VCD & SVCD disc.
If you want to activate the function during
the playback or after pressing the STOP
key twice,
press the DISC MENU key on the remote control
to set the PBC On.
➜ Pay attention to the hint on the screen.
Use the ¡1 or 2™ key to select the page you
like.
➜ If the items of the index menus are numbered,
press the appropriate numerical key on the
remote control.
➜ press the OK key to confirm.
Press the RETURN key to enter the index menu
during the playback.
1
If you want to skip the index menu and
playback directly from the beginning,
press the DISC MENU key on the remote control
to switch off the function.
11
Downloaded From Disc-Player.com Philips Manuals
Operation
Preview Function
2
0 Press the PREVIEW key to enter previewing
menu.
0 Press 34 key to highlight TRACK DIGEST, DISC
INTERVAL or TRACK INTERVAL.
0 Press OK key to open one option.
Disc Interval
If you select DISC INTERVAL, the Disc contents
will be divided into six segments. This helps you
preview the contents of the entire Disc.
0 After you enter the menu of any digest type,
➜ To quit preview function: Press 341 2 to
highlight EXIT and press OK to confirm.
➜ To return to the previewing menu for selecting
the other digest type: Press 341 2 to highlight
MENU and press OK to confirm.
- To start playing the Disc from a certain interval,
press 341 2 to go to the SELECT line in the
display at the bottom of the screen.
- Press the numerical keys to choose a segment
(1-6), then press OK to start play from that point.
1
3
Track Digest
If you select TRACK DIGEST, the first five seconds
of each Track will play. This introduces you to the
contents of each Track on the Disc.
- To choose your desired track, please press 341 2
to go to the SELECT line in the display at the
bottom of the TV screen. Press the numerical
keys to enter the Track you want.
➜ To see other Tracks, press Previous ¡1 or Next
2™ on the remote.
- Press the OK key to start playback.
12
Downloaded From Disc-Player.com Philips Manuals
Track Interval
If you select TRACK INTERVAL, the current Track
will be divided into six parts. This helps you see
the contents of the current Track.
- To play the Track from a certain interval, press
341 2 to go to the SELECT line.
- Press the numerical keys (1-6) to choose a
segment, then press OK to start play from that
point.
Picture CD & MP3 Playback
0
0
0
0
0
0
0
0
0
0
This player can playback JPEG format pictures and
MP3 files on a personally recorded CD-R/RW
disc or commercial CD, and is compatible with
Kodak Picture CD.
Playback songs one by one automatically.
Album and track selection.
Repeat/Shuffle Playback (disc / album / track /
picture).
Picture Preview.
Select any music or pictures from the disc to
playback them together.
Program Playback.
Maximum number of files within one folder is 500
Maximum files Programmable is 100.
MP3: Maximum supported Bitrate is 256kbits or
48kHz in Variable Bitrate mode
JPEG: Maximum supported resolution is 3072 x
2048 (for baseline JPG pictures), or 2000 x 1500
(for progressive JPG pictures).
General Operation
0 If you choose WITH MENU in the Setup Menu
(Please refer to the MP3 & JPEG navigator below
), the Picture CD/MP3 CD menu will be shown
on the screen before playback.
0 At any time during playback, press DISC MENU
to return to the menu.
0 Press 3 or 4 to highlight an Jpeg file in the Disc's
menu, then the picture will be previewed on the
right side of the menu.
MP3 & JPEG Navigator
1
2
3
4
5
6
8
To select a different playback method, follow the
steps below.
At STOP mode, press the SYSTEM MENU key to
open the setup menu.
Press 2 to highlight the PREFERENCE PAGE
icon at the top of the menu.
Press OK or 4 to open the PREFERENCE menu.
Press the 3 4 key to highlight the MP3/JPEG
NAV menu.
Press the 2 key to enter the menu.
Press the 3 4 key to highlight the WITHOUT
MENU or WITH MENU item.
➜ WITHOUT MENU: playback mp3 files
automatically in according to the date sequence.
➜ WITH MENU: playback files in the selected
folder.
Press the OK key to confirm your selection.
Play Mode
Playback Selection
0 One way is to press the number of your favourite
file to play the file at any time during playback.
0 Another way is to select via the menu.
1 Press DISC MENU to open the Picture CD/MP3
CD menu.
2 When the menu appears on the screen, press the
3 4 key to select the folder you want and press
the OK to open it.
3 Press 3 or 4 to highlight a file in the folder and
press OK to confirm.
➜ The playback will start from this file.
Repeat / Shuffle
0 During JPEG play, press REPEAT to choose:
REPEAT ONE - Keep the current JPEG image still
on the screen.
REPEAT ALL - Play all files on the Disc repeatedly.
SHUFFLE - Play files in random order.
REPEAT OFF - Cancel all repeat options and
resume normal playback.
0 While the menu is on the screen, press REPEAT
to choose:
FOLDER - All file in the current folder will play
once.
REPEAT ONE - Keep a JPEG image still on the
screen or plays an MP3 file repeatedly.
REPEAT FOLDER - Play files in the selected folder
repeatedly.
SHUFFLE - Play files in random order.
1
2
3
Program Playback
While the Disc menu is on the screen and play is
stopped, press 1 to switch into the FILELIST.
FILELIST will flash briefly at the bottom of the
screen.
Press 3 or 4 to choose a file to add to the
playlist, then press 2. ADD TO PLAYLIST will
appear briefly at the bottom of the screen. (To
remove an item from the Program, press 1 to go
to the PLAYLIST. Press 3 or 4 to choose the
item, then press 2 to remove it. REMOVE FROM
PLAYLIST will appear briefly at the bottom of the
screen.) The maximum number of files for a
Program is 100.
To play the Program, press 3 or 4 to select any
item in the PLAYLIST, then press OK to start
playing the Program from that point.
➜ To quit the PLAYLIST, press 1.
13
Downloaded From Disc-Player.com Philips Manuals
Picture CD & MP3 Playback
Special JPEG Features
Function Introduction
Picture CD is a disc with a collection of JPEG
format pictures, and all extension filenames should
end with 'JPG'. The CD can be recorded on any
computer, and pictures may be from digital
camera or scanner. If the customers prefer, they
can make this CD become a Digital Album.
Playback with multi-angles
When displaying one picture on TV screen
0 Press the 3 4 1 2 key to get different effects.
3 key: Flip the picture vertically.
4 key: Flip the picture horizontally.
1 key: rotate the picture anti-clockwise.
2 key: rotate the picture clockwise.
Wipe Type
0
0
0
0
0
You can choose any general function introduced
in GENERAL OPERATION, besides, you also can,
Display the thumbnails of 12 pictures.
Zoom the picture.
Rotate the picture.
Flip the picture vertically or horizontally.
Play pictures by different wipe types.
0 Press ANGLE repeatedly during JPEG play to
choose how the pictures will transfer in/out
during play. The default setting is RANDOM.
Special MP3 Features
Function Introduction
Preview Function
1
2
3
4
This function shows the content of the current
folder or the whole disc.
Press the STOP key during playback of JPEG
pictures. You will see the thumbnails of 12 pictures
on the screen.
Press 2™ or ¡1 key to display the other pictures
on the next or the previous page.
Press the 1 2 3 4 key to highlight one of them
and press OK to playback. Or,
Move the cursor to select filmstrip icon at the
bottom of the screen, then press OK. This will
start playback at the first picture on the current
page.
Press DISC MENU to go to the Picture CD/MP3
CD menu.
0
0
0
0
“MP3” stands for “MPEG Audio Layer-3” and is a
part of the MPEG standard. A CD can store up to
10 hours of MP3 audio, which is nearly 10 times
as much as an Audio CD. Each song is recorded
as a file. You can choose any general function
introduced in GENERAL OPERATION. You can
also choose different playback speeds.
To automatically playback MP3 after loading a
MP3 CD without Jpeg pictures, you can choose
WITHOUT MENU in the MP3/JPEG NAV menu.
To stop the track, press STOP key during
playback.
To fast forward or fast reverse the track during
playback at two, four, eight, 16, or 32 times the
normal playback speed, press 2 or 1 key.
To select next or previous track, press 2™ or ¡1
key.
Zoom picture
0 During playback, press ZOOM key to display the
picture with different scales.
0 Press the 1 2 3 4 key to move or pan through
the picture.
Note:When the Jpeg Zoom function is activated,
some keys like SYSTEM SETUP, PLAY, etc. can not
be used normally.
14
Downloaded From Disc-Player.com Philips Manuals
JPEG and MP3 simultaneous
playback
1
2
3
Start playing the MP3 file as described above.
Select a JPEG for playback as described above.
To stop simultaneous playback, press DISC MENU
to stop JPEG playback. Then press STOP to stop
MP3 playback.
Setup Menu
Program (not for Picture CD/MP3)
General Setup menu
1
2
3
Some settings need to be made in this menu.
They are: DISC LOCK, PROGRAM, OSD
LANGUAGE and SCREEN SAVER.
Follow the steps below:
Press the SYSTEM MENU key in STOP mode to
enter the setup menu.
The GENERAL SETUP PAGE will be selected.
Press the OK or 4 key to confirm selection.
1
2
OSD language
This option is to let you to select a language for
information displayed on TV screen.
1
1
2
3
4
5
Press the 34 keys to highlight OSD
LANGUAGE in the GENERAL SETUP menu.
OSD LANGUAGE will be highlighted in green.
Enter its submenu by pressing the 2 key.
Move the cursor by pressing the 34 keys to
highlight the selected language.
Press the OK key to confirm.
Press 1 key to return to the top menu, or press
SYSTEM MENU to remove the menus.
2
3
1
2
1
2
3
To choose PROGRAM, press 34 keys.
Press the 2 key to select the item INPUT MENU,
then press OK.
➜ The PROGRAM menu will appear. This is
where you enter the Track/Chapter numbers in
the order in which you want to play them.
Input your favorite track
Input valid track number by pressing the
numerical keys.
➜ The number of available Titles, Chapters, or
Tracks will appear at the top of the screen.
Use the 1 234 buttons to move to other
Program positions.
➜ If the track number is more than ten, press
Previous ¡1 or Next 2™ to access other
Program pages. Or, press 1 234 to highlight
NEXT button, and then press OK.
Repeat this process to fill the Program.
Remove a track
Press the 1 234 keys to move the cursor to the
track you want to remove.
Press OK or PLAY 2 key to remove this track.
Playback tracks
When programing is completed,
Press the 1 234 keys to select START at the
bottom of the screen.
Press OK.
➜ The Program will start playing automatically.
When the disc is loaded again, you also can
playback the tracks in the program menu.
15
Downloaded From Disc-Player.com Philips Manuals
Setup Menu
1
2
Quit the program playback
In the PROGRAM menu,
Press the 1 234 keys to select EXIT at the
bottom of the screen.
Press the OK key to quit this menu.
Screen Saver
This function is used to turn the screen saver on
or off.
Stop the program playback
0 To resume normal playback, press STOP 9 twice
to stop playing the Program. Press PLAY 2 to
start play at the beginning of the Disc.
1
Repeat the program playback
0 During playback of the programmed tracks, press
the REPEAT key. You can choose playback a track
in the program menu repeatedly or all of the
tracks in program menu repeatedly.
2
3
Disc Lock
When the disc is locked, the player will store its
specific code into the memory for future
identification. After loading the disc next time, the
DVD player will prompt you to enter the
password. Then, press OK to load the disc.
1
2
3
4
Press the 34 keys to highlight DISC LOCK in the
GENERAL SETUP menu.
Enter its submenu by pressing the 2 key.
Press the 34 keys to select LOCK or UNLOCK,
then press OK to confirm.
➜ LOCK: Lock the disc being played.
➜ UNLOCK: unlock the disc.
Press 1 key to return to the top menu, or press
SYSTEM MENU to remove the menus.
NOTE:
1. When a locked disc is loading, the DVD player
will prompt you to enter your password (842100
is the default password).
2. To change the password , refer to the
PASSWORD chapter.
16
Downloaded From Disc-Player.com Philips Manuals
4
5
Press the 34 keys to highlight SCREEN SAVER
in the GENERAL SETUP menu.
Enter its submenu by pressing the 2 key.
Move the cursor by pressing the 34 keys to
highlight the selected item.
➜ ON: In STOP or No DISC mode, if no actions
are performed within 5~6 minutes, the screen
saver will be activated. Press the POWER or
PLAY key on the remote control or the PLAY key
on the front panel to restore the normal mode.
➜ OFF: Screen saver is disabled.
Press OK to confirm.
Press 1 key to return to the top menu, or press
SYSTEM MENU to remove the menus.
Setup Menu
D.R.C. (Dynamic Range
Compression)
Analog Audio Setup menu
1
2
3
This menu is used to adjust some of the Player’s
analog audio settings, such as DOWNMIX, D.R.C.
(Dynamic Range Compression), SOUND MODE,
and 3D SOUND.
Press SYSTEM MENU in STOP mode.
Press the 1 2 keys to highlight the AUDIO
SETUP PAGE icon at the top of the menu.
Press OK or 4 to confirm.
1
2
3
4
ANALOG AUDIO SETUP will be highlighted.
Press OK.
4
5
DOWNMIX
The DVD player will compress the dynamic range
of its sound output for late-night listening.
Press the 34 keys to highlight D.R.C..
Enter its submenu by pressing the 2 key.
Move the cursor by pressing the 34 keys to
highlight the selected item.
➜ ON: Enable D.R.C.
➜ OFF: Disable D.R.C.
Press OK.
Press 1 key to return to the top menu, or press
SYSTEM MENU to remove the menus.
Sound Mode
Press the 34 keys to highlight the DOWNMIX.
Enter its submenu by pressing the 2 key.
Move the cursor by pressing the 34 keys to
highlight the selected item.
0 LT/RT
➜ If you connected the Player to a stereo that
has Dolby Pro Logic.
0 STEREO
➜ If you connected the Player to a TV or Stereo
that has left and right Audio in jacks but does not
have Dolby Pro Logic.
4 Press OK.
5 Press 1 key to return to the top menu, or press
SYSTEM MENU to remove the menus.
Select the sound mode that matches the type of
music you play most often. These preset sound
modes adjust the frequency bands of the audio to
enhance your favourite music style.
1
2
3
1
2
3
4
5
Press the 34 keys to highlight the SOUND
MODE.
Enter its submenu by pressing the 2 key.
Move the cursor by pressing the 34 keys to
highlight the selected item.
➜ NONE: Playback the disc with its original
sound effects.
Press OK.
Press 1 key to return to the top menu, or press
SYSTEM MENU to remove the menus.
17
Downloaded From Disc-Player.com Philips Manuals
Setup Menu
3D SOUND
Digital Output
The 3D SOUND can simulate the echoes and
frequencies that may be available in a particular
environment. Choose the environment that you
would like to recreate by changing the 3D
SOUND setting.
If you connected the Player to a Stereo using the
COAXIAL jack, adjust DIGITAL OUTPUT (audio)
as described below. If you are not using the
COAXIAL jack, no adjustment is necessary.
1
1
2
3
4
5
Press the 34 keys to highlight the 3D SOUND.
Enter its submenu by pressing the 2 key.
Move the cursor by pressing the 34 keys to
highlight the selected item.
➜ OFF: Playback the disc with original sound
effects.
Press OK.
Press 1 key to return to the top menu, or press
SYSTEM MENU to remove the menus.
2
3
4
5
Press the 34 keys to highlight DIGITAL
OUTPUT.
Enter its submenu by pressing the 2 key.
Press the 34 keys to highlight the selected item.
➜ ALL: To select the original default audio settings
as received by most Stereos.
➜ PCM ONLY: If your stereo is PCM-compatible,
or can not decode MPEG-2 or DTS audio. Refer
to your Stereo manual for details.
Press OK.
Press 1 key to return to the top menu, or press
SYSTEM MENU to remove the menus.
Note: If DIGITAL OUTPUT is set to ALL, all audio
settings except MUTE are invalid.
Digital Audio Setup menu
Use the DIGITAL AUDIO SETUP to adjust some
of the Player’s digital sudio settings.
LPCM Output
If you connect the DVD player to a PCM
compatible Stereo via the digital terminals, such as
coaxial etc, you may need to select LPCM
OUTPUT.
Discs are recorded in a certain sampling rate. The
higher the sampling rate, the better the sound
quality.
1
2
3
4
Press SYSTEM MENU in STOP mode.
Press the 1 2 keys to highlight the AUDIO
SETUP PAGE icon at the top of the menu.
Press OK or 4 to confirm.
Press the 34 keys to select DIGITAL AUDIO
SETUP. Press OK.
1
2
3
4
5
18
Downloaded From Disc-Player.com Philips Manuals
Press the 34 keys to highlight the LPCM
OUTPUT.
Enter its submenu by pressing the 2 key.
Move the cursor by pressing the 34 keys to
highlight the selected item.
➜ 48K: Playback a disc recorded at the sampling
rate of 48kHz.
➜ 96K: Playback a disc recorded at the sampling
rate of 96kHz.
Press OK.
Press 1 key to return to the top menu, or press
SYSTEM MENU to remove the menus.
Setup Menu
TV Display
Video Setup menu
1
2
3
There are items included in VIDEO SETUP menu
such as TV TYPE, TV DISPLAY, CLOSED
CAPTIONS, SMART PICTURE, PICTURE
SETTING.
Press SYSTEM MENU in STOP mode to enter
the menu.
Press the 1 2 keys to highlight the VIDEO SETUP
PAGE icon at the top of the menu.
Press OK or 4 to confirm.
16:9
4:3
Letter Box
TV Type
4:3
Pan Scan
Before viewing the DVD or VCD, ensure that the
PAL or NTSC setting of the system matches your
TV set.
1
2
3
4
5
Press the 34 keys to highlight TV TYPE in the
VIDEO SETUP menu.
Enter its submenu by pressing the 2 key.
Move the cursor by pressing the 34 keys to
highlight one option.
➜ MULTI: If your TV is compatible with both
NTSC and PAL and you want the DVD Player to
automatically select the color system of the
current DVD.
➜ PAL: To output image in PAL system.
➜ NTSC: To output image in NTSC system.
Press OK.
Press 1 key to return to the top menu, or press
SYSTEM MENU to remove the menus.
NTSC/PAL Conversion
This player is equipped with a NTSC/PAL
conversion feature to convert the video output
of the disc to match your TV system. The
conversions supported are as below:
Disc
Type
DVD
VCD
Format
NTSC
Output format
Selected mode
PAL
NTSC
MULTI
PAL
NTSC
NTSC
PAL
NTSC
PAL
PAL
NTSC
NTSC
PAL
NTSC
PAL
NTSC
PAL
PAL
Select the aspect ratio of the TV to be connected.
16:9 ➜ when you connect a wide-screen TV to
the DVD player.
4:3 LETTERBOX ➜ when you connect a
normal TV to the DVD player. Displays a wide
picture with bands displayed on the upper and
lower portions of the TV screen.
4:3 PAN SCAN ➜ when you connect a normal
TV to the DVD player. Displays the wide picture
on the whole TV screen with a portion
automatically cut off.
1
2
3
4
5
Setup the item as follows,
Press the 34 keys to highlight the TV DISPLAY
option in theVIDEO SETUP menu.
Enter its submenu by pressing the 2 key.
Move the cursor by pressing the 34 keys to
highlight the selected item.
Press OK.
Press 1 key to return to the top menu, or press
SYSTEM MENU to remove the menus.
Note : PanScan output is not available on
all discs.
Notes:
– If you choose MULTI, please ensure that your
TV set has both the NTSC and PAL systems.
19
Downloaded From Disc-Player.com Philips Manuals
Setup Menu
Closed Captions
Picture Setting
Closed captions are hidden in the video signal of
some Discs. Different than subtitles, closed
captions are intended for the hearing impaired
and also show sound effects. For example, closed
captions may include information such as “phone
ringing” or “footsteps approaching,” while a
subtitle would only show spoken text.
Though you can turn on Closed Captions in the
DVD Player’s menu, the captions must be
available on the Disc. Also make sure you turn on
Closed Captioning on your TV. Otherwise, the
captions will not appear.
In this menu you can personalize the picture color
by adjusting brightness, contrast, tint and color.
Press the 34 keys to highlight PICTURE
SETTING in the VIDEO SETUP menu.
Press OK to open its submenu.
1
2
Brightness/Contrast/Tint/Color
1
2
1
2
3
4
Press 3 4 to select CLOSED CAPTIONS.
Press 2 to enter its submenu.
Press 3 or 4 to select ON or OFF, then press
OK. Your selection will be highlighted in brown.
Press 1 key to return to the top menu, or press
SYSTEM MENU to remove the menus.
Smart Picture
In this menu, you can choose a picture setting
from a fixed set of ideal predefined picture
settings.
1
2
3
4
5
Press the 34 keys to highlight SMART PICTURE
in the VIDEO SETUP menu.
Press the 2 key to highlight the item of the
submenu.
Press the 34 keys to choose an item.
➜ STANDARD: select a standard picture setting.
➜ BRIGHT: make the TV picture brighter.
➜ SOFT: make the TV picture softer.
➜ PERSONAL: achieve the color effect set in
the PICTURE SETTING menu.
Press OK.
Press 1 key to return to the top menu, or press
SYSTEM MENU to remove the menus.
20
Downloaded From Disc-Player.com Philips Manuals
Press the 34 keys to highlight BRIGHTNESS,
CONTRAST, TINT or COLOR.
Press the 2 key.
➜ An adjustment scale will appear on the TV
screen.
Setup Menu
3
4
Press the 2 1 keys to adjust the element you
selected.
➜ For BRIGHTNESS, choosing a more positive
value brightens the color on the screen and
seems to add white to the picture. Choosing a
more negative value darkens the colors in the
picture. Choose zero (0) for the average setting.
➜ For CONTRAST, choosing a more positive
value adds more noticeable difference between
the black and white in your picture and sharpens
the picture. Choose a more negative
CONTRAST value to blur the distinction
between black and white in the picture. The
picture will not seem as sharp.
➜ For TINT, choose a more positive value to add
red to the picture. Choose a negative value to
add yellow to the picture. Choose zero (0) to
balance the reds and yellows in the picture. You
can adjust TINT when you need people’s skin
tones to look more natural.
➜ For COLOR, choose a more positive value to
increase the color in your picture. To decrease
the color in the picture, choose a more negative
value. As you decrease the COLOR, the picture
becomes more black and white. Choose zero (0)
to balance the color.
Press OK key to save the setting and return to
the PICTURE SETTING SETUP menu.
Audio language
DVD discs are recorded in multiple audio
languages. Choose the language you want to hear
by adjusting AUDIO.
1
2
3
4
5
Press the 34 keys to highlight AUDIO.
Enter the submenu by pressing the 2 key.
Move the cursor by pressing the 34 keys to
highlight the selected option.
Press OK.
Press 1 key to return to the top menu, or press
SYSTEM MENU to remove the menus.
NOTE:Your DVD disc may not include the audio
language which you set in the AUDIO menu. If so,
the player will use another audio language instead.
Subtitle language
Some DVDs include subtitles, which you can
choose under SUBTITLE in the PREFERENCE
PAGE.
Preference Setup menu
1
2
3
4
There are options included in PREFERENCE
menu such as AUDIO, SUBTITLE, DISC MENU,
PARENTAL, PASSWORD, DEFAULT and MP3/
JPEG NAV.
Press the STOP key twice.
Press SYSTEM MENU to enter the menu.
Press 2 to highlight the PREFERENCE PAGE
icon at the top of the menu.
Press OK or 4.
1
2
3
4
5
Press the 34 keys to highlight SUBTITLE.
Enter the submenu by pressing the 2 key.
Move the cursor by pressing the 34 keys to
highlight the selected option.
Press OK.
Press 1 key to return to the top menu, or press
SYSTEM MENU to remove the menus.
NOTE:Your DVD disc may not include the subtitle
which you set in the SUBTITLE menu. If so, the
player will use another subtitle language instead.
21
Downloaded From Disc-Player.com Philips Manuals
Setup Menu
Disc Menu language
DVDs have a Disc menu that lets you select
features. Disc menus may be available in multiple
languages. To choose a language, follow these
steps.
1
2
3
4
5
Press the 34 keys to highlight DISC MENU.
Enter the submenu by pressing the 2 key.
Move the cursor by pressing the 34 keys to
highlight the selected item.
Press OK.
Press 1 key to return to the top menu, or press
SYSTEM MENU to remove the menus.
Parental Control
Movies on DVDs may contain scenes which are
not suitable for children. Therefore, discs may
contain ‘Parental Control’ information which
applies to the complete disc or to certain scenes
on the disc. These scenes are rated from 1 to 8,
and alternative, more suitable scenes are available
on the disc. Ratings are country dependent. The
‘Parental Control’ feature allows you to prevent
discs from being played by your children or to
have certain discs played with alternative scenes.
0 VCD, SVCD, CD have no level indication, so
parental control function has no effect on those
kinds of discs. This applies to most illegal DVD
discs.
0 You can follow the steps below to setup the
parental control:
NOTE: If your DVD disc doesn’t include the disc
menu language you have set, the player will use
another recorded language instead.
1
2
3
4
If you choose OTHERS in AUDIO,
SUBTITLE or DISC MENU menu,
You can select other languages. Please do as
follows,
Move the cursor by pressing the 34 keys to
highlight OTHERS.
Press OK.
➜ The DVD player will prompt you to enter a
language code (Four digits).
Input a language code by pressing numerical keys.
➜ Please look up the language code in the
chapter LANGUAGE CODE.
Press OK.
1
2
3
4
5
1
2
Press the 34 keys to highlight PARENTAL.
Move to its submenu by pressing the 2 key.
Then use the 3/4 keys to highlight a rating for
the disc inserted.
Press OK.
Press 1 key to return to the top menu, or press
SYSTEM MENU to remove the menus.
No Parental Control
Parental Control is not activated. The Disc will be
played in full.
Select ADULT item.
Press OK.
Ratings 1 to 7:
Some discs contain scenes which are not suitable
for children. All scenes with a rating higher than
you set will be skipped during playback. However
if the disc contains alternate scenes, these will play
automatically. If not, the playback will stop and the
six digits code will need to be entered again.
22
Downloaded From Disc-Player.com Philips Manuals
Setup Menu
Default Setup
If problems occur while setting up the DVD
player, the DEFAULT function can be used to
reset all options to the factory defaults and all
your personal settings will be erased.
Password
1
2
3
1
2
3
4
Press 34 to highlight DEFAULT.
Highlight RESET by pressing the 2 key.
Press OK.
Press 1 key to return to the top menu, or press
SYSTEM MENU to remove the menus.
CAUTION: When this function is activated, all
setups will be reset to factory defaults.
4
Press the numerical keys to enter the current sixdigit password. (If this is the first time you have set
a password, you do not have to enter an OLD
PASSWORD. The numbers you enter will go into
the NEW PASSWORD box instead.)
5
If successful, the player will prompt for a new sixdigit password in the NEW PASSWORD box.
After that, enter the new password again to
reconfirm in the CONFIRM PWD box.
Press OK to save the new password. The previous
menu will appear.
Press SYSTEM MENU to remove the menus.
MP3/JPEG Navigator
This menu allows you to select alternate settings
when you playback picture CD and MP3 CD.
1
2
3
4
5
This item is used for the parental control and disc
lock. Enter your six digit password when a hint is
displayed on the screen.
Press SYSTEM MENU to enter the menu.
Press 2 to highlight the PASSWORD SETUP
PAGE icon at the top of the menu. Press OK or
4.
PASSWORD will be highlighted. Press 2 to
highlight CHANGE, then press OK.
Press 3 4 to highlight MP3/JPEG NAV.
Press 2 to enter the submenu.
Press 3 4 to highlight WITHOUT MENU or
WITH MENU.
➜ WITHOUT MENU: playback MP3 CD in
sequence automatically.
➜ WITH MENU: playback Jpeg pictures or MP3
music in the selected folder.
Press OK key to confirm your selection.
Press 1 key to return to the top menu, or press
SYSTEM MENU to remove the menus.
6
7
8
NOTE:
1.You can change the setup of parental control
and load a locked disc with a valid password being
entered.
2. If you forget your password, you can enter the
default password 842100.
23
Downloaded From Disc-Player.com Philips Manuals
Specifications
PLAYBACK SYSTEM
AUDIO PERFORMANCE
DVD Video
Video CD & SVCD
CD
PICTURE CD
MP3-CD
CD-R, CD-RW
DVD+R, DVD+RW
DA Converter
24bit
Signal-Noise (1KHz)
100dB
Dynamic range(1KHz)
>90dB
DVD
fs 96 kHz
4Hz- 44kHz
fs 48 kHz
4Hz- 22kHz
SVCD
fs 48 kHz
4Hz- 22kHz
fs 44.1kHz
4Hz- 20kHz
CD/VCD
fs 44.1kHz
4Hz- 20kHz
VIDEO PERFORMANCE
* CVBS
*Component video
1Vpp --- 75Ω
Y: 1.00Vpp --- 75Ω
Pr: 0.7Vpp --- 75Ω
Pb: 0.7Vpp --- 75Ω
TV STANDARD (PAL/50Hz) (NTSC/60Hz)
Number of lines
Playback
625
Multistandard
525
(PAL/NTSC)
CONNECTIONS
AUDIO FORMAT
Digital
Mpeg/ AC-3/ DTS
PCM
MP3(ISO 9660)
compressed Digital
16, 20, 24 bits
fs, 44.1, 48, 96 kHz
24, 32, 56, 64, 96, 128,
256 kbps & variable
bit rate fs, 16, 22.05,
24, 32, 44.1, 48 kHz
Analog Sound Stereo
Component Video Output Cinch
Video Output
Cinch
Audio Output(L+R)
Cinch
Digital Output
1 coaxial
IEC958 for CDDA / LPCM
IEC1937 for MPEG1, MPEG 2, Dolby
Digital and DTS
CABINET
Dimensions (w x d x h)
Weight
Specifications subject to change without prior notice
216 x 216x 45 mm
Approximately 0.8 Kg
POWER CONSUMPTION
Power consumption
Power consumption in Standby mode
<8W
< 1.2W
Maintenance
Cleaning the Disc Compartment
● Always close the CD door to keep the CD
compartment dust-free. To clean, dust the
compartment with a soft dry cloth. Do not use a
solution containing alcohol, spirits, ammonia or
abrasives.
Cleaning Discs
¶ When a disc becomes dirty, clean it with a
cleaning cloth. Wipe the disc from the center out.
Do not wipe in a circular motion.
¶ Do not use solvents such as benzine, thinner,
commercially available cleaners, or antistatic spray
intended for analog records.
24
Downloaded From Disc-Player.com Philips Manuals
Cleaning the disc lens
● After prolonged use, dirt or dust may accumulate
at the disc lens. To ensure good playback quality,
clean the disc lens with Philips CD Lens Cleaner
or any commercially available cleaner. Follow the
instructions supplied with cleaner.
Language Codes
You will need these codes if you want a different language for Subtitles, Audio, or Disc menus.
25
Downloaded From Disc-Player.com Philips Manuals
Language Codes
You will need these codes if you want a different language for Subtitles, Audio, or Disc menus.
26
Downloaded From Disc-Player.com Philips Manuals
Troubleshooting
WARNING
Under no circumstances should you try to repair the system yourself, as this will invalidate the
warranty. Do not open the system as there is a risk of electric shock.
If a fault occurs, first check the points listed below before taking the system for repair. If you are
unable to remedy a problem by following these hints, consult your dealer or service center.
Problem
No power
No picture
Distorted picture
Completely distorted picture or
black/white picture with DVD
or Video CD
Solution
–
–
–
–
–
–
–
–
No sound or distorted sound
No audio at digital output
–
–
–
–
–
–
–
Disc can’t be played
–
–
–
–
–
_
No return to start-up screen after
you remove a Disc.
The player does not respond to
the remote control
The Player does not work
–
–
–
–
–
Player does not respond to some
operating commands during playback
DVD Video player cannot read
CDs/DVDs
–
Any setup changes can’t be stored.
–
–
Check if the AC power cord is properly connected.
Check if the TV is switched on.
Check the video connection.
Set your TV to the correct Video In channel.
The disc is badly scratched or dirty.
Sometimes a small amount of picture distortion
may appear .This is normal.
Make sure the NTSC/PAL setting at the DVD
player matches the video signal of your television.
(See NTSC/PAL CONVERSION)
If the picture becomes distorted after switching
among PAL and NTSC, please set the SMART
PICTURE to STANDARD.
Adjust the volume.
Check that the speakers are connected correctly.
Check the digital connections.
Check if your receiver can decode MPEG-2 or DTS
and if not, please make sure the digital output is set
to PCM.
Check if the audio format of the selected audio
language matches your receiver capabilities.
Do not connect any cables from the Player to a
Stereo’s “PHONO IN” jack.
Deactivate mute at the DVD Player by pressing
MUTE on the Player’s remote.
The DVD+R/DVD+RW/CD-R must be finalized.
Ensure the disc label is facing up.
Check the Parental controls.
Check the Region Code of the DVD. The DVD
must be coded for All regions or Region 3 in order
to play on this DVD Player.
Check if the disc is defective by trying another disc.
If you record a Picture CD or MP3 CD yourself,
ensure that your disc contains at least 10 pictures or
5 MP3 tracks.
Reset the unit by switching the player off, then on
again.
Aim the remote control directly at the sensor on
the front of the player.
Reduce the distance to the player.
Replace the lithium batteries in the remote control.
disconnect the power cord from the power outlet
for a few ninutes. Reconnect it and try to operate
the Player again as usual.
Operations may not be permitted by the disc.
Refer to the instructions of the disc.
Use a commonly available cleaning CD/DVD to
clean the lens before sending the DVD Video player
for repair.
Remove the Setup Menu after make the setup, and
then press POWER key to switch into the Standby
mode.
27
Downloaded From Disc-Player.com Philips Manuals
Meet Philips at the Internet
http://www.philips.com
DVP 320
3141 015 25351
The products and ser vices described herein
are not necessarily available in all countries
Due to continuous product improvements this
document is subject to change without notice.
Downloaded From Disc-Player.com Philips Manuals