1
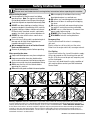
MINIMIX 150
GB
CONCRETE MIXER
OPERATORS MANUAL
F
BÉTONNIÈRE
MANUEL DE L'OPERATEUR
E
HORMIGONERA
MANUAL DEL OPERARIO
P
BETONEIRA
MANUAL DO OPERADOR
NL
BETONMOLEN
BEDIENINGSHANDLEIDING
800/21330/7
Euro1 - 3/05
GB
E
NL
Serial Numbers / Numéros de série
Números de serie / Números de Série
Serienummers
F
P
ATTENTION!
Make a note of the serial numbers of your machine and always quote them in any
communication with a Belle Group Dealer.
ATTENTION!
Notez les numéros de série de la machine et indiquez-les dans toutes vos communications
avec un revendeur du Groupe Belle.
ATENCIÓN!
Tome nota de los números de serie de su máquina y cítelos siempre en cualquier
comunicación con un distribuidor del Grupo Belle.
ATENÇÃO!
Tome nota dos números de série da sua máquina e indique-os sempre na correspondência
que trocar com o Concessionário do Grupo Belle.
LET OP!
Noteer alle serienummers van uw machine. Bij contact met een Belle Groep-dealer moet u
deze nummers vermelden.
MACHINE SERIAL NUMBER. / NUMERO DE SERIE DE LA MACHINE.
NÚMERO DE SERIE DE LA MÁQUINA. / NÚMERO DE SÉRIE DA MÁQUINA.
MACHINESERIENUMMER.
ENGINE SERIAL NUMBER. / NUMERO DE SERIE DU MOTEUR.
NÚMERO DE SERIE DEL MOTOR. / NÚMERO DE SÉRIE DO MOTOR.
MOTORSERIENUMMER.
2
MINIMIX 150 OPERATORS MANUAL
GB
Concrete mixer operators manual
Page: 4
F
Bétonnière manuel de l’operateur
Page: 12
E
Hormigonera manual del operario
Página: 16
P
Betoneira manual do operador
Página: 20
NL
Betonmolen bedieningshandleiding
Bladzijde: 24
Belle Group Sheen UK
Sheen, Nr.Buxton,
Derbyshire, SK17 0EU, GB
UK Sales
+44 (0)1298 84000
+44 (0)1298 84722
[email protected]
Export Sales
+44 (0)1298 84019
+44 (0)1298 84722
[email protected]
Unit 5, Bode Business Park, Ball Haye Green,
Leek, Staffordshire, ST13 6BW, GB
+44 (0)1538 380000
+44 (0)1538 380038
[email protected]
[email protected]
www.belle-group.co.uk
3
MINIMIX 150 OPERATORS MANUAL
GB
Contents
Introduction ........................................................................................................................................4
Serial Numbers ..................................................................................................................................2
Safety Instructions .............................................................................................................................5
Warning Decals .................................................................................................................................6
Assembly Instructions........................................................................................................................7
Stand Assembly.................................................................................................................................8
Loading & Unloading .........................................................................................................................9
Mixing Hints .......................................................................................................................................9
Service & Maintenance....................................................................................................................10
Technical Data............................................................................................................................28-29
Notes ...............................................................................................................................................11
Belle Group reserves the right to change machine specification without prior notice or obligation.
GB
Introduction
??
Read this manual, carefully, observing all operating and safety instructions before, during
and after using your machine, and maintain your machine in good working order.
Congratulations on your purchase of this quality concrete mixer from the Belle Group Range.
This machine is manufactured to conform to the EEC directives currently in force, is issued with a
declaration of conformity and therefore displays the CE mark, applicable in territories where they
are enforced. Retain this manual with your machine for future reference.
SAFETY AND ACCIDENT PREVENTION
Operation Instructions
All persons who apply, assemble, operate, start, control, maintain or repair this machine, must read
and understand the operating instructions.
Owner Responsibility :
The owner must ensure that only qualified persons operate, maintain or repair this machine.
STORAGE
When not in use, store in a dry, locked place. Keep away from children.
Operation for the Intended Purpose :
Mixers are intended for the production of concrete, mortar and plaster. The mixer must be used for
its intended purposes and is not suitable for the mixing of flammable or explosive substances. The
mixers must not be used in an explosive atmosphere.
MAINTENANCE AND REPAIRS
When maintaining this machine only the manufacturers original replacement parts may be used.
The user will lose any possible claims if replacement parts used are other than the makers original
replacement parts.
Only authorised persons should repair the mixer, and within the requirements of the CE mark
(where applicable), where no deviation to the original specification must take place.
Any maintenance and repairs carried out, to any of the electric components must be
undertaken by a qualified electrician.
REPLACEMENT PARTS
Contact your nearest Belle Group dealer. When ordering replacement parts, please quote the
product type, serial number & engine/motor model. Detail the part required in conjunction with the
parts list provided, indicating the Part Number, Item Number and quantity required.
4
MINIMIX 150 OPERATORS MANUAL
Safety Instructions
GB
Read these safety instructions.
Please read and understand all running/safety instructions before operating this machine.
Before starting the mixer
Ensure engine oil is filled to correct level before
operating mixer. Note: The engine must be lifted to
the horizontal position when filling and checking oil.
Check that all guards are in position and correctly fitted.
DO NOT wear loose clothing or jewellery that may
become entangled in the workings of this machine.
Suitable clothing as follows should meet relevant
EEC/local safety standards: overalls, work boots,
goggles, face mask, gloves and ear defenders etc.
DO NOT tip mixer onto the drum mouth when
motor is running.
Ensure that any trailing cable is protected against
damage and not liable to be tripped over or
trapped underneath the mixer.
We recommend the use of an Residual Current
Device on 230v electrics.
Remove all packaging material before operating.
DO ensure plenty of ventilation when running
diesel/petrol engines in a confined area.
DO replace any worn/damaged warning decals.
DO ensure the drum is rotating while emptying
the mixer.
DO always switch off and remove the plug from
the socket if leaving the machine unattended.
DO NOT use as a wheel barrow. Disconnect from
power supply before moving.
BEWARE of the Danger Zones & Hot Zones.
BE A WARE of exhaust venting directions.
Emergency Stop
If you have to turn off the mixer in a emergency
you must:
Electric: either turn off at switch or at the mains,
Petrol: turn the engine switch off, see engine manual.
Fire Fighting
If your mixer catches fire, turn off the electric supply.
Using a dry powder or C02 fire extinguisher put out
the fire. If the fire can not be put out, keep away and
call the fire brigade.
If you are in any doubt about the safety condition of
your machine, please contact your Belle authorized
Service Dealer.
When operating the mixer
Keep unauthorised persons away from mixing drum.
Keep area around the mixer clear of obstructions
which could cause persons to fall onto moving parts.
Always ensure mixer is on level ground before mixing.
DO become familiar with the controls before
operating this machine.
DO ensure that all guards are fitted in the correct position.
Warning - Important Should the socket outlets in your home not be suitable for the plug supplied with your product, the plug
must be removed (cut-off if it is a moulded plug and disposed of) and an appropriate plug fitted. Follow wiring instructions
carefully. Do not connect either core to the earth pin, as this is a Class II Isolated Product. BLUE = NEUTRAL BROWN = LIVE
As the colours of the wires in the mains lead of this appliance may not correspond with the coloured markings identifying the
terminals in your plug, proceed as follows: The wire which is coloured Blue must be connected to the terminal which is is
marked with the letter N or coloured Black. The wire which is coloured Brown must be connected to the terminal which is is
marked with the letter L or coloured Red.
5
MINIMIX 150 OPERATORS MANUAL
GB
E
NL
Warning Decals / Decalcomanies D’avertissement
F
Calcomanias de Advertencia / Autocolantes de Aviso P
Waarschuwingsstickers
WARNING
AVERTISSEMENT
AVISO
AVISO
WAARSCHUWING
CAUTION TAKEN WHEN HANDLING
ATTENTION LORS DE LA MANIPULATION
SE REQUIERE PRECAUCION AL MANIPULARLA
TENHA CUIDADO DURANTE O MANUSEAMENTO
VOORZICHTIG HANTEREN
WEAR EAR PROTECTION
PORT DE PROTECTION ACOUSTIQUE
LLEVE OREJERAS
UTILIZE PROTECÇÃO AUDITIVA
RAAG OORBESCHERMERS
FIRE AND EXPLOSIVE RISK
RISQUE D’INCENDIE ET D’EXPLOSION
RIESGO DE INCENDIO Y EXPLOSION
RISCO DE INCÊNDIO E DE EXPLOSÃO
BRAND- EN ONTPLOFFINGSGEVAAR
WEAR EYE PROTECTION
PORT DE LUNETTES DE PROTECTION
LLEVE ANTEOJOS
UTILIZE PROTECÇÃO OCULAR
DRAAG OOGBESCHERMING
WEAR PROTECTIVE FOOTWEAR
PORT DE CHAUSSURES DE PROTECTION
LLEVE CALZADO PROTECTOR
UTILIZE CALÇADO DE PROTECÇÃO
DRAAG BESCHERMSCHOEISEL
READ OPERATOR MANUAL
LIRE LE MANUEL D’UTILISATION
LEA EL MANUAL DEL USUARIO
LEIA O MANUAL DO OPERADOR
LEES DE GEBRUIKERSHANDLEIDING
DO NOT HANG
NE PAS SUSPENDRE
NO DEBE COLGARSE
NÃO PENDURE
NIET OPHANGEN
THIS WAY UP
HAUT
ESTE LADO HACIA ARRIBA
ESTE LADO PARA CIMA
DEZE ZIJDE BOVEN
ONLY STACK 3 HIGH
EMPILAGE LIMITÉ À 3 NIVEAUX
SOLO DEBE APILARSE A 3 NIVELES
EMPILHAR APENAS A 3 NÍVEIS
NIET MEER DAN 3 HOOG STAPELEN
6
MINIMIX 150 OPERATORS MANUAL
GB
Assembly Instructions / Instructions de Montage
F
E
Instrucciones de Montaje / Instruções de Montagem
P
NL
Montagevoorschriften
Ensure drum fits right up to the shoulder on the shaft. Do not spin on fast as this may damage the gearbox
Vérifier que le tambour s'engage à fond jusqu'à l'arbre. UNE ROTATION TROP RAPIDE D'ENDOMMAGER LA BOITE D'ENGRENAGES
Cerciórese de que enrosca el tambor hasta el reborde en el eje. NO LO HAGA GIRAR MUY RAPIDAMENTE, YA QUE PODRA DAÑARSE LA CAJA REDUCTORA
Assegure-se de que o tambor se adapta ao ombro no eixo. NÃO RODE RAPIDAMENTE POIS PODERÁ DANIFICAR A ENGRENAGEM
Controleer of de trommel vast tegen de kraag op de as zit. TROMMEL EL NIET TE SNEL OPDRAAIEN, WANT HIERDOOR KAN TANDWIELKAST BESCHADIGD RAKEN
Tools Required
Les Outils Requis
Herramientas
Necesarias
Feramentas
Necessárias
Benodigde
Gereedschappen
13mm
x1
x1
Electric only
Uniquement électrique
SOLO MOTOR
ELECTRICO
APENAS ELÉCTRICA
ALLEEN ELEKTRISCH
PARALLEL
PARALLELE
PARALELA
Ensure all nuts and bolts are securely tight
S'assurer que tous les écrous et boulons sont correctement serrés
Compruebe que están bien apretados todos los pernos y tuercas
Assegure-se de que todas as porcas e parafusos estão bem apertados
Controleer of alle moeren en bouten stevig vastzitten.
PLEASE NOTE: SUPPLIED WITH NO OIL IN PETROL ENGINE
USE BOTTLE PROVIDED FOR INITIAL ENGINE FILL
IMPORTANT: FOURNI SANS HUILE DANS LE MOTEUR A ESSENCE
UTILISER LA BOUTEILLE FOURMÉ POUR LA PREMIÉRE UTILISATION.
Emergency Stop Button (Electric Only)
Bouton d’arrêt d’urgence (Uniquement électrique)
Botón de parada de emergencia (SOLO MOTOR ELECTRICO)
Botão de Paragem de Emergência (APENAS ELÉCTRICA)
Noodstopknop (ALLEEN ELEKTRISCH)
NOTA: EL MOTOR DE GASOLINA SE SUMINISTRA SIN ACEITE
UTILIZAR LA BOTELLA SUMINISTRADA PARA EL PRIMER LLENADO
É FAVOR NOTAR: FORNEDCIDO SEM OLÉO NO MOTOR A GASOLINA
USAR RECEPIENT FORNECIDO PARA ENCHIMENTO INICIAL DO MOTOR
LET OP: BENZINEMOTOR IS BIJ AFLEVERING NIET GEVULD MET OLIE
GEBRUIK BIJGELEVERDE FLES VOOR AFVULLEN MACHINE
7
MINIMIX 150 OPERATORS MANUAL
GB
E
NL
Stand Assembly / Montage Du Support
Montaje Del Caballete / Conjunto Do Suporte
Montage Standaard
F
P
2
1
3
DO NOT tip mixer onto drum mouth when motor is running.
NE PAS basculer la bétonnière sur l'ouverture du tambour
lorsque le moteur tourne.
NO vuelque la amasadora contra la boca del tambor con el
NÃO volte a betoneira para dentro da boca do tambor com
motor en marcha.
o motor em funcionamento.
Kantel de betonmolen NIET op de trommelopening
wanneer de motor draait.
CAUTION whilst rotating mixer up into stand position,
always lift from front of mixer.
PRECAUCIÓN: Al girar la mezcladora a su posición vertical levántela
siempre desde la parte delantera de la mezcladora.
ATTENTION tout en faisant tourner le mixeur pour le monter
en position immobile, levez toujours par l'avant du mixeur.
CUIDADO: ao rodar o misturador para cima, para a
posição vertical, levante-o sempre a partir da parte da frente.
LET OP! Als u de mixer naar de rechtopstaande stand draait,
moet u hem altijd aan de voorkant van de mixer optillen.
NOTE: When ready for dismantling the mixer after use, follow all the
previous procedures but in reverse order. Ensure Stand Clip is
located correctly onto frame.
REMARQUE: Une fois prêt à démonter le mixeur après usage,
suivez toutes les procédures précédentes, mais en sens
inverse. Veillez à ce que l'attache de position immobile soit
placée correctement sur le bâti.
NOTA: Cuando esté listo para desmontar la mezcladora después de
utilizarla, siga todos los pasos anteriores en orden inverso. Asegúrese
de que el clip del soporte está situado correctamente en el marco.
NOTA: quando o misturador estiver pronto para ser
desmontado depois da utilização, siga todos os
procedimentos anteriores mas na ordem inversa.
Certifique-se de que o Grampo de fixação vertical está
correctamente posicionado na armação.
OPMERKING: Als u de mixer na gebruik uit elkaar wilt halen, moet u de voorgaande procedures in omgekeerde volgorde uitvoeren.
Controleer of de positioneringsklem goed op het frame zit.
8
MINIMIX 150 OPERATORS MANUAL
Loading & Unloading
GB
Never remain under or in the immediate vicinity of the machine when it is lifted by a crane.
Only use marked lifting points. Always make sure that all lifting devices are dimensioned
for the weight of the products.
Mixing Hints
GB
A few hints on mixing. First add water, about 11/2 gallons approximately, depending on the type of
mix. Cement should go in after some of the aggregates work consistently to the ratio of ingredients
as listed below for whatever type of concrete mix you are working to. Beware of low grade
aggregates, this only leads to trouble later on with sinking and frost spoiling the appearance of the
pour. Also importantly do not get the concrete mix too wet as this can reduce the strength and is
less able to withstand weathering. Never throw material into the mixer, trickle it steadily over the rim
or it will stick firmly to the back of the drum and can only be dislodged by stopping the mixer. The
approximate mixing time for concrete is 21/2 minutes, this is taken when all the material, including
the water has entered the drum. Over mixing can reduce strength and cause segregation of the
coarser aggregates.
Keep your mixer clean, the slightest trace of material left in the drum, will harden and attract more
each time you use it until the machine is useless. Do not throw bricks into a mixer drum to clean it
out. The best method is 1” gravel and clean water, use plenty of it, as this will do the job in half
the time.
TABLE OF
CONCRETE MIXES
MIX
BATCH QUANTITIES
CEMENT
SAND
STONE
112 lb.
50kg
bag
CU.FT
LTR
CU.FT
LTR
APPROX.
BATCH OUTPUT
CU.FT
LTR
MOST ORDINARY
1:2:4
1/2 BAG
1 1/4
35
2 1/2
71
3
85
FOUNDATIONS
1:3:6
1/3 BAG
1 1/4
35
2 1/2
71
2 3/4
78
ROUGH MASS
CONCRETE
1:4:8
1/4 BAG
1 1/4
35
2 1/2
71
2 3/4
78
1:1 1/2:3 2/3 BAG
1 1/4
35
3
71
3
85
WATERTIGHT
FLOORS, TANKS
PITS, ETC.
5 No 2 shovels = approx. 1 cu.ft
9
MINIMIX 150 OPERATORS MANUAL
GB
Service & Maintenance
Before starting any maintenance or repairs, switch off motor, and isolate from the main power supply.
On completion of maintenance, check that the mixer functions correctly and that all guards are correctly fitted.
ELECTRIC MIXER
All portable electric appliances are dangerous if abused. This machine will only operate on one voltage. Check the
power supply to ensure it corresponds to the voltage as indicated on the rating label.
Make sure that the motor is switched off before you plug it into the power supply.
230v - Always use a Residual Current Device ("RCD"), (earth leakage trip), plugged directly into the 230v socket. If
using an extension cable, plug it directly into the RCD.
110v - When using a portable transformer it must have a minimum output of 2.5kw and to continuous rated.
The symbols on the ON/OFF switch are 0 (Red)=OFF and I (Green)=ON in accordance with international standards.
DO NOT use an extension cable between the transformer and the power supply.
Always ensure that the cable between the 110v mixer and transformer is a minium length of
3 metres.
Ensure cable is fitted with cable clip to the mixer frame at all times.
EXTENSION CABLES
If you need to use an extension cable it must be no longer than 30 metres (100 feet) in length. The wire section must be
1.5mm2 on 230v. Ensure that the extension cable is carefully laid out avoiding liquids, sharp edges and places where
vehicles might run over it. Avoid allowing the extension cable to be trapped underneath the mixer. Unroll it fully or it will
overheat and could catch fire. Make sure that any extension cable connections are dry and safe.
COMBUSTION ENGINES
Check oil regularly, level engine up when doing so. For Initial engine fill or top up use a suitable engine oil of a 10W/30
grade. In your own interests read the makers instruction leaflet issued with the machine before starting up.
CLEANING
Wipe off any external material. DO NOT use petrol, turpentine, lacquer or paint thinner, dry cleaning fluids or similar
products. Never let any liquids near the engine/motor. Use 1” gravel and clean water to clean the inside of the drum.
DO NOT use bricks etc. as this will damage the drum.
FRAME
The hole on the underside of the frame is to drain away any water.
BELT
All Belle mixers Electric/Petrol are fitted with
a preset tensioned toothed belt. No
adjustment is necessary.
2
DO NOT try to adjust with the motor running.
Ensure the extension lead is always
unplugged before the motor cover is
removed.
1
GEARBOX
The factory has preset the gearbox oil level.
Before inspecting the gearbox oil level, make sure
the gearbox is cold before removing the filler plug.
Top up with EP90 or similar gear oil in the mix
position to the level of the filler plug.
Gearbox Oil Filling Position
Oil Fill Plug
Mixing Position
10
MINIMIX 150 OPERATORS MANUAL
GB
E
NL
Technical Data / Caracteristiques Techniques
Datos Techicos / Dados Técnicos
Technische Gegevens
B
F
P
C
A
E
F
D
Mixer Model
Overall Dimensions
A - Height (off stand)
B - Width (off stand)
C - Length (off stand)
D - Height (on stand)
E - Width (on stand)
F - Length (on stand)
Modèle de la bétonnière
Dimensions hors tout
A - Hauteur (hors support)
B- Largeur (hors support)
C - Longueur (hors support)
D - Hauteur (sur support)
E- Largeur (sur support)
F - Longueur (sur support)
Modelo de hormigonera
Dimensiones exteriores
A - Altura (sin caballete)
B- Anchura (sin caballete)
C - Longitud (sin caballete)
D - Altura (con caballete)
E- Anchura (con caballete)
F - Longitud (con caballete)
28
Modelo de betoneira
Dimensões totais
A - Altura (fora do suporte)
B - Largura (fora do suporte)
C - Compriment (fora do suporte)
D - Altura (no suporte)
E - Largura (no suporte)
F - Compriment (no suporte)
MINI 150
Model mixer
Globale afmetingen
A- Hoogte (zonder standaard) 897 mm
B - Breedte (zonder standaard) 597 mm
C - Lengte (zonder standaard) 1211 mm
1431.5 mm
D- Hoogte (op standaard)
E - Breedte (op standaard) 1056.5 mm
1227mm
F - Lengte (op standaard)
MINIMIX 150 OPERATORS MANUAL
29
MINIMIX 150 OPERATORS MANUAL
Equipo eléctrico
Tensión nominal
Corriente nominal
Potencia nominal
Frecuencia
Régime du moteur (tr/min) RPM del motor
Système de protection
Sistema de protección
Consommation d'énergie Consumo de energía
Niveau de puissance sonore Nivel de potencia acústica
Equipamento Eléctrico
Tensão Nominal
Corrente Nominal
Potência Nominal
Frequência da Corrente
RPM do Motor
Sistema de Protecção
Consumo de Energia
Nível de potência de som
Elektrische uitrusting
Nominale spanning
Nominale stroom
Nominaal vermogen
Netfrequentie
Motortoerental
Beschermingsklasse
Energieverbruik
Gemeten geluidssterkteniveau
Gewicht standaard
230V
2.6 amp
0.55 kw
50 Hz
2850
IP45
550 watts
84 dB(A)
57 kg
9.5 kg
136 ltr
90 ltr
24
57 kg
9.5 kg
136 ltr
90 ltr
24
110V
5.5 amp
0.6 kw
50 Hz
2850
IP45
600 watts
84 dB(A)
230V
50Hz
110V
50Hz
230V
3 amp
0.6 kw
60 Hz
3480
IP45
670 watts
84 dB(A)
57 kg
9.5 kg
136 ltr
90 ltr
24
230V
60Hz
415V
1 amp
0.55 kw
50 Hz
2780
IP45
550 watts
84 dB(A)
57 kg
9.5 kg
136 ltr
90 ltr
24
415V
50Hz
Poids à vide - essence
Poids du support
Capacité maxi. tambour
Capacité maxi. malaxage
Moteur à combustion
Modèle
Type de combustible
Puissance nominale
Niveau de puissance sonore
Unladen Weight - Petrol
Stand Weight
Maximum Drum Capacity
Maximum Mixing Capacity
Drum speed (RPM)
Combustion Engine
Model
Kind of Fuel
Nominal Power
Sound Power Level
Peso sin carga
Peso del caballete
E
NL
Peso do Suporte
Gewicht standaard
Peso Descarregada - Gasolina Leeg gewicht - Benzine
P
Motor de combustión
Modelo
Clase de combustible
Potencia nominal
Nivel de potencia acústica
Motor de Combustão
Modelo
Tipo de Combustível
Potência Nominal
Nível de potência de som
HONDA
56 kg
9.5 kg
136 ltr
90 ltr
24
BRIGG &
STRATTON
61.5 kg
9.5 kg
136 ltr
90 ltr
24
60 kg
9.5 kg
136 ltr
90 ltr
24
ROBIN
Verbrandingsmotor
3.5HP IC
GXH50
EH09DU
Model
Petrol (Unleaded) Petrol (Unleaded) Petrol (Unleaded)
Soort brandstof
2.2 kw@2800 Rpm 1.2 kw@3800 Rpm 1.5 kw@2800 Rpm
Nominaal vermogen
92 dB(A)
92 dB(A)
92 dB(A)
Gemeten geluidssterkteniveau
Capacidad máx. del tambor Capacidade Máxima do Tambor Maximale inhoud trommel
Capacidad máx. de mezclado Capacidade Máxima de Mistura Maximale menghoeveelheid
Vitesse du tambour (tr/min) Velocidad del tambor (RPM) Velocidade do tambor (RPM) Draaisnelheid trommel (t.p.m.)
F
GB
MINI 150 PETROL MINI 150 A ESSENCE MINI 150 GASOLINA MINI 150 A GASOLINA MINI 150 BENZINE
Equipement électrique
Tension nominale
Courant nominal
Puissance nominale
Fréquence de courant
Electric Equipment
Nominal Voltage
Nominal Current
Nominal Power
Current Frequency
Motor R.P.M.
Protective System
Power Consumption
Sound Power Level
Peso do Suporte
Peso Descarregada - Eléctrica Leeg gewicht - Elektrisch
Capacidad máx. del tambor Capacidade Máxima do Tambor Maximale inhoud trommel
Capacidad máx. de mezclado Capacidade Máxima de Mistura Maximale menghoeveelheid
Vitesse du tambour (tr./min) Velocidad del tambor (RPM) Velocidade do tambor (RPM) Draaisnelheid trommel (t.p.m.)
Peso sin carga
Peso del caballete
Poids à vide - électrique
Poids du support
Capacité maxi. tambour
Capacité maxi. malaxage
NL
Unladen Weight - Electric
Stand Weight
Maximum Drum Capacity
Maximum Mixing Capacity
Drum speed (RPM)
P
F
GB
E
MINI 150 ELECTRIC MINI 150 ELECTRIQUE MINI 150 ELECTRICA MINI 150 ELÉCTRICA MINI 150 ELEKTRISCH
Belle Group Head Office
Sheen, Nr.Buxton, Derbyshire,
SK17 0EU, GB.
+44 (0)1298 84606
+44 (0)1298 84722
[email protected]
http://www.bellegroup.com