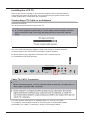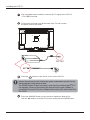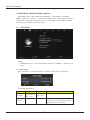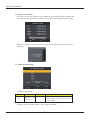
1
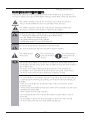
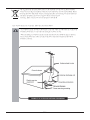
LTV-2291WHC
CONTENTS
English
........................................................ 1 ~ 51
Français
......................................................... 1 ~ 51
Deutsh
......................................................... 1 ~ 51
English
CONTENTS
WARNINGS AND PRECAUTIONS
Important Safety Instructions...................................................................... EN1
Antenna Safety Instructions........................................................................ EN3
INTRODUCING THE LCD TV
Package Contents ................................................................................................... EN4
Setting Your LCD TV ................................................................................ EN5
Your LCD TV ............................................................................................. EN7
Your Remote Control ................................................................................. EN10
INTRODUCING THE LCD TV
.
EN12
Connecting a TV Cable or an Antenna ......................................................
USING THE FEATURES
Customizing the CHANNEL Settings ......................................................... EN14
Customizing the PICTURE Settings .......................................................... EN19
Customizing the SOUND Settings ............................................................ EN21
Customizing the TIME Settings ................................................................. EN23
Customizing the OPTION Settings ............................................................ EN26
Customizing the LOCK Settings ................................................................. EN28
Customizing the OTHER MENU Settings ................................................. EN30
Customizing the MULTIMEDIA Settings .................................................... EN33
Customizing the PVR Settings .................................................................. EN40
TROUBLESHOOTING
.................................................................................................................EN50
SPECIFICATIONS
22”LCD ....................................................................................................... EN51
WARNINGS AND PRECAUTIONS
Warnings and Precautions
To prevent any injuries, the following safety precautions shoul d be observed in the installation, use,
servicing and maintenance of this equipment.Before operating t his equipment, please read this manual
This symbol is intended to alert the user to avoid the risk of electric shock. This eq
must not be disassembled by anyone except qualified service p ersonnel.
This symbol is intended to alert the user to the presence of im portant operating and
maintenance instructions in the literature accompanying the ap pliance.
To reduce the risk of fire or electric shock, do not expose thi s equipment to rain or moisture.
▪ TO REDUCE THE RISK OF ELECTRIC SHOCK,PERSONNEL.
▪ DO NOT REMOVE COVER (OR BACK).
▪ NO USER-SERVICEABLE PARTS INSIDE.
▪ REFER SERVICING TO QUALIFIED SERVICE
Use of controls, adjustments or performance of procedures other
than those specified herein may result in hazardous radiation exposure.
This symbol indicates
caution points.
This symbol indicates
actions that should not
be done.
This symbol indicates
actions that must be
performed.
▪ Do not place the equipment on any uneven or unstable carts, st ands, tables, shelves etc.
The equipment may fall, causing serious injury to children or adults and serious damage to
the equipment itself.
▪ Use only a cart or stand recommended by the manufacturer. This equipment and
recommended cart or stand should be handled with care. Quick stops, excessive force,
and uneven surfaces may cause the equipment and cart/stand to overturn.
▪ Do not disable the 3-wire grounding type plug. The grounding p in on the 3-prong plug is
an important feature. Removing the grounding pin will increas e the risk of damaging the
equipment.
▪ If you can not fit the plug into the electrical outlet, contac t an electrician to install a
grounding outlet.
▪ Always operate this equipment from the type of power source in dicated on the rear of the
serial/model information label.
▪ Never overload wall outlets and extensions.
▪ Use and handle the power cord with care. Do not place any heav y objects on the AC
power cord.
▪ Do not pull the AC power cord. Do not handle the AC power cord with a wet hand.
▪ Do not touch the power cord and antenna cable during lightning .
EN1
Warnings and Precautions
▪ Remove the plug from the wall outlet, if the equipment will not be used for a long period
of time.
▪ Do not place, use or handle this equipment near water.
▪ Never expose the equipment to liquid, rain, or moisture. Seek for service if any o
above is spilled into the equipment.
▪ Do not expose the equipment to extreme temperature or to direct sunlight, as the
equipment may heat up and suffer damage.
▪ Do not install the equipment near any heat sources such as radiators, heat registers,
stoves, or any other apparatus that might produce heat.
▪ Do not attempt to service the equipment yourself.
▪ Opening and removing the covers may expose you to dangerous voltage or other hazards
and may void your warranty. Refer service to qualified personnel.
▪ Do not place or drop any other objects on top.
▪ Do not insert anything into the ventilation holes of your equipment. Inserting any metal
or flammable objects may result to fire or electric shock.
▪ Do not place the equipment on uneven or unstable carts, stands, tables, shelves etc. The
equipment may fall, causing serious injury to children or adults and serious damage to the
equipment itself. Always place the equipment on the floor or on a surface that is sturdy,
level, stable and strong enough to support the weight of the equipment.
▪ Do not block any ventilating openings. Leave an open space around the equipment. Never
place the equipment : on a bed, sofa, rug, or any other similar surfaces; too close to
drapes/curtains/walls, in a bookcase, built-in cabinet, or any other similar places that may
cause poor ventilation.
▪ Unplug this apparatus during lightning storms or when unused for long periods of time.
▪ Refer all servicing to qualified service personnel. Servicing is required when the apparatus
has been damaged in any way, such as power-supply cord or plug is damaged, liquid has
been spilled or objects have fallen into the apparatus, the apparatus has been exposed to
rain or moisture, does not operate normally, or has been dropped.
▪ Always remove the power cord from the outlet before cleaning the equipment.
▪ Never use liquid or aerosol cleaners on the equipment.
Clean only with a soft dry cloth.
▪ Only use attachments/accessories specified by the manufacturer.
LISTENING WITH EARPHONES
▪ Listen at moderate Volumes to avoid hearing damage.
▪ If you hear no sound during playback, do not turn the Volume up as the music may
suddenly begin at a high Volume. Excessive sound pressure from earphones and
headphones can cause hearing loss.
▪ To avoid damaging your ears, adjust the Volume to the lowest level before playback, and
turn up to the desired level when playback has started.
Note: This user manual is for reference only, the actual unit m aybe changed
EN2
This sign indicates that this product may not be disposed of with your regular household
waste. The recycling and separate collection of such products is your responsibility. Please
drop off the above-mentioned waste at a designated place for recycling waste electrical and
electronic equipment. If you do not know where to drop off you
recycling, please contact your local city office or household
i
If an outdoor antenna is connected, follow the precautions below:
▪ An outdoor antenna should not be located in any area where it could come in contact with
overhead power lines, or any other electric light or power circuits.
▪ When installing an outdoor antenna system, extreme caution should be taken to prevent
contact with power lines. Direct contact with power lines may be fatal and should be
avoided at all costs.
EN3
Package Contents
EJECT
AUTO
PROG
INTRO
REPEAT
A-B
AR148
LCD TV SET
Warranty Card
Warranty Book
AC Adapter
Power cord
EN4
Setting Up Your LCD TV
How to install the TV Stand
Open the box, and make sure all necessary parts are in the box.
The package contains:
LCD TV
Stand
Cover an even stable surface with a soft cloth. Place the LCD TV unit
face-down on the cloth. Fit the stand onto the bottom of the LCD TV
unit as shown, then use a screw driver to tighten the screw on the bottom
of the stand until the screw is firmly fixed in place.
EN5
How to setup the TV
Use a supplied antenna cable to connect the VHF/UHF signal to the LCD TV’s ANT.
terminal
Connect the AC power cord at the back of the TV and connect the power cord to
wall outlet.
Insert the 2 batteries supplied in remote control.
Step1 Slide the back cover up to open the battery compartment of the remote control.
Step2 Insert two AAA size batteries. Make sure to match the (+) and ( - ) ends of the
batteries with the (+) and ( - ) ends indicated in the battery compartment. Slide the
cover back into place.
EN6
Your LCD TV
Front/left/Right Side View and Controls
Right Side View
Front View
Left Side View
PLAY/PAUSE
EJECT
EJECT
PLAY/PAUSE
LED
The LED light indicates when the LCD TV
is activated.
IR
Infrared Receiver
SOURCE
Chooses from different input signal sources.
MENU
Press once to display the OSD (on screen display),
press again to turn the OSD off.
CHA
CH+/Scans up and down through channels. Selects submenu item when in the OSD mode.
VOL+/Adjusts the volume up and down. Selects the main-menu item and
change values for items when in the OSD mode..
POWER
Turns the LCD TV on and into standby mode.
PLAY/PLAUSE
EJECJ
EN7
R
L
AUDIO IN
COAX VIDEO
OUT
SCART
DC 12V USB
HDMI
VGA
PC AUDIO
COMMON INTERFACE
Y
Pb
Pr
RF
Reae View and Jacks
DC 12V
Input 12V DC power.
Allows access to digital content stored on a USB storage.
HDMI IN
Connects the all digital AV equipment with HDMI connector.
VGA/PC AUDIO
Connects the PC, or other AV equipment with VGA and line in jacks.
CI
Insert the CI card into the slot
SCART
Connect to external equipment with scart socket. The SCART interface offers RGB, AV
signals with audio input/output between the TV and external
.
video equipment
YPbPr
Connects to the DVD player, Digital Set-Top-Box, or other AV equipment with component
(YPbPr) video
HEAD PHONE
Connect the head phone.
COAXIAL
Connects to the audio jack on the digital/standard 5.1 audio system.
AUDIO IN L/R
CVBS and YPbPr audio input jacks.
RF
Connects RF input from VHF/UHF antenna or cable to receive high/standard definition
television.
VIDEO
Connect the Video output jack of DVD or VCR.
EN8
How to connect CI(Common Interface) card
CI SLOT
To view the scrambled (pay) services in digital TV mode.
TO INSERT A CI CARD
Insert the CI card into the slot in the direction of the arrow until it fits.
TO REMOVE A CI CARD
When removing the CI card, do pull it from its slot.
This function enables you to watch the scrambled services (payservices) in some channels. If you
remove the CI Module, you can watch the available digital/analogue programme in some channels.
EN9
Your Remote Control
STANDBY Turns the LCD TV on and into standby
mode.
EJECT
AUTO
AUTO/EJECT Press this key to AUTO config the picture
setting while in VGA mode, or EJECT the disk in DVD
mode.
MUTE Mutes and restores your LCD TV sound.
0-9 Pressing a number selects a channel.
C/L Press this button continuously to select
Country and Language.
Switches back and forth between the current
and previous channels.
ASPECT Cycles through Wide mode settings.
AUDIO Audio selection button.
VOL+/VOL- Increases and decreases volume.
CH+/CH- Scans up and down the channels.
DISPLAY Pressing once displays a variety of
information such as the current channel and the
input source.
/ENTER The four directions allow you
to navigate the menu .
PROG
INTRO
REPEAT
A-B
ENTER Press this key enters chose item or into
channel list.Both ENTER and OK function.
MENU Displays the OSD menu on the screen.
AR148
DVD SETUP/EXIT To show the DVD SETUP menu
while in DVD mode, or EXIT current setting in any
mode.
INPUT Pressing INPUT displays the source
list, use ▲▼ to select the video equipment
connected to the video inputs of your LCD TV,
and press ENTER button to confirm.
PMODE Selection picture mode.
SMODE Selects sound effect options.
SLEEP Set the sleep timer.
FAV Show the list of favorite channels.
FAV+/ FAV- Increase/decrease favorite channels.
EPG Displays the Programme Guide on the
screen in DTV mode. Pressing again to turn
GUIDE off.
EN10
Your Remote Control
TEXT Turns on and off the Teletext function.
In Media mode, press to jump to the previous
of the currently played chapter or track.
HOLD Freeze a multi-page passage on screen
in Teletext mode.
In Media mode, press to jump to the next of
the currently played chapter or track.
TV/RADIO In DTV mode, press TV/RADIO
button to enter DTV or RADIO mode.
AUDIO Change the audio language of current service
if available.
SUBTITLE Open or close subtitle.
EJECT
AUTO
INDEX Display the main index in Teletext mode.
SIZE Displays the top, bottom or all of page,
to easily read in TELETEXT mode.
In Media mode, use to reverse/advance
/
playback rapidly.
REVEAL Reveals hidden information such as the
answer to a quiz in TELETEXT mode.
ANGLE Use to access various camera angles on a DVD.
SUBPAGE Press it to see subpage and press
again to cancel.
ZOOM Zoom in or out while in DVD mode.
In Media mode, press to start playback or pause.
In Media mode, press to stop playback.
PVR In DTV mode, press PVR button to start
recording, press
button to stop recording.
MEDIA Press to switch to USB signal source directly.
PROG
INTRO
REPEAT
AR148
C
A-B
PROG Use the PROG button to edit the sequence
of he program when in DVD mode.
INTRO Use the INTRO button to show nine sub
pictures of the program if the disk inserted support
this function.
REPEAT Use the Repeat button to repeats selected
sections in DVD mode.
A-B A-B selects the start and finish points in repeat
cycle in DVD mode.
Press the appropriate colour to
direct access functions in TELETEXT, EPG OSD,
and MEDIA signal source mode.
TIME SHIFT In DTV mode, press TS button to
start the delay function, press the
button
to start playing delay program, press the
button to terminate the delay functions.
D.MENU While in DVDmode:
1. When CDDA/MP3/JPEG/GAME is played,it is invalid.
2. When VCD is played ,brings up the Disc menu.
3. When DVD is played ,brings up the Root Menu.
TITLE When DVD is playing, brings up the Title Menu.
D.DISP Displays the dis info.
GOTO Allow to search forward/backward through a disc.
PVR LIST In DTV mode, displays the executed PVR LIST.
EN11
Installing the LCD TV
Refer to the owner’s manual of any external equipment to be connected.When
connecting any external equipment, do not connect any AC power cords to wall
outlets until all other connections are completed.
Connecting a TV Cable or an Antenna
Antenna Connection
The antenna requirements for good color TV.
Use one of the following two diagrams when connecting an outdoor antenna.
A: Shows how to use a VHF/UHF combination outdoor antenna.
B: Shows how to use a separate VHF and/or UHF outdoor antenna.
A. Combination VHF/UHF antenna
COMMON INTERFACE
DC 12V USB
HDMI
VGA
PC AUDIO
SCART
Y
COAX VIDEO
OUT
Pb
Pr
L
R
AUDIO IN
Cable TV (CATV) Connection
For more specific instructions on installing cable TV, consult your cable
TV company. One possible method of connecting the converter/descrambler
provided by your cable TV company is shown in the diagram below
.
EN12
RF
Installing the LCD TV
Use a supplied antenna cable to connect the TV signal to the LCD TV
’s TV CABLE terminal.
Connect the AC power cord at the back of the TV and connect
the power cord to wall outlet.
DC 12V
Press the
button on the remote to turn on the LCD TV.
C
C
C
Press the SOURCE button on the remote to display the Source List.
Use the ▲▼ buttons to select DTV source, and press the ENTER button.
EN13
Using the Features
1. Main Menu outlook and description
Main Menu items(from right order CHANNEL –> PICTURE -> SOUND ->
TIME -> OPTION -> LOCK ) at DTV/ATV input source,the first page showed is
CHANNEL. At non DTV/ATV input source,the first page is PICTURE as default.
Currently press ENTER to get in sub menu
1.1
CHANNEL:
Programme edit
Signal Information
CI Information
MENU
Back
Select
OK
EXIT
Quit
Note:
1) CHANNELcan be only selected under ATV/DTV condition,others can’t be
used.
1.1.1 Auto Scan:
Enter Auto Scan,it shows the frames of ‘country’ and ‘tune type’ optional.
Move
OK
EXIT
1) function declaaration:
Items
Adjust item
Scan Type
DTV + ATV ->
DTV -> ATV
Country
selection
UK -> Australia
-> …
Default
description
DTV + ATV
The default country depends on the
shipping place or clients appointed place, if
no appointed, put UK as default..
EN14
Using the Features
2) operation declaration
:
Press move to select up and down, press DONE to start scanning. When scanning, the
first 50% processing means ATV tuning, the last 50% processing means DTV tuning.
Data
MENU
Back
EXIT
Quit
When ATV tuning, you can press exit to skip ATV tuning and start DTV tuning, as
following:
1.1.2 DTV manual tuning:
Bad
Normal
MENU
Back
Good
EXIT
Quit
1) function description:
Item
CH
Adjust item
Depends
countries
on
default
description
Select channel with leftright button, and
press ENTER to confirm if any signal
strength shows.
2) Press ENTER to confirm tuning(only in DTV condition).
EN15
Using the Features
1.1.3 ATV manual tuning:
EXIT
Quit
1) function description:
Item
Adjust item
Storage To
1 – 100
System
BG -> I -> DK -> L
Current CH
1 – 100
default
1
Description
Current storage space shows
Default option
selection
1
depends
on
country
Current channel shows
Search
Can be searched at full channel condition
Fine-Tune
Fine-tune
Frequency
When gray , no
selected
Show the current frequency, and follow
Search or Fine-Tune to adjust.
2) operation instruction: after tuning by hand, make sure to press RED button
for storage,otherwise all channels searched would not be stored after switching
condition.
EN16
Using the Features
1.1.4 Programme Edit
:
ok
Select
MENU
Back
1) format and description
Encryption
identity
LCN
CH Name
S
21
ABC1
Skip
identity
Lock
identity
Fav
identity
Systerm
1. the Cannel menu includes“Delete/Move/Skip /Rename /Fav”. “ Lock、
Fav、Skip” can be used when clients do some settings to the channel.
(Fav can not be fixed together with Skip).
2) keypress operation introduction
Button
range
description
▲
ATV/DTV
Page up, can turn page by circle
▼
ATV/DTV
Page down, can turn page by circle
ATV/DTV
Delete current channel, as follows:
to enter DELETE mode
1) at normal condition, press
2) at DELETE mode,the button can be used as:
MENU: exit DELETE to enter normal condition
EXIT: exit menu
:cancel current channel, and turn back to normal
ATV
Modify current channel name, only used in ATV mode.
Operation instruction:
to enter RENAME
1) at normal condition, press
2) at RENAME mode,:
MENU:exit RENAME mode,back to normal
EXIT:exit menu
UP/DOWN:switch letters, numbers or signs
LEFT/RIGHT:switch left and right, can select by circle
:exit RENAME mode,return normal condition.
(DELETE)
(RENAME)
EN17
Using the Features
(move)
ATV/DTV
Channel switching function,ATV available as default, DTV
available at non open LCN auto ordering condition.
1) at normal condition ,enter SWAP mode, and current
sellected channel is mobile channel X.
2) at SWAP mode:
MENU:exit SWAP mode,turn to normal condition
EXIT:exit menu
UP/DOWN:choose switching channels
:if current selected channle is what selected before
X, no any other action; otherwise, the current channel is
channle Y, need to exchange X and Y condition. But the
channel number stays 1,2,3…order as before.
(SKIP)
ATV/DTV
Choose if skip the current channel when CH+/- channel
tuning.
At non Skip channel, press ,and Skip the current channel;
to cancle Skip.
At Skip channel, press
(FAV)
ATV/DTV
Set your favorable channel
1.1.5 Signal Information
It only make use at DTV condition,shows signal information, includes:
channel /network /modulation /quality /strength.
Item
Signal Information
Showed signal parameter
Pop out Signal Information menu, shows as follows:
Channel 21
Network
Digita Finland
Modulation 64QAM
Quality
66%
Strength
80%
1.1.6 CI Information
Only be available at DTV condition, it remind if didn’t insert CI card. When
inserting CI card, you can enter menu to check all information in CI card.
1.1.7 Recorded Mode
Enter Recorder menu, do reservation of recording, check PVR specification
in details.
EN18
Using the Features
1.2 PICTURE
Menu
Back
ok
Select
EXIT
Quit
1.2.1 Picture Mode
Menu
Back
EXIT
Quit
1) Function instruction
Item
Picture
Mode
Adust range
Standard -> Mild
->
User
->
Dynamic
default
description
Standard
Default:at non User mode, you can select Contrast、
Brightness 、 Color 、 Sharpness 、 Tint to do the
adjustment, the mode turn to User automatically.
2) operation instruction
Change mode with left right button; turn back to picture main menu by press
MENU button, and press EXIT to exit main menu.
1.2.2 Contrast / Brightness / Color / Sharpness
Menu
Back
EXIT
Quit
1) function instruction
Item
Contrast
Adust range default
0 - 100
description
50
Brightness
0 - 100
50
Color
0 - 100
50
Sharpness
0 - 100
50
VGA not available
0
Only in NTSC systerm condition;
PAL and SECAM recover to 0;
Tint
R50 - 0 - G50
VGA not available
EN19
Using the Features
2) Operation instruction
Adjust :LEFT,RIGHT to adjust numerics size;
Menu :press MENU to return picture main menu;
Exit :EXIT to exit menu;
UP,DOWN: adjust content with up/down button: as
Contrast / Brightness / Color / Sharpness;
1.2.3 Color Temperature
Menu
Back
EXIT
Quit
1) function instruction
Item
Color
Temperature
Adust range
Standard-> Cool -> User
-> Warm
default
description
Standard
At non User mode, you can select
Red/Green/Blue options to amend the
color. The mode will adjusted for User
mode automaticly.
2) operation instruction
Adjust :LEFT,RIGHT to adjust content;
Menu :MENU to turn back;
Exit :EXIT to exit menu;
1.2.4 Red /green /blue
Menu
Back
EXIT
Quit
1) Function instruction
Item
Adust range
default description
Red
0 - 100
50
Green
0 - 100
50
Blue
0 - 100
50
2) Operation instruction
Adjust :LEFT,RIGHT to adjust numerics size;
Menu :MENUto turn back picture main menu;
Exit :EXIT to exit main menu;
UP,DOWN button to select adjustable content:
they are Red /green /blue button;
EN20
Using the Features
1.2.5 Aspect Ratio
1) function instruction
Panel
resolusion
16:9 / 16:10
default
16:9
4:3
4:3
4:3
(physical
demensions
16:9)
16:9
Input
source
No VGA
mode
16:9 -> Zoom1 -> Zoom2 -> Auto -> 4:3
VGA
16:9 -> 4:3
No VGA
4:3 -> 16:9 -> Zoom1 -> Zoom2 -> Auto
VGA
4:3 -> 16:9
No VGA
16:9 -> Zoom1 -> Zoom2 -> Auto -> 4:3
VGA
16:9 -> 4:3
Note:When panel resolusion is 4:3,demension is 16:9 and 4:3 mode,
acturally theoutput resolusiuon is 1:1.
1.2.6 Noise Reduction
1) Function instruction
Items
Noise Reduction
Adjust item
On -> Off
Default
On
description
VGA set as Off,not adjustable
2) Operation instructio
Enter into the menu, choose with UP,DOWN:off /low /middle /default.
1.3 SOUND
Menu
Back
OK
EN21
Select
EXIT
Quit
Using the Features
1.3.1 Sound mode
Menu
Back
EXIT
Quit
1) Function instruction
Items
Sound Mode
Adjust item
Default
description
Standard -> Music
-> Movie -> Sports
-> User
Standard
At non User mode, Treble and Bass can’t
be selected and adjusted
2) Operation instruction
Adjust :LEFT,RIGHT adjustable:Standard -> Music -> Movie -> Sports -> User
Menu :MENU to return picturemain menu
Exit :EXIT to exit menu
1.3.2 Treble/ Bass /Balance
Menu
Back
EXIT
Quit
1) Function instruction :
Items
Adjust item
Default
description
Treble
0 – 100
50
High sound adjust
Bass
0 – 100
50
Low sound adjust
2) Operation instruction
Adjust:LEFT,RIGHT control data size
Menu :MENU for return to picture main menu
Exit :EXIT
UP,DOWN to choose adjusting content:Treble /Bass /Balance
1.3.3 Auto Volume
1)Function:auto sound adjust
2)operation:ENTER to set ON/OFF
1.3.4 Surround sound
1)function :surround settings
2)operation:ENTER to set ON/OFF
1.3.5 SPDIF
1)function :set the SPDIF’s output mode.
2) Operation instruction:ENTER to set Off, PCM or Auto.
EN22
Using the Features
1.4 TIME
Menu
Back
OK
Select
EXIT
Quit
1.4.1 Clock
Menu
Back
EXIT
Quit
1) function instruction
The default rate isn’t get the time information from DTV, but I can set
it by hand when enter CLOCK menu.
2) Operation instruction
Move :UP,DOWN
Menu :MENU to back picture main menu
Exit :EXIT
LEFT,RIGHT button to set parameter
1.4.2 Off time
Menu
Back
EN23
EXIT
Quit
Using the Features
1) function instruction
Items
Defa
ult
Adjust item
description
Repeat
Off -> Once -> Everyday
-> Mon~Fri -> Mon~Sat
-> Sat~Sun -> Sun
Off
Hour
00 - 23
00
When Activate turns Off , Gray,
availble
no
Minute
00 - 59
00
When Activate turns Off , Gray,
availble
no
2) Operation instruction
Move :UP,DOWN
Menu :MENU to back picture main menu
Exit :EXIT
LEFT,RIGHT button to set parameter
1.4.3 On time
Menu
Back
EXIT
Quit
1 ) function instruction
Items
Repeat
Adjust item
Off -> Once -> Everyday
-> Mon~Fri -> Mon~Sat
-> Sat~Sun -> Sun
Defa
ult
description
Off
Hour
00 -> 23
12
When Repeat turns Off,Gray
Minute
00 -> 59
00
When Repeat turns Off,Gray
Volume
0 - > 100
30
When Repeat turns Off,Gray
Source
DTV -> Radio -> Data
-> ATV -> …
DTV
When Repeat turns Off,Gray, no availble;
The order depends on Input Source order
Channel.
ATV:1 – 100
DTV/Radio/Data
:
depending
to
the
channel’s information
See
Note
When Repeat turns Off,Gray, no availble
When choose non TV Source, it turn gray;
At Source, choose DTV/Raido/Data,but it
shows blank when there is no input channel
information.
EN24
Using the Features
2)Operation instruction
Move :UP,DOWN
Menu :MENU to back picture main menu
Exit :EXIT
LEFT,RIGHT button to set parameter
1.4.4 Sleep time
1) function instruction
Items
Sleep Timer
Adjust item
Off -> 10min -> 20min
-> 30min -> 60min ->
90min -> 120min ->
180min -> 240min
Defa
ult
Off
description
Reminding at last 60 seconds:
Stop reminding when press it , sleep
setting turns Off
2) Operation instruction
Enter second menu, use UP,DOWN to set sleep time.
1.4.5 Time zone
1) function instruction
Items
Adjust item
Defa
ult
description
Default choice confirmed as shipping
areaand clients demand.
When Auto tuning, it switched
automatically according to current
selected country.
Time Zone
2)Operation instruction
Enter second menu, use UP,DOWN to set time zone:canary
GMT ./Lisbn GMT /London GMT /Amsterdam GMT+1…….
EN25
Using the Features
1.5 OPTION
OSD Duration
Menu
Back
OK
30S
Select
EXIT
Quit
1.5.1 OSD Language
1) Function instruction
Items
OSD Language
Defa
ult
Adjust item
description
Choose the default language according to
shipping address and clients demand.
Default language:
english/french/germany/italian/portugal
Supported language
2) Operation instruction
Enter second menu, use UP,DOWN to set language
1.5.2 Audio Language 1st
1) Function instruction
Items
Audio Language 1st
Adjust item
Default
First language
selected
description
Not selected at non DTV condition
2) Operation instruction
Enter second menu, use UP,DOWN to set language.
1.5.3 Audio Language 2nd
1) Function instruction
Items
Audio Language 2nd
Adjust item
Default
Second language
selected
description
Not selected at non DTV condition
2) Operation instruction
Enter second menu, use UP,DOWN to set language.
EN26
Using the Features
1.5.4 Subtitle Language 1st
1) function instruction
Items
Subtitle Language 1st
Adjust item
Default
First language
selected
description
Not selected at non DTV condition
2) Operation instruction
Enter second menu, use UP,DOWN to set language.
1.5.5 Subtitle Language 2nd
1) Function instruction
Items
Subtitle Language 2nd
Adjust item
Default
Second
language
selected
description
Not selected at non DTV condition
2) Operation instruction:
Enter second menu, use UP,DOWN to set language.
1.5.6 OSD Duration
1) function instruction:
The OSD’s duration in the screen.
2) Operation instruction:
ENTER to set 5S, 10S, 15S, 20S, 25S, 30S, 35S or 40S.
1.5.7 Country
1)function instruction:
Show the current language, gray, no selected.
1.5.8 Restore factory default
1)function instruction:
Restore factory default.
2)Operation instruction:
Enter second menu, use UP,DOWN button to select “yes” or “no”.
EN27
Using the Features
1.6 LOCK
Lock Channel
Menu
Back
OK
Select
EXIT
Quit
1.6.1 Lock System
1) Function instruction
Items
Lock System
Adjust item
Defa
ult
Off/On
Off
description
Default password is 0000
2) Operation instruction
LEFT to quit passport,turn back main menu
RIGHT to delete password wrote and rewrite correct one. It need
input correct password to enter the LOCK submenu. It shows wrong
password when you put uncorrect password.
MENU to exit to LOCK menu
EN28
Using the Features
1.6.2 Set Password
1) Function instruction
Items
Adjust item
Defa
ult
description
Enter the submenu, insert new password and
confirm it
Set Password
2)Operation instruction
LEFT to exit reset password, back to main menu
RIGHT to cancle the written password, and then rewrite it. If the password
get wrong twice, it shows “password doesn’t match”.
1.6.3 Block Program
1) Format and description
Encrypt
sign
LCN
CH Name
S
21
ABC1
Lock sign
systerm
Note
: . Lock sign is used when clients do some changes of the channel.
2) Button operation
Button
function
Page up,can circle paging;
▲
▼
Page down,can circle paging;
●(LOCK)
Check if locked the current channle, if locked, it need password before
watching.
When press ● at non lock mode: lock the current channle
When press ● at lock mode: lock cancled
1.6.4 Parental Guidance
1) Function:when setted Parental Guidance is lower than programme true
class, it need to lock the channle and then input password to watch it.
Items
Adjust item
Defa
ult
Parental Guidance
Off -> 4 -> 5
-> … -> 18
Off
description
Not selected at non DTV condition
2)Operation instruction
Enter second menu, use UP,DOWN button to choose data,press
ENTER to confirm it.
EN29
Using the Features
2. Other menu
2.1 Channel List
Channel List shows all searched channel.
Move
OK
Select
EXIT
Quit
1) format and description
Encryption
sign
LCN
CH Name
S
21
ABC1
Skip sign
Lock sign
Fav sign
systerm
Note:1. Lock、Fav、Skip sign can be only used when channles do any audits.
2) Button function and instruction
Button
Function
CH List
At DTV/ATV and non Channel List,close non Mute menu to pop out Channel
List menu;
At Channel List menu, exit Channel List menu;
▲
Page up, can circle paged;
▼
Page down, can circle paged;
2.2 Favourite List
Favourite List and Channel List is of the same settings, but showed as clients
favourite channel in Program edit.,use FAV button to show and close Favourite
List menu.
EN30
Using the Features
2.3 EPG
EPG is only available in DTV,channel information classfied by
CHANNLE /TIME.
Can choose up and down:Channel /Time
OK
Select
EXIT
Quit
All programme information, if classified
by time, it shows all programme
informationa at currently time.
Details information of selected programme.
1)operation notes
Move: move up and down
Menu:exit EPG
OK: switch to current selected programme
Index: switch to type option
Record: record programme. It show record mode when selected(check PVR
manual details).
Schedule: record information. Check details at PVR’s Schedule List introduction.
Remind: programme reserved. Choose Remind to show the following settings menu.
Use up and down to choose setted programme.
Programme
Mode
Minute
Hour
Date
Month
Move
OK
Select
EN31
MENU
Back
Using the Features
2.4 Installation Guide
Please set the following options, then
OK
Select
EXIT
Quit
1) Function and instruction: If not stored channel information,
power on and turn to DTV/ATV condition,it shows Installation
Guide menu.
2)Operation
Move: move up and down
Exit:exit menu
OK:enter setted tuning mode
EN32
Using the Features
3. Multimedia
3.1 Brief introduction
At Input Source menu, choose USB source to enter Multimedia condition.
At Multimedia condition,the systerm can do the files clariufy, order, playing
operation and other Browser work besides multimedia playing.
3.2 Multimedia main menu pattern
1) Multimedia main menu style
USB information
multimedia
Discs
Menu
Inserting HD info
Menu
OK
Select
operation
2) Multimedia main menu spare parts introduction
Equip
Instruction
Equip inserting
messege
If inspect the USB equip inserted, it turn bright; otherwise, it turn gray.
Multimedia
style
From left to right PHOTO、MUSIC、MOVIE、TEXT for what need play.
Disc
Shows the insert discs, and order them as letters, from C on.
USB info
It shows current USB equipment information. When no inserting USB,it
shows No Device;when inserting USB equipment, it shows USB equip,such
as USB2.0、USB1.1 and so on;
If inspect there is USB inserting, but with no correct inspeciton messege, it
shows as Reinsert Device.
Operation guide Show the current available operation.
EN33
Using the Features
3.3 PHOTO submenu pattern
1) Multimedia PHOTO’s submenu pattern
Disc
File folders in disc,press ENTER button to enter
page
review
Delete Current File
Add/Remove all
OK
Full screen
Menu
Menu
EXIT
Add/Remove to playlist
Quit
Picture overview
Picture information
2) PHOTO submenu instruction
equip
descrip
Disc
Show the current disc
Page
Show the page of files, such as 1/2 format,the previous number is current
page, the last one is total page
Picture list
Picture list at Current page
preview
window
Pictures at current point
Document
information
???.jpg
[Resolution] 800 x 600
[Size] 28521 Bytes
Data
Time
----files name
----resolusion
----picture size
---- create date
---- create time
EN34
Using the Features
3)Operation instruction
When choose picture, it shows picture preview frame and details, then press
ENTER to enter full screem picture playing.
When after picture full playing, press ENTER to show the following operation
button.
In
Out
4) Button instruction
Button
Function
Info/Display
Show current picture preview, the information is showed as follows:
Blue Hills.jpg
----files name
[Resolution] 1024 x 768
----resousion
[Size] 28521 Bytes
----picture size
Exit
Exit playing, enter previous menu, focus to the multimedia menu PHOTO
Play
Full screen playing of photos, if several files need to play, it would switch
automatically after some time.( default as 5 second)
Pause
Pause
Stop
Stop playing,enter list menu, focus at the files when exit.
Prev.
Play previous file
Next
Play next file
Repeat
Circle mode, can choose repeat 1, repeat all, repeat none, single pic repeat,
selected pics all repeat or non repeat.
Playlist
Playlist
Rotate
Turn pictures by clockwise/ counter clockwise.
Zoom in
Zoom in
Zoom out
Zoom out
EN35
Using the Features
3.4 MUSIC submenu pattern, equip and button introduction.
1) Multimedia MUSIC submenu pattern.
When selected songs in the list, press ENTER to show the songs preview,
as follows:
page preview
disc
Delete Current File
Add/Remove all
OK
Full screen
Menu
Menu
EXIT
Songs list
Files information
2) MUSIC submenu equip description
equip
Disc
Add/Remove to playlist
Quit
descrip
Show selected euqip disc
Page
Show pages
songs list
Show song lists.
Preview
window
Music picture
Fils
information
Show songs name and size etc.
EN36
Using the Features
3) MUSIC playing conditon and keys function
MUSIC playing is the menu just like playing software in PC, mainly have playlist,
basic information, processing sign, operation guide part, as follows:
Songs information
Songs name
Songs list
Screen Saver
1/1
Remove
Remove all from playlist
Goto Time
Operation guide
MUSIC image
progress bar
Play time
4) MUSIC playing equip function
Equip
Descrip
Songs name
Current songs name
MUSIC image
One image used to sign MUSIC
Songs list
Songs marked in browser, from the top files on, orders by letters.
Songs
information
Iterms shows and files show at Browser MUSIC is of the same:
Artist: ABC
Year: 2005
----artist
Title:
DEF
----title
Album: GHI
----album
Bit Rate: 128K
Sampling: 44K
----bit rate and sampling
All of them are get from files
Playing time
Show playing time and in total, such as 00:01:23/00:04:56 format
Operation
guide
Show current operation guide
Processing sign
Show current procession time and rate
5) Button function
Button
Function
Enter
Play focus files, if focus is current file, it play from the beginning.
Up/Down
Move focus at songs list
Exit
Exit MUSIC playing menu, but keep playing songs, when exit to browser
menu, focus the current playing files.
Play
Play
Pause
Pause
Stop
Stop playing,enter browser menu,focus at played files before exit
Next
Play next files
Repeat
Repeat playing, can choose repeat 1, repeat all, repeat none, all repeat and so
on
EN37
Using the Features
3.5 MOVIE playing condition and button function
1) Playing condition
1. MOVIE is playing at full screen for all marked files when clients browsing,from the
top files folder to order with letters.
2. MOVIE’ s zooming requires: Zooming it at most in the current size to preserve the
original size.
2)submenu pattern and instruction
Delete Current File
Add/Remove all
OK
Full screen
Menu
Menu
EXIT
Add/Remove to playlist
Quit
Press ENTER to select image, which shows the files preview frame and files
information, then press Play to start full playing as follows:
Slow
Step
Goto Time
+
1)Button instruction
Repeat :1, ALL, none
Set A : set A circle playing
Playlist: It pop out File list on the left screen, which shows the current playing
list. Clients can browse the list with up down button, and to select files by enter
button, then press list or no operation for 10 seconds, it would exit.
Info:Show the current MOVIE information, includes: current film’s file name,
film’s resolusion, film’s frequency, film’s total time and playing time.
Goto: It pop out the frame as: 00:00:00/01:23:45, the first time is what clients input,
clients can switch the position with left or right button, you can also switch the number
with up or down button, and press ENTER to time settings.
EN38
Using the Features
3.6 TEXT
Delete Current File
Add/Remove all
OK
Full screen
Menu
Menu
EXIT
Add/Remove to playlist
Quit
Choose TEXT files, press ENTER and it shows the above frame. Press
play to star full screem playing as follows:
Operation :
Prev page: previous page
Next page: next page
Prev.: previous files
Next: next files
Stop: stop auto turning pages
Playlist: playlist, show as top right place
Info: current files information, shows files name and size
EN39
Using the Features
4. Personal Video Recorder(PVR)
4.1 Brief
PVR funcition is only available for DTV, includes Record, Timeshift and
Playback function. Recording includes in time record and preserve record.
In-time record can be worked through short-cut button immediately, and
preserve record need to preserve before. Record and Playback can be
done of the same time, that means record DTV and playing USB equip at
the same time.Timeshift is another function for both record and playing
together. The follows it would explain in details.
4.2 PVR menu function details.
4.2.1 PVR File System
Enter PVR from CHANNEL menu, as follows:
Move
OK
Select
MENU
Back
Function
Items
Notes
Check PVR File
System
USB Disk
If not inserting USB equip, it shows Not Find Any USB Device
If inserting USB equip, it shows Pass
Format
It can set MStar Format. Press Enter button to through USB and enter
Format menu, after enter Format, USB can complete PVR functions.
If the function works well, or USB is MStar Format, it shows Pass.
Time Shift Size
Can’t be chosen. After Check PVR File System, it means the USB passed.
MStar Format can be used at Timeshift space, the size is choosen by
clients when doing format.
Speed
Can’t be chosen. After Check PVR File System, it shows the USB
available speed and remind client to operate it safely with this availabel
speed.
EN40
Using the Features
4.2.1.1 Select Disk
Choose the disc to store whatever content need record, as follows, default as C:
Move
OK
Select
4.2.1.2 Check PVR File System
Check storage equipment PVR File System is well established. Default as Start,
press Enter button to inspect the USB files systerm and speed, the processiong
shows Checking….
When no inserting USB, or inspection failed, it shows FAIL.
When inserting USB but didn’t pass MStar Format, enter Format menu.
When inserting USB but inspecting unnormal no partition, it shows No Partition
Found.
If inspection normal, it shows SUCCESS.
Move
OK
Select
4.2.1.3 Format
At Format, press Enter button to start Checking PVR File System, after confirmed
USB equip information, it pop out Format Disk menu as follows:
After Formating, the systerm would establish PVR file systerm according to previous
confirmed PVR File System Size.
EN41
Using the Features
4.2.1.4 Time shift size
When finish Creating PVR file system, it pop out Time Shift Size setting menu, and
clients can set the space size for time shift as follows:
OK
Select
MENU
Back
4.2.2 Channel – Recorder List
1) Pattern for reference
The menu is as follows
Title, ordering
sign
programme
OK
Operation guide
Select
EN42
Using the Features
2) Menu instruction
Items
Notes
Title
Recorded List
Ordering
Show in title right, means the current ordering way, List/Index button can
switch option:Program -> Channel -> Time, which make orders by
programme name, channel order and record time.
Show current condition, recoreded programme shows no mark, if
shows
Mark
PLAY
and
, it means recording, and if it shows
PLAY
and
, it means on the playing, if Focused, it shows color image,
otherwise it is gray.
The programme name is construct by channel number and record channel
number.
Prgramme name
Operation guide
Show the current available operation
Programme notes
Info/Display and Right can pop out current
ticked in the picture.
[DATE] 2005/07/20
[TIME] 15:29:02
[DURATION] 0000:01:52
[CHANNEL NAME] 40 BBC NEWS
[PROGRAM NAME] No Information
Focus programme, which no
----record date
----recard starting time
----duration time
----channel list
----programme name.
3) Button struction
Button
Function
List/Index
When no menu, press Recorded List
When it show Recorded List menu, switch recording programme orders.
Up/Down
Up and down to move Focus to select programme
Left/Right
Close/pop out the programmer instruction
Enter
Play Focus programme
Info/Display
Pop or close programme instruction
●(DELETE)
Delete Focused programme
Menu
Enter Recorded List,press Menu to back to PVR menu, Focus at Recorder
List.
When enter by List shorcut, exit Recorded List, return current menu.
Exit
Exit
EN43
Using the Features
4.2.3 PVR – Record Mode
1) Recorded mode
Month
2010/07/20
Jan
Date
2010/07/20
Date
Jan
Month
Move
Item
OK
Select
MENU
format
Back
notes
Menu title
Recorder Mode
Menu topic
Title
655335
When choose Auto, get current programme to set
recording, Title shows its current name.
Otherwise, show“—”, can’t be used
Mode
Once
Choose recording mode
Switch order:Once -> Everyday -> Weekly
Delete Auto option
Put Auto to record in EPG
Start Date
2005/07/20
Start record date, use Left/Right to set menu.
Start Time
14:00
Start recording time
1End Date
2005/07/20
End recording date
End Time
15:00
Recording end time.
Operation guide
Show current operation
2) Button
Button
Function
Recorder menu
Time set menu
Menu
Exit Recorder, enter PVR menu,
Focus Record Mode
Exit time setting
Up/Down
Move Focus up and down
Move Focus up and down
Left/Right
Adjust Mode, or enter time settings
Adjust data
ENTER
Store current recording and exit
Recorder to enter Recorder
Schedule List
Confirm current settings and exit time
setting
●(Schedule)
Not stored, exit Recorder to enter
Recorder Schedule List
----
Exit
Not stored, exit menu
Not stored, exit menu
EN44
Using the Features
4.2.4 PVR – Recorder Schedule
1) Menu and function
Move
Delete
Back
MENU
EXIT
Quit
Note:
1.Iterms in the blank start time ordering according to record plans
If enter the menu to add new plans, focus to new plans.
2.It enter the menu when recording, focus on current recording plans.
3.Besides 1 and 2 condition, focus to the latest non-start plans.
2) button
Button
Function
Menu
Exit Recorder Schedule List menu, enter PVRmenu, Focus on Recorder
Schedule List
Move
Move Focus up and down
●(Delete)
Delete Focus items
Exit
Exit menu
4.3 PVR shortcut function
4.3.1 PVR shortcut buttons under the DTV
Button
PVR
Function
Enter Record mode
TS
Enter Timeshift mode
PVR List
Pop out Recorded List menu, enter OK/Enter to enter Playback,play it
Note:Record and Recorded List can be enter from PVR menu
EN45
Using the Features
4.3.2 Record
1)Record
Record menu includes two kind: one is Full Mode,the other is Simple Mode.
They can switch by Record/Exit button.
At Record mode, Record menu shows still.
The details is as follows:
一. Full Mode
Note1)
Note4)
Note3)
Note2)
Note:
1. Record
2. recorded time
3. the left row is channel name and the right row is programme name
4. current time
二. Simple Mode
[00:00:20]
Note:At Simple Mode, it only shows Record and record time on the left bottom side.
2) Button function
Button
Stop
Function
Exit Record, shows Processing
Record/Exit
Switch Record menu mode
Play
Enter Playback mode, play it from the start recorded programme
Check Playback instruction in details
List
Close Record menu, pop out Recorded List menu
enter Playback from menu Recorded List
when exit from Recorded List menu, it shows Record again
EN46
Using the Features
4.3.3 Timeshift
4.3.3.1 Timeshift menu
Timeshift is similar with Record menu, includes two kind: one is Full Mode and the other
is Simple Mode.
They can switch by Exit button.
At Timeshift mode, Timeshift keeps still.
As follows shows:
Full Mode:
Note3)
Note1
Note4)
Note2
Note5)
Note:
1)Shows the current operation, such as Play、Pause、Fast Forward、
Fast Rewind、Next、Prev.
2)A->B circle signs, when mark A or B, highlight showings, which only
show at play condition.
3)Timeshift procession showings, the processing tick can show the total
length of Timeshift.
4)There are two time, one time is start by “-”, the other time is stored
content lenghth.
5)Current true time.
Simple Mode:
[-00:03:35]
Note:
1)At Simple Mode, it shows current Timeshift playing conditon, such as
Play、Pause.
2)Simple Mode shows on the left bottom side.
EN47
Using the Features
4.3.3.2 Timeshift conditon
4.3.3.2.1 Timeshift Start conditon
Enter Timeshift to press Pause, and the image paused and it start record
from the paused position.
It shows Timeshift Start condition, as follows:
Button
Function
Play
Enter Timeshift Play condition
Stop
Stop Timeshift
Exit
Switch Timeshift menu mode
List
Close Timeshift, pop out Recorded List
From Recorded List menu to enter Playback, and then exit Timeshift
Exit Recorded List first and then show menu Timeshift
4.3.3.2.2 Timeshift Play
At Timeshift Play condition, the systerm record DTV amd play it at the same time.
Timeshift Play is start by press Timeshift button, at Timeshift Play condition, it can
work Pause、Fast Forward、Fast Rewind, and it would enter A->B circle playing
condition.
4.3.3.2.4 Timeshift Record
Timeshift Play can forward by press Fast Forward or Next button, it would enter
Timeshift Record condition.
Timeshift Record condition, similar to Record mode.
Timeshift Record condition, the button is as follows:
Button
Function
Pause
Pause playing, and return to Timeshift Play condition
Stop
Stop Timeshift mode
Fast Forward
No use
Fast Rewind
Return to Timeshift Play condition, and operate next part.
Prev.
Return to Timeshift Play condition and previous playing for 30 seconds.
If previous to Timeshift recorded content, play it from this place.
Exit
Switch Timeshift menu mode
List
Close Timeshift menu, pop out Recorded List.
Enter playback from Recorded List and then quit Timeshift ,mode.
When quit from Recorded List, show Timeshift menu.
EN48
Using the Features
4.3.4 Playback
4.3.4.1 Playback
Playback is similar with Timeshift, one is Full Mode, and the other is Simple Mode.
They can be switch by Exit button.
At Playback mode,Playback shows still.
Menu mode as following shows:
Full Mode:
Note2) Note1
Note6)
Note3)
Note7)
Note4)
Note5)
Note:
1) Shows the current playing condition, shows as different operation such as: Play、
Pause、Fast Forward、Fast Rewind、Next、Prev.
2) A->Bcircle notes, A or B be marked, high light, which only show in Play condition.
3) Play processing stick shows.
4) There are two time showing, one is for current playng time and the oterh is for
rest programme time.
5) Current time.
6) Recored channel name.
7) The programme name, if no name it shows No Information.
Simple Mode:
[00:03:35]
Note:
1)At Simple Mode, it shows current Playback mode, such as Play、Pause
and so on.
2)Simple Mode shows on the left bottom side.
EN49
TROUBLESHOOTING
TV will not turn on
Make sure the power cord is plugged in, then press the POWER button on the remote
The batteries in the remote control may be exhausted
Replace the batteries.
No picture, no sound
Check the interface cable between TV and antenna.
Press the POWER button on the remote.
Press the SOURCE button on the remote repeatedly to select the connected video
sources.
Poor picture, sound OK
Check the interface cable between TV and antenna.
Try another channel, the station may have broadcast diffculties
.
Adjust the Brightness/Contrast options in the Menu.
Picture OK, poor sound
Sound may be muted. Press the MUTE
button on the remote.
Press the VOL+ button to increase the volume.
Audio noise
Move any infrared equipment away from the TV.
EN50
Specifications
SPECIFICATIONS
Items
Relevant illustration
Panel
22”Wide Screen LCD
Resolution
1920 x 1080 pixels
Features
Input interface
Compatible areas
Multiform
TV standard
DTV standard
PAL
DVB-T
PC
D-sub 15pin input interface
CVBS, YPbPr,HDMI
Composite video input interface,
YPbPr input interface
RF
75Ω aerial interface
SCART
Standard Full SCART interface
Audio
Left, right audio input interface
USB
USB devices input interface
HDMI input interface
Headphone Output
Headphone output interface
Speaker Output
5W x 2
COAXIAL Output
COAXIAL output interface
OSD language
English, French,Deutsh
Power supply
AC in 100-240V, 50/60Hz; DC out 12V,6.0A
Power consumption
Working 72W(Max), Standby 1W
Dimension
565 x 415 x 142 mm (Gift Box)
Weight
4Kg (Net)
Accessories
User Manual
Warranty Card
Remote Control
AAA Battery
Power Cord
AC Adapter
Screwdriver
Features and Specifcations are subject to change without notice
EN51