1
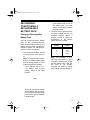
23-250.fm Page 1 Friday, August 6, 1999 2:09 PM
Cat. No. 23-250
OWNER’S MANUAL
Please read before using this equipment.
Universal Battery Pack
Conditioner/Charger
23-250.fm Page 2 Friday, August 6, 1999 2:09 PM
FEATURES
Your Radio Shack Universal Battery
Pack Conditioner/Charger uses advanced technology to condition and
recharge 6- to 12-volt rechargeable
battery packs from camcorders, cellular phones, radio-controlled vehicles, and more.
To prevent your rechargeable battery
pack from losing its ability to fully recharge, you must completely discharge it (condition it) about once
every 10 times you recharge it. Normal battery chargers can only recharge a battery pack. Your Radio
Shack universal battery pack conditioner/charger lets you both discharge and recharge it, increasing
your battery pack’s efficiency and durability.
Reversible Polarity Switch — lets
you quickly reverse the charging polarity of an incorrectly positioned battery pack.
Automatic Switching — automatically switches to the charging mode
when discharging is complete.
Automatic Voltage Sensor — automatically determines the maximum
voltage a connected battery pack will
be charged to.
LED Charging Lights — show you
the battery pack’s charging condition.
Temperature Sensor — protects
battery packs from over-heating during charging.
Its features include:
Multiple Charging Contacts — let
you condition various types of rechargeable battery packs.
Battery Pack Versatility — lets you
recharge Nickel-Cadmium, NickelMetal Hydride, and Lead-Acid rechargeable battery packs.
Built-In Discharger — lets you condition your rechargeable battery pack
for the longest life and best performance.
Two Optional Power Sources — let
you power the conditioner/charger
using either standard AC power or
your vehicle’s battery power.
© 1996 Tandy Corporation.
All Rights Reserved.
Radio Shack is a registered trademark used by Tandy Corporation.
2
23-250.fm Page 3 Friday, August 6, 1999 2:09 PM
CONTENTS
Operation ........................................................................................................ 4
Mounting/Connecting a Rechargeable Battery Pack ................................. 4
Bottom Contact Battery Packs ............................................................ 4
End Contact Battery Packs ................................................................. 6
Connector Type Battery Packs ............................................................ 7
Connecting Power ..................................................................................... 7
Using Standard AC Power .................................................................. 7
Using Your Vehicle’s Battery Power .................................................... 8
Recharging/Conditioning A Rechargeable Battery Pack ........................... 9
Charging a Rechargeable Battery Pack .............................................. 9
Conditioning a Battery Pack .............................................................. 10
Care and Maintenance ................................................................................. 12
Specifications ............................................................................................... 13
Warning: To prevent fire or shock hazard, do not expose this product to rain or
moisture.
CAUTION
RISK OF ELECTRIC SHOCK.
DO NOT OPEN.
!
CAUTION: TO REDUCE THE RISK OF
ELECTRIC SHOCK, DO NOT REMOVE
COVER OR BACK. NO USER-SERVICEABLE PARTS INSIDE. REFER SERVICING TO QUALIFIED PERSONNEL.
!
This symbol is intended to alert you to
the presence of uninsulated dangerous
voltage within the product’s enclosure
that might be of sufficient magnitude to
constitute a risk of electric shock. Do
not open the product’s case.
This symbol is intended to inform you
that important operating and maintenance instructions are included in the
literature accompanying this product.
3
!
23-250.fm Page 4 Friday, August 6, 1999 2:09 PM
OPERATION
To prevent your rechargeable battery
pack from losing its ability to fully recharge, you must condition it (by
completely discharging it) about
once every 10 times you recharge it.
To charge or condition a rechargeable battery pack, you must:
1. Properly mount or connect the
battery pack to the conditioner/
charger
2. Apply AC or DC power to the
conditioner/charger
3. Recharge or condition the battery pack.
These steps are explained in the following sections.
MOUNTING/
CONNECTING A
RECHARGEABLE
BATTERY PACK
You can mount/connect battery
packs with bottom or end contacts, or
with connectors.
Warnings:
• Non-rechargeable battery packs
do not fit into the conditioner/
charger’s charging contacts. Do
not try to connect a nonrechargeable
battery
pack
because it might damage the
conditioner/charger.
4
• Do not try to charge nonrechargeable battery packs
because they could explode.
• Use only one set of the battery
contacts at one time or you
might short the conditioner/
charger or the battery pack.
Notes:
• A rechargeable battery pack can
be properly charged only when
its contacts correctly match the
conditioner/charger’s contacts.
• Not all battery packs look like
the ones shown here. Look for
the battery pack’s + and – contacts to make the connections.
• Your local Radio Shack store
sells replacement battery packs.
Bottom Contact Battery
Packs
Some rechargeable battery packs
have charging contacts located on
the bottom, such as:
Camcorder batteries: Sharp, Sony,
Panasonic, JVC, Canon, etc.
Cellular phone batteries: Motorola,
Ericsson, Nokia, etc .
Charging Contacts
23-250.fm Page 5 Friday, August 6, 1999 2:09 PM
Follow these steps to mount this type
of battery pack on the conditioner/
charger.
1. Pull the battery stopper’s latch
on the right front of the conditioner/charger, then pull open
the stopper.
(illus)
2. To mount a wide battery pack on
the conditioner/charger, position
the attached battery guide so its
edge faces out.
To mount a narrow battery pack,
position the battery guide so its
edge faces in.
3. Place the battery pack on the
conditioner/charger so its contacts overhang, then move the
battery contacts (A and B) up or
down, left or right until they
touch the battery pack’s contacts.
(illus)
4. Push down on the battery stopper’s tab and slide it outward
until it stops (about 3/4 inch) to
make room for the battery pack.
(illus)
(illus)
5. Close the battery stopper and
make sure the latch locks into
place.
(illus)
5
23-250.fm Page 6 Friday, August 6, 1999 2:09 PM
6. To secure the battery pack, push
down on the battery stopper’s
tab and slide it inward until it
touches the battery pack.
(illus)
7. Place the temperature sensor on
the battery pack. The temperature sensor’s magnet keeps the
sensor fixed on the battery pack.
If the battery pack’s temperature
gets too high after a long
charge, the temperature sensor
detects it and the conditioner/
charger stops charging the battery pack.
End Contact Battery Packs
Some rechargeable battery packs
have charging contacts located on
the top and bottom ends, such as the
Hitachi camcorder rechargeable battery pack.
(illus)
Follow these steps to connect this
type of battery pack to the conditioner/charger using the supplied alligator clip adapter.
(illus)
1. Clip the red alligator clip around
the battery pack’s positive (+)
terminal, and the black alligator
clip around the battery pack’s
negative (–) terminal.
Note: To use the alligator clips,
press open the jaws then slowly
release the jaws around the terminal. When removing the clips,
press open the jaws. Do not pull
on the wires.
2. Insert the adapter’s plug into the
rectangular socket on the end of
the conditioner/charger.
Warning: Never leave the
adapter plugged into the conditioner/charger when a battery
pack is mounted on the
charger’s contacts because they
might touch. This could short the
battery pack, damage it or the
charger, and cause a fire.
3. Place the temperature sensor on
the battery pack. The temperature sensor’s magnet keeps the
sensor fixed on the battery pack.
6
23-250.fm Page 7 Friday, August 6, 1999 2:09 PM
If the battery pack’s temperature
gets too high after a long
charge, the temperature sensor
detects it and the conditioner/
charger stops charging the battery pack.
Connector Type Battery
Packs
Some rechargeable battery packs
have a connector, such as 6- to 12volt rechargeable battery packs for
radio-controlled vehicles or cordless
telephones.
Connect this type of battery pack to
the conditioner/charger by plugging
the battery pack’s connector into the
conditioner/charger’s
rectangular
socket (on the end).
(illus)
CONNECTING POWER
Caution: Never connect AC or DC
power to the conditioner/charger
when no battery pack is connected.
Using Standard AC Power
Follow these steps to power the conditioner/charger from a standard AC
outlet using the supplied AC adapter.
(illus)
1. Connect the AC adapter’s barrel
plug to the conditioner/charger’s
12-18V DC jack.
2. Plug the adapter into a standard
AC outlet.
Cautions:
Place the temperature sensor on the
battery pack. The temperature sensor’s magnet keeps the sensor fixed
on the battery pack.
If the battery pack’s temperature gets
too high after a long charge, the temperature sensor detects it and the
conditioner/charger stops charging
the battery pack.
• The supplied AC adapter supplies 18 volts DC and delivers up
to 800 milliamps. Its plug properly fits the conditioner/charger’s
12-18V DC jack and it has a positive center pin. Using an adapter
that does not meet these specifications could damage the battery pack conditioner/charger or
the adapter.
7
23-250.fm Page 8 Friday, August 6, 1999 2:09 PM
• Always plug the AC adapter into
the conditioner/charger before
you plug it into a standard AC
outlet, and always unplug it from
the outlet before you unplug it
from the conditioner/charger.
2. Plug the adapter’s cigarette
lighter plug into your vehicle’s
cigarette-lighter socket.
Note: You can remove the cover
from the adapter’s back so you
can connect another device to
your vehicle’s battery power.
Using Your Vehicle’s Battery
Power
(illus)
Follow these steps to power the conditioner/charger from your vehicle’s
battery using the supplied DC adapter.
Note: When using vehicle battery
power, you cannot charge 12-volt rechargeable battery packs.
(illus)
1. Connect the DC adapter’s small
barrel plug to the conditioner/
charger’s 12-18V DC jack.
Caution: Before plugging the
DC adapter’s cigarette-lighter
plug into the cigarette-lighter’s
socket, make sure the tip is
securely attached to the plug.
8
Cautions:
• The supplied DC cord supplies 12 volts, its small barrel
plug properly fits the conditioner/charger’s 12-18V DC
jack and it has a positive center pin. Using a DC cord that
does not meet these specifications could damage the battery pack conditioner/charger
or the adapter.
• Always plug the DC cord into
the conditioner/charger before
you plug it into your vehicle’s
cigarette-lighter socket, and
always unplug it from the cigarette-lighter socket before
you unplug it from the conditioner/charger.
23-250.fm Page 9 Friday, August 6, 1999 2:09 PM
RECHARGING/
CONDITIONING A
RECHARGEABLE
BATTERY PACK
Charging a Rechargeable
Battery Pack
After you mount/connect the battery
pack to the conditioner/charger,
place the temperature sensor on the
battery, and connect the conditioner/
charger to power, the following sequence occurs automatically.
1. The conditioner/charger sounds
one long beep to verify power is
on.
Note: The beep sounds continuously if you install a battery pack
with the wrong polarity or if the
output terminals are shorted.
• If this happens with a 6V or
7.2V battery pack, set the
polarity switch to the other
position.
• If this happens with a 9.6V or
12V battery pack, you must
remove and properly reinstall
the battery pack.
2. The auto sensor checks the battery pack voltage and the red
CHARGE indicator flashes a
specific number of times that
corresponds to the battery
pack’s maximum voltage.
Flashes
Voltage
2
3
4
5
6.0 V
7.2 V
9.6 V
12.0 V
Note: This indication is accurate only when there is a good
connection between the charger
and the battery pack. If the battery pack is not properly
mounted, the battery’s voltage
might not be correctly identified.
(illus)
When you change the polarity
switch position with power on,
the conditioner/charger beeps
once and the green CHARGE
indicator lights.
9
23-250.fm Page 10 Friday, August 6, 1999 2:09 PM
If you feel the battery’s voltage is
not correctly identified:
• Remove the battery pack from
the charger and make sure
both the battery pack’s and
the charger’s contacts are
clean.
• Mount the battery pack again
and re-adjust the charger’s
contacts (if necessary) to
make sure there is a good
connection
between
the
charger and the battery pack.
Repeat this procedure until the
charger properly identifies the
battery pack.
3. While the battery pack is charging, the CHARGE indicators light
steadily to indicate the corresponding battery pack’s charge.
Indicator
Voltage
Green
Yellow
Red
Low
Medium
Fully Charged
Note: When the battery pack’s
voltage is too low or the battery
pack is damaged, the conditioner/charger could incorrectly
indicate the battery pack’s initial
condition. For this reason, let the
battery pack recharge for about
10 minutes before reading the
CHARGE indicators.
10
4. When the battery pack is fully
charged (the red indicator lights
steadily),
the
conditioner/
charger beeps three times (two
short and one long beep).
(illus)
After you finish charging a rechargeable battery pack, disconnect the
power cord from the power source
first, then dismount the battery pack
from the conditioner/charger.
Conditioning a Battery Pack
To prevent your battery pack from
losing its ability to fully recharge, you
must condition it (by completely discharging it) about once every 10
times you recharge it.
Note: You do not need to condition a
Lead-Acid or Nickel Metal-Hydride
rechargeable battery pack.
1. Mount/connect the battery pack
on the conditioner/charger.
2. Connect power. The conditioner/
charger sounds one short and
one long beep.
23-250.fm Page 11 Friday, August 6, 1999 2:09 PM
3. Press CONDITION to discharge
the remaining power in the battery pack. The yellow CONDITION indicator lights and the
conditioner/charger sounds two
short beeps.
(illus)
Note: To switch to the charging
mode before discharging is complete, remove the battery pack
from the conditioner/charger and
reinstall it. The conditioner/
charger automatically switches
to the charging mode.
4. When conditioning is complete,
the yellow CONDITION indicator
turns off. The conditioner/
charger automatically starts
charging, and the green indicator lights.
11
23-250.fm Page 12 Friday, August 6, 1999 2:09 PM
CARE AND MAINTENANCE
Your Radio Shack Universal Battery Pack Conditioner/Charger is an example of
superior design and craftsmanship. The following suggestions will help you care
for your conditioner/charger so you can enjoy it for years.
Keep the conditioner/charger dry. If it gets wet, wipe it dry immediately. Liquids might contain minerals that can corrode the electronic circuits.
Handle the conditioner/charger gently and carefully. Dropping it
can damage circuit boards and cases and can cause the conditioner/charger to work improperly.
Use and store the conditioner/charger only in normal temperature environments. Temperature extremes can shorten the life of
electronic devices and distort or melt plastic parts.
Keep the conditioner/charger away from dust and dirt, which can
cause premature wear of parts.
CLEANER
Wipe the conditioner/charger with a damp cloth occasionally to
keep it looking new. Do not use harsh chemicals, cleaning solvents, or strong detergents to clean the conditioner/charger.
Modifying or tampering with the conditioner/charger’s internal components can
cause a malfunction and might invalidate your conditioner/charger’s warranty. If
your conditioner/charger is not performing as it should, take it to your local Radio
Shack store for assistance.
12
23-250.fm Page 13 Friday, August 6, 1999 2:09 PM
SPECIFICATIONS
Input Power .......................................................................... 12–18VDC, 800 mA
Charge Mode.............................. Negative (–) Delta Voltage, Delta Temperature
Charging Current..............................................................................750 ± 50 mA
Discharging Current .........................................................................400 ± 50 mA
Chargeable Types of Rechargeable Battery Packs...... Ni-Cd, Ni-MH, Lead-Acid
Dimensions.............................................................. 21/4 × 43/4 × 7 Inches (HWD)
(45 × 120 × 180 mm)
Weight ..................................................................................................... 12.7 Oz
(360 G)
Accessories ......... AC Adapter (Input 120V AC, 60 Hz; Output 18V DC 800 mA)
DC Cord (Input 12V DC; Output 12V)
Wire Connector with Alligator Clips
Specifications are typical; individual units might vary. Specifications are subject
to change and improvement without notice.
13
23-250.fm Page 14 Friday, August 6, 1999 2:09 PM
NOTES
14
23-250.fm Page 15 Friday, August 6, 1999 2:09 PM
15
23-250.fm Page 16 Friday, August 6, 1999 2:09 PM
RADIO SHACK LIMITED WARRANTY
This product is warranted against defects for 90 days from date of purchase from
Radio Shack company-owned stores and authorized Radio Shack franchisees
and dealers. Within this period, we will repair it without charge for parts and labor.
Simply bring your Radio Shack sales slip as proof of purchase date to any
Radio Shack store. Warranty does not cover transportation costs. Nor does it
cover a product subjected to misuse or accidental damage.
EXCEPT AS PROVIDED HEREIN, RADIO SHACK MAKES NO EXPRESS
WARRANTIES AND ANY IMPLIED WARRANTIES ARE LIMITED IN DURATION
TO THE DURATION OF THE WRITTEN LIMITED WARRANTIES CONTAINED
HEREIN. Some states do not permit limitation or exclusion of implied warranties;
therefore, the aforesaid limitation(s) or exclusion(s) may not apply to the purchaser.
This warranty gives you specific legal rights and you may also have other rights which vary from state to
state.
We Service What We Sell
9/94
RADIO SHACK
A Division of Tandy Corporation
Fort Worth, Texas 76102
8A6
Printed in Taiwan