Transcript
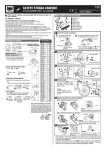
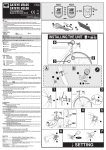
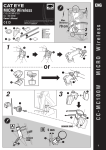
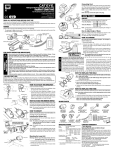
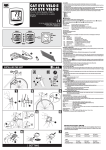
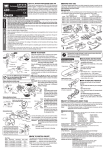
To Light Unit/Switch
Unit
Connecting and Securing Cables
HL-EL700RC
ENG
Design Pat. Pending Copyright©2005 CATEYE Co., Ltd.
EL7-050616 066640042 2
INTRODUCTION
1. Align the male and female cable ends and connect them. Turn
the plugs so that they are securely locked. Fix the cables to
your frame and/or stem to keep them secured.
CAUTION!: Pay attention to the arrangement of the cable
so that it does not interfere with the handling
of the bicycle. Do not secure the cable at an
acute angle because the wire inside the cable
may break.
Line
To Battery Unit
Before using the light, please thoroughly read this manual and keep it for future reference.
Lock
Thank you for purchasing the CATEYE TRIPLE SHOT HL-EL 700RC. The Triple Shot light uses high-power white LEDs, and has
a much longer operating life than other high-power rechargeable systems.
To Battery Unit
COMPONENTS
Frame or
Stem
H31 for oversized
handlebars
Light Unit/Switch Unit
Battery Unit/Battery Bag
Battery Charger
Cable Straps (x 2)
H32
Cable
Straps
Cable Straps
Cable
Bracket (with thick and thin
rubber pads for each)
Support Strap
FOR SAFE OPERATION
• Never short-circuit the terminals of the battery unit or the battery charger. It may cause the unit to overheat,
resulting in fire or damage to the component.
• Securely connect the plug so that the cable will not come unplugged or hinder your riding.
• Never use damaged components (e.g., cables, etc.). Send any damaged components to our customer service
department for repair.
• The light unit may become extremely hot when on or immediately after it is turned off. Please use with caution.
• Do not place it within children’s reach.
• We recommend carrying a flashlight or spare battery unit with you in case the main battery dies.
• Charge the battery unit before using because the unit self-discharges over time, decreasing its voltage.
• Do not leave the battery overly discharged because it shortens the operating life of the battery. Try to charge
the battery unit after each use. (“Overly discharged” refers to the state the battery is in when used over a
period of time while below the specified cutoff voltage.)
• If the lamp body or parts become dirty with mud, etc., clean with a soft cloth which is moistened with mild
soap. Never apply paint thinner, benzine or alcohol; damage will result.
• Place the battery unit at least 10 cm away from any wireless meter, as transmitting and receiving performance may be adversely affected.
• Never disassemble the light unit, battery unit, or battery charger.
• This product is water-resistant under normal weather conditions of rain, etc. However, do not intentionally
submerge it in water or allow rainwater to enter the battery bag.
How to Adjust Beam Angle
Switching on/off
To switch the light on/off, press the button on the switch Adjust the beam angle downward so as not to blind oncoming traffic.
unit.
It can also be adjusted 10 degrees to the left and right.
Run time
Approx. 3.3 hours
Beam Adjustment
Button
Switch Unit
Bracket
Loosen the lever
Quick lever
How to Charge Battery Unit
Important!
Charging indicator state
Orange Light
: Connected to power source
• Be sure to use only the supplied battery charger. This charger
Blinking Red Light : Charging
can accept 100-240 volts.
Green Light
: Charging is completed
• Do not completely remove the battery unit from the battery bag.
• After charging, return the battery to its original storage state. Do not allow water to enter the battery bag.
• The standard charging time and run time are guideline values and depend on the operating environment.
• If the battery unit repeatedly does not meet the proper run time even though it is fully charged, it might be
at the end of its operating life. Replace the old battery unit with a new one. The used battery unit should be
disposed of properly according to local regulations.
Before Initial Use
The battery is shipped with a small charge, that is used to test the unit at the factory. As such, it is
necessary to charge the battery before initial use. (Refer to the “How to Charge” section in this
manual.)
HOW TO MOUNT
Installing Bracket
Attach bracket H31 or H32 to the handlebar.
NOTE: Select H31 for oversized handlebars.
1. Mount a rubber pad and the bracket onto the handlebar. 2
thicknesses of rubber pads are supplied; if necessary, cut
the rubber pad to fit.
2. Tighten and then close the lever to secure it. Make sure the
bracket does not rotate on the handlebar.
CAUTION!: Be sure to adjust the angle of the light’s beam
by referring to the “How to Adjust Beam
Angle” section in this manual before operating the lighting system.
HOW TO USE
Bracket
Rubber pad
Quick lever
1. Remove the battery bag from your bicycle and open the bag.
2. Connect the jack to the battery charger.
3. Plug the battery charger to an AC outlet.
NOTE: When charging is complete, the indicator light changes from flashing red to green.
4. When charging is complete, unplug the charging adapter. Refer to the figures below to rearrange the cable and use the seal
strap to tightly close the opening.
CAUTION!: When securing the battery to the frame, make sure the fixing strap attaches to the center of the battery unit.
Charging Indicator
(For H32 only)
To AC Power Outlet
After Charging
Battery Charger
Cable Arrangement
Battery Unit
Handlebar
or
Mounting Light Unit/Switch Unit
Light Unit
Charging jack
Mounting Light Unit
Seal Strap
Mount the light unit onto the bracket.
To remove unit after use, pull it out while pressing the button
on the bracket.
CAUTION!: Make sure the light unit is cool to the touch
before removing it.
Mounting Switch Unit
Button
Slide in
Strap
Plug
Fixing Strap
Approx. 3 hours Charging jack
How to Store Battery Unit
Switch Unit
Mount the switch unit onto the handlebar.
CAUTION!: Mount the switch unit where it does not
interfere with the handling of the bicycle. Make
sure that it is securely mounted.
1. Adjust the length of the strap with the toggle and wrap the
strap under the bar, hooking it on the switch unit. Make sure
the switch unit does not move around easily.
Battery Unit
The battery unit is stored in its bag as shown in the figure. In case the battery unit is out of its bag, be sure to
return it to its original state. Otherwise, rainwater may
enter the bag, leading to problems with the unit.
Seam
SPARE PARTS
Adjuster
Handlebar
The following spare parts are available.
CAUTION!: Use only genuine spare parts from CATEYE.
#534-1705
Installing Battery Unit
Install the battery unit. If the battery unit has been taken out of
the battery bag, refer to the “How to Charge Battery Unit”
section in this manual and check for the correct arrangement
of the cable and its storage state.
CAUTION!: When mounting the unit, make sure that the
seam of the battery bag is facing down and the
fold line is in front. Wind the fixing strap
around the center of the battery unit.
1. Wrap the fixing strap around the top tube to secure the unit.
CAUTION!: Wrap the strap over the top tube but under
the gear and brake cables. Wrapping the strap
over the cables is dangerous as it may interfere with braking and gear shifting.
2. Use the support strap to secure the battery unit to the down
tube to prevent it from rolling.
NOTE: The battery can also be mounted on alternate positions
on the bicycle. However, please make sure that the seam
of the battery bag is facing down, and the fold line is in
front. This will help prevent any water from entering
the bag.
Standard charging time
Light Unit/
Switch Unit
Fold Line
Gear & Brake
Cables
Down Tube
Support Strap
#534-1707
Battery Unit/
Battery Bag
Battery Bag Set
UL : #534-1708
UK : #534-1709
EC : #534-1710
AS : #534-1711
Battery Charger
#533-8825
Bracket H31
#533-8880
H32
Seam
Top Tube
Fixing Strap
#534-1706
Battery Unit/Battery Bag
Fixing Strap
SPECIFICATIONS
LIMITED WARRANTY
Light Source ------------- Three High-Power White 2-year Warranty : Light/Switch Unit, Battery Unit, Battery Charger
(Excluding degradation of the battery unit)
LEDs
Battery Unit --------------- Nickel hydride battery
(Ni-MH/12V 2700mAh)
Battery Charger ---------- CHR-2700(AC100V-240V
50/60Hz 0.5A)
Operating Time ---------- Approx. 3.3 hours
Standard charging time - Approx. 3 hours
Temperature range ------ Charging: -10°C - 40°C
Operating: -15°C - 45°C
Recharge/discharge number of times
About 300 times (until
the rated capacity drops
to 50%)
* The specifications and design are subject to
change without notice.
If trouble or damage occurs during normal use, the product will be repaired or
replaced free of charge. Type your name, address, date of purchase and the
situation of trouble clearly on the warranty certificate, and send it back to the
appropriate service center together with the product. Insurance, handling and
transportation charges shall be borne by the customer. After being repaired or
replaced, the product will be shipped back to the customer.
CO.,LTD.
2-8-25, Kuwazu, Higashi Sumiyoshi-ku,
Osaka 546-0041 Japan
Attn: CATEYE Customer Service Section
Phone : (06)6719-6863
Fax
: (06)6719-6033
E-mail : [email protected]
URL
: http://www.cateye.co.jp
Service & Research Address for USA
CATEYE Service and Research Center
1705 14th St. 115 Boulder, CO 80302
Phone : 303.443.4595
Toll Free : 800.5CATEYE
Fax
: 303.473.0006
E-mail: [email protected]
URL: http://www.cateye.com