1
Hitachi Storage Command Suite
Hitachi Device Manager Software
SMI-S Provider Installation and User Guide
FASTFIND LINKS
Document Organization
Software Version
Getting Help
Contents
MK-96HC138-06
Copyright © 2008 Hitachi Data Systems
Corporation, ALL RIGHTS RESERVED
Notice: No part of this publication may be
reproduced or transmitted in any form or by
any means, electronic or mechanical,
including photocopying and recording, or
stored in a database or retrieval system for
any purpose without the express written
permission of Hitachi Data Systems
Corporation (hereinafter referred to as
“Hitachi Data Systems”).
Hitachi Data Systems reserves the right to
make changes to this document at any time
without notice and assumes no responsibility
for its use. Hitachi Data Systems products
and services can only be ordered under the
terms and conditions of Hitachi Data Systems’
applicable agreements. All of the features
described in this document may not be
currently available. Refer to the most recent
product announcement or contact your local
Hitachi Data Systems sales office for
information on feature and product
availability.
This document contains the most current
information available at the time of
publication. When new and/or revised
information becomes available, this entire
document will be updated and distributed to
all registered users.
Hitachi, the Hitachi logo, and Hitachi Data
Systems are registered trademarks and
service marks of Hitachi, Ltd. The Hitachi
Data Systems logo is a trademark of Hitachi,
Ltd.
Linux is a registered trademark of Linus
Torvalds.
Solaris is a trademark or registered
trademark of Sun Microsystems, Inc. in the
United States and other countries.
Windows is a registered trademark of
Microsoft Corporation in the U.S. and other
countries.
All other brand or product names are or may
be trademarks or service marks of and are
used to identify products or services of their
respective owners.
ii
Hitachi Device Manager SMI-S Provider Installation and User Guide
Contents
Preface .................................................................................................. vii
Intended Audience ............................................................................................ viii
Software Version............................................................................................... viii
Release Notes ................................................................................................... viii
Document Revision Level ..................................................................................... ix
Document Organization ....................................................................................... ix
Referenced Documents........................................................................................ ix
Document Conventions.........................................................................................x
Convention for Storage Capacity Values ................................................................ xi
Getting Help ....................................................................................................... xi
Comments .......................................................................................................... xi
Overview and Setup of CIM/WBEM ........................................................ 1-1
Device Manager and CIM/WBEM.........................................................................1-2
CIM/WBEM Features of Device Manager..............................................................1-4
Preparing to Use the CIM/WBEM Features...........................................................1-5
Basic Settings Required to Use the CIM/WBEM Features ................................1-5
Setting up the Ports Used by CIM/WBEM Features.........................................1-8
Opening and Closing Ports According to the Communication Type............1-8
Changing the Port Number....................................................................1-9
Setting up the Properties File Used by the CIM/WBEM Feature............................1-10
The server.properties File..........................................................................1-10
server.cim.support .............................................................................1-10
server.cim.support.protocol.................................................................1-10
server.cim.http.port............................................................................1-11
server.cim.https.port ..........................................................................1-11
server.cim.agent ................................................................................1-11
server.cim.support.job........................................................................1-11
The jserver.properties File .........................................................................1-12
classpath...........................................................................................1-12
BaseDir .............................................................................................1-12
Contents
Hitachi Device Manager SMI-S Provider Installation and User Guide
iii
propdir ............................................................................................. 1-12
logdir ............................................................................................... 1-12
Saving the cimom.properties File............................................................... 1-12
org.wbemservices.wbem.cimom.pswdprov .......................................... 1-12
Setting the Service Discovery Feature .............................................................. 1-13
Setting up the Service Discovery Feature ................................................... 1-13
In Windows ...................................................................................... 1-13
In Solaris .......................................................................................... 1-14
In Linux............................................................................................ 1-15
Starting and Stopping the Service Discovery Feature................................... 1-16
In Windows ...................................................................................... 1-16
In Solaris .......................................................................................... 1-16
In Linux............................................................................................ 1-17
Notes on using OpenSLP .......................................................................... 1-17
Acquiring Performance Information.................................................................. 1-18
System Configuration Required to Use the Performance Information Acquisition
Feature ............................................................................................ 1-18
Acquiring Performance Data of Universal Storage Platform V/VM or TagmaStore
USP.................................................................................................. 1-20
Preparations in storage subsystems .................................................... 1-20
Preparations in the host that acquires performance information ............ 1-21
Preparations in the Device Manager server .......................................... 1-22
Settings in the perf_cmddev.properties file .......................................... 1-22
Format of the perf_findcmddev command ........................................... 1-23
Acquiring Performance Data for Hitachi SMS, Hitachi AMS/WMS, Thunder 9500 or
Thunder 9200 ................................................................................... 1-25
Preparations in storage subsystems .................................................... 1-25
Setting up a User to Acquire Performance Information ......................... 1-25
hdvmmodpolluser Command Format ................................................... 1-26
User Permissions for Using CIM/WBEM Features ............................................... 1-27
Security Settings for CIM/WBEM Functionality................................................... 1-28
Modifying the Keystore File for Object Operations....................................... 1-29
Specifying Two-Way Authentication for the Object Operation ...................... 1-31
First Setup Procedure Performed in a CIM Client .................................. 1-31
Setup Procedure Performed in the Device Manager Server.................... 1-31
Second Setup Procedure Performed in a CIM Client.............................. 1-33
Specifying Two-Way Authentication for Event Indications ............................ 1-34
First Setup Procedure Performed in a CIM Client .................................. 1-34
Setup Procedure Performed in the Device Manager Server.................... 1-34
Second Setup Procedure Performed in a CIM Client.............................. 1-37
Disabling Two-way Authentication ............................................................. 1-38
Authenticating File Operations ......................................................................... 1-40
Creating a Keystore File............................................................................ 1-41
Exporting an Authentication File from a Keystore File .................................. 1-42
Creating a Truststore File and Importing an Authentication File ................... 1-42
iv
Contents
Hitachi Device Manager SMI-S Provider Installation and User Guide
Troubleshooting ................................................................................... 2-1
Calling the Hitachi Data Systems Support Center .................................................2-2
Acronyms and Abbreviations .................................................................... 1
Contents
Hitachi Device Manager SMI-S Provider Installation and User Guide
v
Preface
This manual describes the Hitachi Device Manager CIM/WBEM installation. In
this manual, Hitachi Device Manager is abbreviated to Device Manager.
This preface includes the following information:
Intended Audience
Software Version
Release Notes
Document Revision Level
Document Organization
Referenced Documents
Document Conventions
Convention for Storage Capacity Values
Getting Help
Comments
Notice: The use of Device Manager and all other Hitachi Data Systems
products is governed by the terms of your agreement(s) with Hitachi Data
Systems.
Preface
Hitachi Device Manager SMI-S Provider Installation and User Guide
vii
Intended Audience
This manual is intended for users who manage systems containing storage
subsystems (disk array devices). Such users should have a basic knowledge
of:
•
Object oriented programming
•
CIM (Common Information Model)
•
WBEM (Web Based Enterprise Management)
•
SANs (Storage Area Networks)
Furthermore, this document assumes that its users have the following:
•
A background in data processing
•
Understanding of direct-access storage device subsystems and their basic
functions
•
Familiarity with Device Manager
•
Familiarity with the Hitachi storage subsystems
•
Familiarity with the operating system that hosts the Device Manager
Server.
You may also contact your Hitachi Data Systems account team or visit Hitachi
Data Systems online (http://www.hds.com) for additional information about
Device Manager and its features and functions.
Software Version
This document revision applies to Device Manager version 6.0.
Release Notes
Release notes can be found on the documentation CD or on the Hitachi Data
Systems Support Portal:
https://extranet.hds.com/http:/aim.hds.com/portal/dt
Release notes contain requirements and more recent product information that
may not be fully described in this manual. Be sure to review the release notes
before installation.
viii
Preface
Hitachi Device Manager SMI-S Provider Installation and User Guide
Document Revision Level
Revision
Date
Description
MK-96HC138-00
June 2006
Initial Release
MK-96HC138-01
November 2006
Revision 1, supersedes and replaces MK-96HC138-00
MK-96HC138-02
February 2007
Revision 2, supersedes and replaces MK-96HC138-01
MK-96HC138-03
June 2007
Revision 3, supersedes and replaces MK-96HC138-02
MK-96HC138-04
October 2007
Revision 4, supersedes and replaces MK-96HC138-03
MK-96HC138-05
February 2008
Revision 5, supersedes and replaces MK-96HC138-04
MK-96HC138-06
May 2008
Revision 6, supersedes and replaces MK-96HC138-05
Document Organization
The following table provides an overview of the contents and organization of
this document. Click the chapter title in the left column to go to that chapter.
The first page of each chapter provides links to the sections in that chapter.
Chapter
Description
Overview and Setup of
CIM/WBEM
This chapter gives an overview of CIM/WBEM (Web-Based Enterprise
Management) provided by Device Manager and explains how to set up
CIM/WBEM.
Troubleshooting
This chapter provides contact information for the Hitachi Data Systems
Support Center.
Acronyms and Abbreviations
Defines the acronyms and abbreviations used in this document.
Referenced Documents
The following Hitachi referenced documents are also available for download
from the Hitachi Data Systems Support Portal:
https://extranet.hds.com/http:/aim.hds.com/portal/dt
Hitachi Storage Command Suite Documents:
•
Hitachi Device Manager Agent Installation Guide, MK-92HC019
•
Hitachi Device Manager and Provisioning Manager Server Installation and
Configuration Guide, MK-98HC150
Preface
Hitachi Device Manager SMI-S Provider Installation and User Guide
ix
Document Conventions
This document uses the following typographic conventions:
Convention
Description
Bold
Indicates text on a window, other than the window title, including menus, menu
options, buttons, fields, and labels. Example: Click OK.
Italic
Indicates a variable, which is a placeholder for actual text provided by the user
or system. Example: copy source-file target-file
Note: Angled brackets (< >) are also used to indicate variables.
screen/code
Indicates text that is displayed on screen or entered by the user.
Example: # pairdisplay -g oradb
< > angled brackets
Indicates a variable, which is a placeholder for actual text provided by the user
or system. Example: # pairdisplay -g <group>
Note: Italic font is also used to indicate variables.
[ ] square brackets
Indicates optional values. Example: [ a | b ] indicates that you can choose a, b,
or nothing.
{ } braces
Indicates required or expected values. Example: { a | b } indicates that you
must choose either a or b.
| vertical bar
Indicates that you have a choice between two or more options or arguments.
Examples:
[ a | b ] indicates that you can choose a, b, or nothing.
{ a | b } indicates that you must choose either a or b.
underline
Indicates the default value. Example: [ a | b ]
This document uses the following icons to draw attention to information:
Icon
x
Label
Description
Note
Calls attention to important and/or additional information.
Tip
Provides helpful information, guidelines, or suggestions for performing tasks
more effectively.
Caution
Warns the user of adverse conditions and/or consequences (e.g., disruptive
operations).
WARNING
Warns the user of severe conditions and/or consequences (e.g., destructive
operations).
Preface
Hitachi Device Manager SMI-S Provider Installation and User Guide
Convention for Storage Capacity Values
Storage capacity values for logical devices are calculated based on the
following values:
1
1
1
1
KB (kilobyte) = 1,024 bytes
MB (megabyte) = 1024 kilobytes or 1,0242 bytes
GB (gigabyte) = 1024 megabytes or 1,0243 bytes
TB (terabyte) = 1024 gigabytes or 1,0244 bytes
Getting Help
The Hitachi Data Systems Support Center staff is available 24 hours a day,
seven days a week. To reach us, please visit the support Web site for current
telephone numbers and other contact information:
http://www.hds.com/services/support/. If you purchased this product from an
authorized HDS reseller, contact that reseller for support.
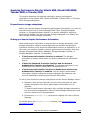
Before calling the Hitachi Data Systems Support Center, please provide as
much information about the problem as possible, including:
•
The circumstances surrounding the error or failure.
•
The exact content of any error message(s) displayed on the host
system(s).
Comments
Please send us your comments on this document. Make sure to include the
document title, number, and revision. Please refer to specific section(s) and
paragraph(s) whenever possible.
•
E-mail: [email protected]
•
Fax: 858-695-1186
•
Mail:
Technical Writing, M/S 35-10
Hitachi Data Systems
10277 Scripps Ranch Blvd.
San Diego, CA 92131
Thank you! (All comments become the property of Hitachi Data Systems
Corporation.)
Preface
Hitachi Device Manager SMI-S Provider Installation and User Guide
xi
xii
Preface
Hitachi Device Manager SMI-S Provider Installation and User Guide
1
Overview and Setup of CIM/WBEM
This chapter gives an overview of CIM/WBEM (Web-Based Enterprise
Management) provided by Device Manager and explains how to set up
CIM/WBEM.
Device Manager and CIM/WBEM
CIM/WBEM Features of Device Manager
Preparing to Use the CIM/WBEM Features
Setting up the Properties File Used by the CIM/WBEM Feature
Setting the Service Discovery Feature
Acquiring Performance Information
User Permissions for Using CIM/WBEM Features
Security Settings for CIM/WBEM Functionality
Authenticating File Operations
Overview and Setup of CIM/WBEM
Hitachi Device Manager SMI-S Provider Installation and User Guide
1-1
Device Manager and CIM/WBEM
Device Manager supports WBEM defined by the standards-setting organization
DMTF. WBEM is a standard proposed by the DMTF for managing networked
devices, including hosts and storage subsystems, over the Internet. WBEM
enables you to share data about devices in different environments (such as
environments with different vendors, operating systems, or protocols) without
considering the differences. WBEM is based on CIM, an object-oriented
information model.
CIM, defined by DMTF, is a standardized approach for managing systems in
network environments. CIM provides a framework for expressing the data to
be managed. Applying CIM to storage subsystems enables you to use
standardized methods to manage the configuration and status of storage
subsystems in networks.
The CIM models provided by Device Manager conform to the SMI-S
specifications (SNIA-CTP) endorsed by SNIA. The CIM models of the Device
Manager server are defined in MOF (Managed Object Format) files provided by
Device Manager.
CIM clients can access Device Manager by using the CIM XML/HTTP interface
defined by WBEM.
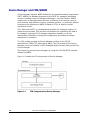
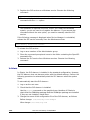
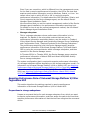
Figure 1-1 shows the CIM components of Device Manager.
Figure 1-1
1-2
CIM Components for Device Manager
Overview and Setup of CIM/WBEM
Hitachi Device Manager SMI-S Provider Installation and User Guide
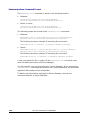
From a CIM client, you can specify a namespace by using the following
procedure:
•
Specify the SMI-S version.
Specify root/smis/smisxx (xx is an abbreviation for the version number).
For example, to specify version 1.2.0, enter root/smis/smis12
The latest namespaces that complies with the specified SMI-S version is
selected.
•
Specify the condition current.
Enter root/smis/current.
The current namespace is selected.
Note: If you need to specify the namespace dmxx (xx is an abbreviation for
the version number) that was supported by Device Manager 5.8 or earlier
versions, contact maintenance personnel.
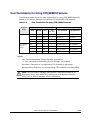
The following table outlines the relationship between the namespaces
supported by Device Manager and the SMI-S versions.
Table 1-1
Correspondence Between Namespaces and SMI-S Versions
Namespace
SMI-S
Root/hitachi/smis10
1.0.2
Root/hitachi/smis11
1.1.0
Root/hitachi/smis12
1.2.0
Root/smis/current
1.2.0
You can obtain information about:
CIM at: http://www.dmtf.org/home/
SMI-S at: http://www.snia.org/smi/home/
Overview and Setup of CIM/WBEM
Hitachi Device Manager SMI-S Provider Installation and User Guide
1-3
CIM/WBEM Features of Device Manager
CIM/WBEM of Device Manager provides the four features specified in SMI-S:
•
Objection operation feature
•
Indication feature
•
Service discovery feature
•
Performance information acquisition feature
These features are described below:
•
Object operation feature
The SMI-S specifications, to which Device Manager conforms, define the
interfaces for devices that make up a storage network, such as storage
subsystems, virtual storage systems, switches, and hosts. The features
that need to be provided by the management service to manage the
devices are grouped in a profile for each device. The profiles used by the
CIM/WBEM features of Device Manager are the Array profile and its
subprofiles. The Array profile defines the interfaces for storage subsystems.
•
Indication feature
The indication feature is the event notification feature defined by CIM.
When an event occurs in a CIM server, the CIM server reports the
indication instance, which shows the information about the event (such as
generation or deletion of a CIM instance), to CIM clients. For a CIM client to
receive indications, its location and transmission conditions for indications
must be registered in the CIM server beforehand. For details on how to
register, see the SNIA Website. Device Manager reports the occurrence of
the following events:
•
–
Generation of a volume
–
Deletion of a volume
–
Allocation of a path
–
Cancellation of a path
Service discovery feature
Device Manager provides the service discovery feature based on the
Service Location Protocol (SLP). The SLP is undergoing standardization by
IETF and provides a way to discover desired services available in a
network. For details on the SLP, see RFC2608. Just by specifying the type
of service, SLP clients can obtain information (such as URLs) about how to
access the available services, and information about service attributes. In
Device Manager, the Device Manager server uses the SLP to report
information about the WBEM Service.
•
Performance information acquisition feature
Using the CIM interface, Device Manager acquires information about I/Os
to ports and LDEVs as performance information of the storage subsystem.
1-4
Overview and Setup of CIM/WBEM
Hitachi Device Manager SMI-S Provider Installation and User Guide
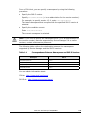
Preparing to Use the CIM/WBEM Features
CIM/WBEM features are disabled by default in the Device Manager settings. To
use them, you must specify the following settings after installation:
•
Basic settings required to use the CIM/WBEM features
•
Setting the port used by CIM/WBEM features
•
Settings required to use SSL (Secure Sockets Layer) in the CIM/WBEM
features
Basic Settings Required to Use the CIM/WBEM Features
To use the CIM/WBEM features, you must first enable them.
To enable the CIM/WBEM features:
1. Change the setting of the server.cim.support property in the property file
server.properties from false to true. The server.properties file is stored
in the following location:
–
Windows:
installation-folder-for-the-Device-Managerserver\HiCommandServer\config\
–
Solaris or Linux:
installation-directory-for-the-Device-Managerserver/HiCommandServer/config
2. Stop any service that uses a port having a port number used by the
CIM/WBEM service.
The table below shows the port used by each CIM/WBEM feature.
Table 1-2
Port Number Used by CIM/WBEM Features
Feature
Port Number Used
Objection operation feature
Non-SSL communication: 5988 (default). SSL communication: 5989 (default)
Service discovery feature
427
Execute the following command to determine if any service program
running is using the same port to be used by each CIM/WBEM feature:
–
Windows: netstat -anp TCP
–
Solaris: netstat -an -P tcp
–
Linux: netstat -tan
If any service program using the same port is running, change the port
number for the service program.
Overview and Setup of CIM/WBEM
Hitachi Device Manager SMI-S Provider Installation and User Guide
1-5
If any service program is running (normally, another WBEM service
program) that is using the same port to be used by an object operation
feature, the object operation feature is not available.
If any service program is running (normally, another SLP service (or SLP
daemon)) that uses the same port (427) to be used by the service
discovery feature, an attempt to start the SLP service (or SLP daemon) for
Device Manager will fail.
In Solaris:
In Solaris, a CIMOM is incorporated in the system during installation. If
the CIMOM is running, an attempt to start CIM/WBEM might fail.
Use the following command to stop CIMOM:
# /etc/init.d/init.wbem stop
Also, delete the CIMOM from inittab to prevent the CIMOM from
automatically starting.
3. Set up and start the SLP service (or SLP daemon).
Set up the SLP service (or SLP daemon) to enable the service discovery
feature. For details, see Setting the Service Discovery Feature.
Note: In the SLP service (or SLP daemon), register the port used by the
CIM/WBEM features. See Setting up the Ports Used by CIM/WBEM
Features.
4. Restart the Device Manager server.
–
In Windows, select Start, All programs, Hitachi Storage Command
Suite, Device Manager, and then Stop Server. When the Device
Manager server has stopped, select Start, All programs, Hitachi
Storage Command Suite, Device Manager, and then Start Server.
–
In Solaris or Linux, execute the following command:
installation-directory-for-the-Device-Manager-server/suitesrvcntl stop_hdvm
When the Device Manager server has stopped, execute the following
command:
installation-directory-for-the-Device-Manager-server/suitesrvcntl start_hdvm
The following shows an example of executing the commands:
# /opt/HiCommand/suitesrvcntl -stop_hdvm
# /opt/HiCommand/suitesrvcntl -start_hdvm
1-6
Overview and Setup of CIM/WBEM
Hitachi Device Manager SMI-S Provider Installation and User Guide
Note: When upgrading Device Manager from version 4.2 or earlier to 4.3
or later, check the httpsd.conf file. If it contains coding that enables SSL
functionality in the CIM/WBEM features, remove or comment out the
coding before upgrading. For details about disabling SSL, refer to
Chapter 7 of the Hitachi Device Manager and Provisioning Manager
Installation and Configuration Guide. When the version of Device
Manager is 4.2 or earlier, the httpsd.conf file is stored in the following
location:
Windows: installation-folder-for-CommonComponent\httpsd\conf\httpsd.conf
Solaris or Linux: /opt/HiCommand/Base/httpsd/conf/httpsd.conf
The following shows the coding contained in the httpsd.conf file that enables
SSL capability when the Device Manager version is 4.2 or earlier:
LoadModule proxy_module complete-path-name-for-the-proxy-module
Listen port-number-for-SSL-in-CIM/WBEM-features
<VirtualHost *:port-number-for-SSL-in-CIM/WBEM-features>
ServerName host-name
SSLEnable
SSLRequireSSL
SSLCertificateFile complete-path-name-for-the-certificate-file-from-CA
SSLCertificateKeyFile complete-path-name-for-the-private-key-file
ProxyPass / http://127.0.0.1:5988/
ProxyPassReverse / http://127.0.0.1:5988/
</VirtualHost>
Overview and Setup of CIM/WBEM
Hitachi Device Manager SMI-S Provider Installation and User Guide
1-7
Setting up the Ports Used by CIM/WBEM Features
Opening and Closing Ports According to the Communication Type
Ports can be opened or closed according to the communication type used by
CIM/WBEM features. Security can be enhanced by closing unused ports.
To open or close the port:
1. Using the server.cim.support.protocol property in the property file
(server.properties) of the Device Manager server, set up whether to open
or close each port according to the communication type.
The setting values for server.cim.support.protocol are shown in the
following table.
Table 1-3
Setting Values for server.cim.support.protocol
Setting Value
Port Status
Applicable Communication Type
HTTP Port
HTTPS Port
1
Open
Close
Non-SSL communication
2
Close
Open
SSL communication
3
Open
Open
SSL communication and non-SSL
communication
2. Restart the Device Manager server.
–
In Windows:
Select Start, All Programs, Hitachi Storage Command Suite,
Device Manager, then Stop Server.
When the Device Manager server has stopped, select Start, All
Programs, Hitachi Storage Command Suite, Device Manager,
then Start Server.
–
In Solaris or Linux, execute the following command:
installation-directory-for-the-Device-Manager-server/suitesrvcntl stop_hdvm
When the Device Manager server has stopped, execute the following
command:
installation-directory-for-the-Device-Manager-server/suitesrvcntl start_hdvm
The following shows an example of executing the commands:
# /opt/HiCommand/suitesrvcntl -stop_hdvm
# /opt/HiCommand/suitesrvcntl -start_hdvm
1-8
Overview and Setup of CIM/WBEM
Hitachi Device Manager SMI-S Provider Installation and User Guide
Changing the Port Number
In the initial state, the port numbers used by the CIM/WBEM features are as
follows:
•
HTTP port number: 5988
•
HTTPS port number: 5989
To specify the port number:
1. Change the port number set in the Device Manager server property
file (server.properties). For details, see the server.properties file.
–
To change the HTTP port number:
Change the port number set in server.cim.http.port.
–
To change the HTTPS port number:
Change the port number set in server.cim.https.port.
2. Restart the Device Manager server.
–
In Windows:
Select Start, All Programs, Hitachi Storage Command Suite,
Device Manager, and then Stop Server.
When the Device Manager server has stopped, select Start, All
Programs, Hitachi Storage Command Suite, Device Manager, and
then Start Server.
–
In Solaris or Linux, execute the following command:
installation-directory-for-the-Device-Manager-server/suitesrvcntl stop_hdvm
When the Device Manager server has stopped, execute the following
command:
installation-directory-for-the-Device-Manager-server/suitesrvcntl start_hdvm
The following shows an example of executing the commands:
# /opt/HiCommand/suitesrvcntl -stop_hdvm
# /opt/HiCommand/suitesrvcntl -start_hdvm
Overview and Setup of CIM/WBEM
Hitachi Device Manager SMI-S Provider Installation and User Guide
1-9
Setting up the Properties File Used by the CIM/WBEM
Feature
When executing CIM, you must set up the properties files for the Device
Manager server, then restart Device Manager. The following table lists the
Device Manager server properties.
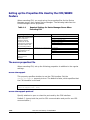
Table 1-4
Required Settings for Device Manager Server When
Executing CIM
Settings Required
File Name
Property
Enable CIM, specify ports
used in CIM, and
configure settings
required to use the
performance information
acquisition feature and
the job setting feature.
server.properties
server.cim.support
server.cim.support.protocol
server.cim.http.port
server.cim.https.port
server.cim.agent
server.cim.support.job
Set up the operating
environment for the
WBEM Service.
wbemservices.properties
Set the authentication
class for Device
Manager.
cimom.properties
Classpath
BaseDir
Propdir
Logdir
org.wbemservices.wbem.cimom.pswdprov
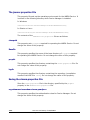
The server.properties File
When executing CIM, set up the following properties in addition to the regular
settings.
server.cim.support
This property specifies whether to use the CIM interface. Set the
server.cim.support property to true. The default is false, which specifies that
the CIM interface is not used.
# whether the server supports CIM interface or not
server.cim.support={true | false}
server.cim.support.protocol
Specify whether to open or close the port used by the CIM interface.
Default: 3 (opens both the port for SSL communication and port for non-SSL
communication.)
1-10
Overview and Setup of CIM/WBEM
Hitachi Device Manager SMI-S Provider Installation and User Guide
server.cim.http.port
To use non-SSL for the CIM interface, specify the HTTP port number.
Default: 5988
server.cim.https.port
To use SSL for the CIM interface, specify the port number of HTTPS.
Default: 5989
server.cim.agent
To use the CIM interface to acquire performance information of storage
subsystems, specify the name of the host on which the Device Manager agent
is installed. If you do not set this property, you cannot acquire performance
information.
Default: None
server.cim.support.job
This property specifies whether a method for creating or deleting a volume,
setting or releasing a path, setting or canceling security for a LUN, or creating
or deleting a LUSE volume is executed asynchronously or synchronously. If the
CIM client does not support the job control subprofile, specify false.
Default: true (The method is executed asynchronously.)
Overview and Setup of CIM/WBEM
Hitachi Device Manager SMI-S Provider Installation and User Guide
1-11
The jserver.properties File
This property file sets up the operating environment for the WBEM Service. It
is stored in the following directory when Device Manager is installed:
In Windows:
installation-folder-for-the-Device-Manager-server\HiCommandServer\config
In Solaris or Linux:
installation-directory-for-the-Device-Manager-server/HiCommandServer/config
The contents of the wbemservices.properties file are as follows.
classpath
This property sets classpath required for operating the WBEM Service. Do not
change the value of this property.
BaseDir
This property specifies the name of the base directory of classpath required
for operating the WBEM Service. Do not change the value of this property.
propdir
This property specifies the directory containing the cimom.properties file. Do
not change the value of this property.
logdir
This property specifies the directory containing the repository (compilation
results of the MOF file: store). Do not change the value of this property.
Saving the cimom.properties File
Save the cimom.properties file in the directory specified by the propdir
property in the wbemservices.properties file.
org.wbemservices.wbem.cimom.pswdprov
This property specifies the authentication class for Device Manager. Do not
change the value of this property.
1-12
Overview and Setup of CIM/WBEM
Hitachi Device Manager SMI-S Provider Installation and User Guide
Setting the Service Discovery Feature
To use the service discovery feature of Device Manager, you need the
following prerequisite software:
•
In Windows or Linux:
OpenSLP 1.0.11
OpenSLP is attached to Device Manager. When you install Device Manager,
the required file is copied. For details on OpenSLP, see the OpenSLP
website (http://www.openslp.org/).
•
In Solaris:
SUNWslpr package and SUNWslpu package
These packages are attached to the Solaris system. For details on the
SUNWslpr package and the SUNWslpu package, see the Sun Microsystems
website (http://docs.sun.com/).
OpenSLP, the SUNWslpr package, and the SUNWslpu package need to be set
up separately. For details, see Setting up the Service Discovery Feature.
When starting the CIM client, set the language tag (locale) for the service
discovery feature to English (en).
Setting up the Service Discovery Feature
In Windows
When you install Device Manager, the OpenSLP files are also installed. To use
the service discovery feature, you need to register the SLP service (service
name: slpd, display name: Service Location Protocol) as a Windows service.
Perform the following procedure to register the SLP service as a Windows
service.
To register the SLP service:
1. Install Device Manager, then log on as a member of the Administrator
group.
2. Display the command prompt and move to the folder containing the
OpenSLP executable file.
OpenSLP is installed in the following folder:
installation-folder-for-the-Device-Manager-server\HiCommandServer\wsi\bin\windows
Overview and Setup of CIM/WBEM
Hitachi Device Manager SMI-S Provider Installation and User Guide
1-13
3. Register the SLP service as a Windows service. Execute the following
command:
> slpd -install
To automatically start the service when Windows starts, execute the
command with the auto option.
> slpd -install auto
This operation is required only once. Even if you restart the Windows
system, you do not need to re-register the daemon. If you execute the
command without the auto option, you need to manually start the SLP
service.
If the following message is displayed when Device Manager is uninstalled,
release the SLP service manually from the Windows services.
An attempt to release the SLP service has failed. After uninstallation, release the SLP
service manually. Uninstallation continues.
To release the SLP service:
1. Log on as a member of the Administrator group.
2. Show the command prompt and move to the folder containing the OpenSLP
executable file.
3. Release the SLP service from Windows services. Execute the following
command:
> slpd -remove
In Solaris
In Solaris, the SLP daemon is installed in the standard configuration. However,
the SLP daemon does not become active with the default settings. Perform the
following procedure to automatically start the SLP daemon when the system
starts.
To automatically start the SLP daemon:
1. Log on as the root user.
2. Check that the SLP daemon is installed.
Use the pkginfo command or the graphical user interface of Solaris to
check that the SUNWslpr package and the SUNWslpu package are installed.
If they are not installed, install them.
3. Change the name of the configuration file of the SLP daemon, as follows:
Before change: /etc/inet/slp.conf.example
After change: /etc/inet/slp.conf
1-14
Overview and Setup of CIM/WBEM
Hitachi Device Manager SMI-S Provider Installation and User Guide
4. Start the SLP daemon by restarting Solaris or executing the following
command:
# /etc/init.d/slpd start
If Device Manager is uninstalled, stop or cancel the SLP daemon, as
required. You can cancel the SLP daemon by using either of the following
methods:
•
Delete /etc/init.d/slpd or rename it.
•
Delete /etc/inet/slp.conf or rename it.
In Linux
When Device Manager is installed, the OpenSLP file is copied at the same time.
Settings do not need to be specified after installation, and the service
discovery feature can be used as-is.
If the following message is displayed when Device Manager is uninstalled,
release the SLP daemon manually from the Linux daemons.
WARNING: An attempt to release the SLP daemon has failed. After uninstallation, release the
SLP daemon manually. Uninstallation continues.
To release the SLP daemon:
1. Log on as the root user.
2. Stop the SLP daemon. Execute the following command:
installation-directory-for-the-Device-Manager-server/HiCommandServer/wsi/bin/slpd.sh stop
The following shows an example of executing the command:
#/opt/HiCommand/HiCommandServer/wsi/bin/slpd.sh stop
3. If /etc/init.d/slpd exists, delete it. Execute the following command:
# chkconfig --level 01345 slpd off
# chkconfig --del slpd
# rm -f /etc/init.d/slpd
Overview and Setup of CIM/WBEM
Hitachi Device Manager SMI-S Provider Installation and User Guide
1-15
Starting and Stopping the Service Discovery Feature
In Windows
To manually start the SLP service, perform either of the following procedures:
•
From Administrative Tools, choose Services and then Service Location
Protocol to start the SLP service.
•
Show the command prompt, move to the folder containing the OpenSLP
executable file, and execute the following command: > slpd -start
To stop the SLP service, perform either of the following:
•
From Administrative Tools, choose Services and then Service Location
Protocol.
•
Display the command prompt, move to the folder containing the OpenSLP
executable file, and execute the following command: > slpd –stop
In Solaris
To manually start the SLP daemon, execute the following command:
# /etc/init.d/slpd start
To stop the SLP daemon, execute the following command:
# /etc/init.d/slpd stop
Note: Sometimes, the /etc/init.d/slpd stop command may not
successfully stop the SLP daemon. In this case, perform the following
procedure to stop the SLP daemon:
•
Return the name of the /etc/inet/slp.conf file to
/etc/inet/slp.conf.example.
You must delete the /etc/inet/slp.conf file at this point.
•
1-16
Restart Solaris
Overview and Setup of CIM/WBEM
Hitachi Device Manager SMI-S Provider Installation and User Guide
In Linux
To manually start the SLP daemon, execute the following command:
installation-directory-for-the-Device-Manager-server/HiCommandServer/wsi/bin/slpd.sh start
To stop the SLP daemon, execute the following command:
installation-directory-for-the-Device-Manager-server/HiCommandServer/wsi/bin/slpd.sh stop
The following shows an example of executing the commands:
# /opt/HiCommand/HiCommandServer/wsi/bin/slpd.sh start
# /opt/HiCommand/HiCommandServer/wsi/bin/slpd.sh stop
Notes on using OpenSLP
The SLP service (or SLP daemon) of OpenSLP outputs operation logs to the
following file:
In Windows: %WINDIR%slpd.log#
#%WINDIR% is replaced by the value of the environment variable WINDIR in
Windows. Normally, the value is C:\WINNT\.
In Linux:
installation-directory-for-the-Device-Managerserver/HiCommandServer/wsi/cfg/slp.log
By default, only the start message at SLP service startup is output to the log
file. Since the SLP service log output (or SLP daemon) accumulates as time
elapses, if you use the SLP service (or SLP daemon) for an extended period of
time, the log output may eventually use up a lot of disk space. To prevent this,
you need to periodically back up the log file and clear the disk space.
Overview and Setup of CIM/WBEM
Hitachi Device Manager SMI-S Provider Installation and User Guide
1-17
Acquiring Performance Information
Device Manager can obtain performance information of a storage subsystem
using the CIM interface. The following storage subsystems are supported:
Universal Storage Platform V/VM, Universal Storage Platform, Network Storage
Platform, AMS, WMS, SMS, and 9500V.
Device Manager acquires the following information for any or all ports (except
for the Thunder 9200, which does not support this feature):
•
Total I/O count
•
Data traffic
Device Manager acquires the following data for open or mainframe volumes:
•
Total I/O count
•
Data traffic
•
Number of read I/Os (and number of read I/Os that hit the cache)
•
Number of write I/Os (and number of write I/Os that hit the cache)
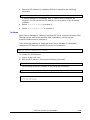
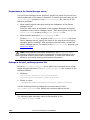
System Configuration Required to Use the Performance Information
Acquisition Feature
Following is a system configuration for collecting performance data of a
storage subsystem.
1-18
Overview and Setup of CIM/WBEM
Hitachi Device Manager SMI-S Provider Installation and User Guide
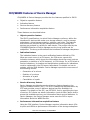
Figure 1-2
Example System Configuration for Collecting Performance
Data of a Storage Subsystem
This section describes the system configuration that is required to use the
performance information acquisition feature.
•
Management server
A management server is a server in which Device Manager server version
5.9 or later is installed. You must set the management server so that
CIM/WBEM can be used. For details, see Preparing to Use the CIM/WBEM
Features.
•
Host that acquires performance information
The host is required when acquiring performance information of Universal
Storage Platform V/VM or Hitachi USP. You must install Device Manager
agent version 5.9 or later on this host.
We recommend that you use the same machine for the host to acquire
performance information and the management server. In this case, the OS
for the host that acquires performance information must be able to support
both Device Manager server and the Device Manager agent.
For example, if the OS for the management server is Windows XP, you
cannot install the Device Manager agent, so you cannot use this machine
as the host that acquires performance information.
Overview and Setup of CIM/WBEM
Hitachi Device Manager SMI-S Provider Installation and User Guide
1-19
Even if you use a machine, which is different from the management server,
for the host to acquire performance information, the OS for the host that
acquires performance information must be Windows, Solaris, or Linux. You
cannot use a host on which HP-UX or AIX is running to acquire
performance information. For details about the OSs (Windows, Solaris, and
Linux) supported by the Device Manager agent, see the Hitachi Device
Manager Agent Installation Guide.
We recommend that you set the central management method of the Device
Manager agent installed on the performance information-acquiring host.
For details on how to set the central management method, see the Hitachi
Device Manager Agent Installation Guide.
•
Storage subsystem
This is a storage subsystem whose performance information is to be
acquired. For details on the microcode versions that can use the
performance information acquisition feature, see the section in Chapter 1
of the Hitachi Device Manager and Provisioning Manager Server Installation
and Configuration Guide, “Required Products for the Storage Subsystem.”
The performance-acquiring host (the Device Manager agent) acquires
performance information of Universal Storage Platform V/VM and Hitachi
USP by using the command device within a storage subsystem, and then
reports it to the Device Manager server.
In Thunder 9500V or Thunder 9200, the Device Manager server acquires
performance information of Hitachi SMS and Hitachi AMS/WMS directly
from a storage subsystem.
The system configuration that is required to acquire performance information
of a storage subsystem differs depending on the storage subsystem model. For
information on Universal Storage Platform V/VM or Hitachi USP, see Acquiring
Performance Data of Universal Storage Platform V/VM or TagmaStore USP. For
information on Hitachi SMS, Hitachi AMS/WMS, Thunder 9500, or Thunder
9200, see Acquiring Performance Data of the Series: Hitachi SMS, Hitachi
AMS/WMS, Thunder 9500 or Thunder 9200.
Acquiring Performance Data of Universal Storage Platform V/VM or
TagmaStore USP
This section describes the settings required to acquire performance
information of Universal Storage Platform V/VM or Hitachi USP.
Preparations in storage subsystems
Prepare a command device for each storage subsystem from which you want
to acquire performance information, and then assign the path to the host that
acquires performance information so that the host can recognize the command
device.
1-20
Overview and Setup of CIM/WBEM
Hitachi Device Manager SMI-S Provider Installation and User Guide
Preparations in the host that acquires performance information
Configure the settings shown below for the performance information-acquiring
host:
To configure the settings:
1. Install the Device Manager agent.
To acquire performance information, a CCI/LIB is necessary. If you install
the Device Manager agent on a host, a necessary CCI/LIB is installed.
However, if a CCI/LIB is already installed on the host, it is not overwritten.
In this case, verify that the CCI/LIB version is 01-12-03/03 or later.
2. Specify settings for central management. (recommended)
3. Write the command device settings in the perf_cmddev.properties file.
To write the settings in the perf_cmddev.properties file, execute the
perf_findcmddev command or edit the file directly. For details, see Settings
in the perf_cmddev.properties file. For details about the perf_findcmddev
command, see Format of the perf_findcmddev command.
Overview and Setup of CIM/WBEM
Hitachi Device Manager SMI-S Provider Installation and User Guide
1-21
Preparations in the Device Manager server
For the Device Manager server property, specify the name of the host from
which performance information is acquired. To specify the host name for the
server.cim.agent property in the server.properties file, use one of the
following methods:
•
When specifying the host name during the installation of the Device
Manager server:
Enter the host name as indicated in the message displayed during the
installation of the Device manager server. That name will be set for the
server.cim.agent property in the server.properties file.
•
When directly editing the server.properties file:
For the server.cim.agent property in the server.properties file of the
Device Manager server, specify the name of the host where the Device
Manager agent is installed. After specifying the host name, restart the
Device Manager server. For details on the server.cim.agent property, see
server.cim.agent.
Note: Verify that the host name specified for the server.cim.agent
property matches the host name registered in Device Manager for the
host that acquires performance information. If these host names are
different, you cannot acquire performance information.
Settings in the perf_cmddev.properties file
Edit the perf_cmddev.properties file to define the command device of the
target storage subsystem. The perf_cmddev.properties file is stored in the
following location:
•
Windows:
installation-folder-for-the-Device-Manageragent\mod\hdvm\config\perf_cmddev.properties
•
Solaris or Linux:
/opt/HDVM/HBaseAgent/mod/hdvm/config/perf_cmddev.properties
Use the following format to define the command device in the
perf_cmddev.properties file. Define one command device per line.
Raid-ID.serial-number.LDEV-number: deviceFileName
The following table describes values to be specified in the
perf_cmddev.properties file.
1-22
Overview and Setup of CIM/WBEM
Hitachi Device Manager SMI-S Provider Installation and User Guide
Table 1-5
Values to Specify in the perf_cmddev.properties File
Setting Item
Raid ID
Value
Specify one of the following depending on the type of the target storage
subsystem:
R600 for Universal Storage Platform V
R601 for Universal Storage Platform VM
R500 for Hitachi USP
R501 for Hitachi NSC55
Serial number
Specify the serial number of the storage subsystem by using decimal numbers.
LDEV number
Specify the CU:LDEV number of the command device by using decimal numbers.
deviceFileName
Specify the command device identifier (the PhysicalDrive number, VolumeGUID, or
device file name) that the host recognizes in the following format (see Note):
In Windows:
\\.\PhysicalDriveX
\\.\Volume{GUID}
In Solaris:
/dev/rdsk/cXtXdXs2
In Linux:
/dev/sdX
X is an integer.
Note: When this item is specified using the PhysicalDrive number in
Windows or Linux, if you restart the OS, the PhysicalDrive number and
device file name might be changed. If this occurs, you need to execute
the perf_findcmddev command to check and update the settings. In
Windows, if you specify this item using the VolumeGUID, the setting is
not affected even if you restart the OS.
Format of the perf_findcmddev command
The perf_findcmddev command lets you set the command device in the
perf_cmddev.properties file. Following is the command format:
•
Windows:
installation-folder-for-the-Device-Manageragent\bin\perf_findcmddev { view | verify | write [-file file-name] }
•
Solaris or Linux:
installation-directory-for-the-Device-Manageragent/bin/perf_findcmddev { view | verify | write [-file file-name] }
To execute this command, you must have Administrator permissions (for
Windows) or root permissions (for Solaris or Linux).
Overview and Setup of CIM/WBEM
Hitachi Device Manager SMI-S Provider Installation and User Guide
1-23
The parameters for the perf_findcmddev command are described below. If you
specify no parameter, multiple parameters, or upper-case parameters, the
method for specifying the command is displayed.
view
This parameter displays the settings for the command devices currently
defined in the perf_cmddev.properties file. If an unrecognizable value is
defined in the perf_cmddev.properties file, that value is displayed as
UNKNOWN. On lines where the definition does not follow the proper
format, all information is displayed as UNKNOWN. Comment lines and
blank lines are not displayed. In addition, if no value is specified in the
perf_cmddev.properties file, only the header is displayed. Following is an
example of output from the command.
Raid ID
R500
R601
R501
Serial#
14050
44332
UNKNOWN
LDEV#
345
456
1045
Device file name
\\.\PhysicalDrive3
\\.\Volume{xxxxxxx-xxxx-xxx-xxxxxxxx}
\\.\PhysicalDrive10
verify
This parameter compares the settings for the command devices defined in
the file perf_cmddev.properties to the settings for the command devices
recognized by the host. If the host recognizes multiple command devices,
the execution result is output for each, regardless of whether the checked
settings are valid.
–
If the information of the command device defined in the
perf_cmddev.properties file matches the information of the command
device recognized by the host, the following message is displayed:
The definition of the command device is valid.
–
If the host does not recognize the command device defined in the
perf_cmddev.properties file:
The error message KAIC28615-W and information of the command
device that is not recognized by the host are displayed.
–
If the command device recognized by the host is not defined in the
settings file:
The error message KAIC28616-W and information of the command
device that is not defined in the settings file are displayed.
write
This parameter outputs the settings of all command devices recognized by
the host to the perf_cmddev.properties file. If no command device
recognized by the host is detected, nothing is output to the
perf_cmddev.properties file. You can use the -file option to specify the
desired file name. To specify the file name, you can use an absolute or
relative path. If the specified file already exists, a message asking if you
want to overwrite that file appears.
If you do not specify the -file option, the perf_cmddev.properties file will
automatically be overwritten.
1-24
Overview and Setup of CIM/WBEM
Hitachi Device Manager SMI-S Provider Installation and User Guide
Acquiring Performance Data for Hitachi SMS, Hitachi AMS/WMS,
Thunder 9500 or Thunder 9200
This section describes the settings required to acquire performance
information of the Hitachi SMS, Hitachi AMS/WMS, Thunder 9500, or Thunder
9200 storage subsystems.
Preparations in storage subsystems
Before you use the feature for acquiring performance information, you need to
use the Physical View of Device Manager Web Client, Storage Navigator
Modular, or Storage Navigator Modular 2 to specify settings for acquiring
performance statistics for each relevant storage subsystem. For details, see
the manuals for each storage subsystem.
Setting up a User to Acquire Performance Information
When performance information is acquired from a storage subsystem, that
storage subsystem might be locked depending on whether the Password
Protection function or the Account Authentication function is enabled for it. In
this case, you might be unable to acquire performance information from any
storage subsystem that Device Manager, Storage Navigator Modular, or
Storage Navigator Modular 2 is accessing.
•
If the Password Protection function is enabled: The storage
subsystem is always locked when you acquire performance information
from it.
•
If both the Password Protection function and the Account
Authentication function are disabled: The storage subsystem is not
locked when you acquire performance information from it.
•
If the Password Protection function is disabled and the Account
Authentication function is enabled: You can acquire performance
information without locking the storage subsystem by creating a user
account dedicated to acquiring performance information.
To set up this account on storage subsystems and the Device Manager server:
a. Register a user account that has only the View permission for each
storage subsystem from which performance information is to be
acquired.
To acquire performance information from multiple storage subsystems,
the user account registered for each of those storage subsystems must
have the same user ID and password.
b. Execute the hdvmmodpolluser command to register this user in Device
Manager.
For details about the hdvmmodpolluser command, see hdvmmodpolluser
Command Format.
Overview and Setup of CIM/WBEM
Hitachi Device Manager SMI-S Provider Installation and User Guide
1-25
hdvmmodpolluser Command Format
The hdvmmodpolluser command is stored in the following location:
•
Windows:
installation-folder-for-the-Device-Managerserver\HiCommandServer\tools\hdvmmodpolluser.bat
•
Solaris or Linux:
installation-folder-for-the-Device-Managerserver/HiCommandServer/tools/hdvmmodpolluser.sh
The following shows the format of the hdvmmodpolluser command:
•
Windows:
hdvmmodpolluser -u Device-Manager-user-id -p Device-Managerpassword user-id-for-reference password-for-reference
The following shows an example of executing the command:
hdvmmodpolluser -u hdvmuser -p hdvmpass hdvmperf perfpass
•
Solaris:
hdvmmodpolluser.sh -u Device-Manager-user-id -p Device-Managerpassword user-id-for-reference password-for-reference
The following shows an example of executing the command:
hdvmmodpolluser.sh -u hdvmuser -p hdvmpass hdvmperf perfpass
A user you specify for the -u option of the hdvmmodpolluser command must
have the Admin permission of Device Manager.
You can register only one user account in Device Manager. If you execute the
hdvmmodpolluser command with another user account specified, the previously
registered information will be overwritten.
To delete user information registered in Device Manager, execute the
command with the -d option specified.
1-26
Overview and Setup of CIM/WBEM
Hitachi Device Manager SMI-S Provider Installation and User Guide
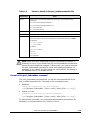
User Permissions for Using CIM/WBEM Features
The following table shows the user permissions for using CIM/WBEM features,
based on the Device Manager permissions and executable CIM methods.
Table 1-6
Resource
Group
All Resources
User-defined
resource
groups
User Permissions for Using CIM/WBEM Features
Device Manager Permissions
Admin
Modify
View
Executable CIM Methods
Peer
(see Note)
Service Methods
CIM Operations
Yes
Yes
Yes
--
Permitted
Permitted
--
Yes
Yes
--
Permitted
Permitted
--
--
Yes
--
Not permitted
Permitted
--
--
--
Yes
Not permitted
Permitted
Yes
Yes
Yes
--
Not permitted
Not permitted
--
Yes
Yes
--
Not permitted
Not permitted
--
--
Yes
--
Not permitted
Not permitted
--
--
--
Yes
Not permitted
Permitted
Legend:
Yes: Has corresponding Device Manager permissions
—: Does not have corresponding Device Manager permissions
Permitted: Execution of corresponding CIM methods is permitted
Not permitted: Execution of corresponding CIM methods is not permitted
Note: For Peer Device Manager permissions, users are treated as All
Resources users, even when they belong to a user-defined resource
group, due to Device Manager server processing.
Overview and Setup of CIM/WBEM
Hitachi Device Manager SMI-S Provider Installation and User Guide
1-27
Security Settings for CIM/WBEM Functionality
CIM/WBEM functionality supports SSL communication for the following
functions:
•
Object operations
In the object operation feature, a CIM client acts as an SSL client and the
Device Manager server acts as an SSL server.
By default, you can perform SSL communication in object operations. If
you want to modify a keystore file used for SSL, see Authenticating File
Operations.
•
Event indication
In the event indication feature, the Device Manager server acts as an SSL
client and a CIM client (Indication Listener) acts as an SSL server.
By default, the Device Manager server can use SSL communication to
receive event indications by following the CIM client requests. In this case,
settings must be specified beforehand to enable SSL communication
between the CIM clients.
Additionally, you can strengthen security by applying two-way authentication
for object operations and event indication. Two-way authentication enables
communications between pre-specified trusted users. In this way, users can
accept object operations from specific CIM clients only, and send event
indications to specific CIM clients only. For details on the setting procedures,
see Specifying Two-Way Authentication for Event Indications.
Caution: You must enable CIM/WBEM functionality to perform SSL
communication.
Note: Use Java™ commands to set up SSL, as described in
Authenticating File Operations.
1-28
Overview and Setup of CIM/WBEM
Hitachi Device Manager SMI-S Provider Installation and User Guide
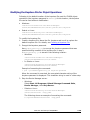
Modifying the Keystore File for Object Operations
Following is the default location of the keystore file used for CIMOM object
operations (the keystore password is wbemssl). At this location, the keystore
file can be used without modification:
•
Windows:
installation-folder-for-the-Device-Managerserver\HiCommandServer\wsi\server\jserver\bin\.keystore
•
Solaris or Linux:
installation-directory-for-the-Device-Managerserver/HiCommandServer/wsi/server/jserver/bin/.keystore
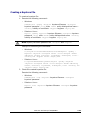
To modify the keystore file:
1. Create a keystore file. Name the file .keystore and use it to replace the
default keystore file. For details, see Creating a Keystore File.
2. Encrypt the keystore password.
Use WSIEncryptString.jar to encrypt the keystore password that was
specified during creation of the keystore file in step 1.
WSIEncryptString.jar is stored in the following location:
–
Windows:
installation-folder-for-the-Device-Managerserver\HiCommandServer\wsi\no-redist
–
In Solaris or Linux:
installation-directory-for-the-Device-Managerserver/HiCommandServer/wsi/no-redist/
Example of executing the command:
> java -jar WSIEncryptString.jar keystore-password
When the command is executed, the encrypted character string of the
keystore password is displayed. This character string is used in a later step.
3. Stop the Device Manager server.
–
Windows:
Select Start, All Programs, Hitachi Storage Command Suite,
Device Manager, then Stop Server.
–
Solaris or Linux:
installation-directory-for-the-Device-Managerserver/suitesrvcntl -stop_hdvm
The following shows an example of executing the command:
# /opt/HiCommand/suitesrvcntl -stop_hdvm
Overview and Setup of CIM/WBEM
Hitachi Device Manager SMI-S Provider Installation and User Guide
1-29
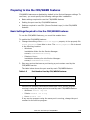
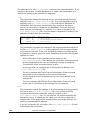
4. Modify the MOF file
(WBEMSolutions_CIMXMLSObjectManagerAdapter_instances.mof).
Specify in the MOF file the keystore password that was encrypted in step 2
of this procedure. The MOF file is stored in the following location:
–
Windows:
installation-folder-for-the-Device-Managerserver\HiCommandServer\wsi\server\jserver\mof\wbemserver
–
Solaris or Linux:
installation-directory-for-the-Device-Managerserver/HiCommandServer/wsi/server/jserver/mof/wbemserver
instance of WBEMSolutions_CIMXMLSCOMATLSSettingData as $xmlscomasetting {
InstanceID
=
"WBEMSolutions:WBEMSolutions_CIMXMLSCOMATLSSettingData:001";
ElementName
= "WBEM Solutions CIM-XML Client Adapter TLS Settings";
MutualAuthenticationRequired = false;
KeyStoreFile
= "{0}/jserver/bin/.keystore";
KeyStorePassword = "xxxxxxx";
TrustStoreFile
= "{0}/jserver/bin/.truststore";
};
Figure 1-3
MOF File Example
The xxxxxxx part of KeyStorePassword contains the character string that
encrypted the keystore password used by the default keystore file. For
xxxxxxx, specify the keystore password that you encrypted in step 2.
5. Compile the MOF file.
Use the mofcomp command to compile the MOF file. The mofcomp
command is stored in the following location:
–
Windows:
installation-folder-for-the-Device-Managerserver\HiCommandServer\wsi\bin\mofcomp.bat
–
Solaris or Linux:
installation-directory-for-the-Device-Managerserver/HiCommandServer/wsi/bin/mofcomp
Example of executing the command:
> mofcomp -s http://localhost/interop -SI -o
..\server\jserver\logr
..\server\jserver\mof\wbemserver\WBEMSolutions_CIMXMLSObjectManage
rAdapter_instances.mof
6. Start the Device Manager server.
1-30
–
In Windows, execute the following command: installation-folder-for-theDevice-Manager-server\suitesrvcntl /start_hdvm.
–
In Solaris or Linux, execute the following command:
installation-directory-for-the-Device-Managerserver/suitesrvcntl -start_hdvm
Overview and Setup of CIM/WBEM
Hitachi Device Manager SMI-S Provider Installation and User Guide
Specifying Two-Way Authentication for the Object Operation
You can use HiKeytool to set up two-way authentication for object operations.
First Setup Procedure Performed in a CIM Client
Create a keystore file for the CIM and export the client authentication file.
For details on creating a keystore file and exporting an authentication file, see
Creating a Keystore File and Exporting an Authentication File from a Keystore
File.
Setup Procedure Performed in the Device Manager Server
The following describes the procedure for setting up two-way authentication,
importing the client authentication file, and exporting the server authentication
file.
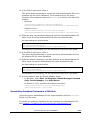
1. Open a command prompt or terminal window, navigate to installationdirectory-for-the-Device-Manager-server/HiCommandServer, and run
HiKeytool.
–
For Windows, type HiKeytool.bat, and then press the Enter key.
–
For Solaris or Linux, type HiKeytool.sh and press the Enter key.
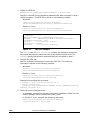
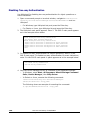
2. The HiKeytool main panel appears. Enter 2.
The SMI-S main panel appears as in the example shown below.
1) Set Security Level for Object Operations
(Current setting:SSL without two-way authentication)
2) Set Security Level for Event Indications
(Current setting:SSL without two-way authentication)
3) Import Client's Certificate to TrustStore for Object Operations
4) Import Client's Certificate to TrustStore for Event Indications
5) Export Server's Certificate from KeyStore for Object Operations
6) Export Server's Certificate from KeyStore for Event Indications
7) Exit
>
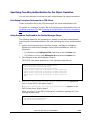
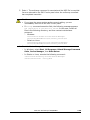
3. If (Current setting:SSL without two-way authentication) appears at
item 1 in the SMI-S main panel, type 1.
If (Current setting:SSL with two-way authentication) appears in the
SMI-S main panel, skip to step 6.
When you type 1 in the SMI-S main panel, a submenu appears as in the
example shown below.
You must stop the Device Manager Server before specifying this setting.
1) SSL without two-way authentication
2) SSL with two-way authentication
>
Overview and Setup of CIM/WBEM
Hitachi Device Manager SMI-S Provider Installation and User Guide
1-31
4. Stop the Device Manager server as indicated in the displayed message.
–
Windows:
Select Start, All Programs, Hitachi Storage Command Suite,
Device Manager, then Stop Server.
–
Solaris or Linux:
Execute the following command:
installation-directory-for-the-Device-Managerserver/suitesrvcntl -stop_hdvm
The following shows an example of executing the command:
# /opt/HiCommand/suitesrvcntl -stop_hdvm
5. Type 2 in the submenu.
The mofcomp command is executed and the MOF file is compiled.
You are returned to the SMI-S main panel when the mofcomp command has
completed execution.
Cautions:
•
If you type the same number as the current setting, you are
immediately returned to the SMI-S main panel.
•
If mofcomp command execution fails, the following message appears:
The compilation of the MOF file failed. In this case, collect all files in
the following directory, and then contact maintenance personnel.
–
Windows:
installation-folder-for-the-Device-Managerserver\HiCommandServer\wsi\server\jserver\mof\wbemserver
–
Solaris or Linux:
installation-directory-for-the-Device-Managerserver/HiCommandServer/wsi/server/jserver/mof/wbemserver
6. In the SMI-S main panel, enter 3.
This option starts processing to import the client authentication file to the
truststore file for object operations.
Note: The truststore file for object operations (the truststore password is
trustssl) is stored in the following location:
1-32
•
Windows:
installation-folder-for-the-Device-Managerserver\HiCommandServer\wsi\server\jserver\bin\.truststore
•
Solaris or Linux:
installation-directory-for-the-Device-Managerserver/HiCommandServer/wsi/server/jserver/bin/.truststore
Overview and Setup of CIM/WBEM
Hitachi Device Manager SMI-S Provider Installation and User Guide
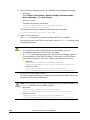
7. Enter the alias, the truststore password, and the client authentication file
name.
Enter the client authentication file name by absolute path. An input
example is shown below.
Enter alias:foocorpclient
Enter truststore-password:trustssl
Enter authentication-filename(absolute path):c:\tmp\client.cer
At completion of processing, you are returned to the SMI-S main panel.
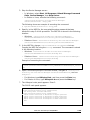
8. In the SMI-S main panel, enter 5.
This option starts processing to export the server authentication file from
the keystore file for object operations.
9. Enter the keystore password, the alias, and the server authentication file
name.
Enter the server authentication file name by absolute path. An input
example is shown below.
Enter keystore-password:serverssl
Enter alias:foocorpserver
Enter authentication-filename(absolute path):c:\tmp\server.cer
At completion of processing, you are returned to the SMI-S main panel.
10. If it has stopped, start the Device Manager server.
–
Select Start, All Programs, Hitachi Storage Command Suite,
Device Manager, then Start Server.
–
In Solaris or Linux, execute the following command:
installation-directory-for-the-Device-Managerserver/suitesrvcntl -start_hdvm
Second Setup Procedure Performed in a CIM Client
Import the server authentication file for object operation into the truststore
file for the CIM client. For details, see Creating a Truststore File and Importing
an Authentication File.
Overview and Setup of CIM/WBEM
Hitachi Device Manager SMI-S Provider Installation and User Guide
1-33
Specifying Two-Way Authentication for Event Indications
This section describes how to set up two-way authentication for event
indications.
First Setup Procedure Performed in a CIM Client
Create a keystore file for the CIM and export the client authentication file.
For details, see Creating a Keystore File and Exporting an Authentication File
from a Keystore File.
Setup Procedure Performed in the Device Manager Server
The following describes the procedure for creating a keystore file and setting
up two-way authentication for event indications, importing the client
authentication file, and exporting the server authentication file.
1. Create a new keystore file for the event indication.
The following shows the default location of the keystore file used for event
indication (the keystore password is indssl).
–
Windows: installation-folder-for-the-Device-Managerserver\HiCommandServer\wsi\server\jserver\bin\.ind.keystore
–
Solaris or Linux: installation-directory-for-the-Device-Managerserver/HiCommandServer/wsi/server/jserver/bin/.ind.keystore
The default keystore file can be used without any modification. To use the
default keystore file, skip to step 6.
To create a new keystore file, name the file .ind.keystore and use it to
replace the default keystore file. For details, see Creating a Keystore File.
2. Encrypt the keystore password. Use WSIEncryptString.jar to encrypt the
keystore password that was specified during creation of the keystore file at
step 1. WSIEncryptString.jar is stored in the following location:
–
Windows:
installation-folder-for-the-Device-Managerserver\HiCommandServer\wsi\no-redist
–
Solaris or Linux:
installation-directory-for-the-Device-Managerserver/HiCommandServer/wsi/no-redist/
Example command execution: > java -jar WSIEncryptString.jar
keystore-password
When the command is executed, the encrypted character string of the
keystore password is displayed. This character string is used in a later step.
1-34
Overview and Setup of CIM/WBEM
Hitachi Device Manager SMI-S Provider Installation and User Guide
3. Stop the Device Manager server:
–
In Windows, select Start, All Programs, Hitachi Storage Command
Suite, Device Manager, then Stop Server.
–
In Solaris or Linux, execute the following command:
installation-directory-for-the-Device-Managerserver/suitesrvcntl -stop_hdvm
The following shows an example of executing the command:
# /opt/HiCommand/suitesrvcntl -stop_hdvm
4. Specify, in the MOF file, the encrypted keystore password that was
obtained in step 2 of this procedure. The MOF file is stored in the following
location:
–
Windows: installation-folder-for-the-Device-Managerserver\HiCommandServer\wsi\server\jserver\mof\wbemserver
–
Solaris or Linux: installation-directory-for-the-Device-Managerserver/HiCommandServer/wsi/server/jserver/mof/wbemserver
5. In the MOF file, change IndicationAuthenticationEnabled to true.
Compile the MOF file using the mofcomp command. The command is stored
in the following location:
–
Windows: installation-folder-for-the-Device-Managerserver\HiCommandServer\wsi\bin\mofcomp.bat
–
Solaris or Linux: installation-directory-for-the-Device-Managerserver/HiCommandServer/wsi/bin/mofcomp
Example of executing the command:
> mofcomp -s http://localhost/interop -SI -o ..\server\jserver\logr
..\server\jserver\mof\wbemserver\WBEMSolutions_CIMXMLIndicationHandlerAdapter_instances
.mof
6. Open a command prompt or terminal window, navigate to installationdirectory-for-the-Device-Manager-server/HiCommandServer, and run
HiKeytool.
–
For Windows, type HiKeytool.bat, and then press the Enter key.
–
For Solaris or Linux, type HiKeytool.sh and press the Enter key.
7. The HiKeytool main panel appears. Enter 2.
The SMI-S main panel appears.
1) Set Security Level for Object Operations
(Current setting:SSL without two-way authentication)
2) Set Security Level for Event Indications
(Current setting:SSL without two-way authentication)
3) Import Client's Certificate to TrustStore for Object Operations
4) Import Client's Certificate to TrustStore for Event Indications
5) Export Server's Certificate from KeyStore for Object Operations
6) Export Server's Certificate from KeyStore for Event Indications
7) Exit
>
Overview and Setup of CIM/WBEM
Hitachi Device Manager SMI-S Provider Installation and User Guide
1-35
8. If (Current setting: SSL without two-way authentication) appears at
item 2 in the SMI-S main panel, type 2.
If (Current setting:SSL with two-way authentication) appears in the
SMI-S main panel, skip to step 11.
When you type 2 in the SMI-S main panel, a submenu appears as in the
example shown below.
You must stop the Device Manager Server before specifying this setting.
1) SSL without two-way authentication
2) SSL with two-way authentication
>
9. Stop the Device Manager server, if running, as indicated in the displayed
message.
–
In Windows, select Start, All Programs, Hitachi Storage Command
Suite, Device Manager, then Stop Server.
–
In Solaris or Linux, execute the following command:
installation-directory-for-the-Device-Managerserver/suitesrvcntl -stop_hdvm
10. Type 2 in the submenu.
The mofcomp command is executed and the MOF file is compiled. You are
returned to the SMI-S main panel when the mofcomp command has
completed execution.
Cautions:
1-36
•
If you type the same number as the current setting, you are
immediately returned to the SMI-S main panel.
•
If mofcomp command execution fails, the following message appears:
The compilation of the MOF file failed. In this case, collect all
files in the following directory, and then contact maintenance
personnel.
–
Windows:
installation-folder-for-the-Device-Managerserver\HiCommandServer\wsi\server\jserver\mof
–
Solaris or Linux:
installation-directory-for-the-Device-Managerserver/HiCommandServer/wsi/server/jserver/mof
Overview and Setup of CIM/WBEM
Hitachi Device Manager SMI-S Provider Installation and User Guide
11. In the SMI-S main panel, enter 4.
This option starts processing to import the client authentication file to the
truststore file for event indications. The truststore file for the event
indication (the truststore password is indtrust) is stored in the following
location:
–
Windows:
installation-folder-for-the-Device-Managerserver\HiCommandServer\wsi\server\jserver\bin\.ind.truststore
–
Solaris or Linux:
installation-directory-for-the-Device-Managerserver/HiCommandServer/wsi/server/jserver/bin/.ind.truststore
12. Enter the alias, the truststore password, and the client authentication file
name. Enter the client authentication file name by absolute path.
An input example is shown below.
Enter alias:foocorpindclient
Enter truststore-password:indtrust
Enter authentication-filename(absolute path):c:\tmp\clientind.cer
At completion of processing, you are returned to the SMI-S main panel.
13. In the SMI-S main panel, enter 6.
This option starts processing to export the server authentication file from
the keystore file for event indications.
14. Enter the keystore password, the alias, and the server authentication file
name. Enter the server authentication file name by absolute path.
An input example is shown below.
Enter keystore-password:serverindtrust
Enter alias:foocorpindserver
Enter authentication-filename(absolute path):c:\tmp\serverind.cer
At completion of processing, you are returned to the SMI-S main panel.
15. If it has stopped, start the Device Manager server.
–
In Windows, select Start, All Programs, Hitachi Storage Command
Suite, Device Manager, then Start Server.
–
In Solaris or Linux, execute the following command:
installation-directory-for-the-Device-Managerserver/suitesrvcntl -start_hdvm
Second Setup Procedure Performed in a CIM Client
Import the server authentication file for object operation into the truststore
file for the CIM client.
For details on creating a truststore file and importing the authentication file,
see Creating a Truststore File and Importing an Authentication File.
Overview and Setup of CIM/WBEM
Hitachi Device Manager SMI-S Provider Installation and User Guide
1-37
Disabling Two-way Authentication
Use HiKeytool for disabling two-way authentication for object operations or
event indications.
1. Open a command prompt or terminal window, navigate to installationdirectory-for-the-Device-Manager-server/HiCommandServer and run
HiKeytool.
–
For Windows, type HiKeytool.bat, and press the Enter key.
–
For Solaris or Linux, type HiKeytool.sh and press the Enter key.
2. The HiKeytool main panel appears. Enter 2. The SMI-S main panel appears
as in the example shown below.
1) Set Security Level for Object Operations
(Current setting:SSL with two-way authentication)
2) Set Security Level for Event Indications
(Current setting:SSL with two-way authentication)
3) Import Client's Certificate to TrustStore for Object Operations
4) Import Client's Certificate to TrustStore for Event Indications
5) Export Server's Certificate from KeyStore for Object Operations
6) Export Server's Certificate from KeyStore for Event Indications
7) Exit
>
3. To disable two-way authentication for object operations, enter 1 in the
SMI-S main panel. To disable two-way authentication for event indications,
enter 2 in the SMI-S main panel. A panel appears as in the example below.
You must stop the Device Manager Server before specifying this setting.
1) SSL without two-way authentication
2) SSL with two-way authentication
>
4. Stop the Device Manager server as indicated in the displayed message.
–
In Windows, select Start, All Programs, Hitachi Storage Command
Suite, Device Manager, then Stop Server.
–
In Solaris or Linux, execute the following command:
installation-directory-for-the-Device-Managerserver/suitesrvcntl -stop_hdvm
The following shows an example of executing the command:
# /opt/HiCommand/suitesrvcntl -stop_hdvm
1-38
Overview and Setup of CIM/WBEM
Hitachi Device Manager SMI-S Provider Installation and User Guide
5. Enter 1. The mofcomp command is executed and the MOF file is compiled.
You are returned to the SMI-S main panel when the mofcomp command
has completed execution.
Cautions:
•
If you type the same number as the current setting, you are
immediately returned to the SMI-S main panel.
•
If mofcomp command execution fails, the following message appears:
The compilation of the MOF file failed. In this case, collect all
files in the following directory, and then contact maintenance
personnel.
–
Windows:
installation-folder-for-the-Device-Managerserver\HiCommandServer\wsi\server\jserver\mof
–
Solaris or Linux:
installation-directory-for-the-Device-Managerserver/HiCommandServer/wsi/server/jserver/mof
6. Start the Device Manager Server.
–
In Windows, select Start, All Programs, Hitachi Storage Command
Suite, Device Manager, then Start Server.
–
In Solaris or Linux, execute the following command:
installation-directory-for-the-Device-Managerserver/suitesrvcntl -start_hdvm
Overview and Setup of CIM/WBEM
Hitachi Device Manager SMI-S Provider Installation and User Guide
1-39
Authenticating File Operations
This section describes the following operations required for SSL-encrypted
communication between the Device Manager server and the CIM client using
the CIM/WBEM functions:
•
Creating a keystore file
•
Exporting authentication files from a keystore file
•
Creating a truststore file and importing authentication files
These operations use the Java (JDK1.4.0) tool hcmdskeytool (for Windows) or
keytool (for Solaris and Linux). The hcmdskeytool and keytool utilities are
installed in the following locations when Device Manager is installed:
•
Installation folder for hcmdskeytool:
installation-folder-for-Common-Component\bin\hcmdskeytool.exe
•
Installation directory for keytool:
installation-directory-for-Common-Component/jdk/bin/keytool
Use the hcmdskeytool or keytool utility to specify the file name, alias, and
password for the keystore file or the truststore file. Note the following when
specifying these items:
•
Do not use the following symbols in the file name:
: , ; * ? " < > |
•
Specify the file name as a character string of no more than 255 bytes.
•
Do not include double quotation marks (") in the alias or password.
Note: This section assumes that a path to the hcmdskeytool or keytool
utility has been added to the environment variable PATH.
1-40
Overview and Setup of CIM/WBEM
Hitachi Device Manager SMI-S Provider Installation and User Guide
Creating a Keystore File
To create a keystore file:
1. Execute the following command:
–
Windows:
hcmdskeytool -genkey -keystore keystore-filename -storepass
keystore-password -alias alias -dname entity-distinguished-name validity validity-of-certificate -keypass keypass -keyalg RSA
–
Solaris or Linux:
keytool -genkey -keystore keystore-filename -storepass keystorepassword -alias alias -dname entity-distinguished-name -validity
validity-of-certificate -keypass keypass -keyalg RSA
Note: Specify the same password for -storepass and -keypass.
Example of executing the command:
–
Windows:
C:\Program Files\HiCommand\Base\bin\hcmdskeytool -genkey keystore .keystore -storepass sanssl -alias san3gssl -dname
"CN=san3g, OU=SSL, O=hitachi, L=yokohama, S=kanagawa, C=JP" validity 720 -keypass sanssl -keyalg RSA
–
Solaris or Linux:
# /opt/HiCommand/Base/jdk/bin/keytool -genkey -keystore
.keystore -storepass sanssl -alias san3gssl -dname "CN=san3g,
OU=SSL, O=hitachi, L=yokohama, S=kanagawa, C=JP" -validity 720
-keypass sanssl -keyalg RSA
2. Check the created keystore file.
Execute the following command:
–
Windows:
hcmdskeytool -list -keystore keystore-filename -storepass
keystore-password
–
Solaris or Linux:
keytool -list -keystore keystore-filename -storepass keystorepassword
Overview and Setup of CIM/WBEM
Hitachi Device Manager SMI-S Provider Installation and User Guide
1-41
Exporting an Authentication File from a Keystore File
To export an authentication file from a keystore file:
1. Execute the following command:
–
Windows:
hcmdskeytool -export -keystore keystore-filename -storepass
keystore-password -alias alias -file authentication-file-name
–
Solaris or Linux:
keytool -export -keystore keystore-filename -storepass keystorepassword -alias alias -file authentication-file-name
2. Check the exported authentication file using the following command:
–
Windows:
hcmdskeytool -printcert -v -file authentication-file-name
–
Solaris or Linux:
keytool -printcert -v -file authentication-file-name
Creating a Truststore File and Importing an Authentication File
To create a truststore file and import the authentication file:
1. Execute the following command:
–
Windows:
hcmdskeytool -import -alias alias -keystore truststore-filename storepass truststore-password -trustcacerts -file authenticationfilename
–
Solaris or Linux:
keytool -import -alias alias -keystore truststore-filename storepass truststore-password -trustcacerts -file authenticationfilename
2. Check the created truststore file:
–
Windows:
hcmdskeytool -list -keystore truststore-filename -storepass
truststore-password
–
Solaris or Linux:
keytool -list -keystore truststore-filename -storepass truststorepassword
1-42
Overview and Setup of CIM/WBEM
Hitachi Device Manager SMI-S Provider Installation and User Guide
Overview and Setup of CIM/WBEM
Hitachi Device Manager SMI-S Provider Installation and User Guide
1-43
2
Troubleshooting
This chapter provides contact information for the Hitachi Data Systems
Support Center.
Calling the Hitachi Data Systems Support Center
Troubleshooting
Hitachi Device Manager SMI-S Provider Installation and User Guide
2-1
Calling the Hitachi Data Systems Support Center
If you need to call the Hitachi Data Systems Support Center, make sure to
provide as much information about the problem as possible, including:
•
The circumstances surrounding the error or failure,
•
The exact content of any error messages displayed.
The Hitachi Data Systems customer support staff is available 24 hours a day,
seven days a week. If you need technical support, please call:
•
United States:
(800) 446-0744
•
Outside the United States:
(858) 547-4526
2-2
Troubleshooting
Hitachi Device Manager SMI-S Provider Installation and User Guide
Acronyms and Abbreviations
CIM
CIMOM
Common Information Model
Common Information Model Object Manager
DMTF
Distributed Management Task Force
Hitachi USP
A generic term for:
Hitachi Universal Storage Platform
Hitachi Network Storage Controller
HTTP
HyperText Transfer Protocol
LDEV
logical device
MOF
Managed Object Format
SLP
SMI-S
SNIA-CTP
Service Location Protocol
Storage Management Initiative - Specification (SNIA)
Storage Network Industry Association-Conformance Testing Program
WBEM
Web-Based Enterprise Management
XML
Extensible Markup Language
Acronyms and Abbreviations
Hitachi Device Manager SMI-S Provider Installation and User Guide
Acronyms-1
Acronyms-2
Acronyms and Abbreviations
Hitachi Device Manager SMI-S Provider Installation and User Guide
Hitachi Device Manager SMI-S Provider Installation and User Guide
Hitachi Data Systems
Corporate Headquarters
750 Central Expressway
Santa Clara, California 95050-2627
U.S.A.
Phone: 1 408 970 1000
www.hds.com
[email protected]
Asia Pacific and Americas
750 Central Expressway
Santa Clara, California 95050-2627
U.S.A.
Phone: 1 408 970 1000
[email protected]
Europe Headquarters
Sefton Park
Stoke Poges
Buckinghamshire SL2 4HD
United Kingdom
Phone: + 44 (0)1753 618000
[email protected]
MK-96HC138-06