1
Heavy-Duty Gas Grill
Parrilla de Gas de Alta Resistencia
OWNER’S MANUAL / MANUAL DEL PROPIETARIO
ASSEMBLY AND OPERATING INSTRUCTIONS
INSTRUCCIONES DE ARMADO Y OPERACIÓN
SAVE THIS MANUAL FOR FUTURE REFERENCE
GUARDE ESTE MANUAL PARA REFERENCIA FUTURA
NOTICE TO INSTALLER:
LEAVE THESE INSTRUCTIONS
WITH THE GRILL OWNER FOR
FUTURE REFERENCE.
AVISO PARA EL
INSTALADOR:
ENTREGUE ESTAS
INSTRUCCIONES AL
PROPIETARIO DE LA PARRILLA
PARA REFERENCIA FUTURA.
WARNING/ADVERTENCIA
HAZARDOUS EXPLOSION MAY RESULT IF THESE WARNINGS AND INSTRUCTIONS
ARE IGNORED. READ AND FOLLOW ALL WARNINGS AND INSTRUCTIONS IN THIS
MANUAL TO AVOID PERSONAL INJURY, INCLUDING DEATH OR PROPERTY DAMAGE.
SE PUEDE PRODUCIR UNA EXPLOSIÓN PELIGROSA SI SE HACE CASO OMISO A
ESTAS ADVERTENCIAS E INSTRUCCIONES. LEA Y SIGA TODAS LAS ADVERTENCIAS
E INSTRUCCIONES EN ESTE MANUAL PARA EVITAR LESIONES PERSONALES,
INCLUSO LA MUERTE, O LOS DAÑOS MATERIALES.
IMPORTANT SAFETY
WARNINGS
WE WANT YOU TO ASSEMBLE AND USE YOUR GRILL AS SAFELY AS POSSIBLE.
THE PURPOSE OF THIS SAFETY ALERT SYMBOL
IS TO ATTRACT YOUR
ATTENTION TO POSSIBLE HAZARDS AS YOU ASSEMBLE AND USE YOUR GRILL.
WHEN YOU SEE THE SAFETY ALERT SYMBOL
PAY CLOSE ATTENTION TO THE INFORMATION WHICH FOLLOWS!
READ ALL SAFETY WARNINGS AND INSTRUCTIONS CAREFULLY
BEFORE ASSEMBLING AND OPERATING YOUR GRILL.
DANGER
IF YOU SMELL GAS:
1. Shut off gas to the appliance.
2. Extinguish any open flame.
3. Open Lid.
4. If odor continues, keep away from the appliance and immediately call your gas supplier or your
fire department.
WARNING
1. DO NOT store or use gasoline or other flammable liquids or vapors in the vicinity of this or any
other appliance.
2. An LP cylinder not connected for use shall not be stored in the vicinity of this or any other
appliance.
DANGER
1
•
DO NOT store a spare LP gas cylinder under or near this appliance.
•
Never fill the cylinder beyond 80% full.
•
A fire causing death or serious injury may occur if the above is not followed exactly.
TABLE OF CONTENTS
General Warnings . . . . . . . . . . . . . . . . . . . . . . . . . . . . . . . . . . . . . . . . . . . . . . 3
Installation and LP Cylinder Specifications and Safe Use. . . . . . . . . . . . . . 4–6
Connecting LP Cylinder and Hose / Regulator to Grill . . . . . . . . . . . . . . . . 6–7
Leak Testing. . . . . . . . . . . . . . . . . . . . . . . . . . . . . . . . . . . . . . . . . . . . . . . . . 8–9
Pre-start Check List . . . . . . . . . . . . . . . . . . . . . . . . . . . . . . . . . . . . . . . . . . . . . 9
Lighting Instructions . . . . . . . . . . . . . . . . . . . . . . . . . . . . . . . . . . . . . . . . . 10–11
Operating Grill and Helpful Hints . . . . . . . . . . . . . . . . . . . . . . . . . . . . . . . 12–14
Proper Care and Maintenance . . . . . . . . . . . . . . . . . . . . . . . . . . . . . . . . 14–16
Transporting and Storage . . . . . . . . . . . . . . . . . . . . . . . . . . . . . . . . . . . . . . . 16
Trouble Shooting . . . . . . . . . . . . . . . . . . . . . . . . . . . . . . . . . . . . . . . . . . . . . . 17
Frequently Asked Questions . . . . . . . . . . . . . . . . . . . . . . . . . . . . . . . . . . 18–19
Parts List and Assembly Instructions. . . . . . . . . . . . . . . . . . . . . . . . . . . . 20–28
Light Canopy Wiring Diagram . . . . . . . . . . . . . . . . . . . . . . . . . . . . . . . . . . . . 29
Cart Assembly Wiring Diagram . . . . . . . . . . . . . . . . . . . . . . . . . . . . . . . . . . . 30
Warranty Information. . . . . . . . . . . . . . . . . . . . . . . . . . . . . . . . . . . . Back Cover
DANGER: Indicates an imminently hazardous situation which, if not avoided, will result in death or serious injury.
WARNING: Be alert to the possibility of serious bodily injury if the instructions are not followed. Be sure to read and
carefully follow all of the messages.
CAUTION: Indicates a potentially hazardous situation which, if not avoided, may result in minor or moderate injury.
FOR GRILL WARRANTY REPLACEMENT PARTS, PLEASE VISIT US AT:
www.grillpartsonline.com
2
GENERAL WARNINGS
WARNING
•
Never use natural gas in a unit designed for liquid propane gas.
•
Never use charcoal or wood briquets in a gas grill. Flavoring chips must be contained in a metal smoking box
to contain ash and prevent fires.
•
Leak test all connections before first use, even if grill was purchased fully assembled and after each tank
refill.
•
Never check for leaks using a match or open flame.
CAUTION: Strong odors, colds, sinus congestion, etc. may prevent the detection of propane. Use caution
and common sense when testing for leaks.
•
Always keep your gas grill free and clear of gasoline, lighter fluid, paint thinner, or other flammable vapors
and liquids or combustible materials.
•
Always check the grill prior to each use as indicated in the "Pre-Start Check List" section of this manual.
•
DO NOT obstruct the flow of combustion or ventilation air.
•
Never place more than 15 pounds on the side burner. DO NOT lean on the side burner shelf.
•
Keep children and pets away from hot grill. DO NOT allow children to use or play near this grill.
•
DO NOT leave the grill unattended while in use.
•
DO NOT allow the gas hose to come in contact with hot surfaces.
•
DO NOT allow grease from drain hole to fall on hose or valve regulator assembly.
•
Keep any electrical supply cords away from water or heated surfaces.
•
Keep a fire extinguisher on hand acceptable for use with gas products. Refer to your local authority to
determine proper size and type.
•
For household use only. DO NOT use this grill for anything other than its intended purpose.
•
DO NOT use while under the influence of drugs or alcohol.
•
Grill is hot when in use. To avoid burns:
•
•
•
•
DO NOT attempt to move the grill.
Wear protective gloves or oven mitts.
DO NOT touch any hot grill surfaces.
DO NOT wear loose clothing or allow hair to come in contact with grill.
1. To protect against electric shock, do not immerse cord or plugs in water or other liquid.
2. Unplug from the outlet when not in use and before cleaning. Allow to cool before putting on or taking off parts.
3. Do not operate any outdoor cooking gas appliance with a damaged cord, plug, or after the appliance
malfunctions or has been damaged in any manner. Contact the manufacturer for repair.
4. Do not let the cord hang over the edge of a table or touch hot surfaces.
5. Do not use an outdoor cooking gas appliance for purposes other than intended.
6. When connecting, first connect plugs from grill accessories to the back of the grill, then plug grill power cord
into a 120V source outlet.
7. Use only a Ground Fault Interrupter (GFCI) protected circuit with this outdoor cooking gas appliance.
8. Never remove the grounding plug or use with an adapter of 2 prongs.
9. Use only extension cords with a 3 prong grounding plug, rated for the power of the equipment and approved
for outdoor use with a W-A marking.
USE CAUTION AND COMMON SENSE WHEN OPERATING YOUR GAS GRILL.
FAILURE TO ADHERE TO THE SAFETY WARNINGS AND GUIDELINES IN THIS MANUAL
COULD RESULT IN SEVERE BODILY INJURY OR PROPERTY DAMAGE.
SAVE THIS MANUAL FOR FUTURE REFERENCE.
3
WARNING
•
FOR OUTDOOR USE ONLY. DO NOT operate indoors or in an enclosed area such as a garage,
shed or breezeway.
•
Use your grill OUTDOORS in a well ventilated space away from dwellings or other buildings to
prevent dangers associated with gas accumulation and toxic vapors. We recommend your grill
be situated at least 10 feet (3.1 m) from buildings. Not adhering to these clearances will prevent
proper ventilation and may increase the risk of a fire and/or property damage, which could also
result in personal injury.
•
Maintain a minimum clearance of 36 inches (91 cm) between all sides of grill, deck railings,
walls or other combustible material. DO NOT use grill under overhead unprotected combustible
construction.
•
DO NOT use or install this grill in or on a recreational vehicle and/or boat.
•
Never operate this appliance with sliding top covers in closed position.
INSTALLATION INFORMATION:
The installation of this appliance must be in accordance with:
All applicable local codes, or in the absence of local codes, either:
• National Fuel Gas Code ANSI Z223.1 NFPA 54
• Natural Gas and Propane Installation Code: CAN/CGA B149.1
• Natural Gas Installation Code: CAN/CGA B149.1 (Canada)
• Propane Installation Code: CAN/CGA B149.2 (Canada)
To check your local codes, see your local LP gas dealer or natural gas company. This grill was not
intended to be connected to a natural gas supply line. If an external electrical source is utilized, it
must be electrically grounded in accordance with local codes, or in the absence of local codes, with
the National Electrical Code, ANSI/NFPA 70, or the Canadian Electrical Code, CSA 22.1 and a
minimum 15 amp supply is needed.
WARNING
LP GAS CYLINDER (NOT SUPPLIED WITH THIS GRILL)
The LP cylinder is available for purchase at the same location the grill was purchased.
The LP (Liquid Propane) gas cylinder specifically designed to be used with this grill must have
a 20 lb. (9.1 kg) capacity incorporating a Type 1 cylinder valve and an over-filling protection
device (OPD).
•
This grill is designed to fit Worthington, Manchester or SMPC brand 20 lb. (9.1 kg) cylinders.
Other brand DOT cylinders may fit this grill if the cylinder has similar dimensions of the top and
bottom rings.
•
DO NOT connect this grill to an existing #510 POL cylinder valve with Left Hand threads. The
Type 1 valve can be identified with the large external threads on the valve outlet.
•
DO NOT connect to a propane cylinder exceeding this capacity.
•
DO NOT connect to a cylinder that uses any other type of valve connection device.
4
CYLINDER SPECIFICATIONS:
When purchasing or exchanging a cylinder for your gas grill, it must be constructed and marked in
accordance with the specifications for LP gas cylinders of the U.S. Department of Transportation
(DOT) or the National Standard of Canada, CAN/CSA-B339 Cylinders, Spheres and Tubes for
Transportation of Dangerous Goods; and Commission, as applicable; and provided with a listed
over-filling prevention device (OPD), and provided with a cylinder connection device compatible with
the connection for outdoor cooking appliances.
The cylinder must also be equipped with:
•
A shut-off valve terminating in a Type 1 gas cylinder valve outlet.
•
A Type 1 valve that prevents gas flow until a positive seal is obtained.
•
An arrangement for vapor withdrawal.
•
A collar to protect the cylinder shut-off valve.
•
A safety relief device having direct communication with the vapor space of the cylinder.
•
A listed over-filling prevention device (OPD).
WARNING
•
Turn off the cylinder valve when your grill is not in use.
•
Handle the tank with care.
•
Always secure the cylinder in an upright position.
•
Never connect an unregulated LP gas cylinder to your grill.
•
DO NOT expose LP gas cylinders to excessive heat or ignition sources.
•
DO NOT store a spare LP gas cylinder under or near your grill.
•
Allow only qualified LP gas dealers to fill or repair your LP gas cylinder.
•
DO NOT allow the cylinder to be filled beyond 80% capacity.
•
Read and follow all warnings and instructions that are on the cylinder and that accompany this
product.
DANGER
•
Never store a spare LP gas cylinder under or near your grill. This could cause excess pressure
to be expelled through the vapor relief valve resulting in fire, explosion, or severe personal
injury including death.
Note: PROPANE GAS IS HEAVIER THAN AIR AND WILL COLLECT IN LOW AREAS.
PROPER VENTILATION IS EXTREMELY IMPORTANT.
5
•
Keep the ventilation opening(s) of the LP gas cylinder enclosure free and clear from
obstructions and debris.
•
DO NOT insert any foreign objects into the valve outlet. Damage to the back-check could
result. A damaged back-check can cause a leak, possibly resulting in explosion, fire, severe
bodily harm, or death.
WARNING
FILLING THE LP GAS CYLINDER:
•
Allow only qualified LP gas dealers to properly fill or repair your LP gas cylinder.
•
New tanks should be purged prior to filling; inform LP gas dealer if you are using a new tank.
•
DO NOT allow the cylinder to be filled beyond 80% capacity. Over-filled tanks can create a
dangerous condition. Over-filled tanks can build-up pressure and cause the relief valve to expel
propane gas vapors. The vapor is combustible and if it comes in contact with a spark source or
flame an explosion causing severe burns, bodily harm, or death could occur.
•
Always use a protective cylinder cap when grill is not connected to cylinder.
•
If you exchange a cylinder with a qualified exchange program, be sure the cylinder has
a Type 1 valve and an over-filling prevention device (OPD).
INSTALLING THE LP GAS CYLINDER ONTO THE GRILL:
1. Check that the cylinder valve is closed by turning the knob
clockwise.
2. Place the cylinder into the tank holder in the bottom
of cabinet.
3. Orient the cylinder as shown so that the hose is not kinked
or damaged.
4. Fully tighten the tank retention screw underneath tank
holder to secure tank.
5. Attach or detach regulator to the LP gas cylinder only
when cylinder is at rest in tank holder.
Tank Holder
HOSE AND REGULATOR:
Your grill is equipped with a Type 1 connection device with
the following features:
1. The system will not allow gas flow from the cylinder until
a positive connection to the valve has been made.
Note:
The cylinder valve must be turned off before any
connection is made or removed.
Tank Retention Screw
2. A thermal device that will shut off the gas flow if the device is
subject to temperatures above 240°F to 300°F (115°C to
150°C). If this should happen, remove the entire regulator
assembly and dispose of properly. A replacement regulator
assembly can be purchased by contacting customer service
at 800-527-0717. The cause of the excessive heat should be
determined and corrected before using your grill again.
3. A regulator flow limiting device, when activated, restricts the
flow of gas to 10 cubic feet per hour. If the flow limiting
device is activated, perform Regulator Resetting Procedure.
REGULATOR RESETTING PROCEDURE:
1. Turn burner control knobs to "OFF", turn off the cylinder valve and disconnect regulator from LP gas
tank. Wait approximately two minutes.
2. Reattach regulator and slowly turn cylinder valve back on. The flow limiting device will now be reset.
6
WARNING
•
Never use your grill without leak testing all gas connections and hoses. See the section on
"Leak Testing" in this manual for proper procedures.
WARNING
The pressure regulator and hose assembly supplied with your gas grill must be used.
•
DO NOT attempt to connect grill, as purchased for LP (propane) gas, to any other fuel supply
source such as a natural gas line. A conversion kit (Model 812-8000-S) must be purchased and
installed for use with natural gas.
•
DO NOT use any other pressure regulator/hose assembly other than the one supplied with your grill.
Replacement pressure regulator/hose assembly must be part No 155-8750-0, which can be obtained
by contacting customer service at 800-527-0717.
•
DO NOT attempt to adjust or repair the regulator. The regulator is designed to operate at a
maximum output pressure of 11 inches of water column (2.74 kPa).
During assembly and/or replacement of the gas cylinder, keep the gas supply hose free of kinks and/or
damage.
Visually inspect the hose assembly prior to each use for evidence of damage, excess wear, or
deterioration. If found, replace the assembly before using your grill. Only the manufacturer's supplied
replacement should be used.
WARNING
CONNECTING HOSE AND REGULATOR TO AN LP GAS CYLINDER
•
Ensure the tank valve is CLOSED prior to connecting the LP gas cylinder to your grill. Turn the
valve knob clockwise to properly close the valve. Read and follow all instructions and warnings
on the supply hose safety tags. Read and follow all warnings in this manual concerning the safe
use of LP gas cylinders and the hose and regulator before connecting cylinder to grill. Read
and follow all warnings on the LP cylinder.
CONNECTING HOSE AND REGULATOR:
1. Check that the cylinder valve is closed by turning the knob clockwise.
2. Check that the grill’s burner control knobs are in the "OFF" positions.
3. Remove the protective plastic cap from the cylinder valve and the connection device.
4. Hold regulator and insert the nipple of connection device into the LP cylinder valve outlet. Ensure that
the device is centered properly.
5. Turn the large coupling nut clockwise by hand and tighten to a full stop. Take care not to cross thread
the coupling nut onto the cylinder valve. Do not over-tighten the knob onto the valve. Do not use tools to
tighten connection.
Note:
If you are unable to make the connection, repeat Steps 4 and 5.
6. Check that the hose does not contain kinks, does not contact sharp edges, and does not contact
surfaces that may become hot during use.
7. Leak check all fittings before lighting your grill. See section on "Leak Testing" in this manual.
7
DANGER
LEAK TESTING:
To prevent fire or explosion hazard:
•
DO NOT smoke or permit ignition sources in the area while conducting a leak test.
•
Perform test OUTDOORS only in a well ventilated area.
•
Never perform a leak test with a match or open flame.
•
Never perform a leak test while the grill is in use or while grill is still hot.
WARNING
WHEN TO PERFORM A LEAK TEST:
•
After assembling your grill and before lighting for the first time, even if purchased fully assembled.
•
Every time the LP gas cylinder is refilled or if any of the gas components are replaced.
•
Any time your grill has been moved.
•
At least once per year or if your grill has not been used for more than 60 days.
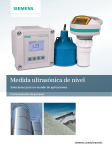
CHECKING FOR LEAKS:
1.
2.
3.
4.
Create a mixture of 50% water and 50% liquid dishwashing soap.
Open the lid.
Ensure all control knobs are set to the "OFF" position.
Turn on the fuel supply at the cylinder valve. Turn the
cylinder valve knob one turn counter-clockwise.
5. Apply the soap water mixture to the following:
A
Supply tank (cylinder) weld.
B
Connection nut to tank valve.
C
Back side of connection nut to brass
nipple.
D
Brass nipple connection into regulator.
E
Regulator connections to gas supply
hoses.
F
Hose connection to gas manifold.
G
The full length of gas supply hose.
H
Tank valve to cylinder.
Watch For Bubbles
F
G
E
H
D
C
B
A
8
6. Check each place listed (A–H) for growing bubbles which indicates a leak.
7. Turn off gas supply at cylinder valve.
8. Turn on control knobs to release gas pressure in hose.
9. Turn control knobs to "OFF" position.
10. Tighten any leaking connections.
11. Repeat soapy water test until no leaks are detected.
12. Turn off gas supply at cylinder valve until you are ready to use your grill.
13. Wash off soapy residue with cold water and towel dry.
14. Wait 5 minutes to allow all gas to evacuate the area before lighting grill.
CAUTION:
Note:
DO NOT use the grill if leaks cannot be stopped. Contact a qualified gas appliance
repair service.
The leak test must be performed in an area that has adequate lighting in order to see if
bubbles are developing.
WARNING
PRE-START CHECK LIST:
Property damage, bodily harm, severe burns, and death could result from failure to follow these
safety steps. These steps should be performed after the grill has been assembled and prior to each
use. DO NOT operate this grill until you have read and understand ALL of the warnings and
instructions in this manual.
PRE-START CHECK LIST:
9
•
Ensure that the grill is properly assembled.
•
Inspect the gas supply hose for burns, chaffing, kinks, and proper routing before each use. If it is
evident there is excessive abrasion or wear, or the hose is cut, it must be replaced prior the grill being
used. Replace with hose and regulator, Model No. 155-8750-0, which can be obtained by contacting
customer service at 800-527-0717.
•
Leak check all gas connections and hose. See section on "Leak Testing".
•
Ensure that all electrical supply cords are properly grounded. Keep any electrical supply cord and the
fuel supply hose away from any heated surfaces. Hose should be at least 3 inches from hot surfaces.
•
Position your grill on level ground in a well ventilated location, a safe distance from combustible
materials, buildings and overhangs.
•
Properly place the empty grease tray under the grease drain hole in the bottom of the grill to catch
grease during use.
•
DO NOT obstruct the flow of combustion and ventilation air.
WARNING
Read, understand and follow all warnings and instructions contained in this manual. DO NOT skip
any of the warnings and instructions contained in the preceding sections of this manual.
WARNING
LIGHTING INSTRUCTIONS:
Follow the instructions exactly.
1. OPEN THE GRILL LID before attempting to light a burner so that fumes do not accumulate inside
the grill. An explosion could occur if grill lid is closed.
2. Check that all burner control knobs and the cylinder valve are turned to the "OFF" position.
3. Turn on the fuel supply by rotating the cylinder valve knob counter-clockwise to full open.
4. DO NOT stand with head, body, or arms over the grill when lighting.
LIGHTING THE MAIN BURNERS, SIDE BURNERS & SEAR BURNER:
1. Open lid before lighting burner.
2. Make sure all control knobs are in the "OFF" position.
3. Select the burner to be lit. Push and turn the control knob of that
burner to the "HIGH" position.
4. Press the electronic igniter and hold for 3 – 5 seconds to light burner.
5. If ignition does NOT occur in 5 seconds, turn control knob to "OFF",
wait 5 minutes to allow gas to dissipate and repeat lighting procedure.
6. Repeat steps 3 – 5 for lighting each burner. Always use electronic
igniter for lighting each burner. If burner does not ignite using the
push-button igniter, wait 5 minutes, see "Match Lighting the Main Burners" section.
7. To turn off, turn each control knob clockwise until it locks in the "OFF" position. This does not turn off
the gas flow from the cylinder.
Note:
If burner does not light or flame is too low, you may have spider or other insect blockage in
burner, or the flow limiting device has been activated. See "Burner Assembly/Maintenance"
under Proper Care and Maintenance, or "Regulator Resetting Procedure" under Connecting LP
Cylinder and Hose/Regulator to Grill.
MATCH LIGHTING THE MAIN BURNERS:
1. Open lid before lighting.
Matchlighter
Cooking Grill
2. Turn the burner control knobs to "OFF".
3. Place a paper match in the end of the matchlighter. Strike and
carefully place a match approximately 1/2" (1 to 2 cm) from the
main burner element to be lit.
4. Turn on the main burner control knob to the "HIGH" position. The
burner should light within 5 seconds.
5. If the burner does not light, turn the control knob to "OFF" and wait
5 minutes for gas to dissipate and repeat lighting procedure.
Heat Distribution
Plate Lighting Hole
6. If the burner does not light within the first few attempts of match
lighting, there is a problem with the gas supply. Turn off the gas
at the burner and cylinder. DO NOT attempt to operate the grill until the problem is found and
corrected. See "Trouble Shooting" section of this manual.
10
MATCH LIGHTING THE SEAR BURNER:
Match
1. Open the lid of your grill before lighting.
2. Make sure the control knob is in the "OFF" position.
3. Place a paper match in the end of the matchlighter. Strike and
carefully place a match approximately 1/2" (1 to 2 cm) from the
lower left corner of the sear burner element.
4. Turn the sear burner control knob to the "HIGH" position. The
burner should light within 5 seconds.
5. If the burner does not light, turn the control knob to "OFF" and
wait 5 minutes for gas to dissipate and repeat lighting procedure.
6. If the burner does not light within the first few attempts of match
lighting, there is a problem with the gas supply. Turn off the gas at the burner and cylinder. DO NOT
attempt to operate the sear burner until the problem is found and corrected. See "Trouble Shooting"
section of this manual.
MATCH LIGHTING THE SIDE BURNER:
1. Open the lid to the side burner before lighting.
2. Make sure control knob is in the "OFF" position.
3. Strike and carefully place a match approximately
1/2" (1 to 2 cm) from the burner.
4. Turn the side burner control knob to the "HIGH" position. The
burner should light within 5 seconds.
5. If the burner does not light, turn the control knob to "OFF" and
wait 5 minutes for gas to dissipate and repeat lighting procedure.
6. If the burner does not light within the first few attempts of match
lighting, there is a problem with the gas supply. Turn off the gas at the burner and cylinder. DO NOT
attempt to operate the grill until the problem is found and corrected. See "Trouble Shooting" section of
this manual.
Note:
Observe flame height when lit: Flame
should be a Blue/Yellow color between
1"–2" when burner is on "HIGH".
TURNING OFF THE GRILL:
1. Turn off the cylinder valve.
2. Turn all burner control knobs to the "OFF" position.
Note:
Turn off LP cylinder first to prevent gas from being left in the system under pressure.
CAUTION:
•
The cylinder valve should always be in the off,
or closed, position when the grill is not in use.
To turn off the cylinder valve,
turn knob clockwise until it stops.
11
WARNING
OPERATING THE GRILL:
Never use Charcoal or Lighter Fluid inside your Gas Grill. Read and follow all warnings and
instructions contained in the preceding sections of this manual.
BREAKING IN YOUR GRILL:
•
In manufacturing and preserving the components of your grill, oil residue may be present on the
burner and cooking surfaces of your grill.
•
Before cooking on your grill for the first time you should preheat it for 15 minutes on "HIGH" to burn
off these residual oils.
PREHEATING THE GRILL:
•
Prior to use, it is recommended that you preheat your grill. This ensures that the grilling surfaces are
at the desired temperatures to sear the food sugars when cooking. After lighting your grill, set the
main burner control knobs to the "HIGH" position for 10 to 15 minutes.
CONTROLLING FLARE-UPS:
•
Flare-ups are a part of cooking meats on a gas grill. This adds to the unique flavor of cooking on a
gas grill. Excessive flare-ups can over-cook your food and cause a dangerous situation for you and
your grill. Excessive flare-ups result from the build-up of grease in the bottom of your grill. If this
should occur, DO NOT pour water onto the flames. This can cause the grease to splatter and could
result in serious burns or bodily harm. If grease fire occurs turn off the main burners until the grease
burns out.
WARNING
•
DO NOT leave your grill unattended while in use.
•
DO NOT move grill when in use.
•
DO NOT use water to extinguish flare-ups.
•
Have fire extinguisher readily accessible suitable for use with gas appliances.
TO MINIMIZE FLARE-UPS:
•
•
•
Trim excess fat from meats prior to cooking.
Cook meats with high fat contents (chicken or pork) on Low settings or indirectly.
Ensure that your grill is on level ground and the grease is allowed to evacuate the grill through the
drain hole in the bottom and into grease cup.
12
USING OTHER FEATURES OF THE GRILL:
Indicator Light
THE WARMING DRAWER:
1. To turn the warming drawer ON, turn control knob of
warming drawer to desired temperature.
2. To turn the warming drawer OFF, turn control knob of
warming drawer to the OFF position.
Note: Warming drawer is equipped with an air vent.
Slide the air vent lever to the left to fully close
and to the right to open.
THE CANOPY LIGHTS:
Warming Drawer
•
The canopy lights provide outdoor lighting when operating grill at night.
•
The lights can be operated from the push button light switch located on the front control panel.
Note: When replacing bulb, unscrew lens and pull old
bulb straight out of the bulb holder. Make certain
that “legs” on new bulb are straight. Insert “legs”
into the two holes in the bulb holder. Gently push
bulb straight in until fully seated and centered.
Replace lens back on light. When replacing bulbs,
never exceed 100 watt bulbs.
THE SIDE BURNER:
•
The side burner can be used to prepare side dishes such as beans, potatoes, corn, or to warm
sauces.
•
The burner valve can be adjusted from high to low depending upon your cooking demands.
WARNING
13
•
Read instructions on lighting your grill to light the side burner.
•
Never close the side burner cover when the burner is lit.
•
Use a 10" diameter pot or smaller that does NOT have an extended handle when cooking on the
side burner. Center pot over burner.
•
Never place more than 15 pounds on the side burner. The side burner is not constructed to hold
weight exceeding 15 pounds.
•
Use caution to avoid bumping grill, side burner or pot to prevent pot from spilling contents
possibly leading to severe burns.
•
DO NOT use side burner to deep fry food in oil to avoid dangers associated with oil igniting
creating a very dangerous situation.
GRILL COOKING TIPS
CLEANLINESS
•
Always wash hands thoroughly with soap and hot water prior to handling food and after handling raw
meat, uncooked poultry or seafood.
•
When using a platter to carry raw meat, uncooked poultry or seafood to the grill, make sure to wash the
platter thoroughly with soap and hot water before placing cooked foods back on the platter or use
different platters for raw and cooked foods.
•
Never use the same utensils when handling raw meat, uncooked poultry or seafood unless you wash the
utensils thoroughly with soap and hot water.
•
Never re-use marinade from raw meat or uncooked poultry on foods that have been cooked and are
ready to be served.
GRILLING TO PROPER TEMPERATURE
•
Use a meat thermometer to be sure food has reached a safe internal temperature.
•
The US Department of Agriculture recommends the minimum temperature be reached for the
following food items:
Chops . . . . . . . . . . . . . . . . . . . . .145 degrees F (62.8° C)
Ground Meat . . . . . . . . . . . . . . .160 degrees F (71° C)
Pork . . . . . . . . . . . . . . . . . . . . . . .160 degrees F (71° C)
Poultry . . . . . . . . . . . . . . . . . . . . .180 degrees F (82° C)
Roasts . . . . . . . . . . . . . . . . . . . . .145 degrees F (62.8° C)
Seafood . . . . . . . . . . . . . . . . . . . .140 degrees F (60° C)
Vegetables . . . . . . . . . . . . . . . . .145 degrees F (62.8° C)
HELPFUL HINTS
•
If you pre-cook meat or poultry, do so immediately before grilling.
•
Never defrost meat at room temperature or on a countertop.
•
Refrigerate leftovers within 2 hours of taking food off the grill.
•
For additional information, please phone the USDA’s toll free Meat & Poultry Hotline at 800-535-4555.
PROPER CARE & MAINTENANCE
•
To protect your grill from excessive rust, the unit must be kept clean and covered at all times when not
in use.
•
Wash cooking grills and heat distribution plates with hot, soapy water, rinse well and dry. Lightly coat
cooking grill with vegetable oil or vegetable oil spray.
•
Clean inside and outside of grill by wiping off with a damp cloth. Apply a light coat of vegetable oil or
vegetable oil spray to the interior surface to prevent rusting.
•
The stainless steel exterior surface of your grill, can be cleaned with stainless steel cleaner.
•
Never apply paint to the interior surface. Rust spots on the interior surface can be buffed, cleaned, then
lightly coated with vegetable oil or vegetable oil spray to minimize rusting.
14
CLEANING AND MAINTENANCE:
•
Keep the appliance free and clear of combustible materials, gasoline and other flammable vapors
and liquids.
•
•
Keep the ventilation openings of the cylinder enclosure free and clear of debris.
Visually check burner flames for proper operation (see pictorial in "Burner Assembly/Maintenance" under
Proper Care and Maintenance). Spiders or other insects can nest in the burner causing gas blockage.
•
For safe grilling and peak performance of your grill, perform these checks at least twice per year or
after extended periods of storage.
•
Be sure to tighten up all hardware (nuts, bolts, screws, etc.) at least twice per year.
CAUTION! Some parts may contain sharp edges. Wear protective gloves if necessary.
•
There is an access hatch on the left side of the grill body for inspecting and repairing of the side burners.
•
There is an access hatch on the back panel of the grill body for inspecting and repairing of the electric
element of the warming drawer.
•
Remove the cooking grills, heat distribution plates and burners from inside your grill. Use a brush with
hot water and detergent to remove excess residue. NEVER use a commercial oven cleaner. Rinse
completely with water. Towel dry and replace all components as described in the assembly instructions.
BURNER ASSEMBLY/MAINTENANCE
•
Although your burners are constructed of stainless steel, they may corrode as a result of the extreme
heat and acids from cooking foods. Regularly inspect the burners for cracks, abnormal holes, and other
signs of corrosion damage. If found, replace the burner.
•
DO NOT obstruct the flow of combustion and ventilation air. Burner tubes can become blocked by
spiders and other insects building their nests. Blocked burner tubes can prevent gas flow to the
burners and could result in a burner tube fire or fire beneath the grill. To clean the Burner Assembly
follow these instructions to clean and/or replace parts of burner assembly or if you have trouble igniting
the grill.
1. Turn gas off at control knobs and LP cylinder tank valve.
2. Remove cooking grills, and heat distribution plates.
3. Carefully lift each burner up and away from valve
openings.
4. Use a narrow bottle brush or a stiff wire bent into a
small hook to run through each burner tube and flame
port several times.
Debris
NOTE: Wear eye protection when performing
procedure 5.
5. Use compressed air to blow into burner tube and out the flame ports.
Check each port to make sure air comes out each hole.
6. Wire brush entire outer surface of burner to remove food residue and dirt.
7. Check burner for damage, if any large cracks or holes are
found replace burner.
IMPORTANT: Burner opening must slide over valve nozzle.
8. Carefully replace burners.
9. Replace each burner and follow the "Gas Leak Testing"
section of this manual. Relight burners to verify proper
operation.
10. Replace heat distribution plates and cooking grills.
15
Valve
Nozzles
Burner Orifice
PROPER BURNER OPERATION
COOKING GRILLS
•
Clean with mild soap detergent and water. A brass bristled brush or a nylon cleaning pad can be used
to remove residue from the stainless steel surfaces. Do not use steel wire bristles to clean the cooking
grills. Steel can cause the finish to chip or crack. DO NOT use a commercial oven cleaner.
HEAT DISTRIBUTION PLATES
•
Periodically, it may be necessary to inspect and clean the heat distribution plate to prevent excess
grease build-up. When the grill is cold, remove the cooking grills. Inspect the heat distribution plates
and replace if broken or damaged. Do not allow heat distribution plates to become damaged to the
extent that they may fall through onto the burners. Replace the heat distribution plates and cooking
grills and light the burners. Operate the grill on "HIGH" for 10 minutes to remove the excess grease.
WARNING
TRANSPORTING AND STORAGE:
•
Never move a grill when it is hot or when objects are on the cooking surfaces.
•
Make sure that cylinder valve is shut off. After moving the grill check that all gas connections
are free of leaks. Refer to instructions for Leak Testing.
•
DO NOT store a spare LP gas cylinder (filled or empty) under or near the grill.
•
Never store flammable liquids or spray canisters under or near the grill.
•
DO NOT extinguish grease fires using water.
•
If the outdoor cooking gas appliance is not in use, the gas must be turned off at the supply
cylinder.
•
Storage of an outdoor cooking gas appliance indoors is permissible only if the cylinder is
disconnected and removed from the outdoor cooking gas appliance.
•
Cylinders must be stored outdoors out of reach of children and must not be stored in a
building, garage or any other enclosed area.
•
When removing the grill from storage, spider webs or other debris may be blocking the burner.
See "Burner Assembly/Maintenance" under Proper Care and Maintenance.
BEFORE STORING YOUR GRILL:
•
Ensure that the cylinder valve is fully closed.
•
Clean all surfaces.
•
Lightly coat the burners with cooking oil to prevent excess rusting.
•
If storing the grill indoors, disconnect the LP tank and leave the LP tank OUTDOORS.
•
Place a protective cap cover on the LP tank and store the tank outdoors in a well ventilated area out
of direct sunlight.
•
Clean burner prior to use after storing, at the beginning of grilling season or after a period of one
month not being used. Spiders and insects like to build nests in burner tubes (especially during colder
months). These nests can cause fires in burner tubes or under grill.
•
If storing the grill outdoors, cover the grill with a grill cover for protection from the weather.
16
TROUBLE SHOOTING
Problem:
Burner will not light
1. Check LP cylinder fuel level.
2. Bad electrode spark.
Check to see if the grill will match light.
Electrode or collector may need adjustment.
3. Burner may not be properly seated.
4. Burner may be obstructed.
5. The cylinder valve may be closed.
6. Regulator is not properly seated on cylinder valve.
•
Fire at control knob
1. Burner holes may be obstructed. See section on
"Burner Assembly/Maintenance" under Proper Care
and Maintenance.
2. Burner is improperly seated on control valve.
3. Gas connections may be loose.
Leak Check and tighten all connections.
•
Yellow Flames at burner
1. Burner is obstructed. See section on
"Burner Assembly/Maintenance" under Proper Care
and Maintenance.
Flame blows out on "LOW"
1. Burner holes may be obstructed. See section on
"Burner Assembly/Maintenance" under Proper Care
and Maintenance.
2. Grill is not sufficiently preheated.
3. Burner is improperly seated on control valve.
Burner does not get hot enough
1. Flow control device has been activated in regulator.
See Regulator Resetting Procedure under
Connecting LP Cylinder and Hose/Regulator to Grill.
Grill is Too Hot
1. Excess grease build-up causing grease fires.
2. Damaged or faulty regulator.
Replace with factory authorized parts.
3. Cook on a lower temperature setting.
•
•
•
•
17
Possible Causes:
FREQUENTLY ASKED QUESTIONS
Your grill's serial number and model number, and the contact information for Brinkmann Customer Service, are
listed on a silver label found beneath the control panel, on the back of the grill or on the side of the grill body,
under the side shelf.
These questions and answers are for your general knowledge, and may not be applicable to your model grill.
Question: Why does my grill not light properly?
Answer: Always follow lighting instructions as listed on the control panel or in this manual. Also check these
causes:
•
Check LP gas supply.
•
Check to ensure all gas connections are secure.
•
The igniter AA battery may need replacing.
•
Ignition wires may be loose. Remove the battery, inspect the igniter junction box found behind the control
panel and connect any loose wires.
•
Spark electrode tips may need repositioning. With the gas supply closed and control knob set to the "OFF"
position, press the igniter button and have another person watch for the presence of a spark at the
electrode tips. The gap between the spark electrode tip and spark receiver should be about 3/16". If the
electrode tip needs to be adjusted, bend it to the appropriate gap distance.
•
Check that the end of each burner venturi tube is properly located over its gas valve orifice fitting.
•
There may be an obstruction in the gas line. To correct this, remove LP gas hose / regulator or natural gas
fuel line from your grill. Open gas supply for one second to test for obstruction. If no obstruction is present,
reconnect fuel line. If the fuel line is blocked, replace with a new hose / regulator assembly.
•
If an obstruction is suspected in the hose / regulator assembly, orifice or gas valves call Brinkmann
Customer Service at 800-527-0717.
Question: Why does my LP gas grill have a low flame or a flame with orange / yellow color?
Answer: You need to purge air from the gas line or reset the regulator's flow limiting device. Opening the
cylinder valve all the way or too quickly triggers the regulator’s flow limiting device to shut down the gas flow,
which prevents excessive gas flow to your grill. Note: This procedure should be done every time a new LP gas
tank is connected to your grill:
RESETTING THE REGULATOR FLOW LIMITING DEVICE
•
Turn control knob to the "OFF" position.
•
Turn off the LP gas tank at the cylinder valve.
•
Disconnect regulator from LP gas tank.
•
Let tank stand for two minutes.
•
Reconnect regulator to the LP gas tank.
•
Open grill lid or side burner lid. Turn the cylinder valve on slowly until 1/4 or 1/2 open.
•
Light the grill by following the instructions on your control panel or in this owner's manual.
Question: How and when do I clean the interior cooking components of my grill?
Answer: Use a fiber or brass cleaning brush to clean the interior of the grill, cooking grills, heat distribution
plates and grease containers. Never use a wire brush or metal scraper on porcelain-finished parts, as they can
scratch or chip the porcelain finish and promote rusting.
18
FREQUENTLY ASKED QUESTIONS
Cleaning Stainless Steel Cooking Grills: Wash grills with a mild detergent and rinse with hot water before
initial use and as needed. DO NOT use a commercial oven cleaner. For stubborn food residue, use a
degreaser and fiber or brass cleaning brush.
Cleaning Porcelain-Finished Cast-Iron Cooking Grills: Wash grills with a mild detergent and rinse with hot
water before initial use and as needed. For stubborn food residue, use a degreaser and fiber or brass cleaning
brush. Dry immediately using a soft cloth or paper towels.
Cleaning Heat Distribution Plate: Heat distribution plates should be cleaned whenever food or grease
drippings accumulate to reduce the chance of flare-ups. Wash heat distribution plates with a mild detergent
and rinse with hot water. Use a degreaser and fiber or brass cleaning brush to remove stubborn food residue.
Do not use a wire brush or metal scraper on porcelain-finished heat distribution plates, as they can scratch or
chip the porcelain finish and promote rusting.
Cleaning the Grease Tray and/or Grease Cup: The grease tray and/or grease cup (some models) should be
inspected before each grill use to reduce the chance of fire. Remove grease (a plastic spatula works well) and
wash all parts with a mild soap or degreaser and warm water solution.
Question: What causes grill parts to rust and what effect does it have on the grill materials?
Answer: Rusting is a natural oxidation process and may appear on cast-iron and steel parts. Rust will not
affect the short-term performance of your grill. However, weathering and extreme heat can cause a stainless
steel lid to turn a bronze color. This is discoloration, not rust, and is not considered a manufacturing defect.
Question: What causes my stainless steel grill lid to discolor and how do I clean my grill lid?
Answer: Smoke, weathering and high heat can cause a stainless steel grill lid to turn bronze in color. This is
not to be confused with rust and is not a product defect. Machine oils used in the manufacturing process of
stainless steel as well as cooking oils and a dirty grill lid can also encourage discoloration if the lid is not
cleaned prior to grill use. After your grill is assembled, remove the protective PVC film from your grill lid and
use a stainless steel cleaner and soft cloth to remove residual adhesive and oils from the inside and outside of
your grill lid. Never use abrasive cleaners or scrubbers. In addition to the initial cleaning, routine cleaning to
remove dirt, grease and oils will help discourage lid discoloration.
Question: Can I convert my grill from propane gas to natural gas?
Answer: Most gas grills are manufactured to exact specifications and are certified for either propane gas or
natural gas use only. However, some models can be converted safely with conversion kits available for specific
models. Contact Brinkmann Customer Service at 800-527-0717 to see if your grill can be converted.
Question: Why does the hose / regulator assembly supplied with my grill not fit the older LP gas tank I’ve
used for years?
Answer: U.S. Government regulates gas appliances and LP gas tanks. When regulations were changed, the
LP gas tank fittings were updated to ensure compliance. If your LP gas tank does not fit the hose / regulator
supplied with your new grill, the tank is outdated and must be replaced. Note: Effective April 1, 2002, all LP gas
tanks sold must include an "OPD" overflow protection device. This internal device prevents the LP gas tank
from being overfilled. Tanks without an OPD valve cannot be refilled.
Question: Sometimes I hear a humming sound coming from my gas regulator. Should I be concerned?
Answer: The humming sound is gas flowing through the regulator. A low volume of noise is normal and will not
interfere with the operation of your grill. If the humming noise is loud and excessive, you need to purge air from
the gas line or reset the regulator flow limiting device following the Regulator Resetting Procedure under
Connecting LP Cylinder and Hose/Regulator to Grill. This procedure should be done every time a new LP gas
tank is connected to your grill. For help, refer to your owner’s manual or call Brinkmann Customer Service at
800-527-0717.
19
ASSEMBLY INSTRUCTIONS
READ ALL SAFETY WARNINGS & ASSEMBLY INSTRUCTIONS CAREFULLY
BEFORE ASSEMBLING OR OPERATING YOUR GRILL.
WE RECOMMEND TWO PEOPLE WORK TOGETHER WHEN ASSEMBLING THIS UNIT.
The following provided tools are required to assemble this Charmglow® Deluxe Kitchen Gas Grill:
• Screwdriver
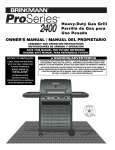
PARTS LIST:
1
1
Grill Body Assembly
2
1
Tank Tray Assembly
3
1
Left Side Table
4
1
Side Burner Grate
5
2
Cooking Grates
6
1
Sear Burner Grate
7
1
Right Side Table
8
1
Left Side Drawer
9
2
Heat Distribution Plates
10
11
12
13
14
15
16
17
18
1
2
2
1
1
2
1
1
1
Right Side Drawer
Drawer Handles
Sliding Grill Covers
Grease Cup
Grease Cup Bracket
Canopy Supports Frames
Electrical Outlet Box
Light Fixture Assembly
Light Canopy
This grill is designed with Dual Fuel Valves to easily
convert from LP (propane) gas to natural gas. A
conversion kit (Model 812-8000-S) must be purchased
and installed for use with natural gas.
20
1
2
7
3
4
5
6
8
10
9
12
13
14
11
16
15
18
17
FOR GRILL WARRANTY REPLACEMENT PARTS, PLEASE VISIT US AT:
www.grillpartsonline.com
(Proof of purchase will be required.)
Inspect contents of the box to ensure all parts are included and undamaged.
21
Choose a good, cleared assembly
area and get a friend to help you put
your grill together. Lay cardboard
down to protect grill finish and
assembly area.
CAUTION: Some parts may
contain sharp edges.
Wear protective
gloves if necessary.
Step 1
Screw the short tube into the elbow
of the light fixture assembly.
Step 2
Thread the electrical cord through the
back of the canopy as illustrated.
Step 3
Lay the light canopy on the ground.
Loosen the two bolts and nuts on
each light. Align electric light fixture
holes over canopy holes and secure
with bolts and nuts provided on each
light.
22
Step 4
Halfway unscrew the eight bolts preinstalled to the left and right support
brackets. Align the left canopy support
bar holes with the support bracket
holes and tighten the support bracket
bolts. Repeat for right canopy support
bar. (Left and right canopy supports
are called out when viewed from front
of the grill)
Right
Canopy
Support
Left
Canopy
Support
Cord
Bracket
Note: When performing Step 5,
lift canopy assembly with the
help of a friend and align with
canopy support bars.
Step 5
Halfway unscrew the eight bolts preinstalled to the left and right support
bars. Lift the canopy and align key
holes in the canopy assembly to the
bolts at the top of the left and right
support bars. Rest electric cord in the
slot on top of the right support bar.
Slide bolts through the key hole and
tighten securely into place.
Step 6
Run the electric cord down the right
support bar and secure it with the
pre-installed cord brackets.
23
Step 7
Remove the two screws from drawer
handle then attach handle to drawer,
insert the screws from the inside of
the drawer.
Step 8
Loosen four screws on each side of
the grill body about halfway. With the
help of a friend, place the slots on the
right side table over the four screws
and slide downward. Pull drawer out
to gain access to screw heads.
Tighten the screws to secure. Repeat
this procedure for the left side table.
Step 9
Insert drawers into right and left side
tables.
24
Step 10
Insert sliding lids on grill body into
left and right side tables.
Note: Lift sliding lids over tabs
when inserting into side
tables.
Step 11
Unscrew pre-attached four bolts on
bottom panel. Align the holes in the
tank drawer with the holes of the
bottom panel. Then secure with the
four bolts previously removed.
Note: Make sure the drawer
handle is facing forward.
Step 12
Install grease cup bracket into rear
of grill assembly.
Step 13
Slide grease cup into grease cup
bracket located under grill body on
back panel of grill.
25
Step 14
Remove
this Bolt
Halfway unscrew the four bolts that
hold the electrical sockets. Electrical
outlets are located in the back of the
grill. Remove the bolt in the center of
the right hand outlet
Step 15
Install electric box gasket onto the
bolts.
Plugs for
Refrigerator and
accessories
Plugs for
Light Canopy
Step 16
Slide electric outlet box onto outlet
bolts aligning key holes to bolts.
Tighten securely. Replace bolt in the
center of the right hand outlet from
Step 14.
26
Step 17
Side Burner
Grate
Place the heat distribution plates
on lower level of grill body
assembly directly above burners.
Cooking Grills
Step 18
Place side burner grate over side
burner on far left side.
Heat Distribution
Plates
Step 19
Place cooking grills on support
ribs directly above heat
distribution plates.
Note: Stainless steel cooking grill
should only be placed
above sear burner on far
right side. Do not operate
with black cooking grills
over sear burner.
Step 20
Remove igniter cap and insert
battery with positive end of battery
toward igniter cap. Replace igniter
cap and make sure the igniter is
working properly.
Battery
Igniter Cap
27
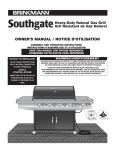
Charmglow® Deluxe Kitchen 8750 (Assembled)
28
Canopy Wiring
Diagram
29
Cart Wiring
Diagram
Note: If the original heater electrical cord needs to be
replaced, use an approved appliance wiring
rated for 250˚ C.
Use only with a GFCI protected circuit.
Use only extension cords approved for outdoor use
marked with W-A and rated for the power of this appliance.
30
IMPORTANTES DE SEGURIDAD
ADVERTENCIAS
QUEREMOS QUE USTED ENSAMBLE Y UTILICE SU PARRILLA CON LA MAYOR
SEGURIDAD POSIBLE.
LA FINALIDAD DE ESTE SÍMBOLO DE ALERTA
DE SEGURIDAD ES ATRAER SU
ATENCIÓN A LOS POSIBLES RIESGOS INHERENTES EN EL ENSAMBLADO Y USO DE
SU PARRILLA.
CUANDO VEA EL SÍMBOLO DE ALERTA DE SEGURIDAD
¡LEA DETENIDAMENTE TODA LA INFORMACIÓN DADAA CONTINUACIÓN!
LEA TODAS LAS ADVERTENCIAS E INSTRUCCIONES DE SEGURIDAD
CUIDADOSAMENTEANTES DE ENSAMBLAR Y UTILIZAR SU PARRILLA.
PELIGRO
SI USTED HUELE A GAS:
1. Corte el suministro de gas al aparato.
2. Extinga toda llama abierta.
3. Abra la cubierta.
4. Si continua el olor, aléjese de la unidad y llame a la compañía de gas de inmediato o al departamento de
bomberos.
ADVERTENCIA
1.
NO almacene o utilice gasolina u otros líquidos o vapores inflamables cerca de este o cualquier otro
aparato.
2.
Un cilindro de gas LP no conectado para su uso no podrá almacenarse cerca de este o cualquier otro
aparato.
PELIGRO
31
•
NO almacene un cilindro de gas LP de repuesto bajo o cerca de este aparato.
•
Nunca llene el cilindro a más del 80%.
•
Si las advertencias dadas arriba no se siguen al pie de la letra, puede ocurrir un
incendio que cause una muerte o lesión grave.
ÍNDICE DE MATERIAS
Advertencias generales . . . . . . . . . . . . . . . . . . . . . . . . . . . . . . . . . . . . . . . . 33
Instalación, especificaciones y uso seguro del cilindro de gas LP . . . . . 34–36
Cómo conectar la manguera o el regulador del cilindro de gas LP a la parrilla . 36–37
Prueba de detección de fugas. . . . . . . . . . . . . . . . . . . . . . . . . . . . . . . . . 38–39
Lista de revisión antes del primer uso . . . . . . . . . . . . . . . . . . . . . . . . . . . . . 39
Instrucciones de encendido . . . . . . . . . . . . . . . . . . . . . . . . . . . . . . . . . . 40–41
Cómo utilizar la parrilla y consejos útiles . . . . . . . . . . . . . . . . . . . . . . . . 42–44
Debido cuidado y mantenimiento . . . . . . . . . . . . . . . . . . . . . . . . . . . . . . 44–46
Transporte y almacenaje . . . . . . . . . . . . . . . . . . . . . . . . . . . . . . . . . . . . . . . . 46
Guía de resolución de problemas . . . . . . . . . . . . . . . . . . . . . . . . . . . . . . . . 47
Las preguntas más frecuentes . . . . . . . . . . . . . . . . . . . . . . . . . . . . . . . . 48–49
Lista de piezas e instrucciones de ensamblado . . . . . . . . . . . . . . . . . . . 50–58
Diagrama del cableado de la campana . . . . . . . . . . . . . . . . . . . . . . . . . . . . . 59
Diagrama del cableado del carrito. . . . . . . . . . . . . . . . . . . . . . . . . . . . . . . . . 60
Información sobre la garantía . . . . . . . . . . . . . . . . . . . . . . . . . . . Contraportada
PELIGRO:
Indica una situación peligrosa inminente que, de no ser evitada, resultará en la muerte o en
una lesión grave.
ADVERTENCIA: Manténgase alerta ante la posibilidad de una lesión corporal grave si no sigue las instrucciones.
Asegúrese de leer y seguir cuidadosamente todos los mensajes.
PRECAUCIÓN: Indica una posible situación peligrosa que, de no ser evitada, podría ocasionar una lesión menor
o moderada.
PARA REEMPLAZO DE PARTES GARANTIZADOS PARA SU CALENTADOR, FAVOR DE
VISITARNOS AL SITIO: www.grillpartsonline.com
32
ADVERTENCIAS GENERALES
ADVERTENCIA
•
•
•
•
•
•
•
•
•
•
•
•
•
•
•
•
•
Nunca utilice gas natural en una unidad hecha para gas propano líquido.
Nunca utilice briquetas de carbón vegetal o de leña en una parrilla de gas. Los trocitos para impartir sabor deben
permanecer en una caja metálica para el ahumado para guardar la ceniza y prevenir incendios.
Realice la prueba de detección de fugas en todas las conexiones antes del uso inicial, incluso si la parrilla fue
comprada totalmente ensamblada y después de rellenar el tanque cada vez.
Nunca use un fósforo (cerillo) o llama abierta para detectar fugase.
PRECAUCIÓN:
Olores intensos, catarros, congestión de los senos nasales, etc. pueden dificultar o imposibilitar
la detección de propano. Tenga precaución y use su sentido común al realizar la prueba de
detección de fugas.
Siempre mantenga su parrilla de gas sin gasolina, líquido para encendedores, diluyente de pintura (thinner) u otros
vapores o líquidos inflamables o materiales combustibles.
Siempre revise su parrilla antes de cada uso como lo indica la sección "Lista de revisión antes del primer uso" de
este manual.
NO obstruya el flujo del aire de combustión o ventilación.
Nunca coloque un peso mayor de 15 libras (6.8 kg) sobre el quemador lateral. NO se recargue en el anaquel del
quemador lateral.
Mantenga a niños y mascotas lejos de la parrilla caliente. NO permita que los niños utilicen la parrilla para jugar o
jueguen cerca de ella.
NO deje la parrilla desatendida cuando la esté utilizando.
NO permita que la manguera de gas toque superficies calientes.
NO permita que la grasa del orificio de drenaje caiga sobre la manguera o el ensamblado del regulador de la
válvula.
Mantenga todos los cables de suministro eléctrico alejados del agua o de superficies calentadas.
Keep a fire extinguisher on hand acceptable for use with gas products. Refer to your local authority to determine
proper size and type.
For household use only. DO NOT use this grill for anything other than its intended purpose.
NO la use si está bajo la influencia de drogas o alcohol.
La parrilla está muy caliente durante el uso. Para evitar quemaduras:
•
NO intente mover la parrilla.
•
Póngase guantes protectores o guantes gruesos para el horno.
•
NO toque ninguna superficie caliente de la parrilla.
•
NO se ponga ropa suelta o permita que su pelo pueda tocar la parrilla.
1. Para protegerse de un choque eléctrico, no sumerja el cable o enchufe en agua u otro líquido.
2. Cuando no use su unidad o la limpie, desenchúfela. Déjela enfriar antes de ponerle o quitarle piezas.
3. No opere ningún aparato de gas para cocinar en el exterior si el cable o enchufe está dañado o después de que la
unidad funciona mal o ha sido dañada de algún modo. Póngase en contacto con el fabricante para su reparación.
4. No deje que el cable cuelgue sobre el borde de la mesa o toque superficies calientes.
5. No utilice ningún aparato de gas para cocinar en el exterior para una finalidad para la cual no fue hecho.
6. Al conectarlo, primero conecte los enchufes de los accesorios para la parrilla a la parte trasera de ésta, luego
enchufe el cable de suministro eléctrico de la parrilla a un tomacorriente de 120V.
7. Use solamente un circuito protegido por un circuito GFCI (interruptor de circuito con conexión a tierra) en el aparato
de gas para cocinar en el exterior.
8. Nunca quite el enchufe a tierra ni lo use con un adaptador para 2 terminales.
9. Utilice solamente cables de extensión con enchufe de 3 terminales con conexión a tierra aprobado para la potencia y
el uso externo con indicación W-A.
TENGA PRECAUCIÓN Y USE SU SENTIDO COMÚN AL OPERAR SU PARRILLA DE GAS.
LA PERSONA QUE NO SIGA LAS ADVERTENCIAS Y DIRECTRICES DE SEGURIDAD
CONTENIDAS EN ESTE MANUAL PODRÍA TENER UNA LESIÓN GRAVE O UN GRAN
DAÑO A LA PROPIEDAD.
GUARDE ESTE MANUAL PARA CONSULTARLO EN EL FUTURO.
33
ADVERTENCIA
•
PARA USO EXTERNO ÚNICAMENTE. NO lo opere adentro o en áreas cerradas como una cochera, un
cobertizo o un pasadizo techado abierto.
•
Use su parrilla AFUERA en un lugar bien ventilado lejos de viviendas u otros edificios para evitar
peligros relacionados con la acumulación de gas y vapores tóxicos. Recomendamos que su parrilla
esté situada por lo menos a 10 pies (3.1 m) de cualquier edificio. Quien la ponga a una distancia más
cercana obstaculizará su debida ventilación y posiblemente incrementará el riesgo de un incendio
y/o de daños a la propiedad que podrían también causar lesiones personales.
•
Conserve una distancia mínima de 36 pulgadas (91 cm) entre todos los lados de la parrilla, del
barandal de la cubierta, de un muro u otro material combustible. NO utilice la parrilla debajo de
construcciones no protegidas que puedan incendiarse.
•
NO utilice o instale esta parrilla en o sobre un vehículo recreativo o lancha.
•
Nunca opere este electrodoméstico con las cubiertas deslizables de la parte superior en posición
cerrada.
INFORMACIÓN SOBRE LA INSTALACIÓN:
La instalación de este electrodoméstico debe cumplir con:
Todos los códigos locales pertinentes o en caso de no haberlos, con el:
• Código nacional para gas combustible ANSI Z223.1 NFPA 54
• Código para la instalación de gas natural y propano: CAN/CGA B149.1
• Código para la instalación de gas natural: CAN/CGA B149.1 (Canadá)
• Código para la instalación de gas propano: CAN/CGA B149.2 (Canadá)
Para revisar sus códigos locales correspondientes, acuda al distribuidor de gas LP de su localidad o
compañía de gas natural. Esta parrilla no fue fabricada para ser conectada a una tubería de suministro
de gas natural. Si se utiliza una fuente eléctrica externa, debe estar conectada a tierra según los códigos
locales o en caso de no haberlos, según el Código Eléctrico Nacional, ANSI/NFPA 70 o el Código
Eléctrico Canadiense CSA 22.1. Se necesita un suministro mínimo de 15 amperios.
ADVERTENCIA
CILINDRO DE GAS LP (NO INCLUIDO CON ESTA PARRILLA)
El cilindro de gas LP puede comprarse en la misma tienda en que adquirió la parrilla.
El cilindro de gas LP (propano líquido) diseñado especialmente para usarse con esta parrilla
debe tener una capacidad de 20 libras (9.1 kg) con una válvula incorporada de tipo 1 y un
dispositivo de protección contra sobrellenado (OPD).
•
Esta parrilla fue hecha para los cilindros de las marcas Worthington, Manchester o SMPC de 20
libras (9.1 kg). Otros cilindros de marca DOT pueden caber en esta parrilla si los anillos
superior e inferior del cilindro tienen dimensiones similares.
•
NO conecte esta parrilla a una válvula de cilindro #510 POL con roscas izquierdas. La válvula
tipo 1 puede ser identificada por las roscas externas grandes en la salida de la válvula.
•
NO la conecte a un cilindro de propano que sobrepase esta capacidad.
•
NO la conecte a un cilindro que use cualquier otro tipo de dispositivo para conectar la válvula.
34
ESPECIFICACIONES DEL CILINDRO:
Al comprar o cambiar el cilindro para su parrilla de gas, fíjese que haya sido hecho y marcado
conforme a las especificaciones para cilindros de gas LP del Departamento de Transporte de los
EE.UU. (DOT) o de la Norma Nacional Canadiense, CAN/CSA-B339 para cilindros, esferas y tubos
para el transporte de mercancía peligrosa y de la comisión, como sean pertinentes; y equipados con
un dispositivo protector reglamentario de sobrellenado (OPD) y un dispositivo conector de cilindros
compatible con conexión para electrodomésticos de uso externo.
El cilindro también debe estar equipado con:
•
Una válvula de cierre que termina en la salida de la válvula para el cilindro de gas tipo 1.
•
Una válvula tipo 1 que evita el flujo de gas hasta que se haya obtenido un sello positivo.
•
Una disposición para sacar el vapor.
•
Un collarín para proteger la válvula de cierre del cilindro.
•
Un dispositivo de alivio de seguridad comunicado directamente con el espacio de vapor del cilindro.
•
Un dispositivo reglamentario de prevención de sobrellenado (OPD).
ADVERTENCIA
•
Apague la válvula del cilindro cuando no use su parrilla.
•
Manipule el tanque con cuidado.
•
Siempre fije el cilindro en su lugar en posición vertical.
•
Nunca conecte un cilindro de gas LP no reglamentado a su parrilla.
•
NO exponga los cilindros de gas LP a demasiado calor o fuentes ignífugas.
•
NO almacene el cilindro de gas LP de repuesto debajo o cerca de su parrilla.
•
Permita que sólo distribuidores de gas LP calificados llenen o reparen su cilindro de gas LP.
•
NO deje que el cilindro sea llenado a más del 80% de su capacidad.
•
Lea y siga todas las advertencias e instrucciones impresas en el cilindro y que acompañan a
este producto.
PELIGRO
•
Nunca guarde el cilindro de repuesto del gas LP bajo o cerca de su parrilla, ya que podría
causar sobrepresión y ésta tendría que ser expulsada a través de la válvula de alivio para
vapor, lo que causaría un incendio, una explosión o graves lesiones personales que podrían
ser mortales.
Nota: EL GAS PROPANO ES MÁS PESADO QUE EL AIRE, POR LO QUE SE ACUMULARÁ EN
ZONAS BAJAS. BUENA VENTILACIÓN ES DE SUMA IMPORTANCIA.
35
•
Mantenga la(s) abertura(s) de ventilación de su cilindro de gas LP gas libres de cualquier
obstrucción y basura.
•
DO NOT NO introduzca ningún objeto extraño a la salida de la válvula porque podría dañarse
el control del flujo unidireccional y causar una fuga, la cual a su vez puede ocasionar una
explosión, un incendio, graves lesiones corporales o la muerte.
ADVERTENCIA
CÓMO LLENAR EL CILINDRO DE GAS LP:
•
Deje que sólo distribuidores calificados de gas LP llenen o reparen debidamente su cilindro.
•
Los nuevos tanques deben ser purgados antes del llenado; notifíquele al distribuidor de gas LP
si está usando un nuevo tanque.
•
NO deje que el cilindro sea llenado a más del 80% de su capacidad. Los tanques sobrellenados
pueden representar un peligro porque la excesiva presión acumulada puede hacer que la
válvula de alivio expulse vapores de gas propano. El vapor es combustible y si hace contacto
con una chispa o llama, ocurrirá una explosión que causará quemaduras graves, daños
corporales o la muerte.
•
Siempre utilice una capa protectora para el cilindro cuando su parrilla no está conectada al cilindro.
•
Si canjea su cilindro mediante un programa calificado de canje, asegúrese que su cilindro
tenga una válvula tipo 1 y un dispositivo de prevención de sobrellenado (OPD).
CÓMO INSTALAR EL CILINDRO DE GAS LP A LA
PARRILLA:
1. Revise que la válvula del cilindro esté cerrada girando la
perilla en el sentido de las manecillas del reloj.
2. Coloque el cilindro al sujetador del tanque situado en la
parte inferior del gabinete.
3. Oriente al cilindro como se muestra de tal manera que la
manguera no se enrede o dañe.
4. Apriete al máximo el tornillo retenedor del tanque situado
bajo el sujetador del tanque para fijar el tanque a su lugar.
Sujetador del tanque
5. Una o desprenda el regulador al cilindro de gas LP sólo
cuando el cilindro esté descansando sobre el sujetador
del tanque.
MANGUERA Y REGULADOR:
Su parrilla está equipada con un dispositivo de conexión
tipo 1 que tiene las siguientes características:
1. El sistema no permitirá que fluya gas del cilindro hasta que
haya una buena conexión con la válvula.
Nota:
Tornillo retenedor del tanque
La válvula del cilindro debe estar cerrada antes de
hacer o quitar la conexión.
2. Tiene un dispositivo térmico que cerrará el flujo de gas si el
dispositivo se expone a temperaturas de 240°F a 300°F
(115°C a 150°C). Si esto llegase a suceder, quite todo el
ensamblado del regulador y deséchelo debidamente. Puede
adquirir otro llamando al departamento de atención al cliente
800-527-0717. Es necesario averiguar la causa del calor
excesivo antes de utilizar su parrilla nuevamente.
3. Un dispositivo limitador de regulación del gas activado
disminuye el flujo de gas a 10 pies cúbicos por hora. Si éste ha
sido activado, siga el Método para Restablecer el Regulador.
MÉTODO PARA RESTABLECER EL REGULADOR:
1. Gire las perillas de control del quemador a "OFF" (apagado), apague la válvula del cilindro y desconecte el
regulador del tanque de gas LP. Espere unos dos minutos.
2. Vuelva a unir el regulador y lentamente gire la válvula del cilindro para abrirla. Ahora habrá
restablecido el dispositivo limitador del flujo.
36
ADVERTENCIA
•
Nunca use su parrilla sin antes revisar todas las conexiones y mangueras para detectar fugas.
Consulte la sección sobre "Prueba de detección de fugas" de este manual para seguir los métodos
indicados.
ADVERTENCIA
Deben utilizarse el regulador de la presión y el ensamblado de la manguera incluidos con su parrilla de
gas.
•
NO intente conectar la parrilla comprada para gas LP (propano) a cualquier otra fuente
suministradora de combustible tal y como una tubería de gas natural. Debe comprarse e instalarse
un equipo de conexión (modelo 812-8000-S) para que pueda utilizarse con gas natural.
•
NO use ningún otro regulador de presión o ensamblado de la manguera que no sea el incluido con su
parrilla. El regulador de presión o ensamblado de la manguera de repuesto debe ser el número de pieza
155-8750-0 que puede obtenerse llamando al departamento de atención al cliente al 800-527-0717.
•
NO intente ajustar o reparar el regulador, el cual ha sido fabricado para operar a una presión
máxima de salida de 11 pulgadas (28 cm) de columna de agua (2.74 kPa).
Durante el ensamblado y/o reposición del cilindro de gas, fíjese que la manguera suministradora de gas no
esté dañada o enredada.
Revise muy bien el ensamblado de la manguera antes de cada uso para detectar algún daño, desgaste
excesivo o deterioro. Si lo hay, cambie el ensamblado antes de utilizar su parrilla. Utilice sólo la reposición
suministrada por el fabricante.
ADVERTENCIA
CÓMO CONECTAR LA MANGUERA Y EL REGULADOR A UN CILINDRO DE GAS LP
•
Cerciórese de que la válvula del tanque esté CERRADA antes de conectar el cilindro de gas LP a su
parrilla. Gire la perilla de la válvula en el sentido de las manecillas del reloj para cerrar la válvula
debidamente. Lea y siga todas las instrucciones y advertencias en las etiquetas de seguridad de la
manguera suministradora. Lea y siga todas las advertencias de este manual concernientes al uso
seguro de los cilindros de gas LP y de la manguera y del regulador antes de conectar el cilindro a la
parrilla. Lea y siga todas las advertencias impresas en el cilindro de gas LP.
CÓMO CONECTAR LA MANGUERA Y EL REGULADOR:
1. Cerciórese de que la válvula del cilindro haya sido cerrada al girar la perilla en el sentido de las manecillas
del reloj.
2. Revise que las perillas de control del quemador de la parrilla estén en la posición de "OFF".
3. Retire la tapa protectora de plástico de la válvula del cilindro y del dispositivo de conexión.
4. Detenga el regulador e introduzca el dispositivo de conexión del tubo corto enroscado a la salida de la
válvula del cilindro de gas LP, asegurándose centrar bien el dispositivo.
5. Gire manualmente la tuerca grande de acoplamiento en el sentido de las manecillas del reloj y apriete hasta
el tope. Cuídese de no entrecruzar la rosca de acoplamiento con la válvula del cilindro. No apriete
demasiado la perilla a la válvula ni utilice herramientas para apretar la conexión.
Nota:
Si no puede hacer la conexión, repita los pasos 4 y 5.
6. Fíjese que la manguera no se haya enredado, que no tenga bordes filosos y no haga contacto con
superficies que puedan calentarse con el uso.
37
7. Revise todos los aditamentos antes de encender su parrilla. Consulte la sección sobre "Prueba de detección
de fugas" de este manualde fugas" de este manual.
PELIGRO
PRUEBA DE DETECCIÓN DE FUGAS:
Para evitar un incendio o riesgo de explosión:
•
NO fume ni permita fuentes ignífugas en la zona donde realice la prueba de detección de fugas.
•
Realice la prueba AFUERA y sólo en una zona bien ventilada.
•
Nunca realice una prueba de revisión de fugas con un fósforo (cerillo) o con una llama abierta.
•
Nunca realice una prueba de revisión de fugas mientras está utilizando la parrilla o cuando ésta
todavía está caliente.
ADVERTENCIA
CUÁNDO REALIZAR UNA PRUEBA DE DETECCIÓN DE FUGAS:
•
Tras haber ensamblado su parrilla y antes de encenderla por primera vez, incluso si la compró
totalmente ensamblada.
•
Cada vez que el cilindro de gas LP sea rellenado o si reemplaza alguno de sus componentes.
•
Cada vez que su parrilla haya sido movida.
•
Por lo menos una vez al año si no ha utilizado su parrilla por más de 60 días.
CÓMO REVISAR PARA ENCONTRAR FUGAS:
1. Elabore una mezcla de 50% agua y 50% de jabón líquido lavaplatos.
2. Abra la cubierta.
3. Fíjese que todas las perillas de control estén en posición
apagada ("OFF").
4. Abra el suministro de combustible en la válvula del cilindro
girando la perilla de la válvula una vez en contra del sentido
de las manecillas del reloj.
5. Aplique la mezcla de jabón y agua a las siguientes piezas:
A
Soldadura del tanque de suministro (cilindro).
B
Tuerca de conexión a la válvula del tanque.
C
Lado trasero de la tuerca de conexión al tubo corto
enroscado de latón.
D
Conexión del tubo corto enroscado de latón al regulador.
E
Conexiones del regulador a las mangueras
suministradoras de gas.
Fíjese que salgan
burbujas
F
G
E
H
D
F
Conexión de la manguera al tubo de distribución de gas.
C
G
La longitud total de la manguera suministradora de gas.
B
H
Válvula del tanque al cilindro.
A
38
6. Revise cada lugar mencionado (A–H) para ver si salen burbujas que indicarán una fuga.
7. Cierre el suministro de gas en la válvula del cilindro.
8. Abra las perillas de control para dejar salir la presión del gas en la manguera.
9. Gire las perillas de control a la posición de "OFF" (apagado).
10. Apriete todas las conexiones en que detectó fugas.
11. Repita la prueba de detección de fugas con agua jabonosa hasta ya no ver burbujas.
12. Cierre el suministro de gas en la válvula del cilindro hasta que esté listo para utilizar su parrilla.
13. Lave el residuo jabonoso con agua fría y seque con una toalla.
14. Espere 5 minutos para que el gas se salga del área antes de encender la parrilla.
PRECAUCIÓN: NO use la parrilla si no puede parar las fugas. Llame a un servicio calificado de
reparación de aparatos de gas.
Nota:
Debe realizar la prueba de detección de gas en una zona con suficiente luz para ver si
salen burbujas.
ADVERTENCIA
LISTA DE REVISIÓN ANTES DEL PRIMER USO:
Daños a la propiedad, lesiones corporales, quemaduras graves y la muerte pueden ocurrir si usted
no sigue estas medidas de seguridad que deben tomarse tras haber ensamblado la parrilla y antes
de cada uso. NO utilice esta parrilla hasta que haya leído y entendido TODAS las advertencias e
instrucciones de este manual.
LISTA DE REVISIÓN ANTES DEL PRIMER USO:
39
•
Asegúrese de que la parrilla haya sido ensamblada debidamente.
•
Inspeccione la manguera suministradora de gas para detector quemaduras, rozaduras, enredos y el
recorrido debido antes de cada uso. Si es obvio que hay demasiada abrasión o desgaste o si la
manguera ha sido cortada, debe reemplazarla antes de utilizar su parrilla. Reemplace con la manguera
y el regulador para el modelo No. 155-8750-0, el cual puede obtenerse llamando al departamento de
atención al cliente 800-527-0717.
•
Revise todas las conexiones de gas y la manguera para detectar fugas. Consulte la sección "Prueba de
detección de fugas".
•
Asegúrese de que todos los cables de suministro eléctrico estén conectados a tierra debidamente.
Mantenga todo cable de suministro eléctrico y la manguera suministradora de combustible lejos de
cualquier superficie caliente. La manguera debe estar por lo menos a 3 pulgadas (7.5 cm) de
superficies calientes.
•
Ponga su parrilla sobre una superficie nivelada en una ubicación bien ventilada a una distancia segura
de materiales, edificios y voladizos de techo combustibles.
•
Coloque debidamente la bandeja vacía de grasa bajo el orificio de drenaje de grasa en la parte inferior
de la parrilla para atrapar a la grasa que gotea durante el uso.
•
NO obstruya el flujo del aire de combustión y ventilación.
ADVERTENCIA
Lea, entienda y siga todas las advertencias e instrucciones contenidas en este manual. NO se salte
ninguna advertencia e instrucción contenida en las secciones anteriores de este manual.
ADVERTENCIA
INSTRUCCIONES DE ENCENDIDO:
Siga las instrucciones al pie de la letra.
1. ABRA LA CUBIERTA DE LA PARRILLA antes de intentar encender un quemador para que los vapores
no se acumulen dentro de su parrilla. Puede ocurrir una explosión si la cubierta de la parrilla está cerrada.
2. Revise que todas las perillas de control del quemador y la válvula del cilindro hayan sido giradas a la
posición de "OFF" (apagado).
3. Abra el suministro de gas girando la perilla de la válvula del cilindro en contra de las manecillas del
reloj hasta que se abra al máximo.
4. NO se quede parado con su cabeza, cuerpo o brazos sobre la parrilla al encenderla.
CÓMO ENCENDER LOS QUEMADORES PRINCIPALES,
LATERALES Y EL QUEMADOR DE FUEGO DIRECTO:
1. Abra la cubierta antes de encender el quemador.
2. Asegúrese de que todas las perillas de control estén en la posición de "OFF".
3. Decida cuál quemador encender. Empuje y gire la perilla de control para tal
quemador a la posición de "HIGH" (alto).
4. Presione el encendedor electrónico y manténgalo así por 3–5 segundos para encender al quemador.
5. Si NO se enciende en 5 segundos, gire la perilla de control a "OFF" y espere 5 minutos para que se disipe
el gas. Repita la técnica del encendido.
6. Repita los pasos 3–5 para encender cada quemador. Siempre utilice el encendedor electrónico para
encender cada quemador. Si el quemador no se enciende empujando el botón del encendedor, espere 5
minutos y consulte la sección "Cómo encender los quemadores principales con un fósforo".
7. Para apagarlos, gire cada perilla de control en el sentido de las manecillas del reloj hasta que quede
cerrada en la posición de "OFF". Sin embargo, esto no cierra el flujo de gas del cilindro.
Nota: Si el quemador no se enciende o la llama es demasiado baja, quizá haya arañas o insectos que
bloquean el quemador o el dispositivo limitador del flujo ha sido activado. Consulte "Ensamblado y
mantenimiento del quemador" bajo “Debido cuidado y mantenimiento” o bien "Método para
Restablecer el Regulador" bajo “Cómo conectar el cilindro de gas LP y la
manguera o el regulador a la parrilla”.
CÓMO ENCENDER LOS QUEMADORES PRINCIPALES CON UN FÓSFORO:
Encendedor de
fósforos
1. Abra la cubierta antes de encender el quemador.
Parilla para cocinar
2. Gire las perillas de control a la posición de "OFF".
3. Ponga un fósforo (cerillo) de papel en el extremo del encendedor de
fósforos, encienda el fósforo y acérquelo cuidadosamente a aprox. 1/2"
(1 a 2 cm) del elemento del quemador principal que debe encenderse.
4. Gire la perilla de control del quemador de fuego directo a la posición de
"HIGH". El quemador debería encenderse dentro de 5 segundos.
5. Si el quemador no se enciende, gire la perilla de control a "OFF" y
espere 5 minutos para que se disipe el gas. Repita la técnica del
encendido.Si el quemador no se enciende en los primeros intentos de
Orificio para encender la
encenderlo con el fósforo, hay un problema con el suministro del gas.
placa de distribución térmica
Cierre el gas en el quemador y además en el cilindro. NO intente
operar la parrilla hasta que el problema haya sido encontrado y
rectificado. Consulte la sección "Resolución de problemas" de este manual.
6. Si el quemador no se enciende en los primeros intentos de encenderlo con el fósforo, hay un problema con
el suministro del gas. Cierre el gas en el quemador y además en el cilindro. NO intente operar la parrilla
hasta que el problema haya sido encontrado y rectificado. Consulte la sección "Resolución de problemas"
de este manual.
40
CÓMO ENCENDER EL QUEMADOR DE FUEGO
DIRECTO CON UN FÓSFORO:
Fósforo
1. Abra la cubierta de su parrilla antes de encender.
2. Asegúrese de que la perilla de control esté en la posición de "OFF".
3. Ponga un fósforo (cerillo) de papel en el extremo del encendedor
de fósforos, encienda el fósforo y acérquelo cuidadosamente a
aprox. 1/2" (1 a 2 cm) de la esquina inferior izquierda del elemento
del quemador de fuego directo.
4. Gire la perilla de control del quemador de fuego directo a la
posición de "HIGH". El quemador debería encenderse dentro de 5
segundos.
5. Si el quemador no se enciende, gire la perilla de control a "OFF" y espere 5 minutos para que se
disipe el gas. Repita la técnica del encendido.
6. Si el quemador no se enciende en los primeros intentos de encenderlo con el fósforo, hay un
problema con el suministro del gas. Cierre el gas en el quemador y además en el cilindro. NO intente
utilizar el quemador de fuego directo hasta que el problema haya sido encontrado y rectificado.
Consulte la sección "Resolución de problemas" de este manual.
CÓMO ENCENDER EL QUEMADOR LATERAL
CON UN FÓSFORO:
1. Abra la cubierta de su parrilla antes de encender.
2. Asegúrese de que la perilla de control esté en la posición de "OFF".
3. Encienda el fósforo y acérquelo cuidadosamente a aprox.
1/2" (1 a 2 cm) del quemador.
4. Gire la perilla de control del quemador lateral a la posición de
"HIGH" (alto). El quemador debe encenderse dentro de 5
segundos.
5. Si el quemador no se enciende, gire la perilla de control a "OFF" y espere 5 minutos para que se
disipe el gas. Repita la técnica del encendido.
6. Si el quemador no se enciende en los primeros intentos de encenderlo con el fósforo, hay un
problema con el suministro del gas. Cierre el gas en el quemador y además en el cilindro. NO intente
utilizar la parrilla hasta que el problema haya sido encontrado y rectificado. Consulte la sección
"Resolución de problemas" de este manual.
Nota:
Observe la altura de la llama al encenderse: Debe ser de
color azul o amarillo y tener una altura de 1"–2" (2.5 a 5 cm)
cuando el quemador esté en "HIGH" (alto).
CÓMO APAGAR LA PARRILLA:
1. Cierre la válvula del cilindro.
2. Gire todas las perillas de control del quemador a la posición de "OFF".
Nota:
Cierre el cilindro de gas LP primero para prevenir que el gas permanezca en el sistema
bajo presión.
PRECAUCIÓN:
•
La válvula del cilindro siempre debe estar en la posición
cerrada o apagada (“off”) cuando no se esté utilizando la
parrilla.
Para cerrar la válvula del cilindro, gire la perilla en
elsentido de las manecillas del reloj hasta el tope.
41
ADVERTENCIA
CÓMO UTILIZAR LA PARRILLA:
Nunca use carbón de leña o líquido encendedor en el interior de su parrilla de gas. Lea y siga
todas las ADVERTENCIAS e instrucciones contenidas en las secciones anteriores de este manual.
CÓMO ESTRENAR SU PARRILLA:
•
En la fabricación y preservación de los componentes de su parrilla pueden haber quedado residuos
de aceite en el quemador y las superficies para cocinar de su parrilla.
•
Antes de cocinar en su parrilla por primera vez, debe precalentarla por 15 minutos en "HIGH" para
quemar estos residuos de aceite.
CÓMO PRECALENTAR LA PARRILLA:
•
Recomendamos que precaliente su parrilla antes utilizarla para asegurarse de que todas las
superficies de la parrilla estén a la temperatura deseada para consumir los azúcares de los alimentos
al cocinar. Tras encender su parrilla, ajuste las perillas de control del quemador principal a la posición
de "HIGH" por 10 a 15 minutos.
CÓMO CONTROLAR LLAMARADAS:
•
Las llamaradas son parte de cocinar carnes en una parrilla de gas, y les imparten un sabor único. Sin
embargo, demasiadas llamaradas pueden sobrecocinar sus alimentos y ocasionar situaciones
peligrosas para usted y su parrilla. Las llamaradas excesivas son causadas por la acumulación de
grasa en la parte inferior de su parrilla. Si esto llegara a ocurrir, NO vierta agua sobre las llamas
porque la grasa podría salpicar, causando quemaduras graves o lesiones corporales. Para que cesen
las llamaradas, apague los quemadores principales y espere a que la grasa se termine de consumir.
ADVERTENCIA
•
NO deje su parrilla sin atender mientras la utiliza.
•
NO mueva la parrilla cuando la esté utilizando.
•
NO use agua para extinguir llamaradas.
•
Tenga un extintor a la mano idóneo para usarse con aparatos de gas.
PARA REDUCIR LAS LLAMARADAS AL MÍNIMO:
•
•
•
Corte el exceso de grasa de la carne antes de cocinarla.
Cocine carne con alto contenido en grasa (pollo o puerco) a fuego bajo o indirecto.
Cerciórese de que su parrilla esté sobre una superficie nivelada y la grasa pueda gotear de la parrilla
a través del orificio de drenaje en la parte inferior hasta la bandeja de grasa.
42
CÓMO UTILIZAR LAS OTRAS FUNCIONES DE LA PARRILLA:
Luz indicadora
COMPARTIMIENTO DE CALENTAMIENTO:
1. Para ENCENDER el compartimiento de calentamiento,
gire la perilla de control del compartimiento de
calentamiento a la temperatura deseada.
2. Para APAGAR el compartimiento de calentamiento,
gire la perilla de control a la posición de OFF.
Nota: El compartimiento de calentamiento está
equipado con una salida para el aire. Deslice la
palanca de la ventila de aire hacia la izquierda
para cerrarla totalmente y hacia la derecha para
abrirla.
LAS LUCES DE LA CAMPANA:
•
Las luces de la campana alumbran el exterior de su parrilla en la noche.
•
Las luces pueden operase desde el interruptor de luz
controlado por botón de contacto localizado en el panel frontal
de control.
Compartimiento de
calentamiento
Nota: Al cambiar la bombilla, desatornille el lente y jale la
bombilla antigua directamente del sujetador de
bombillas. Asegúrese de que las “patas” de la nueva
bombilla estén derechas e introdúzcalas en los dos
agujeros del sujetador de bombillas. Con cuidado,
empuje la bombilla directamente hacia adentro hasta
que haya quedado bien asentada y centrada. Ponga el lente de vuelta a la lámpara.
Al cambiar bombillas, nunca ponga una de más de 100W (vatios).
EL QUEMADOR LATERAL:
•
El quemador lateral puede usarse para preparar platos adicionales como frijoles, papas, elotes o
también para calentar salsas.
•
La válvula del quemador puede ajustarse hacia arriba o abajo según su estilo de cocinar.
ADVERTENCIA
43
•
Lea las instrucciones sobre cómo encender su parrilla para saber cómo encender el quemador lateral.
•
Nunca cierre la cubierta del quemador lateral cuando el quemador ya está encendido.
•
Al cocinar en el quemador lateral, use una olla de 10" (25 cm) de diámetro o menor que NO tenga un
asa extendida. Centre la olla sobre el quemador.
•
Nunca coloque más de 15 libras (6.8 kg) sobre el quemador lateral, ya que no está construido para
aguantar un peso que sobrepase las 15 libras.
•
Tenga precaución para no chocar contra la parrilla, el quemador lateral o la olla para evitar que se
derrame su contenido que podría ocasionar quemaduras graves.
•
NO utilice el quemador lateral para freír en baño de aceite. Así evitará los peligros asociados con la
inflamación del aceite que crearía una situación muy peligrosa.
CONSEJOS PARA COCINAR A LA PARRILLA
LIMPIEZA
•
Siempre lávese las manos muy bien con agua y jabón antes de manipular comida y después de
manipular carne cruda (res, cerdo, aves de corral), pescado y mariscos.
•
Si utiliza un platón para llevar carne, aves de corral, pescado o mariscos crudos a la parrilla, no se olvide
lavar el platón muy bien con agua y jabón antes de poner la comida cocida nuevamente sobre el platón o
utilice platones distintos para los alimentos crudos y cocidos.
•
Nunca use los mismos utensilios al manipular carne, aves de corral, pescado o mariscos crudos a
menos que lave los utensilios muy bien con agua muy caliente y jabón.
•
Nunca vuelva a usar el adobo ácido de cualquier carne cruda sin cocer en los alimentos ya cocinados
listos para servirse.
COCINAR A LA PARRILLA A LA TEMPERATURA INDICADA
•
Use un termómetro para carne para asegurarse de que el centro de la carne o del pescado esté a
buena temperatura.
•
El Departamento de Agricultura de los EE.UU. (USDA) recomienda que la temperatura mínima para los
siguientes alimentos sea la siguiente:
Chuletas . . . . . . . . . . . . . . . . . . 145 grados F (62.8° C)
Carne molida . . . . . . . . . . . . . . 160 grados F (71° C)
Cerdo . . . . . . . . . . . . . . . . . . . . 160 grados F (71° C)
Aves de corral . . . . . . . . . . . . . 180 grados F (82° C)
Asados . . . . . . . . . . . . . . . . . . . . 145 grados F (62.8° C)
Pescado y mariscos . . . . . . . . 140 grados F (60° C)
Verduras . . . . . . . . . . . . . . . . . . . 145 grados F (62.8° C)
CONSEJOS ÚTILES
•
Si precalienta carnes o aves, hágalo justo antes de asarlas a la parrilla.
•
Nunca descongele carne a temperatura ambiente o encima de una mesa.
•
Refrigere los restos de comida a las 2 horas de haber quitado la comida de la parrilla.
•
Para más información, sírvase llamar a la línea telefónica directa sin costo del USDA al 800-535-4555.
DEBIDO CUIDADO Y MANTENIMIENTO
•
Con el fin de proteger su parrilla de la oxidación excesiva, debe mantener su unidad limpia y cubierta en
todo momento cuando no la utilice.
•
Lave las parrillas para cocinar y las placas de distribución térmica con agua caliente jabonosa,
enjuague bien y seque. Aplique o rocíe una capa delgada de aceite vegetal a la parrilla para cocinar.
•
Limpie el exterior e interior de la parrilla frotando con un paño o trapo húmedo. Aplique o rocíe una
capa delgada de aceite vegetal al interior para evitar que se oxide.
•
Puede limpiar la superficie exterior de acero inoxidable de su parrilla con limpiador para acero inoxidable.
•
Nunca aplique una capa de pintura al interior. Los lugares oxidados del interior pueden pulirse, limpiarse y
luego se les puede aplicar o rociar una capa delgada de aceite vegetal para minimizar la oxidación.
44
LIMPIEZA Y MANTENIMIENTO:
•
•
•
•
•
•
•
•
Mantenga su electrodoméstico sin ningún material combustible, gasolina u otros vapores y líquidos inflamables.
Mantenga las aberturas de ventilación del cilindro sin cubiertas y libres de escombros.
Revise las llamas del quemador para ver que estén funcionando bien (vea la ilustración en "Ensamblado y
mantenimiento del quemador" en la sección “Debido cuidado y mantenimiento”). Arañas o insectos pueden
tener sus nidos adentro, bloqueando así el gas.
Para asar a la parrilla sin peligro y con el mejor funcionamiento posible, revísela por lo menos dos veces al
año o tras un largo período de almacenamiento.
Cerciórese de apretar toda la ferretería (tuercas, pernos, tornillos, etc.) por lo menos dos veces al año.
¡PRECAUCIÓN! Algunas piezas pueden tener bordes filosos. En caso necesario, póngase guantes protectores.
Hay una escotilla de acceso al lado izquierdo del cuerpo de la parrilla para inspeccionar y reparar los
quemadores laterales.
Hay una escotilla de acceso en el panel trasero del cuerpo de la parrilla para inspeccionar y reparar el
elemento eléctrico del compartimiento de calentamiento.
Quite las parrillas para cocinar, las placas de distribución térmica y los quemadores del interior de su
parrilla. Use un cepillo con agua muy caliente y detergente para quitar los residuos sobrantes. Enjuague
muy bien con agua. Seque con una toalla y reemplace los componentes tal y como se describe en las
instrucciones de ensamblado.
ENSAMBLADO Y MANTENIMIENTO DEL QUEMADOR
•
•
1.
2.
3.
4.
5.
6.
7.
8.
9.
10.
45
Aunque sus quemadores fueron hechos de acero inoxidable, pueden corroerse debido al calor extremo y
los ácidos de los alimentos que se cocinan. Inspeccione los quemadores con regularidad para detectar
grietas, agujeros anormales y otros indicios de daño por corrosión. Si los detecta, reemplace el quemador.
NO obstruya el flujo del aire de combustión y ventilación. Los tubos del quemador pueden estar
bloqueados por arañas e insectos que construyen allí sus nidos. Un tubo tapado obstaculiza el flujo de gas
hacia los quemadores, lo que podría causar un incendio en el tubo del quemador o debajo de la parrilla.
Para limpiar el ensamblado del quemador, siga las siguientes instrucciones para limpiar o cambiar las
piezas del ensamblado del quemador o si tiene problemas al encender la parrilla.
Cierre el gas en las perillas de control y en la válvula del tanque del cilindro de gas LP.
Quite las parrillas para cocinar y las placas de distribución térmica.
Levante cuidadosamente cada quemador y aléjelo de las aberturas de la válvula.
Use un cepillo angosto para botellas o un alambre rígido
doblado como un gancho pequeño para poderlo
meter varias veces a través de cada tubo del quemador y la
salida de la flama.
NOTA: Póngase gafas protectoras al realizar el
procedimiento No. 5.
Utilice aire comprimido para soplar hacia adentro de cada
tubo del quemador y hacia fuera de las salidas de la flama.
Revise cada salida para verificar que está saliendo aire de cada orificio.
Con el cepillo de alambre, talle toda la superficie exterior del quemador
para quitar la mugre y los residuos de comida.
Revise el quemado para detectar daños y si ve grietas
grandes o agujeros, reemplace el quemador.
IMPORTANTE: La abertura del quemador debe deslizarse
sobre la boquilla de la válvula.
Reemplace los quemadores cuidadosamente.
Reemplace cada quemador y siga las instrucciones de la
sección "Prueba de revisión de fugas de gas" de este
manual. Vuelva a encender los quemadores para verificar
su buen funcionamiento.
Boquillas
Orificio del quemador
Reemplace las placas de distribución térmica
de la válvula
y las parrillas para cocinar.
Escombros
BUEN FUNCIONAMIENTO DEL QUEMADOR
PARRILLAS PARA COCINAR
•
Límpielas con detergente suave y agua. Puede utilizar un cepillo con cerdas de latón o una almohadilla
para limpiar hecha de nylon para quitar los residuos de las superficies de acero inoxidable. No use cerdas
de alambre de acero para limpiar las parrillas para cocinar, ya que el acero puede causar que el acabado
se agriete o descascare. NO use limpiador comercial para hornos.
PLACAS DE DISTRIBUCIÓN TÉRMICA
•
Periódicamente, puede que sea necesario inspeccionar y limpiar la placa de distribución térmica para
evitar que se acumule la grasa. Cuando la parrilla esté fría, quite las parrillas para cocinar, inspeccione las
placas de distribución térmica y reemplácelas si están rotas o dañadas. No deje que las placas se dañen
al grado de que puedan caerse sobre los quemadores. Reemplace las placas de distribución térmica y las
parrillas para cocinar y encienda los quemadores. Utilice la parrilla en "HIGH" por 10 minutos para quitar el
exceso de grasa.
ADVERTENCIA
TRANSPORTE Y ALMACENAMIENTO:
•
•
•
•
•
•
•
•
•
Nunca mueva una parrilla cuando esté caliente o cuando objetos se encuentren encima de las
superficies para cocinar.
Asegúrese de que la válvula del cilindro esté cerrada. Después de mover la parrilla, fíjese que
ninguna conexión del gas tenga fugas. Consulte las instrucciones sobre cómo detectar fugas.
NO almacene un cilindro de gas LP de repuesto (lleno o vacío) bajo o cerca de la parrilla.
Nunca guarde líquidos inflamables o latas de atomizador bajo o cerca de la parrilla.
NO extinga incendios causados por grasa con agua.
Si no utiliza su electrodoméstico de gas para cocinar afuera, debe cerrar el gas en el cilindro de
suministro.
Se permite almacenar un electrodoméstico de gas para cocinar afuera adentro de su casa sólo
si el cilindro ha sido desconectado y sacado del electrodoméstico.
Los cilindros deben almacenarse afuera y lejos del alcance de los niños. Tampoco deben
guardarse en un edificio, una cochera o cualquier otra área cerrada.
Al sacar su parrilla del lugar de almacenamiento, es posible que telarañas o alguna otra basura
esté tapando el quemador. Consulte "Ensamblado y mantenimiento del quemador" en la
sección “Debido cuidado y mantenimiento”.
ANTES DE GUARDAR SU PARRILLA:
•
Cerciórese de haber cerrado totalmente la válvula del cilindro.
•
Limpie todas las superficies.
•
Aplíqueles a los quemadores una capa delgada de aceite para cocinar para evitar que se oxiden
demasiado.
•
Si guarda su parrilla afuera, desconecte el tanque de gas LP y déjelo AFUERA.
•
Ponga una tapa protectora sobre el tanque de gas LP y almacénelo afuera en un lugar bien ventilado
alejado de la luz directa del sol.
•
Limpie el quemador antes de usarlo al sacarlo del almacenamiento, al comienzo de la temporada de
asar a la parrilla o después de un mes de no haberlo usado. A las arañas e insectos les gusta
construir sus nidos en los tubos de quemadores (especialmente en los meses en que hace frío) y
estos nidos pueden causar incendios en los tubos de los quemadores o bajo la parrilla.
•
Si guarda la parrilla afuera, cúbrala para protegerla de las inclemencias del tiempo.
46
RESOLUCIÓN DE PROBLEMAS
Problema:
•
1. Revise si hay suficiente gas en el cilindro.
2. Mala chispa del electrodo.
Revise si la parrilla se enciende con el fósforo.
El electrodo o colector pueden necesitar un ajuste.
3. El quemador podría no estar bien asentado.
4. El quemador puede estar tapado.
5. La válvula del cilindro puede estar cerrada.
6. El regulador no está bien asentado sobre la
válvula del cilindro.
•
Fuego en la perilla de control
1. Los orificios del quemador pueden estar tapados.
Consulte “Ensamblado y mantenimiento del quemador”
en la sección "Debido cuidado y mantenimiento".
2. El quemador no está bien asentado sobre la válvula
de control.
3. Las conexiones del gas pueden estar flojas.
Revise para detectar fugas y apriete todas las
conexiones.
•
Llamas amarillas en el
quemador
1. El quemador está tapado. Consulte “Ensamblado
y mantenimiento del quemador” en la sección
"Debido cuidado y mantenimiento".
•
La llama se apaga en "LOW"
1. Los orificios del quemador pueden estar tapados.
Consulte “Ensamblado y mantenimiento del
quemador” en la sección "Debido cuidado y
mantenimiento".
2. La parrilla no ha sido precalentada lo suficiente.
3. El quemador no está bien asentado en la válvula
de control.
•
•
47
El quemador no enciende
Posibles causas:
El quemador no se calienta bien
La parrilla se calienta demasiado
1. Se ha activado el dispositivo controlador del flujo en
el regulador. Consulte “Método para restablecer el
regulador” en la sección “Cómo conectar el cilindro
de gas LP y la manguera o el regulador a la parrilla”.
1. Demasiada grasa acumulada causa incendios
de grasa.
2. Regulador dañado o defectuoso.
Reemplácelo con pieza autorizada de fábrica.
3. Cocine a temperatura más baja.
LAS PREGUNTAS MÁS FRECUENTES
El número de serie y de modelo de su parrilla, así como la información de contacto para el Servicio al Cliente de
Brinkmann, están impresos en la etiqueta plateada situada debajo del panel de control ya sea en la parte trasera
de la parrilla o al lado del cuerpo de la parrilla, bajo el anaquel lateral.
Estas preguntas y respuestas son para su información general solamente y podrían no ser pertinentes para el
modelo de su parrilla.
Pregunta: ¿Por qué no se enciende bien mi parrilla?
Respuest: Siempre siga las instrucciones que aparecen en el panel de control o en este manual.
Además, tome en cuenta estas causas:
•
Revise el suministro de gas LP.
•
Revise para cerciorarse de que todas las conexiones de gas están bien fijas.
•
Quizá tenga que cambiarse la pila AA del encendedor.
•
Los cables del encendido pueden estar flojos. Quite la pila, inspeccione la caja de conexiones del
encendedor ubicada atrás del panel de control y conecte los cables sueltos.
•
Las puntas de los electrodos que generan la chispa quizá se aflojaron de su lugar. Cierre el suministro de
gas y ponga la perilla de control en la posición de "OFF". Presione el botón del encendido y dígale a otra
persona que se fije si sale una chispa de las puntas del electrodo. La distancia que separa a la punta
generadora de chispas del electrodo del receptor de la chispa debe ser de aprox. 3/16" (1/2 cm). Si la
punta del electrodo necesita un ajuste, dóblela para que esté a la distancia correcta.
•
Revise que el extremo de cada tubo Venturi del quemador esté bien situado sobre el accesorio para el
orificio de la válvula de gas.
•
Quizá haya una obstrucción en la tubería de gas. Para corregir el problema, quite la manguera o el
regulador del gas LP o bien la tubería del gas natural de su parrilla. Abra el suministro de gas por un
segundo para ver si todavía está obstruida la tubería. Si ya no lo está, vuelva a conectarla, pero si está
tapada, reemplácela con una nueva manguera o un ensamblado del regulador.
•
Si sospecha que hay una obstrucción en la manguera, el ensamblado del regulador, el orificio o las
válvulas de gas, llame al departamento de atención al cliente de Brinkmann al 800-527-0717.
Pregunta: ¿Por qué mi parrilla de gas LP tiene una llama baja o una llama anaranjada o amarilla?
Respuesta: Necesita sacar el aire de la tubería de gas o reajustar el dispositivo limitador del flujo del
regulador. Si la válvula del cilindro se abre totalmente o demasiado rápido, se activará el dispositivo limitador
del flujo del regulador y cerrará el flujo de gas para que no fluya demasiado gas a su parrilla. Nota: Debe
realizar este procedimiento cada vez que conecte un nuevo tanque de gas LP a su parrilla:
CÓMO REAJUSTAR EL DISPOSITIVO LIMITADOR DEL FLUJO DEL REGULADOR
•
Gire la perilla de control a la posición de "OFF".
•
Cierre el tanque de gas LP en la válvula del cilindro.
•
Desconecte el regulador del tanque de gas LP.
•
Deje el tanque parado por dos minutos.
•
Vuelva a conectar el regulador al tanque de gas LP.
•
Abra la cubierta de la parrilla o del quemador lateral. Gire la válvula del cilindro lentamente hasta que
esté 1/4 ó 1/2 abierta.
•
Encienda la parrilla siguiendo las instrucciones de su panel de control o de este manual del propietario.
Pregunta: ¿Cómo y cuándo debo limpiar los componentes interiores para cocinar de mi parrilla?
Respuesta: Use un cepillo limpiador de latón para limpiar el interior de la parrilla, las parillas para cocinar, las
placas de distribución térmica y los recipientes de grasa. Nunca utilice un cepillo de alambre o cepillo metálico
para tallar en las piezas con acabado de porcelana, ya que pueden rayarlo o agrietarlo y fomentar la oxidación.
48
LAS PREGUNTAS MÁS FRECUENTES
Cómo limpiar parrillas para cocinar de acero inoxidable: Lave las parrillas con detergente suave y enjuáguelas
con agua caliente antes de usarlas por primera vez y cuando sea necesario. NO utilice un limpiador de hornos
comercial. Para residuos de comida difíciles de quitar, use un desengrasador y una fibra o un cepillo para limpiar
latón.
Cómo limpiar las parrillas para cocinar de hierro fundido con acabado de porcelana: Lave las parrillas con
detergente suave y enjuáguelas con agua caliente antes de usarlas por primera vez y cuando sea necesario. NO
utilice un limpiador de hornos comercial. Para residuos de comida difíciles de quitar, use un desengrasador y una
fibra o un cepillo para limpiar latón. Séquelas de inmediato con un paño o trapo suave o con toallas de papel.
Cómo limpiar la placa de distribución térmica: Las placas de distribución térmica deben limpiarse siempre que
haya goteado y se haya acumulado comida o grasa para disminuir la posibilidad de llamaradas. Limpie las placas
de distribución térmica con un detergente suave y enjuáguelas con agua caliente. Utilice un desengrasador y una
fibra o un cepillo para limpiar latón para quitar los residuos de comida que se han adherido. No utilice un cepillo de
alambre o cepillo metálico para tallar en las piezas con acabado de porcelana, ya que pueden rayarlo o agrietarlo y
fomentar la oxidación.
Cómo limpiar la bandeja y/o el tazón de grasa: La bandeja o el tazón de grasa (en algunos modelos) deben
inspeccionarse antes de cada uso de la parrilla para disminuir la posibilidad de un incendio. Quite la grasa (con una
espátula de plástico, por ejemplo) y lave todas las piezas con jabón suave o desengrasador y una solución de agua
caliente.
Pregunta: ¿Que causa la oxidación en las piezas de la parrilla y qué efecto tiene eso en los materiales de la parrilla?
Respuesta: La oxidación es un proceso natural que puede aparecer en las piezas hechas de hierro fundido y
acero. La oxidación no afectará el funcionamiento a corto plazo de su parrilla, aunque las inclemencias del
tiempo y el calor extremo sí pueden hacer que la cubierta de acero inoxidable adquiera un color bronceado.
Se trata de una decoloración, no una oxidación y por ello no se considera un defecto de fabricación.
Pregunta: ¿Qué causa que mi parrilla de acero inoxidable se decolore y cómo puedo limpiar la cubierta de mi parrilla?
Respuesta: Humo, las inclemencias del tiempo y mucho calor pueden hacer que la cubierta de acero inoxidable
adquiera un color bronceado. Esto no debe confundirse con oxidación y no es un defecto de fabricación. Los
aceites para máquinas utilizados en el método de fabricación del acero inoxidable y los aceites para cocinar y una
cubierta de la parrilla sucia también pueden fomentar la decoloración si la cubierta no es limpiada antes de utilizar
la parrilla. Después de ensamblar su parrilla, quite la película de PVC protectora de la cubierta de su parrilla y utilice
un limpiador de acero inoxidable y un trapo o paño suave para quitar todo residuo de adhesivo y aceite del interior y
exterior de la cubierta de su parrilla. Nunca use limpiadores o depuradores abrasivos. Además de la limpieza inicial,
la limpieza rutinaria para quitar mugre, grasa y aceite ayudará a que no se decolore la cubierta.
Pregunta: ¿Puedo convertir mi parrilla de gas propano a gas natural?
Respuesta: La mayoría de las parrillas de gas se fabrican conforme a especificaciones exactas y están autorizadas
para usarse exclusivamente para gas propano o natural. Sin embargo, algunos modelos pueden ser convertidos sin
peligro con equipos de conversión disponibles para ciertos modelos. Llame al departamento de atención al cliente
de Brinkmann al 800-527-0717 para averiguar si su parrilla puede ser convertida.
Pregunta: ¿Por qué el ensamblado la manguera o del regulador incluido con mi parrilla no puede adaptarse al
antiguo tanque de gas LP que he utilizado por muchos años?
Respuesta: El gobierno federal de los EE.UU. regula los electrodomésticos de gas y los tanques de gas LP.
Cuando se modificó el reglamento, se actualizaron los accesorios para tanques de gas LP con el fin de que
cumplieran con el reglamento, Si su tanque de gas LP no es compatible con la manguera o el regulador incluido
con su nueva parrilla, su tanque es anticuado y debe reemplazarse. Nota: A partir del 1 de abril del 2002, todos los
tanques de gas LP vendidos deben incluir un dispositivo protector contra sobrellenado u "OPD". Este dispositivo
interno evita que el tanque de gas LP sea sobrellenado. Tanques sin la válvula OPD no pueden rellenarse.
Pregunta: A veces oigo un zumbido proveniente de mi regulador de gas. ¿Debo estar preocupado?
Respuesta: El zumbido es causado por el gas que está pasando por el regulador. Es normal que haga poco ruido y
esto no obstaculizará el funcionamiento de su parrilla. Sin embargo, si el zumbido es fuerte, necesita sacar aire de
la tubería de gas o reajustar el dispositivo limitador del flujo de gas con el método para restablecer el regulador en
la sección “Cómo conectar el cilindro de gas LP y la manguera o el regulador a la parrilla”. Este método debe
seguirse cada vez que usted conecte un nuevo tanque de gas LP a su parrilla. Si necesita ayuda, consulte su
manual del, propietario o llame al departamento de atención al cliente de Brinkmann al 800-527-0717.
49
INSTRUCCIONES DE ENSAMBLADO
LEA MUY BIEN TODAS LAS ADVERTENCIAS DE SEGURIDAD E INSTRUCCIONES DE
ENSAMBLADO ANTES DE ENSAMBLAR O UTILIZAR SU PARRILLA.
RECOMENDAMOS QUE DOS PERSONAS COLABOREN EN EL ENSAMBLADO DE ESTA UNIDAD.
Las siguientes herramientas son indispensables para ensamblar esta parrilla de gas
Charmglow® Deluxe Kitchen:
• Destornillador
PARTS LIST:
1
1
Ensamblado del Cuerpo de la Parrilla
2
1
Ensamblado de la Bandeja del Tanque
3
1
Mesa Lateral Izquierda
4
1
Parrilla del Quemador Lateral
5
2
Parrillas para Cocinar
6
1
Parrilla para el Quemador
de Fuego Directo
7
1
Mesa Lateral Derecha
8
1
Compartimiento Lateral Izquierdo
9
2
Placas de Distribución Térmica
10
11
12
13
14
15
16
17
18
1
2
2
1
1
2
1
1
1
Compartimiento Lateral Derecho
Asas para el Compartimiento
Cubiertas Deslizantes de la Parrilla
Tazón de Grasa
Abrazadera del Tazón de Grasa
Marcos Sostenedores de la
Campana
Caja Eléctrica de Salida
Ensamblado de la Instalación de Luz
Campana con Luz
Esta parrilla fue diseñada con Válvulas para
Combustible Dobles para convertir fácilmente gas
propano líquido (LP) a gas natural. Un juego de
conversión (812-8000-S Modelo) debe ser comprado e
instalado para uso con gas natural.
50
1
2
7
3
4
5
6
8
10
9
12
13
14
11
16
15
18
17
PARA PARTES DE REEMPLAZO DE PARRILLA BAJO GARANTIA, FAVOR DE VISITARNOS POR
LA RED MUNDIAL EN: www.grillpartsonline.com
(Se requerirá el comprobante de compra.)
Inspeccione el contenido de la caja para verificar que todas las partes estén incluidas e intactas.
51
Escoja un área abierta y libre de
escombros para el ensamblado y
pídale a un amigo que le ayude a
ensamblar su parrilla. Ponga cartón
debajo para proteger al acabado de
la parrilla y al área del ensamblado.
PRECAUCIÓN: Algunas piezas
pueden tener
bordes filosos.
Póngase guantes
protectores en
caso necesario.
Paso 1
Atornille el tubo corto al codo del
ensamblado de la instalación de luz.
Paso 2
Pase el cable eléctrico a través de la
parte trasera de la campana como se
muestra.
Paso 3
Coloque la campana con luz sobre el
suelo. Afloje los dos pernos y tuercas
de cada luz. Alinee los agujeros de la
instalación eléctrica sobre los
agujeros de la campana y fije con los
pernos y las tuercas incluidas con
cada luz.
52
Paso 4
Desatornille a la mitad los ocho
pernos preinstalados de las
abrazaderas de soporte izquierda y
derecha. Alinee los orificios de la
barra de soporte izquierda para la
campana con los orificios para la
abrazadera de soporte y apriete los
pernos de ésta. Haga lo mismo con
la barra de soporte derecha para la
campana. (Se llaman soporte
izquierdo y derecho de la campana si
son vistos desde el frente de la
parrilla)
Soporte
Soporte izquierdo
de la campana
derecho de la
campana
Abrazadera
del cable
Nota: Al realizar el Paso 5, levante el
ensamblado de la campana
con la ayuda de un amigo y
alinéelo con las barras de
soporte de la campana.
Paso 5
Desatornille a la mitad los ocho
pernos preinstalados de las barras
de soporte derecha e izquierda.
Levante la campana y alinee los ojos
de la cerradura del ensamblado de la
campana con los pernos situados en
la parte superior de las barras de
soporte derecha e izquierda.
Descanse el cable eléctrico en la
ranura ubicada en la parte superior
de la barra de soporte derecha.
Deslice los pernos a través del ojo
de la cerradura y apriete fijamente en
su lugar
Paso 6
Tienda el cable eléctrico a lo largo de
la barra de soporte derecha y fíjelo
en su lugar con las abrazaderas para
cables preinstaladas.
53
Paso 7
Quite los dos tornillos del asa del
compartimiento y luego una el asa al
compartimiento, introduzca los
tornillos desde el interior del
compartimiento.
Paso 8
Afloje aproximadamente a la mitad
los cuatro tornillos de cada lado del
cuerpo de la parrilla. Con la ayuda de
un amigo, coloque las ranuras
situadas en la mesa lateral derecha
sobre los cuatro tornillos y deslice
hacia abajo. Jale el compartimiento
hacia afuera para poder alcanzar las
cabezas de los tornillos. Apriete los
tornillos para fijarlos. Haga lo mismo
para la mesa lateral izquierda.
Paso 9
Inserte los compartimientos a las
mesas laterales izquierda y derecha.
54
Paso 10
Inserte las cubiertas deslizantes al
cuerpo de la parrilla, a las mesas
laterales izquierda y derecha.
Nota: Levante las cubiertas
deslizantes sobre las
lengüetas al insertar en las
mesas laterales.
Paso 11
Desatornille los cuatro pernos
previamente unidos al panel inferior.
Alinee los orificios en el
compartimiento del tanque con los
orificios del panel inferior. Hecho
esto, fije los cuatro pernos quitados
anteriormente.
Nota: Fíjese que el asa del
compartimiento mire hacia
adelante.
Paso 12
Instale la abrazadera para el tazón
de grasa a la parte trasera del
ensamblado de la parrilla.
Paso 13
Deslice el tazón de grasa a la
abrazadera correspondiente
ubicada bajo el cuerpo de la parrilla
que se encuentra en el panel
trasero de ésta.
55
Paso 14
Quite este
perno
Desatornille a la mitad los cuatro
pernos que detienen los casquillos
eléctricos. Los tomacorrientes están
situados en la parte trasera de la
parrilla. Quite el perno del centro del
tomacorriente derecho.
Paso 15
Instale el empaque de la caja
eléctrica de salida a los pernos.
Paso 16
Enchufes para el
refrigerador y los
accesorios
Enchufes para
la campana de
luz
Deslice la caja eléctrica de salida a
los pernos de salida alineando los
ojos de la cerradura a los pernos.
Apriete muy bien. Reemplace el
perno del centro de la salida derecha
del Paso 14.
56
Paso 17
Rejilla del
quemador
lateral
Coloque las placas de distribución
térmica en el nivel inferior del
ensamblado del cuerpo de la
parrilla directamente encima de
los quemadores.
Parrillas para
cocinar
Placas de
distribución
térmica
Paso 18
Coloque la rejilla del quemador
lateral sobre el quemador lateral
situado en el extremo izquierdo.
Paso 19
Coloque las parrillas para cocinar
sobre las nervaduras de sostén
directamente encima de las
placas de distribución térmica.
Nota: La parrilla para cocinar de
acero inoxidable debe
colocarse sólo encima del
quemador de fuego directo
ubicado en el extremo
derecho. No utilice su
unidad con las parrillas
negras para cocinar sobre
el quemador de fuego
directo.
Paso 20
Quite la tapa del encendedor e
introduzca la pila con el polo
positivo apuntando hacia la tapa
del encendedor. Reemplace la tapa
del encendedor y asegúrese de
que el encendedor funcione
debidamente.
57
Pila
Tapa del
encendedor
Charmglow® Deluxe Kitchen 8750 (Armada)
58
Diagrama del
cableado de la
campana
59
Diagrama del
cableado del
carrito
Nota: Si es necesario cambiar el cable eléctrico
original del calentador, use un cableado
aprobado para el electrodoméstico aprobado
para 250° C.
Use solamente una tomacorriente protegido por un GFCI
(Interruptor de Circuito de Defecto de Suelo).
Use solo extensiones aprobados para uso al aire libre marcadas con
las letras W-A y clasificadas para el uso de este aparato.
60
FOR GRILL WARRANTY REPLACEMENT PARTS, PLEASE VISIT US AT:
www.grillpartsonline.com
PARA PARTES DE REEMPLAZO DE PARRILLA BAJO GARANTIA, FAVOR DE VISITARNOS POR
LA RED MUNDIAL EN: www.grillpartsonline.com
WARRANTY
The Brinkmann Corporation warrants to the original purchaser that the Charmglow® Deluxe Kitchen Gas Grill is free from defects due to workmanship or
materials for:
Five-year: on stainless steel burners
Three-year: on all other stainless steel parts
One-year: on valves, frame, housing, cart, igniter, cooking grates and other related parts
The Brinkmann Corporation’s obligations under this warranty are limited to the following guidelines:
•
This warranty does not cover grills that have been altered/modified or damaged due to: normal wear, rust, abuse, improper maintenance and/or
improper use.
•
This warranty does not cover surface scratches, rust or heat damage to the finish, which is considered normal wear.
•
The Brinkmann Corporation may elect to repair or replace damaged units covered by the terms of this warranty.
•
This warranty extends to the original purchaser only and is not transferable or assignable to subsequent purchasers.
The Brinkmann Corporation requires reasonable proof of purchase. Therefore, we strongly recommend that you retain your sales receipt or invoice. To obtain
replacement parts for your Charmglow® Deluxe Kitchen Gas Grill under the terms of this warranty, please call Customer Service Department at
800-527-0717. A receipt will be required. The Brinkmann Corporation will not be responsible for any grills forwarded to us without prior
authorization.
EXCEPT AS ABOVE STATED, THE BRINKMANN CORPORATION MAKES NO OTHER EXPRESS WARRANTY.
THE IMPLIED WARRANTIES OF MERCHANTABILITY AND FITNESS FOR A PARTICULAR PURPOSE ARE LIMITED IN DURATION TO THOSE
LISTED ABOVE FROM THE DATE OF PURCHASE. SOME STATES DO NOT ALLOW LIMITATIONS ON HOW LONG AN IMPLIED WARRANTY
LASTS, SO THE ABOVE LIMITATION MAY NOT APPLY TO YOU.
ANY LIABILITY FOR INDIRECT, INCIDENTAL OR CONSEQUENTIAL DAMAGES ARISING FROM THE FAILURE OF THE CHARMGLOW® DELUXE
KITCHEN GAS GRILL TO COMPLY WITH THIS WARRANTY OR ANY IMPLIED WARRANTY IS EXCLUDED. CUSTOMER ACKNOWLEDGES THAT
THE PURCHASE PRICE CHARGED IS BASED UPON THE LIMITATIONS CONTAINED IN THE WARRANTY SET OUT ABOVE. SOME STATES DO
NOT ALLOW THE EXCLUSION OR LIMITATION OF INCIDENTAL OR CONSEQUENTIAL DAMAGES, SO THE ABOVE LIMITATION OR EXCLUSION
MAY NOT APPLY TO YOU. THIS WARRANTY GIVES YOU SPECIFIC LEGAL RIGHTS, AND YOU MAY ALSO HAVE OTHER RIGHTS WHICH VARY
FROM STATE TO STATE.
GARANTÍA
The Brinkmann Corporation garantiza al comprador original que la parrilla Charmglow® de Gas de Alta Resistencia está libre de defectos de materiales o
mano de obra:
Cinco-años: los quemadores de acero inoxidable
Tres-años: en todas las piezas de acero inoxidable restantes
Un-año: en válvulas, armazón, envoltura, carro, encendedor, rejillas de cocinar y piezas relacionadas
Las obligaciones de The Brinkmann Corporation con respecto a esta garantía se limitan a lo siguiente:
•
Esta garantía no cubre parrillas que hayan sido alteradas/modificado o dañadas debido a: uso normal, herrumbre, maltrato, mantenimiento inadecuado
y/o uso inapropiado.
•
Esta garantía no cubre rayones superficiales, daño por herrumbre o por calor al acabado, lo cual se considera como uso normal.
•
The Brinkmann Corporation puede decidir reparar o reemplazar las unidades dañadas cubiertas bajo los términos de esta garantía.
•
Esta garantía se otorga al comprador original únicamente y no es transferible o asignable a los compradores posteriores.
The Brinkmann Corporation exige un comprobante de compra razonable. Por lo tanto, le recomendamos enfáticamente que retenga su recibo o factura de
venta. Para obtener partes de repuesto para la parrilla Charmglow® de Gas de Alta Resistencia bajo los términos de esta garantía, sírvase contactar al
Departamento de Servicio al Cliente al 800-527-0717. Se exigirá la presentación de un recibo. The Brinkmann Corporation no será responsable de
ninguna parrilla devuelta a nosotros sin autorización previa.
EXCEPTO POR LO INDICADO ARRIBA, THE BRINKMANN CORPORATION NO OTORGA NINGUNA OTRA GARANTÍA EXPRESA.
LAS GARANTÍAS IMPLÍCITAS DE COMERCIABILIDAD Y ADECUACIÓN CON UN FIN EN PARTICULAR SON DE DURACIÓN LIMITADA DE ACUERDO
A LO INDICADO ARRIBA A PARTIR DE LA FECHA DE COMPRA. ALGUNOS ESTADOS NO PERMITEN LIMITACIONES DE DURACIÓN DE UNA
GARANTÍA IMPLÍCITA; POR LO TANTO, LA LIMITACIÓN ANTERIOR PODRÍA NO SER APLICABLE EN SU CASO.
SE EXCLUYE CUALQUIER RESPONSABILIDAD POR DAÑOS INDIRECTOS, INCIDENTALES O CONSIGUIENTES DERIVADOS DE LA FALTA DE
CUMPLIMIENTO DE ESTA GARANTÍA O DE CUALQUIER GARANTÍA IMPLÍCITA DE THE CHARMGLOW® DE GAS DE ALTA RESISTENCIA. EL
CLIENTE RECONOCE QUE EL PRECIO DE COMPRA COBRADO SE BASA EN LAS LIMITACIONES CONTENIDAS EN LA GARANTÍA ANTERIOR.
ALGUNOS ESTADOS NO PERMITEN LA EXCLUSIÓN O LIMITACIÓN DE LOS DAÑOS INCIDENTALES O CONSIGUIENTES; POR LO TANTO, LA
LIMITACIÓN O EXCLUSIÓN ANTERIOR PODRÍA NO SER APLICABLE EN SU CASO. ESTA GARANTÍA LE OTORGA DERECHOS LEGALES
ESPECÍFICOS Y USTED PUEDE TENER ADEMÁS OTROS DERECHOS QUE VARÍAN DE UN ESTADO A OTRO.
140-8750-S
11/07
©2007 The Brinkmann Corporation
Dallas, Texas 75244 U.S.A
www.brinkmann.net
Owner’s Manual for Model
Manual del Propietario para el Modelo
810-8750-S