1
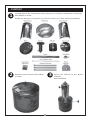
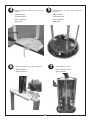
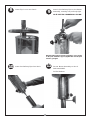
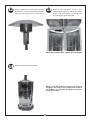
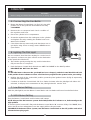
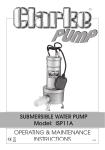
PATIO HEATER
MODEL No. PHT3
Green
Black
Stainless
OPERATING & MAINTENANCE
INSTRUCTIONS
0102
Thank you for purchasing this CLARKE PATIO HEATER.
WARNING!
It is MOST IMPORTANT that ANYONE attempting to use this apparatus
read this booklet thoroughly beforehand and carefully follow the
instructions given.
This will ensure their safety, and that of others around them.
Additionally, you can look forward to the heater giving you long and
satisfactory service.
This heater is designed for OUTDOOR USE ONLY
GUARANTEE
This CLARKE product is guaranteed against faulty manufacture for a period of 12 months from
the date of purchase. Please keep your receipt as proof of purchase. This guarantee is invalid
if the product is found to have been abused or tampered with in any way, or not used for the
purpose for which it was intended.
Faulty goods should be returned to their place of purchase, no product can be returned to us
without prior permission.
This guarantee does not effect your statutory rights.
SPECIFICATIONS
Type of gas
Propane
Rated pressure
37bar
Rated heating capacity
11 kW - 40,000BTU/Hr
Consumption
0.900 kg/h
Part No.
Black
6919100
Green
6919105
Stainless Steel
6919110
2
FEATURES
Patio Heaters are portable radiators, simple, highly efficient and reliable, whose functions are based
on the principle of reflected heat.
Wide areas can be heated depending upon atmospheric conditions. These models can be used
outdoors or indoors if the room is large enough and has a constant supply of fresh air.
Patio Heaters are suitable for an environment with a volume of at least 200 m3
Patio Heaters do not expel exhaust gas, non-polluting liquid gas fuel is used (Propane). This heater
complies with current European directives and standards.
The Heaters are fitted with the following safety devices
a. THERMOELECTRIC PROTECTION:
The pilot flame heats an element that, when heated, keeps the gas tap of the heater open (NOT
THE ONE ON THE CYLINDER). Within one minute of the pilot flame being extinguished, the gas supply
is shut off from the heater tap.
C. PIEZOELECTRIC LIGHTING:
Undoubtedly the safest method of lighting, i.e., no naked flame is required.
3
SAFETY PRECAUTIONS
This Patio Heater is designed for OUTDOOR USE ONLY
•
Patio Heaters MUST NOT be used in homes, offices and similar environments.
•
NEVER MAKE ANY MODIFICATIONS to the heater.
•
Patio Heaters can be installed in rooms with a volume of AT LEAST 200 M3, PER HEATER
•
MAKE SURE that there is no flammable material within 2M of the heater
•
MAKE SURE that all other materials are more than 1M from the heater
•
PAY ATTENTION to whatever may be above the heater because:
At 30 cm from the hood the temperature is 50°C
At 60 cm from the hood the temperature is 40°C
At 90 cm from the hood the temperature is 30°C
•
Any flammable coating must be at least 1M from the reflecting hood of the heater.
•
DO NOT TOUCH any part of the heater above the stack ,it could be very hot, enough to cause
serious burns.
•
ALWAYS wait at least one hour after switching off the heater completely before touching the
parts above the start button.
•
NEVER cover the heater .
•
DO NOT START the heater if it is not completely assembled.
•
To stabilise the heater, ALWAYS use cylinders with an empty weight of not less than 11 kg.
•
DO NOT USE the heater when there are strong winds, or secure its base to prevent the possibility
of it tipping over.
•
NEVER move the heater when it is lit.
•
NEVER move the heater just after switching off, but wait until it is cool.
•
REMOVE the gas cylinder from its compartment when the heater is not in use for long periods.
•
DO NOT replace the rubber hose (8) with one greater than 1M in length.
•
ALWAYS close the gas cylinder valve after use.
•
ALWAYS keep a constant check on the heater when it is operating.
•
DO NOT KEEP gas cylinder in cellars, basements, stairwells, corridors, underground passages, etc.
•
DO NOT EXPOSE the gas cylinder to the sun: if this is necessary, it must be covered.
•
KEEP the cylinder away from sources of heat.
4
ASSEMBLY
1
2
Carefully unpack the components and lay them out, checking to ensure that no damage
was suffered in transit.
Should any damage be apparent, you should contact you Clarke dealer immediately.
3
Ensure the nuts on the top of the diffuser
are tight.
Attach the Diffuser to the Burner
assembly.
4xScrews M5x10
5
4
6
5
Attach Support Brackets to Stack
Support.
Attach Base to the three support
brackets.
6xBolts M6x20
6xBolts M6x20
12xFlat Washers
12 Flat Washers
6xLock Washers
6xLock Washers
6xM6 Nuts
6xM6 Nuts
7
Attach stack to the stack support.
3xBolts M6x12
Attach Back Cover
4x Pan Head Screws
4 Flat washers
3xFlat Washers
6
8
Lower Top Cover over Stack
9
Attach Gas Delivery Pipe to the Burner
Assembly, ensuring it is perfectly tight.
NOTE: USE TWO SPANNERS AS SHOWN.
NOTE: Test the joint for leaks by applying a soapy liquid
to the joint. If bubbles appear, tighten the nut. The joint
must be gas tight.
10
11
Insert Gas Delivery Pipe into Stack
Secure Burner Assembly to Stack.
3xScrews M6x12
3x Flat Washers
7
12
13
Attach Reflector by placing two flat
washers on each post followed by the
reflector, then the round headed nuts.
Attach the regulator hose to the
connection arrowed, using the worm
drive clip supplied, ensuring the
connection is perfectly tight.
NOTE: The hose should be approx. 40cm in length.
14
Slide the front panel into place.
NOTE: Check the Regulator and hose for leaks by
applying a few drops of soapy liquid to the joints. If
any bubbles are apparent, investigate and repair
before proceeding.
8
OPERATION
WARNING!
Before using your Patio Heater ensure that all safety precautions have been complied with.
A. Connecting the Gas Bottle
Fig.1
1. Ensure the Burner Control Knob (A, Fig.1) is in the OFF
position. To do this, push the knob IN and turn fully
CLOCKWISE.
2. Remove the access panel and check condition of
the regulator and hose.
3. Place the cylinder in its compartment.
4. Screw the regulator into the outlet port on the cylinder
and tighten securely ensuring the flexible hose is not
stretched or kinked. .
5. Check that the tap turns easily and that there are no
gas leaks, using foam or soapy water...NEVER use an
open flame.
B. Lighting The Pilot Light
We recommend that first time starting be carried out in
the open air, as fumes are given off due to the elimination
of the protective lubricants.
1. Turn ON the gas by turning the tap anticlockwise then
fully secure the access panel
2. Push the Burner Control Knob IN and turn ANTI-CLOCKWISE to the PILOT position.
IMPORTANT! DO NOT force the Knob.
NOTE:
For the initial start or whenever the gas bottle has been changed, push the Control Knob IN and hold
in this position for two minutes to ensure all air has been purged from the system before proceeding.
3. Holding the knob in the ‘pushed IN’ position, press the piezo ignition button (B, Fig.1) repeatedly
until the pilot light ignites.
4. Continue to hold the Control Knob ‘IN’ for a further 1 minute after the pilot light is lit. When it is
released, it will pop back outwards and the pilot light should remain ‘ON’.
C. Low Burner Setting
With the pilot light lit, turn the Burner Control Knob anti-clockwise until it reaches the first indent.
D. HIGH Burner Setting
Turn the Burner Control Knob anticlockwise until it stops.
NOTE: Always allow the burner to operate in the LOW position for 5 minutes or so, before turning to the
High position.
To turn the patio heater OFF...first push the Burner control Knob ‘IN’ and turn it fully CLOCKWISE, then,
when the flame has extinguished, turn the supply OFF at the gas bottle.
IMPORTANT! If the Burner fails to operate, turn the Burner Control Knob to the OFF position and wait 5
minutes before trying again.
7
STORAGE
The heater is constructed from materials to withstand normal weather conditions, however, it is
advised to store under cover for maximum preservation.
If there are problems of space, the reflecting hood (1) can be removed, and the nuts and washers
preserved with care (NB: they are all stainless steel). Remove the cylinder from its compartment.
Enclose the burner unit in a polythene bag and similarly wrap the side covers to discourage the
possibility of local wild life from setting up home.
RESTARTING AFTER STORAGE
Remove the Diffuser, by removing the four screws around the outer band, clean inside and out with
an ordinary cloth (DO NOT USE oily products that would produce fumes when the heater is next
switched on).
Remove any cobwebs and dust from the Burner, then reassemble the parts.
Check the rubber hose and if cracked or damaged in any way, replace it with a hose of approx.
40cm in length.
MAINTENANCE
There are no user serviceable parts for this heater. It is necessary only to keep the various components
clean, particularly the underside of the hood. DO NOT clean the heater when it is lit or only just
switched off. Wait until it has cooled down. Clean using a clean soft cloth.
CHECK annually that the hose connecting the regulator to the Delivery pipe is in good order: otherwise,
replace it. (see your Clarke dealer)
Any repairs should be made by trained technicians and with original replacement parts. For parts
and servicing, consult your CLARKE dealer.
POINTS TO REMEMBER
Propane gas is stored under pressure, and the filling process causes the cylinder to get warm. Taking
gas out of the cylinder reverses this process and the cylinder gets colder. When a cylinder is stored
outside, the cylinder temperature equalises with the ambient temperature.
In the summer, taking cold gas from a warmish cylinder is not so much a problem, but in winter, an
already cold cylinder gets even colder as gas is removed, and moisture from the warmer air condenses
on the cold surface of the cylinder, similar to condensation on a window. In the worst case, this
moisture may even begin to freeze on the outside of the regulator.
This also has an effect on the flow rate of the gas. It should be noted that the flow rate at -10
degrees C is only half that at 15 degrees C. The volume of gas, and hence the heat output, is
therefore similarly effected.
10
TROUBLE SHOOTING
PROBLEM
POSSIBLE CAUSE
REMEDY
Gas odour during setup
Gas leak
Check all gas connections
Gas odour before first ignition
Gas leak
Check all gas connections
When piezo igniter button is
pressed, there is no spark at
pilot electrode.
Igniter electrode or piezo wire not connected
Reconnect igniter electrode or wire**
Broken electrode or piezo wire
Replace broken electrode or wire**
Faulty piezo igniter
Replace piezo igniter**
Electronic ignition is wet
Keep ignition system dry
Gas supply not turned on
Turn on gas supply
Control knob not in PILOT position
Follow Operational Instructions
Low gas pressure
Check gas supply pressure
Faulty Regulator
Replace regulator
Crimped pilot gas line
Replace pilot gas line**
Air in gas line
Pressing control knob in for 1-2 minutes or
until you smell gas.
Thermocouple not hot enough
Hold down control knob longer in pilot
position.
When igniter button is pressed,
there is spark at the pilot
electrode, but no pilot ignition
Pilot lights but does not stay lit
Connections not secure
Tighten connections
Faulty thermocouple
Replace thermocouple**
Faulty valve
Replace valve**
Windy conditions
Shield from wind
Delayed ignition
Burner lights but does not stay lit
Incorrect Burner flame
Low gas pressure
Check gas supply pressure
Blocked orifice
Check orifice opening**
Faulty valve
Replace valve**
Low gas pressure
Check gas supply pressure
Connections not secure
Tighten connections
Faulty valve
Replace valve**
Faulty Regulator
Replace regulator
Windy conditions
Shield from wind
Incorrect gas supply or pressure
Check gas supply pressure
Blocked orifice
Check orifice opening**
Faulty valve
Replace valve**
Faulty Regulator
Replace regulator
High altitude
Adjust orifice size for altitude**
** Consult your Clarke dealer
SPARE PARTS AND SERVICE
For Spare Parts and Service, please contact your nearest dealer, or CLARKE International, on
one of the following numbers.
PARTS & SERVICE TEL: 020 8988 7400
PARTS & SERVICE FAX: 020 8558 3622
or e-mail as follows:
PARTS: [email protected]
SERVICE: [email protected]
11