1
BS5R666D-0504
5R66 600Mダイバー
ダイバーズウオッチ600(5R66)
BS5R666D-0504
http://www.seiko-watch.co.jp/
お客様相談窓口 全国フリーダイヤル 0120-612-911(下記の最寄地に着信いたします)
お客様相談室
東京
〒101-0044 東京都千代田区鍛冶町 2-1-10
大阪
〒550-0013 大阪市西区新町 1-4-24
600
大阪 四ツ橋新町ビルディング 8階
5R66
お客様相談係
札幌
〒060-0061 札幌市中央区南一条西 7-20-1 札幌スカイビル 4階 セイコーサービスセンター内
福岡
〒810-0801 福岡市博多区中洲 5-1-22
取扱説明書
松月堂ビル 6階 セイコーサービスセンター内
INSTRUCTION
●この度はセイコープロスペックスをお買い上げいただき、ありが
とうございました。
●この時計は極めて高い防水品質を持つ本格的プロフェッショナル
ダイバーズウオッチです。
●ダイバーズウオッチとして、その機能を充分に発揮できるように設
計・製作上配慮してありますので、安心してご使用いただけます。
●末永くご愛用いただくために、この説明書をよくお読み頂き、正
しくお取扱ください。
※お買い求めの際の金属バンドの調整はお買い上げ店・弊社お客様
相談窓口(裏表紙に記載)にて承っておりますが、その他のお店
では有料もしくはお取扱いいただけない場合があります。
警告
取扱いを誤った場合に、重傷を負うなどの重大な結果になる危険性が想定さ
れることを示します。
注意
取扱いを誤った場合に、軽傷を負う危険性や物質的損害をこうむることが想
定されることを示します。
■潜水に際しての注意事項(※必ずお読みください)・・・・・・・・・・・・・・・・・・・・・・・・・・・3
■製品の特長 ・・・・・・・・・・・・・・・・・・・・・・・・・・・・・・・・・・・・・・・・・・・・・・・・・・・・・・・・・・・・・・5
■各部の名称 ・・・・・・・・・・・・・・・・・・・・・・・・・・・・・・・・・・・・・・・・・・・・・・・・・・・・・・・・・・・・・・6
■ご使用方法(ゼンマイの巻きかた)・・・・・・・・・・・・・・・・・・・・・・・・・・・・・・・・・・・・・・・・・7
■時刻・日付合わせ、時差修正使用方法 ・・・・・・・・・・・・・・・・・・・・・・・・・・・・・・・・・・・・・10
■パワーリザーブ表示の見かた ・・・・・・・・・・・・・・・・・・・・・・・・・・・・・・・・・・・・・・・・・・・・・27
■回転ベゼルの使いかた ・・・・・・・・・・・・・・・・・・・・・・・・・・・・・・・・・・・・・・・・・・・・・・・・・・・29
■ダイバーアジャスターの操作 ・・・・・・・・・・・・・・・・・・・・・・・・・・・・・・・・・・・・・・・・・・・・・30
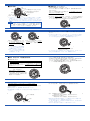
■潜水に際しての注意事項(※必ずお読みください)
◇潜水前
次の項目を点検してください。
A時刻が正確にセットされているか。
Bパワーリザーブ表示が1/2以上あるか。少なかった場合、リュウズ回してゼンマイを巻
き上げてください。→「●リュウズでのゼンマイの巻きかた」をご参照ください。
C回転ベゼルの回り具合は良好か。(所定の時間にセットされているか。ゆるすぎたり、
きつすぎたりしないか。
)
④りゅうずのねじをしっかり締めてあるか。
Eバンドとガラスにひび、カケ等の異常がな
いか。
Fケースのねじにゆるみがないか。
3
Gバンドの固定は確実か。(バネ棒、止め金、 C
A
その他。)
24
2
22
4
20
■ルミブライトについて ・・・・・・・・・・・・・・・・・・・・・・・・・・・・・・・・・・・・・・・・・・・・・・・・・・・31
18
6
B
16
■こんな時には、・・・・・・・・・・・・・・・・・・・・・・・・・・・・・・・・・・・・・・・・・・・・・・・・・・・・・・・・・・36
F
6
■使用上の注意とお手入れの方法 ・・・・・・・・・・・・・・・・・・・・・・・・・・・・・・・・・・・・・・・・・・・32
8
目次
14
10
D
12
■アフターサービスについて ・・・・・・・・・・・・・・・・・・・・・・・・・・・・・・・・・・・・・・・・・・・・・・・38
E
■補修用性能部品について ・・・・・・・・・・・・・・・・・・・・・・・・・・・・・・・・・・・・・・・・・・・・・・・・・38
G
■製品仕様 ・・・・・・・・・・・・・・・・・・・・・・・・・・・・・・・・・・・・・・・・・・・・・・・・・・・・・・・・・・・・・・・39
■製品の特長
注意
万一、異常が認められた場合は、お買い上げ店にご相談ください。
◇潜水中
4
飽 和 潜 水において、水中でのリュウズ操 岩などにぶつけない 回転ベゼルは水の中
水深600mまでの範囲 作はしないでくださ ように注意してくだ ではやや回転がきつく
い。
さい。
なることがありますが、
でご使用ください。
異常ではありません。
◇潜水後
●防水性能について
この時計は、ヘリウムガスを使用する飽和潜水向け仕様として、水深600メートルに充分耐え
うる高度な防水性と、長期間の水中使用に耐えうる優れた耐水性をあわせ備えています。
●スプリングドライブについて
スプリングドライブとはセイコー独自の機構で、ゼンマイが巻き解ける力を唯一の動力源としな
がらも、クオーツ時計と同等の高精度を実現した機構です(
。機構の詳細は別冊の
「スプリン
グドライブ・ハンドブック」
をお読みください。
)
ゼンマイを充分に巻き上げた状態から、約72時間
(約3日間)
動き続けます。ゼンマイの巻き上
げ状態がわかるパワーリザーブ表示付きです。秒針は完全に滑らかなスイープ運針で動きま
5
す。
巻き上げ方式は自動巻きですが、手巻き機構も併せて備えていますので、始動時の巻き上
げに便利です。
さらに、日付連動式の時差修正機能付きで、24時針が付いています。
注意
海水を真水でよく洗い落とし、サビなど
が出ないようにしてください。
また時計を洗った後よく拭いてくださ
い。
スプリングドライブはゼンマイの力で動きます。パワーリザーブ表示の残量
が無くなる前に充分に巻き上げてご使用ください。
特に低温下(0℃以下)では、パワーリザーブ表示が「1/6」以下になると止
まる可能性がありますのでご注意ください。
■各部の名称
■ご使用方法(ゼンマイの巻きかた)
分針
時針
回転ベゼル
ねじロック解除位置:ゼンマイ巻き上げ
(手巻き)
1段目:時差修正および日付合わせ
2段目:時刻合わせ
24
2
4
20
22
18
8
6
6
16
秒針
14
この時計は自動巻き式(手巻き付き)です。
・ゼンマイは、腕につけてご使用いただく際には、通常の腕の動きで自然に
巻き上がります。
・止まっている時計をお使いになる場合には、リュウズを回してゼンマイを
巻き上げることをお勧めします。
10
12
パワーリザーブ
表示針
24時針
6
日付
リュウズ
ねじロック位置
●リュウズでのゼンマイの巻きかた
※リュウズはねじロック方式を採用しています。リュウズ操作をする場合は、ロックを解除し
てご使用ください。リュウズ操作をしない場合は必ずロック状態にしておいてください。
また、ねじ込む際は、ねじのかみあい具合に注意しゆっくりとねじ込んでください。回しにくい場
合は元に戻してからやり直してください。無理にねじ込むとねじ部
(ケース)
を壊す恐れがあります。
Aリュウズは、ねじロック仕様になっております。リュウズを左(6時方向)7
に回してねじロックを解除してください。(ねじロックが完全に解除される
と、リュウズは締めこんだときの位置よりも少し外側に出ます。
)
24
2
22
4
20
警告
18
24
8
16
16
8
20
20
18
6
14
10
6
6
18
4
4
6
14
2
22
8
14
10
12
※ゼンマイの巻き上がり量については27ページ「■パワーリザーブ表示の見かた」をご参
照ください。
※フル巻き上げの状態からさらにリュウズを回しても、リュウズは止まらずに回転さ
せることができます。リュウズを回し続けても時計が壊れることはありませんが、
ゼンマイはそれ以上巻き上がりませんので過剰な操作はお控えください。
24
2
22
6
6
16
※回転ベゼルのメンテナンスを考慮して、ケース上面の2箇所のねじを外すこ
とで、回転ベゼルを着脱できる構造となっていますが、絶対に緩めたりしな
いでください。メンテナンスはセイコーが責任を持って行います。
10
12
12
24
2
22
20
4
18
9
8
16
※リュウズを5回転させると約10時間分
のパワーリザーブが得られます。巻き
上げ操作時の目安にしてください。
※なお、リュウズを左(6時方向)に回
してもゼンマイは巻き上がらず、空回
りする構造になっています。
6
6
Bねじロックが解除されましたら、 Cパワーリザーブ表示針がフル巻き
リュウズを押し付けないように注
上げ表示になるまで、ゼンマイを
8
意しながら右(12時方向)にゆっ
巻いてください。秒針が動きはじ
くり回して、ゼンマイを巻いてく
めます。
ださい。
14
10
12
Dリュウズを押し付けながら右(12
時方向)に回し、止まるところま
でねじ込んでください。
※リュウズをねじ込んでいる時に若干のクリック感がありますが、これはゼンマイが
巻き上げられる感触が伝わっているものですので問題はありません。
■時刻・日付合わせ、時差修正使用方法
●時刻の合わせかた
24
2
22
18
6
8
16
24
11
6
10〈タイプ 1 〉通常の24時針として使用する場合
(午前・午後が読める)
・普通の使い方がこのタイプになります。
・たとえば、時、分、24時針とも日本時間に
合わせた時計を、海外旅行中に旅先の時刻
に時差修正で合わせた際、24時針で日本時
間を知ることができ便利です。
4
20
・必ず時計が動いている状態(ゼンマイが巻き上げられた状態)で、日付・時刻の
合わせをしてください。
・この時計の24時針の使いかたには、2つのタイプがあります。そのタイプによっ
て時刻の合わせかたが異なりますので、どんな使いかたにするのか選択してから
時刻合わせをしてください。
〈タイプ 2 〉24時針に他の地域の時刻を表示させて使用する場合
・住む場所とは、異なる時刻(時差のある時刻)に合わせておき、24時針と時分針と
でデュアルタイム表示として使用する場合にこのタイプを選びます。
・たとえば、24時針を世界標準時(GMT)に合わせ、時分針を日本時間に合わせる
と、いつでも24時針でGMTを確認できることになります。
2
22
10
12
4
20
14
18
16
8
6
6
14
10
12
Bリュウズを左に回し、24時針と分針に注目し現在時刻に合わせます。
Aリュウズを左(6時方向)に回してねじロックを解除してから、2段目まで引
き出してください。
2
20
ねじロック解除位置
4
18
16
8
6
1
14
10
12
2段目
ねじロック位置
20
18
1
6
24
22
4
12
2
16
※秒針が止まりますので、秒針が0秒に来た時に引き出してください。
※必ず時計が動いている状態(ゼンマイが巻き上げられた状態)で時刻合わせをして
ください。
24
22
8
24時針を普通の24時針として合わせる方法〈タイプ1を選択した場合〉
14
10
12
<例> 午前10時0分に合わせる場合は・・・
24時針を24時の10時(=5時位置)、分針を0分に合わせます。
午後6時0分に合わせる場合は・・・・
24時針を24時の18時(=9時位置)、分針を0分に合わせます。
※時針が合わせる時刻と異なる時刻を示している場合がありますが、24時針と分針の
みを見て合わせてください。
(時針は後から合わせます。
)
※この時、時針の位置によって日付修正される場合がありますが、これも後で合わせ
られますのでご安心ください。
※合わせたい時刻の手前から分針をゆっくり進めて合わせてください。
13
C時報と同時にリュウズを押し込んでください。
Eリュウズを回転させ、時針を現在時刻に合わせてください。
※24時針、分針、秒針のみ現在時刻に合った状態になっています。
※時刻合わせは、電話の時報サービスTEL.117が便利です。
④リュウズを1段目まで引き出してください。
24
※日付を合わせる場合は、ここで一緒に合わせてください。
(詳しくは→21ページ「●日付の合わせかた」を参照)
※日付が変わるところが午前0時ですので、午前・午後を間違いなく合わせてくださ
い。
※リュウズの回転の際、時針の1時間単位の動きを確認しながら静かに回してくださ
い。
※時針を修正している時、その他の針が少し動きますが故障ではありません。
2
4
20
22
F合わせ終わったらリュウズを押し込んでください。さらに押し付けながら 15
右(12時方向)に回して止まるところまでねじ込んでください。
14
18
6
1
※リュウズをねじこんでいる時に若干のクリック感がありますが、これはゼンマイが
巻き上げられる感触が伝わっているものですので問題はありません。
8
16
14
10
12
24時針を他の地域の時刻として合わせる方法〈タイプ2を選択した場合〉
Bリュウズを左に回し、24時針と分針に注目し合わせたい「他の地域」の時
刻に合わせます。
Aリュウズを左(6時方向)に回してねじロックを解除してから、2段目まで
引き出してください。
24
2
22
20
4
18
1
16
8
6
※秒針が止まりますので、秒針が0秒に来た時に引き出してください。
※必ず時計が動いている状態(ゼンマイが巻き上げられた状態)で時刻合わせをして
ください。
14
10
12
16
17
24
2
ねじロック解除位置
4
8
2段目
10
12
ねじロック位置
C時報と同時にリュウズを押し込んでください。
※24時針、分針、秒針のみ「他の地域」の時刻に合った状態になっています。
※時刻合わせは、電話の時報サービスTEL.117が便利です。
④リュウズを1段目まで引き出してください。
24
Eリュウズを回転させ、時針を現在時刻(日本時間)に合わせてください。
※日付を合わせる場合は、ここで一緒に合わせてください。
(詳しくは→21ページ「●日付の合わせかた」を参照)
※日付が変わるところが午前0時ですので、午前・午後を間違いなく合わせてくださ
い。
※リュウズの回転の際、時針の1時間単位の動きを確認しながら静かに回してくださ
い。
※時針を修正している時、その他の針が少し動きますが故障ではありません。
2
4
20
22
18
18
16
8
6
1
14
10
12
より正確に時刻合わせをするために!
・スプリングドライブ機構の構造上、より正確な時刻合わせをしていただくには、
下記の点にご注意ください。
1.時刻合わせをする場合は、ゼンマイを充分(パワーリザーブ表示がフル巻上げ)
巻き上げてください。
2.止まっている時計を動かした場合は、ゼンマイを充分巻いて30秒程度秒針が動
いてから、リュウズを2段目に引き出してください。
3.リュウズを2段目まで引き出して秒針を止めている時間は、「30分以内」にして
20
ください。これ以上の時間引き出していた場合は一旦リュウズを押し込み、30
秒程度は秒針が動いてから、時刻合わせをし直してください。
F合わせ終わったらリュウズを押し込んでください。さらに押し付けながら 19
右(12時方向)に回して止まるところまでねじ込んでください。
※リュウズをねじこんでいる時に若干のクリック感がありますが、これはゼンマイが
巻き上げられる感触が伝わっているものですので問題はありません。
●日付の合わせかた
・この時計の日付修正は、時差修正の方法で時針を2周させて1日分の日付修正を行います。
(23ページ「●時差修正の使いかた」を参照ください。)
・時針を時計回りに2周させると「日を送る」こととなり、逆回転させると「日を戻
す」ことができます。
・時刻合わせの後の日付合わせや、前月が小の月(2,4,6,9,11月)の場合、修正を行っ
てください。
Aリュウズを左(6時方向)に回してねじロックを解除してから、リュウズを
21
1段目まで引き出してください。
Bリュウズを回転させ時針を2周させる毎に、日付が「1日分」修正できます。
24
2
22
ねじロック
解除位置
4
16
14
右回転:時針は、時計回りと逆方向に回転し、時針を
2周させると日付が1日戻ります。
6
1
8
16
14
20
18
6
1
<例> 24時針で、ロンドンの時刻を表示し、時分針で日本時間を表示させる場合…
日本時間午前10時0分の場合、ロンドンは、午前1時0分になります。
24時針を24時針の1時(12時と1時の間)、分針を0分に合わせます。
※他の地域として選択できるのは、日本時間からの時差が1時間単位で地域に限られ
ます。
※時針が合わせる時刻と異なる時刻を示している場合がありますが、24時針と分針の
みを見て合わせてください。
(時針は後から合わせます。
)
※この時、時針の位置によって日付修正される場合がありますが、これも後で合わせ
られますのでご安心ください。
※合わせたい時刻の手前から分針をゆっくり進めて合わせてください。
18
20
22
1段目
10
12
ねじロック位置
左回転:時針は、時計回りに回転し、時針を2周させ
ると日付が1日進みます。
※日付はどちらの方法で修正してもかまいません。日付修正が少ない方向を選択して
ください。
※リュウズの回転は、静かに行ってください。
※2周単位で時針を回転させると、時刻を変えることなく日付の修正ができます。
※時針を修正している時、その他の針が少し動きますが故障ではありません。
C日付合わせが終わったら、時針の位置を再度確認してリュウズを押し込ん
でください。
さらに押し付けながら右(12時方向)に回して止まるところまでねじ込ん
22 でください。
※リュウズをねじこんでいる時に若干のクリック感がありますが、これはゼンマイが
巻き上げられる感触が伝わっているものですので問題はありません。
●時差修正の使いかた
・海外旅行等で時差のある地域へ移動した場合、時計を止めることなく現地の時刻に
合わせられます。
・この修正は、日付に連動していますので、正しい時差修正が行なわれると現地の日
付を表示させることができます。
時差修正のしかた
Aリュウズを左(6時方向)に回してねじロックを解除してから、リュウズを
1段目まで引き出してください。
23
Bリュウズを回転して時差修正を行ってください。
時針だけが修正されます。
※1時間単位で時針の動きを確認しながらリュウズを回してください。
●都市と時差の比較表
※都市名・日本時間との時差は以下のとおりです。
24
2
ねじロック
解除位置
4
20
22
18
1段目
8
16
14
都市名
日本時間との時差
その他の都市
ウエリントン★
+3時間
フィージー諸島 オークランド★
ヌメア
+2時間
ソロモン諸島
シドニー★
+1時間
グアム島 ハバロフスク★
東京
±0時間
ソウル 平壌
香港
−1時間
マニラ 北京 シンガポール
バンコク
−2時間
ジャカルタ
ダッカ
−3時間
カラチ
−4時間
ドバイ
−5時間
モスクワ★
−6時間
メッカ ナイロビ
カイロ★
−7時間
アテネ★ イスタンブール★
6
1
右回転:マイナス時差修正(時針が戻ります)
10
左回転:プラス時差修正(時針が進みます)
12
ねじロック位置
※
「●都市と時差の比較表」の日本時間との時差を参照してください。
24 ※時差修正をするときは、午前・午後および日付等にご注意ください。
※時針を修正している時、その他の針が少し動きますが、故障ではありません。
※リュウズ右回転で時差修正をしてAM0:00を通過してPM9:00∼AM0:00付近に合
わせる場合は一旦、PM8:00まで戻し合わせてください。
C時差修正が終わったら、時針の位置を再度確認してリュウズを押し込んで
ください。さらに押し付けながら右(12時方向)に回して止まるところま
でねじ込んでください。
※リュウズをねじこんでいる時に若干のクリック感がありますが、これはゼンマイが
巻き上げられる感触が伝わっているものですので問題はありません。
パリ★
−8時間
ローマ★ アムステルダム★
ロンドン★
−9時間
カサブランカ
アゾレス諸島★
−10時間
リオデジャネイロ★
−12時間
カラカス
−13時間
サンティアゴ★
ニューヨーク★
−14時間
ワシントン★ モントリオール★
−15時間
メキシコシティー★
デンバー★
−16時間
エドモントン★
ロサンゼルス★
−17時間
サンフランシスコ★
アンカレッジ★
−18時間
ホノルル
−19時間
ミッドウエイ島
−20時間
26 シカゴ★
25
タシケント★
■パワーリザーブ表示の見かた
・パワーリザーブ表示で、ゼンマイの巻き上げ具合が確認できます。
・時計を腕から外して置いておく際には、次にご使用(携帯)されるまで動
き続けるかどうかをパワーリザーブ表示でご確認の上、必要に応じてゼン
マイを巻き上げてください。(時計を止めないためには、必ず余裕を持った
時間分を巻き上げるようにしてください。)
パワーリザーブ
の指示
ゼンマイの状態
持続時間
27
巻き上げ無しの状態
半分程度巻き上がった状態
約36時間(約1日半)動
時計は止まっているか、
きます。
止まる直前の状態です。
フル巻き上げの状態
約72時間(約3日間)動
きます。
★…サマータイム有り
※各都市の時差、およびサマータイムは国または地域の都合により変更する場合があります。
※フル巻き上げ状態でリュウズをそれ以上回しても、あるいは自動巻き機構による巻き上げが
行なわれても、ゼンマイが損傷を受けることはありませんのでご安心してお使いください。
この時計のゼンマイは自動巻き機構特有の構造(スリッピングアタッチメント)の働きで、
ゼンマイが巻き止まらないようになっております。
※モデルによって、
「パワーリザーブの指示」位置が若干異なる場合があります。
●自動巻き機構によるゼンマイ巻き上げの目安について
■回転ベゼルの使いかた
・ご使用時間と巻き上げ具合の目安は下記の通りです。実際にはお客様のご
使用状況(時計を携帯使用される時間や運動量等)によって異なってきま
すので、パワーリザーブ表示でご確認ください。
●経過時間の測定
1日当たり12時間の携帯で連続して3∼5日間ご使用されると、フル巻き上げ
になると思われます。
※1日のご使用時間が短い場合などは、パワーリザーブ表示をご確認の上、
必要に応じてゼンマイを巻き上げてください。
・回転ベゼルを動かし▼マークを分針に合わせてください。ある時間が経過
した後に、分針の指す回転ベゼル上の目盛を読めば、その時までの経過時
間がわかります。
・※回転ベゼルには0.5分単位のクリック装置がついていますので、目盛のセ
ットがしやすいと同時に、ショックなどで不用意に回転することを防ぎ
ます。
28
29
24
2
20
22
4
18
6
16
8
6
右図は10時10分潜水開始
(▼位置)後、30分経過した
ことを示しています。
14
10
12
時間
経
過
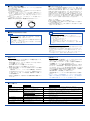
■ダイバーアジャスターの操作
■ルミブライトについて
バンドの長さを簡単に調節する機構です。ウェットスーツの上に着用する際
などにお役立て下さい。
A安全ぶたを90度程度起こします。
B安全ぶたをさらに20度程度倒します。多少抵抗がありますが、軽い力で倒れますの
で力を入れ過ぎないようにご注意ください。
CBの動作の後、6時側のバンドをバンドカーブに沿う方向に(曲線を描くように)
引きます。この際も軽い力で引けますので、力を入れ過ぎないようにしてください。
スライダーは約30mm伸びますが、上面の「目印」以上には引き出さないようにご
注意ください。
30 D矢印のロックボタンを押してから、上ぶたを持ち上げ、バックルを開放します。こ
の状態で手首につけてください。
E手首につけたら上ぶた、安全ぶたの順に閉じてください。
F時計をつけていない方の手で、バンドを適当なところまで縮めてください。
①
②
目印
(上面部)
スライダー
ロックボタン
上ぶた
12時間側バンド
⑤
安全ぶた
上ぶた
⑥
安全ぶた
③
⑥
④
ロックボタン
6時側バンド
■使用上の注意とお手入れの方法
〈照度データ〉
(目安値)
A. 太陽光〔晴天〕100,000ルクス〔曇天〕10,000ルクス
B. 屋内(昼間窓側)〔晴天〕3,000ルクス以上〔曇天〕1,000ルクス∼3,000ルク
ス〔雨天〕1,000ルクス以下
C. 照明(白色蛍光灯40Wの下で)〔1m〕1,000ルクス〔3m〕500ルクス(通常
室内レベル)
〔4m〕250ルクス
注意
かぶれやアレルギーについて
注意
日常のお手入れ
32
「ルミブライト」は、放射能等の有害物質を全く含んでいない、環境・人に安
全な蓄光(蓄えた光を放出する)物質です。ルミブライトは、太陽光や照明
器具の明りを短時間(約10分間:500ルクス以上)で吸収して蓄え、暗い中で
長時間(約3∼5時間)光を放つ夜光です。なお、蓄えた光を発光させていま
すので輝度(明るさ)は時間が経つに従ってだんだん弱まってきます。また、
光を蓄える際のまわりの明るさや時計との距離、光の吸収度合には多少の誤
差が生じることがあります。特に暗い環境での潜水の際は、光が充分に吸収
されていないと水中で発光しない場合があります。最低でも上記条件の光を 31
あてるか、水中ライトを併用して潜水される様、十分ご注意ください。
・ダイビングなど海水中でのご使用のあとは、真水で洗い、よく拭き取って
ください。化学薬品を使って洗わないでください。
・回転ベゼルは、ベゼルの下に汚れなどがたまり機能を損なう場合がありま
すので清潔にしてご使用ください。
・金属バンドについては、時々柔らかい歯ブラシ等を使い、石けん水で部分
洗いなどのお手入れをお願いします。
・バンドは多少余裕を持たせ、通気性をよくしてご使用ください。
・かぶれやすい体質の人や、体調によっては、皮膚にかゆみやかぶれをきた
すことがあります。
・かぶれの原因として考えられるのは、
1.金属・皮革に対するアレルギー
2.時計本体及びバンドに発生した錆、汚れ、付着した汗などです。
・万一肌などに異常を生じた場合は、ただちに使用を中止し、医師にご相談 33
ください。
その他、携帯上ご注意いただきたいこと
・転倒時や他人との接触などにおいて、時計の装着が原因で思わぬケガを負
う場合がありますのでご注意ください。
・特に乳幼児を抱いたりする場合は、時計に触れることでケガを負ったり、
アレルギーによるかぶれをおこしたりする場合もありますので、十分にご
注意ください。
・落としたりぶつけたりはもちろんのこと、激しいスポーツなどによるショ
ックもお避けください。時計が一時的に遅れたり進んだりします。
保管について
定期点検について
・「−10℃∼+60℃からはずれた温度」下では機能が劣化したり、
停止したりする場合があります。
・磁気の影響(テレビ、スピーカ、磁気ネックレス等)があると
ころに放置しないでください。
・強い振動のあるところに放置しないでください。
・極端にホコリの多いところに放置しないでください。
34 ・薬品の蒸気が発散しているところや薬品にふれるところに放置
しないでください。
(薬品の例:ベンジン、シンナーなどの有機溶剤、およびそれ
らを含有するもの=ガソリン、マニキュア、化粧品などのスプ
レー液、クリーナー剤、トイレ用洗剤、接着剤など=水銀、ヨ
ウ素系消毒液など)
・温泉や、防虫剤の入った引き出しなど特殊な環境に放置しない
でください。
・機種5R66の点検及び分解掃除はメーカーにて行ないますので、販
売店にはメーカーへ依頼するようお申しつけください。
・ながくご愛用いただくために、3∼4年に一度程度の分解掃除によ
る点検調整(オーバーホール)をおすすめします。
ご使用状況によっては、機械の保油状態が損なわれたり、油の汚
れなどによって部品が磨耗し、時計の進み、遅れが大きくなるこ
とがあります。また、パッキン等の部品の劣化が進み、汗や水分
35
の侵入などをで防水性能が損なわれる場合があります。分解掃除
による点検調整を、お買い上げ店にご依頼ください。
・部品交換の時は、「純正部品」とご指定ください。
・定期点検の際には、パッキンやバネ棒の交換もあわせてご依頼く
ださい。
※ダイバーズウオッチの使用環境は、ケースやバンド以外に内部の
機械にもその影響を与える場合がありますので、上記の期間を目
安に定期的な点検(オーバーホール)をお勧めします。
■こんな時には
現象
時計が止まっている。
考えられる原因
ゼンマイのエネルギーが無くなった。
このようにしてください
「●ゼンマイの巻きかた」に従ってゼンマイを巻き上げ、時刻を合わせ直してご使用ください。
携帯中や時計を外す際は、パワーリザーブ表示の針を確認し、必要に応じてゼンマイを巻いてください。
毎日使用しているが、パワーリザーブ表示が上
携帯時間が少ないか、
あるいは腕の動きが少ない。
がらない。
携帯使用する時間を長くしていただくか、時計を外す際のパワーリザーブ表示の残量が次にご使用される
までの時間分に足りない場合は、
リュウズを回してゼンマイを巻き上げてください。
時計が一時的に進む/遅れる。
暑いところ、
または、寒いところへ放置した。
常温に戻れば元の精度に戻ります。時刻を合わせ直してください。この時計は気温5℃∼35℃で
腕につけたときに安定した時間精度が得られるように調整してあります。
磁気を発生するもののそばに置いた。
磁気を遠ざけると、元の精度に戻ります。時刻を合わせ直してください。
元に戻らない場合には、
お買い上げ店にご相談ください。
落としたり強くぶつけたりまたは激しいスポーツをした。
強い振動が加えられた。
時刻を合わせ直してください。
元に戻らない場合には、
お買い上げ店にご相談ください。
パッキンの劣化などにより時計内部に水分が入った。
お買い上げ店にご相談ください。
36
ガラスのくもりが消えない。
パワーリザーブ表示の残量があるのに時計が
低温下(0℃以下)
に放置した。
止まった。
低温下(0℃以下)では、パワーリザーブ表示が「1/6」以下のときは時計が止まる場合があります。
リュウズを回してゼンマイを巻いてください。
止まっている時計を動かした直後、時刻合わ 動き出す際、
調速機構が働くまではやや時間がかかります。
せをしたら、秒針の運針が早く見えた。
(故障ではありません)
調速機構が働くまでに数秒間かかります。より正確に時刻を合わせるには、30秒程度秒針が動いてから
時刻合わせをしてください。
日付が、
日中に変わる
時刻合わせが12時間ずれている
12時間、針を進めて時刻および日付を合わせ直してください。
※その他の現象は、
お買い上げ店にご相談ください。
37
■アフターサービスについて
■製品仕様
・お買い求めいただきましたセイコープロスペックスは厳重な検査、調整を行った後、
お手元にお届けしております。しかし、取扱説明書にそった正常なご使用状態で保
証期間内に万一、不具合が生じた場合には保証書をそえて、お買い上げ店へお持ち
ください。メーカーにて無料で修理、調整させていただきます。保証内容は、保証
書に記載してあります。
・保証期間経過後の修理及びセイコープロスペックスについてのご相談は、お買い上
げ店でうけたまわっております。なお、ご不明な点は「セイコーウオッチ株式会社
お客様相談窓口」
(裏表紙に記載)へお問い合わせください。
1.基本機能・・・・・・・・3針(時・分・秒)、24時針、日付表示、パワーリザ
ーブ表示
2.水晶振動数・・・・・・・32,768Hz
3.精度・・・・・・・・・・平均月差±15秒以内(ただし、気温5℃∼35℃におい
て腕につけた場合)
(日差±1秒相当)
4.作動温度範囲・・・・・・−10℃∼+60℃
ただし、低温下(0℃以下)ではパワーリザーブ表示
が1/6以上で使用のこと
5.駆動方式・・・・・・・・ゼンマイ巻〈自動巻き(手巻き付き)〉
39
6.運針方式・・・・・・・・スイープ運針
7.付加機能・・・・・・・・時差修正機能(日付連動)
8.持続時間・・・・・・・・約72時間(約3日間)
38 ■補修用性能部品について
・この時計における補修用性能部品の保有期間は、通常7年間を基準としています。
正常なご使用であれば、この期間中は原則として修理可能です。(補修用性能部品
とは、時計の機能を維持するのに不可欠な修理用部品です。
)
・修理可能な期間はご使用条件によりいちじるしく異なり、精度が元通りにならない
場合もありますので、修理ご依頼の際にお買い上げ店とよくご相談ください。
・修理のとき、ケース・文字板・針・ガラス・バンドなどは一部代替品を使用させて
いただくことがありますのでご了承ください。
・その他、わからない点がありましたら、「セイコーウオッチ株式会社お客様相談窓
口」へお問い合わせください。
bThank you very much for choosing a SEIKO PROSPEX watch.
bThis is a professional diver ’
s watch featuring an extremely high water
resistant quality.
bThe watch is designed and manufactured to conform to requirements of a
standard diver’
s watch, so that you can use it for diving with confidence.
bPlease read the instructions in this booklet carefully for its proper use. We
hope you enjoy wearing this watch for many years to come.
※A length adjustment service of the metal band which is attached to the watch
upon purchase is available from the retailer from whom the watch was
purchased or SEIKO CUSTOMER SERVICE CENTER. Some other
retailers may charge you for the length adjustment or may not undertake
such treatments.
※パワーリザーブ表示がフル巻き上げの状態から
9.電子回路・・・・・・・・発振・分周・スプリングドライブ制御回路
(C-MOS-IC):1個
10.使用石数・・・・・・・・30石
11.耐磁性能・・・・・・・・4,800A/m(60ガウス、JIS・ISO両規格に準ずる)
12.外装防水性能・・・・・・600m飽和潜水用防水(JIS2種潜水時計600m)
※仕様は改良のため予告なく変更することがあります。
CONTENTS
■PRECAUTIONS FOR DIVING(PLEASE MAKE SURE TO OBSERVE THE FOLLOWING)・・・・42
■CHARACTERISTICS ・・・・・・・・・・・・・・・・・・・・・・・・・・・・・・・・・・・・・・・・・・・・・・・・・・・・・44
■NAMES OF THE PARTS ・・・・・・・・・・・・・・・・・・・・・・・・・・・・・・・・・・・・・・・・・・・・・・・・・・46
■HOW TO USE(HOW TO WIND THE MAINSPRING)・・・・・・・・・・・・・・・・・・・・・・・・47
■HOW TO SET THE TIME AND DATE, HOW TO USE THE TIME DIFFERENCE ADJUSTMENT FUNCTION ・・・・50
■HOW TO READ THE POWER RESERVE INDICATOR ・・・・・・・・・・・・・・・・・・・・・・・・67
■HOW TO USE THE ROTATING BEZEL・・・・・・・・・・・・・・・・・・・・・・・・・・・・・・・・・・・・・69
WARNING
■HOW TO USE THE DIVER ADJUSTER ・・・・・・・・・・・・・・・・・・・・・・・・・・・・・・・・・・・・・70
WARNING indicates the risks of serious consequences such as severe injuries
unless the following safety regulations are strictly observed.
■LUMIBRITE ・・・・・・・・・・・・・・・・・・・・・・・・・・・・・・・・・・・・・・・・・・・・・・・・・・・・・・・・・・・・71
■TO PRESERVE THE QUALITY OF YOUR WATCH ・・・・・・・・・・・・・・・・・・・・・・・・・・・72
■TROUBLESHOOTING ・・・・・・・・・・・・・・・・・・・・・・・・・・・・・・・・・・・・・・・・・・・・・・・・・・・76
CAUTION
■AFTER-SALE SERVICE ・・・・・・・・・・・・・・・・・・・・・・・・・・・・・・・・・・・・・・・・・・・・・・・・・・・78
CAUTIONS indicate the risks of light injuries or material damages unless the
following safety regulations are strictly observed.
■PRECAUTIONS FOR DIVING(PLEASE MAKE SURE TO OBSERVE THE FOLLOWING.)
◇Before diving
Check the following:
■NOTES ON THE REPLACEMENT PARTS ・・・・・・・・・・・・・・・・・・・・・・・・・・・・・・・・・・78
■SPECIFICATIONS ・・・・・・・・・・・・・・・・・・・・・・・・・・・・・・・・・・・・・・・・・・・・・・・・・・・・・・・79
CAUTION
If there are any malfunctions, contact the retailer from whom the watch was purchased.
1. The time is correctly set.
2. The power reserve indicator shows the level of remaining power not less than one-half. If
the remaining power shows less than one-half, manually wind the mainspring. Refer to
“●REMARKS ON THE SELF-WINDING MECHANISM OF THE MAINSPRING.”
3. The rotating bezel turns smoothly. (The“▼”mark should be aligned with the minute
hand and the bezel rotation must not be too
loose or too tight.)
4. The crown is completely screwed in.
5.
42 There are no visible cracks or scratches on
the crystal or watch band.
C
A
6. The case screws are tightly fastened.
7. The band is firmly attached to the watch
(with spring bars, clamp or other parts.)
24
2
4
20
22
18
F
16
14
10
D
12
E
Take care not to bump the
watch against hard objects
such as rocks.
This watch can withstand waterresistant
to 60 ATMOSPHERES (water pressure
to a depth of 600
meters).
Do not operate
the crown in
the water
Bezel rotation may become
slightly harder in the water
but this is not a malfunction.
43
8
6
6
B
◇While diving
◇After diving
Rinse the watch in fresh water to
wash out all seawater and wipe it
thoroughly dry to prevent rust.
G
■CHARACTERISTICS
bWater resistance
This watch is designed for saturation diving by using helium gas featuring a superior
waterproof property to withstand depths down to 600 meters as well as excellent
water resistance which enables the watch to be safely worn underwater for an
extended period of time.
bSpring Drive
Spring Drive, the unique mechanism made available only by SEIKO technology,
ensures quartz accuracy while using the mainspring as its sole power source. (For
details of the Spring Drive mechanism, refer to the separate manual "Spring Drive
44 Handbook.")
The watch will work continuously for approximately 72 hours (three days) when the
mainspring is fully wound. The watch features a power reserve indicator to show the
winding state of the mainspring. The sweep second hand works in a perfectly smooth
movement.
This is a self-winding watch equipped with a manual winding mechanism. When first
using the watch, manual winding is convenient.
The watch also has a 24-hour hand with the added feature of a time difference
adjustment function interrelated with the date display.
CAUTION
This watch is powered by the mainspring. To ensure constant operation of the
watch, be sure to wind up the mainspring sufficiently before the power reserve
indicator points to“0”
.
The watch may stop if the power reserve indicator is showing less than one-sixth,
especially it is left under a temperature below 0℃.
45
■NAMES OF THE PARTS
Hour hand
24
2
6
18
4
20
22
Second hand
8
16
14
Power reserve
indicator
46
■HOW TO USE(HOW TO WIND THE MAINSPRING)
Minute hand
Rotating bezel
Screw lock type crown unlocked: winding
up the mainspring (manual operation)
6
First click position: Time difference
adjustment/Date setting
Second click position: Time setting
Crown
Screw lock type crown locked
Date
10
12
24-hour hand
※The crown is a screw lock type crown. To operate the crown, unlock the crown by unscrewing
it. Keep the crown locked unless it is necessary to operate the crown.
When screwing the crown in, turn it slowly with care, ensuring that the screw is properly
engaged. If it is stiff and difficult to work, unscrew it and redo it. Be careful not to forcibly
tighten the screw, as doing so may damage the screw.
This watch is a self-winding watch equipped with a manual winding mechanism.
・When the watch is worn on the wrist, the motion of the wearer’
s arm winds
the mainspring of the watch.
・When first using a stopped watch, it is recommended that you manually wind
the mainspring by turning the crown.
●How to manually wind the mainspring by turning the crown
1. The crown is a screw-lock type crown. Turn the crown counterclockwise(the 47
6 o’
clock direction)to unlock the screw.(When the screw is completely
unlocked, the crown is projected outward from its original position.)
24
2
22
4
20
WARNING
18
24
8
16
16
8
20
20
18
6
14
10
6
6
18
4
4
6
14
2
22
8
14
10
12
※To check the winding state of the mainspring, refer to“ ■ HOW TO READ THE
POWER RESERVE INDICATOR ”on page 67.
※There is no need to turn the crown further when the mainspring is fully wound. The
crown can be turned without damaging the watch mechanism; it only winds the
mainspring free.
24
2
22
6
6
16
※Although the rotating bezel is removable by design for easy maintenance, do
not attempt to unscrew the two upper screws. SEIKO assumes responsibility
for maintenance.
10
12
12
24
2
22
20
4
18
49
8
16
※As for manual winding, if you give the
crown five full rotations, it provides the
power to run the watch for approximately ten hours.
※If the crown is turned counterclockwise(the 6 o’
clock direction)
, the
mainspring of the watch will not be
wound.
6
6
2. After unlocking the screw, slowly 3. Wind the mainspring until the
power reserve indicator shows a full48 turn the crown clockwise(the 12 o’
clock direction)to wind the mainwound state. Immediately, the
spring. Take care not to press
second hand starts moving.
down the crown.
14
10
12
4. Gently turn the crown clockwise(the 12
o’
clock direction)while pressing it, until
it is screwed all the way in and locked.
※While screwing the crown in, the watch clicks as the mainspring is wound. This
should not cause any concern since this is caused by movement of the mainspring.
■HOW TO SET THE TIME AND DATE, HOW TO USE THE TIME DIFFERENCE ADJUSTMENT FUNCTION
●HOW TO SET THE TIME
・When setting the date and time, ensure that the watch is working: the main spring
is sufficiently wound.
・If your watch has a 24-hour hand, it has two different types of 24-hour hand usage.
Since the time setting method differs according to the type of usage, please choose
the type before setting the time.
〈Type 2〉Using the 24-hour hand to indicate the time in a different time zone.
・By setting the 24-hour hand to the time of a place different from where you live
(somewhere with time difference)
, this type uses the 24-hour and hour/minute hands
for dual time display.
・For instance, by setting the 24-hour hand to GMT while setting the hour and minute
hands to indicate Japan time, you can easily check GMT with the 24-hour hand at any
time.
24
20
18
20
18
2. Turn the crown counterclockwise to set the 24-hour and minute hands to the
current time.
20
18
8
20
18
1
8
6
Screw lock type crown locked
2
4
6
Second click position
24
22
16
Screw lock type crown unlocked
4
16
10
8
8
10
12
2
12
6
6
14
24
14
10
12
※Pull the crown out when the second hand is at the 12 o’
clock position since the second
hand will be stopping on the spot.
※When setting the time, ensure that the watch is working:the mainspring is sufficiently
wound.
1
4
16
4
14
6
1. Unscrew the crown by turning it counterclockwise(the 6 o’
clock direction)
,
and then pull it out to the second click.
22
51
2
How to set the 24-hour hand as a regular 24-hour indicator〈When the type 1 usage is selected〉
52
6
24
22
16
・This is the standard usage type for the 24hour hand.
・For instance, by setting the hour, minute and
24-hour hands to Japan time, even if you set
the hour and minute hands to display the time
of the place you are staying while traveling
abroad by using the time difference
adjustment function, you can easily check the
time in Japan with the 24-hour hand which is
quite convenient.
2
22
〈Type 1〉Simply using the 24-hour hand to show the 24-hour time as an AM/PM
50
indicator.
14
10
12
53
<Example> To set to 10:00 A.M., adjust the 24-hour hand to indicate“10”on the 24-hour scale(5 o’
clock position)
, and the minute hand to the“0”minute position.
To set to 6:00 P.M., adjust the 24-hour hand to indicate“18”on the 24-hour scale(9 o’
clock position)
, and the minute hand to the“0”minute position.
※Only the 24-hour and minute hands are to be set at this stage. The hour hand is to be
set later so it is not necessary to adjust the hour hand yet, even if it is indicating the
wrong time.
※The date may be altered depending on the position of the hour hand, however it
should not cause any concern since it can also be adjusted later.
※Set the minute hand behind the time and then slowly advance it to the desired time.
3. Push the crown back in simultaneously with the time signal.
※The setting of the 24-hour, minute and second hands to the current time is now
completed.
※The telephone time signal service(117)is helpful in setting the exact time.
4. Pull the crown out to the first click.
24
5. Turn the crown to set the hour hand to the current time.
※Adjust the date also at this point if necessary.
(Refer to“●HOW TO SET THE DATE”on page 61.)
※The moment the date changes it is midnight. When setting the time, be sure that
AM/PM is set correctly.
※Turn the crown slowly, checking that the hour hand moves in one-hour increments.
※When adjusting the hour hand, the other hands may move slightly. However, this is
not a malfunction.
2
4
20
22
6. Push the crown back in upon completion of time setting. Screw the crown in 55
completely by turning it clockwise(12 o’
clock direction)while pressing it.
54
※While screwing the crown in, the watch clicks as the mainspring is wound. This
should not cause any concern since this is caused by movement of the mainspring.
8
16
14
10
12
How to set the 24-hour hand as a dual time indicator for a“different time zone area”〈When the type 2 usage is selected〉
2. Turn the crown counterclockwise to set the 24-hour and minute hands to the
current time of your desired time zone area.
1. Unscrew the crown by turning it counterclockwise(the 6 o’
clock direction)
,
and then pull it out to the second click.
24
20
Screw lock type crown unlocked
4
18
16
8
6
1
14
Second click position
10
12
Screw lock type crown locked
3. Push the crown back in simultaneously with the time signal.
※The setting of the 24-hour, minute and second hands to the time in a different time
area is now completed.
※The telephone time signal service(117)is helpful in setting the exact time.
4. Pull out the crown to the first click.
20
4
2
18
16
24
22
1
6
※Pull the crown out when the second hand is at the 12 o’
clock position since the second
hand will be stopping on the spot.
※When setting the time, ensure that the watch is working: the mainspring is
sufficiently wound.
56
2
22
8
18
6
1
14
10
12
57
<Example> To set the 24-hour hand to the time in London while setting the hour/minute hands to indicate Japan time
When the time in Japan is 10:00 A.M., it is 1:00 A.M. in London.
Set the 24-hour hand to indicate“1”on the 24-hour scale(between the 12 o’
clock and 1 o’
clock position),
while the minute hand is at the“0”minute position.
※The time difference adjustment function serves only for a time in a different time zone area where the time
difference from Japan time is represented in one-hour increments.
※Only the 24-hour and minute hands are to be set at this stage. The hour hand is to be set later so it is not
necessary to adjust the hour hand yet, even if it is indicating the wrong time.
※The date may be altered depending on the position of the hour hand, however it should not cause any
concern since it can also be adjusted later.
※Set the minute hand behind the time and then slowly advance it to the desired time.
5. Turn the crown to set the hour hand to the current time(Japan time)
.
※Adjust the date also at this point if necessary.
(Refer to“●HOW TO SET THE DATE”on page 61.)
※The moment the date changes it is midnight. When setting the time, be sure that
AM/PM is set correctly.
※Turn the crown slowly, checking that the hour hand moves in one-hour increments.
※When adjusting the hour hand, the other hands may move slightly. However, this is
not a malfunction.
24
8
10
12
Tips for more accurate time setting
・ Take notice of the following points in order to set the time more accurately.
1. Before setting the time, wind the mainspring until the power reserve indicator
shows a full-wound state.
2. When using a watch after it has stopped, wait approximately 30 seconds after the
second hand starts moving, and then pull the crown out to the second click.
3. Do not stop the second hand with the crown being at the second click position for
thirty minutes or longer. If the time the crown has been at the second click position
60
and the second hand has been stopped exceeds 30 minutes, push the crown back in
to its original position, and let the second hand move for 30 seconds or longer, then
restart the time setting.
※While screwing the crown in, the watch clicks as the mainspring is wound. This
should not cause any concern since this is caused by movement of the mainspring.
●HOW TO SET THE DATE
・This watch is designed so that the date changes one day by turning the hour hand
two full rotations in the same way as“the time difference adjustment function”.
(Refer to “ ● HOW TO USE THE TIME DIFFERENCE ADJUSTMENT
FUNCTION”on page 63.)
・The date advances one day by turning the hour hand two full rotations clockwise,
while the date is set back one day by turning the hour hand two full rotations
counterclockwise.
・Set the date after setting the time. Manual date adjustment is required at the end of a
month that has less than 31 days: February, April, June, September and November.
1. Unlock the screw lock type crown by turning it counterclockwise(the 6 o’
61
clock direction)
, and then pull it out to the first click.
2. Each time the hour hand makes two full rotations by turning the crown, the
date is adjusted one day.
Screw lock type
crown unlocked
24
2
22
4
16
14
10
12
6
1
8
18
6
16
14
20
20
4
1
6. Push the crown back in upon completion of time setting. Screw the crown in 59
completely until it stops by turning it clockwise(12 o’
clock direction)while
pressing it.
18
2
22
58
First click
position
Clockwise:
The hour hand turns counterclockwise.
The date is set back one day when the hour
hand makes two full rotations counterclockwise.
Counterclockwise:
the hour hand turns clockwise.
The date advances one day when the
hour hand makes two full rotations clockwise.
Screw lock
type crown locked
62
※The date can be adjusted either by advancing it or by setting it back. Turn the hour
hand clockwise or counterclockwise by whichever is convenient.
※Turn the crown gently.
※To adjust the date without changing the time, turn the hour hand in two-full-rotation
increments.
※When adjusting the hour hand, the other hands may move slightly. However, this is
not a malfunction.
●HOW TO USE THE TIME DIFFERENCE ADJUSTMENT FUNCTION
3. After completing the date setting, check the position of the hour hand once
again and push the crown back in. Then, screw the crown in completely until
it stops by turning it clockwise(12 o’
clock direction)while pressing it.
How to adjust the time difference
1. Unlock the screw lock type crown by turning it counterclockwise
(the 6 o’
clock direction)
, and then pull it out to the first click.
※While screwing the crown in, the watch clicks as the mainspring is wound. This
should not cause any concern since this is caused by movement of the mainspring.
・For example, while traveling abroad and staying in a place with a different time from
where you live, you can conveniently set the watch to indicate the local time in the
different time zone area without stopping the watch.
・The time difference adjustment is interrelated with the date display. If the time
difference is correctly adjusted, the watch displays the correct date of the place where
you are staying.
63
2. Turn the crown to set the hour hand to indicate the time of the place where
you are staying. The hour hand is independently set to the time in a different
time zone.
※Turn the crown slowly, checking that the hour hand moves in one-hour increments.
24
2
Screw lock type
crown unlocked
4
20
22
18
6
1
Clockwise:
Setting the time back
(The hour hand turns counterclockwise.)
Counterclockwise:
Advancing the time
(The hour hand turns clockwise.)
※Refer to the table below for time differences from Japan time in major cities in the world.
Names of the cities
Other cities
Time difference with Japan Time
+ 3 hours
Fiji islands, Auckland★
´
Noumea
+ 2 hours
Solomon Islands
Sydney★
+ 1 hours
Guam, Khabarovsk★
Tokyo
±0
Seoul, Pingyang
Hong Kong
− 1 hours
Manila, Beijing, Singapore
Bangkok
− 2 hours
Jakarta
Dacca
− 3 hours
3. After completing the time difference adjustment, check the position of the
hour hand once again and push the crown back in. Then, screw the crown in
completely until it stops by turning it clockwise(12 o’
clock direction)while
pressing it.
Karachi
− 4 hours
Dubai
− 5 hours
Moscow★
− 6 hours
Mecca, Nairobi
※While screwing the crown in, the watch clicks as the mainspring is wound. This
should not cause any concern since this is caused by movement of the mainspring.
Cairo★
− 7 hours
Athens★, Istanbul★
8
16
Wellington★
14
10
12
First click
position
Screw lock type crown locked
※Refer to“●MAJOR CITIES IN THE WORLD AND TIME DIFFERENCE TABLE”for
time differences from Japan time.
64 ※When adjusting the time difference, make sure that AM/PM and the date are
correctly set.
※When adjusting the hour hand, the other hands may move slightly. However, this is
not a malfunction.
※When turning the crown clockwise to set the hour hand to indicate any time between
9:00 P.M. and 0:00 A.M. advancing past midnight, temporarily set the hour hand
back to 8:00 P.M., and then advance it to the desired time.
Paris★
− 8 hours
Rome★, Amsterdam★
London★
− 9 hours
Casablanca
Azores★
− 10 hours
Rio de Janeiro★
− 12 hours
Caracas
− 13 hours
Santiago★
New York★
− 14 hours
Washington★, Montreal★
− 15 hours
Mexico City★
Denver★
− 16 hours
Edmonton★
Los Angels★
− 17 hours
San Francisco★
Anchorage★
− 18 hours
Honolulu
− 19 hours
Midway Islands
− 20 hours
66 Chicago★
■HOW TO READ THE POWER RESERVE INDICATOR
・The power reserve indicator lets you know the winding state of the
mainspring.
・Before removing the watch from your wrist, observe the power reserve
indicator to check if the watch has stored enough power to keep running until
the next time you wear it. If necessary, wind the mainspring.(To prevent the
watch from stopping, wind the mainspring to store the excess power that will
allow the watch to run for extra time.)
The Power
Reserve Indicator
67
The winding state
Fully wound
Half wound
Unwound
of the mainspring
The number of hours Approximately 72 hours Approximately 36 hours The watch either stops
(3 days)
(1 day and a half)
or is running down.
the watch can run
★…Cities marked with“★”use daylight saving time.
※The time differences and use of daylight saving time in each city are subject to change according
to the governments of the respective countries or regions.
●REMARKS ON THE SELF-WINDING MECHANISM OF THE MAINSPRING
■HOW TO USE THE ROTATING BEZEL
The illustration below indicates that 30 minutes have elapsed since the diving
started at 10:10
(
“▼”mark indicated the time when you started diving.)
・How to measure the elapsed time
Turn the rotating bezel to set ▼mark to the minute hand. After certain
amount of time
24
2
69
4
20
22
18
8
6
6
16
The mainspring of the watch becomes fully wound when it is worn for twelve
hours for three to five days.
※In a case where you wear the watch for a short period of time each day,
observe the power reserve indicator to check the level of the remaining
power. If necessary, manually wind the mainspring.
65
Tashkend★
※When the mainspring is fully wound, the crown can be turned further, or the mainspring may
wind without damaging the mainspring itself. The mainspring of the watch employs a slipping
attachment structure, a self-winding watch specific mechanism, to prevent the mainspring from
over winding.
※The orientation of“the power reserve indicator”may slightly vary depending on the model.
・The correlation between the number of hours the watch is worn and the
winding state of the mainspring is provided below for your reference.
However, the winding state of the mainspring may vary depending on actual
use conditions, such as the number of hours you wear the watch or the extent
of your movement while wearing it. It is recommended that you observe the
power reserve indicator to check the level of remaining power of your watch.
68
●MAJOR CITIES IN THE WORLD AND TIME DIFFERENCE TABLE
14
10
12
elapsed time
elapsed, read the graduation on the rotating bezel which the minute hand
points to. The elapsed time is indicated.
※For safety’
s sake, the rotating bezel rotates only counterclockwise with clicks.
Therefore, accidental rotation of the bezel is prevented, and also the bezel can be
easily set to measure the elapsed time.
■HOW TO USE THE DIVER ADJUSTER
The Diver Adjuster is a bracelet mechanism to adjust the bracelet length of your Diver’
s
Watch. It is very useful when you wear the watch over a wet suit.
1. Lift up the flap approximately 90°
until it stands upright. Do not extend the slider at this step.
2. Lightly push back the flap further approximately 20°
.
When doing so, take care not to push the flap forcibly as more force is required to do so
than to lift up the flap.
3. Lightly pull the bracelet on the 6 o’
clock side of the watch along the curved line of the
bracelet to pull out the slider. When doing so, take care not to pull the bracelet forcibly.
The slider can be pulled out approximately 30 mm. Be careful not to pull it out beyond the
limit mark inscribed on it.
4. While pressing the lock button indicated by the arrow(4), lift up the clasp to release the
70 buckle, and put on the watch on your wrist.
5. Close the clasp first and then, the flap.
6. Hold the bracelet on both the 6 and 12 o’
clock sides of the watch with fingers to reduce the
length of the slider until it fits well around your wrist.
①
②
Limit mark
on the slider
Slider
Lock button
Clasp Bracelet on the
12 o'clock side
of your watch
⑤
Flap
Clasp
⑥
Flap
③
⑥
④
Lock button
Bracelet on the
6 o'clock side
of your watch
■TO PRESERVE THE QUALITY OF YOUR WATCH
CAUTION
RASH AND ALLERGY
CAUTION
Daily care
72
■LUMIBRITE(IF YOUR WATCH HAS LUMIBRITE)
LumiBrite is a luminous paint is completely harmless to that human beings and natural
environment, containing no noxious materials such as radioactive substance.
LumiBrite is a newly-developed luminous paint that absorbs the light energy of the
sunlight and lighting apparatus in a short time and stores it to emit light in the dark.
For example, if exposed to a light of more than 500 lux for approximately 10 minutes,
LumiBrite can emit light for 5 to 8 hours.
Please note, however, that, as LumiBrite emits the light it stores, the luminance level of
the light decreases gradually over time. The duration of the emitted light may also differ
slightly depending on such factors as the brightness of the place where the watch is
exposed to light and the distance from the light source the watch.
When you make a dive in the dark water, LumiBrite may not emit light unless it absorbs
and stores light sufficiently.
71
Before diving , therefore, be sure to expose the watch to light under the condition
specified above so that it fully absorbs and stores light energy. Otherwise, use the watch
together with an underwater flashlight.
<Reference data on the luminance>
y Sunlight
〔Fine weather〕:100,000 lux
〔Cloudy weather〕:10,000 lux
z Indoor(Window side during daytime)
〔Fine weather〕
:more than 3,000 lux
〔Cloudy weather〕
:1,000 to 3,000 lux
〔Rainy weather〕:less than 1,000lux
{ Lighting apparatus(40-watt daylight fluorescent light)
〔Distance to the watch:1m〕:1,000 lux
〔Distance to the watch:3m〕:500 lux(average room luminance)
〔Distance to the watch:4m〕:250 lux
・After using the watch in seawater, for instance, after diving, rinse it in fresh
water and wipe thoroughly dry. Do not use chemicals to wash the watch.
・Clean the rotating bezel regularly. If dust gathers under the bezel, the rotation
of the bezel will become difficult.
・Clean the soiled part of the metal band using a soft toothbrush dipped in soapy
water.
・Adjust the bracelet and band so that there will be a little clearance between the
bracelet or band and your wrist to avoid accumulation of perspiration.
・If you are constitutionally predisposed to rash, the band may cause you to
debelop a rash or an itch depending on your physical condition.
・The possible cause of the rash are as follows:
1. Allegy to metals or leathers
2. Rust, dust or perspiration on the watch or band
・If you develop any skin reactions, take off the watch and consult a doctor 73
immediately.
PRECAUTIONS ON WEARING YOUR WATCH
・In case you tumble and fall or bump into others with the watch worn on your
wrist, you may be injured by the reason of the fact that you wear the watch.
・When you make contact with children, especially with infants, they may get
injured or debelop arush caused by allergy.
・Do not drop the watch or hit it against a hard surface and not wear the watch
while playing active sprots. the watch may gains/loses time.
PLACES TO KEEP YOUR WATCH
PERIODIC CHECK
・If the watch is left in a temperature below −10℃ or above +60℃ for a long
time it may function improperly or stop operating.
・Checking and overhaul of the watch (cal. 5R66) will be performed by SEIKO.
When you take the watch to the retailer from whom it was purchased, request
that the watch will be checked and overhauled by SEIKO.
・Do not leave the watch in a place where it is subjected to strong magnetism or
static electricity.
・Do not leave the watch where there is strong vibration.
・We suggest that you have your watch checked by SEIKO every 3 or 4 years
for oil condition or damage due to water or sweat. After checking the watch,
adjustment and repair may be required.
・Do not leave the watch in a dusty place.
・When replacing the parts, please specify“SEIKO GENUINE PARTS.”
・Do not expose the watch to gases or chemicals.
(Ex.: Organic solvents such as benzine and thinner, gasoline, nail polish,
cosmetic spray, detergent, adhesives, mercury, and iodine antiseptic
solution.)
・Be sure to have the gasket and push-pin replaced with new ones when
checking the watch.
74
75
※Depending on the environment where a diver’
s watch is used, its inner parts or
movement as well as its case or band may be affected. We recommend that you have
your watch overhauled regularly at every period indicated above.
・Do not leave the watch in a hot spring, or do not keep it in a drawer having
insecticides inside.
■TROUBLE SHOOTING
Trouble
The watch stops operating.
Possible cause
The power supplied by the mainspring has been
consumed.
Solution
Refer to“■HOW TO USE(HOW TO WIND THE MAINSPRING)”to wind the mainspring and reset the time. While you are wearing
the watch or when you take it off, check the remaining power shown by the power reserve indicator and wind the mainspring if necessary.
Even though you wear the watch every day, The watch is worn on your wrist only for a short period of
the power reserve indicator does not move up. time, or the amount of arm movement is small.
Wear the watch for an extended period of time, or when taking off the watch, turn the crown to wind the
mainspring if the remaining power shown by the power reserve indicator is not sufficient for the next use.
The watch has been left or worn in extremely high or low
temperatures.
Return the watch to a normal temperature so that it works accurately as usual, and then reset the time. The watch has been
adjusted so that it works accurately when it is worn on your wrist under a normal temperature range between 5℃ and 35℃.
The watch is left close to an object with a strong magnetic
field.
Prevent the watch from making close contact with magnetic objects so that the watch works accurately as usual, and then reset the
time. If the watch does not work accurately again after the above procedure, contact the retailer from whom the watch was purchased. 77
You drop the watch, hit it against a hard surface, or wear it while
playing active sports. The watch is exposed to strong vibrations.
Reset the time. If the watch does not work accurately as usual after resetting the time, contact the
retailer from whom the watch was purchased.
The watch temporarily gains or loses time
76
The inner surface of the glass is clouded.
Moisture has entered the watch because the gasket has deteriorated.
Contact the retailer from whom the watch was purchased.
The watch stops even though the power
The watch has been left under a temperature below 0℃.
reserve indicator is not showing “0”.
If the watch is left under a temperature below 0℃, it may stop if the power reserve indicator is
showing less than one-sixth. In such a case, turn the crown to wind the mainspring.
Right after starting the watch, it seems that the second When starting the watch, it takes a little time before the
hand moves quicker than usual when setting the time. adjustment function starts working(this is not a malfunction).
It takes several seconds before the adjustment function starts working. Set the time after the
second hand moves for approximately 30 seconds to set the time correctly.
The date changes at 12 o ’
clock noon.
AM/PM is not properly set.
Advance the hands for 12 hours to reset the time and date.
※Contact the retailer from whom the watch was purchased for any other troubles.
78
■AFTER-SALE SERVICE
■SPECIFICATIONS
・Your SEIKO PROSPEX watch has been strictly inspected and precisely regulated
prior to your purchase. However, if your watch becomes defective during the course
of normal use while your watch is still under guarantee, we will regulate, adjust, or
repair the watch at no cost to you. Please present your watch to the retailer from
whom the watch was purchased with the certificate of guarantee within the guarantee
period. Guarantee coverage is provided in the certificate of guarantee.
・For repair after the guarantee period or any other information regarding SEIKO
PROSPEX watches, consult the retailer from whom the watch was purchased.
Should you have any questions, please contact SEIKO CUSTOMER SERVICE
CENTER(listed on the back cover of this booklet)
.
1. Features: 3 hands(Hour, Minute and Second hands)
, 24-hour hand, Date display,
Power Reserve Indicator
2. Frequency of crystal oscillator: 32,768 Hz
3. Loss/gain(monthly average)
:±15 seconds(±1 second per day)
(worn on your
wrist at a normal temperature range between 5℃ and 35℃)
4. Operational temperature range: −10℃ to +60℃
Under a low-temperature condition(below 0℃)
, always keep at least one-sixth of the
watch power shown by the power reserve indicator.
5. Driving System: Spring Drive(Self-winding type with manual winding function)
6. Hand movement: Sweep second hand
79
7. Additional functions: Time difference adjustment function(interrelated with the date
display)
8. Continuous operating times: Approx. 72 hours(Approx. 3 days)*If the power
reserve indicator shows the power supplied by the mainspring is full before starting
the watch.
9. IC(Integrated Circuit)
:Oscillator, frequency divider, and spring drive control circuit
(C-MOS-IC)
: 1 piece
10. Jewels: 30 jewels
11. Magnetic resistance: 4,800 A/m(60 gauss, conforming to JIS/ISO specifications)
12. Water resistance: 600-meter water resistance, suitable for saturation diving(JIS
Class 2 diver’
s watch)
■NOTES ON THE REPLACEMENT PARTS
・A stock of spare parts for SEIKO PROSPEX watches will be kept for 7 years. In
principle, your watch can be reconditioned within this period.(Replacement parts are
those that are essential to maintain the functional integrity of the watch.)
・Please note that, according to the conditions of use, your watch may not be able to be
reconditioned or its accuracy may not be restored. Consult the retailer from whom
the watch was purchased before having your watch repair.
・Please note that, if watch parts such as the case, dial, hands, glass, band, or other
accessories are damaged, some alternative parts may be used for repairs.
・Should you have any questions, please contact SEIKO CUSTOMER SERVICE
CENTER.
80
※The specifications are subject to change without prior notice due to product improvements.