1
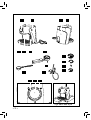
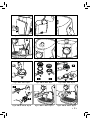
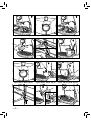
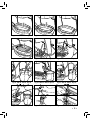
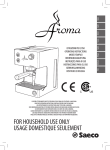
ISTRUZIONI PER L'USO
OPERATING INSTRUCTIONS
MODE D’EMPLOI
BEDIENUNGSANLEITUNG
INSTRUÇÕES PARA O USO
INSTRUCCIONES PARA EL USO
GEBRUIKSAANWIJZING
INSTRUKCJE OBSŁUGI
LEGGERE ATTENTAMENTE QUESTE ISTRUZIONI D'USO PRIMA DI UTILIZZARE LA MACCHINA.
READ THESE OPERATING INSTRUCTIONS CAREFULLY BEFORE USING THE MACHINE.
LIRE ATTENTIVEMENT CES INSTRUCTIONS AVANT D’UTILISER LA MACHINE.
DIESE BEDIENUNGSANLEITUNG IST VOR DEM ERSTEN GEBRAUCH DER MASCHINE AUFMERKSAM ZU LESEN.
LER ATENTAMENTE ESTAS INSTRUÇÕES PARA O USO ANTES DE USAR A MÁQUINA.
LÉANSE ATENTAMENTE LAS SIGUIENTES INSTRUCCIONES DE USO ANTES DE UTILIZAR LA MÁQUINA.
LEES DEZE INSTRUCTIES AANDACHTIG DOOR VOORDAT U HET APPARAAT IN GEBRUIK NEEMT.
PRZECZYTAĆ UWAŻNIE NINIEJSZE INSTRUKCJE OBSŁUGI PRZED UŻYTKOWANIEM URZĄDZENIA.
Ideas with Passion
1
5
2
6
3
7
4
8
11
12
10
13
14
18
9
17
15
40 cm
16 in
16
20 cm
8 in
20 cm
8 in
20 cm
8 in
20 cm
8 in
Fig.A - Abb.A - Afb.A - Rys.A
•2•
Fig.1 - Abb.1 - Afb.1 - Rys.1
Fig.2 - Abb.2 - Afb.2 - Rys.2
Fig.3 - Abb.3 - Afb.3 - Rys.3
Fig.4 - Abb.4 - Afb.4 - Rys.4
Fig.5 - Abb.5 - Afb.5 - Rys.5
Fig.6 - Abb.6 - Afb.6 - Rys.6
Fig.7 - Abb.7 - Afb.7 - Rys.7
Fig.8 - Abb.8 - Afb.8 - Rys.8
Fig.9 - Abb.9 - Afb.9 - Rys.9
Fig.10 - Abb.10 - Afb.10 - Rys.10
Fig.11 - Abb.11 - Afb.11 - Rys.11
Fig.12 - Abb.12 - Afb.12 - Rys.12
•3•
Fig.13 - Abb.13 - Afb.13 - Rys.13
Fig.14 - Abb.14 - Afb.14 - Rys.14
Fig.15 - Abb.15 - Afb.15 - Rys.15
Fig.16 - Abb.16 - Afb.16 - Rys.16
Fig.17 - Abb.17 - Afb.17 - Rys.17
Fig.18 - Abb.18 - Afb.18 - Rys.18
Fig.19 - Abb.19 - Afb.19 - Rys.19
Fig.20 - Abb.20 - Afb.20 - Rys.20
Fig.21 - Abb.21 - Afb.21 - Rys.21
Fig.22 - Abb.22 - Afb.22 - Rys.22
Fig.23 - Abb.23 - Afb.23 - Rys.23
Fig.24 - Abb.24 - Afb.24 - Rys.24
•4•
Fig.25 - Abb.25 - Afb.25 - Rys.25
Fig.26 - Abb.26 - Afb.26 - Rys.26
Fig.27 - Abb.27 - Afb.27 - Rys.27
Fig.28 - Abb.28 - Afb.28 - Rys.28
Fig.29 - Abb.29 - Afb.29 - Rys.29
Fig.30 - Abb.30 - Afb.30 - Rys.30
Fig.31 - Abb.31 - Afb.31 - Rys.31
Fig.32 - Abb.32 - Afb.32 - Rys.32
Fig.33 - Abb.33 - Afb.33 - Rys.33
Fig.34 - Abb.34 - Afb.34 - Rys.34
Fig.35 - Abb.35 - Afb.35 - Rys.35
Fig.36 - Abb.36 - Afb.36 - Rys.36
•5•
1
GENERAL INFORMATION
The coffee machine is ideal for brewing 1 or 2 cups of
espresso coffee and it is provided with a swivel steam
and hot water spout. The controls on the front side of the
machine are labelled with easy-to-read symbols.
The machine has been designed for household use only.
It is not suitable for professional, continuous use.
Warning. No liability is held for damages caused
by:
• Improper and inconsistent use of the machine.
• Repairs carried out by anyone other than authorized service centres.
• Tampering with the power cord.
• Tampering with any component of the machine.
• Use of non-original spare parts and accessories.
• Failed descaling and storage at temperatures
below 0°C.
In such cases, the warranty is not valid.
1.1
To Facilitate interpretation
The warning triangle indicates the
instructions that are important for
user's safety. Please follow these
instructions carefully to avoid serious injury!
Illustrations, parts of the machine and control elements
are referred to by numbers or letters; in this case please
refer to the illustration.
This symbol emphasizes particularly important
information to take into greater account for a
better use of the machine.
The illustrations corresponding to the text can be
found on the first pages of the manual. Please refer to
this page while reading the operating instructions.
1.2
How to Use These Operating Instructions
Keep these operating instructions in a safe place and
make them available to anyone who may use the coffee
machine.
For further information or in case of problems, please
refer to any authorized service centre.
• 14 •
2
TECHNICAL SPECIFICATIONS
The manufacturer reserves the right to make technical
changes to the product.
Nominal Voltage - Power rating - Power supply
See label on the appliance
Shell material
Plastic
Size (w x h x d) (mm)
270 x 350 x 300
Weight
4 kg
Cord length
1.2 m
Control panel
Front side
Portafilter
Pressurized type
Pannarello
Special for cappuccinos
Water Tank
1.5 litres - Removable type
Pump pressure
15 bar
Boiler
Stainless steel
Safety devices
Thermal fuse
3
SAFETY REGULATIONS
Do not put live parts in contact with water: Danger of
short circuit! Overheated steam and hot water may cause
scalding! Do not direct the steam or hot water jet towards
body parts. Handle the steam/hot water spout with care:
Danger of scalding!
Intended Use
The coffee machine is intended for domestic use only.
Do not make any technical changes or use the machine
for unlawful purposes since this would create serious
hazards! The appliance is not for use by persons
(included children) with reduced physical, mental or
sensory abilities or with scarce experience and/or
competences, unless they are supervised by a person
responsible for their safety or they are instructed by
him/her to use the machine.
Connect the coffee machine only to a suitable socket.
The voltage must correspond to the value shown on the
machine’s label.
Power Cord
Do not use the coffee machine if the power cord is
defective. If damaged, the power cord must be replaced
by the manufacturer or its customer service centre. Do
not run the cord around sharp corners and edges as well
as on hot objects and keep it away from oil.
Do not use the power cord to carry or pull the coffee
machine. Do not unplug the machine by pulling the power
cord or touch the plug with wet hands.
Do not let the power cord hang freely from tables or
shelves.
Protecting Other People
Prevent children from playing with the machine.
Children are not aware of the risks stemming from
household appliances. Do not leave the coffee machine
packaging within the reach of children.
Danger of Burns
Do not direct the jet of overheated steam and/or hot water
towards yourself or other people. Always use the special
handles or knobs.
Do not disconnect (remove) the pressurized portafilter
during coffee brewing. Hot water drops may spill out of
the coffee brew unit during the warming up.
Location
Place the coffee machine in a safe place, where nobody
may overturn it or be injured.
Hot water or overheated steam may spill out of the
machine: Danger of scalding!
Do not keep the machine at a temperature below 0°C;
frost may damage the machine.
Do not use the coffee machine outdoors.
Do not place the machine on very hot surfaces and
close to open flames in order to prevent its housing from
melting or being damaged.
Cleaning
Before cleaning the machine, disconnect it by pressing
the ON/OFF button, then pull out the plug from the
socket. Wait for the machine to cool down. Do not
immerse the machine in water!
It is strictly forbidden to tamper with the internal parts of
the machine.
Water left in the tank for several days should not be
consumed. Wash the tank and fill it with fresh drinking
water.
within easy reach.
• Allow for a minimum distance from the sides of the
machine as shown in Fig. A.
Storing the Machine
If the machine is to remain unused for a long time, turn
it off and unplug it from the socket. Keep it in a dry place
out of children’s reach. Shelter it from dust and dirt.
Repairing / Maintenance
In case of failure, faults or a suspected fault after
dropping, remove the plug from the socket immediately.
Do not operate a faulty machine. Servicing and repairing
should be carried out by authorized service centres only.
All liability for damages caused by works not carried out
in a professional manner is declined.
Fire Safety
In case of fire, use carbon dioxide (CO2) extinguishers.
Do not use water or dry powder extinguishers.
Key to machine components (Page 2)
1
2
3
4
5
6
7
8
9
10
11
Control panel
ON/OFF button
Water Tank
Hot water/steam knob
Drip tray & grill
Coffee brew unit
Steam spout (Pannarello)
Power cord
Ground coffee measuring scoop
Pressurized portafilter
Ground coffee filter
(single piece for 1 or 2 coffee(s))
Ground coffee filter adapter
Brewing pin
Coffee pod filter
Coffee/Water light - "Machine ready"
Steam ready light
Selection knob
Cappuccinatore (optional)
12
13
14
15
16
17
18
4
INSTALLATION
For your and other people safety, follow the "Safety
Regulations" in section 3 carefully.
4.1
Packaging
The original packaging has been designed to protect the
machine during transport. We recommend keeping the
packaging for future transport.
Space for Operation and Maintenance
To ensure that the coffee machine works properly and
efficiently, read the following instructions.
• Choose an even surface.
• Choose an adequately lit and clean location with a socket
4.2
Installation Instructions
Before installing the machine, read the following safety
instructions carefully.
• Put the machine in a safe place.
• Make sure children cannot play with the machine.
• 15 •
English
Power Supply
• Do not place the machine on hot surfaces or near open
flames.
The coffee machine is now ready to be connected to the
power supply.
Note: It is recommended to wash the components
before using them for the first time and/or after
they have not been used for a certain period of time.
4.3
Machine Connection
Electric power can be dangerous! It is therefore
essential to follow the safety regulations
carefully. Do not use faulty cords! Faulty cords and
plugs must be immediately replaced by authorized
service centres.
Appliance voltage has been pre-set by the manufacturer.
Make sure that the power voltage matches the indications
on the identification plate on the bottom of the appliance.
• Make sure that the ON/OFF button (2) is not pressed
before connecting the machine to the power supply.
• Fit the plug into a wall socket with suitable power
voltage.
4.4
Water Tank
• (Fig.1) - Remove the water tank (3).
• (Fig.2) - Rinse the water tank and fill it with fresh drinking
water taking care not to overfill it.
• (Fig.1) - Insert the water tank making sure that it has
properly been replaced in its former seat.
Use only fresh, non-sparkling drinking water to
fill the tank. Hot water, as well as any other liquid,
may damage the tank. Do not turn on the machine with
empty water tank: make sure there is enough water in
the tank.
4.5
Circuit Priming
Before starting the machine after a long period of
inactivity and after ejecting steam, the machine circuit
needs to be primed.
• (Fig.3) - Press the ON/OFF button (2).
• (Fig.4) - Place a container under the steam spout.
• (Fig.5) - Open the "hot water/steam" knob (4) by turning
it anticlockwise.
" position
• (Fig.6) - Switch the selection knob to the "
(17).
• Wait until a steady jet of water flows out of the steam spout
(Pannarello).
• (Fig.6) - Switch the selection knob to the " "position
(17).
• Close the "hot water/steam" knob (4) by turning it
clockwise. Remove the container.
The machine is now ready to operate. Please see the
related sections for coffee brewing operating details.
• 16 •
4.6
Drip Tray Adjustment
The drip tray can be adjusted according to the cup size.
To adjust the drip tray height, do as follows.
• (Fig.24) - Lift the drip tray and remove the grill.
• (Fig.25) - Remove the support under the drip tray.
• (Fig.26 - 27) - Rotate the support and place it in the coffee
machine.
• (Fig.28) - Put the drip tray on the support and replace the
grill.
5
COFFEE BREWING
Warning! During the coffee brewing, do not
remove the pressurized portafilter by manually
turning it clockwise. Danger of burns.
• During this operation, the "machine ready" light (15) may
flash; this is to be considered a standard and not a faulty
operating mode.
• Before using the machine, make sure that the hot water/
steam knob (4) is closed and that there is enough water
in the tank.
• (Fig.3) - Press the ON/OFF button (2).
• Wait until the "machine ready" light (15) turns on. The
machine is now ready for coffee brewing.
5.1
Using Ground Coffee
• (Fig.7) - Insert the pin (13) into the pressurized portafilter
(10).
• (Fig.8A) - Insert the adapter (12) into the pressurized
portafilter (10), then insert the filter (11).
• (Fig.11) - Insert the portafilter into the brew unit from the
bottom (6).
• (Fig.12) - Turn the portafilter from left to right until it locks
in place.
• (Fig. 14) - Preheat the pressurized portafilter by switching
the selection knob (17) to the "
" position until some
water spills out of it. This is to be done only for the first
coffee brewing.
• When 50cc of water have flowed out, switch the selection
knob (17) to the " " position in order to stop brewing.
• (Fig.16) - Remove the portafilter from the machine by
turning it from right to left and drain any water left. There
is no need to change the filter to make one or two coffees,
since the machine is equipped with a special filter (11).
• (Fig.9A) - Add 1- 1.5 measuring scoop for single coffee
and 2 measuring scoops for double coffee. Remove any
coffee residues from the rim of the filter.
• (Fig.11) - Insert the portafilter (10) into the brew unit from
the bottom (6).
• (Fig.12) - Turn the portafilter from left to right until it locks
in place.
• (Fig.13) - Take 1 or 2 preheated cups and place them
under the pressurized portafilter. Make sure that they are
correctly placed under the coffee dispensing holes.
• (Fig.14) - Turn the selection knob (17) to the "
"
position.
Note: If a small quantity of water remains in the
portafilter; this is absolutely normal and is due
to the portafilter features.
Note for cleaning: Keep the filter of the
pressurized portafilter clean by removing it from
its seat and washing it with drinking water (Fig. 17). Wash
the adapter and the pin of the portafilter, then wash the
portafilter itself.
5.2
6
TIPS FOR CHOOSING COFFEE
As a general rule any type of coffee available on the
market can be used. However, coffee is a natural product
and its flavour changes according to its origin and blend;
it is therefore a good idea to try different types of coffee
in order to find the most suited to your personal taste.
For optimal results, however, we recommend using
espresso machine blends. As a rule, Coffee should
always come out of the portafilter without any dripping.
The speed of coffee dispensing can be modified by
slightly changing the amount of coffee in the filter and/or
by using a different coffee grind.
Saeco recommends using single-dose coffee pods
marked ESE for a tasty coffee and easier cleaning and
preparing.
Using Coffee Pods
• (Fig.10) - By using a coffee spoon, remove the ground
coffee filter (11) and the adapter (12) from the pressurized
portafilter (10).
• (Fig.7) - Remove the pin (13) from the pressurized
portafilter (10).
• (Fig.9B) - Insert the pod filter (14) into the pressurized
portafilter (10).
• (Fig.11) - Insert the portafilter into the brew unit from the
bottom (6).
• (Fig.12) - Turn the portafilter from left to right until it locks
in place.
• (Fig. 14) - Preheat the pressurized portafilter by switching
" position until some
the selection knob (17) to the "
water spills out of it. This is to be done only for the first
coffee brewing.
• When 50cc of water have flowed out, switch the selection
knob (17) to the " " position in order to stop hot water
dispensing.
• (Fig.16) - Remove the pressurized portafilter from the
machine by turning it from right to left. Be careful not to
remove the filter.
• (Fig.9B) - Insert the pod into the portafilter and make sure
the paper of the pod does not overhang the portafilter.
• (Fig.11) - Insert the portafilter into the brew unit from the
bottom (6).
• (Fig.12) - Turn the portafilter from left to right until it locks
in place.
• Take 1 preheated cup and place it under the portafilter;
make sure that it is correctly placed under the coffee
dispensing holes.
• (Fig.14) - Turn the selection knob (17) to the "
"
position.
• When the desired quantity of coffee has been obtained,
turn the selection knob (17) to the " " position in order
to stop coffee brewing, then remove the coffee cup.
• (Fig.16) - Wait a few seconds after brewing, then remove
the portafilter and dispose of the used pod.
Note for cleaning: Keep the filter of the
pressurized portafilter clean by removing it from
its seat and washing it with drinking water (Fig. 17). Then
wash the portafilter.
BEFORE USING THE HOT WATER/STEAM
JET, MAKE SURE THAT THE STEAM SPOUT
(PANNARELLO) IS POSITIONED OVER THE DRIP
TRAY.
7
HOT WATER
Danger of scalding! When brewing starts, spurts
of hot water may come out. The spout can reach
high temperatures: do not touch it with bare hands.
• (Fig.3) - Press the ON/OFF button (2).
• Wait until the "machine ready" light (15) turns on. The
machine is now ready.
• (Fig.18) - Place a container or a teacup under the steam
spout (Pannarello).
• (Fig.5) - Open the knob (4).
" position
• (Fig.6) - Switch the selection knob to the "
(17).
• When the desired quantity of hot water has been
dispensed, set the selection knob (17) to the " "
position.
• (Fig.5) - Close the knob (4).
• Remove the container with hot water.
8
STEAM / CAPPUCCINO
Danger of scalding! When brewing starts, spurts
of hot water may come out. The spout can reach
high temperatures: do not touch it with bare hands.
• (Fig.3) - Press the ON/OFF button (2).
• Wait until the "machine ready" (15) light turns on.
• (Fig.19) - Switch the selection knob (17) to the " "
position.
• Wait until the light (16) turns on. The machine is now ready
• 17 •
English
• When the desired quantity of coffee has been obtained,
turn the selection knob (17) to the " " position in order
to stop coffee brewing. Wait a few second after brewing
has stopped, then remove the cups of coffee (Fig. 15).
• (Fig.16) - Remove the pressurized portafilter and empty
the remaining coffee residues.
for steam ejection.
• (Fig.18) - Place a container under the steam spout.
• (Fig.5) - Open the knob (4) for a few seconds, so that
remaining water flows out of the steam spout (Pannarello).
In a short time only steam will come out.
• Close the knob (4) and remove the container.
• Fill 1/3 of the container you wish to use to prepare your
cappuccino with cold milk.
Use cold milk to get a better result.
• (Fig.20) - Immerse the steam spout in the milk and open
the knob (4) by turning it anticlockwise. Turn the milk
container with slow upward movements so that it warms
up evenly.
•
•
•
A maximum steam brewing of 60 seconds is
recommended.
• When brewing ends, close the knob (4) and remove the
cup with the frothed milk.
• (Fig.19) - Switch the selection knob (17) to the " "
position.
If both lights are on and the machine has reached a too
high temperature to brew coffee, prime the circuit as
described in section 4.5 to make the machine ready for
use.
Note: The machine is ready when the "machine
ready" light (15) is permanently on.
Note: If brewing a cappuccino as described is
not possible, prime the circuit as explained in
Section.5, then repeat the procedure.
The same procedure can be used to heat other
beverages.
• After this operation, clean the steam spout with a wet
cloth.
9
CLEANING
Maintenance and cleaning may only be carried out
when the machine has cooled down and has been
disconnected from the power supply.
• Do not immerse the machine in water nor place any of its
parts in a dishwasher.
• Do not use spirit, solvents and/or aggressive chemical
agents.
• We recommend cleaning the water tank and filling it up
with fresh water daily.
• (Fig.21-22) - Every day, after heating the milk, remove
the external part of the Pannarello and wash it with fresh
drinking water.
• (Fig.23) - Clean the steam spout weekly. In order to do
this, please:
- Remove the external part of the Pannarello (for standard
• 18 •
•
cleaning).
- Loosen the ring nut (without removing it).
- Remove the upper part of the Pannarello from the steam
spout.
- Wash the upper part of the Pannarello with fresh drinking
water.
- Wash the steam spout with a wet cloth and remove any
milk residue.
- Replace the upper part of the steam spout (make sure
it is completely inserted).
- Tighten the previously loosened ring nut.
Reassemble the external part of the Pannarello.
(Fig.24) - Empty and clean the drip tray daily
Use a damp and soft cloth to clean the appliance.
(Fig.17) - To clean the pressurized portafilter do as
follows:
- Remove the filter, wash it thoroughly with hot water.
- Remove the adapter (if fitted), wash it thoroughly with
hot water.
- Remove the pin, wash it thoroughly with hot water.
- Wash the internal part of the pressurized portafilter.
Do not dry the machine and/or its components in a
microwave and/or in a conventional oven.
Note: do not wash the pressurized portafilter in
the dishwasher.
10 DESCALING
The formation of limescale inside the appliance is
inevitable. It is necessary to descale the machine every
3-4 months of use and/or when you notice a reduction in
the water delivery.
If you want to descale the machine yourself,
you can use a non-toxic and/or non-harmful
descaling product for coffee machines (commercially
available). We recommend using Saeco descaling
solution.
Warning! Do not use vinegar as a descaling
solution.
• (Fig.1) - Remove and empty the water tank.
• (Fig.2) - Mix the descaling solution with water as specified
on the descaling solution box and fill the water tank. Fit
the tank into the machine.
• (Fig.3) - Turn on the machine by pressing the ON/OFF
button (2).
• (Fig.4) - Place a container under the steam spout.
• (Fig.5 - 6) To remove at intervals (one cup at a time) all
the descaling solution: open the knob (4) and switch the
selection knob (17) to the "
" position.
To stop brewing, switch the selection knob (17) to the
" " position and close the knob (4).
• (Fig.3) - During each interval disconnect the machine
by pressing the ON/OFF button (2) in order to let the
descaling solution take effect for about 10-15 minutes.
Empty the container.
• (Fig.1 - 2) - When the descaling solution is finished,
remove the water tank, rinse it and fill it with fresh drinking
water.
• (Fig.1) - Reinsert the tank into the machine.
• (Fig.4) - Place a container under the steam spout.
• (Fig.5 - 6) - Open the knob (4) and set the selection knob
(17) to the "
" position to empty 2/3 of the water. To
stop brewing switch the selection knob (17) to the " "
position and close the knob (4).
• Let the machine warm up and empty the water tank as
described above.
Wash the cappuccinatore as follows:
If you are using a product other than the
recommended one it is however important to
follow the manufacturer’s instructions shown on the
descaling solution box.
After washing the components of the cappuccinatore,
place it back on the coupling located on the machine.
11 CAPPUCCINATORE (OPTIONAL)
Not all machine models are provided with
cappuccinatore. The cappuccinatore allows you to easily
and quickly prepare delicious cappuccinos.
Follow these simple instructions to install it.
1 (Fig.29) - Loosen the ring nut on the upper part of the
cappuccinatore.
2 Insert the cappuccinatore completely into the steam
spout.
3 (Fig.30) - Tighten the ring nut.
To use the cappuccinatore, prepare the machine as
described in the related sections.
Before using the accessories, we recommend washing
them with water (Fig.31-32), immerse the suction pipe
in a fresh water container and eject a small quantity of
steam (please refer to the related instructions). In this
way, the accessories will be perfectly clean before use.
To clean the cappuccinatore, suck up clean water
to clean the suction pipe.
• (Fig.35) - Remove the extremity of the cappuccinatore
from its seat.
• Separate the cappuccinatore’s components.
• (Fig.36) - Wash the cappuccinatore extremity with
lukewarm water. Make sure no dirt is left inside.
11 DISPOSAL
• Put unused appliances out of service.
• Disconnect the plug from the socket and cut the electrical
cord.
• At the end of its life, take the appliance to a suitable waste
collection site.
This product complies with EU Directive 2002/96/EC.
The symbol
on the product or on its packaging
indicates that this product may not be treated as
household waste. Instead it shall be handed over to the
applicable collection point for the recycling of electrical
and electronic equipment.
By ensuring this product is disposed of correctly, you will
help prevent potential negative consequences for the
environment and human health, which could otherwise
be caused by inappropriate waste handling of this
product. For more detailed information about recycling
of this product, please contact your local city office, your
household waste disposal service or the shop where you
purchased the product.
While the machine is getting ready, prepare a special
container with milk or use the milk container. Place it
beside the machine.
• (Fig.33) - Immerse the suction pipe in the prepared
milk.
• (Fig.34) - Eject steam as described in section 8. Turn the
pin to modify the milk froth.
Lift the pin gently to obtain more froth.
• After preparing the cappuccino, immerse the suction
pipe into a container with fresh clean water and eject
steam. The cappuccinatore is clean when clean water is
dispensed. Clean the suction pipe externally with a damp
cloth.
The cappuccinatore must be removed and
completely washed once a week.
• 19 •
English
Warning. Do not use steam when the extremity of
the cappuccinatore is not inserted into its seat.
Fault
Possible cause
Solution
The machine does not turn on.
Machine not connected to the power
supply.
Connect the machine to the power supply.
The pump is very noisy.
No water in the tank.
Refill with water. (section 4.4).
The “machine ready” light (15) was off
while switching the selection knob (17)
to the "
" position.
Wait until the “machine ready” light (15)
turns on.
The portafilter is not inserted for
preheating (section 5).
Preheat the portafilter.
Cold cups.
Preheat the cups with hot water.
Not suitable milk: powdered milk,
low-fat milk.
Use whole milk.
Dirty Pannarello.
Clean the Pannarello as described in
section 9.
No steam in the boiler.
Prime the circuit (section 4.5) and repeat
the operations described in section 8.
Too little coffee in the portafilter.
Add coffee (section 5).
Coffee ground is too coarse.
Use a different blend (section 6).
Coffee is old or not suitable.
Use a different blend (section 6).
Old or not suitable pod.
Change the pod.
One component missing in the
portafilter.
Make sure that all components are present
and that they have been installed properly.
No water.
Refill with water. (section 4.4).
The coffee is too cold.
Milk does not froth.
It is not possible to prepare a
cappuccino.
The coffee is dispensed too
fast, no foam builds up.
Coffee is not dispensed or
dispensed only in drips.
Coffee drips from the edges.
The grind is too fine.
Use a different blend (section 6).
Coffee pressed in the portafilter.
Shake the ground coffee.
Too much coffee in the portafilter.
Reduce the quantity of coffee in the
portafilter.
Knob (4) is open.
Close the knob (4).
Traces of limestone.
Descale the machine (section 10).
The filter in the portafilter is clogged.
Clean the filter (Section 9).
Not suitable pod.
Change type of pod.
The portafilter is incorrectly inserted
into the brew unit.
Insert the portafilter correctly (Section 5).
The upper edge of the portafilter is
dirty.
Clean the rim of the portafilter.
Pod wrongly inserted.
Insert the pod correctly. Make sure it does
not come out of the portafilter.
Too much coffee in the portafilter.
Reduce the quantity of coffee using the
measuring scoop.
Please contact an authorized service centre for any faults not covered in the above table or when the suggested
solutions do not solve the problem.
• 20 •
DICHIARAZIONE DI CONFORMITA' CE
EC 2006/95, EC 2004/108,
EC 1992/31, EC 1993/68
Noi :
EC DECLARATION OF CONFORMITY
EC 2006/95, EC 2004/118,
EC 1992/31, EC 1993/68
We :
Saeco International Group
Via Torretta , 240
40041 GAGGIO MONTANO (BO)
dichiariamo sotto la nostra responsabilità che il prodotto :
MACCHINA PER CAFFE' SINGOLA
TIPO : SIN 026X
al quale si riferisce questa dichiarazione è conforme
alle seguenti norme :
• Sicurezza di elettrodomestici e apparecchi elettrici - Requisiti generali
EN 60335-1 (2002) + A1(2004) + A2(2006) + A11(2004)
+ A12 (2006)
• Sicurezza di elettrodomestici e apparecchi elettrici - Parte
2-15 - Requisiti specifici per apparecchi per riscaldare
liquidi - EN 60 335-2-15 (2002) + A1(2005)
• Sicurezza apparecchi per uso domestico e similare. Campi
elettromagnetici - Metodi per la valutazione e le misure
EN 50366 (2003) + A1 (2006).
• Limiti e metodi di misurazione dei disturbi radio caratteristici di apparecchi con motore elettrico e termici per
uso domestico e simili scopi, strumenti elettrici e simili
apparecchiature elettriche - EN 55014-1 (2000) + A1
(2001) + A2 (2002)
• Compatibilità elettromagnetica (EMC)
Parte 3^ Limiti - Sezione 2 : Limiti per le emissioni di corrente armonica (corrente in ingresso dell'apparecchiatura
≤ 16A per fase) - EN 61000-3-2 (2000)
• Compatibilità elettromagnetica (EMC) - Parte 3^ Limiti
- Sezione 3 : Limitazione delle fluttuazioni e dei picchi di
tensione nei sistemi di alimentazione a bassa tensione
per apparecchiature con corrente nominale ≤ 16A.
EN 61000-3-3 (1995) + A1(2001)
• Requisiti di immunità per elettrodomestici, strumenti e
apparecchi similari. Norma per famiglia di prodotti EN
55014-2 (1997) + A1 (2001)
secondo le disposizioni delle direttive :
CE 73/23, CE 89/336, CE 92/31, CE 93/68.
Saeco International Group
Via Torretta , 240
40041 GAGGIO MONTANO (BO)
declare under our responsibility that the product :
COFFEE MAKER
TYpe : SIN 026X
to which this declaration relates is in conformity with the
following standards or other normative documents :
• Safety of household and electrical appliances - General
requirements - EN 60335-1(2002 ) + A1(2004) + A2(2006)
+ A11(2004) + A12(2006)
• Safety of household and electrical appliances - Part 2-15
- Particular requirements for appliances for heating liquids
- EN 60335-2-15(2002) + A1(2005)
• Household and similar electrical appliances - Electromagnetic fields - methods for evaluation and measurement
EN 50366 (2003) + A1 (2006).
• Electromagnetic compatibility (EMC) - Requirements for
household appliances , electric tools and similar apparatus
- Part 1 Emission EN 55014-1 (2000) + A1 (2001) + A2
(2002).
• Electromagnetic compatibility (EMC) - Part. 3^ Limits
- Section 2 : Limits for harmonic current emissions (equipment input current ≤ 16A for phase) - EN 61000-3-2
(2000)
• Electromagnetic compatibility (EMC)
Part 3^ : Limits - Section 3 : Limitation of voltage changes
, voltage fluctuations and flicker in public low - voltage
supply systems , for equipment with rated current ≤ 16 A
for phase and not subject to conditional connection
EN 61000-3-3 (1995) + A1 (2001)
• Electromagnetic compatibility - Requirements for household appliances , electric tools and similar apparatus
- Part 2. Immunity - Product family standard EN 55014-2
(1997) + A1 (2001)
following the provisions of the Directives :
EC 73/23, EC 89/336, EC 92/31, EC 93/68.
Gaggio Montano 05/07/2006
Gaggio Montano 05/07/2006
R&D
Ing. Andrea Castellani
KONFORMITÄTSERKLÄRUNG CE
2006/95/EG, 2004/108/EG,
1992/31/EG, 1993/68/EG
Wir:
DÉCLARATION CE DE CONFORMITÉ
CE 2006/95, CE 2004/108,
CE 1992/31, CE 1993/68
Nous :
Saeco International Group
Via Torretta , 240
40041 GAGGIO MONTANO (BO)
erklären unter eigener Verantwortung, dass das Produkt:
EINZELKAFFEEMASCHINE
TYP : SIN 026X
auf das sich diese Erklärung bezieht, folgenden Normen
entspricht:
• Sicherheit elektrischer Geräte für den Hausgebrauch und
ähnliche Zwecke - Allgemeine Anforderungen
EN 60335-1 (2002) + A1(2004) + A2(2006) + A11(2004)
+ A12 (2006)
• Sicherheit elektrischer Geräte für den Hausgebrauch und
ähnliche Zwecke - Teil 2-15
Besondere Anforderungen für Geräte zur Flüssigkeitserhitzung - EN 60 335-2-15 (2002) + A1(2005)
• Sicherheit Geräte für den Hausgebrauch und ähnliche
Zwecke. Elektromagnetische Felder
Verfahren für die Bewertung und die Messungen EN 50366 (2003) + A1 (2006).
• Grenzwerte und Messverfahren für Funkstörungen von
Geräten mit elektromotorischem - Antrieb und Elektrowärmegeräten für den Hausgebrauch und ähnliche Zwecke,
Elektrowerkzeugen und ähnlichen Elektrogeräten EN 55014-1 (2000) + A1 (2001) + A2 (2002)
• Elektromagnetische Verträglichkeit (EMV)
Teil 3 Grenzwerte - Abschnitt 2: Grenzwerte für Oberschwingungsströme (Geräte-Eingangsstrom ≤ 16A je
Leiter) - EN 61000-3-2 (2000)
• Elektromagnetische Verträglichkeit (EMV)
Teil 3 Grenzwerte - Abschnitt 3: Grenzwerte für Spannungsschwankungen und Flicker in Niederspannungsnetzen für Geräte mit einem Eingangsstrom ≤ 16A.
EN 61000-3-3 (1995) + A1(2001)
• Störfestigkeit von Haushaltsgeräten, Elektrowerkzeugen
und ähnlichen Geräten.
Produktfamiliennorm EN 55014-2 (1997) + A1 (2001)
gemäß den Bestimmungen der Richtlinien:
73/23/EG, 89/336/EG, 92/31EG, 93/68/EG.
Gaggio Montano 05/07/2006
Saeco International Group
Via Torretta , 240
40041 GAGGIO MONTANO (BO)
déclarons sous notre responsabilité que le produit :
MACHINE À CAFÉ
TYPE : SIN 026X
auquel se réfère cette déclaration est conforme aux
normes suivantes :
• Sécurité d'appareils électroménagers et électriques Prescriptions générales - EN 60335-1 (2002) + A1(2004)
+ A2(2006) + A11(2004) + A12 (2006)
• Sécurité d'appareils électroménagers et électriques - Partie
2-15. Prescriptions particulières pour les appareils de chauffage des liquides - EN 60 335-2-15 (2002) + A1(2005)
• Sécurité des appareils pour usage domestique et analogue.
Champs électromagnétiques - Méthodes pour l'évaluation
et les mesures EN 50366 (2003) + A1 (2006).
• Limites et méthodes de mesure des perturbations radio
produites par les appareils électroménagers ou analogues
comportant des moteurs électriques ou des dispositifs
thermiques, par les outils électriques et par les appareils
électriques analogues EN 55014-1 (2000) + A1 (2001) + A2 (2002)
• Compatibilité électromagnétique (CEM)
Partie 3 Limites - Section 2 : Limites pour les émissions
de courant harmonique (courant appelé par les appareils
≤ 16A par phase) - EN 61000-3-2 (2000)
• Compatibilité électromagnétique (CEM)
Partie 3 Limites - Section 3 : Limitation des variations
et des fluctuations de tension et du papillotement dans
les réseaux d'alimentation basse tension pour appareils
ayant un courant nominal ≤ 16A. EN 61000-3-3 (1995) +
A1(2001)
• Prescriptions d'immunité pour les appareils électroménagers, outils électriques et appareils analogues. Norme de
famille de produits EN 55014-2 (1997) + A1 (2001)
conformément aux dispositions des directives :
CE 73/23, CE 89/336, CE 92/31, CE 93/68.
Gaggio Montano 05/07/2006
R&D
Ing. Andrea Castellani
DECLARACIÓN DE CONFORMIDAD CE
2006/95 CE, 2004/108 CE,
1992/31 CE, 1993/68 CE
Nosotros, la empresa :
DECLARAÇÃO DE CONFORMIDADE CE
CE 2006/95, CE 2004/108,
CE 1992/31, CE 1993/68
Nós :
Saeco International Group
Via Torretta , 240
40041 GAGGIO MONTANO (BO)
Saeco International Group
Via Torretta , 240
40041 GAGGIO MONTANO (BO)
declaramos bajo nuestra responsabilidad que el producto :
declaramos sob nossa inteira responsabilidade que o
produto :
MÁQUINA DE CAFÉ
TIPO : SIN 026X
MÁQUINA DE CAFÉ
TIPO : SIN 026X
al cual se refiere esta declaración, cumple con las
siguientes normas :
a que se refere esta declaração está conforme com as
seguintes normas :
• Seguridad de los aparatos electrodomésticos y análogos
- Requisitos generales - EN 60335-1 (2002) + A1(2004)
+ A2(2006) + A11(2004) + A12 (2006)
• Seguridad de los aparatos electrodomésticos y análogos
- Parte 2-15 - Requisitos particulares para aparatos para
calentar líquidos - EN 60 335-2-15 (2002) + A1(2005)
• Seguridad de los aparatos electrodomésticos y análogos.
Campos electromagnéticos. Técnicas de ensayo y de
medida EN 50366 (2003) + A1 (2006).
• Límites y métodos de medida de las características
relativas a la perturbación radioeléctrica de los aparatos
electrodomésticos o análogos accionados por motor o
con dispositivos térmicos, de las herramientas y equipos
eléctricos análogos - EN 55014-1 (2000) + A1 (2001) +
A2 (2002)
• Compatibilidad electromagnética (CEM)
Parte 3^ Límites - Sección 2 : Límites para las emisiones
de corriente armónica (equipos con corriente de entrada
≤ 16 A por fase) - EN 61000-3-2 (2000)
• Compatibilidad electromagnética (CEM)
Parte 3^ Límites - Sección 3 : Limitación de las fluctuaciones de tensión y del flicker en redes de baja tensión
para los equipos con corriente de entrada ≤ 16 A.
EN 61000-3-3 (1995) + A1(2001)
• Requisitos para los aparatos electrodomésticos, herramientas eléctricas y aparatos análogos. Inmunidad.
Norma de familia de productos EN 55014-2 (1997) + A1
(2001)
• Segurança de aparelhos electrodomésticos e análogos
- Parte 1: Regras gerais - EN 60335-1 (2002) + A1(2004)
+ A2(2006) + A11(2004) + A12 (2006)
• Segurança de aparelhos electrodomésticos e análogos
- Parte 2-15 - Regras particulares para aparelhos de aquecimento de líquidos - EN 60 335-2-15 (2002) + A1(2005)
• Aparelhos electrodomésticos e análogos. Campos electromagnéticos
Métodos para avaliação e medição EN 50366 (2003) +
A1 (2006).
• Requisitos para electrodomésticos, ferramentas eléctricas
e dispositivos similares - Parte 1: Emissão
Norma de família de produto - EN 55014-1 (2000) + A1
(2001) + A2 (2002)
• Compatibilidade electromagnética (CEM)
Parte 3^ Limites - Secção 2 : Limites para emissões de
corrente harmónicas (corrente de entrada do equipamento
até 16A, inclusive, por fase) - EN 61000-3-2 (2000)
• Compatibilidade electromagnética (CEM)
Parte 3^ Limites - Secção 3 : Limitação das flutuações
de tensão e tremulação em sistemas de alimentação de
baixa tensão para equipamentos de corrente nominal até
16 A, inclusive. EN 61000-3-3 (1995) + A1(2001)
• Requisitos para aparelhos electrodomésticos, ferramentas portáteis e aparelhos eléctricos análogos .
Norma de família de produto EN 55014-2 (1997) + A1
(2001)
conforme a lo establecido en las directivas :
73/23 CE, 89/336 CE, 92/31 CE, 93/68 CE.
segundo as disposições das directivas :
CE 73/23, CE 89/336, CE 92/31, CE 93/68.
Gaggio Montano 05/07/2006
Gaggio Montano 05/07/2006
R&D
Ing. Andrea Castellani
EG CONFORMITEITSVERKLARING
EG 2006/95, EG 2004/108,
EG 1992/31, EG 1993/68
DEKLARACJA ZGODNOŚCI WE
2006/95 WE, 2004/108 WE,
1992/31 WE, 1993/68 WE
My:
Wij :
Saeco International Group
Via Torretta , 240
40041 GAGGIO MONTANO (BO)
verklaren onder eigen verantwoordelijkheid dat het
product:
ENKELVOUDIGE KOFFIEMACHINE
Type : SIN 026X
waarnaar deze verklaring verwijst, voldoet aan de
volgende normen:
• Huishoudelijke en soortgelijke elektrische toestellen
- Veiligheid - Algemene eisen - EN 60335-1 (2002) +
A1(2004) + A2(2006) + A11(2004) + A12 (2006)
• Huishoudelijke en soortgelijke elektrische toestellen Veiligheid - Deel 2-15 - Bijzondere eisen voor toestellen
voor verwarming van vloeistoffen
EN 60 335-2-15 (2002) + A1(2005)
• Veiligheid voor huishoudelijke en soortgelijke toestellen.
Elektromagnetische velden. - Methoden voor evaluatie
en meting EN 50366 (2003) + A1 (2006).
• Elektromagnetische compatibiliteit - Eisen voor huishoudelijke toestellen, elektrisch gereedschap en soortgelijke
apparaten - Deel 1 Emissie - EN 55014-1 (2000) + A1
(2001) + A2 (2002)
• Elektromagnetische compatibiliteit (EMC)
Deel 3-2 : Limietwaarden - Limietwaarden voor de emissie
vanharmonische stromen (ingangsstroom van de toestellen 16 A per fase) - EN 61000-3-2 (2000)
• Elektromagnetische compatibiliteit (EMC)
Deel 3-3 : Limietwaarden - Limietwaarden voor spanningswisselingen, spanningsschommelingen en flikkering in
openbare laagspanningsnetten voor apparatuur met een
ingangsstroom 16 A per fase en zonder voorwaardelijke
aansluiting EN 61000-3-3 (1995) + A1(2001)
• Elektromagnetische compatibiliteit - Eisen voor huishoudelijke toestellen, elektrisch gereedschap
en soortgelijke apparaten - Deel 2: Immuniteit - Productgroepnorm EN 55014-2 (1997) + A1 (2001)
volgens de bepalingen van de richtlijnen:
EG 73/23, EG 89/336, EG 92/31, EG 93/68.
Gaggio Montano 05/07/2006
Saeco International Group
Via Torretta , 240
40041 GAGGIO MONTANO (BO)
niniejszym deklarujemy, ponosząc za to pełną odpowiedzialność, że produkt:
EKSPRES DO KAWY POJEDYNCZY
TYP : SIN 026X
do którego odnosi się ta deklaracja jest zgodny z wymaganiami zawartymi w następujących normatywach:
• Zasady bezpieczeństwa dla sprzętu domowego i elektrycznego - Wymagania ogólne - EN 60335-1 (2002) +
A1(2004) + A2(2006) + A11(2004) + A12 (2006)
• Zasady bezpieczeństwa dla sprzętu domowego i elektrycznego - Część 2-15 - Wymagania szczególne dla
urządzeń służących do ogrzewania płynów
EN 60 335-2-15 (2002) + A1(2005)
• Zasady bezpieczeństwa przyrządów do użytku domowego
i podobnego. Pola elektromagnetyczne
Metody oceny i pomiaru EN 50366 (2003) + A1 (2006).
• Dopuszczalne poziomy i metody pomiarów zakłóceń radioeletrycznych wytwarzanych przez urządzenia o silniku
elektrycznym lub termiczne do użytku domowego lub do
podobnych celów i przez przyrządy i sprzęty elektryczne
- EN 55014-1 (2000) + A1 (2001) + A2 (2002)
• Kompatybiliność elektromagnetyczna (EMC)
Część 3^ Dopuszczalny poziom - Rozdział 2: Dopuszczalne poziomy emisji harmonicznych prądu (prądu
wejściowego ≤ 16A na fazę) - EN 61000-3-2 (2000)
• Kompatybiliność elektromagnetyczna (EMC)
Część 3^ Dopuszczalny poziom - Rozdział 3: Dopuszczalne zmiany i wahania napięcia w systemach zasilania
niskim napięciem dla urządzeń o prądzie nominalnym ≤
16A. - EN 61000-3-3 (1995) + A1(2001)
• Wymagania dotyczące odporności sprzętu domowego,
przyrządów i podobnej aparatury. Normatywa dla grupy
produktów EN 55014-2 (1997) + A1 (2001)
zgodnie z rozporządzeniami zawartymi w dyrektywach:
WE 73/23, WE 89/336, WE 92/31, WE 93/68.
Gaggio Montano 05/07/2006
R&D
Ing. Andrea Castellani
Type Sin026X
Cod. 15001190 Rev.00 15-07-07
Saeco International Group S.p.A. Via Torretta, 240 - 40041 Gaggio Montano
Bologna - Italy - Tel. +39 0534.771.111 - Fax. +39 0534.31025
http://www.saeco.com