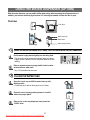
1
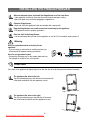
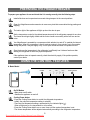
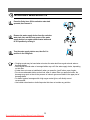
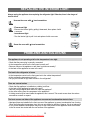
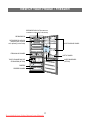
ENGLISH
OWNER’S INSTRUCTIONS
Register your product at www.samsung.com/global/register
DA68-01281L REV(0.3)
Downloaded from Fridge-Manual.com Manuals
FEATURES
These operating instructions cover various models.
The characteristics of your appliance may differ
slightly from those described in this manual.
Environment-friendly fridge/freezer using R600a
refrigerant and cyclopentane blowing agent.
• This products protects the environment by using the
R600a refrigerant and the cyclopentane blowing agent.
• Properties:
ODP (Ozone Depletion Potential): 0
GWP (Global Warming Potential): Lowest
R600a or R134a is used as a refrigerant.
Check the compressor label on the rear of the
appliance and the rating label inside the fridge to
see which refrigerant is used for your refrigerator.
High-energy efficiency
• Optimized power consumption when using R600a and
cyclopentane.
SUPER fast freezing function
• Food can be stored in fresh conditions by cooling it
quickly via the “SUPER” freezing function.
Fresh compartment, just above 0°C
• Drawer for dry or wrapped food.
• Drawer for fresh salades, vegetables and fruits.
Fridge at the top, drawer-type freezer at the bottom
• The highly ergonomic vegetable compartment is placed
at waist height as it is frequently used.
• The drawer-type freezer minimizes temperature variations
and stores food cleanly and conveniently.
CONTENTS
Power on/off
• The main power switch is handy to switch the appliance on
and off without pulling out the main plug.
FEATURES................................................................................. 1
WARNINGS / SAFETY PRECAUTIONS ................................. 2
INSTALLING THE FRIDGE / FREEZER................................... 4
PREPARING THE FRIDGE / FREEZER................................... 5
USING THE CONTROL FEATURES..........................................5
STORING FOOD IN THE REFRIGERATOR OR FREEZER..... 8
MAKING ICE ............................................................................ 10
USING THE WATER DISPENSER (OPTION)........................ 11
REMOVING AND CLEANING THE ACCESSORIES............. 13
CLEANING THE WATER DISPENSER................................... 14
REPLACING THE INTERIOR LIGHT.......................................15
PROBLEMS AND SOLUTIONS .............................................. 15
USAGE PRECAUTIONS.......................................................... 16
VIEW OF YOUR FRIDGE / FREEZER.....................................17
Digital temperature control display
• The display shows all functions of the appliance, so that
you can easily control them.
ECO
• Just press the ECO button to obtain the most energyefficient temperature settings: freezer at -17°C and fridge at
6°C.
VAC
• Save on energy consumption by switching off the fridge
and maintaining only the freezer running when you take
a long vacation or are away for any reason.
1
Downloaded from Fridge-Manual.com Manuals
WARNINGS / SAFETY PRECAUTIONS
To avoid any risk of personal injury, material damage or incorrect use of the appliance, be sure to
observe the following safety precautions. (After reading these owner’s instructions, please keep them in
a safe place for reference). Remember to hand them over to any subsequent owner.
Indicates that a danger of death or
serious injury exists.
Indicates that a risk of personal
injury or material damage exists.
Warning
Caution
Do not disassemble, repair or alter the
appliance.
• It may cause fire or abnormal operations, which
may lead to injury.
Warning
Do not plug several appliances into the same
socket.
• This could cause overheating and the risk of fire.
Pull the power plug out of the socket before
replacing the interior light in the refrigerator.
• Otherwise, there is a risk of electric shock.
Keep the power plug away from the rear of the
fridge/freezer.
• A damaged power plug may cause fire due to
overheating.
Be sure to ground the appliance.
• Otherwise, it may cause material damage and
electric shock.
Do not directly spray water inside or outside the
fridge/freezer.
• There is a risk of fire or electric shock.
If you wish to dispose of the refrigerator /
freezer, throw it away after removing the door or
its seals.
• In this way, it is not possible for a child to remain
trapped inside it.
Do not spray inflammable gas near the
fridge/freezer.
• There is a risk of explosion or fire.
Do not bend the power cord excessively or place
heavy articles on it.
This constitutes a fire hazard. If the power cord is
This appliance contains a small amount
of isobutane refrigerant (R600a), a
natural gas with high environmental
compatibility, but it is also combustible. When
transporting and installing the appliance, care
should be taken to ensure that no parts of the
refrigerating circuit are damaged.
damaged, have it replaced immediately by the
manufacturer, its service agent or a similarly
qualified person.
Do not insert the power plug with wet hands.
• You may receive an electric shock.
Refrigerant squirting out of the pipes could
ignite or cause an eye injury. If a leak is detected,
avoid any naked flames or potential sources of
ignition and air the room in which the appliance
is standing for several minutes.
• In order to avoid the creation of a flammable gasDo not install the refrigerator / freezer in a damp
air mixture if a leak in the refrigerating circuit occurs,
place, where it may come into contact with water.
the size of the room in which the appliance may be
• Incorrect insulation of the electrical parts may
sited depends on the amount of refrigerant used.
cause an electric shock or fire.
The room must be 1m3 in size for every 8 g of
R600a refrigerant inside the appliance. The amount
Do not store volatile and inflammable
of refrigerant in your particular appliance is shown
substances in the refrigerator.
on the identification plate inside the appliance.
• The storage of benzene, thinner, alcohol, ether, LP
• Never start up an appliance showing any signs of
gas or other such substances may cause an
damage. If in doubt, consult your dealer.
explosion.
Do not put a container filled with liquid on top of
the appliance.
• If the water spills on to any electrical parts, it may
lead to fire or electric shock.
2
Downloaded from Fridge-Manual.com Manuals
Do not touch any containers and food in the
freezer with wet hands.
• It may cause frostbite.
Warning
• Keep ventilation openings in the appliance
enclosure or mounting structure clear of
obstruction.
• Do not use mechanical devices or any other
means to accelerate the defrosting process, other
than those recommended by the manufacturer.
• Do not damage the refrigerant circuit.
• Do not use electrical appliances inside the
fridge/freezer, unless they are of a type
recommended by the manufacturer.
Remove any foreign matter from the power plug
pins.
• Otherwise, there is a risk of fire.
Do not insert your hand into the bottom area of
the appliance.
• Any sharp edges may cause personal injury.
After unplugging the appliance, wait for at least
five minutes before plugging it in again to the
wall socket.
• Abnormal operation of the freezer may cause
material damage.
Caution
If the appliance is not to be used for a long
period of time, pull out the power plug.
• Any deterioration in the insulation may cause fire.
Do not store too much food in the appliance.
• When you open the door, an item may fall out and
cause personal injury or material damage.
Do not let children touch or play with the
control panel on the front of the appliance.
• Do not allow children to play with this appliance.
• Do not stand or lean on the base panel, pull-out
parts, doors and so on.
• Repairs and maintenance of the appliance should
only be performed by a qualified technician.
Incorrect repairs by an unqualified person are a
potential source of danger that may have critical
consequences for the user of the appliance.
• Never put ice cubes or ice lollies straight from the
freezer into your mouth. (The low temperature
may cause “freezer burns”.)
Do not put bottles or any kinds of glass in the
freezer.
• The container may break and cause personal
injury.
If the wall socket is loose, do not insert the
power plug.
• If may cause electric shock or fire.
Do not disconnect the power cord by pulling
on it.
• You may disconnect a wire and cause a short
circuit.
Do not store articles on top of the appliance.
• When you open or close the door, the articles may
fall and cause personal injury or material damage.
Caution
Do not store pharmaceutical products, scientific
materials or other temperature-sensitive
products in the refrigerator.
• Products that require strict temperature controls
must not be stored in the refrigerator.
The refrigerant used in fridge/freezers and the
gases in the insulation material require special
disposal procedures. Ensure that none of the pipes
on the back of the appliance are damaged prior to
disposal.
Do not let a child hang from the door.
3
Downloaded from Fridge-Manual.com Manuals
INSTALLING THE FRIDGE/FREEZER
Allow an adequate space and install the fridge/freezer on a firm, level floor.
• If the appliance is not level, there may be unusual noises and poor cooling.
• Wait for at least one hour before plugging the appliance in.
Clean the fridge/freezer.
• Wipe and clean the appliance inside and outside with a damp cloth.
Plug the fridge/freezer into a wall socket used exclusively by this appliance.
• This appliance must be properly grounded.
Place the food in the fridge/freezer.
• It is recommended that you wait for the appliance to cool for 2-3 hours before storing food in it.
Warning
Use of an grounded socket exclusively for the
appliance:
• If you are using a socket with an earthing terminal, you
do not require a separate earthing connection.
Use of a non-grounded socket:
• Connect the “earthing wire” to the copper plate and bury
it at a depth of at least 25 cm in the ground.
25cm
LEVELLING
If the front of the appliance is slightly higher than the rear, the door can be open and closed more easily.
The appliance tilts down to the left.
Turn the left adjusting leg in the direction of the arrow with
a flat head screwdriver until the appliance is level.
The appliance tilts down to the right.
Turn the right adjusting leg in the direction of the arrow
with a flat head screwdriver until the appliance is level.
4
Downloaded from Fridge-Manual.com Manuals
PREPARING THE FRIDGE/FREEZER
To prepare your appliance for use and check that it is running correctly, take the following steps.
Install all shelves and compartments removed during transport in the correct positions.
Clean the fridge/freezer and accessories to remove any dust that accumulated during packing and
shipping.
The interior light of the appliance will light up when the door is open.
Set the temperature control to the coldest temperature and let the refrigerator operate for one hour.
The freezer should get slightly chilled and the motor should run smoothly with a soft hum and no
noise.
Your fridge/freezer is operated by a compressor which switches “on and off” to maintain the internal
temperature. When the compressor is new, it requires running in for a period of up to five months.
During this period, it may be slightly noisy. This is quite normal and does not represent a fault.
Store food once the temperature in the refrigerator is sufficiently low. It takes a few hours after
starting the refrigerator to reach the proper temperature.
If the appliance does not operate correctly, check the electricity supply. If the problem persists,
contact your dealer.
USING THE CONTROL FEATURES
A. Basic Model
On/Off
Low
Mid
High
Cooling Power
➀
On/Off Button
• Main power on/off switch.
• Switches the appliance on and off.
Cooling Power button
• Press the Cooling Power button to control the refrigerator temperature.
• Initially, the mid-point temperature setting is selected.
• There are five temperature settings, represented by five indicator lights (➀).
When all lights are on, the temperature is at its coolest.
• Press the Cooling Power button one or more times until the required temperature is set.
• The freezer temperature will be adjusted automatically according to the refrigerator temperature.
5
Downloaded from Fridge-Manual.com Manuals
B. Model with Digital Display
Super
➁ ➀ ➂ ➄ ➃ ➅
POWER Button
• Main power on/off switch.
• Switches the appliance completely on or off.
SUPER Button
• Switches the fast freeze function on or off.
• Use when you wish to freeze foods quickly.
• The SUPER indicator ➀ remains on while the fast freeze function is running.
• While this function is selected, the refrigerating device remains switched on continuously and
produces a very low temperature inside the freezer.
• The fast freeze function switches off automatically. When the fast freeze process is completed,
the SUPER indicator ➀ switches off and the freezer switches back to the previous setting
temperature.
FRE.TEMP Button
• In the normal model, the temperature displayed ➃ is the setting temperature of the freezer.
• To change the freezer temperature:
– Press the FRE.TEMP button.
The current setting temperature is displayed (➃) preceded by “F” (➁).
– Press the FRE.TEMP button one or more times or hold it down until the required temperature
is displayed (➃).
• The temperature changes in sequence. After -25°C, the display returns to -17°C again.
• Freezer temperature range: -17°C to -25°C.
Note
Once the power is re-instated, the temperature display ➃ displays “– –”. In this case, the display
“– –” is disappeared by pressing FRE. TEMP button or REF. TEMP button.
6
Downloaded from Fridge-Manual.com Manuals
REF.TEMP Button
• To change the refrigerator temperature:
– Press the REF.TEMP button.
The current setting temperature is displayed (➃) preceded by “R” (➁).
– Press the REF.TEMP button one or more times or hold it down until the required temperature is
displayed (➃).
– When you complete the setting of refrigerator temperature, the refrigerator temperature display
(➃) flashes 5 times and returns to the setting temperature of the freezer.
• The temperature changes in sequence. After +6°C, the display returns to +1°C.
• Refrigerator temperature range: +1°C to +6°C.
Note
The temperature display (➃) flashes “– –” if there has been a power failure. Check that
the food stored in the appliance has not gone bad.
ECO Button
• To set the most energy-efficient temperature automatically for the refrigerator and freezer, simply
press the ECO button.
Freezer temperature: -17°C.
Refrigerator temperature: 6°C.
• The ECO indicator ➄ remains on while the ECO function is operating.
• If you press the FRE.TEMP or REF.TEMP button, the ECO function is cancelled and the appliance
is set to the new temperature selected.
VAC Button
• If you are going on a long vacation or business trip or you do not need to use the refrigerator,
press the VAC button.
• The refrigerator is switched off but the freezer remains on.
• The VAC indicator (➅) remains on while the VAC function is operating.
You must empty the refrigerator before pressing the VAC button.
Caution
Note
If the SUPER, ECO or VAC mode is already selected and you press one of the other
buttons, the current mode is cancelled and the mode corresponding to the button
pressed is selected.
It is possible, if the ECO mode is already selected and you press SUPER mode, the
temperature of refrigerator and freezer is controlled independenty.
(refrigerator : ECO mode, freezer : SUPER mode)
7
Downloaded from Fridge-Manual.com Manuals
STORING FOOD IN THE REFRIGERATOR OR FREEZER
When storing food in the appliance,
follow the recommendations below.
• Allow warm food and beverages to cool down
before storing them in the appliance.
• Ensure that food is well-wrapped or covered
before it is stored. This will prevent food from
dehydrating, deteriorating in colour or losing
flavor and will help maintain freshness. It will
also prevent cross-flavouring.
• Never let any oil or grease come into contact
with the plastic fittings or door seals, as these
materials easily become porous.
• Never store any explosive substances inside
the appliance. High-proof alcohol should only
be stored upright in tightly sealed containers.
A. Refrigerator
Transparent, safety glass shelf (optional)
• Place food in storage containers and lay the items out
at suitable intervals.
• The storage shelf is of an unbreakable, transparent material,
so that you can use it safely.
Fresh salad drawers
• Vegetable and fruit can be stored in this compartment.
• It is possible, if you need more space to store vegetable
and fruits, to remove drawers.
• A declared storage volume of fresh food storage compartment
is calculated with fresh salad drawers removed.
Dairy and multi-purpose guard
• Store fatty foods, like butter and cheese.
• Store small, packed foods, like milk, yogurt and
beverages.
Bottle guard
• Store small bottles and cartons (1 litre) of beer, milk,
juice in the upper part and large bottles and cartons
(1.5 litres) in the lower part.
8
Downloaded from Fridge-Manual.com Manuals
B. Freezer
Upper freezer drawer
• Store packed frozen foods, like ice cream
and bacon.
Middle/lower freezer drawer
• Store fresh meat and fish or dried foods,
which are divided into suitably sized
portions.
Note
For more space, you can store food with drawers and ice maker removed.
A declared storage volume of frozen food storage compartment is calculated with ice cube,
ice tray, upper and middle freezer drawers removed.
Wrapping food
Note
Pack the food in suitably sized portions for your household.
Vegetable and fruit portions should be no heavier than 1 kg, while meat portions can be up
to 2.5 kg.
Smaller portions freeze through more quickly and the quality is thereby maintained better when
defrosting and preparing the food.
It is important to seal food in airtight bags or containers before freezing to prevent it from losing
favor or dehydrating.
Wrap the food, press out any air and seal it airtight.
Suitable wrapping materials:
Plastic bags, cling-film, aluminium foil and freezer containers. These items are available from
any dealer.
Unsuitable wrapping materials:
Wrapping paper, greaseproof paper, cellophane, bin bags or used carrier bags.
Suitable sealing materials:
Rubber bands, plastic clips, string, freezer tape or similar.
Plastic film and bags may be heat-sealed using a special sealing iron or press.
Before placing a package in the freezer, it should be clearly labelled with the contents and
date of freezing.
9
Downloaded from Fridge-Manual.com Manuals
MAKING ICE
A. Twist type
Pull out the ice cube maker.
Fill trays in up to the water level mark
(arrow).
Put the ice cube maker back in
position.
Close the freezer door.
Once the water has become frozen,
turn the knobs on the ice cube trays to
empty ice cubes into the storage bin.
B. Normal type
Pour water into the ice cube maker.
• Fill the maker up to about 80% with
water.
Place the ice cube maker in the upper
freezer drawer.
To take out the ice cubes:
• Twist the ice cube maker slightly.
Danger of explosion
Warning • The coldest parts of the refrigerator are the rear panel and the lowest shelf. This is the best
place to store delicate foodstuffs.
• Glass bottles containing liquids that can freeze should never be stored in the freezer as the
glass will explode when the contents freeze.
Note
Making ice quickly
To make a large quantity of ice quickly, press the “SUPER” button to select the fast freeze
function.
10
Downloaded from Fridge-Manual.com Manuals
USING THE WATER DISPENSER (OPTION)
With the water dispenser, you can obtain chilled water easily without opening the refrigerator door. In
addition, you can save electricity by more than 30% reducing the number of times the door is open.
Overview
Push lever
Water tank cap
Water tank
Water supply device
WHEN THE WATER DISPENSER IS NOT USED,THE FOLLOWING WAYS ARE RECOMMENDED
Fix the water supply device tightly into the fixing hole.
• The door will not be closed automatically when the water
supply device is pulled out for a long time because of cold
leaking.
Place a separate spare beverage bottle in the location
of the exclusive water tank.
• Two 1.5 litre bottles can be used.
FILLING THE WATER TANK
Open the round cap and fill the water tank up with
drinking water.
• Fill the tank up to the full level (just over 4.2 litres).
Close the round cap by pushing down on it until it
clicks into proper place.
Place a cup on the tray dispenser, then press the
“PUSH” lever.
11
Downloaded from Fridge-Manual.com Manuals
INSTALLING A REGULAR BOTTLE
Press the fixing lever, lift the exclusive water tank
upwards, then remove it.
Remove the water supply device from the exclusive
water tank, then set the inner groove of the water
supply device in a regular mineral water bottle and
fix it in position by turning it.
Turn the water supply device over, then fix it in
position in the fixing hole.
Note
• Gurgling sounds may be heard when air enters the water tank from regular mineral water or
beverage bottles.
• Some regular mineral water or beverage bottles may not fit the water supply device, depending
on their size.
• If water does not come out satisfactorily when you press the “push” button, press it again.
• Do not use carbonated drinks, such as cola, cider or sodas. When you press the button, the
beverage may spurt out due to the pressure of carbonic gas accumulated in the upper part of
beverage bottle.
• For better hygiene, beverages with a high sugar content (juice, soft drinks) are not
recommended.
• Use bottled mineral water or boiled tap water that does not contain any particles.
12
Downloaded from Fridge-Manual.com Manuals
REMOVING AND CLEANING THE ACCESSORIES
Before cleaning the appliance, you must always switch it off and unplug it from the wall socket.
Do not use a steam cleaner. The hot steam could damage the surface of the appliance or the electrical
components, causing a risk of electric shock.
Ice cube maker (optional)
• Hold the knob of ice cube maker, then pull the ice cube
maker forward.
• Remove the ice cube maker and rinse it in water.
Ice tray (optional)
• Using the handle, pull the ice tray out as far as it will go,
then remove it by lifting it up slightly and pulling it towards
you.
Fresh salad drawers
• Pull the salad drawers out as far as it will go, then remove
it by lifting it slightly and pulling it towards you.
• Wipe it with a damp cloth.
Bottle guard
• Hold the bottle guard in both hands, then remove it by
lifting it slightly and pulling it towards you.
• Wash it in water.
Freezer drawer
• Holding the freezer drawer in both hands, pull it out as far
as it will go, then remove it by lifting it up slightly and
pulling it towards you.
• Wipe it with a damp cloth.
Transparent, safety glass shelf (optional)
• Remove the shelf, then clean it using water and
detergent.
• When replacing the shelves, do not mix up the top,
middle and bottom shelves.
Note
When you remove the tempered glass shelves, load a glass and a trim simultaneously to
prevent from dropping the glass.
Rubber seals
• Clean the rubber seals with a damp cloth and detergent.
Use a wooden skewer wrapped in a small cloth to clean
in the grooves.
13
Downloaded from Fridge-Manual.com Manuals
CLEANING THE WATER DISPENSER
Dispenser Tray
Using the dispenser tray handle, remove the tray.
Empty the water in the dispenser tray, then clean it using
warm water and detergent.
Dispenser tray
Connection path
Wipe out the connection path and surrounding area with a clean
damp cloth.
Water Tank / Supply Device
Pull upward and disassemble the hooks on both
sides of the large-sized cap.
Loosen the water supply device by turning it in the
direction of the arrow and removing it.
Wipe the large-sized cap and the exclusive water tank
with warm water and detergent.
• Hold the cap and pull it upwards to remove it. Clean the
cap and filtering bottle attached to the cap with a soft
brush.
After cleaning the water supply device with a soft
brush, press the water supply device operation lever,
then wash it in running water.
• Clean the water tank frequently if it used to dispense tea or other such beverages. Only use
filtered tea. For better hygiene, beverages with a high sugar content (juice, soft drinks) are not
Caution
recommended.
• Deposits can be cleaned by wiping the tank with a cloth dampened in vinegar or salt water.
• Check that the rubber seal on the water supply device has not slipped off or is not damaged
by a sharp-edged object. Otherwise, it may leak.
14
Downloaded from Fridge-Manual.com Manuals
REPLACING THE INTERIOR LIGHT
Always unplug the appliance when replacing the refrigerator light. Otherwise, there is the danger of
electric shock.
Unscrew the cover with + head screwdriver.
- Fluorescent light
• Remove the interior light by pulling it downward, then replace it with
a new one.
- Incandescent light
• Turn the interior light to pull it out and replace it with a new one.
Screw the cover with + head screwdriver.
PROBLEMS AND SOLUTIONS
The appliance is not operating at all or the temperature is too high
• Check that the power plug is correctly connected.
• Is the temperature control on the front panel correctly set?
• Does sun shine on the appliance or are there heat sources nearby?
• Is the back of the appliance too near to the wall?
The food in the refrigerator is frozen
• Is the temperature control on the front panel set to the coldest temperature?
• Is the surrounding temperature too low?
• Did you put food with a high water content in the refrigerator?
There are unusual noises
• Check that the appliance is installed on a stable, level floor.
• Is the back of the appliance too near to the wall?
• Have any foreign objects fallen behind or under the appliance?
• Is the noise coming from the compressor in the appliance?
• A ticking sound may be heard inside the appliance; this is normal. This sound occurs when the various
accessories contract or expand.
The front corners and sides of the appliance are warm and condensation starts to form
• Heat-proof pipes are installed in the front corners of the appliance to prevent condensation from forming.
When the surrounding temperature rises, this may not always be effective. However, this is not abnormal.
• In very humid weather, condensation may form on the outer surface of the appliance when the moisture
in the air comes into contact with the cool surface of the appliance.
15
Downloaded from Fridge-Manual.com Manuals
You can hear a liquid babbling in the appliance
• This is the refrigerant, which cools the inside of the appliance.
There is a bad smell inside the appliance
• You did not seal the food.
• Store foods covered and clean the cold inlet.
There is a layer of frost on the appliance’s walls
• Is the air outlet on the appliance plugged in?
• Space the food out as much as possible to improve ventilation.
• Is the door fully closed?
Condensation forms on the inside wall of the appliance and around vegetables
• Food with a high water content is stored uncovered with a high humidity level or the door has been left
open for a long time.
• Store the food with a cover or in sealed containers.
USAGE PRECAUTIONS
Store food with a high water content at the
front of a refrigerator shelf.
Store hot food in the appliance after it has
cooled.
• If you store cold food, you save on electricity and
improve refrigeration.
Tips
Power Saving Tips
• Install the appliance in a cool, dry room with adequate ventilation.
Ensure that it is not exposed to direct sunlight and never put it near a direct source of heat (radiator, for
example).
• Never block any vents or grilles on the appliance.
• Allow warm food to cool down before placing it in the appliance.
• Put frozen food in the refrigerator to thaw.
You can then use the low temperatures of the frozen products to cool food in the refrigerator.
• Do not keep the door of the appliance open for too long when putting food in or taking food out.
The shorter the time for which the door is open, the less ice will form in the freezer.
16
Downloaded from Fridge-Manual.com Manuals
VIEW OF YOUR FRIDGE / FREEZER
REFRIGERATOR LIGHT (fluorescent or
incandescent, depending on the model)
REFRIGERATOR
REFRIGERATOR SHELVES
(tempered glass, crystal or
wire, depending on the model)
MULTI-PURPOSE GUARD
FRESH SALAD DRAWER
BOTTLE GUARD
TWIST ICE MAKER AND ICE
STORAGE BIN (OPTION)
FREEZER
FREEZER DRAWER
17
Downloaded from Fridge-Manual.com Manuals
WATER DISPENSER
(OPTION)
Ambient Room Temperature Limits
This fridge/freezer is designed to operate in ambient temperatures specified by
its temperature class marked on the rating plate.
Temperature
Class
Extended Temperate
Ambient Temperature
Symbol
Maximum
Minimum
SN
32°C (90°F)
10°C (50°F)
Temperate
N
32°C (90°F)
16°C (61°F)
Subtropical
ST
38°C (100°F)
18°C (64°F)
T
43°C (109°F)
18°C (64°F)
Tropical
NOTE: Internal temperatures may be affected by such factors as the location of
the fridge/freezer, ambient temperature and the frequency with which
you open the door. Adjust the temperature as required to compensate
for these factors.
Correct Disposal of This Product (Waste Electrical & Electronic Equipment)
English
(Applicable in the European Union and other European countries with separate
collection systems)
This marking shown on the product or its literature, indicates that it should not be disposed with
other household wastes at the end of its working life. To prevent possible harm to the
environment or human health from uncontrolled waste disposal, please separate this from other
types of wastes and recycle it responsibly to promote the sustainable reuse of material
resources.
Household users should contact either the retailer where they purchased this product, or their
local government office, for details of where and how they can take this item for environmentally
safe recycling.
Business users should contact their supplier and check the terms and conditions of the purchase
contract. This product should not be mixed with other commercial wastes for disposal.
If you have any questions or comments relating to Samsung products,
please contact the SAMSUNG customer care center.
Samsung Electronics America, Inc.
1-800-SAMSUNG (7267864)
www.samsung.com
Downloaded from Fridge-Manual.com Manuals