1
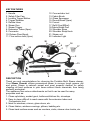
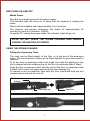
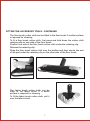
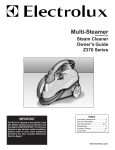
Portable Multi Steamer
USER MANUAL
MODEL: DSC21
IMPORTANT SAFEGUARDS
When using an electric appliance, basic precautions should always be followed:
READ ALL INSTRUCTIONS BEFORE USING THIS STEAMER
WARNING
DANGER OF SCALDING
CAUTION - To reduce the risk of fire, electric shock, or injury:
! To provide continued protection against risk of electric shock connect to properly grounded
outlets only.
! Check that the main voltage corresponds to the voltage indicated on the rating label.
! This product is designed for domestic use only.
! Do not use outdoors.
! Do not leave the Steam Cleaner unattended while plugged in. Unplug the electrical cord when
not in use and before servicing.
! Do not allow to be used as a toy. Close attention is necessary when used near children, pets or
plants.
! The Steam Cleaner is not intended for use by young children or infirm persons without
supervision. Young children should be supervised to ensure that they do not play with the
appliance.
! Do not immerse the Steam Cleaner into water or other liquids.
! Never direct steam towards people, animals or plants, or equipment containing electrical
components.
! Always unplug the power cord from the electrical socket when filling the Steamer.
! Do not use with damaged cord or plug. If the Steam Cleaner is not working as it should, has
been dropped, damaged, left outdoors, or immersed into water, return it to a qualified service
engineer before continuing use. If the supply cord is damaged, it must be replaced by a qualified
service engineer.
! Do not pull or carry by cord, use cord as handle, close a door on cord, or pull cord around sharp
edges or corners. Keep cord away from heated surfaces.
! Never force the plug into an outlet.
! Do not use extension cords or outlets with inadequate current carrying capacity.
! Unplug after use. Do not unplug by pulling on cord. To unplug, grasp the plug, not the cord.
! Do not insert any objects into openings. Do not use with any opening blocked.
! Do not handle plug or the Steam Cleaner with wet hands or operate without shoes.
! Do not touch the hot surfaces during use. Allow the accessories to cool down before changing
them.
! Keep your work area well lighted.
! Never put desiccating, aromatic, alcoholic or detergent products into the Steamer as this may
damage it or make it unsafe for use.
! Never block the steam openings of the product or place it on a soft surface, where the steam
openings may be blocked, Keep the steam openings free of lint, hair, and the like.
! When filling with water use Measuring Cup. Do not try to overfill.
! Follow these steps before unscrewing the Filler Cap:
1) Unplug the power supply and allow to cool down.
2) Slowly start to unscrew the Filler Cap, wait a few seconds, then
screw it off completely.
3) Do not open water tank while in use.
! Use only as described in this manual. Use only manufacturer's recommended accessories and
service agent.
SAVE THESE INSTRUCTIONS
2
KEY FEATURES
1. Handle
2. Safety Filler Cap
3. Locking Trigger Button
4. Trigger Release
5. Deluxe Hose
6. Steam Gun
7. Steam Trigger
8. Extension Tubes (2pcs)
9. Connector
10. Deluxe Floor Brush
11. Floor cotton cloth (2pcs)
12. Concentrator tool
13. Fabric Brush
14. Glass Squeegee
15. Round Brush (2pcs)
16. Funnel
17. Refill Cup(500ml)
18.Fabric Brush Pad
19. Shoulder Strap
20. Shoulder Strap Hook
21. Steam unit
22. Indicator Light
20
18
2
19
3
4
1
16
17
21
6
12
9
10
22
5
13
7
14
11 15
8
DESCRIPTION
Thank you and congratulations for choosing the Portable Multi Steam cleaner.
Your Steam Cleaner utilizes pressurized steam to remove tough grease, dirt
and grime. Steam is nature's purest and most powerful cleaner for safely
cleaning all hard surfaces in your home without harsh chemicals, thus being
perfectly ecological.
The appliance has various attachments so that it can be used for many
purposes such as:
1. Clean upholstery, sealed grout, bathroom/kitchen tile, stovetops.
2. Easy to clean difficult to reach areas with the extension tubes and
Concentrator tool.
3. Ideal for windows, mirrors, glass doors, etc.
4. Clean fabrics, window coverings, pillows, bedding etc.
5. Clean hard surface areas such as counters, sinks, shower door tracks, etc.
3
FILLING THE STEAM CLEANER WITH WATER
WARNING!
THERE IS A DANGER OF SCALDING. YOU MUST NEVER ATTEMPT TO
REMOVE THE SAFETY CAP WHILE THE STEAM CLEANER IS
SWITCHED ON OR UNDER PRESSURE. THE TOOLS AND HOSE WILL
GET HOT DURING USE. ALLOW THE TOOLS TO COOL DOWN
BEFORE CHANGING THEM WHILE THE STEAM CLEANER IS BEING
USED.
The steam cleaner tank has a capacity of 650ml.
Check that the steam cleaner is disconnected
from the mains supply.
Press the Locking Trigger Button until any
pressure has been released.
Unscrew the safety cap.
Check that there is no residual water in the
steam cleaner. Always empty the unit first to
ensure that only the correct measured volume
of water can then be added.
Make sure the steam cleaner is on a stable flat
surface.
Fill the measuring cup with water of 500ml and
the tank with a maximum of 650ml. It is not
necessary to use distilled water.
Using the funnel, pour the water into the steam
cleaner.
WARNING!
DO NOT OVERFILL THE TANK. USE ONLY 650ml WATER. NEVER PUT
DESCALING, AROMATIC, ALCOHOLIC OR DETERGENT PRODUCTS
INTO THE STEAM CLEANER, AS THIS MAY DAMAGE IT OR MAKE IT
UNSAFE FOR USE.
Screw the safety cap back onto the steam cleaner and tighten by hand.
4
SWITCHING ON AND OFF
Mains Power
Plug the 3-pin mains plug into the mains supply.
The Indicator light will come on to show that the steamer is heating the
water.
Steam will be available after approximately 3 to 4 minutes.
The steamer will provide continuous hot steam for approximately 20
minutes for each fill of the tank. (650ml).
To switch Off, unplug the power cable, the Indicator Light will go out.
NOTE: DO NOT LEAVE THE STEAM CLEANER UNATTENDED
DURING THE HEATING-UP PERIOD.
USING THE STEAM CLEANER
Fitting the Accessory Tools
The tools can be fitted directly to the Gun, or to the end of the extension
tubes. The two extension tubes can be fitted together to give extra reach if
required.
To fit the tools or extension tubes first make sure that the aperture in the
tool is aligned with the retaining lug on the Gun (or extension tube if fitted).
Push the tool or extension tube onto the end of the Gun (or extension tube
if fitted) until it clicks into place and is held by the retaining lug.
To remove a tool or extension tube from the Gun, press and hold the tool
release button and pull the tool off.
Tool release
button
Retaining lug
5
Aperture
WARNING!
THE TOOLS, EXTENSION TUBES AND THE HOSE WILL GET HOT
DURING USE. ALLOW THE TOOLS TO COOL DOWN BEFORE
REMOVING THEM WHILE THE STEAM CLEANER IS BEING USED.
FITTING THE ACCESSORY TOOLS - CONTINUED
The tools can be fitted in a variety of different sequences. See below.
Always make sure that the tool is locked securely in place before using the
steamer.
The glass squeegee must be used in conjunction with the fabric brush.
The round brushes can only be used in conjunction with the concentrator
tool.
WARNING!
THE TOOLS, EXTENSION TUBES AND THE HOSE WILL GET HOT
DURING USE. ALLOW THE TOOLS TO COOL DOWN BEFORE
CHANGING THEM WHILE THE STEAM CLEANER IS BEING USED.
6
FITTING THE ACCESSORY TOOLS - CONTINUED
The floor brush cotton cloth can be fitted to the floor brush if a softer surface
is required for cleaning.
To fit a floor brush cotton cloth, first press and hold down the cotton cloth
retaining clip on one side of the floor brush.
Position one side of the floor brush cotton cloth under the retaining clip.
Release the retaining clip.
Wrap the floor brush cotton cloth over the bristles and then secure the end
of the pad under the retaining clip on the other side of the floor brush.
The fabric brush cotton cloth can be
fitted to the fabric brush if a softer
surface is required for cleaning.
To fit the fabric brush cotton cloth, pull it
over the fabric brush.
7
FITTING THE ACCESSORY TOOLS CONTINUED
The window cleaning squeegee can be
attached to the fabric brush.
Remove the fabric brush pad, if fitted.
Locate the two lugs on the squeegee in
the slots on the rear of the fabric brush.
Push the squeegee upwards until it clicks
into place over the clip on the front of the
fabric brush.
The round brush can be fitted to the
concentrator tool for cleaning in
corners and other areas with limited
access.
To fit the round brush, push it firmly on
to the end of the concentrator tool.
WARNING!
DO NOT HOLD THE EXTENSION HOSE WHEN IN USE AS IT WILL
BE HOT.
NOTE: ALWAYS STORE THE TOOLS IN A SAFE PLACE.
ATTACHING THE SHOULDER STRAP
Using the detachable shoulder strap allows for greater freedom of movement
when both hands are needed for various cleaning tasks. To attach the shoulder
strap to the steam cleaner, simply snap to the shoulder strap hooks onto the
connecting rings on the unit body. When using the steam cleaner with the
shoulder strap, avoid rocking or tilting the unit excessively as this may cause
water to enter the hose and be discharged along with the steam.
8
USING THE STEAM CLEANER
WARNING!
DO NOT USE THIS STEAM CLEANER ON ANY APPLIANCE THAT
CONTAINS ELECTRICAL COMPONENTS, (SUCH AS THE
INTERIOR OF OVENS), AND IS NORMALLY CONNECTED TO A
MAINS OR BATTERY POWER SUPPLY. NEVER TURN THE HAND
STEAMER ON ITS SIDE WHEN STEAM CLEANING, OR DIRECT
STEAM AT ANY PERSON, PET OR PLANT.
CAUTION!
DO NOT USE ON DRAYLON, SOFT PLASTICS, UNSEALED WOOD
AND COLD GLASS. ON SURFACES THAT HAVE BEEN TREATED
WITH WAX OR SOME NON-WAX FLOORS, THE SHEEN MAY BE
REMOVED BY THE HEAT AND STEAM ACTION.
NOTE: IT IS RECOMMENDED THAT A SAMPLE CLEANSING BE
CARRIED OUT ON AN ISOLATED AREA OF THE SURFACE TO BE
CLEANED. ALSO, CHECK WITH THE RESPECTIVE
MANUFACTURER'S LITERATURE FOR THE OBJECT TO BE
CLEANED.
OPERATING THE TRIGGER LOCK.
THE TRIGGER LOCK CAN BE USED TO LOCK THE STEAM
TRIGGER OFF PREVENTING ACCIDENTAL STEAM RELEASE AND
IT CAN ALSO BE LOCKED ON IN THE CASE OF LONG CLEANING
PROCESSES WHICH MAKES IT EASIER ON THE HAND. THE
TRIGGER IS LOCKED BY SLIDING THE SWITCH FORWARD AND
RELEASED BY SLIDING THE SWITCH BACK.
Press the Trigger Button
Steam will be released from the tool.
Pass the tool you are using slowly over the surface to be cleaned. To sanitize
specific areas, pass the tool slowly over the area at a distance of no more than
one inch away.
The tools can be used to clean and sanitize work surfaces, remove the lime
scale from taps and tiles, and for non-electrical oven utensils.
Non-electrical cooker parts, such as oven racks, baking trays, griddles, pan
supports and removable oven linings must be steam cleaned well away from
any electrical components. Ensure that these parts are completely dry prior to
reassembly.
9
Refilling the steam cleaner while cleaning
Should the need arise to refill the steam cleaner with water while cleaning,
unplug the power cable from the mains supply socket.
Press the steam release trigger until all pressure has been released.
WARNING!
ALTHOUGH THE STEAM PRESSURE IN THE STEAM CLEANER
HAS BEEN RELEASED, THE STEAM CLEANER STILL CONTAINS
VERY HOT WATER. DO NOT ATTEMPT TO REMOVE THE SAFETY
CAP UNTIL THE STEAM CLEANER HAS COOLED DOWN.
Release Trigger button
Wait at least 5 minutes for the steam cleaner to cool, then carefully start to
unscrew the safety cap. If you hear steam escaping, stop and wait until the
hissing sound stops. Press steam trigger to safely release residual steam
pressure.
Carefully, continue to unscrew the safety cap. If you hear steam escaping
again, stop and wait for the hissing to stop. Continue in this manner until the
safety cap can be removed.
Take great care, as any residual water will be very hot.
Check that there is no residual water in the steam cleaner. Always empty
the unit first to ensure that only the correct measured volume of water can
then be added.
Slowly fill the steam cleaner with water using the measuring jug and funnel.
Screw the safety cap back onto the steam cleaner and tighten by hand.
Plug the 3-pin mains plug into the mains socket.
The Indicator Light will come on.
Continue with the instructions for steam cleaning.
When you have finished steam cleaning, unplug the power cable from the
mains supply socket.
Allow the steam cleaner and accessories to cool completely then empty any
residual water. Clean and dry the accessories and store in a dry place.
10
MAINTENANCE
There are no user servicable parts inside the steam cleaner.
Cleaning
WARNING!
THE STEAM CLEANER MUST BE UNPLUGGED FROM THE MAINS
POWER SUPPLY AND ALLOWED TO COOL DOWN BEFORE ALL
CLEANING AND MAINTENANCE TASKS. ALWAYS UNSCREW THE
SAFETY CAP VERY CAREFULLY TO ENSURE THERE IS NO
PRESSURE INSIDE UNIT. WAIT AT LEAST 5 MINUTES FOR THE
STEAM CLEANER TO COOL, THEN CAREFULLY START TO
UNSCREW THE SAFETY CAP. IF YOU HEAR STEAM ESCAPING,
STOP AND WAIT UNTIL THE HISSING SOUND STOPS. CAREFULLY,
CONTINUE TO UNSCREW THE SAFETY CAP. IF YOU HEAR
STEAM ESCAPING AGAIN, STOP AND WAIT FOR THE HISSING TO
STOP. CONTINUE IN THIS MANNER UNTIL THE SAFETY CAP CAN
BE REMOVED. DO NOT IMMERSE THE STEAM CLEANER IN
WATER.
After each use, empty any remaining water from the steam cleaner.
Rinse out the steam cleaner every month to eliminate any accumulated
calcium deposits. Make sure the steam cleaner is cold and disconnected
from the mains supply. Fill the steam cleaner with approximately half a
measuring jug of clean water. Screw the safety cap onto the steam cleaner
and tighten by hand. Shake the steam cleaner for a few seconds, remove
the safety cap and empty out the water into a container.
Wipe the body of the steam cleaner with a soft, dry cloth. Do not use any
abrasive cleaners.
Store the steam cleaner in a dry, cool place.
11
TROUBLESHOOTING GUIDE
Below is a chart detailing the most common problems, their causes and
solutions. Prior to troubleshooting, isolate the unit by removing the cord from the
power socket.
PROBLEM
No steam
CAUSE
SOLUTION
The steamer is not Plug the power cable and
on.
make sure the Indicator light is
on.
Water tank is empty.
No steam, but Condensation
water
formed inside
hose.
Puffs of steam
during refill
Refill the
instructed.
water
tank
as
is Press the Steam Trigger and
the release the water until steam
comes.
Water tank is too Leave the steamer to cool
hot.
down for a while before refill,
use the provided Funnel for
refill every time.
12
After Sales Service.
Warranty: This product is warranted to the original user for 12 months
from date of purchase free from manufacturing defect at time of
purchase. The product is intended for domestic use. Please keep your
receipt or other evidence of purchase showing date of purchase, as this
must be produced in the event of a claim.
To claim under this warranty, or for other repair or assistance with this
product, please contact Domotec Customer Service Department by
phoning 01844 698516.
DOMOTEC HOME APPLIANCES LIMITED. Contact
[email protected] www.innovationideas.co.uk
Beversbrook Ind. Est, Calne, Wilts. SN11 9PL.
This electrical appliance complies with directive 2002/96/EC (Waste
Electrical and Electronic Equipment----WEEE).
The meaning of the crossed-through waste bin symbol on the appliance
is that the product must be disposed of separately to other household
waste at the end of the useful life of the appliance. The user is
responsible for delivering the appliance to an appropriate collection
centre at that time.
Appropriate separate collection for environment-friendly treatment and
recycling prevents or reduces harmful effect on the environment and
human health. You can obtain information on available collection
services in your area by contacting your local Council waste collection
department, or the retailer from which you bought the appliance.
Domotec Home Appliances is an Innovation Ideas quality brand.
13