1
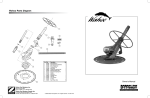
Owner’s Manual
Guide du propriétaire
Important Information
Notice for Vinyl Liner Pools: Before installing your new Zodiac automatic pool cleaner, examine the
interior of your pool carefully. If the vinyl liner is brittle or has stones, wrinkles, roots or metal corrosion
in contact with the underside of the liner, or has damage to the base material or supporting walls, do
not install the cleaner before having a qualified professional perform the necessary repairs or liner
replacement. Zodiac will not be responsible for liner damage caused by a cleaner which is in
disrepair, pattern removal from a vinyl liner, or a cleaner used in a pool having an aged or
deteriorated liner. Please see Limited Warranty.
•
To help prevent suction entrapment accidents, wall vacuum fittings should have a safety vac lock
installed. Contact your builder or retail pool professional for details.
•
Clean the skimmer basket, pump basket and pool filter before installing the Zodiac cleaner and
on a regular basis thereafter.
•
Always disconnect the cleaner before cleaning or backwashing the pool filter. After cleaning, let
the filtration system run for at least five minutes before re-connecting the cleaner.
•
Remove the cleaner from the pool before chemical or shock treatments. Wait a minimum of four
hours after super chlorination before re-installing the cleaner.
For customer service or support:
Zodiac Pool Care, Inc.
2620 Commerce Way
Vista, CA 92081-8438
1-800-822-7933
Zodiac Pool Care Canada, Ltd.
2115 South Service Road West, Unit 3
Oakville, ON, Canada L6L 5W2
1-888-647-4004
www.zodiacpoolcare.com
www.zpc.ca
To ensure prompt warranty service, should it be required, please:
• Complete and return the Zodiac Warranty Card.
• Record your purchase information.
• Attach a copy of your purchase receipt to this document.
Date of Purchase: ___________ Purchased From: __________________________________
Serial Number (Located on underside of cleaner) ___________________________________
If service is required, simply present your Owner’s Manual with the attached receipt at any
Zodiac authorized warranty center nationwide.
G3 is a trademark of Zodiac Pool Care, Inc. For sale and use in the United States, Canada and Mexico only.
This pool cleaner is not warranted or guaranteed outside of the United States, Canada or Mexico.
This pool cleaner is covered by one or more of the following patents:
US patents: 5315728, 5421054, 5450645, 5465443 and 6122794. Canadian patents: 2127566, 2134220, 2161309 and 2266355.
2
Introduction
Congratulations on the purchase of your new Zodiac G3 automatic pool cleaner, and thank you for
choosing Zodiac. Powered by Baracuda technology, the G3 is designed and manufactured for easy
installation, and years of carefree operation.
The Zodiac G3 connects to a dedicated cleaner (suction) line or a pool skimmer. As water flows through
the cleaner, dirt and debris is pulled directly into the pool filtration system.
Before installing the cleaner, please take a few moments to become familiar with its components and to
review the items listed under Important Information on the previous page.
Wheel Deflector
Cleaner Body
Finned Disc
Hose Section
Foot Pad
45° Elbow (2)
Hose Weight
FlowKeeper™ Valve
4-1/2" Connector
Valve Cuff
Flow Gauge
Hose
Protector Net
6 5 4 3 2 1 0
0 1 2 3 4 5 6
3
Installation
Prepare the Pool
1. Manually vacuum the pool if excessive debris is present,
and make sure the pool filter and pump basket are clean.
2. Close the pool main drain line.
3. Adjust the return lines to blow downward
to break up surface circulation and
ensure complete cleaning coverage.
• Loosen the fitting lock ring
• Redirect the eyeball downward
• Retighten the lock
If the return fitting cannot be adjusted, the fitting
MUST be replaced with Zodiac return line
diverter (part #W90153 for 1-1/2", #W90155
for 2" or #W24100 for pools without return fittings).
Assemble the Cleaner
Stretch the finned disc over the foot pad
with the fins pointing up. The disc should fit
securely in the groove and rotate freely
on the pad.
Slide the wheel deflector over the extension
pipe, clips up, until it snaps onto place. The
deflector should rotate freely.
Stretch
Assemble the Hose
For corner or end installations, connect enough
hose to reach the farthest point of the pool and
then add one more section.
For center installations, connect enough hose to
reach the farthest point of the pool and then add
two more sections.
Skimmer or
Dedicated Suction
Cleaner Line
1 Hose
Section
Skimmer or
Dedicated Suction
Cleaner Line
Hose
Weight
Hose
Weight
2 Hose
Sections
Snap the hose weight into position in the middle of the first hose section, about 20 inches from the
end of the hose.
4
Connect the Hose
Submerge the hose completely, removing all air. Tip: Turn on the pump, place the hose in front of the return
line until it is flooded. Turn off the pump.
To connect to a dedicated suction line:
1. Insert the male end of the hose into the large
end of the 45° elbow.
2. Connect the elbow to the safety
vac wall fitting.
3. Angle the elbow upward towards
the water surface.
Hose
Elbow
Elbow
Dedicated
Cleaner Line
To connect to a skimmer:
The FlowKeeper valve must always be used in single skimmer
installations. It is pre-set at the factory for the cleaner but offers
three settings to adjust the flow. The lower the setting number, the
lower the flow. Pull the handle to adjust the setting up or down.
The red tab can be used to open the valve and stop the cleaner.
FlowKeeper
Adjustment
If the pool has more than one skimmer, connect the hose to
the one closest to the pump.
The parts used to connect the hose, and the sequence in which
they are installed depends on the type of skimmer.
Deep Skimmer
Shallow Skimmer
45 Elbow
45 Elbow
4-1/2" Connector
FlowKeeper
Valve
Valve Cuff
Hose
Protector
Net
Hose
Protector
Net
FlowKeeper
Valve
Valve Cuff
4-1/2"
Connector
1. Remove the skimmer basket.
2. Insert the valve fitting and connect the FlowKeeper with the arrow pointing down towards
the skimmer pipe.
3. Attach the hose protector net to the hose section that goes into the skimmer.
4. Choose the fitting combination that best suits the skimmer to complete the connection.
5
Test and Adjust for Proper Flow
Keeping the hose submerged, attach the Flow Gauge to the hose and turn on the pump.
Verify that the red indicator in the gauge (viewed from the side) is at the Number 3 setting.
6 5 4 3 2 1 0
0 1 2 3 4 5 6
If necessary, use the valves in the pool equipment area to adjust the flow.
•
For skimmer connections on pools with one skimmer, flow is automatically regulated by the
FlowKeeper Valve. The red indicator should be at the proper setting.
•
For skimmer connections on pools with more than one skimmer, leave the valve on the
skimmer connected to the hose open and slowly close the other until the proper setting is reached.
•
For dedicated suction line connections, leave the vacuum line open and slowly close the skimmer line until the flow is at the proper setting.
If flow is in the low range (0-2):
• Check and clean the pool filter and baskets if necessary.
• Verify that valves controlling the suction lines are in the correct position.
If flow is in the high range (4-6):
• Verify that valves controlling the suction lines are in the correct position.
• Lower the flow setting on the FlowKeeper Valve.
• Open the main drain slightly to further reduce flow.
Connect the Cleaner
Turn off the pump. Keeping the hose underwater,
remove the Flow Gauge.
1. Submerge the cleaner and flood it with water.
2. When bubbles stop coming from the extension
pipe, connect the hose to the cleaner.
3. Allow the cleaner to drift to the bottom
of the pool.
4. Turn on the pool pump and begin cleaning.
6
Operation and Maintenance
Fine Tuning Cleaner Performance
The G3 cycles on/off with the pool filtration pump vacuuming and cleaning all surfaces randomly throughout the pool. The coverage of the G3 is dependent on the pool’s shape and available water flow. In some
applications, adjustments may be necessary to optimize cleaning coverage.
The hose weight is positioned to
compensate for the buoyancy of the hose.
A properly balanced hose will create a
45-degree angle to the cleaner and the
bottom of the pool.
In pools 8-1/2 feet or deeper, an extra hose
weight (part #W83247) may be necessary.
Add the weight 5 to 8 feet from the cleaner.
Incorrect
Correct
Balance
Incorrect
A return line can be used to guide the cleaner
away from steps or areas with V-shaped corners,
and reduce patterning.
Direct the return to gently push the cleaner hose
by positioning the return directional so it aims
towards the wall on the opposite side of the pool,
and surface movement is visible 8 feet out
from the return.
In this example, any return within the grey area
can be used.
Routine Maintenance
To maintain performance:
•
Never coil the hose. Straighten a coiled hose with warm water or by laying it in the sun for a day.
A kinked or coiled hose will adversely effect the G3’s coverage of the pool.
•
When not in the pool, keep the disc flat to avoid warping.
•
Periodically inspect cleaner parts for wear. Replace the footpad when the depths of the channels
between the treads are 1/8" or less.
•
Empty the pump basket regularly. The more debris in the pool, the more often it should be cleared.
•
Always disconnect the cleaner before cleaning or backwashing the pool filter. After cleaning, let the
filtration system run for at least five minutes before re-connecting the cleaner.
7
Clearing the Diaphragm
Use the Quick Access Cassette system to quickly
clear the diaphragm or check it for damage.
Cassette
Chamber
To remove:
1. Unscrew the cassette and pull it out
of the cleaner.
2. Loosen the cassette chamber; pull out the
inner pipe and diaphragm.
Inner Pipe
3. Pull off the diaphragm.
Inspect it for debris or wear, and rinse it
thoroughly with water. Replace if necessary.
Retaining
Ring
Diaphragm
To install:
1. Verify that the retaining ring is on
the diaphragm.
2. Push diaphragm onto inner pipe.
Cassette
Chamber
3. Pull inner pipe and diaphragm through
until the diaphragm seats against the lip.
4. Reconnect the cassette and reinstall on cleaner.
Replacing the Foot Pad
The foot pad should be replaced when the depths of the channels between the treads are 1/8" or less.
To remove:
To install:
Press down on the locking tab while pulling
the foot flange toward you and up.
Slide locking tab into position and push
down on shoe to lock into place.
Tab
Storage and Winterizing
Never coil the hose. Always store G3 out of direct sunlight. When storing for the winter, drain all water
from the cleaner. Remove all connectors and adapters from the dedicated suction line or skimmer. Store
finned disc flat, and hose sections disconnected, drained and straight.
8
Troubleshooting
If you experience a problem with your G3, please follow the troubleshooting steps below to restore
performance. If further assistance is required, contact Zodiac Customer Service. Please have your serial
number and date of purchase available when you call.
Problem
Solution
Cleaner does not move or moves slowly.
• Confirm that the main drain is closed.
• Use Flow Gauge to ensure proper flow. Note: In water
60° F (16° C) or less, it may be necessary to increase
flow to compensate for the reduced flexibility of the
hose and diaphragm.
• Check diaphragm for damage or wear.
• Backwash filter and empty pump basket.
• Check for air in system. If water level in pump basket
drops or you see excessive air bubbles in the pump
basket or coming from the return lines, there is air in the
system. Check hose connections, tighten all fittings at
pump and check gasket in pump basket for wear.
Cleaner patterns, does not cover entire pool. • Use Flow Gauge to verify proper flow. Increase flow to
improve climbing. Reduce to move cleaner off the walls.
• Ensure return fittings are directed down. Add a
return diverter if necessary.
• Make sure hose is not kinked or coiled. Lay in sun to
straighten if necessary.
• Verify correct hose weight positioning.
• Move hose weight away from cleaner slightly. For deep
pools add a weight.
• Confirm proper hose length.
Cleaner gets stuck at steps.
• Use Flow Gauge to verify proper flow.
• Confirm proper hose length. Shorten if necessary.
• Use return jets to guide cleaner.
Cleaner stays on walls or edge of pool.
• Using Flow Gauge as guide, reduce flow to the cleaner.
• Verify correct hose weight positioning.
• Move hose weight away from cleaner slightly.
Cleaner won’t climb walls.
Note: Climbing ability may be limited in some vinyl pools
and pools with safety ledges.
• Using Flow Gauge as guide, increase flow to cleaner.
• Verify correct hose weight positioning.
9
Zodiac G3 Parts Diagram
1
18
2
3
6 5 4 3 2 1 0
0 1 2 3 4 5 6
13
4
19
22
20
6
12
5
11
21
23
24
10
7
14
25
8
15
9
No. Part #
16
17
10
1
2
3
4
W83278
W69545
W69526
W70326
5
6
7
8
9
10
11
12
13
14
15
16
17
18
19
20
21
22
23
24
25
W74000
W70345
W56525
W81600
W69698
W69994
W56124
W41079
W69542
W69541
W70328
W70329
W70327
W83247
W70335
W70050
W60263
W33160
W70244
W33800
W83140
Description
Wheel Deflector
Retaining Collar
Bumper Fin - G3
Cassette Outer Extension Pipe
w/ Handnut
Compression Ring
Assy, G3 Cass Chamber w/Comp Ring
Inner Extension Pipe
Retaining Ring
Long-Life Diaphragm (US/Mexico)
Cassette Assembly Complete (US/Mex)
Float
Weight
Right G3 Main Body
Left G3 Main Body
Foot Flange
Disc, 36 Finned
Foot Pad
Hose Weight (US/Mexico)
Flow Gauge
FlowKeeper Valve
Valve Cuff
4-1/2" Connector
45° Elbow
Hose Protector Net
Long-Life Hose Kit - 12 x 1 Meter
Qty.
1
1
1
1
1
1
1
1
1
1
1
1
1
1
1
1
1
1
1
1
1
1
2
1
1
Zodiac G3 Limited Warranty
This Zodiac G3 cleaner was carefully inspected before shipment from our warehouse. Upon unpacking, if any part proves
defective or missing, please notify Zodiac Pool Care, Inc. or Zodiac Pool Care Canada, Ltd. (“Zodiac”) immediately. Please refer to
the information in this manual for complete instructions on the installation and operation of your G3.
ZODIAC WARRANTS THIS G3 POOL CLEANER:
IN US/MEXICO
IN CANADA
AGAINST ALL MANUFACTURING DEFECTS:
AGAINST WEAR AND TEAR:
ZODIAC WARRANTS THE G3 HOSE:
AGAINST DEFECTS, AND WEAR AND TEAR
TWO (2) YEARS
TWO (2) YEARS
TWO (2) YEARS
TWO (2) YEARS
IN US/MEXICO
IN CANADA
TWO (2) YEARS
ONE (1) YEAR
ALL WARRANTIES ARE EFFECTIVE FROM THE DATE OF PURCHASE.
Should this product prove defective in workmanship, materials or wear during the applicable warranty period, the consumer’s sole
and exclusive remedy shall be such repair or replacement of the product as provided below.
THE LIMITED WARRANTY PROVIDED HEREIN IS THE SOLE AND EXCLUSIVE WRITTEN WARRANTY WITH RESPECT TO
THE G3 POOL CLEANER. ALL IMPLIED WARRANTIES IMPOSED BY APPLICABLE LAW, INCLUDING ANY IMPLIED
WARRANTY OF MERCHANTABILITY OR FITNESS FOR A PARTICULAR PURPOSE, ARE LIMITED TO THE DURATION OF
THE EXPRESS LIMITED WARRANTY. SOME JURISDICTIONS DO NOT ALLOW LIMITATIONS ON HOW LONG AN IMPLIED
WARRANTY LASTS, SO THE ABOVE LIMITATION MAY NOT APPLY TO YOU.
NOTICE: As a term of any warranties provided above, you must contact Zodiac immediately upon the happening of any event upon
which you make a warranty claim. Failure to provide this prompt notice may result in your forfeiting warranty rights and claim.
THIS LIMITED WARRANTY EXCLUDES THE FOLLOWING:
1. Discoloration of the G3 pool cleaner. This is caused by reaction to ultraviolet rays and the chemicals used in the pool water.
Discoloration does not affect the operating ability of the G3. Therefore, this Limited Warranty does not cover the replacement of
discolored parts.
2. Damage to or malfunction of the unit resulting from excess chlorination or improper water chemistry balance.
3. Replacement of parts which fail or become defective as a result of improper installation, negligence, misuse, abuse or tampering
by unauthorized repair personnel.
4. Age, pool water imbalance, and improper installation can cause vinyl pool liners to become brittle or unduly wrinkled. Corrosion of
the supporting walls and /or irregularities in the pool base may also cause liner failure. The use of this product in such an
environment is at the pool owner’s risk. Therefore, the pool owner hereby releases the manufacturer from any and all claims for
damage where these conditions exist.
5. The G3 is designed for use in in-ground pools only. If unit is used in any other application, the pool owner hereby releases the
manufacturer from any and all claims. This misuse will void all warranty on the unit.
6. In no event shall Zodiac be liable in contract or in tort, or under any other legal theory, for lost profits or revenues, loss of use or
similar economic loss, or for indirect, special, incidental, consequential or similar damages, even if it has been advised of the
possibility of such claim. Some jurisdictions do not allow the exclusion or limitation of incidental or consequential
damages, so the above limitation or exclusion may not apply to you.
IMPORTANT WARRANTY NOTICES FOR VINYL LINER POOL OWNERS
• Certain vinyl liner patterns are particularly susceptible to rapid surface wear or pattern removal caused by objects coming into contact with the vinyl surface, including pool brushes, pool toys, floats, fountains, chlorine dispensers, and automatic pool cleaners.
• Some vinyl liner patterns can be seriously scratched or abraded simply by rubbing the surface with a pool brush. Ink from the
pattern can also rub off during the installation process or when it comes into contact with objects in the pool. Zodiac is not
responsible for, and the Limited Warranty does not cover, pattern removal, abrasion or marking on vinyl liners.
• Vinyl liners are subject to deterioration or damage due to age, the effect of chemicals, corrosion or failure of the supporting walls;
as well as improper installation, maintenance or cleaning of the supporting walls or base. Before installing the G3, examine the
interior of your pool carefully. If your vinyl liner is brittle or has stones, wrinkles, roots or metal corrosion in contact with the
underside of the liner, or has damage to the base material or supporting walls, do not install the G3 before having a qualified
professional perform the necessary repairs or liner replacement.
ZODIAC WILL NOT BE RESPONSIBLE FOR LINER DAMAGE CAUSED BY (1) A G3 CLEANER WHICH IS IN DISREPAIR,
(2) PATTERN REMOVAL FROM A VINYL LINER, OR (3) A G3 CLEANER USED IN A POOL HAVING AN AGED OR
DETERIORATED LINER.
WARRANTY PROCEDURES
No claim under this Limited Warranty will be recognized unless the registration card, included in your box, is completed and returned
within thirty (30) days of the purchase date. Only the original purchaser may submit a claim under this Limited Warranty.
Purchaser’s claims against Zodiac shall be limited to those claims which may be asserted under the Limited Warranty
relating to any defect, malfunction or wear of the G3.
To obtain warranty replacements or repair, call Zodiac for authorization. When submitting a claim, always supply the serial
number, evidence of purchase date, retailer and a brief description of the problems/defects encountered. Zodiac reserves the right to
repair or replace all defective or worn parts covered by this Limited Warranty, and return same to purchaser, freight collect.
Zodiac assumes no responsibility for any warranties or representations made by other individuals or businesses beyond the express
terms contained in this Limited Warranty. This warranty gives you specific legal rights, and you may also have other rights which vary
from jurisdiction to jurisdiction.
For sale and use in the United States, Mexico and Canada only. This pool cleaner is not warranted or guaranteed in any other country.
11
Zodiac Pool Care, Inc.
2620 Commerce Way,
Vista, CA 92081 USA • Tel: 1-800-822-7933
Zodiac Pool Care Canada, Ltd.
2115 South Service Road West, Unit 3
Oakville, ON Canada L6L 5W2 • Tel: 1-888-647-4004
©2008 Zodiac Pool Care, Inc. All rights reserved. TL-2050 2/08