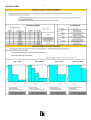
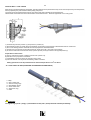
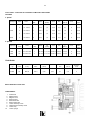
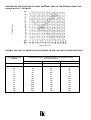
1
Italkrane
YOYO CHAIN HOIST
s.r.l.
DESCRIPTION
INSTALLATION
MAINTENANCE
1
FOREWORD
Estimated Customer,
Thank you for choosing an Italkrane.s.r.l. product. All our products are built in conformity with the European rules and regulations
in force.
This operation manual conforms with the provisions of MACHINERY DIRECTIVE 89/392/EEC and amendments thereof, concerns
cranes, lifting winches and GO*UP electric wire rope hoist, single or multiple speed, in various construction forms, and the relevant
monorail, bi-rail and minimum headroom trolleys. Machines are built in conformity with FEM - ISO – EN rules and regulations and
updated on the basis of the latest safety provisions.
Our state-of-the-art construction systems together with the rigorous in-house tests, guarantee the safety and quality of all
components.
To get the best results, you are strongly advised to follow the simple check, installation and startup procedures carefully.
For your own safety and in order to avoid temporary stoppages of the machine, it is advisable to carry out all the maintenance
procedures indicated in this manual.
Worn out or broken parts should be replaced with original spare parts only. Our guarantee will not cover products that are worn out or
broken due to failure to comply with this operation manual. We also reserve the right to make constructive changes or to modify one
or more features of our machines without notice, with a view to improving and updating the product with new technologies.
The main purpose of the instructions contained in this manual is to help users to get to know the machines so as to allow them to take
all measures as well as prepare human and material means necessary to a safe use of the machine and to guarantee a long working
life.
Italkrane s.r.l. wishes you a pleasant work.
Italkrane
s. r . l .
Bussero –Milan, Italy
E-mail: [email protected]
www.italkrane.it
20060 BUSSERO (MI)
Via Monza, 13
Tel +39 02 92 97 21 Fax +39 02 95 034 16
2
GENERAL DEFINITIONS AND IMPORTANT INFORMATION
CONTENTS AND ADDRESSEES OF THE MANUAL
This manual defines the “intended use” of the lifting equipment (hereinafter called “machines”) listed in the foreword, their technical,
performance and functional characteristics, their use and their maintenance. It is meant for:
•
•
•
•
the plant, workshop and /or construction site manager
operators employed on using the lifting equipment
operators employed on transportation, handling and installation
staff members employed on maintenance
The manual must be stored and guarded by a clearly identifiable person responsible for it, in a suitable location and should be kept in
the best possible conditions; it must always be available for consultation.
In case of wear and tear and/or loss, apply immediately to the manufacturer for a replacement copy.
N.B. Italkrane s.r.l. reserves the material and intellectual property rights of this manual and forbids its divulgation and
reproduction, even partial, without prior written consent.
DEFINITIONS
User
A user (entrepreneur/company) is the person/entity that uses and employs hoisting equipment (crane/winch/hoist) or has them used
by capable and trained for the purpose staff.
Trained Staff
Trained staff consists of individuals that have been explained their assignments and the potential dangers inherent in the use of
hoisting equipment and have become familiar with the safety devices and measures as well as with accident prevention rules and
regulations.
Operator
Person assigned to the use of hoisting machinery.
Electrical Maintenance Man
Qualified individual capable of servicing the lifting device under standard use conditions and assigned to routine electrical
maintenance, adjustment and repair operations.
He/she is capable of working in the presence of voltage on the switchboards.
Mechanical Maintenance Man
Qualified individual capable of servicing the lifting device under standard use conditions and assigned to routine mechanical
maintenance, adjustment and repair operations
Electrician
Qualified technician authorized to perform operations of a complex and extraordinary electrical nature.
Mechanic
Qualified technician authorized to perform operations of a complex and extraordinary mechanical nature.
RELATION WITH THE USER
This manual is an integral part of the hoisting machine and reflects the state-of-the-art at the moment of its release on the market. Any
integration provided for by the manufacturer should be kept together with the original manual.
In the event of alienation of the hoisting machine to a third party, the first user is bound to supply, together with the machine, this
manual and the relevant documents attached to it. (declaration of conformity, diagrams, check register etc.)
3
MANUFACTURER LIABILITY AND GUARANTEE
The buyer, in order to avail themselves of the guarantee, shall scrupulously comply with the instructions contained herein, In particular
the buyer shall:
• Use the machine within the prescribed usage limits.
• Perform a careful and punctual maintenance.
• Assign the use of the machine to capable and duly trained operators (please, bear in mind the minimum age prescribed by the
law).
• Prevent individuals under the effects of drugs, alcohol and medicines slowing down reflexes, from performing machine
maintenance, control, repair or disassembly operations.
• Use original spare parts only.
• Not alter nor modify, without prior authorization, the machine or parts of it.
The intended use and configuration provided for the machine are the only admissible ones.
This manual’s contents do not substitute for, but rather complete, the obligations under the accident prevention rules and
regulations in force in the Country where the machine is installed.
PERIODIC CHECKS
Hoisting equipment must be checked at least once a year - even more often, according to the Country regulations – by a qualified
technician who will verify their fitness. The check report is to be kept inside the machine’s dossier.
Check and verification schedule must be adapted to the actual use of the machine. Intensive use demands for shorter intervals
between maintenance operations.
NOISE LEVELS
The level of acoustic pressure produced by our machines with a full load is always inferior to 85 dB (A).
This value does not include the contributions and effects of environmental characteristics such as, for example, the transmission and
reflection of sound through metal frames
PACKING
Hoist only
Over land
It consists of a pallet to which the machine is fastened; the block is carefully gathered on its side thus avoiding bending or crushing of
the rope.
Particular protection is granted to delicate parts, namely limit switches, power supply cables and terminals.
On request, waterproof protection can be provided. For distant destinations everything is protected by a wooden crate inside which
the machine is waterproofed against rain.
Over sea
The machine is packed in a strong IK standard size case, or as the client requires. Markings showing weights, lifting-points and
storage are included. The instructions given must be carefully followed in order to avoid lubricant-leakage.
HOIST WITH OTHER COMPONENTS
If the hoist is shipped along with other parts of bridge cranes or similar machines, the packaging is specifically designed for the
relevant order. The various components are carefully positioned, with reliable fixed supports so as to avoid internal movements or
collisions during transportation, loading and unloading, taking into consideration total weight and center of gravity.
4
FORWARDING
Transport must be entrusted to qualified forwarders if the goods are to be moved with proper care. IK does not accept any
responsibility in the event equipment is forwarded by the client and /or by forwarders of their choice.
No other goods must be placed on top of the machines being forwarded, nor on the corresponding cases or crates.
During transportation goods must be protected against rain. When transported by sea, the goods must be kept away from spray and
wet winds. If large crane girders are transported using articulated lorries or trucks joined by tow bars it is recommended that the
girders are not placed under transversal or torsional stress during transport.
During the anchorage of the girders onto the means of transport, special care must be taken that the bindings do not distort nor bend
the edges of the structures nor scratch the paint. Therefore, attach wooden wedges or protective angulars to edges and take
particular care to provide suitable horizontal support for girders and their parts, using appropriate stands. To avoid oil-leakage or
alterations in the settings of electric components during transportation and handling, level, positioning and adherence to the securing
points indicated must be complied with.
HANDLING
• Prepare a clearly delimited unloading area of a size befitting that of the item to be handled (pallet, crate, etc.), with a flat
surface.
• In consideration of the kind of packing, prepare all the necessary equipment for unloading and handling the machine and any
accessories or parts thereof taking into account their weight, size, overall dimensions as well slings, yokes and other hoisting
gear.
• Handle loads with great care in the previously delimited area, avoiding swings, oscillations and dangerous unbalances.
• Once the handling is completed, check that packing is intact and that no damages have been made.
UNPACKING
Open carefully from the top, undo the various parts, and lift them out vertically with great care after having secured them carefully.
CHECK FOR MISSING PARTS
During unpacking check against the packing list, that the machine is complete and none of its parts are missing. Also check that all
the accessories essential to installation and connections (e.g. nuts and bolts, brackets, small particulars of electric lines) are present.
Should you believe a part to be missing, contact the manufacturer.
Provide for the disposal of waste packing in conformity with the relevant provisions of the law in force in the area where the
machine is installed, according to their nature (plastic, wood, cardboard, etc.), having previously separated them, as necessary.
STORAGE
Packed goods can normally be stored in a closed warehouse for up to five years provided that the temperature is no lower than –20°
C nor higher than +70°C and humidity levels do not exceed 70%; special packing would need to be designed for different temperature
values.
Protect, where protection is not already provided, mechanisms and worked surfaces using anti-oxidizing products.
If, for whatever reason, humidity levels were to exceed +70% or storage were to continue for a longer period it would be necessary to
carry out some extra preliminary operations before setting the machine to work. No other packages must be placed on top of the
crates.
FUNCTIONING AND INTENDED USE
The machine supplied is to be used only for vertical lifting, and when fitted with a trolley, horizontal travel.
Particular cases in which hoist or winches are to be used for specific work, or horizontal pulling, or at angles other than vertical, are
indicated in the technical documentation and technical tables enclosed. In order to set the limit-switches the machine's working paths
must be established so as to study whether they are suitable or not for the work in hand. If there are any doubts with regard to this,
please contact the manufacturer before setting the machine to work.
Depending on the amount of work the machine is subjected to, a working life of at least 10 years can be expected, after which all of the
manufacturers responsibilities expire.
To allow an estimate of the residual lifetime of a machine, a record of use for the first 10 years of operation is recommended. This
5
record is to show the history of the machine and should include statistics relating to operating times, average hoisting heights and
loadings. Failure to keep such a record could invalidate any claims regarding possible machine defects within the first 10 years of
operations.
CONTROL MODES
All hoisting (up and down), travel (left and right) and sliding (back and forth) movements, but in case of manual executions, are
electrically activated and can be controlled by means of a push button control pendant or of a radio remote control.
All movements can be activated either by means of push buttons or of actuators which activate the function as they are pressed. Slow
auxiliary speeds, if provided, can be activated as follows:
•
•
By means of separate actuators or push buttons, that activate “slow” speeds independently of “fast” ones.
By means of a sole double snap scaled actuator or push button, where the first snap controls the “slow” speed while the
second controls the “fast” speed.
The push button control panel, if supplied, is equipped with an emergency stop red mushroom push button which stops the machine,
when pressed all the way down.
To restart the machine, it is necessary to bring the stop push button back into its “lifted” position, thus permitting the consent to start,
and then push the start button.
The push button control panel allows the operator to operate near the load.
The machine can be controlled also by means of a radio control, the push buttons’ or actuators’ functioning remains unchanged from
that of the push button control panel in its hanging or sliding execution.
”EX” version radio remote control
Standard version radio remote control
If the machine is operated by means of a radio control, the push button control panel is not connected to the machine, therefore
operator in order not to prejudice their own and/or other people’s safety.
GENERAL SAFETY RULES
Before operating the machine, it is necessary to:
•
Read carefully the technical documentation.
•
Know which safety devices are installed on the machine and where they are located.
•
Learn how to operate the emergency stop devices and their location.
Some activities such as assembly and maintenance (e.g. assembly of wire rope) may expose operators to dangerous situations, it is
therefore crucial to follow the following instructions:
•
The expressly trained staff should be familiar with the operating procedures they must follow, with the potential danger
situations which might arise as well as with the best ways to avoid them.
•
If, in order to allow a particular maintenance operation, technical intervention, inspection or repair, staff members in charge
have to completely or partially deactivate, remove or open protections, it will be their duty, when that particular operation is
finished, to bring the machine back into use checking that no foreign objects (e.g. parts, tools etc.) where left behind which
may cause malfunctioning and damages to persons or things.
•
In order to preserve their own as well as other people’s safety, staff members in charge of maintenance, inspections and
repairs shall, before performing their duty and inasmuch as possible, take all necessary safety measures.
They shall, in particular:
Ensure electrical power to the machine was disconnected and the relevant preventive measures (blocking devices, warning
notices etc.) were taken in order to prevent the machine from being accidentally started.
Pay great attention if, in case of electrical maintenance or repair, they have to service the machine while the power supply is
connected.
RESIDUAL RISKS
WARNING
Following an in-depth analysis of all hazards present in the operation and use phases of machines in any possible configuration and
of the relevant accessories, all necessary measures were taken in order to eliminate, inasmuch as possible, risks to operators and/or
limit or reduce relative risks from dangers which can not completely be eliminated at the source.
Yet, the following residual risks remain, which can be avoided or reduced through the following prevention activities.
6
RISKS DURING USE
DANGERS/RISK
Risk from danger of crushing
During the handling of the suspended load
in case of exposure of the operator and/or
other people in area within the load’s path.
Risk from danger of snagging and/or
crushing
As a result of contact with ropes or
sheaves.
PROHIBITION/WARNING
•
•
•
•
OBLIGATION/PREVENTION
It is forbidden to hoist loads
while people is crossing the
handling area.
It is forbidden to transit, stop
and operate under a suspended
load.
•
Caution! Exposure to moving
parts can cause dangerous
situations.
It is forbidden to touch moving
parts.
•
•
The operator responsible for the
hoisting equipment must comply
with the prescriptions of the
user’s manual to guarantee the
best safety conditions.
Obligation to periodic inspection
of rope, hook and lifting
accessories.
Obligation to wear protective
gloves during rigging operations.
RISKS DURING MAINTENANCE / REPAIR
DANGERS/RISK
PROHIBITION/WARNING
Risk from danger of electrocution
When working on electric equipment
without cutting the power off.
•
Risk from danger of snagging and/or
crushing
As a result of contact with ropes, sheaves,
drums, joints or other rotating parts.
•
•
OBLIGATION/PREVENTION
It is forbidden to operate on
electric equipment and
installations before cutting them
off from their power source.
•
Caution! Exposure to moving
parts can cause dangerous
situations.
It is forbidden to restart the
equipment before re-installing
the temporarily removed
protection devices.
•
•
•
Entrust electrical maintenance to
qualified personnel only.
Comply with the prescriptions of
the user’s manual for the
maintenance of electrical
installations.
Entrust mechanical maintenance
to qualified personnel only.
Obligation to wear protective
gloves.
7
WORKING LIMITS
8
9
10
RULES AND REGULATIONS
The following chief technical rules and regulations were taken into account while designing and building our lifting machinery:
•
•
•
•
•
•
•
•
•
•
•
•
•
•
•
•
•
•
•
•
EN-292, Section 1a and 2a “Safety of Machinery”
EN-60204 –1 ”Safety of Machinery. Electrical Equipment of Machines”
EN-60204 -32” Safety of Machinery. Electrical Equipment of Machines. Requirements for Hoisting Machines”
EN-60439 -1 “Low-Voltage Switchgear and Control gear Assemblies”
EN-60529 “Specification for Degrees of Protection Provided by Enclosures (IP code)”
ISO 4301 “Classification of Cranes and Lifting Appliances”
ISO 4308-1 “Selection of wire ropes”
UNI 7670 “Calculation of Mechanisms for Lifting Equipment ”
UNI 9466 “Calculation of the drums”
DIN 15401 ”Selection of lifting hooks”
FEM 1.001/94 “Calculation of Lifting Equipment”
FEM 9.511/86 “Classification of Mechanisms”
FEM 9.661/86 “Selection of wire rope drums and pulleys”
FEM 9.761/93 “Load Limiting Device”
FEM 9683/95 “Choice of hoisting and traveling motors”
FEM 9.755/9 “Safe Working Periods”
FEM 9.941/95 “Control Symbols”
FEM. 1.001 3rd edition 1987: volume;
CNR-UNI 10021/85: “Steel Structures for Lifting Equipment”;
UNI EN1993-6:2007: Eurocode 3 – Design of Steel Structures - Part 6: Crane Supporting Structures
11
SAFETY SIGNS
Hazard Signs
Caution
Caution, High Voltage
Caution, Overhead Load
Caution, Risk of Crushing
Caution, Moving Machinery
Caution, Hot Surface
Caution, Dangerous Atmosphere
Prohibition Signs
Do not start. Men working on machine
Do not remove guards
Mandatory Signs
Wear Protective Gloves
Wear Protective Footwear
Wear Safety Harness
Read the Instructions Before Use
ADMISSIBLE AND INADMISSIBLE LOADS
Loads shall be:
of a mass, bulk, balance and temperature suitable for the characteristics of the place where they are to be handled, besides
being compatible with the machine performance.
•
equipped with suitable grip points and/or secured with special contrivances and/or gear that prevent their accidental fall.
•
perfectly stable and not subject to changing their own statical (e.g. barycentre) or physical configuration while they’re being
handled.
•
•
•
•
•
•
Not admissible loads include (non-exhaustive list):
loads whose weight exceeds the machine’s nominal capacity;
loads which may change their chemical/physical statical configuration or their barycentre;
loose food products which may become contaminated by coming into contact with the hook or machine’s lubricants;
toxic and noxious products and substances, when not handled in special containers;
loads with surfaces which may not be resistant to the pressure applied, for example, by slings.
12
HOISTING GEAR
Usually admitted gear:
•
Hoisting gear interposing themselves between the lifting hook and the load, such as for example:
clamps, horizontal lifting bars, suckers, magnets, etc.
•
Slings made with ropes and/or chains and/or textile or plastic bands.
•
Lifting gear must be used according to the instructions provided by their manufacturers.
Usually not admitted gear:
•
Gear fed by independent electric lines
•
Gear that, during operations, may collide with parts of the lifting machine.
•
Gear limiting load handling.
•
Gear whose functional characteristics may induce dynamic overstress exceeding acceptable limits or accidental overload..
MACHINE USE AND SAFETY MEASURES
To obtain the best performance from the machine, it is recommended to use it observing the following instructions:
•
•
•
•
•
•
•
•
•
•
•
•
•
•
•
•
•
•
•
•
•
•
•
•
•
•
•
ALWAYS follow the rules given in the operation and maintenance manual.
ALWAYS take heed of the rules and warnings written on the machine. Warning plates on the machines are safety notices
and must be perfectly readable at all times.
ALWAYS stop using the machine if any of the following occurs: machine not working properly, a suspicion that something is
broken, incorrect movements, unusual noises, or any other unusual detectable fault.
ALWAYS follow the maintenance schedule with great care and record, for each check, any observations with regard to, in
particular, hooks, wire ropes, brakes, limit switches and load limiter.
ALWAYS keep the brakes, limit switches, load limiter and all other safety devices under constant check.
ALWAYS check periodically the degree of wear and tear and of efficiency of wire ropes and hooks (see the relevant
paragraphs).
ALWAYS make sure that slings are well fastened to the hook and pull them tight carefully and slowly, prior to lifting the load.
ALWAYS use of the machine only after its full efficiency has been assessed and allow its use to specifically trained staff
only.
ALWAYS all machinery, big or small, indoors or outdoors, while not in operation, must never be left unattended unless all
safety measures have been implemented.
ALWAYS check the “emergency stop” push button works properly.
ALWAYS make sure the machine operates in a duly protected from atmospheric agents (rain, wind, snow, etc.) environment
or, if located outdoors, that it has suitable protections.
ALWAYS make sure movements correspond to the relevant controls.
ALWAYS warn all people at risk that handling operations are about to start.
ALWAYS check the machine and its main components (the push button control pendant, for example) are suitably
maintained properly maintained (cleaning, lubrication).
ALWAYS verify the machine’s performance is suitable to the service it is intended for.
ALWAYS verify the fitness and functioning of the electrical control panel and the correct functioning of motors in particular.
ALWAYS verify the fitness and efficiency of the sling (chains, straps, ropes, etc.) checking there are no patent damages
such as deformations, tears etc.
ALWAYS make sure the machine’s hook is centered with respect to the perpendicular prior to slinging and handling the
load.
ALWAYS work outside the operating range of the hoisted load.
ALWAYS work in the best possible conditions as to lighting and visibility of the load and of the relevant operating area.
ALWAYS use “slow” speeds for approaching and lowering operations.
ALWAYS avoid using combined movements and swinging the load.
ALWAYS report any anomalies such as failures, suspected breakages, incorrect movements, excessive noisiness etc., to
the competent person in charge and discontinue use of the machine.
ALWAYS switch-off power supply to the machine in the event of maintenance, inspections or repairs and when done with
using the machine.
ALWAYS make sure the load meets no obstacles during handling operations.
ALWAYS, when the work is finished, bring the machine to a “parking” position with regard to ropes, hooks and push button
control pendants so that they are not at risk of collision.
ALWAYS wear suitable working clothes and, if necessary, personal protective equipment.
13
IMPROPER USE
Improper use of the machine and want of maintenance may jeopardize the operator's and other people's health and safety
as well as damage the working environment and compromise the machine’s functioning and safety.
The actions listed hereunder, which of course do not exhaust all possible “improper uses” of the machine, represent the
most common and obvious ones.
They are hence to be absolutely avoided:
•
•
•
•
•
•
•
•
•
•
•
•
•
•
•
•
•
•
•
•
•
•
•
•
•
•
•
•
•
•
•
•
•
•
•
•
•
•
•
•
NEVER lift loads with people moving across the working area.
NEVER drag nor draw loads.
NEVER lift loads which are glued to the ground by ice.
NEVER operate without paying the due attention during handling.
NEVER discharge the load abruptly.
NEVER leave the load unattended.
NEVER use the machine for uses which are not consistent with the ones it is intended for, nor for other operations such
as replacing lamps, or as a mobile scaffolding, etc.
NEVER lift or lower loads at maximum speed.
NEVER lift loads suspended in such a manner that the point of lift is outside of the center of gravity
NEVER swing a load in order to suspended in such a manner that the point of lift is outside of the center of gravity.
NEVER use the machine without wearing the suitable working clothes as well as, if necessary, personal protective
equipment.
NEVER lift loads by the hook’s tip.
NEVER lift guided loads without first having planned and put to effect suitable safety measures.
NEVER leave loads suspended when the machine is out of operation.
NEVER handle loads without having clear vision, an effective system of visual contact, or audio communication.
NEVER lift a load which is exposed to winds, such as to make loading conditions not acceptable.
NEVER consistently handle loads that are close to the maximum capacity of the machine without taking into
consideration the machines duty rating
NEVER consistently operate so as to activate the load limiter.
NEVER get into the habit of using the emergency stop device for routine operations.
NEVER allow unqualified or unsuitable personnel to use the machine.
NEVER modify the machine’s, or its accessories’, performances or features in order to change its originally intended
use.
NEVER lower a load by manual operation in the event of power failure, unless a special device has been fitted to this
purpose by the manufacturer.
NEVER perform maintenance, repairs or inspections without putting the machine out of operation first.
NEVER, while performing maintenance operations, lean ladders against the machine, use unsuitable tools, work
without wearing personal protective equipment (helmet, goggles, gloves, safety harness etc.).
NEVER do not reverse abruptly during handling operations.
NEVER leave the machine, after finishing work, without bringing the hook to a height of 2.5 m. minimum.
NEVER use the machine on temporary supports, suspensions or provisionally installed raceways.
NEVER use temporary electric connections using unsuitable or uninsulated provisional cables or with unbalanced
phases which do not correspond to the direction of the machine's lifting path.
NEVER use a crane with twin travel motors, when one of them is broken or not correctly connected, as this may cause
the crane to derail and fall.
NEVER use the machine with electric lines which are not in perfect working order (jammed loops, off-line or dirty
raceways, loop feeder trolleys not sliding properly). A torn electric cable might have disastrous consequences.
NEVER use the machine with wire ropes that are unsuitable, torn, deformed, unlubricated or have broken strands.
NEVER use an hook which is frayed, open, without safety spring catch or not properly secured by its nut.
NEVER activate repeatedly (repeated impulses) control push buttons or actuators (e.g. push button control pendant).
NEVER use the machine if limit switches are not working, anticollision is switched off or electric current is out of phase.
NEVER use the machine if brakes are released or their lining is worn out.
NEVER use push button control panels which are cracked or whose wires come out of the sheath of the suspension
cables, are frayed or uninsulated.
NEVER apply under-hook accessories which are not suitable as to their weight and safety level to the hook or the
machine in general. In any case, the accessory’s mass must be taken into consideration when considering the nominal
working capacity.
NEVER touch revolving pulleys, moving wire ropes, taut slings where they are in contact with the load or between hook
and slings.
NEVER tamper with the settings of safety devices (limit switches, load limiter etc.).
NEVER go on lowering the hook after having placed the load so that the ropes run free.
14
NOTE
Automatic limit switches are emergency safety devices, not to be used under normal service conditions. In particular, the hoist limit
switch shall be adjusted in such a way that the block can approach the fixed lower parts of the winch by not less than 0.3 - 0.5 m; on
its rundown the hook shall stop at 0.2 - 0.3 m from floor level (see page 137).
When the hook is in the lowest position at least two rope spare turns for each drawing ends shall be still wound on the drum.
INSTALLATION
In setting the machines to work all the rules of good technical practice and the manufacturer's instructions given in this user’s manual
must be followed, particularly:
•
•
•
•
•
•
•
•
•
•
•
•
•
•
The first ever setting to work of the machine must be performed by trained staff.
The technical characteristics of the machine must correspond to what was ordered as well as to the use for which it is
intended.
The lifting capacity of the machine must be equal to or higher than the loads to be lifted and the lifting path must not be
shorter than necessary.
The power supply voltage available must correspond to the machine's (+/- 10 % of the nominal value): it is not possible to
use the machine if the voltage or the frequency are different from the ones required.
The electric power supply cables must be adequate as to cross-section and insulation to the power indicated and extension
cords and temporary sockets must never be used.
The mono rail or crane gantry beams which carry the machine must be correctly sized, based on the reaction force defined
by the manufacturer.
Always check rails/monorails are not damaged. They must be free from obstacles, depressions or foreign bodies.
Always check the working area is free from anything which may interfere..
Working intensity must correspond to the one the machine was designed or purchased for, otherwise it may result in the
reduction of the machine’s life and safety.
Check there is no leakage of lubricant.
Check travel limit switches and the relevant actuators are properly positioned and locked.
Make sure there are end stops for the bridge and/or the trolley.
Check that the moving direction coincides with the function envisaged for the pressed push button/actuator. Otherwise,
immediately stop maneuvering and reverse two phases of the incoming feeding line on the control panel, or else reverse the
connection to the relevant motors.
Road test the wire rope by hoisting a light load at “slow” speed. This allows the wire rope to adapt itself to the working
conditions, thus permitting the adjustment of strands and wires and prolonging the rope’s life.
RUNNING CHECKS
Before using the machine a preliminary test must be carried out to give the best guarantee of service. Even if all the machines up to
20-Ton capacity undergo a dynamic lifting test with a 10% overload (unless otherwise requested on purchase) in the factory it is
preferable that the client satisfies himself with a more realistic test after assembly. This test is also useful for the following checks:
a)
actual working conditions
b)
running difficulties (correct assembly check)
c)
potential running hindrances (check on railways and their installation tolerances)
d)
setting the load limiter
SAFETY DEVICES
Power supply to the machine must be cut off by disconnecting the switch/disconnecting switch and/or pressing the “emergency stop”
push button located on the push button panel. In order to return the emergency push button to its normal position, turn it anticlockwise.
An electrical and/or mechanical interlock prevents two opposite rotation direction command signals from being simultaneously
transmitted to motors, both at “slow” or at “fast” speed.
The lack of voltage causes the motors to stop at once thanks to the immediate action of electromagnetic brakes.
Safety snap hooks are installed on lifting hooks to avoid accidental unhooking of slings and/or loads.
Position limit switches (e.g. hoisting and traveling) define the maximum motion range. They are emergency devices and should not be
used as either stop or consent devices for subsequent operations.
The load limiter prevents the machine from being used under overloading conditions (the limit of intervention is usually set at 115% of
regular load)
Controls (push buttons and/or manipulators), when they are not pressed by the operator, automatically commute to the 0 position,
thus stopping the movement (“dead man” control).
Should, when the control (push button and/or manipulators) is operated, the movement and/or direction not coincide with the
one selected due to a malfunctioning, release the control. If, in spite of the control being released, the movement does not stop, press
the “emergency stop” push button immediately.
15
TESTS
(in conformity with machinery EC directive 98/37/EC)
Before setting the machine to work it must be tested in overload under the following condition:
DYNAMIC TEST
The dynamic test is carried out with an overload coefficient of 1.1 (110% of the nominal load) all movements must
then be carefully carried out without checking the speeds or heating of the motors.
STATIC TEST
The static test is carried out with an overload coefficient of 1.25 (125% of the nominal load).
This test must be carried out in the absence of wind.
It consists of lifting the nominal load a minimum distance from the ground and then adding the extra weight
without jerks.
Remarks
Loads used in functional tests must be checked with precision dynamometers complete with a certificate to
attest its efficiency and an adequate metrological sensitivity. Certified loads may be used as an alternative.
At the same time as the static test, a measurement of the main girder's deformation is usually taken.
Unless otherwise indicated in the contract there are no compulsory limits to the elastic sags.
The old rule of judging the strength of a machine on the basis of the lowest sag has fallen into disuse.
In practice the value of the sag should be considered exclusively on the basis of the use of the machine.
DOCUMENTATION
Unless otherwise requested in the contract, the following certificates guaranteeing the quality and strength of the components are
supplied with the machine.
• Certificate for the wire rope installed on the machine with all the construction features and the manufacturer’s name.
• Certificate for the hook giving the quality of the material, size and the manufacturer‘s name.
• Declaration of conformity according to European Community Directive 90/37/EC (and amendments thereof).
IMPORTANT WARNINGS
UORI ESERCIZIO
lf the machine is to work in hazardous areas we guarantee that all components are made in conformity with European regulations and
all electric parts are legally certified in compliance with EN 60079. All of the electric components enclosed in explosion-proof cases
are supplied with certificates issued by authorized European Institutes.
16
SPECIAL EXECUTION
Machinery in special versions are available, specifically designed for demanding environmental conditions and service such as:
steel-works, foundries, galvanic baths, refineries, cement-works, marine, tropical regions, power stations, nuclear power plants,
petrochemical plants.
Some special optional features:
•
•
•
•
•
•
•
•
•
•
•
•
•
No aluminum alloys
No copper alloys
Anti-spark rope-guide and wheels
Stainless steel screws and bolts
Stainless steel wire ropes
Fail-safe additional brakes
Anti-condensation heaters for motors and equipment
Double-grooved drum for precision vertical lifting
Special paint
Explosion proof wiring with explosion proof cases
Traveling trolleys for curved railways
Sequence input phases control- input phase failure
Feed-forward or feed-back control of all movements
17
EXPLOSION-PROOF EXECUTION EQUIPMENT FOR HAZARDOUS AREAS
Hazardous areas are locations where, under given conditions, potentially explosive atmospheres may develop.
An explosive atmosphere consists of air mixed with: combustible gas, vapor or dust. In an explosive atmosphere, a rapidly
spreading combustion (explosion) may take place following its ignition at atmospheric pressure caused by a triggering source
such as a hot surface, a spark, either of an electric or mechanic nature, the presence of a flame or an exothermic reaction. In order
for an explosion to take place it is therefore necessary that air, or other gaseous mixture containing oxygen, inflammable material
and a triggering source should all be present at the same time.
The first big difference between components operating in hazardous atmospheres is determined by the environment in which
they operate. Electrical appliances are divided into two groups.
Group I: electrical appliances for use in mines with firedamp gas
Group II: electrical appliances for use in other explosive atmospheres
Italkrane is mainly involved with Group II appliances. The dissertation hereunder refers to this Group.
Under the 1999/92/EC directive, regarding Group II, the user is required to classify hazardous areas, subdividing them into
zones on the basis of the frequency and duration of the presence of explosive atmosphere. That same European Directive
divides appliances into three categories with different levels of protection and connects them with the areas of use so as to
guarantee the same level of safety in all zones.
In proportion to the kind of substances present in classified areas, areas are dived in zone 1, 2, 3 and zone 20, 21, 22.
When the risk is due to the presence of flammable gases, vapors or mists, the classification made based on EN60079-10
regulation, originates three possible zones which are defined as follows:
•
•
•
Zone 0 = areas where an explosive atmosphere is permanently, or for long periods, present
Zone 1 = areas where the formation of explosive atmospheres is probable, or possible, under normal conditions
Zone 2 = areas where explosive atmosphere is not usually present and, when it is present, it is so for short periods.
When hazard is due to the presence of combustible dust, the classification gives rise to three danger zones named Zone
20, 21 and 22 where the level of risk is defined as above.
Directive 96/9/EC (ATEX) divides appliances into three categories with different levels of protection depending on the zone of
installation in order to guarantee always the same level of protection.
COMBUSTIBLE
SUBSTANCES
GAS AND VAPORS
DUST
ZONES
0
1
2
20
21
22
APPLIANCE
CATEGORIES
1G
2G
3G
1D
2D
3D
CLASSIFICATION OF ELECTRICAL APPARATUS FOR EXPLOSIVE GAS, OR VAPOR, ATMOSPHERE.
Electrical apparatus in presence of gas or vapors are protected according to different methods of protection.
The most common in ITALKRANE applications are “D” protections, where the triggering source is contained in a closed explosion
proof case designed in compliance with EN 60079-1 rule, and “M” protections in which the triggering source is resin encapsulated
in compliance with EN 60079-18 rule.
For some methods of protection (for “D” method of protection in particular), Gas Group II subdivides into three gas subgroups:
Group IIA, Group IIB, Group IIC.
A case belonging to a certain group is appropriate for lower level case groups too: a group IIB case is also appropriate for group
IIA; a group IIC case is also appropriate for groups IIA and IIB.
TEMPERATURE CLASSES
Electrical apparatus in presence of gas or vapors are divided into 6 temperature classes according to their maximum surface
temperature. Maximum surface temperature is the highest temperature reached by any point on the surface of the electrical
equipment operating under nominal conditions. In cases:
*
*
the temperature on the external surface for “D” and “P” methods of protection;
the temperature on any internal or external point for “E” and “N” methods of protection.
Ignition Temperature of an
Explosive Mixture [C°]
over 450
from 300 to 450
from 200 to 300
from 135 to 200
from 100 to 135
from 85 to 100
Temperature Class
T1
T2
T3
T4
T5
T6
Maximum surface temperature of
electrical equipment at an
environment temperature of 40°C
[°C]
[°F]
450
300
200
135
100
85
842
572
392
275
212
185
18
Example of case classification in presence of gas:
Ex
d
IIB
T4
European Standard Safety Protection
Temperature Class
Method of Protection with Explosion proof Case
Gas Group
Table with different types of gas in connection with different temperature classes
Enclosur
e
Group
Referenc
e
Temperature Class
T1
T2
I
Ammonia
Toluene
IIA
T3
T4
T5
T6
Methane
(Firedamp)
Coke-oven
Gas
Carbon
Monoxide
Acetone
Benzene
Naphthalene
IIB
Town
Gas
IIC
Hydrogen
Water gas
Propylene
Propane
Ethyl chloride
Butane
Styrene
Ethane
Iso-octane
Xylene
Methyl ethyl
propyl butyl
oxyl amyl
acetate
Ethylene
Ethylene
Oxide
Pentane
N-Decane
Heptane
Hexane
Ciclohexane
Kerosene
Sulphurized
Hydrogen
Butyric
aldehyde
Benzaldehyde
Octane
Aceticaldehyde
Methylether
Methyl ethyl
ether
Ethyl
nitrate
Ethyl
ether
CLASSIFICATION OF ELECTRICAL APPARATUS FOR USE IN THE PRESENCE OF COMBUSTIBLE DUST.
Electrical apparatus in presence of combustible dust are protected according to different methods of protection.
The most common in ITALKRANE applications are tD A21 and tD A22 protections, in which the protection against combustible dust is
obtained by means of an explosion-proof enclosure with mechanical protection in compliance
with EN 61241-1 rule, and “mD” protections where the triggering source is resin encapsulated.
- TEMPERATURE CLASSES FOR COMBUSTIBLE DUST
Electrical apparatus in the presence of combustible dust are classified according to the maximum surface temperature. Such
temperature must be inferior to either the ignition temperature of the dust cloud in the explosive atmosphere or the temperature of a
dust layer that may collect on the enclosures
Maximum Surface Temperature of
Enclosure at 40°
[°C]
Maximum Ignition Temperature
of the Dust Cloud at 40°
Considering the Safety Factor
[°C]
Maximum Ignition Temperature
of a 5 mm Dust layer at 40°
Considering the Safety Factor
[°C]
450
300
200
135
100
85
675
450
300
202.5
150
127.5
525
375
275
210
175
160
Example of classification of enclosures in presence of combustible dust:
Ex
tD
A21
T135°C
IP 55
Mechanical Protection
European Standard Safety Protection
Temperature Class
Method of protection with explosion-proof case
Dust-proof protection with mechanical protection
19
COMPLIANCE WITH CONSTRUCTION RULES
The following European safety rules are complied with:
EN 60079-0
EN 60079-1 (CEI 31-58)
EN 60079-7 (CEI 31-65)
EN 60079-18
EN 60529 (CEI 70-1)
EN 50.020 (CEI 31-9)
EN 61241-1
General rules and regulations
Explosion-proof Enclosures “D”
Increased Safety Method of Protection “E”
Encapsulation “M”
Enclosure Protection Degree (IP)
Intrinsic Safety Method of Protection “I”
Electrical Installations for Use in the Presence of Combustible
Dust
The maintenance and inspection of all electric components and explosion-proof equipment should be carried out by specially
appointed skilled personnel only. The explosion-proof cases must be opened using specifically designed spanners (hexagonal,
triangular etc.).
Always:
•
Scrupulously check that cases have been properly closed after inspection.
•
Carefully remove all dust from the case surface.
•
Do not put gaskets, sealing fluids or other products between case and cover, but only use a very thin layer of vaseline or
siliconic grease. The siliconic grease layer acts as an antioxidant as well as guarantees the protection grade indicated on
the cases’ tags (e. g. IP 55).
•
Take the greatest care so as to prevent cables from being trampled on or tampered with, maintain festoon lines, which
should be checked often, always in good conditions, with cable suspension trolleys sliding smoothly on the track to prevent
cables from being torn or damaged.
•
Wire ropes of lifting equipment must be assiduously checked and replaced if showing even the slightest damage. Please
note that breakage of strands induced by jerks generates sparks.
•
In addition all mechanical members (supports, wheels, buffers, joints, shafts) must be carefully and frequently checked so
as to eliminate possible causes of friction (the wheel-rims for example) and the resulting danger of over-heating.
•
Brakes also must be constantly checked so as to prevent disks and shoes from being used when badly worn out.
All explosion-proof equipment must be used with the utmost care so as to avoid countercurrents and repeated starts.
During load preparation carefully plan harnessing points and the relevant fastenings and hoist slowly so as to prevent ropes from
sliding over hooks and to avoid friction or breakage.
Markings, as well as the certificate of conformity, are issued by an officially recognized laboratory, after it has run all the required tests
and inspections on the member’s prototype. (E.g. CESI, Ineris).
20
21
CABLE ENTRANCE IN EX CASES
The entry-points of the electric cables with the explosion-proof cases can be made in four different ways:
A) EEx d type cable glands of the compression type with no sealing
B) Traditional cable glands for EEx e (normally made in metal or plastic), "stuffing" type
C) Sealing EEx d type joints for round cables.
D) Sealing EEx d type joints for flat cables.
ASSEMBLY INSTRUCTIONS FOR “D” TYPE (TOR) CABLE GLANDS
1.
2.
3.
4.
5.
6.
7.
8.
9.
Clean carefully the cable sheath and the internal surfaces of the cable gland
Strip the cable back to the indicated length.
Add the hardener to the resin in proportion as specified in the table hereunder and mix thoroughly avoiding air bubble formation.
The mixing operation must be carried out at room temperature (15°C ÷ 25°C).
In order to prevent resin mixture from leaking out, fill the C area of the cable gland with suitable material (e.g.: plaster, glass
fabric, etc.).
Pour the mixture filling the B section of the cable gland up to the level indicated.
Remove any traces of resin from the coupling point (zone D)
Do not move the cable during the drying/hardening phase (t ≥ 12 hrs). During hardening, it is recommended that sudden changes
in temperature of 10°K/h or more are avoided.
Fit Part A of the cable gland on the enclosure (L ≥ 8 mm). In case of cylindrical thread, do use Loctite thread locker for
anti-loosening action.
Connect part B to part A using the screws provided.
Resin
Hardener
Proportion in Weight
Camattini MC 62/W363
W363
100:13
Mascherpa EP 149/EPI 220
EPI 220
100:9
WARNING:
FAILURE TO COMPLY WITH THE ASSEMBLY INSTRUCTIONS, WITH PARTICULAR REFERENCE TO RESIN POURING,
AFFECTS THE EXPLOSION-PROOF QUALITY OF THE COMPONENT AND RELIEVES ITALKRANE FROM ANY AND ALL
LIABILITIES FOR ANY POSSIBLE RESULTING DAMAGES.
22
HOW TO SEAL C TYPE JOINTS
After having completed assembly and testing, seal the joints which are placed at the entry of the various explosion proof components,
with a proprietary two part urethane rubber potting compound.
The resins must be prepared observing the proportions and times indicated by the manufacturer.
Handle these resins with care and avoid all direct contact with the skin. Store the ingredients in a cool dry place.
1) Unscrew the joint from position (1) and place it in position (2).
2) Put asbestos scraps (or similar fire-proof material) on the bottom and press them well between the two conductors
3) Pour in the sealing mixture which will have been prepared as described below.
4) Fill the joint up to the level of the lower thread for C type and until 1 mm under rim for D type
5) As soon as the mixture has become hard, replace cap and put the joint back in its original position (1).
Preparation of the mixture
A) Pour a small amount of the contents of the tin into a plastic cup.
B) Add the correct proportion of hardener.
C) Immediately mix well for about 30 seconds using a stick.
D) Pour the mixture over the joints immediately, before it hardens.
0
Mixing operations must be performed at an ambient temperature of 15 C or above.
“A” TYPE CABLE GLAND (SCREENED OR ARMORED ROUND CABLE)
1 - Body
2 – Inner rubber seal
3 – Armour locking rings
4 – Intermediate socket
5 – Outer rubber seal
6 – Anti-friction ring
7 - Head
WARNING:
The tightening of parts 1 (body), 4 (intermediate socket) and 7 (head) should be checked periodically.
23
PREPARATION OF RESIN MIXTURE FOR “A” TYPE CABLE GLANDS
Warning! To prevent resin from hardening inside the mixing nozzle (max. 15 minutes), make sure all cable
glands are ready for sealing.
2
1
5
3
4
How to proceed:
•
A Press lever 1 and pull out plunger 2
•
B Twist the cartridge holder
•
C Insert cartridge
•
D Remove protective cap from 3 cartridge
•
E Insert mixing nozzle 4
• F Pull trigger 5 only when cable glands are ready for sealing
WARNING: ALL THE CABLE GLANDS WITH THE FOLLOWING WARNING TAG HAVE TO BE SEALED UP BEFORE THE
COMMISIONING OF THE DEVICE ON WHICH THEY ARE ASSEMBLED. FAILURE TO COMPLY WITH THE INSTRUCTIONS,
WITH PARTICULAR REFERENCE TO RESIN POURING, AFFECTS THE EXPLOSION-PROOF QUALITY OF THE COMPONENT
AND RELIEVES ITALKRANE s.r.l. FROM ANY AND ALL LIABILITIES FOR ANY POSSIBLE RESULTING DAMAGES.
24
ELECTRIC COMPONENTS
MOTORS
The different types of motor on cranes and hoists are all provided with six-stud terminal boards.
Single-speed motors have terminal boards fitted for star or delta connections. Double-speed motors are fitted only for the nominal
voltage required; three terminals are used for low speeds and the other for high speeds.
Terminal arrangement is given on each motor rating plate.
Before carrying out crane tests make sure that the rating plate voltage, referring to the motor connections, is the same as your mains.
Motors do not require any special maintenance and bearings are pre-greased for a very long service period.
To ensure cooling make sure that the casing is kept clean and as free of dust as possible. Also make sure that couplings attached to
parts projecting from the shaft are well secured and not loose; if loose, repeat keying immediately (change fiat-key or half-coupling).
It must be remembered that if the motor does not start with a suspended load perhaps the power supply voltage is lower than the
nominal voltage; starting with a full suspended load is only possible when the voltage at the motor terminals on take-off is no lower
than 5% the one on the rating plate, unless otherwise specified.
AUTOMATIC LIMIT SWITCHES
Automatic limit switches are emergency devices, therefore they must not be used in normal service conditions.
If they are needed for normal conditions additional limit switches will be installed in such a way that they work before the emergency
ones.
The limit switches which are normally installed on the three movements of the crane are auxiliary switches; they function on the low
voltage current so as to open the corresponding control contactor.
On request, for particularly demanding service, it is possible to install power limit switches which directly cut off two or three phases at
the motor power supply.
However, these devices must be released by hand.
TROLLEY TRAVELING AND BRIDGE SLIDING AUTOMATIC SWITCHES
These switches may be either roller type or "double-lyre" shaped. In both cases, in order to alter the bridge or Trolley approach
operations, the fixed catches must be moved without touching the switch.
The trolley stop distance is set on construction, while the crane stop catch has to be installed during assembly following the same
procedure as for the trolley.
The roller type limit switches for the bridge require rather long shoes (at least twice the braking distance) while the double-"lyre" limit
stop switches a catch to act on the "lyre" is needed.
Limit switches are devices, that should not be abused and frequently inspected.
ANTI-COLLISION
When two machines are running along the same railways, automatic stop devices must be installed to prevent collision when the
safety distance is exceeded.
These devices are placed in such a way that the two machines will not collide even at maximum speed. The brakes must be set for
short-distance braking and kept under constant check.
TROLLEY FEEDING LINE
For the power supply of moving equipment, round or fiat form flexible cable in loop arrangement are normally used, thus allowing the
cable to stretch along a section parallel to the hoist trolley or crane bridge.
The loops are supported by saddles which are attached to trolleys sliding along their raceway.
The flexible cables can be either single or multiple according to service requirements as it is possible to have low voltage conductors
or mains voltage conductors the main switch must be in the "OFF" position before any repairs or maintenance are carried out.
No maintenance is required for this type of line apart from inspection of the trolleys to check they slide properly, and constant checking
of the screw which holds the joints and the suspensions.
Special care must be taken during the assembly of the track; flush the joints so as to avoid the loop feeders jamming and the resulting
tearing of the cables.
The conductors are sheathed in PVC. thus allowing a service temperature range of -20° to +70°C, unless o therwise specified.
An alternative to festooned lines which is often used is the cable supporting chain, which is supported by raceways fitted on the crane
frame.
25
CONTROL GEAR
A metal panel contains all the electric equipment for the starting, protection and control of the motors.
Auxiliary voltage is supplied via a transformer which is kept constantly connected. When required, auxiliary protection can be
provided by means of fuses and protections of suitable capacity on the main currents to the motors. Control equipment, inside its
case, requires periodic maintenance.
If a contactor does not close properly (single-phase current is supplied to the motors or the brakes) change the contact or change the
broken part completely.
If the crane has to work in a dusty environment, clean the remote control switches by blowing between them. In very humid conditions
(with the crane working outside) all electric components should be periodically sprayed with commercially available modern
water-repellent silicone-based product (make sure they are suitable for electric equipment).
Make sure fuses are inserted tightly; when replacing them see they are the same type.
Panel must not vibrate too much during crane operations so periodically check that the bolts are tight.
It is a good rule, at the end of each shift, to open the line main remote control switch by pressing the "stop" button.
For detailed information of the power and control circuits refer to the provided circuit drawings.
PUSH-BUTTON CONTROL PENDANT
Control pendants are essential to the crane or hoist function, and can be subject to abuse.
It is necessary, therefore, to keep it constantly under check thus avoiding loss of work-hours, and operator safety. We
particularly suggest;
•
Make sure it does not come into contact with oily substances, dampness or dirt; avoid bangs and squashing; do not
pull or twist the supporting cable; if needed move the panel gently; do not use the cable to pull the hoist; do not
allow knots or eyelets to form in the cable.
•
Replace the hanging cable if any conductor has been damaged.
•
Always keep a spare panel and corresponding cable in stock
Starting class for lifting motors (according to FEM 9683/95 regulation)
FEM – SO
Group
Starting
Intermittence
(limited to 10’)
M1
M2
M3
M4
M5
M6
M7
M8
90
120
150
180
240
300
360
≥360
15%
20%
25%
30%
40%
50%
60%
60%
Starting class for traveling motors (according to FEM 9683/95 regulation)
FEM – SO
Group
Starting
Intermittence
(limited to 10’)
M1
M2
M3
M4
M5
M6
M7
M8
60
90
120
150
180
240
300
≥300
10%
15%
20%
25%
30%
40%
50%
60%
The manufacturer accepts no responsibility for improper use or for exceeding the number of cycles/working time given in the project
data.
26
PRE ERECTION VERIFICATION
•
•
•
•
•
•
•
•
•
•
•
•
•
•
•
•
Check that no damage has occurred to the various parts of the machine during transportation. Pay particular attention to the
rope, push-button control panel and its cable, limit switches, and electric connection cables.
Check that the voltage indicated on the hoists data plate and on those on the motors corresponds to the rate power available.
Check if the motor and brake terminal boards are correctly connected in accordance with the indications given on the
relevant data plates.
Check that the ropes, with regard to their securing points, are in the right place. If not, put them right (clamps, wedges and
pulleys).
Check that the reduction units are filled with oil to the right level. Hoist reduction units are normally supplied with oil.
Check that all required components are available.
Prior to assembly, check that all components are whole and undamaged.
Check that clearances, overall dimensions etc correspond to the contract data.
Check that runway beams and rails are installed in accordance with the appropriate standard.
Check length, capacity and suitability of the electrical supply system, paying particular attention to voltage range, conductors
cross section and rating of mains switch.
Check availability and suitability of the equipment required to assemble the machine and install same, prior to the
commencement of assembly.
Ensure that there is adequate space for maneuvering the machine into position.
Ensure that the orientation of the machine corresponds to the appropriate drawings.
Make sure the available personnel have adequate skill and experience
When possible, carry out tests on assembled machine prior to installation.
Check all slinging points and ensure that the machine is secure and evenly balanced, the method depending on the
availability and type of rigging equipment.
ASSEMBLY OF HOIST
Remove the hoist from its packaging without damaging the ropes and the various electric components.
- A fixed hoist is secured mechanically to the base structure using high-strength bolts which are very slightly
smaller than the diameter of the holes on the frame. If necessary insert spacers to ensure perfect planarity.
- A monorail hoist requires more careful erection, usually the trolley can be inserted front-first on to the girder.
If this is not possible, disassemble the wheel-bearing flanges loosening the TIE RODS which hold the hoist. Upon re-assembly check
that the nuts are well tightened to ensure a good sliding movement the wheel/web axial gap should usually be around 2-4 mm.
The wheels are shaped to work correctly on both level (IPE) and slanted (INP - IPS) railways.
When welded girders (double T shaped or box-type) remove all unevenness and the remnants of soldering.
Any girder joints must be leveled and smoothed without hollows or interruptions.
The girders must also be straight (unless the trolley is designed for working on curves) and the supports must not be on different
levels
Before lifting the hoist make sure the fastenings are placed so as not to damage parts and that the machine is well-balanced so
as to avoid the supporting ropes slipping out and the hoist falling.
The bi-rail electric hoist is laid on its rails which are already precisely gauged, perfectly parallel and strictly horizontal.
The wheel thread, measured on the bottom of its rims must be 5-10 mm wider than the rail.
Before setting the machine to work, check the space available in relation to the size of the hoist to ensure
there is no interference with fixed structures.
Install suitable, sturdy fixed fingers or saddles at the ends of the horizontal paths to activate the limit switches.
Install a sturdy end stop onto the sliding girder at the same height as the buffer to avoid overshooting or prevent the hoist from
falling.
Make sure the limit switches for horizontal movements stop the trolley, at maximum speed, a few centimeters before the buffer
hits the stop plate.
If the monorail hoist on crane is supplied with an electric power supply line.
Arrange the brackets 1.5 meters from each other, securing them to the upper flanges of the girder or similar with the relative
clips.
Arrange the loops in the saddles, insert the whole trolleys into the raceway, and secure the terminal boards to the feeding point.
Insert the driving bracket on the hoist into the appropriate trolley and connect up the machine electrically.
All the setting operations for the limit switches and the resetting of safety distances must be carried out by specialized
electricians with the authorization by respective section heads.
27
SERPES LINE WITH “ZECCA” SYSTEM SUSPENSION
The raceway on which the suspension trolleys of festoon lines travel, is supported by brackets which are attached to the upper rim of
the crane’s girder (see Pict. 1)
Brackets are secured to the girder by means of a “ZECCA” clamp system the rigid connection of which is granted by friction, thanks to
two wedges assembled by means of one single screw.
The angle of the wedges is such that it guarantees a firm grip and it prevents loosening.
The installation on the prearranged points (usually marked on the girder) is extremely easy.
Simply attach the “ZECCA” onto the girder’s rim (see picture 2) and firmly tighten the screw that holds the wedges together.
The cable raceway is now installed.
To release the “ZECCA”, loosen the screw and deal a few mallet blows to separate wedges.
Picture1
Picture 2
28
ELECTROMECHANICAL ANTI-COLLISION SYSTEMS
PATH
1600 path anti-collision
2000 path anti-collision
2500 path anti-collision
FESTOONED LINES (MAIN ELEMENTS)
Raceway
Type
EUROPEAN
Material
Thickness
Instant inertia
Resisting moment
Weight
Distance between suspensions
Capacity
Fe PO2 zinc coated steel
1.5 mm
1.9 cm4
1.1 cm3
1.19 kg/m
1.5 m
30 kg every 1.5 m
Suspensions
A
2170
4190
5190
B
1400
1900
1900
C
1600
2000
2500
29
Brackets
Weight
Capacity
L=
350 mm
721 g
35 kg
L=
450 mm
840 g
30 kg
Joints
Fixed trolley
Saddle
A= 25mm
A= 35mm
A= 55mm
A= 65mm
A= 80mm
A= 100mm
Weight
265 g
285 g
320 g
340 g
365 g
400 g
Saddle
A= 25mm
A= 35mm
A= 55mm
A= 65mm
A= 80mm
A= 100mm
Weight
310 g
330 g
365 g
385 g
410 g
445 g
Saddle
A= 25mm
A= 35mm
A= 55mm
A= 65mm
A= 80mm
A= 100mm
Weight
485 g
505 g
540 g
560 g
585 g
620 g
Cable trolleys
L=
550 mm
959 g
25 kg
L=
650 mm
1078 g
20 kg
L=
800 mm
1257 g
15 kg
30
“YOYO” ELECTRIC CHAIN HOISTS
Electric chain hoist of the YOYO range and the relevant electric traveling trolleys are
manufactured according to the concept of modular components which allow the
production of different executions, both standard and special. Base components, motor
and reducer, thanks to their extreme compactness are assembled to one another on a
coaxial line, so as to guarantee the maximum exploitation of the hook’s path as well as
the hoist’s minimum overall dimensions. They are manufactured using the most
advanced technologies which are based on highly industrialized production processes
and allow the production, through economy of scale, of totally reliable and technologically
innovative machinery.
The high quality standard is guaranteed and verified by the quality system certified
according to UNI EN ISO 9001:2000.
Main dimensions of hoist, E execution
PROTECTION AND INSULATION OF ELECTRICAL PARTS:
Self-braking hoisting and traveling motors: IP55 protection – “F” grade insulation
Baco Brake IP 65
Limit switches: Minimum protection IP65 – Max. voltage of insulation: 500V
Cables: CEI 20/22 II – Maximum Voltage of Insulation 750/1000 V
Non-standard protections and insulations may be supplied upon request.
ELECTRIC SUPPLY:
Standard DMK electric chain hoists are designed to be supplied with alternating current at the following voltage:
three-phase 400 V– 50 Hz in conformity with IEC 38-1
Non-standard voltages and frequencies may be supplied upon request.
NOMINAL CONDITIONS OF USE IN STANDARD EXECUTIONS:
Working temperature: min. – 10° C; max. + 40° C
Max. relative humidity: 80%
Max. altitude above sea level: 1,000 m.
The machine should be placed under some kind of roof, in a well-aired, free from corrosive vapors (e.g. acid vapors, salty mists, etc.)
environment
Special executions for different environmental conditions or for outdoor operations may be supplied upon request.
NOISE LEVEL
The level of acoustic pressure produced by the full load hoist is always inferior to 85 dB (A). The impact of environmental
characteristics such as sound transmission through metallic frames, reflection due to the combination of machinery and walls, is not
included in the above value.
31
STANDARD EXECUTIONS
YOYO hoist’s flexibility of use allows for 5 standard executions.
EXECUTION WITH ELECTRIC TROLLEY:
(E) it is used for heavy service or when the load can not be pushed by hand; traveling is guaranteed by the trolley to which the hoist is
secured, which is controlled by the hoist’s push button control panel.
E
FIXED EXECUTION
(F) the hoist is suspended by means of a support (Fs) or of a hook. (Fg)
Fs
Fg
EXECUTION WITH MECHANICAL CHAIN TROLLEY
(M) traveling is obtained by means of a maneuvering chain controlled by the operator which conveys motion to the trolley wheels. It
is employed for applications with a limited number of maneuvers, on short journeys or where micrometrical movements are needed.
M
EXECUTION WITH PUSH TROLLEY
(S) horizontal traveling happens through the load being pushed by hand; it is used for light operations or on quite short journeys.
S
32
DESCRIPTION OF MAIN COMPONENTS
(see picture 1 for references)
HOISTING AND TRAVELING ELECTRIC MOTOR
(1-8) Three-phase asynchronous, designed for S3 intermittent duty, executed in compliance with European rules and regulations. Closed
mechanical protection so as to prevent dust and water from entering, wherever they may come from.
Flange-mounted application (B5 shape), on the outside of the hoist, therefore it benefits from a perfect cooling thanks to the frame’s fins.
Available with single polarity, for single speed hoists, with double polarity for double speed ones.
CLUTCH LOAD LIMITER
(2) Emergency device, works as a load limiter in the event of overloading [RES. 4.2.1.4. Enclosure I – Machinery Directive].]
Asbestos-free clutch disks.
BRAKE
(3) Load holding is guaranteed by a powerful disk brake assisted by a toroidal electromagnet which is fed at the same time as the motor is.
Designed for a braking torque which exceeds the necessary one by 60%, but which is adjustable according to the different requirements, it is
equipped with an easy system for the temporary compensation of the wear and tear of brake linings.
Pict. 1
HOISTING REDUCER
(4) Compact parallel axles execution, with cylindrical gearing in alloyed, hardened and tempered steel, refaced and grinded fast gears,
supported by ball bearings and lubricated in oil bath. The frame is made of aluminum alloy to increase heat dissipation.
SPROCKET – CHAIN GUIDE
(puller/inserter) (5)
Thermally treated, it has five hollows which are machined using high-precision automatic machinery. It transmits motion to the chain
ensuring its optimal running. The chain guide guarantees the housing and the pulling of the chain’s links with respect to the sprocket’s
hollows, both while hoisting or lowering [RES. 4.1.2.4. Enclosure I Machinery Directive]
CHAIN
(6) Calibrated and made of high grade steel rod, of a special quality with high dynamic stability, 80 kg/mm2 minimum breaking load
and minimum elongation at fracture of over 10%. The safety factor of use is always above 5 [RES. 4.1.2.4. – Enclosure I Machinery
Directive]. The thermal and galvanic treatments it undergoes confer it high resistance to wear and tear, ageing and corrosion.
33
LOADING HOOK
(7) Made of high grade steel, it is equipped with a safety device (spring catch) against accidental unhooking of the load [RES. 4.1.2.6.
e – Enclosure I Machinery Directive] and revolves on a thrust bearing.
HOOK TACKLE
(single fall hoists) (7)
It connects the chain to the revolving hook. Made of steel, it is equipped with a thermally treated increased section pin for chain
locking
BLOCK
(double fall hoists) (7)
Aluminum cast, completely closed, it is equipped with a thermally treated high grade rotating sprocket, with chain housing hollows.
MOTOR REDUCER WITH SELF-BRAKING MOTOR:
(9) transmits motion to the trolley’s gear wheels for the E Type Electric version [RES. 4.1.2.6. c – Enclosure I Machinery Directive].
TRAVELING TROLLEYS
(10-11) used for horizontal traveling of the load, they are manufactured in three different versions: thrust manual hoist; mechanical
chain hoist; electric hoist. They slide along the girder’s lower flange and can be adjusted according to the width of the same girder’s
flange; made of steel plate, they are equipped with anti-fall and anti-derailment brackets [RES. 4.1.2.2. Enclosure I Machinery
Directive] and shock absorbing buffers. Trolleys are equipped with mechanically worked pressed steel wheels which revolve on
permanent lubrication ball bearings.
CHAIN CONTAINER
(13) Required for containing the hanging length of chain, it is available in several sizes according to the hook’s run; it is made of
shock-resistant plastic and it equipped with suspensions which confer it functional mobility.
ELECTRIC CONTROLS
AC 48 V – 50HZ LOW VOLTAGE ELECTRIC EQUIPMENT,
(14) including: the transformer for low voltage supply of control circuits, the main line contactor, the contactors for controlling the
hoists motors and the electric trolley (if any), the transformer’s protection fuses and the terminal box for the connection of auxiliary and
power circuits. Components are contained in a IP 55 protection grade watertight case, made of shock-resistant thermoplastic. The
control equipment is located on the motor side of the hoist.
TRAVEL LIMIT SWITCHES
(15): they limit the horizontal travel of the electric trolley along the girder
[RES. 4.1.2.6. a – Enclosure I Machinery Directive].
HOIST ELECTRIC LIMIT SWITCH
(17) Supplied as standard, they limit the hook’s hoisting and lowering path [RES. 4.1.2.6. a – Enclosure I Machinery Directive].
Consisting of two precision micro-switches which work according to the “slow positive opening” principle and act upon the auxiliary
circuit of the control device of the hoisting motor.
STOPS
They are fitted on the descending length of the chain and on the load-bearing one on single fall hoists, they act
as regulators and limiters for the hook’s path [RES. 4.1.2.6. a – Enclosure I Machinery Directive]; they are made of pressed steel and
are equipped with a shock-absorbing insert.
SUSPENSION
Available in the execution with hook or in the 90° v ersion for longitudinal hoists.
TOW ARM:
the tow arm is available for all types of trolley. It connects the trolley to the feeding line. It is easily adjustable in all directions and
represents a fundamental element for towing the feeding line so as to avoid tearing of the cables.
34
YOYO HOIST – ELECTRICAL FEATURES OF MOTORS AND FUSES
HOISTING
1 speed
Capacity kg
500
1000
2000
Speed
m/min
Hoist
Chain
falls
Motor
kW
(50 Hz)
Cos ø
la/In
In
(380 V)
Delayed Universal
Fuses
Brake
Type
4
YY 500-4
1
80L 4
0,75
0,85
4,5
1,8
4
BY 80
8
YY 500-8
1
80L 2
1,5
0,75
4,8
4,1
8
BY 80
4
YY 1000-4
1
90S 4
1,1
0,85
4,5
1,8
4
BY 90
8
YY 1000-8
1
80L 2
1,5
0,75
4,8
4,1
8
BY 80
4
YY 2000-8
2
80L 2
1,5
0,75
4,8
4,1
8
BY 80
Chain
falls
Motor
kW
(50 Hz)
Cos ø
Ia/in
In
(380 V)
Delayed Universal
Fuses
Brake
2 speeds
Capacity kg
Speed
m/min
Hoist
Type
500
8/2
YY 500-8/2
1
80L 8/2
0,75/0,18
0,78/0,7
4,5/3,7
2,1/0,6
4
BY 80
1000
8/2
YY 1000-8/2
1
90L 8/2
1,1/0,25
0,75/0,7
4,8/4,2
4,1/4,2
8
BY 90
2000
4/1
YY 2000-4/1
2
90L 8/2
1,1/0,25
0,75/0,7
4,8/4,2
4,1/4,2
8
BY 90
TRAVELING
Capacity
Kg.
Speed
KW
m/min
Trolley
Motor
(50 Hz)
500
10
MO 80
63L 4
0,18
to 2000
20
MO 80
63L 2
0,25
BACO BRAKE-CLUTCH UNIT
COMPONENTS
1
2
3
4
5
6
7
8
9
10
Slotted hub
Mobile keeper
Magnetic core
Brake springs
Brake fixed disk
Brake mobile disk
Clutch assembly screw
Brake/clutch assembly screw
Clutch body
Clutch springs
Cos ø
la/In
(380 V)
In
Delayed
Universal
Fuses
0,72
3,5
0,6
2
0,76
4,1
0,8
2
35
11
12
Clutch mobile disk
Hoisting motor
DESCRIPTION OF BRAKE FUNCTIONING:
When the core (3) is fed, magnetic force overcomes the action exerted by the springs (4), attracts the keeper (2) which
disengages the disk (6) and enables the shaft (1), which is dragged by the clutch, to rotate freely.
Upon power supply failing, the keeper detaches due to the action of the springs and generates a pressure on the fixed disk (5) thus
blocking, through the hub (1), the rotation of the shaft that is connected to the reducer.
DESCRIPTION OF CLUTCH FUNCTIONING:
The motor shaft (12) transmits its torque through the pressure exerted by the springs (10) between the body (9) and the disk (11) and
the slotted hub (1).
Springs’ power and number are calculated so as to allow the transmission of a torque equal to the nominal torque of the motor
increased by 25% - 60%.
As a result, in case of loads exceeding the one which the hoist can tolerate, the clutch will skid thus preventing all the mechanical
members below from undergoing abnormal stress.
This particular clutch guarantees a double protection for both the hook at minimum height and the overload on hoisting.
The clutch should only be used for brief periods of time (1 or 2 seconds) in order to avoid wear or overheating.
PERIODIC CHECKS OF THE BACO UNIT
After a year of service or in the event of poor braking it is advisable to verify the degree of wear and tear of the brake disk (6). Separate
the motor/clutch unit by working on the screws (8), remove the fixed disk (5) and check the degree of wear and tear of the brake disk
and the springs’ (4) functionality. Replace if the thickness of the disk’s braking band is less than 5 mm. Simultaneously to this
operation, verify the degree of wear and tear of the clutch by untightening the screws (7) and removing the locking ring.
For the clutch too, the friction surface minimum thickness should be 5 mm or higher.
CLUTCH SETTING
a) Discontinue power supply to the motor by acting on the
main line disconnecting switch.
b) Remove the lid from the motor fan
c) Remove the plastic cap located in the BACO’s neck
d) Introduce a 4 mm hexagonal wrench (14) into the hole
e) Using the fan, rotate the motor shaft in one direction till the
hexagonal wrench fits into the screw seat (13). Unscrew
the screw approx. two turns.
f) Using the hexagonal wrench, keep the BACO’s rotor still
and rotate the motor a few degrees by means of the fan.
Rotating the motor clockwise decreases the torque.
Anti-clockwise rotation increases the torque.
g) Tighten the screw back (13)
h) Pull the wrench out. Connect the hoist to the power supply
with great care (mind the fan) and run a test
i) If the result does not meet the requirement, start again from
a) till the required setting is achieved.
j) In the event of particular needs and settings, We would like
to remind you that YoYo hoists can be equipped with
“Motor-Sentry” electronic load limiter acting on the motor’s
ammetric absorption. In this case, the BACO will act as a
limit switch only.
36
LUBRICANTS
QUANTITY OF LUBRICANT
(with reference to the reducer) Kg
GO 71 type hoisting reducer: 0,7 Kg.
TYPES OF LUBRICANT
TYPE OF LUBRICANT
(valid for temperatures from -10° to +80° C)
ISO 3498
UNI 7164
MEMBERS TO BE LUBRICATED
AGIP
ROLOIL
ESSO
SHELL
TOTAL
MOBIL
BLASIA
220
ARM
EP 220
SPARTAN EP
220
OMALA
220
CARTER
EP 220
MOBILGE
AR630
OIL
(HOISTING REDUCER)
CC 220
TROLLEY REDUCER, WHEELS
GEARING AND HOISTING CHAIN
GR MU
EP 2
LITEX
EP 2
BEACON
EP 2
ALVANIA
EP 2
MULTIS
EP 2
MOBILUX
EP2
GREASE
XM2
HOIST
For use in aggressive environments use silicone grease or molybdenum disulfide grease once a week
All hoists are supplied complete with lubricant.
Hoisting and traveling reducers are supplied complete with a five years supply of lubricant.
All rolling bearings, the supports and the chain come already lubricated and therefore further lubrication prior to putting the machine
into operation.
“GO” SERIES HOISTING REDUCER
Disassembling this reducer it extremely easy; just remove the hoist limit switch and extract the reducer by slipping it off the shaft.
It is advisable to perform washing or oil change on the workbench.
Check the degree of wear of locking rings by verifying the presence of signs of seeping. In any case, it is advisable
to replace the rings every 5 years. Locking rings should be spread with sealant prior to being mounted.
37
SPARE PARTS CARD
REPLACE EVERY
Pos
QUANTITY
NAME
24
36
O
48
60
per machine
spares
O
1 set
1 set
O
1
1
1
1
1
1
1
Hoisting brake’s mobile disks
2
Brake’s magnetic core
3
Sprocket
O
4
Chain guide
O
5
Chain
6
Block
7
Trolley brake’s mobile disks
1
1
8
Trolley wheels
O
1 set
1 set
9
Wheels’ bearings
O
1 set
10
Trolley pinion
O
O
O
O
Clutch disks. Foundation frame
12
Trolley limit switch
13
Fuses
14
Transformer
15
Brake’s power supply bridge
16
Push button control pendant with cable
17
Trolleys for trolley line
O
i
O
1 set
O
O
O
1
1
i
1
1 set
3 sets
1
O
1
i
O
1
1
1 set
1 set
O
SCHEDULED MAINTENANCE (up to 60 months)
Check and maintenance
operations
Hoisting brake
1 year
(12 months)
O
Clutch
Chain
(1)
2 years
(24 months)
3 years
(36 months)
4 years
(48 months)
5 years
(60 months)
O
O
O
O
O
O
O
O
O
O
Chain guide
O
O
O
Travel limit switch
O
O
O
O
O
Push button pendant
O
O
O
O
O
Trolley wheels
O
O
Electrical equipment
O
O
O
Power line
O
Block
Slackening of structural elements
O
O
Motors
O
Hoisting reducer
O
Traveling reducer
O
Hoisting sprocket
O
O
O
O
O
(1) The chain must be replaced according to its degree of wear and tear. The mandatory periodical check is governed by the rules and regulations prescribed by the law.
38
SPECIAL USAGE MODES FOR YOYO HOISTS
Check once a week that:
•
The hoisting brake works properly
•
The clutch is efficient
•
The limit switches’ (if any) functionality
•
The push button control pendant and the relevant connections are not damaged
•
The hoisting chain is efficient and lubricated
CHAIN
The hoist’s chain undergoes constant stress; it is important to be familiar with this member so as to avoid any trouble, consequently:
• If the hoist operates in aggressive or abrasive environments lubricate with dry molybdenum disulfide aerosol lubricant.
• Where avoiding dripping is mandatory, use silicone grease.
• The chain life is determined by the lubrication degree as well as by the intensity of service. Lubrication and check operations should
therefore be proportioned to the hours of service.
• The chain should be checked by visually verifying the degree of wear according to the nominal values shown in the table
• Replace the chains in the event even only one link has stretched or worn by over 5%.
• Replace the chain in the event a stretching of over 2% on a length of 11 links is detected.
Chain Type: RB 80
Pitch
Nominal
dimension
tolerance
Tolerance
on
material’s
diameter
Pn
dn
7
Width
±0.3
21
0.4
1)
Working length
Internal
w3
external
W2
min.
max.
8.4
23.8
11 x pn
tolerance
1)
max.
231
1.1
DIMENSIONS OF HOIST CHAIN AND
LINKS
1 link’s central cross line
L multiple length of the pitch
P pitch
Dn Chain diameter as measured
Ds welding diameter
E length affected by the weld
W1 inner width at welding point
W2 outer width above welding point
1
Weld’s
diameter
ds
7.6
39
REPLACING THE CHAIN
If the chain vibrates or squeaks checking its efficiency is mandatory.
Should there be any doubts with regard to cracks, bucklings, wear, replace the chain and, preferably, the sprocket too.
• Remove the chain container and unhook the stop on the end of the chain.
• Connect the first link of the new chain to the last link of the old chain by means of a small flexible cable, then run the old
chain downwards.
• Please bear in mind that the side of the chain where the welding point is must be external with respect to the sprocket.
• Put the end stop and the chain container back into place.
40
YOYO HOIST HOISTING CHAIN’S CERTIFICATE
pewag austria GmbH
A-8605 Kaptenberg. Mariazeller StraBe 143
Phone: +43 (0) 3862 / 22 1 33-0 Fax: +
43 (0) 3862 / 22 1 33-700
[email protected]
www_pewag.com
Inspection Certificate acc. to EN 10204 3.1
Specifications according to
EN 818-1, EN 818-7
Customer
FAS S.P.A.
VIA DEI LAVORATORI 118
I
20092 CINISELLO BALSAMO (MI)
Order-No.: 3971PW/08
Certificate No.:
200803729118
7603300
Works Ref. No.:
Technical specifications of the chain:
Norm-Designation:
HE WN-G80 RAS- 7X21
GZN
Ident-No.:
11093
Surface:
ELECTRO GALVANIZED, BLUE CHROMATED, CONSERVED,
Stamp:
H16 DAT A
Additional information:
Pieces
Length
[m]
8
100
Weight
[kg]
Materia'
867
special steel
Nominai data
Working load limit
M5/M3
100011250
kg
Proof load min.
kN
40
Breaking load min.
kN
%
60
Elongation at rupture min.
Nominai diameter
10
d
mm
ds
it
mm
Pitch
Length of measurement
11 t
mm
231 +0,70/-0,40
Outside width
b2
mm
Max. 23,6
Inside width
bl
Max. diameter at the weld
Surface hardness
mm
mm
7 +0,101-0,10
7,5
21 +0,251-0,15
Min.
8,4
NV10 580-700
HV10
Hardness at the core
Case depth
mm
CA.380
0,21-0,35
Declaration of manufacturer:
We declare under our sole responsibility that the product to which this declaration relates is in conformity with the regulations of
98/37EG and its amendments. Applies for the use in load suspension devices only, if the latter also meets the regulations.
Kapfenberg, the
Result of test
WITHOUT ANY
OBJECTION
16.06.08
Quality department
i.A. Ing. Kurt Gaber
(acceptance representative)
This certificate was generateti by
computer and is valid without a
signature.
This test certificate must be kept far ten years resp. during the entire service life.
Rechtsform: Gese!Ischaft mbH, Stz: Graz
Firmenbuchnummer: FN 35 3031
Firmenbuchgericht: Landesgerichl Graz tOr ZAS
ATU 26809901, ARA-Lizenznr.: 1269 1SO
9001 zertilizierles Werk
Bankverbirdungerr
Raiffeiserilandeseank Sterermark, Ktn.-Nr.: 7441900. BLZ 38000
Swift RZSTAT2G. IBAN: AT 86 3800 0090 0744 1900
Rank Austria AG, Kto-Nr.: 760 131 807 00, BLZ 12000
SWIFT: BKAUATWW. IBAN: AT 15 1209 0760 1318 6700
41
WORKING CHECKS
-
-
Check that the voltage available corresponds to that indicated on the motor-rating-plates.
Lubricate the rope, the drum, the pulley groove, the rope guide-ring and the gears of the monorail trolley drive wheels without
contaminating the mono rail beam.
Check that the colored limit switch rod is in vertical position, up for monorail trolleys, down for bi-rail trolleys.
Once the connections with the power supply line are made, check that the direction of the movements corresponds to the symbols
on the push-button control panel, proceed as follows; push the "on" button and then one brief push on one of the lower buttons
check that the hook actually moves down. This is the only way for the limit switches to work regularly.
Otherwise invert two phases at the power supply.
Perform all movements in no-load conditions and record the setting of electric limit switches if necessary.
CLEANING AND LUBRICATION
Cleaning may be performed by not highly qualified personnel. The hook, block and push button control panel (or radio-control)
must be kept as clean as working conditions allow.
Any cleaning operation at height must be per formed by qualified personnel wearing the suitable personal protective
equipment.
Such operations must be performed within the scheduled periodical checks.
•
Cleaning may be performed using means, utensils and detergents or solvents normally employed for cleaning
industrial equipment.
•
Remove any foreign and soiling substances with the aid of vacuum cleaners, cloths etc.
•
Dry any oil and/or grease in excess that may be present on the machine’s parts.
The careful lubrication of the machine’s mechanisms is one of the conditions required in order to guarantee the
efficacy, efficiency and long life of the machine.
HOIST AND CRANE WITH HOIST
All cranes equipped with an electric hoist meant for service within Europe are supplied fully lubricated. Hoisting, trolley
traveling and bridge sliding reducers are filled with lubricant which is sufficient and suitable for at least 3 years of service.
All rolling bearings, ball supports and wire ropes are already lubricated and therefore further lubrication prior to starting up the
machine is not necessary.
Nevertheless, you are kindly requested to check reducers’ levels through the relevant indicator caps.
42
MAINTENANCE
To ensure good, long-lasting service, suitable maintenance on the various electromechanical parts of the machine is
essential.
The maintenance intervals given in the enclosed table apply to machinery working indoors in normal climatic conditions for an
average working cycle during which normal loads are lifted (rarely maximum load).
When the machine is outdoors, or only under a protective roof, or exposed to the elements or to a saline atmosphere it is
necessary to intensify maintenance, up to reducing normal intervals by half.
Pay attention to the following instructions:
•
Cut off the power supply by means of the main isolating switch
•
Employ specially appointed skilled personnel only
•
Comply with the maintenance intervals given in the table, shorten them for particularly intensive work cycles or if work
is carried out in severe environmental conditions (see paragraph above)
•
Follow the procedures given in our instructions
•
Only use original spare parts to replace worn ones
•
Always keep the machine clean using suitable products
•
Observe the life working limit and carry out a complete service on its expiry
•
Our company is ready to help or advise you at any time, and provide personnel to carry out maintenance duties.
TABLE OF LUBRICATING OILS OF THE MOST IMPORTANT BRANDS
* OIL
0
for ambient temperatures <-10 C
0
>80 C
* GREASE
•
•
•
•
•
SPARTANS EP220
GLYCOLUBE Range 220
0
for ambient temperatures <-10 C (mm -54)
0
> 80 C (max 120) BEACON
BEACON
Lubricants, solvents and detergents are toxic/injurious to health:
They may cause irritation if put in direct contact with the skin.
If inhaled they may cause serious intoxication.
Swallowing them may result in death.
They must be handled with care, using adequate personal protective equipment (e.g. gloves)
Do not disperse in the environment. Dispose of as toxic/injurious waste in compliance with local and national
regulations.
43
SCHEDULED MAINTENANCE
(up to 60 months)
NOTE
Staff members employed in the maintenance of the machine must:
•
Be properly trained
•
Be familiar with this user’s manual
•
Have an in-depth knowledge of accident prevention rules and regulations
•
All non-authorized personnel must keep outside the working area during operations
Before starting the machine after a breakdown event, the machine must be carefully inspected and checked in
order to detect any damages; start up operations must be performed anew.
Never interfere, unless specifically required for repairs, with the settings or the arrangement of the safety devices.
Tampering with them may result in serious damages to the machine.
When it is not needed, cut off power supply to the machine while performing maintenance operations on it.
Put up a notice saying: MACHINE UNDER MAINTENANCE – DO NOT CONNECT TO POWER SUPPLY.
Never cut off safety and protection devices fitted on the machine: should it be necessary to do so, display warning signs
inviting to operate with the greatest caution.
Always verify the existence and suitability of grounding connections as well as their compliance with rules and
regulations. Failure to ground electric equipment may result in serious injury to persons.
Avoid using flammable or toxic solvents (benzine, ether, alcohol, etc.) Avoid prolonged contact with solvents and inhaling
their vapors. In particular, avoid using them in the proximity of open flames.
Always make sure, before starting the machine, that maintenance men are at safety distance and that tools and
materials were not left on or by the machine.
Always use protective gloves while performing maintenance operations.
All accessible moving parts and transmission members, excluding the wire rope and block only, must be protected
against accidental contacts. Fit protections back into place before putting the machine back into operation.
In the event of a fire, never use water; disconnect all power supply and use suitable fire extinguishers.
Ensure the tools to be employed are in perfect conditions and have insulating handgrips, if required.
Pay the utmost attention to all RESIDUAL RISKS highlighted on board of the machine and in this user’s manual.
QUALIFICATION OF SERVICEMEN
In order to be in a position to properly perform maintenance operations on the machines and their accessories, maintenance
men must:
• know the laws in force with regard to accident prevention for maintenance operations on machines with motor transmission
and be capable of applying them;
• be able to use and refer to this documentation
• be involved in the functioning of the machine
• detect any irregularity and, if need be, take the necessary measures.
44
Authorized workers in charge of servicing hoists are:
THE OPERATOR EMPLOYED IN THE USE OF THE MACHINE
TYPICAL MAINTENANCE ACTIVITIES:
• verifying the correct functioning of the machine. Co-operation with members of the staff in charge of periodical
and/or extraordinary maintenance, upon timely notice given by the same operator in the event he/she detects an
anomaly.
• cleaning and lubricating the machine’s part he/she is usually in contact with (push button control pendant and hook)
and maintenance operations which do not require to work aloft (e.g. lubrication of the hook’s thrust block).
• Required technical knowledge:
• knowledge of the use and functions of the machine
• knowledge of lubricants employed on the machine and of the dangers connected to them
• Required qualification:
fitness for work with regard to specific operating and environmental characteristics.
MECHANICAL MAINTENANCE MAN
•
Typical maintenance activities:
•
•
•
•
•
adjustment of backlash of brakes and mechanisms
verification of the execution of movements and adjustment of safety devices
checking backlashes and wear and tear degree of components (wire rope, drum, pulleys)
replacement of components subject to wear (wire rope, rope guide, pulleys) according to this manual
ordinary maintenance of mechanic units and replacement of worn parts with original spares
• Required technical knowledge:
• good knowledge of mechanical hoisting and handling motor systems
• good knowledge of safety devices fitted on the machine (limit switches, brakes, load limiter, etc.)
• basic knowledge of simple electric control and adjustment technique
(adjustment of limit switches, replacement of fuses, connection of motors, etc.)
• knowledge of measuring and testing methods to establish the actual conditions of the machine
(verification of: brakes, degree of wear and tear of wire rope and hook, abnormal noisiness, etc.)
• methods of logical research of non complex breakdowns and evaluation of the results
• ability to organize the measures fit for bringing the machine back to its function and performance
• ability to draw up a maintenance operation report
• Required qualification:
• Full training as an industrial engineer complete with specialization and experience in servicing industrial hoisting
and handling systems.
ELECTRICAL MAINTENANCE MAN
•
Typical maintenance activities:
•
•
•
•
•
servicing electric equipment starting from functional diagrams
verification of the execution of movements and electric adjustment of safety devices
verification of wear and tear of electric components (contacts of electric equipment)
repair of electric units and replacement of worn parts with original spares
Required technical knowledge:
• good knowledge of electric equipment and installations
• good knowledge of electric components and safety devices fitted on the machine (limit switches, brakes,
load limiter, etc.)
• basic knowledge of simple electric control and adjustment technique (replacement according to
45
•
•
•
•
•
•
the original diagram of: motors, limit switches, push button panels, control boards, cables and wires, etc.)
basic knowledge of simple mechanic control and adjustment technique (verification of
wear and tear, adjustment of mechanic stops, etc.)
knowledge of measuring and testing methods to establish the actual conditions of the machine
(verification of electrical equipment’s efficiency and reliability)
knowledge of methods of research of breakdowns and failures and experience in electric control systems for
hoisting and handling machinery
ability to organize the measures fit for bringing the hoist back to its function and performance
ability to draw up a maintenance operation report
• Required qualification:
• Full training as an electrical industrial engineer complete with specialization and experience in servicing
industrial hoisting and handling systems
.
ELECTRO-MECHANICAL MAINTENANCE MAN:
He/she is an operator whose working profile, besides having the electrical serviceman’s typical characteristics, gathers and
epitomizes the technical competence and capacity required of a mechanical serviceman.
MECHANICAL ENGINEER
•
Typical technical activities:
• mechanical adjustment of safety devices, settings and tests (proof load tests)
• ordinary maintenance operations and replacement of complex and/or critical, with regard to safety,
mechanic components (reducers, motors, etc.)
• repairs of mechanical units following extraordinary maintenance (repairs of structural parts with welding
filling material, mechanical on board processing, etc.)
•
Required technical knowledge:
•
•
•
•
knowledge of mechanical industrial hoisting and handling systems certified by specific training
specific knowledge of safety devices fitted on the machine (limit switches, brakes, load limiter, etc.)
essential knowledge of electric control and adjustment technique (verification of motors)
specific competence with regard to measuring and testing for determining the actual conditions of
the machine (verification of: brakes, push button control pendant, limit switches, etc.)
• specific competence with regard to the methods of logic research for breakdowns and evaluation of the
results
• ability to direct the measures fit for bringing the machine back to its function and performance
• ability to draw up a maintenance operation report
•
Required qualification:
• Full training as an industrial mechanical engineer complete with specialization and specific competence in
hoisting and handling systems
ELECTRICAL ENGINEER
• Typical maintenance activities:
• electrical adjustment of safety devices, settings and tests (proof load tests)
• ordinary maintenance operation following the replacement of complex and/or safetywise critical
electric components (limit switches, motors, L.V. switchboard)
• repair of electric units following extraordinary maintenance operations (repair of electric
motors with partial replacements, replacement of limit switches with changes in the set-up, etc.).
• Required technical knowledge:
• extremely good knowledge of electrical installations and wiring on industrial hoisting and handling equipment
46
• specific knowledge of electric components and of the safety devices fitted on the machine (limit switches,
brakes, load limiter, etc.)
• experience in control and electric adjustment techniques (ability to operate on the original
diagram in order to make improvements to: limit switches, push button control pendants, control
switchboards, cables and wires, etc.)
• knowledge of the control and mechanic adjustment (verification of wear and tear degree, verification of the
performance of
the performance of mechanic components; adjustment of mechanic stops, verification of noise level, etc.)
• specific competence with regard to measuring and testing methods for determining the actual conditions of
the hoist (verification of electrical equipment’s efficiency and reliability)
• specific competence with regard to the methods of logic research for breakdowns and evaluation of the
results
on control electric equipment and check of hoisting equipment
• ability to direct the measures fit for bringing the hoist back to its function and performance
• ability to draw up a maintenance operation report.
• Required qualification:
• Full training as an industrial electrical engineer complete with specialization and specific competence in
electrical apparatus of hoisting and handling systems.
ELECTROMECHANICAL ENGINEER:
He/she is a highly qualified and specifically trained operator, whose working profile gathers and epitomizes, besides
the knowledge and competence typical of an electrical engineer, those of a mechanical engineer too.
Special recommendations with regard to maintenance:
1. 1. Maintenance operations, if performed correctly, guarantee the safety of operators employed in the use of the hoist and
reduce downtime following breakdowns.
2. A timely performed repair prevents the machine from further deteriorating.
3. Always use, as far as possible, original spare parts and products
4. Before putting the machine under maintenance, follow the instructions hereunder:
• The members of the staff employed in ordinary and extraordinary maintenance operations must have read and
fully understood all information included in this chapter and in chapter 3
• Extraordinary maintenance is only to be performed by authorized, qualified
and purposely trained personnel.
All maintenance operations should be performed, when possible, with the machine off and under
conditions of safety, using suitable tools and adequate individual protective equipment, according to the
indications of the rules and regulations in force, displaying a notice board reading: “MACHINE UNDER
MAINTENANCE”.
In the event of problems or to order spare parts, please contact Technical Assistance at Italkrane S.r.l.
MAINTENANCE SCHEDULE
The maintenance schedule includes ordinary maintenance, which consists of inspections, checks and verifications carried out
by the machine operator and/or by qualified personnel employed in the company and periodical maintenance, including part
replacement, adjustment and lubrication operations performed by technical staff which has been trained to the purpose by
means of specific classes or publications.
As maintenance operations may be performed at dangerous height from the ground, maintenance
staff members shall have recourse to adequate equipment (scaffolding, platform, ladders, etc.) allowing
them to safely perform their work.
Personnel members shall furthermore be equipped with the individual protective equipment
(I.P.E.) prescribed by the laws in force.
47
DAILY AND PERIODICAL MAINTENANCE
It includes maintenance operations which can be directly performed by the machine operator or by qualified personnel, as
prescribed in this publication and/or in papers herewith attached, which do no require the use of special tools or equipment.
Maintenance operations are divided into:
DAILY OPERATIONS, FOR THE CARE OF THE HOIST OPERATOR:
•
•
•
generic visual checks
functional verifications: motor check, limit switch check, brake test with no load, test of the “stop” button and
of other functions of the push button control panel
check of the conditions of wire rope and hook.
MONTHLY OPERATIONS, PERFORMED BY QUALIFIED PERSONNEL:
•
•
•
•
•
visual check of each mechanism and of lubricant leaks, if any
functional test of brakes with a full load
check for anomalous noises and/or vibrations
greasing of mechanisms and limit switches in order to ensure regular operations and limit their wear and tear
check of functionality and integrity of the push button control panel and cable thereof.
QUARTERLY OPERATIONS, PERFORMED BY QUALIFIED PERSONNEL:
•
•
•
•
•
•
•
•
•
verification of efficiency and wear and tear degree of: hook, wire rope and rope guide
verification of the wear and tear degree of drum and pulleys
verification of the wear and tear degree of wheels, pinions, traveling trolley’s and/or bridge’s guide rollers
verification of efficiency and functionality of load limiter
visual check of the switchboard’s inside to ascertain any presence of dusts
verification of oxidized contacts: after cleaning, they are to be covered with a very thin layer of a specific product
verification of greasing of traveling trolleys of the festooned line, if any, and check of cables
verification of the efficiency and integrity of the power supply line and of its components
verification of motors and brakes and check of their wear and tear degree
RECURRENCE AND DEADLINES OF MAINTENANCE OPERATIONS
The recurrence of the following operations refers to machines which are used under standard operation conditions and are
valid up to the M5 service group (ISO 4301/88 rule), or 2m (FEM 9.511 rule). If the hoist is normally and properly used on a
8-hour daily shift, its overhauling may be carried out after a period of use of 10 years approx. (FEM 9.755 – S.W.P. rule). If the
hoist is employed on more than one shift per day, maintenance intervals shall be reduced accordingly.
48
TABLE OF PERIODIC CHECK AND MAINTENANCE OPERATIONS
Notes
Periodic Checks
Object
Daily
Checks
Inspections - Tests
at page
Monthly
Generic visual
checks
Verification of
correct
functioning
Annual
General
Verification of
visual inspections
wear and tear
Annual test
Verification of efficiency and
wear and tear degree
Verification of bolted/welded
joints
Structural elements
Weldings
Pins and hinges
Lifting chain
Verification of efficiency
and wear and tear degree
Visual inspection
Fixing elements
Visual inspection
and verification
of spring catch
Hoisting
hook
Verification of efficiency
and wear and tear degree
Verification of efficiency
and wear and tear degree
Block sproket
Rotating sproket
Verification of efficiency
and wear and tear degree
Lifting sproket
Chain guide
Hoisting reducer
Verification of
noisiness
Traveling reducer
Hoisting motor
Verification of
Traveling motor
correct
Tests with load
functioning
Hoisting brake
Verification of
Traveling brake
correct
Tests
of braking
distances with load
functioning
Tests with load
Verification of wear
and tear degree
Wheels and pinions
Verification of wear
Guiding rollers
and tear degree
Buffers
Verification of wear
Trolley
and tear degree
Verification of
Wiring
Push button control panel and cable
correct
or radio-control
functioning
Visual inspection
of external breaks
of push button
control pane/cablel
Verification of wear
and tear degree
and efficiency
Tests with load
Load
Limiter (clutch)
Hoist limit switches
Verification of
Travel limit switches
correct
Slide limit switches
functioning
Cleanliness and
lubrication
Verification of the
correct
state of
cleanliness and
lubrication
Tests with load
Verification of wear
and tear degree
and efficiency
Inspection of
general lubrication
Verification of leaks.
Lubricate wire ropes,
hook and mechanisms
All operations must be logged in a check register prepared to this purpose.
Verification of setting
49
OPERATIONS TO BE PERFORMED
The long-life, economical use and efficiency of lifting equipment depend on the scheduled maintenance given in this table.
These are general maintenance procedures and should be considered the minimum requirement.
Naturally, reference to 60 months of scheduled maintenance doesn’t guarantee that the machine will work perfectly, in
addiction to maintenance other factors are important: appropriate use, the intensity of working cycle, and environmental
conditions.
We strongly advise compliance with the maintenance intervals given below, checks concerning parts subject to wear tear as
well as the consumption of lubricant.
IMPORTANT
Intervals between servicing should decrease when hoists and cranes are operating in extreme environmental conditions, or
have a high Duty Rating, (eg. Monthly instead of yearly checks).
EVERY
1 YEAR
(12
months)
COMPONENTS TO BE INSPECTED
REPLACEMEN VERIFICATIONS AND
TS
ADJUSTMENTS
LUBRICATIONS
BRAKES
Air Gap – Springs
Lining wear and tear
LIFTING CHAIN
Crushing, broken wires Cleaning and greasing
CHAIN GUIDE
Sproket clearance and
wear and tear degree
PUSH BUTTON CONTROL PANEL
Broken push buttons
and blocked terminals
WHEELS OF THE MONORAIL
TROLLEY
LIMIT SWITCH
Wear and tear degree
Toothing play
Pinion keying
Working order
Stop limits
Cleaning
Cleaning
Cleaning of sliding
surfaces and greasing of
the toothing
50
EVERY
COMPONENTS TO BE
INSPECTED
BRAKES
2 YEARS
(24 months)
LIFTING CHAIN
CHAIN GUIDE
PUSH BUTTON CONTROL PANEL
WHEELS OF THE MONORAIL
TROLLEY
REPLACEMEN
TS
VERIFICATIONS AND
ADJUSTMENTS
LUBRICATIONS
Air gap - Springs
Lining wear and tear
Cleaning
Crushing, broken wires
Cleaning and greasing
Sproket play and wear
and tear degree
Broken push buttons and
Cleaning
blocked terminals
Wear and tear degree
Cleaning of sliding surfaces
Toothing play
and greasing of toothing
Pinion keying
LIMIT SWITCHES
Working order
Stop limits
Oil top-up
HOISTING SPEED REDUCER
Oil leakage
Noise level
Oil top-up
TRAVELING REDUCERS
Oil leakage
Noise level
Shock absorber play
FLEXIBLE ELECTRIC CABLES
Insulation-broken
conductors
SWITCHGEARS
Working order
State of protections
51
EVERY
3 YEARS
(36 months)
COMPONENTS TO BE
INSPECTED
BRAKES
REPLACEMENTS
Brake linings for
bridge and trolley
hoisting
VERIFICATIONS
AND
ADJUSTMENTS
Air gap - Springs
Braking distances
LUBRICATIONS
Cleaning
Crushing, broken
threads
Cleaning and greasing
PUSH BUTTON CONTROL PANEL
Broken push
buttons and
blocked terminals
Cleaning
WHEELS OF THE MONORAIL
TROLLEY
Wear and tear
degree
Toothing play
Pinion keying
Cleaning of sliding surfaces
and greasing of the toothing
LIFTING CHAIN
CHAIN GUIDE
LIMIT SWITCHES
Rope guide ring
Hoist limit switches
Stop limits
HOISTING REDUCER
Wear and tear
degree of gearing
Oil change
TRAVELING REDUCERS
Wear and tear
degree of gearing
Oil change
SWITCHGEAR
Working order,
setting, protections
and timers
Cleaning
FLEXIBLE ELECTRIC CABLES
Insulation – broken
conductors
CONNECTING AND FIXING BOLTS
AND NUTS
Nuts locking
Hinge functionality
WHEEL UNITS FOR TROLLEY
TRAVELING
Position of pins
Wear and tear of
dampers
Working order
Terminal boards
ELECTRIC MOTORS
BLOCK
Wear and tear of
hook and sproket
Greasing of thrust bearings
ROTATING AND COMPENSATING
SPROKET
Wear and tear
degree and
flowability
State of supports
Cleaning
METALLIC FRAMES
Check of joints
State of the paint
FIXED ELECTRIC CONNECTIONS
Cable fixing
Blocked terminals
Insulation
52
EVERY
4 YEARS
(48 months)
COMPONENTS TO BE INSPECTED
REPLACEMENTS
BRAKES
Servo brake
LIFTING CHAIN
Wire rope
VERIFICATIONS
AND
ADJUSTMENTS
Air gap - Springs
Wear and tear of
linings
LUBRICATIONS
Cleaning
Cleaning and greasing
Sprocket play and
wear and tear
degree
CHAIN GUIDE
PUSH BUTTON CONTROL PANEL
Push button control Maneuvering
panel and cable
directions
WHEELS OF THE MONORAIL
TROLLEY
Wheels, pinions,
bearings
Wear and tear
degree
Toothing play
Pinion keying
Cleaning of sliding surfaces
and greasing of the toothing
LIMIT SWITCHES
Working order
Stop limits
HOISTING REDUCER
Oil leakage
Oil top-up
TRAVELING REDUCERS
Oil leakage
Oil top-up
SWITCHGEAR
Working order,
setting, protections
and timers
Cleaning
FLEXIBLE ELECTRIC CABLES
Insulation – broken
Cleaning
conductors
CONNECTING AND FIXING BOLTS
AND NUTS
Nut locking
UNITS FOR TROLLEY TRAVELING
Reducer dampers
Cleaning
ELECTRIC MOTORS
Working order
Terminal boards
BLOCK
Wear and tear of
hook and sproket
ROTATING AND
COMPENSATING SPROKET
Wear and tear
degree
METALLIC FRAMES
Check of joints
State of the paint
FIXED ELECTRIC CONNECTIONS
Cable fixing
Cleaning
ALWAYS REQUIRE OUR HOIST FOR YOUR UNIT
53
EVERY
5 YEARS
(60 months)
COMPONENTS TO BE INSPECTED
REPLACEMENTS
BRAKES
Crushing, broken
threads
LIFTING CHAIN
Drum play and
wear and tear
degree
Broken push
buttons and
blocked terminals
Wear and tear
degree
Toothing play
Pinion keying
CHAIN GUIDE
PUSH BUTTON CONTROL PANEL
WHEELS OF THE MONORAIL
TROLLEY
LIMIT SWITCHES
VERIFICATIONS
AND
ADJUSTMENTS
Air gap - Springs
Wear and tear of
linings
Limit switches
of trolley
LUBRICATIONS
Cleaning
Cleaning and greasing
Cleaning
Cleaning of sliding surfaces
and greasing of the toothing
Stop limits
HOISTING REDUCER
Wear and tear
degree of gearing
Oil top-up
TRAVELING REDUCERS
Wear and tear
degree of gearing
Oil top-up
SWITCHGEAR
Transformer
Functionality
Setting, protections
and timers
FLEXIBLE ELECTRIC CABLES
Insulation – broken
Cleaning
conductors
CONNECTING AND FIXING BOLTS
AND NUTS
Locking of nuts and
of fixing members
UNITS FOR BRIDGE SLIDING
Wheels’ bearings
Position of pins
Wear and tear of
dampers
Cleaning
Functionality
Terminal boards
ELECTRIC MOTORS
BLOCK
Sprocket
Bearings
ROTATING AND
COMPENSATING SPROKET
Sprocket
Bearings
METALLIC FRAMES
Check of joints
State of the paint
FIXED ELECTRIC CONNECTIONS
Cable fixing
Greasing of thrust bearings
and bearings
Cleaning
54
AUTHORIZED PERSONNEL FOR OPERATIONS IN THE EVENT OF BREAKDOWN
Personnel authorized to operate in the majority of breakdowns, or where not otherwise indicated, are maintenance men who are
experienced or qualified through a specific training on mechanical and electrical parts. Where indicated, operations must be
performed by specialized, or specifically trained, staff members or by technical staff sent by the manufacturer.
BREAKDOWN
The machine does not work.
If, when control push buttons are pressed, the machine does not work:
•
Do not insist pressing push buttons
•
Check main or auxiliary fuses are not loosened or blown
•
Check limit switches, as some contacts may have remained open
•
It is possible that a conductor inside the push button control panel's cable is interrupted due to crushing caused by
transportation or assembly
•
The brake is jammed for lack of power supply; check the brake’s functioning separately from the motor’s
•
If disk brakes vibrate excessively it means that:
a) they are fed with two phases only
b) feeding voltage is too low
c) the air gap between magnetic parts is too large.
•
The push button control panel is faulty
•
The low voltage transformer is blown (check the output voltage)
•
If the crane has a tendency to start and then stop, it is possible that one of the bridge motors has two phases which are
inverted with respect to the other motor
•
If the bridge tends to go out of square or one of the wheels to get over the rails:
a) one of the motors is not working properly
b) one of the two brakes is jammed
c) one of the driving wheels does not touch the raceway (verify tolerances on raceways).
•
The hoist can not lift the nominal load, has trouble getting started, does not resume the suspended load:
a) the power supply line is under-dimensioned, voltage drops by over 8%.
b) voltage is to be checked between the phases at the starting of the hoisting motor
c) the hoisting motor is not connected properly (check the terminal board).
Repair
Operating modes in the event of emergency:
•
If one of the hoisting brakes has a faulty servo brake:
a) manually loosen the braking action and let the load down very slowly and with the greatest caution
b) if the system has two working speeds, let the load down using the active one
•
If one of the bridge sliding motors is stalled:
a) in the event either the servo brake or the feeder are faulty, loosen both brakes and use the crane with the
greatest caution
b) if one of the motors is blown, remove the faulty motor reducer by slipping it off the hollow shaft and
provisionally use the crane, with great caution, at the lowest available speed and, if possible, with the load
nearer to the efficient motor.
In both cases, have the machine fully repaired as soon as possible.
In the event of breakage regarding which no qualified hands are available, do not hesitate to contact us for
assistance.
ME
55
WHAT TO DO IF
FUNCTION
BREAKDOWN
Hoist
lifting
Does not start
Does not start
Does not start
Possible cause of breakdown
traveling
X
•
•
•
•
•
•
hoist/lower limit switches
hoisting/lowering contactor
hoisting/lowering push button
load limiter
hoist motor
Hoisting motor fuses
X
X
•
•
•
•
•
hoist/trolley power supply cable
power supply line
low voltage transformer
line contactor
line fuses
X
•
•
•
•
•
left/right limit switches
left/right contactor
left/right push button
trolley motor
traveling motor fuses
-
starts partially
(in one direction only)
Trolley
• limit switch, contactor or push button of the
inhibited function
(independent from one another)
• One phase loss
X
X
the movement does not finish
in the due distance
X
besides, the load
slides down
and is not held
X
the movement does not finish
within the due limits
X
X
• function brake
• function limit switches
• faulty direction push button
• relevant contactor
• “false contact”
• function brake
the movement
continues in its function
also
after releasing the relevant
push button
X
X
hoisting reducer
excessively
noisy
X
-
trolley reducer
excessively
noisy
-
screeching brake
screeching noise
during braking
screeching wheels
(jerk motion)
X
X
• scarce lubrication
• service off cycle
• clearance between wheel and girder’s flange is
too narrow
• scarce lubrication
• not correct/excessively intensive service
• presence of dust
• excessive clearance
• worn out braking lining
X
-
screeching lifting chain and/or
sprokets
X
X
• wrong clearance between wheel and girder's
flange
• scarce lubrication
• not correct/excessively intensive service
-
• worn out wire rope or drum/pulleys
• scarce lubrication
• not correct/excessively intensive service
• non correct contact between rail and wheel
• non aligned joints of sliding beam
the hoist bumps during
traveling
-
X
the hoist and/or trolley move
slowly or the hoist
has difficulty lifting the load
X
X
electric current in the hook
X
-
• faulty or damaged wiring
-
X
-
• clearance between wheel and girder’s flange is
too narrow
• obstacle on the girder’s flange
• oil and grease on the girder's flange
the trolley skids on the rails
and does not travel
•
•
•
•
voltage drop
overloading (in the absence of the load limiter)
beginning of reducer seizing
non correct contact between rail and wheel
56
BREAKDOWN OF COMPONENTS AND POSSIBLE REMEDIES
Causes of poor functioning of single parts and possible remedies
Type of breakdown
Possible causes of breakdown
Possible remedy
the wire rope ascends “jerkily” and
screeches
• breakdown of the lifting chain and/or sprokets
• scarce lubrication
• replace the lifting chain and, if necessary, the
sprokets
• lubricate the lifting chain , and the sprokets
brake skidding
• wear and tear of the braking lining
• presence of oil/grease
• adjust the clearance or replace the lining
• clean the lining
• non correct service
• restore the correct working conditions
Overheating brake
• wrong adjustment
• it works in unsuitable environmental conditions •
the brake does not unlock
• lack of power supply
• wrong adjustment
adjust the brake
• restore voltage values
• adjust the brake
the brake tends to “stick”
• it works in unsuitable environmental conditions • restore adequate conditions
o off service condition
the limit switch is locked open
won’t restore
• clogged activating head
• incorrect correspondence
• interrupted connections
the control panel push buttons are
locked “closed”
• clogged push button control panel
• cleaning
• check conductors
contactors have “glued”
contacts
• use in unsuitable environmental conditions or
for not intended service
• restore right use conditions
the motor is too hot
• voltage fluctuations are > 10%
• poor cooling
• environmental temperature > to the one
expected
• the hoist usage does not conform to the
service condition
provided for
• blown fuses or not adjusted thermal
the motor does not start
• provide the right voltage
•
restore the correct air circulation
adapt the motor’s characteristics
• adapt the service conditions to the ones provided
for
• replace the fuse and/or adjust the thermal
• the contactor interrupted the power supply
• check the function’s contactor
• overloading, blocking due to high starting
frequencies,
• rewind the motor and guarantee a better
protection
insufficient protection
• upon starting, the voltage or the frequency
become lower
the motor has difficulties starting
• clean it and restore right conditions
• check the switchgear
•
improve the power supply line or network
conditions
than their nominal values
• faulty winding, the rotor touches the stator
• have a qualified technician making the repair
the motor buzzes and absorbs
too much current
short circuit in the motor’s winding
false contact
• the power supply lacks one phase
•
check the power supply and/or the contactor
• the motor reducer is blocked
• the brake is blocked
• request a qualified technician’s intervention
• check and, if necessary, adjust the brake
• short circuit in the power supply cables
• short circuit in the motor
•
eliminate the short circuit
• request a qualified technician’s intervention
• falty winding
• rewind the motor
• accidental activation of the function
• check push button control panel conductors
57
PUTTING THE MACHINE OUT OF OPERATION
The machine must be immediately put out of operation in face of the following negative events:
• Cracks in the plates or weldings, due to stress and fatigue.
• Permanent deformations of the main structure or of structural elements, due to overloading or external factors
• Deformations caused by collisions due to the action of the wind.
• Break in the chain guard of hoisting or traveling reducers.
• Destruction of the braking linings of the hoisting brakes
• Stretching of the wire rope or breaking of the pulleys caused by overloading, anchoring of the hook to fixed structures,
collision of the block against the machine body.
• Breaking of the reducer/drum shaft or of the motor coupling or shaft.
• Heavy wear and tear of hoisting gears.
• Hoisting brake inefficiency due to faulty relevant servo brake.
DISMANTLING, DISPOSAL AND SCRAPPING
• The demolition of the machines and of all the accessories thereof must be performed using suitable tools and equipment
chosen taking into consideration the nature of the material involved (oxy-hydrogen flame, hacksaws, etc.)
• All components or parts must be reduced to pieces of dimensions which are such as to make their future use impossible.
• All materials, following their dismantling and scrapping, must be disposed of separately taking into careful consideration
their different nature (metals, plastics, lubricating oils, etc.) entrusting their disposal, where possible, to qualified
companies and always in full compliance with the relevant provisions of the law in force.
SPARE PARTS TABLE
POS.
REPLACEMENT
EVERY MONTHS
NAME
24
1
Hoisting brake friction linings
2
Hoisting servo brake
3
Chain guide
Recommended
stock
x
1 set
1 set
x
1
1
1
1
48
60
x
Lifting chain
7
Friction linings of the trolley brake
8
Monorail trolley wheels
9
Monorail wheel bearings
10
Pinions for monorail trolley
11
Traveling unit dampers
12
Hoist limit switch
12
Trolley limit switch
13
Fuses
x
x
x
x
x
x
Transformer
15
Push button control panel
Trolleys for push button control
panel line
Trolleys for trolley line
x
x
x
x
1
1
1 set
1 set
1 set
1 set
Disks or shoes
Electromagnetic or
Electro-hydraulic
For hoists only
Disks or shoes
1 set
x
14
17
x
NOTES
Per machine
x
4
16
36
QUANTITY
2
2
1 set
1 set
1
1
1
1
1 set
3 sets
1
1
1
1 sets
3
1 set
2
18
Trolleys for general line
1 set
2
The chain must be replaced according to its degree of wear and tear or broken threads. The mandatory periodical check is governed by the
rules and regulations prescribed by the law.
Always use Italkrane original spare parts!
58
ELECTROMAGNETIC “BABY” DISK BRAKE IN STANDARD OR EXPLOSION-PROOF EXECUTION –
DIRECT CURRENT FEEDING
BRAKE
When power is supplied to the brake, the electromagnet (3) is energised overcoming the pressure exerted by the springs (4) by
means of the floating keeper (2), in so doing freeing the friction disc (6) and allowing the motor shaft to rotate freely. When the
electric power to the brake is interrupted, the electromagnet (3) being de-energised enables the springs (4) to re-exert pressure
on the brake disk via the floating keeper (2), thus stopping rotation of the motor shaft.
This arrangement referred to as "Fail Safe" means that with the power on, the brake is released, and with the power off, the
brake is automatically applied.
MAINTENANCE
After the unit has been in service for a maximum of 12 months, or should a reduction in braking efficiency be detected, the
brake disc (6) must be checked for damage or excessive wear.
The following sequences should be applied:
A)
Disconnect brake feeder cable at motor terminal box.
B)
Remove brake cover (7).
C)
Carefully remove electromagnet (3) and keeper plate (2) from the location pins, leaving spacers (9) in position.
D)
Remove the mobile disc (6) and with a Micrometer check the thickness, if less the 5 mm, it should be replaced.
E)
Whilst the electromagnet is removed, examine all brake springs (4), if there is any sign of spring fatigue, all springs
should be replaced.
F)
When re-assembling it is important that the brake feeder cable is not trapped or in any way the insulation damaged.
1
2
3
4
5
6
7
8
9
10
11
12
FIXED DISK
FRICTION DISK
PINION HUB
MOBILE DISK
SPACER
ASSEMBLING SCREW
FIXED DISK
WINDING
FAN
CAP
MAGNETIC CORE
SPRING
IMPORTANT
From the aforementioned it will be apparent that by reducing the quantity, or the rating of the springs, the
torque and the subsequent efficiency of the brake can be affected.
NEITHER THE QUANTITY NOR THE RATING OF THE SPRINGS SHALL BE ALTERED WITHOUT THE
MANUFACTURES APPROVAL; THE SAME APPLIES TO ANY OTHER COMPONENTS.
59
INSTALLATION AND SETTING OF TRAVEL LIMIT SWITCHES
Roller limit switch
Cross limit switch
Examples of adjustable (single or double peg) actuators for limit switches, to be used with cross limit switches.
Cross limit switch in “EX IIB” execution
Lever limit switches in “EX IIC” execution”
60
POSITIONING SLIDE ACTUATORS FOR LEVER LIMIT SWITCHES
(Optional) Slide actuators are of the adjustable kind. They are adjusted by making them slide along the guide
SLIDE
GUIDE
SLIDING
First of all, secure the guide to the fixed structure (e.g. raceway) where the machine is installed.
FIXED STRUCTURE
FIXING SCREWS
Position the actuator so that the crane moves slowly toward the end stop.
When the buffer is approx. 50 mm from the mechanical stop, the hoist must stop as a result of the action of the limit switch.
61
LEVER
ROLLER
A=50 mm APPROX
62
RECOMMENDED MINIMUM SAFETY DISTANCES TO BE OBSERVED DURING THE
ADJUSTMENT OF THE HOIST-LOWER LIMIT SWITCHES
FOR EMERGENCY
HOISTING
PLEASE NOTE
When the emergency limit switch is open, it is no longer possible
to operate the crane using the normal controls.
Therefore it is necessary to continue in one of two ways:
·
act on the line contactor manually and at the same time
lower the hook a few centimetres;
·
by-pass the emergency limit switch contacts temporally and
lower the hook.
·
find out why the "hoisting" contact did not work, repair the
fault and re-set the limit switch.
LOWERING
All limit switch setting operations and re-setting safety-gaps must be carried out by specialised electricians
authorised by respective section heads.
63
SETTING OF THE "TER" TYPE WORM SCREW HOIST LIMIT SWITCHES
This series of limit switches is made up of a case
containing a worm screw unit and micro-switches. ]t is
directly driven by the rope drum axle to which it is
connected by means of a plastic coupling or an hexagonal
shaft.
Removing the cover the cams of the micro-switches can
be seen.
The cam can be released by loosening the central screw;
with lateral screws 1 - 2 - 3 place the cams in the exact
position for opening the contact relative to the two working
directions.
Re-tighten the central screw and carry out a few lifting
manoeuvres as a final test. If there is a cam for the
emergency contact, which acts on the line contactor
switch, there should be a slight delay compared to the
"hoist" contact.
The contacts must be set in the following order;
emergency, "hoist" and then "lower".
Make sure the central screws are tight and then carefully
shut the case.
(To be carried out by a qualified operator)
E
Emergency micro switch
S “Hoisting” micro switch
D “Lowering” micro switch
SETTING OF THE “BOX 0A” TYPE WORM SCREW HOIST LIMIT SWITCH
(to be carried out by a qualified operator)
For setting operations, please refer to the instructions for TER type limit switch
Central screw
Screws
open
S hoisting contact
D lowering contact
CAMS
D
1
S
2
64
STANDARD VERSION SPA SERIES PUSH BUTTON CONTROL PANEL
65
CHIEF SYMBOLS
(in compliance with FEM 9.941/95 “Control Symbols”)
“Ex” EXECUTION “FLY” SERIES PUSH BUTTON CONTROL PANEL
IP66 MECHANICAL PROTECTION GRADE
II 2GD EExd IIB T6 EXPLOSION-PROOF EXECUTION
**
ENVIRONMENTAL TEMPERATURE -20°C/+55°C
66
SAFETY RULES FOR CRANE OPERATORS
•
•
•
•
•
•
•
•
•
•
Only qualified crane operators shall use the crane.
Before beginning work make sure that runways are clear. Check limit switches and inform the Section Head immediately if
there are any problems.
Never lift loads exceeding maximum capacity or not properly slinged. Consult data given on the crane.
Never start operating until starting signal is given, by the operators assistant or rigger.
Do not swing the load. Always unload in line with by the operators assistant or rigger the vertical path.
Do not lift or transport over working and transit areas. When this is absolutely unavoidable operations must be signalled.
Before leaving its position the crane-operator must ensure that no loads are left suspended, switch off the power supply and
set the controls to zero.
Never leave anything on the gangway. The driver's cab must be kept clean and clear of inflammable material. When the
crane is out of service for repair or maintenance, switch off the main power supply, and display notice to this effect.
After work and during breaks out-door service gantry or similar cranes must be clamped with tongs or other devices.
When the crane power supply flexible cable runs along the ground make sure no damage occurs to it.
SLING CAPACITY
STEEL SLINGS WITH FIBRE
CORE – res. 180 Kg/mmq
Ø
D
I
A
M
E
T
E
R
ALLOYED STEEL CHAIN SLINGS
GRADE 80
Ø
DIAM
E
T
E
R
800
1.000
1.600
2.000
2.560
3.000
3.840
24
6.000
4.800
26
6.600
5.000
28
8.000
30
9.000
32
10.100
36
12.600
40
15.500
M
A
T
E
R
I
A
L
W
I
D
TH
1.300
920
7
1.200
960
1.680
2.500
SF1
1.000
800
2.000
1.400
50
1.350
2.000
2.800
4.000
5.000
6.400
8.000
9.600
1.410
2.000
2.800
3.500
4.500
5.650
6.750
10
13
16
20
22
26
32
2.500
4.000
6.400
10.000
12.000
16.000
25.000
2.000
3.200
5.120
8.000
9.600
12.800
20.800
3.500
5.600
9.000
14.000
16.800
22.400
32.000
5.250
8.400
13.500
21.000
25.200
32.000
50.000
SF2
SF3
SF4
SF5
SF6
SF8
SF10
2.000
3.000
4.000
5.000
6.000
8.000
10.000
1.600
2.400
3.200
4.000
4.800
6.400
8.000
4.000
6.000
8.000
10.000
12.000
16.000
20.000
2.800
4.200
5.600
7.000
8.400
11.200
14.000
62
75
100
150
225
300
1.600 1.280
3.200
3.200
1.800 1.440
3.600
3.600
2.500 2.000
5.000
5.000
3.250 2.600
6.500
6.500
4.500 3.600
9.000
9.000
6.000 4.800 12.000 12.000
SAFETY COEFFICIENT = 6
12.000
8.500
SF12
12.000
9.600
24.000
16.900
50
900
SF15
15.000
12.000
30.000
21.200
62
SF20
20.000
16.000
40.000
28.200
75
SF25
25.000
20.000
50.000
35.300
SF34
34.000
27.200
68.000
47.900
13.200
9.330
16.000
11.300
18.000
12.700
20.200
14.280
25.200
17.800
31.000 22.000
SAFETY COEFFICIENT = 6
SAFETY COEFFICIENT = 6
SAFETY COEFFICIENT = 6
1.080
2.700
2.700
720
1.800
1.800
1.100
880
2.200
2.200
1.350
1.080
2.700
2.700
100
1.800
1.440
3.600
3.600
150
2.250
1.800
4.500
4.500
200
2.700
2.160
5.400
5.400
POLYESTER
650
1.000
1.400
2.000
2.500
3.200
4.000
4.800
T
Y
P
E
FLAT SLINGS
POLYAMMIDE OR
NYLON
8
10
12
14
16
18
20
22
POLYESTER RING SLINGS
SAFETY COEFFICIENT = 6
CAPACITIES REFER TO NEW SLINGS WHEN MILTIPLE FALL SLINGS ARE USED THE MAXIMUM ANGLE AT THE APEX
WHERE THE FALLS ARE OPENED WIDEST MUST BE TAKEN INTO ACCOUNT IT IS NOT ADVISABLE TO USE SLINGS
WITH THE APEX ANGLE OVER 120°
67
SAFETY RULES FOR LOAD SLINGING
Given the ever increasing use of hoisting equipment for handling materials, the issue of load slinging is becoming more and more
important.
The personnel members employed in such operations must be informed of the specific hazards to
which they are exposed or to which they may expose other workers.
Loads which can be connected directly to the hook of a hoisting machine are rare. Flexible means
such as chains, wire or textile ropes, are used in most cases. Particular attention must be paid to their
capacity, as ropes and chains used for slinging and hoisting loads are subject to neglect and to
service conditions which are a lot harder than those which hoisting machines are subject to.
Depending on the inclination of the sections the sling consists of, the force acting on each of them,
with a 1,000 Kg load, ranges from 500 Kg (vertical slings) to 1,932 Kg (150° inclination), as shown in
Picture 1.
Picture 1 – inclination of sling sections and acting forces.
Operation: LOAD HANDLING
LOAD HOISTING EQUIPMENT
If the weight of the load can not be equally divided among several slings, and it is necessary that a
single sling is fit to support the entire load, while the other slings shall grant stability to the load
(picture 2).
Picture 2 – Sling supporting the load and sling giving it stability
The slinging means (ropes, chains and straps) must be positioned at the bottom of the hook
saddle, never resting them on the tip, and no knots must be made to shorten them. Making hooks
work on the end tip is forbidden.
Please be reminded that if two ties cross on the same hook, one of them does is idle
and they will both wear in the point where they overlap (picture 3).
Picture 3 – Crossed ties
If the load is uneven or has corners and sharp edges which may damage ropes or chains, wood
or rubber distance blocks shall be interposed to
avoid damages.
(Picture 4).
Picture 4 – Distance blocks to avoid damages to the rope
or chain
Examples of protection of sharp corners
and edges
68
Wire rod ties, which hold bundles of bars or pipes, must not be used to hoist those same bundles.
Once the load is slinged, check its balancing by slowly hoisting the load by a few centimeters. The suspended load must never be
guided by hand, but only with ropes or hooks. The non-intervention of protections and of safety equipment or wrong maneuvers or the
incorrect use of PPEs may result in the following hazards
CRUSHING
SPECIFIC SAFETY REQUIREMENTS
The appropriate specific safety requirements for load hoisting machinery are listed hereunder:
•
•
•
•
•
•
Maximum admissible capacity must be displayed on all hoisting equipment (not including hand operated ones) and hooks.
Hooks must be fitted with safety catches or be shaped so as to prevent ropes, chains or other slinging apparatus from
coming unhooked.
Ropes and chains of hoisting machines must be checked every quarter by qualified
staff, and be registered on the appropriate page of the matriculation-book.
Load hoisting and hoisting-moving maneuvers must be designed so as to prevent
suspended loads from traveling above workers and places where the load fall might
be dangerous. If such transit is unavoidable, load hoisting and/or handling
maneuvers must be timely announced by appropriate and dedicated signals in
order to allow, where possible, people to move away from the area where they
might be exposed to danger if a load fell down.
Hoisting and handling machines must be fitted with braking devices which can
guarantee a prompt stopping and a stand still position of load and machine and,
when required for safety purposes, guarantee a smooth stopping.
When a black-out might endanger people, hoisting machines must be fitted with
devices which will cause both the load and the machine to stop automatically.
However, the stopping must always be smooth in order to avoid excessive stress as
well as to prevent the stability of the load from being compromised by dangerous
swinging.
Further and/or different safety requirements may be prescribed for a machine and the above information are therefore to be
considered neither exhaustive nor mandatory.
•
•
Motor operated elevators must be built so as to work with the motor engaged even while lowering
While using hoisting and handling machines, the necessary measures in order to guarantee the stability of the machine and
of its load, depending on the type of machine, on its speed, on accelerations at starting and stopping and on the
characteristics of the route.
CHIEF BEHAVIOR RULES FOR WORKERS AND PROCEDURES
Each worker shall pay the greatest attention during operations, following the instructions supplied by the employer, by managers and
by the persons in charge as well ass the information contained in the user’s manual of the machine.
CHIEF ACCIDENTS
The notes hereunder do not ensue from statistical data, which at the moment are not available, but from experiences collected in
factories and among people working in this field.
69
DIAGRAM FOR THE SELECTION OF CROSS SECTIONAL AREA OF THE FEEDING CONDUCTOR
Starting Current
(voltage drop 5% - COS ϕ 0.8)
LINE LENGTH (m)
THERMAL CAPACITY OF CONDUCTORS ACCORDING TO FEM 1.001 RULES AND REGULATIONS
Cross section of each
conductor
mm
2
1,5
Accepted intensity for insulated conductors at a temperature of 40°C
for a service factor of:
100%
60%
40%
A
A
A
18
18
20
2,5
26
26
30
4
34
34
40
6
44
44
50
10
61
61
75
16
82
87
105
25
108
120
145
35
135
145
175
50
168
180
210
70
207
240
270
95
250
270
330
120
292
310
380
150
335
350
430
70
Round and flat armored cables
NAMEPLATES
HOIST-WINCH
71
INSTRUCTIONS FOR MAINTAINING MACHINES IN GOOD RUNNING ORDER WHEN INOPERATIVE
When, due to particular applications, service is irregular or perhaps the machine remain inoperative and stationary in an especially aggressive area the
follow measures should be taken:
•
•
•
Put the machine through all its movements every day, completing at least 3 working cycles, even with no load.
Check the condition of the limit switches every 15 days. For limit switches made up of micro-switches arranged along the drum
and for the travelling, pins, saddles and moving joints must be lubricated using water-repellent silicone-based Vaseline. Also
check that the mechanical parts are moving easily. After this carry out a practice no-load test with the proper care.
The push-button control panel should be kept covered, protected from humidity and dust in a vertical upside - down position.
(Otherwise, not with standing the cable glands, water will get in through the hanging cable).
EVERY MONTH
•
•
•
•
•
•
Check the condition of the disk or shoe brakes; clean and lubricate the moving joints of the latter.
Check and lubricate any monorail trolley unprotected gears.
Clean all mono rail lower flanges and gantry rails.
Remove all dirt, grease, oil sand or oxidation dust, from all rotating parts with particular regard to auxiliary units (levers, small
pistons, pin axles).
After having opened the containers spray all electric component with appropriate specific lubricants and water-repellents.
Check that anti-condensation heaters are working properly and the relative thermostat is not worn or inefficient. For this
purpose it is essential that the main isolating switch, placed at the beginning of the feeding point, always stays "on".
ANTI-OXIDIZING PREVENTION PROCEDURE
All unvarnished machined surfaces, both internal and external, must be cleaned, dried and coated with rust preventer, which will
guarantee a protective coat for at least 12 months, on condition that it is not burned, dissolved or mechanically removed
•
•
•
For external surfaces, the anti-rust treatment is made with a compact coating of high-quality anti-corrosive agent
For machined surfaces inside an assembled unit, the anti-rust treatment will be of a type which does not require to be
removed before using the machine
Admissible methods for applying anti-rust treatment are: spray, brush, by filling, etc., through all available openings or
disassembling, if necessary, the parts to coat completely and protect all internal machined surfaces. Particular care must be
used with all the open surfaces of rolling and sliding bearings, so that they are completely coated
Paints and Protective Substances
Finished surfaces subject to oxidizing or corrosion must be coated, by spraying, brushing or dipping, with an easily removable
protective substance against water and hydrocarbons, which is fully compatible with materials and surfaces to be protected.
No anti-rust protective substance can be used on electric parts such as switches, rotors, distributors, brushes, terminals, connectors
or other non-metal parts such as friction disks, brakes, rubber, plastic, fabric or leather. When the anti-rust substance precludes the
use of such components, make sure it is completely dry before assembling the latter.
All protected surfaces must be isolated from touching wood or other hygroscopic materials by means of wax or polyethylene sheets or
other similar products. In special cases, impregnating paper may also be used for coating surfaces and materials subject to corrosion.
Such products have the advantage of being easily and quickly removed.
If the protective coat breaks it must be restored to allow storage of goods to continue. Rust preventer must be of a type which can be
removed using mineral turpentine.
•
Machined surfaces must be cleaned using petroleum based solvents and dried before applying the rust preventer.
Usually, the rust preventer is not applied on metals which are intrinsically resistant to corrosion, such as:
• Copper, nickel, brass, or other corrosion-resistant metals or alloys
• Surface-treated metals or zinc, nickel or tin coated metals.
• If there is the possibility that the anti-rust products gets in contact with non-steel materials, it is necessary to accurately
select the most suitable rust preventer based on the effects it may have on those same materials.
However, the direct contact between a steaming rust preventer and non-ferrous metals (with the exception of aluminum
and its alloys) must be avoided.
72
Hoists
(1)
(2)
(3)
(4)
Clean shafts, joints and other exposed machined surfaces using solvent and coat them with an anti-rust product.
Keep bearings greased if they are not of the “life lubricated” kind.
Clean loading chains and steel wire ropes and coat them with a suitable lubricant.
Lubricate pulleys, pinions and sprockets applying grease on their teeth and grooves.
PRODUCTS AND MANUFACTURERS
SHELL
MOBIL
VALVOLINE
AGIP
ENSIS FLUID-S
METAL GARD 360
TECTYL 502 C
RUSTIA 81
-
-
TECTYL 846
-
APPLICAZIONE SU
MACHINED MECHANIC
COMPONENTS
SHIPMENTS BY SEA
DRYING SUBSTANCES: drying substances for absorbing humidity must be recyclable, non-corrosive and with a colored
indicator to indicate its exhaustion
OPERATIONS TO BE CARRIED OUT BEFORE SETTING MACHINES TO WORK WHICH HAVE UNDERGONE A
LONG PERIOD OF STORAGE ON THE SITE OR INACTIVITY
(to be carried out by a qualified operator)
STRUCTURES:
•
Remove protection which is applied to rails, and any traces of paint or lubricant.
•
Remove protection from threaded holes, e.g. end carriages to crane beam fixings, if necessary by tapping.
•
Remove protection, lubricant, paint or any corrosion from bright mating surfaces, e.g. end carriage to crane beam.
•
Repair any damage to crane beam flanges (single girder cranes) or mating surfaces that may have been caused by
mishandling or through storage.
•
Using the correct paint, touch up parts that have been effected by handling and through storage.
MECHANISMS:
•
Check there are no leaks of lubricant from the reducers and replace any damaged seals.
•
Top up the lubricating oil.
•
Check that all the elements which hold the mechanisms to the structures are tight.
•
Remove any traces of corrosion from rotating or sliding pins such as limit switches, control pins, saddles for activating
micro-switches, control chains for various components.
•
Check any corrosion of the wires which make up the rope. Clean the metal ropes, the pulley grooves and the lifting drums.
Lubricate with grease.
•
Lubricate the axle ball bearing of the hooks, it not sealed for life type.
•
Remove any water which has gathered in the concave parts of covers, ball bearings, fins.
•
Lubricate the surface of the mechanical parts which are not painted (transmission shafts, couplings, control rods).
ELECTRIC PART:
•
Check the overall condition.
•
Motors: Remove all condensation from the inside sucking air through the open terminal box or after having taken off the end
cover. Dry with blasts or air.
•
Disk brakes: open the brake cover and remove all disks.
•
Dry using air, check the condition an efficiency of the springs. Put the disks back after having carefully
•
cleaned the braking surface and restored the air gap.
•
Brakes and shoes: clean the braking surfaces carefully and remove all traces of humidity, paint or lubricant.
•
Apply some lubricant to the articulations.
•
Limit switches: limit switches must be checked carefully to establish their good running order both from the mechanical and
electrical points of view. Particularly lubricate the moving joints and pins.
•
Control switch-gear: open al casings, remove condensation, dry the contacts of the remote control switches. Check the
condition of any electronic cards. Spray all components with a suitable substance. Apply Vaseline to the closing sections
and to the threaded covers off all the explosion-proof containers after having cleaned the surface carefully.
•
Carry out insulation test at 2000 V after having first insulated any bridge rectifiers electronic cards, or DC brakes.
•
Check that all electric lines and loops slide easily and if necessary lubricate trolley-wheels after having carefully cleaned
railways.
•
A very thorough check should be carried out on the push-button control pendant: remove condensation, check that contacts
are working properly, and that terminals are well-secured. For explosions-proof version check the that pins turn perfectly
and the small control pistons slide properly, then lubricate.
73
VERIFICATION OF THE EFFICIENCY OF BUFFERS
•
•
Check that end stops are not deformed and that they are
firmly
secured to the structures and that the buffer is intact and well secured to its support.
Replace buffers when they show: signs of breaking or of permanent deformation, cuts,
abrasions, incisions.
VERIFICATION OF THE EFFICIENCY OF THE CONTROL ELECTRIC SYSTEM
WARNING! Some of the operations described hereunder are performed with the power supply on, be extremely careful)
•
•
•
•
•
•
•
•
•
Check the inside of the control equipment by opening the cases’ door(s).
Operating on the push button panel, verify that the mobile parts of the contactors move properly and smoothly; otherwise, it
may happen that the electromagnet is not strong enough to guarantee the correct closing of contacts.
To avoid false contacts, heating or noisiness, verify that the voltage fed to coils is correct.
Verify the efficiency of conductors and grounding connections and, and tighten if necessary, all the screws of the grounding terminals.
Verify that terminals are firmly tightened; check that the ID number is clearly visible and integral with the terminal; verify the thermo
insulating material is not damaged and promptly replace it in the event of cracks or rips.
Keep an adequate stock for each fuse and/or temperature relays installed (see the wiring diagram), so that, if necessary,
they can be replaced quickly with one of the same kind.
Check all the gaskets of covers and cable glands
Check all ID plates on the cover or on the side of cases are at their proper place and readable
Replace electric components immediately if they are no longer capable of guaranteeing functional reliability
Never perform improvised repairs.
VERIFICATION OF THE PUSH BUTTON CONTROL PANEL AND OF THE CABLE THEREOF
•
•
•
•
•
•
•
Verify the conditions of the push button panel
Check the functionality and efficiency of every push button,
Clean push buttons removing all deposits and dirt from their seats
Verify that nameplates are readable
Check gaskets.
Verify the conditions of the multi-core cable of the push-button panel as well as of all flexible cables, making sure there are no
cuts, abrasions, bare patches or bare conductors.
Make sure the push-button panel's suspension strings are efficient and correctly attached to the body of the machine.
VERIFICATION OF THE EFFICIENCY OF THE LOAD LIMITER
The machine is equipped with a load limiting device.
The limiter consists of a wattmetric electronic system which, on perceiving an excessive power is required of the hoisting motor due to
overloading, acts on the supply circuit of the coils of control contactors of the electric appliance.
The intervention of the load limiter indicates the maximum admissible loading limit has been reached, stops all functions (hoisting and
traveling) with the exception of lowering.
•
•
Verify its correct intervention by making sure that it's activated with a load ranging from 115% and 120% of the nominal load.
Repeat the operation several times verifying the repetitiveness of the release values.
Load limiters are devices which perform safety functions and their breakdown or malfunctioning may seriously jeopardize the
safety of the persons exposed!
The verification of the setting value of the release limit of the intervention threshold of the load limiter must be performed, as
prescribed by the FEM 9.761 rule, at least once a year by using suitably prepared masses whose value is known and/or with the aid of
a loading cell with visualization of stress values.
Logging the values resulting from the yearly verifications of the setting of the load limiters into the check register is strongly
recommended.
Do not tamper with nor disconnect the load limiter, nor change the pre-established setting values
74
in the event a new setting of the load limiter is needed, such operation must be performed by Italkrane s.r.l. technical assistance or by
personnel authorized by Italkrane s.r.l.
VERIFICATION OF THE EFFICIENCY OF PARTS AND COMPONENTS
For the single parts of the machines, scrupulously follow the instructions hereunder:
•
•
•
•
•
Annual verification of the efficiency of structural elements, pins and hinges:
Metallic structures, in addition to the usual alterations due to environmental factors or to wear and tear of mobile
members (hinges), may be subject, sometimes accidentally or during handling operations, to blows, contacts or
sliding with other machines and equipments or even to anomalous stress which may damage carpentry frames,
weldings and pins. Structures, after being perfectly cleaned, must therefore undergo periodical scrupulous checks
to ascertain their suitability and, if necessary, repair any damages.
Brackets consisting of plates and pin, forming hinge elements, are subject to wear and tear as mobile and oscillating
elements undergoing sliding friction in the contact area. Replace them if, during checks, excessive wear and tear is
discovered.
All screw-pins, high-grade plugs and pins must be disassembled and carefully checked, together with their seats,
once a year.
Repair structures and hinged elements, or replace them if they show: deformations, elongations, crushing, dents, buckling,
wear and tear: worn out parts, reduced sections, incisions, abrasions, corrosions, oxidations, scratches, chipped paint, rips:
cracked weldings, cracks, cuts or incisions, broken parts, variations of sections of > 10%, or of diameter or of thickness of
>5% compared to the original values
VERIFICATION OF THE EFFICIENCY OF REDUCERS
Check that the noise level of reducers does not vary in intensity. Vibrations or excessive noise levels indicate either worn out toothing or
a faulty bearing.
Check there is no leakage of lubricant.
IN CASE OF ANOMALIES
•
Performing corrective maintenance operations on hoisting and traveling reducers is strictly forbidden.
•
All extraordinary maintenance operations on hoisting, traveling or sliding reducers must be performed by Italkrane s.r.l
technical assistance or by personnel authorized by Italkrane s.r.l.
VERIFICATIONS OF THE EFFICIENCY OF ELECTRIC MOTORS
Clean the motor(s) removing the dust from the cases as it may hinder regular cooling; check that ventilation openings are not obstructed.
Check, with the nominal load, that there are no anomalous noises (buzzes, frictions)
Make sure that the temperature of the case does not exceed 110°C. Otherwise, find the cause and check the service the hoist is meant for.
Verify absorption and voltage, comparing them to the nominal values indicated on the nameplate of each motor.
IN CASE OF ANOMALIES:
•
Performing corrective maintenance operations inside the motors is strictly forbidden
•
All extraordinary maintenance operations on hoisting, traveling or sliding motors must be performed by Italkrane s.r.l.
technical assistance or by personnel authorized by Italkrane s.r.l.
VERIFICATION OF THE EFFICIENCY OF BRAKES
•
•
•
•
•
Check the brakes are released correctly, verifying that the rotor is not held and/or there are no frictions.
Check that, with the nominal load, the brake, once the push button is released, holds the load suspended for at least 10 minutes
without the load sagging or skidding.
In case of skidding, lower the load to the ground, disconnect power supply and check the wear and tear degree of the brake
shoe lining to discover any anomalies.
If necessary, adjust the brake and/or replace the brake shoe with brake lining.
Replace the brake shoe with the new brake lining when the load is unstable even after adjusting the brake.
IN CASE OF ANOMALIES:
•
Performing corrective maintenance operations motor brakes is strictly forbidden
•
All extraordinary maintenance operations on brakes must be performed by . Italkrane s.r.l. technical assistance or by
personnel authorized by . Italkrane s.r.l.
75
Italkrane
s.r.l.
GRU & PARANCHI
CRANES & HOISTS
20060 BUSSERO-MILANO - ITALY Via Monza, 13
Tel + 39 02 92 97 21
Fax + 39 02 95 034 16
E-mail [email protected]
www.italkrane.it
CE Declaration of Conformity
In compliance with the Annex IIA of the Machinery Directive (2006/42/CE)
We hereby declare that the following products
•
•
•
•
•
YoYo electric chain hoists with capacity ranging from 0.5 to 2.5 T
GO UP electric or pneumatic wire rope hoists with capacity ranging from 1.25 to 32 T, with or without monorail or bi-rail trolley.
Electric bridge cranes or single-girder or double-girder gantry cranes with hoist or winch with a capacity ranging from 1 to 200 T
Pillar cranes, wall cranes and jib cranes with capacity ranging from 0.25 to 16 T.
Manual chain or wire rope hoists with capacity ranging from 0.25 to 30 T.
Comply with the following EC directives:
•
•
•
•
2006/42/CEMachinery Directive and later modifications
2006/95/CE Low Voltage Directive
2004/108/CE Electromagnetic Compatibility Directive and later modifications
ATEX 94/9/EC Directive on products for use in potentially explosive atmospheres
Are designed and manufactured in conformity with the following equalized Rules and Regulations:
•
•
•
•
EN ISO 12100/1 /2 2003 Machine Safety
EN 55014-1 /A1 /A2 Electromagnetic Compatibility
IP Protection EN 60034-5
EN 60204-32 Hoist Electric Equipment
In conformity with Annex V of the Machinery Directive:
• The CE symbol has been put on the machine
• The Technical file is stored in the manufacturer's premises.
Italkrane s.r.l
General Manager
QA/QC Manager
The CE declaration of conformity is valid together with the confirmation of the putting into operation, according to the indications in the
User’s Manual
76
CHECK REGISTER
In order to be able to prove the correct management of the machine check and maintenance activities, as well as to keep track of any
responsibilities with regard to the activities carried out, it is strongly recommended that the machine’s check register is scrupulously
filled in and updated during the machine’s entire life (10 years), as provided by the RES 4.4.2.b Directive ex 89/392/EEC.
In addition to all activities relating to the life and use of the machine (parts replacement, revisions, significant anomalies, etc.), all
operations prescribed by the maintenance plan according to the terms indicated in the relevant paragraph of this manual must
mandatorily be recorded in the check register.
The service man in charge will be responsible for filling in the check register in all its parts and recording all notes which are deemd to
be useful. The service man’s name must be clearly identifiable, so as the date on which the service was performed.
CHECK REGISTER
Lifting equipment type
Year of construction
Serial number
Operation Date
Operation Description
Service man’s signature
Notes
77
TABLE OF CONTENTS
FOREWORD ____________________________________________________________________________ 1
GENERAL DEFINITIONS AND IMPORTANT INFORMATION _______________________________________ 2
RELATION WITH THE USER ______________________________________________________________________________ 2
MANUFACTURER LIABILITY AND GUARANTEE ______________________________________________________________ 3
PERIODIC CHECKS _____________________________________________________________________________________ 3
NOISE LEVELS _________________________________________________________________________________________ 3
PACKING _____________________________________________________________________________________________ 3
FORWARDING ________________________________________________________________________________________ 4
HANDLING ___________________________________________________________________________________________ 4
UNPACKING __________________________________________________________________________________________ 4
CHECK FOR MISSING PARTS _____________________________________________________________________________ 4
STORAGE ______________________________________________________________________________ 4
FUNCTIONING AND INTENDED USE _________________________________________________________ 4
CONTROL MODES _____________________________________________________________________________________ 5
GENERAL SAFETY RULES __________________________________________________________________ 5
RISKS DURING USE ____________________________________________________________________________________ 6
WORKING LIMITS _______________________________________________________________________ 7
RULES AND REGULATIONS _______________________________________________________________ 10
SAFETY SIGNS _________________________________________________________________________ 11
ADMISSIBLE AND INADMISSIBLE LOADS _________________________________________________________________ 11
HOISTING GEAR ______________________________________________________________________________________ 12
MACHINE USE AND SAFETY MEASURES
________________________________________________ 12
IMPROPER USE ________________________________________________________________________ 13
INSTALLATION ________________________________________________________________________ 14
RUNNING CHECKS______________________________________________________________________ 14
SAFETY DEVICES ______________________________________________________________________________________ 14
TESTS ______________________________________________________________________________________________ 15
DYNAMIC TEST _______________________________________________________________________________________ 15
STATIC TEST _________________________________________________________________________________________ 15
DOCUMENTATION____________________________________________________________________________________ 15
IMPORTANT WARNINGS _______________________________________________________________________________ 15
SPECIAL EXECUTION ____________________________________________________________________ 16
EXPLOSION-PROOF EXECUTION EQUIPMENT FOR HAZARDOUS AREAS ___________________________ 17
CLASSIFICATION OF ELECTRICAL APPARATUS FOR USE IN THE PRESENCE OF COMBUSTIBLE DUST. _________________ 18
- TEMPERATURE CLASSES FOR COMBUSTIBLE DUST ________________________________________________________ 18
CABLE ENTRANCE IN EX CASES __________________________________________________________________________ 21
HOW TO SEAL C TYPE JOINTS ___________________________________________________________________________ 22
“A” TYPE CABLE GLAND (SCREENED OR ARMORED ROUND CABLE) ___________________________________________ 22
PREPARATION OF RESIN MIXTURE FOR “A” TYPE CABLE GLANDS _____________________________________________ 23
ELECTRIC COMPONENTS ________________________________________________________________ 24
MOTORS ____________________________________________________________________________________________ 24
78
AUTOMATIC LIMIT SWITCHES __________________________________________________________________________ 24
TROLLEY TRAVELING AND BRIDGE SLIDING AUTOMATIC SWITCHES ___________________________________________ 24
ANTI-COLLISION _____________________________________________________________________________________ 24
TROLLEY FEEDING LINE ________________________________________________________________________________ 24
CONTROL GEAR ______________________________________________________________________________________ 25
PUSH-BUTTON CONTROL PENDANT _____________________________________________________________________ 25
PRE ERECTION VERIFICATION ____________________________________________________________ 26
ASSEMBLY OF HOIST __________________________________________________________________________________ 26
SERPES LINE WITH “ZECCA” SYSTEM SUSPENSION ____________________________________________ 27
ELECTROMECHANICAL ANTI-COLLISION SYSTEMS ____________________________________________ 28
FESTOONED LINES (MAIN ELEMENTS) ______________________________________________________ 28
“YOYO” ELECTRIC CHAIN HOISTS __________________________________________________________ 30
PROTECTION AND INSULATION OF ELECTRICAL PARTS: _____________________________________________________ 30
ELECTRIC SUPPLY: ____________________________________________________________________________________ 30
NOMINAL CONDITIONS OF USE IN STANDARD EXECUTIONS: ________________________________________________ 30
NOISE LEVEL _________________________________________________________________________________________ 30
STANDARD EXECUTIONS ______________________________________________________________________________ 31
EXECUTION WITH ELECTRIC TROLLEY: ___________________________________________________________________ 31
FIXED EXECUTION ____________________________________________________________________________________ 31
EXECUTION WITH MECHANICAL CHAIN TROLLEY __________________________________________________________ 31
EXECUTION WITH PUSH TROLLEY _______________________________________________________________________ 31
DESCRIPTION OF MAIN COMPONENTS ___________________________________________________________________ 32
HOISTING AND TRAVELING ELECTRIC MOTOR _____________________________________________________________ 32
CLUTCH LOAD LIMITER ________________________________________________________________________________ 32
BRAKE ______________________________________________________________________________________________ 32
HOISTING REDUCER __________________________________________________________________________________ 32
SPROCKET – CHAIN GUIDE _____________________________________________________________________________ 32
CHAIN ______________________________________________________________________________________________ 32
LOADING HOOK ______________________________________________________________________________________ 33
HOOK TACKLE _______________________________________________________________________________________ 33
BLOCK ______________________________________________________________________________________________ 33
MOTOR REDUCER WITH SELF-BRAKING MOTOR: __________________________________________________________ 33
TRAVELING TROLLEYS _________________________________________________________________________________ 33
CHAIN CONTAINER ___________________________________________________________________________________ 33
ELECTRIC CONTROLS __________________________________________________________________________________ 33
AC 48 V – 50HZ LOW VOLTAGE ELECTRIC EQUIPMENT, _____________________________________________________ 33
TRAVEL LIMIT SWITCHES ______________________________________________________________________________ 33
HOIST ELECTRIC LIMIT SWITCH _________________________________________________________________________ 33
STOPS ______________________________________________________________________________________________ 33
SUSPENSION ________________________________________________________________________________________ 33
TOW ARM: __________________________________________________________________________________________ 33
YOYO HOIST – ELECTRICAL FEATURES OF MOTORS AND FUSES _______________________________________________ 34
BACO BRAKE-CLUTCH UNIT ____________________________________________________________________________ 34
DESCRIPTION OF BRAKE FUNCTIONING: _________________________________________________________________ 35
DESCRIPTION OF CLUTCH FUNCTIONING: ________________________________________________________________ 35
PERIODIC CHECKS OF THE BACO UNIT ___________________________________________________________________ 35
CLUTCH SETTING _____________________________________________________________________________________ 35
LUBRICANTS __________________________________________________________________________ 36
TYPES OF LUBRICANT ___________________________________________________________________ 36
SPARE PARTS CARD ___________________________________________________________________________________ 37
SPECIAL USAGE MODES FOR YOYO HOISTS _______________________________________________________________ 38
CHAIN ______________________________________________________________________________________________ 38
REPLACING THE CHAIN ________________________________________________________________________________ 39
YOYO HOIST HOISTING CHAIN’S CERTIFICATE________________________________________________ 40
79
WORKING CHECKS _____________________________________________________________________ 41
CLEANING AND LUBRICATION ____________________________________________________________ 41
HOIST AND CRANE WITH HOIST _________________________________________________________________________ 41
MAINTENANCE ________________________________________________________________________ 42
TABLE OF LUBRICATING OILS OF THE MOST IMPORTANT BRANDS ____________________________________________ 42
SCHEDULED MAINTENANCE (up to 60 months) _____________________________________________ 43
QUALIFICATION OF SERVICEMEN _________________________________________________________ 43
THE OPERATOR EMPLOYED IN THE USE OF THE MACHINE ___________________________________________________ 44
MECHANICAL MAINTENANCE MAN _____________________________________________________________________ 44
ELECTRICAL MAINTENANCE MAN _______________________________________________________________________ 44
ELECTRO-MECHANICAL MAINTENANCE MAN:_____________________________________________________________ 45
MECHANICAL ENGINEER_______________________________________________________________________________ 45
ELECTRICAL ENGINEER ________________________________________________________________________________ 45
ELECTROMECHANICAL ENGINEER: ______________________________________________________________________ 46
MAINTENANCE SCHEDULE _____________________________________________________________________________ 46
DAILY AND PERIODICAL MAINTENANCE ____________________________________________________ 47
DAILY OPERATIONS, FOR THE CARE OF THE HOIST OPERATOR: _______________________________________________ 47
MONTHLY OPERATIONS, PERFORMED BY QUALIFIED PERSONNEL: ___________________________________________ 47
QUARTERLY OPERATIONS, PERFORMED BY QUALIFIED PERSONNEL: __________________________________________ 47
RECURRENCE AND DEADLINES OF MAINTENANCE OPERATIONS _____________________________________________ 47
TABLE OF PERIODIC CHECK AND MAINTENANCE OPERATIONS __________________________________ 48
OPERATIONS TO BE PERFORMED _________________________________________________________ 49
AUTHORIZED PERSONNEL FOR OPERATIONS IN THE EVENT OF BREAKDOWN ______________________ 54
BREAKDOWN _________________________________________________________________________ 54
WHAT TO DO IF ______________________________________________________________________________________ 55
BREAKDOWN OF COMPONENTS AND POSSIBLE REMEDIES __________________________________________________ 56
PUTTING THE MACHINE OUT OF OPERATION ________________________________________________ 57
DISMANTLING, DISPOSAL AND SCRAPPING _________________________________________________ 57
SPARE PARTS TABLE ____________________________________________________________________ 57
ELECTROMAGNETIC “BABY” DISK BRAKE IN STANDARD OR EXPLOSION-PROOF EXECUTION – DIRECT
CURRENT FEEDING _____________________________________________________________________ 58
BRAKE ______________________________________________________________________________________________ 58
MAINTENANCE ______________________________________________________________________________________ 58
INSTALLATION AND SETTING OF TRAVEL LIMIT SWITCHES _____________________________________ 59
POSITIONING SLIDE ACTUATORS FOR LEVER LIMIT SWITCHES __________________________________ 60
RECOMMENDED MINIMUM SAFETY DISTANCES TO BE OBSERVED DURING THE ADJUSTMENT OF THE
HOIST-LOWER LIMIT SWITCHES ___________________________________________________________ 62
SETTING OF THE "TER" TYPE WORM SCREW HOIST LIMIT SWITCHES _____________________________ 63
SETTING OF THE “BOX 0A” TYPE WORM SCREW HOIST LIMIT SWITCH ____________________________ 63
STANDARD VERSION SPA SERIES PUSH BUTTON CONTROL PANEL _______________________________ 64
CHIEF SYMBOLS _______________________________________________________________________ 65
“Ex” EXECUTION “FLY” SERIES PUSH BUTTON CONTROL PANEL _________________________________ 65
SAFETY RULES FOR CRANE OPERATORS ____________________________________________________ 66
80
SLING CAPACITY _______________________________________________________________________ 66
SAFETY RULES FOR LOAD SLINGING _______________________________________________________ 67
LOAD HOISTING EQUIPMENT ___________________________________________________________________________ 67
CRUSHING __________________________________________________________________________________________ 68
SPECIFIC SAFETY REQUIREMENTS _______________________________________________________________________ 68
CHIEF BEHAVIOR RULES FOR WORKERS AND PROCEDURES __________________________________________________ 68
CHIEF ACCIDENTS ____________________________________________________________________________________ 68
DIAGRAM FOR THE SELECTION OF CROSS SECTIONAL AREA OF THE FEEDING CONDUCTOR ___________ 69
THERMAL CAPACITY OF CONDUCTORS ACCORDING TO FEM 1.001 RULES AND REGULATIONS ________ 69
NAMEPLATES _________________________________________________________________________ 70
HOIST-WINCH _______________________________________________________________________________________ 70
INSTRUCTIONS FOR MAINTAINING MACHINES IN GOOD RUNNING ORDER WHEN INOPERATIVE ______ 71
ANTI-OXIDIZING PREVENTION PROCEDURE _________________________________________________ 71
OPERATIONS TO BE CARRIED OUT BEFORE SETTING MACHINES TO WORK WHICH HAVE UNDERGONE A
LONG PERIOD OF STORAGE ON THE SITE OR INACTIVITY _______________________________________ 72
STRUCTURES: _____________________________________________________________________________________ 72
MECHANISMS: _______________________________________________________________________________________ 72
ELECTRIC PART: ______________________________________________________________________________________ 72
VERIFICATION OF THE EFFICIENCY OF BUFFERS ______________________________________________ 73
VERIFICATION OF THE EFFICIENCY OF THE CONTROL ELECTRIC SYSTEM ___________________________ 73
VERIFICATION OF THE PUSH BUTTON CONTROL PANEL AND OF THE CABLE THEREOF _______________ 73
VERIFICATION OF THE EFFICIENCY OF THE LOAD LIMITER ______________________________________ 73
VERIFICATION OF THE EFFICIENCY OF PARTS AND COMPONENTS _______________________________ 74
VERIFICATION OF THE EFFICIENCY OF REDUCERS __________________________________________________________ 74
VERIFICATIONS OF THE EFFICIENCY OF ELECTRIC MOTORS __________________________________________________ 74
VERIFICATION OF THE EFFICIENCY OF BRAKES _____________________________________________________________ 74
CHECK REGISTER _______________________________________________________________________ 76