1
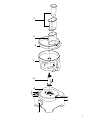
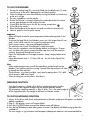
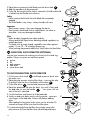
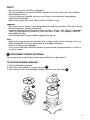
FOOD PROCESSOR
INSTRUCTIONS FOR USE
SAVE THESE INSTRUCTIONS
ROBOT
MODE D’EMPLOI
CONSERVEZ CE MODE D’EMPLOI
FOOD PROCESSOR
INSTRUCCIONES PARA EL USO
REPASE Y GUARDE ESTAS INSTRUCCIONES
LEA CUIDADOSAMENTE ESTE INSTRUCTIVO ANTES DE USAR
SU APARATO
m
in
0
P
m
ax
MODEL/MODELE/MODELO
DFP950 series
Register this product on-line and receive a free trial issue of Cook's Illustrated.
Visit www.delonghiregistration.com.
Visit www.delonghiusa.com for a list of American service centers.
Visit www.delonghicanada.com for a list of Canadian service centers.
Enregistrez ce produit en ligne et recevez un numéro gratuit de Cook's Illustrated.
Visitez www.delonghiregistration.com.
Visitez www.delonghiusa.com pour y voir une liste des centres de
réparation des États-Unis
Visitez www.delonghicanada.com pour y voir une liste des centres de
réparation Canadienne
Registre este producto en línea y reciba un ejemplar gratis de Cook's Illustrated.
Visite www.delonghiregistration.com.
Visite www.delonghiusa.com para ver la lista de centros de servicios
de los Estados Unidos
Visite www.delonghicanada.com para ver la lista de centros de servicios de Canadá
ELECTRONIC CHARACTERISTICS/CARACTÉRISTIQUES ÉLECTRONIQUES
CARACTERISTICAS ELECTRICAS
120V~60HZ 600W
F
E
3
D
C
2
1
B
A
L
K
J
G
m
in
0
P
H
m
ax
I
2
27
N
20
O
P
21
1.5
28
Q
1.3
29
1.1
0.9
0.7
0.5
0.3
22
R
30
S
23
1.5
1.3
1.1
0.9
0.7
31
0.5
0.3
4
24
m
in
25
0
P
m
ax
M
26
32
m
in
0
P
m
ax
3
SAFETY PRECAUTIONS
When using electrical appliances, basic safety precautions should always be followed to reduce the risk of
fire, electrical shock and/or personal injury.
1 The blades and discs are very sharp, bowl handle with care. Always hold the knife blade by the finger grip A at the top, away from the cutting edge, both when handling and cleaning.
2
3
4
5
6
7
8
9
10
11
12
13
14
15
16
17
18
19
20
21
Do not lift or carry the processor by the bowl handle - or the handle may break resulting in injury.
Always remove the knife blade before pouring contents from the bowl.
Keep hands and utensils out of the processor bowl and blender carafe while conA
nected to the power supply.
Switch off and unplug:
- before fitting or removing parts
- after use
- before cleaning
Never use your fingers to push food down the feed tube. Always use the pusher/s supplied.
Before removing the lid from the bowl or blender/mill from the power unit:
- switch off;
- wait until the attachment/blades have completely stopped;
- be careful not to unscrew the blender carafe or mill from the blade unit.
Allow all liquids to cool to room temperature before placing them in the blender.
Do not use the lid to operate the processor, always attach the bowl and lock the lid when unit is powered off and use the on/off speed control to power the machine on.
This machine will be damaged and may cause injury if the interlock mechanism is subjected to excessive force.
Never use an unauthorized attachment.
Never leave the machine on unattended.
Never use a damaged machine. Get it checked or repaired: see ‘service’.
Never let the power unit, cord or plug get wet.
Don’t let excess cord hang over the edge of a table or worktop or touch hot surfaces.
Never misuse your food processor and only use it for its intended domestic use.
Do not exceed the maximum capacities stated.
This appliance is not intended for use by persons (including children) with reduced physical, sensory or
mental capabilities, or lack of experience and knowledge, unless they have been given supervision or
instruction concerning use of the appliance by a person responsible for their safety.
Children should be supervised to ensure that they do not play with the appliance.
De'Longhi will not accept any liability if the appliance is subject to improper use, or failure to comply
with these instructions.
Misuse of your food processor/blender can result in injury.
SAVE THESE INSTRUCTIONS
FOR HOUSEHOLD USE ONLY
SHORT CORD INSTRUCTIONS
A short power cord is provided to reduce the risk resulting from entanglement or tripping
over a longer cord. Longer detachable power supply cords are available and may be used
if care is exercised in their use. If a longer detachable power cord or extension cord is used
(1) the marked electrical rating of the extension cord should be at least as great as the electrical
rating of the appliance, and (2) the longer cord should be arranged so that it will not
drape over the countertop or table top where it can be pulled on by children or tripped over
unintentionally. The electrical rating of the appliance is listed on the bottom of the unit. If the
appliance is of the grounded type, the extension cord should be a grounded type 3 wire cord.
This appliance has a polarized plug. One blade is wider than the other. To reduce the risk
of electrical shock this plug will fit in a polarized outlet only one way. If the plug does not fit,
contact a qualified electrician. Do not attempt to modify the plug in any way.
4
Before plugging in
- Make sure your electricity supply is the same as the one shown on the underside of your
machine.
Before using for the first time
1 Remove all packaging including the plastic blade covers from the knife blade. Take care the
blades are very sharp. These covers should be discarded as they are to protect the blade
during manufacturing and transit only.
2 Wash all parts see ‘cleaning’
3 Push excess cord into the back of the machine.
To purchase optional accessories please visit www.delonghi.com or call customer service listed
on the warranty page.
KEY
PROCESSOR
A
B
C
D
E
F
G
H
I
power unit
detachable drive shaft
bowl
lid
feed tube
pushers
safety interlocks
cord storage
speed control with power on light
BLENDER
N
O
P
Q
R
S
filler cap
lid
lid seal
carafe
sealing ring
blade unit
WEIGHING FUNCTION
J
K
L
M
on/zero button
display screen
kg/lb button
weighing plate
ATTACHMENTS
20
knife blade
27
geared citrus press (optional)
21
dough tool
28
mill (optional)
22
twin beater geared metal whisk
29
mini processor bowl (optional)
23
thick slicing/coarse shredding disc
30
induction juice extractor (optional)
24
thin slicing/fine shredding disc
31
attachment storage (optional)
25
(Julienne) fine chipper disc (optional)
32
spatula
26
rasping disc (optional)
5
TO USE YOUR FOOD PROCESSOR
1 Fit the detachable shaft onto the power unit (1).
2 Then fit the bowl. Place the handle towards the back and turn clockwise until it locks (2).
3 Fit an attachment over the drive shaft.
- Always fit the bowl and attachment onto the machine before adding ingredients.
4 Place lid on top of bowl - ensuring the top of the drive shaft fits into the center of the lid.
Turn lid clockwise to lock safety switch on lid into the handle of the food processor (3).
- Do not use the lid to operate the processor, always use the on/off control.
5 Plug unit in and the power light located on the speed dial will come on. Press on/zero button to use the scale or just turn dial and select a speed.
- As a safety precaution processor the food won’t work if the bowl and lid are fitted incorrectly.
- Use the pulse (P) for short bursts. The pulse will operate for as long as the control is held in position.
6 Reverse the above procedure to remove the lid, attachments and bowl.
- Always switch off before removing the lid.
Important
- Your food processor is not suitable for crushing or grinding coffee beans, or processing
granulated sugar to caster sugar.
- When adding extracts or flavorings to mixtures avoid contact with the plastic as this may
result in permanent stains.
Choosing a speed for all functions
FUNCTION
TOOL/ATTACHMENT
Knife Blade
Whisk
6
SPEED
MAXIMUM CAPACITIES
Boxed cake mix
Pastry - cutting fats into flour
Adding water to combine pastry ingredients
Chopping/pureeing/pates
Min – Max
5 – Max
1–5
Max
1.5Kg/3lb 5oz Total Wt
340g/12oz Flour Wt
Soups – start at a low speed and move up
to Max
Min –Max
1 liter/4 cups
Egg Whites
Egg & sugar
Cream
Max
Max
5 – Max
6 Egg Whites
Max
600g/1lb 6oz
600g/1lb 6oz Meat
500 mls/2 cups
Dough tool
Yeasted mixes
Discs – slicing/
shredding/chipping
Firm food items such as carrots, hard cheese.
Softer items such as cucumbers, tomatoes
5 – Max
Min – 5
1.8kg/12 cups
Blender
All processing
Max
1.5 liters/2pts 12fl.oz
Rasping disc (optional) Parmesan cheese, Potatoes for gnocchi or
potato dumplings.
Max
1.8kg/12 cups
Citrus Press (optional) Citrus fruits
1
Mini Bowl & knife
(optional)
All processing
Max
Mill (optional)
All processing
Max
Induction Juice
Extractor (optional)
Fruit & Vegetables
Max
200g/8oz
500g/1lb 2oz
TO USE YOUR BLENDER
1 Ensure the sealing ring (R) is correctly fitted into the blade unit (S). Leaking will occur if the seal is damaged or not fitted correctly.
2 Screw the blade unit onto the carafe by turning the blade unit clockwise
as far as it will go.
3 Put your ingredients into the carafe.
4 Ensure the lid seal is correctly fitted to the underside of the lid so there
are no gaps between the lid and the lid seal.
5 Fit and lock the filler cap in the lid, by turning one position
.
6 Fit the lid to the carafe.
7 Place the blender onto the power unit and turn clockwise to lock (4).
8 Select a speed or use the pulse control.
1.5
1.3
1.1
0.9
0.7
Important
- Allow all liquids to cool to room temperature before placing them in the
blender.
- To ensure the long life of your blender, never run it for longer than 60 seconds. Switch off as soon as you’ve got the right consistency.
- Don’t process spices - they may damage the plastic.
- The machine won’t work if the blender is fitted incorrectly.
- Don’t put dry ingredients into the blender before switching on. If necessary, cut them into pieces; remove the filler cap; then with the machine
running, drop them through one by one.
- Don’t use the blender as a storage container. Keep it empty before and
after use.
- Never blend more than 1 1/2 litres (50 oz) - less for frothy liquids like
milkshakes.
Hints
- When making mayonnaise, put all the ingredients, except the oil into the
blender. Then with the machine running, remove filler cap and pour oil slowly through the filler cap hole.
- Thick mixtures, e.g. pates and dips, may need scraping down. If it’s difficult to process, add more liquid.
- When crushing ice use the pulse in short bursts.
0.5
0.3
R
S
1.5
1.3
1.1
0.9
0.7
0.5
0.3
4
mi
0
n
P
ma
x
WEIGHING FUNCTION
- Your food processor is fitted with a built in weighing function to allow
ingredients to be weighed straight into the bowl or blender carafe.
- The Maximum weighing capacity is 3Kg./6.6 lbs. This is the total weight of
all the ingredients plus the weight of the bowl or blender carafe.
m
in
0
TO USE THE WEIGHING FUNCTION
P
1 Always fit the drive shaft, bowl and attachment or blender carafe onto the power unit before
adding ingredients.
2 Plug in – the display screen will remain blank.
3 Press the ON/ZERO button once and the display screen will light up.
4 Press the (kg/lb) button to select either grams or ounces. The display will default to kg/g when first
switched on.
- The unit weighs in 2g increments and teaspoon/tablespoon measures are recommended for
7
weighing small quantities.
5 Check the display shows ‘0’, if not, zero by pressing the ON/ZERO button. Then weigh the
required ingredients straight into the bowl or carafe. After the weight is
displayed, press the ON/ZERO button and the display will return to
‘0’. Add the next ingredients and that weight will be displayed. Repeat
until all ingredients are weighed.
- If the display is not zeroed and either the ingredients or the
bowl/attachment/lid are removed the display will show [ - - - -] to represent a minus reading. To zero press the ON/ZERO button once.
6 Add the lid and select a speed to operate the processor.
- During operation the display screen with freeze [- - - -] until the speed
control returned to the off position.
- After processing the last weight will be displayed on the screen when
the speed control is returned to the off position. Note: The weight of the
lid will be included if the display is not zeroed before switching on.
- The weight of any additional ingredients added down the feed tube while the processor is
running will not be shown on the display screen.
-M- WEIGHING PLATE
A removable weighing plate is supplied for weighing ingredients without using the bowl or blender. To use, place the plate on top of the
power unit and turn clockwise to lock. Then follow steps 2 to 5 under
‘to use the weighing function’. To remove, turn the plate counterclockwise and lift off.
m
in
0
P
m
ax
Auto switch off
- The display screen will turn off automatically if the same weight reading is shown after 5
minutes.
- The display screen can be turned off manually by pressing and holding down the ON/ZERO
button for a few seconds.
Important
- Do not overload by exceeding the maximum weighing capacity of 3Kg./6.6 lbs
- Do not subject the power unit to excessive force as this may damage the weighing sensor.
- Always place the food processor on a dry flat surface prior to weighing.
- Do not move the power unit during operation of the weighing function.
USING THE ATTACHMENTS
20 KNIFE BLADE/ 21 DOUGH TOOL
The knife blade is the most versatile of all the attachments. The length of the
processing time will determine the texture achieved. For coarser textures use
the pulse control.
Use the knife blade for cake and pastry making, chopping raw and
cooked meat, vegetables, nuts, pate, dips, pureeing soups and to also 20
make crumbs from biscuits and bread. It can also be used for yeasted
dough mixes if the dough tool is not supplied.
Use the dough tool for yeasted mixes.
Hints
knife blade/dough tool
- Cut food such as meat, bread, vegetables into cubes approximately 2cm/3⁄4in before processing.
8
- Biscuits should be broken into pieces and added down the feed tube
while the machine is running.
- When making pastry use fat straight from the fridge cut into
2cm/3⁄4in.cubes.
- Take care not to over-process.
- Place the dry ingredients in the bowl and add the liquid down the feed
tube while the machine is running. Process until a smooth elastic ball of
dough is formed this will take 60 - 90 secs.
- Re-knead by hand only. Re-kneading in the bowl is not recommended as
it may cause the processor to become unstable.
21
22 TWIN BEATER GEARED WHISK
Use for light mixtures only e.g. egg whites, cream, evaporated milk and for whisking eggs and
sugar for fatless sponges. Heavier mixtures such as fat and flour will damage the gears.
USING THE WHISK
1 Fit the drive shaft and bowl onto the power unit.
2 Push each beater securely into the drive head B .
3 Fit the whisk by carefully turning until it drops over the drive shaft until the bottom of the
whisks are almost touching the bottom of the bowl.
4 Add the ingredients.
5 Fit the lid - ensuring the end of the shaft locates into the center of the lid. Turn lid clockwise to
lock safety switch on lid into the handle of the food processor (3).
6 Switch on.
22
Important
- The whisk is not suitable for making boxed cake mix or creaming fat and
sugar as these mixes will damage the gears. Always use the knife blade
for making cakes.
B
Hints
- Best results are obtained when the eggs are at room temperature.
- Ensure the bowl and whisks are clean and free from grease before
whisking.
SLICING/SHREDDING DISCS
reversible slicing/shredding discs - thick 23 , thin 24 .
Use the shredding side for cheese, carrots, potatoes and foods of a similar texture.
Use the slicing side for cheese, carrots, potatoes, cabbage, cucumber,
zucchini, beet and onions.
(Julienne) fine chipper disc 25 (optional).
Use to cut: potatoes for Julienne style French fries; firm ingredients for
salads, garnishes, casseroles and stir fries (e.g. carrot, turnip, zucchini ,
cucumber).
rasping disc 26 (optional).
Grates Parmesan cheese and potatoes for gnocchi or potato dumplings.
23
24
25
SAFETY
- Never remove the lid until the cutting disc has completely stopped.
- Handle the cutting discs with care - they are extremely sharp.
26
9
TO USE THE CUTTING DISCS
D
E
1 Fit the drive shaft and bowl onto the power unit.
2 Holding by the center grip D , place the disc onto the drive shaft
with the appropriate cutting side facing upwards E .
3 Fit the lid ensuring the drive shaft is centered in the lid and the lid
is locked into the handle.
4 Choose which size feed tube you want to use. The pusher contains
a smaller feed tube for processing individual items or thin ingredients and a larger feed tube for bigger or multiple ingredients.
To use the small feed tube - first put the large pusher inside the feed
tube.
To use the large feed tube - use both pushers together.
5 Put the food in the feed tube.
6 Switch on and push down evenly and slowly with the pusher - never put your fingers in the
feed tube.
m
in
0
P
m
ax
Hints
- Use fresh ingredients.
- Don’t cut food too small. Fill the
width of the large feed tube fairly
full. This prevents the food from slipping sideways during processing.
Alternatively use the small feed tube.
- When using the fine chipper disc,
place ingredients horizontally G .
- When slicing or shredding: food
placed upright F comes out
shorter than food placed horizontally
G .
G
F
m
m
in
in
0
0
P
P
m
m
ax
ax
- It is normal to have a small amount
of non-shredded food on the top of
the disc after processing.
27 CITRUS PRESS (OPTIONAL)
Use the citrus press to squeeze the juice from citrus fruits (e.g.
oranges, lemons, limes and grapefruits).
a cone
b sieve
I
A
B
H
TO USE THE CITRUS PRESS
1 Fit the drive shaft and bowl onto the power unit.
2 Fit the sieve into the bowl - ensuring the sieve handle is locked
into position directly over the bowl handle H .
3 Place the cone over the drive shaft turning until it drops all the
way down I .
4 Cut the fruit in half. Then turn the speed dial and press the fruit
onto the cone.
- The citrus press will not operate if the sieve is not locked correctly.
10
m
in
0
P
m
ax
28 MILL (OPTIONAL)
Use the mill for milling herbs, nuts and coffee beans.
A
a
b
c
d
B
blade unit
sealing ring
jar
sprinkler lid
SAFETY
- Never fit the blade unit to your machine
without the jar fitted.
- Never unscrew the jar while the mill is fitted
to your machine.
- Don’t touch the sharp blades. Keep the
blade unit away from children.
- Never remove the mill until the blades have completely stopped.
Important
- To ensure the long life of your mill, never run for longer than 30 seconds.
Switch off as soon as you’ve got the right consistency.
- Don’t process spices - they may damage the plastic.
- The machine won’t work if the mill is fitted incorrectly.
- Use for dry ingredients only.
C
D
TO USE YOUR MILL
1 Put your ingredients into the jar. Fill it no more than half full.
2 Ensure the sealing ring is correctly fitted into the blade unit, with the
ring being pushed and locked around the inner circle of the blade unit.
3 Turn the blade unit upside down. Lower it into the jar, blades down.
4 Screw the blade unit onto the jar until it is finger tight.
5 Place the mill onto the power unit and turn to lock J .
6 Switch on to maximum speed or use the pulse control.
7 After milling, you can replace the blade unit with the sprinkler lid and
shake out your food.
- The sprinkler lid is not airtight so store excess food in airtight container
to ensure freshness.
Hints
- Herbs are best milled when clean and dry.
J
m
in
0
P
m
ax
29 MINI PROCESSOR BOWL (OPTIONAL)
Use the mini processor bowl to chop herbs and process small quantities of ingredients e.g.
meat, onion, nuts, mayonnaise, vegetables, purées, sauces and baby food.
a
b
mini processor knife blade
mini processor bowl
TO USE THE MINI PROCESSOR BOWL
1 Fit the drive shaft and bowl onto the power unit.
2 Fit the mini processor bowl - ensuring the ribs on the inside of the mini bowl chimney align
with the slots in the main bowl chimney
I .
11
3 Place the mini processor knife blade over the drive shaft K .
4 Add the ingredients to be processed.
5 Fit the lid ensuring the drive shaft is centered in the lid and the lid
is locked into the handle and switch on.
Safety
- Never remove the lid until the knife blade has completely
stopped.
- The knife blade is very sharp - always handle with care.
K
A
B
Important
- Don’t process spices – they may damage the plastic.
- Don’t process hard food such as coffee beans, ice cubes or
chocolate – they may damage the blade.
I
Hints
- Herbs are best chopped when clean and dry.
- Always add a little liquid when blending cooked ingredients to
make baby food.
- Cut foods such as meat, bread, vegetables into cubes approximately 1-2 cm (1⁄2 – 3⁄4 in) before processing.
- When making mayonnaise add the oil slowly down the feed tube.
m
in
0
P
m
ax
30 INDUCTION JUICE EXTRACTOR (OPTIONAL)
Use the juice extractor for making juice from firm fruit and vegetables. Always use juicer on maximum speed.
a
b
c
d
e
pusher
lid
pulp remover
filter drum
juicer drive shaft
A
B
P
C
TO USE THE INDUCTION JUICE EXTRACTOR
1 Fit the juicer drive shaft M and food processor bowl onto
the power unit.
2 Place the pulp remover into the filter drum - ensuring the tabs
fit and lock into the slots in the bottom of the drum N .
3 Fit the filter drum O into the food processor bowl.
4 Place the attachment lid onto the bowl, turn until it locks and
the feed tube sits over the handle P . Your juicer will not
work if the lid is unlocked.
5 Cut the food into small pieces to fit the feed tube.
6 Switch on and push down evenly with the pusher - never put
your fingers in the feed tube. Process fully before adding
more.
- After adding the last piece, let the juicer run for a further 20
seconds to extract all the juice from the filter drum.
7 To remove the pulp from the filter drum simply remove the
pulp remover (c) from the filter drum (d) and tap pulp loose.
12
N
D
O
E
M
m
in
0
P
m
ax
SAFETY
- Do not use the juicer if the filter is damaged.
- The cutting blades on the base of the filter drum are very sharp, take care when handling
and cleaning the drum.
- Only use the pusher supplied. Never put your fingers in the feed tube. Unplug before
unblocking the feed tube.
- Before removing the lid, switch off and wait for the filter to stop.
Important
- If the juicer starts to vibrate, switch off and empty the pulp from the drum. (The juicer vibrates
if the pulp becomes unevenly distributed).
- Maximum capacity that can be processed at one time is 500g/1.1 lbs of fruit or vegetables.
- Some very hard foods may make your juicer slow down or stop. If this happens switch off
and unblock the filter.
- Switch off and clear the pulp collector regularly during use.
Hints
- Before processing remove stones and pits (e.g. mangos, melon, plum) and tough skins (e.g.
melon, pineapple). You don’t need to peel or core apples and pears.
- Use firm, fresh fruit and vegetables.
- Citrus juice will be bitter and frothy because its peel and pith get processed too. Use the citrus juicer instead.
31 ATTACHMENT STORAGE (OPTIONAL)
You can purchase an attachment storage carousel that fits inside the bowl.
TO USE THE STORAGE CAROUSEL
1 Fit the knife blade to the bowl.
2 Then fit the whisk and discs, into the carousel Q .
3 Fit the carousel over the knife blade and place the processor lid on top R .
R
Q
m
in
0
P
m
ax
13
CARE & CLEANING
- Always switch off and unplug before cleaning.
- Handle the blades and cutting discs with care - they are extremely sharp.
- Some foods may discolor the plastic. This is perfectly normal and won’t harm the plastic or
affect the flavor of your food. Rub with a cloth dipped in vegetable oil to remove the discoloration.
Power unit
- Wipe with a damp cloth, then dry. Ensure that the interlock area is
clear of food debris.
- Store excess cord in the storage area at the back of the
machine S .
S
Blender/mill
1 Empty the carafe/jar before unscrewing it from the blade unit.
2 Wash the carafe/jar by hand.
3 Remove and wash the seals.
4 Don’t touch the sharp blades – brush them clean using hot soapy water, then rinse thoroughly under the tap. Don’t immerse the blade unit in water.
5 Leave to dry upside down.
Twin beater geared whisk
- Detach the beaters from the drive head by gently pulling them free. Wash in warm soapy
water.
- Wipe the drive head with a damp cloth, then dry.
Do not immerse the drive head in water.
All other parts
- Wash by hand, then dry.
- Alternatively they can be washed on the top rack of your dishwasher. A short low temperature program is recommended.
SERVICE AND CUSTOMER CARE
- If the cord is damaged it must, for safety reasons, be replaced by De'Longhi or an authorized De'Longhi service center.
- If you experience any problems with the operation of the processor, before calling for assistance refer to the troubleshooting guide.
If you need help with:
- using your appliance or
- servicing or repairs
- Contact the customer service hotline listed on the warranty page.
14
Troubleshooting guide
Problem
The processor will not operate
Cause
Solution
No power/indicator light not lit.
Check processor is plugged in
Bowl not locked on correctly.
Check bowl is located correctly and the
handle is situated towards the right hand side.
Lid not locked correctly.
Check that the lid interlock is correctly
locked in place.
If none of the above check the fuse/
circuit breaker in your home.
Processor stops during
processing
Processor overloaded/maximum
capacities exceeded.
Lid unlocked.
Poor performance of
tools/attachments.
Refer to hints in relevant “using
the attachment” section.
Weighing function
Display screen freezes on [- - - -] Quantity weighed too small.
Check maximum capacities stated under
“to use your food processor”.
Check lid is locked correctly.
Check attachments are assembled correctly.
Use teaspoon and tablespoon measures
for very small quantities.
Weight changed on display
screen
Power unit moved during operation. Do not move unit during use.
Zero the display before weighing next
ingredients.
15
LIMITED WARRANTY
This warranty applies to all products with De’Longhi or Kenwood brand names.
What does the warranty cover?
We warrant each appliance to be free from defects in material and workmanship. Our obligation under this warranty is limited to repair at our factory or authorized service center of
any defective parts or part thereof, other than parts damaged in transit. In the event of a
products replacement or return, the unit must be returned transportation prepaid. The repaired or new model will be returned at the company expense.
This warranty shall apply only if the appliance is used in accordance with the factory directions, which accompany it, and on an Alternating current ( AC ) circuit.
How long does the coverage last?
This warranty runs for one year (1) from the purchase date found on your receipt and
applies only to the original purchaser for use.
What is not covered by the warranty?
The warranty does not cover defects or damage of the appliance, which result from repairs
or alterations to the appliance outside our factory or authorized service centers, nor shall it
apply to any appliance, which has been subject to abuse, misuse, negligence or accidents.
Also, consequential and incidental damage resulting from the use of this product or arising
out of any breach of contract or breach of this warranty are not recoverable under this warranty. Some states do not allow the exclusion or limitation of incidental or consequential
damage, so the above limitation may not apply to you.
How do you get service?
If repairs become necessary, see contact information below:
U.S. Residents:
Please contact our toll free hotline at 800-322-3848 or log onto our website at
www.delonghi.com.
For all accessories, spare parts or replacement parts, please contact our parts division at 1-800865-6330.
Residents of Canada: Please contact our toll free hotline at 1-888-335-6644 or log onto
our website at www.delonghi.com.
Residents of Mexico: Please refer to the Limited Warranty statement for Mexico.
Please refer to the back page of the manual for De’Longhi addresses.
The above warranty is in lieu of all other express warranties and representations. All
implied warranties are limited to the applicable warranty period set forth above. This limitation does not apply if you enter into an extended warranty with De’Longhi. Some states do
not allow limitations on how long an implied warranty lasts, so the above exclusions may
not apply to you. De’Longhi does not authorize any other person or company to assume for
it any liability in connection with the sale or use of its appliance.
How does state law apply?
This warranty gives you specific legal rights, and you may also have other rights, which
vary from state to state.
16