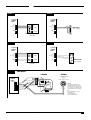
1
Installation & Programming Manual - Click for Help ? INSTALLATION & PROGRAMMING MANUAL E-TECH ET8 CONTROL PANEL V4 – INSTALLATION MANUAL, REVISION 1 A$12.00 INC GST VERSIONS COMMENCING NOVEMBER 2001 Quality Endorsed Fictional Company ISO9001 E-Tech Security Products Pty Ltd “Australia’s largest designer and manufacturer of high quality security products” HEAD OFFICE: E-Tech Security Products Pty Ltd ABN 000 110 110 12 Security Close Safe Hills NSW 2147 Australia Ph +61 23 9988 7766 Fax +61 23 9988 7765 ET8 V4 INSTALLER MANUAL Revision 1, November 2001 E-TECH SECURITY PRODUCTS Australian Communications Authority TELECOMMUNICATIONS COMPLIANCE Document Part Number: 890–265 For product: 100–191 ET8 LED Control Panel (V4) 100–688 ET8 LCD Control Panel (V4) © 2001 E-Tech Security Products Pty Ltd ACN 000 110 110 ET8 V4 installer Specifications may change without notice. LIC.No. 218042 CONTENTS Introduction .................................................................. 4 Features ....................................................................... 4 Specifications ............................................................... 4 Packing list ................................................................... 5 Installation procedures ................................................ 5 CONNECTION DIAGRAM ......................................... 6 Wiring examples .......................................................... 7 Keypad ....................................................................... 10 OPERATION SUMMARY ......................................... 11 HOW TO PROGRAM Quick start Programming ........................................... 12 How to enter Program Mode ..................................... 13 Program mode levels ................................................. 13 PROGRAMMING OPTIONS USER CODES .......................................................... 14 Timers ......................................................................... 15 Vibration Sensitivity .................................................... 16 Zone Assignment ................................................. 17–19 AREA PARTITIONING ....................................... 20–21 Zone To Output Mapping ..................................... 22–23 Various Options .................................................... 24–25 Tamper/Keypad Panic Output Mapping ................... 26 System Operation Shortcuts ...................................... 27 MONITOR MODE OUTPUT MAPPING .................... 28 Day mode output mapping ........................................ 28 Miscellaneous Options .............................................. 29 SUPERVISED RADIO ZONES ................................. 31 Supervision time ........................................................ 31 Radio Supervision Alerts ..................................... 32–33 Misc. options 1 ..................................................... 34–35 Misc. options 2 ..................................................... 36–37 DIALLER OPTIONS Telephone Numbers 1 & 2 ......................................... 38 Account Number 1 & 2 ............................................... 38 Telephone Number 3 – Test Calls ............................. 39 Telephone Number 4 – Callback ............................... 39 Follow me Telephone Number .................................. 39 Report zone alarms ................................................ 40 Report zone restorals ................................................. 40 Report multiple zone alarms ...................................... 40 Account No.2 zones ................................................... 40 Report Miscellaneous alarms .................................... 41 Report Miscellaneous Restorals ............................... 41 Restoral Reporting options ........................................ 41 Test Call Interval ..................................................... 42 Time before Next test call .......................................... 42 Dialling Method .......................................................... 42 Disable Dialler ............................................................ 43 Contact ID format ................................................... 43 Audible DTMF format ................................................. 43 Audible Pulse format .............................................. 43 Contact ID Reporting Codes .................................. 44 Alternate Dialling ........................................................ 45 Check for dial tone ..................................................... 45 Number of Dialling Attempts ...................................... 45 Area1 open/close reports .......................................... 46 Area2 open/close reports .......................................... 46 Siren Chirp on kiss-off ............................................... 46 Strobe Flash on kiss-off ............................................. 46 Forced Opening Report ............................................. 47 Delay Closing Report ................................................. 47 Manual Exclude Report ............................................. 47 Auto Exclude Report .................................................. 47 Enable Test Calls .................................................... 48 Mains Report Delay .................................................... 48 Listen-in to dialler ....................................................... 48 Swinger Shutdown ..................................................... 49 Line Fault Monitor ...................................................... 49 Line Fault to AUX2 ..................................................... 49 Remote access ........................................................... 50 Direct Connect ............................................................ 50 Remote access options ........................................ 50–51 Required Rings .......................................................... 52 FACTORY DEFAULTS Clear Radio Devices .................................................. 53 Clear Memory ............................................................ 53 Clear Panel Options ................................................... 53 Clear User Codes ...................................................... 53 RADIO OPTIONS Radio Quick Start ....................................................... 54 E-Tech Radio Interface .............................................. 54 Signal strength meter ................................................. 54 Radio Devices, Operation .......................................... 55 Radio Supervision, Defined ....................................... 55 Radio Device Programming ................................... 56 Radio Key Programming ......................................... 57 REMOTE OPERATION Audible Monitoring Operation ............................... 58 Remote Operation by Telephone .......................... 59 E-Tech Accessories ................................................... 60 Wireless Products ...................................................... 61 PROGRAMMING OPTIONS SUMMARY ................ 62 Installation Record ..................................................... 63 INTRODUCTION FEATURES • 8 Fully programmable zones • Any combination of hardwire or radio zones The E-TECH ET8 is a wholly Australian Designed and Manufactured product from E-Tech Security Products, Australia's largest manufacturer of quality electronic security products. E-Tech Security Products Pty Ltd is a Quality Accredited Company to ISO 9001. • Full radio supervision • Contact ID Dialler Format • Ultra-Modern and Impact resistant Housing • E-Tech Audible Dialler Format • "Follow Me" Audible Dialler Option • Separate 24 Hour Tamper input • Single or Double Trigger Zones • Remote LED or LCD Keypads (Max 3) • Fully programmable via the system Keypad – Eliminates the need for expensive programmers or Proms. • Inbuilt Vibration Sensor Analyser • All programming data is permanently stored in a non-volatile EEprom memory • Warning beeps timing extended by changing to Entry Delay 2 timer. • Windows based Up\Down load Software allows remote programming and event status • The outputs for Area 1 and Area 2 can now be made to pulse on for 2 seconds. This makes them useful as Smoke Detector Reset outputs by adding an external relay. • True Dynamic Battery Test every time the Panel is armed / disarmed and every hour • Area Partitionable (2 Areas). Any Zone can be programmed to any area, as well as common areas • Comes complete with an AC plug pack and supports a 12V 7Ah battery to maintain systems security under all power supply conditions This version of the ET8 introduces a number of new features including Radio PIR Supervision, E-Tech LCD Keypad and numerous other innovations. ET8 Version 4 ENHANCEMENTS OVER Versions 3.x RADIO • Radio supervision. Radio supervision can be used with E-TECH radio detectors that transmit periodic supervision signals. • Options added to either Toggle or Pulse Aux1 with the Radio Panic key. • Option to have quieter siren chirps when arming/disarming with key switch or radio keys. ARMING • Arm only codes. Keypad codes can now be made to ARM ONLY - this does not apply to Radio key codes. • Option for siren warning burst when arming with radio key and a zone is unsealed. • Monitor mode outputs are now selectable for both the 2 second monitor mode and full monitor mode. DIALLER • Aux 2 output option for telephone line fail. • Dialler sends a CANCEL report if there has been an alarm in full monitor mode. • Dialler Listen-In has been added via the Siren output. • The Miscellaneous Alarm reporting options have been increased to include reports such as Mains Fail, Battery Fail, radio tamper reports and others now selectable). • Audible Format is now more flexible in alarm reports. Mains and Battery fail reports can now be sent when using the Audible format if required. • Closing reports can be delayed until end of exit time. • Manual and Auto Exclude reports can be disabled. • Monitor Mode (Home Mode) • Outputs are separately fused with Automatic Reset Fuses • Day Mode and Door Chime feature. • 30 Event Memory • Supports 8 Radio Devices (Radio PIRs, Radio Reeds etc) HARDWARE • An option to select 3k3 EOL resistors for Zones. Default is 2k2. • Supports 14 Radio Keys • All inputs and outputs are heavily protected against lightning and high voltage supply transients. An earth terminal is provided for extra protection • A Tamper lead assembly has been provided to connect the internal tamper switch to the Tamp header. UP/DOWNLOAD • CallBack in Normal Mode and User Program mode is now optional to allow up/download without having a fixed callback telephone number. • The ET8 Up/Download Software is completely new and is compatible with Windows 9x. The user interface and presentation is also completely different. MISCELLANEOUS • Only include mains fail in alarm memory when the previous event is not mains fail. • Fire Siren sound can be selected for 24hr zones. Handy for Smoke Detectors. • 15 User Codes • Separate Icons added to keypad to distinguish 0 & 9 on LCD keypad. • ‘Arm only’ codes can be programmed • Day mode does not latch zone alarms. The warnings are either for 2secs or while the Day zone is unsealed. • Programmable Inputs to activate selectable Outputs • Zone Exclude with User Code Entry only accepts zones (1-8) that are in the AREAS that the User Code can arm. • Designed utilising the latest SMD Technology • In User Program Mode a Siren Test can be started by entering 77777777E (8 sevens) and Dialler Test Report can be initiated by entering 66666666 ( 8 sixes). • Forced Arming Feature • Simple to Program and Use. • An option added which gives quiet siren chirps in Monitor mode, instead of the full volume siren sound. 4 E-TECH ET8 (V4) CONTROL PANEL – INSTALLER MANUAL INSTALLATION PROCEDURES The location of the main panel housing should be in an area that is within the protected area of the premises. A linen closet or cupboard are good examples as these are generally located in the centre of the Premises. Positioning of the movement detectors should be considered as the incorrect position may cause unwanted alarms. 2 1 HOW TO REMOVE THE LID 1. Unclip the lid by pushing in the directions of the arrows 1 and 2 as shown below. 2. Remove the Battery from the base. 3. Mount the rear panel housing to a secure location. 4. Insert the PCB stand-offs in the Panel and then plug the circuit board onto the stand-offs. 5. Wire to the circuit board terminal blocks, as per the wiring instructions shown in this installation manual. 6. Replace the Battery. 7. Insert the panel tamper bracket as shown at left. 8. Program the control panel as required INSTALLING PCB STANDOFFS & TAMPER BRACKET PACKING LIST 100–191 E-Tech ET8 LED Control Panel 100–688 E-Tech ET8 LCD Control Panel SPECIFICATIONS Box construction ................. 3mm Polycarbonate (equiv. 1.2mm mild steel) Box Dimensions .................. 223W x 300H x 85D mm QTY DESCRIPTION 1 ET8 main board 1 ET8 housing 1 E-Tech LED keypad (100-192) or... E-Tech LCD keypad (100-667) 1 17VAC plug pack 1 12V 7Ah battery (optional) 1 Dialler telephone lead 1 User manual 1 Installer manual 9 2.2K End Of Line resistors 1 Lead assembly for Battery 1 Lead assembly for Internal Tamper 1 Tamper bracket 1 Zone list label 2 Housing cover screws 2 Circuit board standoff Plug Pack ........................... 240Vac, output [email protected] Power Supply ..................... 13.8Vdc @ 800mA Quiescent Current .............. 80mA with 1 Keypad Operating Voltage ............. 9.5V– 14V dc Rechargeable Battery ........ 12 volt 7.0 Amp/hour, lead acid Battery Charging current .. 350mA maximum, current limited Dynamic Battery Test ......... Every Hour and on arming 10.75V with a 5 amp load Fuses .................................. 2 Amp resettable / sirens & reset. 500mA resettable / 12 volt auxiliary outputs 200 mA resettable / strobe output INPUTS ............................... 8 x Zone inputs 2 x 24hr Tamper inputs End of line resistor .............. 2200 Ohm Remote Keypad input ......... Proprietary Maximum Keypads ............. 3 J2 Header .......................... Multi-pin connector for the E-Tech Radio Interface (100-200) OUTPUTS Siren .................................... On board siren driver. Timed output. Maximum 3 x 8 Ohm horn speakers Strobe ................................. 12V DC latching output. Maximum 2 x 1 Watt strobe lights Reset ................................... 12V DC timed output. Maximum 3 x 12V piezo screamers Equipment power output .... 13.8V DC output for powering detectors and other equipment. Maximum 500mA. J3 Header ........................... Multi-pin connector provides the outputs AUX1, AUX2, ARM1, ARM2, 12V DC. E-TECH ET8 (V4) CONTROL PANEL – INSTALLER MANUAL 5 CONNECTION DIAGRAM 2K2 TAMP N.C. 0V TELEPHONE 12V DC Power for detectors, etc 2K2 Zone 8 2K2 Zone 7 2K2 Zone 6 2K2 Zone 5 2K2 Zone 4 2K2 Zone 3 2K2 Z8 Zone 2 2K2 +12V Zone 1 C Z7 Z6 C Z5 J2 Z4 See CONNECTION EXAMPLES for end-of-line resistor wiring detail RECEIVER C Z3 Z2 C AUX1 AUX2 ARM1 ARM2 12V 0V Z1 0V DAT E-TECH SECURITY PRODUCTS 105-220 KEYPAD J1 J3 PROG TAMP 12V DC Power for detectors, etc +12V E-Tech LED Keypad (100-192) CLK DAT CLK COM COM Up to 2 x E-Tech 12V Siren (100-172) OR 3 x Top Hat Screamer (100-238) RESET Up to 2 x Strobe Light (NOI-300) STR Up to 2 x Horn Speaker, 8 Ohm (NOI-110) SIREN BATTERY AC 17V 17V AC (Red & Black) AC EARTH Maximum 3 keypads +12V +12V EARTH (White) E-Tech 17V AC Plug Pack (840-029) (Australia only) HEATSINK ZONE CONNECTION EXAMPLES N.C. Normally Closed Devices E-TECH ET8 Zone N.C. Contacts 2K2 C N.O. Normally Open Devices E-TECH ET8 N.O. Contacts Zone 6 2 2K C E-Tech LCD Keypad (100-667) E-TECH ET8 (V4) CONTROL PANEL – INSTALLER MANUAL WIRING EXAMPLES EXAMPLE 1 E-TECH QUANTUM DETECTORS 4 WIRE CONNECTION EXAMPLE 3 ANY N.C. DEVICE E-Tech ET8 CONTROL PANEL E-Tech ET8 CONTROL PANEL 0V +12V Zone [1~8] C 0V +12V Zone [1~8] C 2K2 REED SWITCH (N.C. contacts)) 2K2 0V +12V N.C. ALARM N.C. N.C. TAMPER N.C. TAMP C TAMP C E-Tech QUANTUM DETECTOR (all models) EXAMPLE 2 E-TECH QUANTUM DETECTORS 6 WIRE CONNECTION EXAMPLE 4 ANY N.O. DEVICE E-Tech ET8 CONTROL PANEL E-Tech ET8 CONTROL PANEL 2 2K2 0V +12V Zone [1~8] C 0V +12V N.C. ALARM N.C. 2K 0V +12V Zone [1~8] C COM NO 2K2 TAMP C N.C. TAMPER N.C. TAMP C NC PANIC BUTTON (N.O. contacts)) E-Tech QUANTUM DETECTOR (all models) EXAMPLE 5 SIREN WIRING EXTERNAL E-Tech ET8 CONTROL PANEL INTERNAL 2K2 TAMPER SWITCH (SWI920) 12V INTERNAL SIREN (100-172) or NOI230, NOI240, 100-238 SIREN STROBE LIGHT (NOI300) E-TECH ET8 (V4) CONTROL PANEL – INSTALLER MANUAL RED HORN SPEAKER (NOI110) BLACK STR Terminal block is supplied with E-Tech siren covers RED RESET BLACK TAMP C * NOTE: E-Tech Panel & Noise KITS are supplied with the E-Tech Internal Horn Speaker (100-171). This must be connected to the SIREN output in parallel with the Horn Speaker/s. TIP: 100-171 Internal Horn Speaker has WHITE wires. 100-172 Internal Siren has RED & BLACK wires. 7 INPUTS MONITORED ZONES The E-Tech ET8 has 10 separate monitored inputs. • 8 x Fully programmable Zone inputs • 2 x 24 hour Tamper input ZONE INPUTS Each zone input must be terminated with a 2K2 (2200 ohm) resistor as supplied. All inputs must be sealed with an EOL resistor even if unused. For wiring details of Keypads, Keyswitches, Panic Buttons and Warning devices, see the wiring diagrams in the wiring section of this manual. TAMP – Tamper Input The TAMP input must also be sealed with a 2K2 end of line resistor. This input is always a 24hr input. AC INPUT TERMINALS These terminals are for the connection of the E-Tech plugpack. The E-Tech ET8 requires an AC transformer rating of 1.4 Amps @ 17 V AC minimum. (E-Tech Part No. POW215) BATTERY These terminals are for the connection of a sealed lead-acid rechargeable 12Volt battery. Charge current is limited to 350mA. The charge voltage is factory preset at 13.8 V and does not need changing. Note: A 12 Volt sealed lead acid rechargeable battery must be connected for correct panel operation. Observe correct Polarity when connecting the battery. (E-Tech Part Number BAT210 12V 7Ah battery) EARTH For maximum protection against damage caused by lightning strikes, connect a good earth to this terminal. Alternatively use the Earth lead from the plug pack. PROG/TAMP – Program Link & Internal Tamper Input The PROG/TAMP link appears on the two pin J1 header. The PROG/TAMP link has two purposes: 1. To enter Installer Program Mode on initial power up. Power-up with the PROG link OFF. The PROG link (or Box Tamper lead) must be ON in operating mode. 2. Box Tamper. When used with the Internal Tamper Lead (supplied), PROG/TAMP serves as the 24hr tamper input for the panel’s internal tamper switch. Replace the PROG Link with the Box Tamper Lead. Connect the Internal Tamper Lead spade terminals directly to the terminals of the internal tamper switch (supplied). An end-of-line resistor is NOT required on this input. When PROG/TAMP is used for Internal Tamper, powering up with the panel’s cover open will enter Installer Program Mode. 8 E-TECH ET8 (V4) CONTROL PANEL – INSTALLER MANUAL OUTPUTS OUTPUT FUSING The 12V outputs, Siren, Reset and Strobe outputs are protected by Automatic Reset electronic fuses. These outputs will automatically reset once the overload is removed. 12 VOLT OUTPUT: A regulated 13.8 VDC output is available to power detectors and other equipment. This output is available from two sets of terminals marked +12V and 0V. The output is protected by an Automatic Reset fuse. A maximum load of 500mA may be connected to these terminals. SIREN: BACKUP BATTERY A properly charged battery MUST be installed to ensure the Siren, Strobe and Reset outputs operate correctly. The on-board siren driver will drive a maximum of 3 x 8 ohm horn speakers (ETech Part No. NOI110 or 100-171 Internal Siren). The output will reset at the end of siren time (P29E) or whenever the panel is reset, whichever comes first. The output is protected by an Automatic Reset fuse. SIREN LOAD STR – Strobe: A maximum output of 2.0A continuous is available from the SIREN, and RESET outputs and 200mA from the STR output. A latched 12VDC output for connecting strobe lights. This output will latch on in the event of an alarm condition and stay on until the panel is reset. Recommended maximum power load: 3 x Horn speakers (SIREN output) A maximum of 2 x 1 Watt Strobes (E-Tech Part No. NOI300) can be connected to this output. The output is protected by an Automatic Reset fuse. RESET: 2 x Strobe lights (STR output) A 12V DC output for connecting E-Tech Sirens, piezo sirens or relays, etc. This output will reset at the end of siren time (P29E) or whenever the panel is reset, whichever comes first. 2 x E-Tech Internal Sirens (100-172) (RESET output) Note: (This assumes no more than 500mA is being drawn from the 12V device output). A maximum of 3 x 12V piezo Sirens (E-Tech Part No. NOI240, NOI 230, 100238) or 2 X E-Tech Piezo (Part No 100-172) can be connected to this output. The output is protected by an Automatic Reset fuse. J3 HEADER AUX1: This output is an open collector (switch negative) which can supply a maximum of 100mA. Zone alarms may be selected to trigger this output by option P58E. AUX2: J3 OPEN COLLECTOR OUTPUTS This output is an open collector (switch negative) which can supply a maximum of 100mA. Zone alarms may be selected to trigger this output by option P59E. ARM1: This output is an open collector (switch negative) which can supply a maximum of 100mA. This output is turned on when Area 1 is armed. ARM2: This output is an open collector (switch negative) which can supply a maximum of 100mA. This output is turned on when Area 2 is armed. E-TECH ET8 (V4) CONTROL PANEL – INSTALLER MANUAL 9 KEYPAD ET8 KEYPAD The ET8 control panel may be supplied with either the LED keypad (100-192) or the E-Tech LCD Keypad (100-667). CABLE LENGTH The maximum allowable cable length is 100m (total cable length to all keypads) . The keypad provides important visual and audible indications and is the main interface for operating and programming the ET8 control panel. DISPLAY TEST (LCD Keyad only) To display all the keypad icons press and hold the button for at least 2 seconds. All the icons will be on whilst the button is held down. NUMBER OF KEYPADS Up to 3 LED and/or LCD keypads can be connected to the ET8. Display Test can be activated at any time either in operating mode or any program mode. 105mm 90mm LED KEYPAD LCD KEYPAD · Unclip the top half of the keypad housing by pushing the top clips down with a small screwdriver and pulling the housing forward. Backlit LCD icon display · Screw the base of the keypad housing to the wall using the 4 mounting holes provided. · Connect the wires to the screw terminals as per the wiring diagram shown in this manual. · Clip the top half onto the base by first engaging the bottom clips and swinging the top closed. Push hard to ensure the clips engage. · Attach the Zone list label on the inside of the lid. MEMORY button PANIC buttons ARM button PANIC MEMORY Not Ready PANIC buttons 150mm · Bring the 4 connecting wires to the terminal block on the PCB on the rear of the keypad housing. “Not Ready” light ARM 1 2 3 MONITOR button MONITOR 4 5 6 EXCLUDE button EXCLUDE 7 8 9 MEMORY button MEMORY P 0 E ARM button PANIC ARM 1 2 3 MONITOR button MONITOR 4 5 6 EXCLUDE button EXCLUDE 7 8 9 PROGRAM button PROGRAM 0 ENTER PROGRAM button ENTER button ENTER button Protective flap not shown Protective flap not shown The “Not Ready” light is on when the panel is not ready to Arm. i.e, a zone is unsealed, there may still be movement in the premises or a door or window left open KEYPAD BEEPER SOUNDS Each key press 1 beep Valid command 3 beeps Error 1 long beep Mains Power is off or Panel Battery is low 10 10 beeps LED KEYPAD ZONES 1~8 OFF ON Zone is sealed Zone is unsealed READY Zone is unsealed, or Power fault or System is Armed, or phone line fault Ready to Arm ARMED Disarmed Armed (AREA 1) ARM2 Disarmed Armed (AREA 2) Disarmed Monitor Mode FLASHING Zone alarm Monitor Mode (LED Keypad only) MAINS Normal Mains Power is off BATTERY Normal The panel’s backup battery is low MEMORY Normal EXCLUDE Normal TAMPER Normal Memory Mode selected New alarms in memory Zones are excluded Tamper alarm RADIO Normal (And in Memory Mode indicates a low battery alarm from a radio device) Indicates that a Radio Key or other radio device has a low battery LINE Normal Dialler is on line Phone line fault or failure to communicate PROGRAM Normal User Program Mode Installer Program Mode Ready to Arm Not ready to Arm Not Ready 10 STATUS LCD KEYPAD E-TECH ET8 (V4) CONTROL PANEL – INSTALLER MANUAL Receiving radio signal 135mm KEYPAD INSTALLATION OPERATION SUMMARY OPERATION LCD KEYPAD LED KEYPAD RADIO KEY ENTER ARM ARM or... ARM [User Code] [User Code] DISARM ENTER [User Code] ENTER x2 ENTER MONITOR MONITOR MODE or... MONITOR [User Code] PANIC PANIC or... PANIC PANIC [User Code] or... Press twice within 4 seconds P69E 5E must be ON Both keys together ENTER (Keypad Panic Shortcut must be ON, P62E 4E) ENTER [x] [User Code] KEYPAD DURESS ENTER [User Code] PANIC or... [User Code] or... Both keys together or... [User Code] (Keypad Panic Shortcut must be ON, P62E 4E) or... Hold Press and hold for 4 seconds (P68E 3E & 4E must be OFF) [x] [User Code] ENTER To Disarm and report a Duress Alarm, add any of the digits 5, 6, 8 or 9 before the User Code when Disarming ENTER EXCLUDE EXCLUDING ZONES or... EXCLUDE [User Code] [Zone No.] [Zone No.] ENTER ENTER ENTER MEMORY ALARM MEMORY or... Press MEMORY MEMORY ENTER ENTER or... Enter the zone numbers to be Excluded [Zone No.] [Zone No.] [User Code] Enter the zone numbers to be Excluded To exit Exclude mode To exit Exclude mode ENTER [User Code] ENTER repeatedly to display the last 30 events To exit Memory mode or... Press [User Code] repeatedly to display the last 30 events To exit Memory mode E-TECH ET8 (V4) CONTROL PANEL – INSTALLER MANUAL 11 PROGRAMMING QUICK START PROGRAMMING Use one of these programming summaries for fast setup of your ET8 as a Local, Audible Monitored or Central Station Monitored system. The control panel will be ready for use immediately. QUICK START 1 - step by step QUICK START 1 LOCAL SYSTEM STEP KEY STROKES 1 1 2 Quick Start 1 shows you how to change User Code 1 (the Master Code). 2 1 1 By default, the dialler is disabled until programmed. DESCRIPTION 3 3 COMMENT Enter User Program Mode Program Light is ON Selects the option for User Code 1 The existing code is displayed by the keypad lights, followed by 3 beeps Enter the new User Code Can be 3 to 6 digits long 4 Enter the new User Code again The new code is displayed by the keypad lights, followed by 3 beeps 5 To exit Program Mode Program light turns OFF QUICK START 2 - step by step QUICK START 2 AUDIBLE MONITORING Quick Start 2 shows you how to change User Code 1 (the Master Code), enable Audible Monitoring and program 1 telephone number. This will enable the dialler to report alarms to any telephone including mobile phones. DESCRIPTION COMMENT Enter User Program Mode Program Light is ON 2 0 0 0 0 0 0 Enter Installer Program Mode Program Light is FLASHING 3 1 Selects the option for User Code 1 The existing code is displayed by the keypad lights, followed by 3 beeps STEP KEY STROKES 1 1 2 3 1 4 5 6 8 6 7 7 0 8 4 Enter the new User Code Can be 3 to 6 digits long Enter the new User Code again The new code is displayed by the keypad lights, followed by 3 beeps At P86E, turns ON option 4 Audible Monitoring enabled Selects the option for Telephone No.1 Up to 15 digits 9 Enter the telephone number Can be up to 15 digits long To exit Program Mode Program light turns OFF See page 58 for further information on the operation of Audible Monitoring. QUICK START 3 - step by step QUICK START 3 CENTRAL STATION MONITORING Quick Start 3 shows you how to change User Code 1 (the Master Code), enable Central Station Monitoring and program one telephone number. This will enable the dialler to report alarms to a Central Station. STEP KEY STROKES DESCRIPTION COMMENT Enter User Program Mode Program Light is ON 2 0 0 0 0 0 0 Enter Installer Program Mode Program Light is FLASHING 3 1 Selects the option for User Code 1 The existing code is displayed by the keypad lights, followed by 3 beeps 1 1 2 3 1 4 5 6 8 6 7 7 0 8 9 10 2 Up to 15 digits 7 2 3 1 2 Enter the new User Code Can be 3 to 6 digits long Enter the new User Code again The new code is displayed by the keypad lights, followed by 3 beeps At P86E, turns ON option 2 Central station Monitoring enabled Selects the option for Telephone No.1 Existing Ph No (if any) displayed Enter the Telephone Number Can be up to 15 digits long Enter the Account Number Must be 4 digits To exit Program Mode Program light turns OFF Option P86E 2E is ON by factory default. This option only needs to be turned ON if previously programmed OFF. The Central Station’s receiver telephone number - supplied by the Central Station Account Number to identify the premises - supplied by the Central Station * Factory default Master Code is: 123 * Factory default Installer Code is: 000000 12 E-TECH ET8 (V4) CONTROL PANEL – INSTALLER MANUAL PROGRAMMING FACTORY DEFAULT MASTER CODE: 123 INSTALLER CODE: 000000 PROGRAM MODE LEVELS TABLE 4. FLOW CHART INSTALLER PROGRAM MODE PROGRAM light Installer Program Mode allows access to ALL program options. is FLASHING Power up with Program Link OFF (Usually on first time installation) INSTALLER PROGRAM Mode PROGRAM LIGHT IS FLASHING PROGRAM Note: The panel will remain in Installer Program Mode indefinitely. [INSTALLER CODE] Factory default Installer Code: 000000 USER PROGRAM MODE PROGRAM light USER PROGRAM Mode is ON PROGRAM PROGRAM LIGHT IS ON • All User Codes • Entry Exit Times • Follow Me Telephone number [MASTER CODE] Factory default Master Code: 123 Note: The panel will automatically drop out of User Program Mode to Operating Mode if no keypad buttons are pressed for 4 minutes. NORMAL OPERATING Mode PROGRAM LIGHT IS OFF HOW TO ENTER PROGRAM MODE FROM POWER UP 1. Power-up with the PROG link OFF. (The PROG link (or Box Tamper lead) must be ON in Operating Mode). USING KEYPAD The panel must be Disarmed. 1. Press The keypad will respond with 3 beeps [MASTER CODE] This is User Program Mode (PROGRAM light is ON). 2. Press [INSTALLER CODE] The keypad will respond with 3 beeps This is Installer Program Mode (PROGRAM light is FLASHING). HOW TO EXIT PROGRAM MODE 1. Press then This is Operating Mode (PROGRAM light is OFF). Selects a program option (address) The current value is displayed Enter new data E-TECH ET8 (V4) CONTROL PANEL – INSTALLER MANUAL 3 beeps ENTER button Enter new value using keys 0 - 9 ENTER button 2 Digit Option (00 to 99) The keypad lights or icons will display the current value PROGRAM button KEY SEQUENCE IN PROGRAM MODE 3 beeps User Program Mode allows the owner to program: 13 PROGRAMMING P01E – P10E RADIO PROGRAMMING P11E – P25E See pages 56,57 USER CODES PROGRAM MODE LEVEL: User codes are the 3 to 6 digit codes used to operate the panel by keypad. User, Installer, Remote by PC User Codes 1–15: Used to arm/disarm the panel. These codes can also be programmed as Arm Only codes. User Code 1 is also the Master Code which is used to access Client Program mode. FACTORY DEFAULT: User Code 1: 123 Installer Code: 000000 All other codes: [blank] PROGRAMMING SEQUENCE: NOTES: • User Codes can be 3 to 6 digits in length. • User codes cannot start with ‘0’. P[11–25]E the existing code is displayed [ENTER NEW CODE] E [ENTER NEW CODE AGAIN] E the new code is displayed • All codes must be unique to each other. • User Codes 2–15 can be programmed to be ARM ONLY codes. EXAMPLE: To program the Master Code Enter new code • When programming a code you must enter it twice for verification. 1 • To clear an existing code, re-program that code with any number (not an existing code) beginning with 0. Enter new code again 1 TO DELETE A CODE: To delete a User Code, enter the MEMORY key in place of the code. EXAMPLE: To delete User Code 2: P12E MEMORY E • To clear all codes (except the Installer Code), enter P98E in Installer Program mode. See Page 53. • Codes are rejected if already used. Some codes that are similar to existing codes may also be rejected. • Open/Close reports are identified by user number when the control panel is base station monitored. INSTALLER CODE NOTES: ARM ONLY CODES User Codes 2–15 can be set as Arm Only Codes. These codes can Arm but cannot Disarm the panel. When programming a code, enter ARM E in front of the code to enable the Arm Only option. EXAMPLE: To program User Code 2 to be 1234 and an Arm Only code: P12E ARM E 1234E 1234E • All of the above notes also apply to the Installer Code. The function of the Installer Code is to gain access to Installer Program Mode. When the code is viewed, the ARMED icon is displayed before the digits of the code. See Page 13, “How To Enter Program Mode.” CODE TABLE 14 ENABLE AS A RADIO CODE OPTION No DESCRIPTION FACTORY DEFAULT User Code 1 P11E Master Code 123 User Code 2 P12E 2E User Code 3 P13E 3E User Code 4 P14E 4E User Code 5 P15E 5E User Code 6 P16E 6E User Code 7 P17E 7E User Code 8 P18E 8E User Code 9 P19E 1E Radio Key programming, User Code 10 P20E 2E User Code 11 P21E 3E Page 57 User Code 12 P22E 4E User Code 13 P23E 5E User Code 14 P24E 6E User Code 15 P25E Installer Code P99E CODE (Keypad Code only) P09E 7E Installer Code E-TECH ET8 (V4) CONTROL PANEL – INSTALLER MANUAL 000000 P10E PROGRAMMING OPTION No P26E DESCRIPTION DEFAULT P26E Entry Delay Time 1 20 P27E Entry Delay Time 2 6 P28E Exit Delay Time P29E Siren Reset Time NOTE Seconds x10 = 60 seconds 60 Seconds 5 Minutes ENTRY DELAY TIME1 User, Installer, Remote by PC The Entry Delay Time 1 is the time given to Disarm the Panel after a Entry Delay 1 zone is unsecured. FACTORY DEFAULT: The Entry Delay Time1 setting is from 1 to 99 seconds. PROGRAM MODE LEVEL: 20 seconds PROGRAMMING SEQUENCE: NOTES: P26E existing time is displayed [ENTER NEW TIME] E new time is displayed • Programmable from 1 – 99 seconds EXAMPLE: To program Entry Delay Time1 to be 30 seconds: P26E 30E P27E ENTRY DELAY TIME2 User, Installer, Remote by PC The Entry Delay Time2 is the time given to Disarm the panel after an Entry Delay2 zone is unsecured. FACTORY DEFAULT: The Entry Delay Time2 setting is from 10 to 990 seconds (1 – 99). PROGRAM MODE LEVEL: 60 seconds Note: The Entry Delay Time2 is set in 10 second increments so that a value setting of 6 means a 60 seconds delay. NOTES: • Programmable from 10 – 990 seconds PROGRAMMING SEQUENCE: P27E existing time is displayed [ENTER NEW TIME] E new time is displayed EXAMPLE: To program Entry Delay Time2 to be 600 seconds: P27E 60E P28E EXIT DELAY TIME The Exit Delay Time is the time given to secure and depart the premises after the Panel is Armed. All zones (except 24hr zones) are inactive during the Exit Delay time. PROGRAM MODE LEVEL: User, Installer, Remote by PC FACTORY DEFAULT: 60 seconds The Exit Delay Time setting is from 1 to 99 seconds. NOTES: PROGRAMMING SEQUENCE: • Programmable from 1 – 99 seconds P28E existing time is displayed [ENTER NEW TIME] E new time is displayed • RELATED OPTIONS: P62E 8E Exit Time x10 EXAMPLE: To program Exit Delay to be 85 seconds: P28E 85E P29E SIREN RESET TIME The Siren Reset Time sets the duration of the Siren and Reset outputs. PROGRAM MODE LEVEL: Installer, Remote by PC The Siren Reset Time setting is from 1 to 99 minutes. FACTORY DEFAULT: 5 minutes PROGRAMMING SEQUENCE: P29E existing time is displayed [ENTER NEW TIME] E new time is displayed NOTES: • Programmable from 1 – 99 minutes • Siren times of longer than 5 minutes are contrary to noise pollution regulations in most areas. EXAMPLE: To program Siren Time to be 4 minutes: P29E 4E E-TECH ET8 (V4) CONTROL PANEL – INSTALLER MANUAL 15 PROGRAMMING P30E – P38E VIBRATION SENSITIVITY Installer, Remote by PC Each zone has individually adjustable sensitivity for connection of E-Techensor Vibration Sensors. FACTORY DEFAULT: Zone sensitivity is adjusted by toggling zones ON in options P30E to P38E. PROGRAM MODE LEVEL: Normal sensitivity. P30E, all zones = ON P30E, Normal Sensitivity– vibration analyser disabled. This is used for normal alarm devices. Zone response time, 200ms. NOTES: P31–38E are the options for the 8 levels of vibration sensitivities. P31E is the most sensitive setting. • Sensitivity can be individually programmed for each zone. • Zones are allocated to one sensitivity level at any one time. Turning a zone ON in a sensitivity level, turns the zone OFF in any other sensitivity level. • To revert zone sensitivity back to Normal. Turn the required zone/s ON at Option 30. • Avoid using P31 and P38 sensitivity – they are provided as a guide to the upper and lower limits. PROGRAMMING SEQUENCE: P [30–38] E zones are displayed [Zone No] E EXAMPLE: To program zones 2 and 3 to be Medium Sensitivity: P34E 2E 3E the keypad display will show zone lights 2 & 3 to be ON 2 3 1 2 3 4 5 6 7 8 • USING E-TECHSENSORS. E-Techsensors are sensitive to high frequencies and insensitive to low frequencies. Therefore it is not necessary to apply much force to the protected structure, rather a very rapid succession of blows. The sensitivity has been correctly adjusted when a single blow applied with a soft object (e.g. by hand) does not cause an alarm whereas a rapid series of blows (using a metal object such as a screwdriver blade) will cause an alarm. Factory Default Setting for P30E. All zones selected ON = Normal sensitivity. Example P34E: Zones 2 & 3 are Medium sensitivity. VIBRATION SENSITIVITY Zones OPTION No SENSITIVITY P30E Normal P31E High 1 2 3 4 5 6 7 8 ON ON ON ON ON ON ON ON P32E P33E P34E P35E P36E P37E P38E Low ON = Factory default setting E-Tech E-TECHSENSOR Vibration sensor Part No. VIB100 16.5mm In addition to zone sensitivity adjustment, the overall sensitivity of the ETechsensor can be adjusted by rotating the body of the E-Techsensor within its bracket. The bracket must always be mounted horizontally and the arrow must point up for any required setting. 51mm N/C Vibration contacts YELLOW N/C Tamper GREEN loop RED BLUE M L L H 20mm 350mm cable 36mm 2 x 3mm holes at 27mm spacing 16 E-TECH ET8 (V4) CONTROL PANEL – INSTALLER MANUAL PROGRAMMING ZONE AS SIGNMENT ASSIGNMENT Zones OPTION No DESCRIPTION P39E Double Trigger zones 1 2 3 4 5 6 7 8 P40E Instant zones DELAY GROUP P41E Entry Delay 1 zones Only one option allowed per zone P42E Handover zones P43E Entry Delay 2 zones P44E Lockout zones ON ON ON ON ON ON ON ON P45E Area 1 zones ON ON ON ON ON ON ON ON P46E Area 2 zones P51E Monitor zones P52E 24Hr zones P53E Day zones ON ON ON ON ON ON ON ON ON = Factory default setting P39E DOUBLE TRIGGER ZONES Zones programmed to Double Trigger will recognise an alarm condition if: PROGRAM MODE LEVEL: Installer, Remote by PC • The zone has been triggered twice within a 4 minute period. • If any 2 zones (both programmed for double trigger), each trigger once. • The zone is left unsealed for longer than 15 seconds. FACTORY DEFAULT: all OFF: No Double Trigger zones NOTES: PROGRAMMING SEQUENCE: • Double Trigger is useful for preventing unwanted alarms from zones in harsh environments such as sheds and garages. P39E [Zone No]E toggles the options ON and OFF P39E [Zone No]E OFF: The zone is not a Double Trigger zone P39E [Zone No]E ON: The zone is a Double Trigger zone • 0E will turn all selections OFF MEMORY E will turn all selections ON P40E INSTANT ZONES Instant Zones operate only in the Armed state. When Armed at the expiry of exit time, Instant Zones will activate assigned outputs immediately when triggered. PROGRAM MODE LEVEL: Installer, Remote by PC P40E [Zone No]E turns the options ON FACTORY DEFAULT: 3E–8E ON: Zones 3~8 are Instant P40E [Zone No]E ON: The zone is an Instant Zone To deselect the option, select a different zone type in the DELAY GROUP. NOTES: • When a zone is selected for this type, it is automatically deselected from any other zone type in the DELAY GROUP P41E ENTRY DELAY1 ZONES Entry Delay1 zones operate only in the Armed state. When Armed, at the expiry of exit time these zones will activate the Entry Delay Timer1 (P26E) when they are triggered. If the panel is not disarmed before the expiry of the Entry Delay Timer1, the alarm outputs will be activated. PROGRAM MODE LEVEL: Installer, Remote by PC FACTORY DEFAULT: 1E ON: Zone 1 has Entry Delay1 P41E [Zone No]E turns the options ON NOTES: • The keypad sonalert will beep during Entry Delay as a reminder to disarm the panel. Entry beeps can be disabled by program option P60E 1E. P41E [Zone No]E ON: The zone is an Entry Delay1 zone To deselect the option, select a different zone type in the DELAY GROUP. • When a zone is selected for this type, it is automatically deselected from any other zone type in the DELAY GROUP E-TECH ET8 (V4) CONTROL PANEL – INSTALLER MANUAL 17 PROGRAMMING P42E HANDOVER ZONES Handover zones are delayed only if entry is made through an Entry Delay zone first. If a Handover zone is triggered first, the zone behaves as an instant zone. Normally, the “point of entry” zone should be Delay zone, with any other zones in the entry path programmed as Handover zones. PROGRAM MODE LEVEL: Installer, Remote by PC FACTORY DEFAULT: 2E ON: Zone 2 is a Handover zone NOTES: PROGRAMMING SEQUENCE: • When a zone is selected for this type, it is automatically deselected from any other zone type in the DELAY GROUP P43E When an Entry Delay2 zone is triggered, it has entry delay as set by the Entry Delay Time2 (P27E). Installer, Remote by PC FACTORY DEFAULT: PROGRAMMING SEQUENCE: all OFF: No zones have Entry Delay2 P43E [Zone No]E turns the options ON NOTES: • When a zone is selected for this type, it is automatically deselected from any other zone type in the DELAY GROUP PROGRAM MODE LEVEL: Installer, Remote by PC FACTORY DEFAULT: all ON: All zones are Lockout zones NOTES: • The SIREN output always locks out • 0E will turn all selections OFF MEMORY E will turn all selections ON • RELATED OPTIONS: P60E 4E Tamper Reset Lockout P45E, P46E P42E [Zone No]E ON: The zone is a Handover zone To deselect the option, select a different zone type in the DELAY GROUP. ENTRY DELAY2 ZONES PROGRAM MODE LEVEL: P44E P42E [Zone No]E turns the options ON P43E [Zone No]E ON: The zone is an Entry Delay2 zone To deselect the option, select a different zone type in the DELAY GROUP. RESET LOCKOUT ZONES All 8 zones and tamper input can be programmed to Lockout, i.e. cause the RESET OUTPUT to sound only once whilst the panel is armed. The RESET OUTPUT is then locked out for that alarmed zone until entering a valid code has reset the panel. PROGRAMMING SEQUENCE: P44E [Zone No]E toggles the options ON and OFF P44E [Zone No]E OFF: The zone is not a Lockout zone P44E [Zone No]E ON: The zone is a Lockout zone AREA PARTITIONING See page 20 P47E – P50E ASSIGNING USER CODES TO AREAS See page 21 18 E-TECH ET8 (V4) CONTROL PANEL – INSTALLER MANUAL PROGRAMMING P51E MONITOR ZONES Monitor zones allow you to Arm selected zones while others are ignored. Typically used for perimeter zones such as windows and doors while you are at home. Example: Upstairs zones are Disarmed while downstairs zones are Armed in Monitor mode. PROGRAM MODE LEVEL: Installer, Remote by PC FACTORY DEFAULT: all OFF: No Monitor zones NOTES: PROGRAMMING SEQUENCE: • RELATED OPTIONS: P63E Monitor Mode output mapping P64E 1E 2 second Monitor Mode alarm P64E 3E Monitor zones have Entry Delay2 P52E P51E [Zone No]E toggles the options ON and OFF P51E [Zone No]E OFF: The zone is not a Monitor zone P51E [Zone No]E ON: The zone is a Monitor zone 24hr ZONES 24hr Zones operate at all times regardless of the mode of panel operation, i.e. Armed, Disarmed or Monitor. When alarmed, these zones will activate assigned outputs immediately. To reset those alarms a valid user code must be entered. PROGRAM MODE LEVEL: Installer, Remote by PC FACTORY DEFAULT: all OFF: No 24hr zones NOTES: • The Tamper input is always a 24hr zone • For silent 24hr zones, simply deselect the zone/s from options P54E–P57E (Reset, Strobe, Sonalert & Siren) • To change a 24hr zone to any other zone type, the zone must also be reassigned to an AREA (P45E or P46E). Selecting a zone as 24hr will override any other zone type setting such as Instant, Delayed or Handover. PROGRAMMING SEQUENCE: P52E [Zone No]E toggles the options ON and OFF P52E [Zone No]E OFF: The zone is not a 24hr zone P52E [Zone No]E ON: The zone is a 24hr zone 24hr zones are independent of Area operation. All other zone types must be assigned to at least one Area to become active. P53E DAY ZONES Day Zones operate when the panel is fully disarmed, i.e. when Area 1, Area 2 and Monitor are all off. When alarmed, these zones will activate the assigned outputs instantly. PROGRAM MODE LEVEL: Installer, Remote by PC FACTORY DEFAULT: all OFF: No Day zones The outputs mapped to the Day Zone will turn on while the zone is unsealed. Turn P64E 2E on, to limit Day Zone alarms to 2 seconds. NOTES: • RELATED OPTIONS: P63E 5E–8E Day zone output mapping P64E 2E 2 sec Day Mode alarm PROGRAMMING SEQUENCE: P53E [Zone No]E toggles the options ON and OFF P53E [Zone No]E OFF: The zone is not a Day zone P53E [Zone No]E ON: The zone is a Day zone • TYPICAL USES: Instant alert when a delivery door is opened. Doorway alert for a shop. Turn ON option P63E 7E for keypad sonalert when a Day zone alarms. E-TECH ET8 (V4) CONTROL PANEL – INSTALLER MANUAL 19 PROGRAMMING AREA PARTITIONING For example, Office A and Office B operate as separate areas but the entrance foyer used by both offices is assigned to both areas meaning it will automatically Arm when both Areas have Armed. The Common Area then automatically disarms when either Area1 or Area2 Disarms. DEFINITION Area Partitioning allows the 8 zones to be split into two partitions; Area1 and Area2. The panel then effectively operates as two separate systems sharing only the siren outputs and dialler. OPERATION USER CODE ASSIGNMENT Arming and Disarming is carried out as normal from a single keypad or separate keypads installed in both areas or by Radio Key. A User Code assigned to an Area can Arm and Disarm only that Area. User Codes assigned to both Areas will operate both Areas simultaneously. Area operation only applies to zones when they are in the armed state. This means that Day, 24hr and Monitor zones are independent of the area operations. COMMON AREA ZONES Zones assigned to both Areas are armed only when Area1 and Area2 are both armed. This allows the Common Area zone/s to be shared by both Areas. Note: Area partitioning is in addition to Monitor Mode. Any zone may be allocated to any area. Zones OPTION No DESCRIPTION 1 P45E Area 1 zones ON ON ON ON ON ON ON ON 2 3 4 5 6 7 8 P46E Area 2 zones ON = Factory default setting ASSIGNING ZONES TO AREAS P45E, P46E Assign (or remove) zones that will operate when Area 2 is armed. PROGRAM MODE LEVEL: Installer, Remote by PC PROGRAMMING SEQUENCE: FACTORY DEFAULT: P45E [Zone No]E toggles the options ON and OFF for Area1 P45E [Zone No]E OFF: The zone is not in Area1 P45E [Zone No]E ON: The zone is in Area1 No zones assigned to Area 2. NOTES: • For options P45E and P46E, [Zone No] E toggles the selection ON and OFF. • Zones assigned to BOTH areas become Common zones. • If no Area operation is required, assign all zones to Area 1. (This is also the factory default). P46E [Zone No]E toggles the options ON and OFF for Area2 P46E [Zone No]E OFF: The zone is not in Area2 P46E [Zone No]E ON: The zone is in Area2 EXAMPLE: To program zones 1~4 for Area 1 and zones 1, 5~8 for Area 2. In this example, we have assigned zone 1 to both areas, so it becomes a Common Zone. P45E use the [Zone No] E sequence to turn ON only zones 1~4. P46E use the [Zone No] E sequence to turn ON zone 1 and zones 5~8. P45E: AREA 1 zones 1 2 3 4 P46E: AREA 2 zones 1 Example: Zone 1 is assigned to both Areas, so it is a Common Zone 20 E-TECH ET8 (V4) CONTROL PANEL – INSTALLER MANUAL 5 6 7 8 P47E P49E DESCRIPTION Codes 1-8 to AREA1 Codes 1-8 to AREA2 OPTION No DESCRIPTION P48E P50E Codes 9-15 to AREA1 Codes 9-15 to AREA2 ON ON ON ON ON ON ON ON ON 1E User Code 2E 9 User Code 3E 10 User Code 4E 11 User Code 5E 12 User Code 6E 13 User Code 7E 14 User Code 15 OPTION No 1E User Code 2E 1 User Code 3E 2 User Code 4E 3 User Code 5E 4 User Code 6E 5 User Code 7E 6 User Code 8E 7 User Code 8 PROGRAMMING ON ON ON ON ON ON ON ON = Factory default setting. P47E, P48E ASSIGNING USER CODES TO AREAS DESCRIPTION: Assign (or remove) User Codes to Areas. Area 1 User Codes PROGRAMMING SEQUENCE: PROGRAM MODE LEVEL: Installer, Remote by PC P47E 1E–8E toggles the options ON and OFF Assigns User Codes 1–8 to AREA1 FACTORY DEFAULT: P48E 1E–7E toggles the options ON and OFF Assigns User Codes 9–15 to AREA1 All User Codes assigned to Area 1 P49E 1E–8E toggles the options ON and OFF Assigns User Codes 1–8 to AREA2 P49E, P50E P50E 1E–7E toggles the options ON and OFF Assigns User Codes 9–15 to AREA2 DESCRIPTION: Area 2 User Codes PROGRAM MODE LEVEL: EXAMPLE: To assign User Codes 1–8 to AREA1 and User Codes 9–15 to AREA2. P47E turn ON lights 1–8 P48E turn OFF lights 1–7 P49E turn OFF lights 1–8 P50E turn ON lights 1–7 Installer, Remote by PC FACTORY DEFAULT: User Code 1 (Master Code) assigned to Area 2. NOTES: • User Codes can be assigned to either a single Area or to both Areas. • If a User Code is assigned to NO Areas, the code is effectively disabled and will not operate the panel. • To make a User Code arm or disarm just one Area, assign that code only to the required Area. User Codes 2 3 4 5 6 7 8 9 10 11 12 13 14 15 EXAMPLE: User codes 1–8 are assigned to AREA 1. AREA 1 P47E User Codes 1-8 • Assigning User Codes to Areas has no effect unless zones are also assigned to Areas. • For this option [Zone No] E toggles the selection ON and OFF. 1 User Codes 1 2 3 4 5 6 7 8 P48E User Codes 9-15 9 10 11 12 13 14 15 EXAMPLE: User codes 9–15 are assigned to AREA 2. AREA 2 P49E User Codes 1-8 P50E User Codes 9-15 E-TECH ET8 (V4) CONTROL PANEL – INSTALLER MANUAL 21 PROGRAMMING ZONE TO OUTPUT MAPPING When a zone alarms, it can turn on any or all of the following 6 outputs: Sonalert, Strobe, Siren, Reset, AUX1, AUX2. The programming is selected with options P54E – P59E. Simply set the zone number to the output to select it. The zone LED will indicate if the zone is selected. The Tamper Input and the Keypad Panic can be programmed to turn on the Reset, Strobe, Sonalert and Siren by using option P61E. ZONE TO OUTPUTS MAPPING Zones OPTION No DESCRIPTION 1 NOTE: Zone To Output Mapping applies to zones when the panel is in the Armed or 24hr state. P54E Reset zones ON ON ON ON ON ON ON ON 2 3 4 5 6 7 8 P55E Strobe zones ON ON ON ON ON ON ON ON P56E Sonalert zones ON ON ON ON ON ON ON ON For MONITOR and DAY mode Output Mapping – see Option P63E 1E–8E, page 28 P57E Siren zones ON ON ON ON ON ON ON ON P58E Aux1 zones ON ON ON ON ON ON ON ON P59E Aux2 zones ON ON ON ON ON ON ON ON ON = Factory default setting P51~P53E, page 19 P54E PROGRAM MODE LEVEL: RESET OUTPUT ZONES Selects the zones to trigger the Reset output. Installer, Remote by PC FACTORY DEFAULT: PROGRAMMING SEQUENCE: all ON: All zones trigger Reset output P54E [Zone No]E toggles the options ON and OFF NOTES: P54E [Zone No]E OFF: The zone will not trigger the Reset output P54E [Zone No]E ON: The zone will trigger the Reset output • 0E will turn all selections OFF MEMORY E will turn all selections ON P55E PROGRAM MODE LEVEL: STROBE OUTPUT ZONES Selects the zones to trigger the Strobe output. Installer, Remote by PC FACTORY DEFAULT: PROGRAMMING SEQUENCE: all ON: All zones trigger Strobe output P55E [Zone No]E toggles the options ON and OFF NOTES: P55E [Zone No]E OFF: The zone will not trigger the Strobe output P55E [Zone No]E ON: The zone will trigger the Strobe output • 0E will turn all selections OFF MEMORY E will turn all selections ON P56E PROGRAM MODE LEVEL: KEYPAD SONALERT ZONES Selects the zones to trigger the Keypad Sonalert (beeper). Installer, Remote by PC FACTORY DEFAULT: PROGRAMMING SEQUENCE: all ON: All zones trigger Keypad Sonalert P56E [Zone No]E toggles the options ON and OFF NOTES: P56E [Zone No]E OFF: The zone will not trigger the Keypad Sonalert P56E [Zone No]E ON: The zone will trigger the Keypad Sonalert • 0E will turn all selections OFF MEMORY E will turn all selections ON 22 E-TECH ET8 (V4) CONTROL PANEL – INSTALLER MANUAL PROGRAMMING P57E PROGRAM MODE LEVEL: SIREN OUTPUT ZONES Selects the zones to trigger the Siren output. Installer, Remote by PC FACTORY DEFAULT: PROGRAMMING SEQUENCE: all ON: All zones trigger Siren output P57E [Zone No]E toggles the options ON and OFF NOTES: P57E [Zone No]E OFF: The zone will not trigger the Siren output P57E [Zone No]E ON: The zone will trigger the Siren output • 0E will turn all selections OFF MEMORY E will turn all selections ON P58E PROGRAM MODE LEVEL: Installer, Remote by PC FACTORY DEFAULT: all OFF: No zones trigger AUX1 NOTES: • 0E will turn all selections OFF MEMORY E will turn all selections ON P59E PROGRAM MODE LEVEL: Installer, Remote by PC FACTORY DEFAULT: all OFF: No zones trigger AUX2 NOTES: • 0E will turn all selections OFF MEMORY E will turn all selections ON AUX1 OUTPUT ZONES Selects the zones to trigger the AUX1 output. AUX1 output is Pin1 on the J3 header on the main board. PROGRAMMING SEQUENCE: P58E [Zone No]E toggles the options ON and OFF P58E [Zone No]E OFF: The zone will not trigger the AUX1 output P58E [Zone No]E ON: The zone will trigger the AUX1 output AUX2 OUTPUT ZONES Selects the zones to trigger the AUX2 output. AUX2 output is Pin2 on the J3 header on the main board. PROGRAMMING SEQUENCE: P59E [Zone No]E toggles the options ON and OFF P59E [Zone No]E OFF: The zone will not trigger the AUX2 output P59E [Zone No]E ON: The zone will trigger the AUX2 output E-TECH ET8 (V4) CONTROL PANEL – INSTALLER MANUAL 23 E n tr y b eep s Keysw Monit or/Dis Keysw ar m /A r m / Disar m Tamp er sire n lock out D u res s to R eset o u tp u t Auo E xclud e zo n e s A u to KP dis play o ff Delay AREA 1 -2 o u tp u t s PROGRAMMING OPTION No P60E DESCRIPTION 1E 2E 3E 4E 5E 6E 7E 8E Various options ON ON ON ON = Factory default setting. P60E 1E ENTRY BEEPS The sonalert will beep during Entry Delay. PROGRAM MODE LEVEL: Installer, Remote by PC PROGRAMMING SEQUENCE: FACTORY DEFAULT: Entry Beeps ON P60E 1E toggles the option ON and OFF NOTES: P60E 1E OFF: Entry Beeps OFF P60E 1E ON: Entry Beeps ON P60E 2E, 3E KEYSWITCH MONITOR MODE ARMING An externally fitted, normally open momentary Keyswitch can be used to Arm, Disarm or change the ET8 to Monitor mode. PROGRAM MODE LEVEL: Installer, Remote by PC The keyswitch is wired to zone 8 (zone 8 is then no longer available as a normal alarm input, but IS still available for use as a Radio Zone). FACTORY DEFAULT: No keyswitch enabled NOTES: • The keyswitch always Arms Area1 only. MONITOR ARMED • Momentary short circuit across resistor to toggle panel modes. DISARM DISARM • Open circuit resistor to trigger keyswitch panic. P60E 2E is ON P60E 3E is ON • The keyswitch always Disarms Area1 and Area2. ARMED MONITOR DISARM P60E 2E is ON P60E 3E is ON • Multiple keyswitches can be used. Wire in parallel. PROGRAMMING SEQUENCE: P60E 2E or 3E toggles the option ON and OFF P60E 2E & 3E OFF: No keyswitch operation. Zone 8 is a normal alarm input. P60E 2E ON: Keyswitch cycles between Monitor and Disarm. P60E 3E ON: Keyswitch cycles between Arm and Disarm. P60E 2E & 3E ON: Keyswitch cycles between Arm, Monitor and Disarm. 24 E-TECH ET8 (V4) CONTROL PANEL – INSTALLER MANUAL PROGRAMMING P60E 4E TAMPER ALARM LOCKOUT This option programs the Tamper input to Lockout, i.e. cause the Siren & Reset outputs to sound only once whilst the panel is armed. PROGRAM MODE LEVEL: Installer, Remote by PC FACTORY DEFAULT: PROGRAMMING SEQUENCE: ON: Tamper Reset Lockout enabled P60E 4E toggles the option ON and OFF NOTES: P60E 4E OFF: Tamper Reset Lockout disabled P60E 4E ON: Tamper Reset Lockout enabled RELATED OPTIONS: P44E Lockout zones P60E 5E DURESS TO RESET OUTPUT Keypad Duress is normally a silent alarm. This option makes the Duress alarm trigger the Reset output. PROGRAM MODE LEVEL: Installer, Remote by PC FACTORY DEFAULT: PROGRAMMING SEQUENCE: OFF: No Reset output on Duress alarm P60E 5E toggles the option ON and OFF NOTES: •To Disarm with Duress, add any of the digits 5,6,8 or 9 in front of the User Code when disarming. P60E 6E PROGRAM MODE LEVEL: Installer, Remote by PC FACTORY DEFAULT: ON: Auto Exclude enabled NOTES: • RELATED OPTIONS: P62E 7E Siren burst on Auto Exclude P60E 5E OFF: No Reset output on Duress alarm P60E 5E ON: Duress alarm triggers Reset output AUTO EXCLUDE ZONES If a zone is unsealed at the end of Exit Time the panel can either Exclude (ignore) that zone or immediately alarm. The panel will give a 2 second Siren burst at the end of Exit Time to indicate that the panel is armed with a zone/s Auto Excluded. The 2 sec Siren burst can be disabled by option P62E 7E. PROGRAMMING SEQUENCE: P60E 6E toggles the option ON and OFF P60E 6E OFF: Auto Exclude disabled (instant alarm if unsealed at end of Exit Time) P60E 6E ON: Auto Exclude enabled (zone is excluded if unsealed at end of Exit Time) P60E 7E PROGRAM MODE LEVEL: Installer, Remote by PC FACTORY DEFAULT: OFF: Display is always ON NOTES: • On the LCD keypad, the display and display backlighting will turn off but the keys backlighting will remain on. The keypad flap can be closed to reduce stray light from the keys. P60E 8E PROGRAM MODE LEVEL: Installer, Remote by PC FACTORY DEFAULT: OFF: ARM1 & ARM2 outputs are instant NOTES: DISABLE THE DISPLAY The LED indicators on the keypad can be programmed to blank after 4 minutes of no keypad use. Any action that causes a beep will restore the display (Use the button preferably). PROGRAMMING SEQUENCE: P60E 7E toggles the option ON and OFF P60E 7E OFF: Display is always on P60E 7E ON: Display will blank after 4 minutes DELAY ARM1 & ARM2 OUTPUTS The output ARM1 turns on when Area 1 is armed. The output ARM2 turns on when Area 2 is armed. These outputs can be programmed to turn on instantly or at the end of Exit Time ARM1 & ARM2 output s are Pins 3 & 4 on the J3 header on the main board. PROGRAMMING SEQUENCE: P60E 8E toggles the option ON and OFF P60E 8E OFF: ARM1 & ARM2 outputs turn on instantly P60E 8E ON: ARM1 & ARM2 outputs turn on at end of Exit Time E-TECH ET8 (V4) CONTROL PANEL – INSTALLER MANUAL 25 Tamp er to Reset outpu Tamp t er to Strob e outp Tamp u er to t Sona ler t Tamp er to Siren outpu KP Pa t nic to Reset KP Pa outpu nic to t Strob e outp KP Pa ut nic to Sona ler t KP Pa nic to Siren outpu t PROGRAMMING OPTION No P61E DESCRIPTION 1E 2E 3E 4E 5E 6E 7E 8E Tamper & Panic alarms mapping ON ON ON ON ON ON ON ON ON = Factory default setting. P61E 1E–4E TAMPER ALARM / OUTPUT MAPPING This option selects which outputs will trigger when a Tamper Alarm occurs. PROGRAM MODE LEVEL: Installer, Remote by PC PROGRAMMING SEQUENCE: FACTORY DEFAULT: P61E 1E–4E toggles the options ON and OFF 1E–4E, ON: Tamper alarm triggers all outputs P61E 1E: Tamper Alarm to Reset output P61E 2E: Tamper Alarm to Strobe output P61E 3E: Tamper Alarm to Keypad Sonaler t output P61E 4E: Tamper Alarm to Siren output NOTES: • A Tamper Alarm can be caused by the TAMP input or by removing the the J1 link. P61E 5E–8E KEYPAD PANIC ALARM / OUTPUT MAPPING This option selects which outputs will trigger when a Keypad Panic alarm occurs. PROGRAM MODE LEVEL: Installer, Remote by PC FACTORY DEFAULT: PROGRAMMING SEQUENCE: 5E–8E, ON: Panic alarm triggers all outputs P61E 5E–8E toggles the options ON and OFF NOTES: • A Keypad Panic Alarm can be caused by the PANIC keys on the keypad (* E or ** together, depending on Option P64E6E). 26 P61E 5E: Keypad P61E 6E: Keypad P61E 7E: Keypad P61E 8E: Keypad Panic Alarm to Reset output Panic Alarm to Strobe output Panic Alarm to Keypad Sonaler t output Panic Alarm to Siren output E-TECH ET8 (V4) CONTROL PANEL – INSTALLER MANUAL Shor t cut M emor y Disp Shor t lay cut Z one E xclud Shor t e cut M onitor Shor t Mode cut K eypad Shor t Panic cut A rea1 A Shor t rming cut A rea2 A 2 sec rming Siren Auto Exclu Exit T de ime x 10 PROGRAMMING OPTION No P62E DESCRIPTION 1E 2E 3E 4E 5E 6E 7E 8E Operation Shortcuts, etc ON ON ON ON ON ON = Factory default setting. P62E 1E–6E SYSTEM OPERATION SHORTCUTS Some keypad operations can be programmed to operate with or without a User Code. PROGRAM MODE LEVEL: Installer, Remote by PC FACTORY DEFAULT: 1E, ON: Memory Display shor tcut enabled 2E, ON: Zone Exclude shortcut enabled 3E, ON: Monitor Mode shor tcut enabled 4E, OFF: Keypad Panic disabled 5E, ON: Area1 Arming shortcut enabled 6E, OFF: Area2 Arming shortcut disabled NOTES: • A Tamper Alarm can be caused by the TAMP input or the J1 link. • Allocate a User Code to Area2 before programming Area2 shortcut arming. If Area 2 is shortcut armed then it will always remain armed. This will bar entry into program mode until Area 2 is disarmed. P62E 7E PROGRAM MODE LEVEL: Installer, Remote by PC FACTORY DEFAULT: ON: Siren burst on Auto Exclude enabled NOTES: • RELATED OPTIONS: P60E 6E Auto Exclude zones P62E 8E PROGRAM MODE LEVEL: PROGRAMMING SEQUENCE: P62E 1E–6E toggles the options ON and OFF P62E 1E Memory Display shor tcut P62E 2E Zone Exclude shor tcut P62E 3E Monitor Mode shor tcut P62E 4E Keypad Panic shor tcut P62E 5E Area1 Arming shortcut P62E 6E Area2 Arming shortcut OPERATING EXAMPLES: Arming without shortcut: [User Code] Arming with shortcut: Keypad Panic without shortcut: Keypad Panic with shortcut: [User Code] SIREN BURST ON AUTO EXCLUDE This option allows the disabling of the 2 second siren burst at end of Exit Time which indicates a zone/s has been Auto Excluded. PROGRAMMING SEQUENCE: P62E 7E toggles the option ON and OFF P62E 7E OFF: Siren burst on Auto Exclude disabled P62E 7E ON: Siren burst on Auto Exclude enabled EXIT TIME X10 This option multiplies the normal exit time by a factor of 10. Installer, Remote by PC FACTORY DEFAULT: PROGRAMMING SEQUENCE: OFF: Exit Time x10 disabled P62E 8E toggles the option ON and OFF NOTES: P62E 8E OFF: Exit Time is the time set by P28E P62E 8E ON: Exit Time is multiplied by 10 • RELATED OPTIONS: P28E Exit Time EXAMPLE: If P28E = 22 seconds then if P62E 8E is ON, the exit time is 22 x 10 = 220 seconds. E-TECH ET8 (V4) CONTROL PANEL – INSTALLER MANUAL 27 Monit or to Reset outpu Monit t or to Strob e outp Monit u or to t Sona ler t o Monit utput or to Siren outpu Day M t ode to R e set ou Day M tput ode to Strob Day M e outp ode to ut Sona Day M ler t o utput ode to Siren outpu t PROGRAMMING OPTION No P63E DESCRIPTION 1E 2E 3E 4E 5E 6E 7E 8E Monitor & Day mode output mapping ON ON ON = Factory default setting. P63E 1E–4E PROGRAM MODE LEVEL: MONITOR MODE OUTPUT MAPPING This option selects which outputs are triggered by alarms in Monitor Mode. Installer, Remote by PC FACTORY DEFAULT: 1E–4E OFF: No Monitor Mode outputs NOTES: • RELATED OPTIONS: P64E 1E 2second Monitor alarm P63E 5E–8E PROGRAM MODE LEVEL: PROGRAMMING SEQUENCE: P63E 1E–4E toggles the options ON and OFF P63E 1E: Monitor Mode to Reset output P63E 2E: Monitor Mode to Strobe output P63E 3E: Monitor Mode to Keypad Sonaler t output P63E 4E: Monitor Mode to Siren output DAY MODE OUTPUT MAPPING This option selects which outputs are triggered by alarms in Day Mode. Installer, Remote by PC FACTORY DEFAULT: 5E, 6E ON 7E, 8E OFF NOTES: • RELATED OPTIONS: P64E 2E 2second Day alarm PROGRAMMING SEQUENCE: P63E 5E–8E toggles the options ON and OFF P63E 5E: Day Mode to Reset output P63E 6E: Day Mode to Strobe output P63E 7E: Day Mode to Keypad Sonalert output P63E 8E: Day Mode to Siren output MONITOR Mode and DAY Mode Output Mapping is an extra feature released with the ET8 V4. Note that MONITOR and DAY zones do not automatically assume the outputs assigned by Options P54E–P59E. Those options only apply to zones when the panel is in the ARMED state. Options P63E 1E–8E allow different outputs to be triggered when the panel is in MONITOR and DAY modes. For ZONE TO OUTPUT MAPPING (Armed & 24hr states) – see Options P54E – P59E, page 22 28 E-TECH ET8 (V4) CONTROL PANEL – INSTALLER MANUAL 2 sec ond M onitor 2 sec Alarm ond D ay Ala rm Monit or zon es En tr y2 Radio Key c hirp & 50Hz flash mains frequ ency Doub le key Keypa Keypa d Pan ic d Fire Alarm Keypa d Med ical A larm PROGRAMMING OPTION No P64E DESCRIPTION Miscellaneous options 1E 2E 3E 4E 5E 6E 7E 8E ON ON ON ON ON = Factory default setting. P64E 1E 2 SECOND MONITOR MODE ALARM Alarms in Monitor Mode can either activate the programmed outputs for Siren Time duration (P29E) or they can activate the outputs for 2 seconds only. PROGRAM MODE LEVEL: Installer, Remote by PC FACTORY DEFAULT: PROGRAMMING SEQUENCE: OFF: Monitor Mode outputs normal time P64E 1E toggles the option ON and OFF NOTES: P64E 1E OFF: Monitor Mode outputs have normal time as set by P29E P64E 1E ON: Monitor Mode outputs are ON for 2 seconds only • RELATED OPTIONS: P51E Set Monitor zones P63E 1E–4E Monitor Mode output mapping P64E 2E 2 SECOND DAY MODE ALARM Alarms in Day Mode will activate the programmed outputs while the zone is unsealed or they can activate the outputs for 2 seconds only. PROGRAM MODE LEVEL: Installer, Remote by PC FACTORY DEFAULT: PROGRAMMING SEQUENCE: ON: 2 secDay Mode outputs P64E 2E toggles the option ON and OFF NOTES: • RELATED OPTIONS: P53E Assign Day zones P63E 5E–8E Day Mode output mapping P64E 3E MONITOR ZONES ENTRY DELAY2 Monitor zones can either have the delay types set by options P40E–P43E or they can all be assigned to have Entry Delay 2. This allows all Monitor zones to be programmed with the same entry delay time. PROGRAM MODE LEVEL: Installer, Remote by PC FACTORY DEFAULT: ON: Monitor zones all have Entry Delay2 PROGRAMMING SEQUENCE: NOTES: • RELATED OPTIONS: P27E Entry Delay Time 2 P51E Assign Monitor zones P63E 1E–4E Monitor Mode output mapping P64E 4E P64E 2E OFF: Day Mode outputs are ON while the zone is unsealed P64E 2E ON: Day Mode outputs are ON for 2 seconds only P64E 3E toggles the option ON and OFF P64E 3E OFF: Monitor zones behave as programmed by P40E–P43E P64E 3E ON: Monitor zones all have Entry Delay2 ARM/DISARM CHIRPS Installer, Remote by PC If this option is selected the Siren and Strobe Outputs will "Chirp" when the panel is Armed and Disarmed with the Keyswitch or Radio Keys. FACTORY DEFAULT: The panel will make 1 Chirp on Arming, and 3 Chirps on Disarming. PROGRAM MODE LEVEL: OFF: No chirps NOTES: • RELATED OPTIONS: P68E 8E Quiet Chirps PROGRAMMING SEQUENCE: P64E 4E toggles the option ON and OFF P64E 4E OFF: No Arm/Disarm chirps P64E 4E ON: Siren & Strobe outputs will chirp on arm/disarm E-TECH ET8 (V4) CONTROL PANEL – INSTALLER MANUAL 29 PROGRAMMING P64E 5E 50Hz MAINS FREQUENCY Selects either 50Hz or 60Hz mains power frequency operation. Leave the factory default for use in Australia and New Zealand. Users in North America should select 60Hz mains frequency. PROGRAM MODE LEVEL: Installer, Remote by PC FACTORY DEFAULT: ON: 50Hz mains frequency Required for the accurate timing of dialler test reports (if programmed). It has no effect on local or other dialler operations. NOTES: PROGRAMMING SEQUENCE: P64E 5E toggles the option ON and OFF P64E 5E OFF: 60Hz mains frequency P64E 5E ON: 50Hz mains frequency P64E 6E DOUBLE KEY KEYPAD PANIC Installer, Remote by PC This option allows the Keypad Panic alarm to be triggered by pressing both Panic buttons together. FACTORY DEFAULT: NOTE: PROGRAM MODE LEVEL: [User Code] always triggers Keypad Panic ON: Double key Keypad Panic enabled PROGRAMMING SEQUENCE: NOTES: • RELATED OPTIONS: P62E 4E Shortcut Keypad Panic P64E 6E toggles the option ON and OFF • The E-Tech LCD keypad has two buttons labelled P64E 7E PROGRAM MODE LEVEL: Installer, Remote by PC FACTORY DEFAULT: OFF: No Keypad Fire Alarm NOTES: • RELATED OPTIONS: P68E 6E Fire Siren sound P64E 8E PROGRAM MODE LEVEL: Installer, Remote by PC FACTORY DEFAULT: OFF: No Keypad Medical Alarm NOTES: • RELATED OPTIONS: 30 P64E 6E OFF: No double key Keypad Panic P64E 6E ON: Double key Keypad Panic enabled KEYPAD FIRE ALARM This option enables the Keypad Fire Alarm. Pressing and then activates the dialler and reports a Fire Alarm and triggers the siren. The “Fire Alarm” siren sound is different to the normal alarm siren sound. PROGRAMMING SEQUENCE: P64E 7E toggles the option ON and OFF P64E 7E OFF: No Keypad Fire Alarm P64E 7E ON: Keypad Fire Alarm enabled KEYPAD MEDICAL ALARM This option enables the Keypad Medical Alarm. Pressing activates the dialler and reports a Medical Alarm. PROGRAMMING SEQUENCE: P64E 8E toggles the option ON and OFF P64E 8E OFF: No Keypad Medical Alarm P64E 8E ON: Keypad Medical Alarm enabled E-TECH ET8 (V4) CONTROL PANEL – INSTALLER MANUAL and then PROGRAMMING Zones OPTION No P65E DESCRIPTION 1 2 3 4 5 6 7 8 Supervised Radio zones ON = Factory default setting P65E SUPERVISED RADIO ZONES This option assigns zones that will operate as Radio Supervised types. PROGRAM MODE LEVEL: Installer, Remote by PC Supervised signals failure is reported (as per the P66E output options) when no signal is received from a Radio Supervision Zone for the Supervision Time P67E. FACTORY DEFAULT: all OFF: No Radio Supervision zones NOTES: Radio Supervision for any zone is not enabled unless a Radio PIR is assigned to the zone, (P01E–P08E). • 0E will turn all selections OFF MEMORY E will turn all selections ON • RELATED OPTIONS: P66E 1E–6E Radio Supervision Alerts P67E Radio Supervision Time P01E–P08E Programming Radio Devices P66E 1E–6E PROGRAMMING SEQUENCE: P65E [Zone No]E toggles the options ON and OFF P65E [Zone No]E OFF: The zone is not a Supervised Radio zone P65E [Zone No]E ON: The zone is a Supervised Radio zone RADIO SUPERVISION ALERTS, SUPERVISION TIME SPEEDUP See pages 32–33 P67E SUPERVISION TIME Installer, Remote by PC The SUPERVISION TIME is the time allowed between radio transmissions received by the ET8 from any Supervised E-Tech Radio PIR (100–663). FACTORY DEFAULT: The SUPERVISION TIME setting is from 01 to 24 hours. PROGRAM MODE LEVEL: 24hrs PROGRAMMING SEQUENCE: NOTES: • A setting of less than 3 hours is not recommended. P67E existing time is displayed [ENTER NEW TIME] E new time is displayed • The Supervision timer is reset on exit from Installer Program Mode, on Arm or Disarm and on reception of the Supervision signal from the particular Radio PIR. EXAMPLE: To program SUPERVISION TIME to be 4 hours: P67E 04E • The Supervision signal from each Supervised Radio PIR is individually timed. • RELATED OPTIONS: P65E Radio Supervision Zones P66E 1E–6E Radio Supervision Alerts P66E 7E–8E Supervision Time Speed-up See Page 56 for Radio Device programming RADIO SUPERVISION The purpose of Radio Supervision is to verify the correct operation of E-Tech Radio PIRs. The Supervision signal from the Radio PIR tells the panel that the device has not been removed from radio range and is in working order. Non-SUPERVISION Radio PIRs can also be programmed and used with the ET8 SUPERVISION TIMERS. A non-SUPERVISION enabled Radio PIR will transmit signals to the ET8 only when it has detected an event. Obviously, there is no guaranteed signal period. In either case, when the allowed time limit is exceeded then a WARNING is first given (if programmed by P66E 3E), and then after 1 minute, the programmed RADIO SUPERVISION ALERTS are generated by the ET8. NOTE: Manually Excluding a Supervised Zone will also disable Radio Supervision for that zone. E-TECH ET8 (V4) CONTROL PANEL – INSTALLER MANUAL 31 Super vision RESE Super T out put vision STRO Super BE ou vision tput SONA Super LERT vision outpu t SIREN Super o u t p vision ut AUX1 Super outpu vision t AUX2 Super outpu vision t speed Super up x6 vision speed up x1 0 PROGRAMMING OPTION No P66E DESCRIPTION 1E 2E 3E 4E 5E 6E 7E 8E Radio Supervision Alerts ON = Factory default setting. P66E 1E RADIO SUPERVISION ALERTS – RESET OUTPUT Setting this option turns the Reset output ON when a SUPERVISED RADIO alert occurs. The Reset output will remain ON for the duration of the ALARM TIME (Set by Option P29E). PROGRAM MODE LEVEL: Installer, Remote by PC FACTORY DEFAULT: OFF: Supervision Reset output disabled PROGRAMMING SEQUENCE: NOTES: P66E 1E toggles the option ON and OFF • RELATED OPTIONS: P65E Supervised Radio Zones P66E 1E OFF: Supervision Reset output disabled P66E 1E ON: Supervision Reset output enabled P66E 2E RADIO SUPERVISION ALERTS – STROBE OUTPUT Setting this option turns the Strobe output ON when a SUPERVISED RADIO alert occurs. The Strobe output will remain ON until the panel is disarmed. PROGRAM MODE LEVEL: Installer, Remote by PC FACTORY DEFAULT: PROGRAMMING SEQUENCE: OFF: Supervision Strobe output disabled P66E 2E toggles the option ON and OFF NOTES: P66E 2E OFF: Supervision Strobe output disabled P66E 2E ON: Supervision Strobe output enabled • RELATED OPTIONS: P65E Supervised Radio Zones P66E 3E RADIO SUPERVISION ALERTS – KEYPAD SONALERT & DELAY ALL SUPERVISION OUTPUTS PROGRAM MODE LEVEL: Setting this option turns the Keypad Sonalert ON when a SUPERVISED RADIO alert occurs. The Keypad Sonalert remains ON until any keypad key is pressed. Installer, Remote by PC FACTORY DEFAULT: OFF: Supervision Keypad Sonalert disabled NOTES: • When this option is turned ON, it delays the operation of all other selected Supervision outputs by one minute. • RELATED OPTIONS: P65E Supervised Radio Zones Also, turning this option ON makes all Supervision outputs delayed by one minute. PROGRAMMING SEQUENCE: P66E 3E toggles the option ON and OFF P66E 3E OFF: Supervision Keypad Sonalert disabled AND all Supervision outputs trigger instantly P66E 3E ON: Supervision Keypad Sonalert enabled AND all Supervision outputs are delayed by 1 minute 32 E-TECH ET8 (V4) CONTROL PANEL – INSTALLER MANUAL PROGRAMMING P66E 4E RADIO SUPERVISION ALERTS – SIREN OUTPUT Setting this option turns the Siren output ON when a SUPERVISED RADIO alert occurs. The Siren output will remain ON for the duration of the ALARM TIME (Set by Option P29E). PROGRAM MODE LEVEL: Installer, Remote by PC FACTORY DEFAULT: OFF: Supervision Siren output disabled PROGRAMMING SEQUENCE: NOTES: P66E 4E toggles the option ON and OFF • RELATED OPTIONS: P65E Supervised Radio Zones P66E 4E OFF: Supervision Siren output disabled P66E 4E ON: Supervision Siren output enabled P66E 5E RADIO SUPERVISION ALERTS – AUX1 OUTPUT Setting this option turns the AUX1 output ON when a SUPERVISED RADIO alert occurs. PROGRAM MODE LEVEL: Installer, Remote by PC FACTORY DEFAULT: PROGRAMMING SEQUENCE: OFF: Supervision AUX1 output disabled P66E 5E toggles the option ON and OFF NOTES: • AUX1 output is Pin1 on the J3 header on the main board P66E 5E OFF: Supervision AUX1 output disabled P66E 5E ON: Supervision AUX1 output enabled • RELATED OPTIONS: P65E P66E 6E RADIO SUPERVISION ALERTS – AUX2 OUTPUT Setting this option turns the AUX2 output ON when a SUPERVISED RADIO alert occurs. PROGRAM MODE LEVEL: Installer, Remote by PC FACTORY DEFAULT: PROGRAMMING SEQUENCE: OFF: Supervision AUX2 output disabled P66E 6E toggles the option ON and OFF NOTES: • AUX2 output is Pin2 on the J3 header on the main board P66E 6E OFF: Supervision AUX2 output disabled P66E 6E ON: Supervision AUX2 output enabled • RELATED OPTIONS: P65E P66E 7E PROGRAM MODE LEVEL: Installer, Remote by PC FACTORY DEFAULT: OFF: Supervision Time normal NOTES: • RELATED OPTIONS: P67E Supervision Time P66E 8E Supervision Time speedup x10 P66E 8E PROGRAM MODE LEVEL: Installer, Remote by PC FACTORY DEFAULT: OFF: Supervision Time normal NOTES: • RELATED OPTIONS: P67E Supervision Time P66E 7E Supervision Time speedup x6 • P66E 7E & 8E are normally only used for Supervision testing purposes SUPERVISION TIME SPEEDUP X6 Setting this option speeds up the Supervision Time by 6. For instance if P67E is set to 1 hour (60 minutes), then this option will reduce it to 10 minutes. (i.e., 60 divided by 6). PROGRAMMING SEQUENCE: P66E 7E toggles the option ON and OFF P66E 7E OFF: Supervision Time normal as set by P67E P66E 7E ON: Supervision Time speedup x6 SUPERVISION TIME SPEEDUP X10 Setting this option speeds up the Supervision Time by 10. For instance if P67E is set to 1 hour (60 minutes), then this option will reduce it to 6 minutes. (i.e., 60 divided by 10). PROGRAMMING SEQUENCE: P66E 8E toggles the option ON and OFF P66E 8E OFF: Supervision Time normal as set by P67E P66E 8E ON: Supervision Time speedup x10 NOTE: If both P66E 7E and 8E are both ON then the Supervision time is sped up by 60. For instance if P67E is set to 1 hour (60 minutes), then this option will reduce it to 1 minute. (i.e., 60 divided by 60). E-TECH ET8 (V4) CONTROL PANEL – INSTALLER MANUAL 33 3K3 z one r esisto rs Radio Key P anic t oggle Radio s AUX Key P 1 anic p Radio ulses AUX1 Key A rming 24hr unsea zone led w fire sir arning en so 4th b und utton Radio Key fo Quiet r AUX chirps 1 on Ar m/Dis arm PROGRAMMING OPTION No P68E DESCRIPTION 1E 2E 3E 4E 5E 6E 7E 8E Miscellaneous options ON = Factory default setting. P67E SUPERVISION TIME, page 31 P68E 2E 3K3 ZONE RESISTORS Setting this option ON changes the Zone 1 to Zone 8 (and External Tamper) monitoring resistor from 2K2 to 3K3. PROGRAM MODE LEVEL: Installer, Remote by PC FACTORY DEFAULT: PROGRAMMING SEQUENCE: OFF: No 3K3 zone resistors P68E 2E toggles the option ON and OFF NOTES: P68E 2E OFF: 3K3 zone resistors disabled P68E 2E ON: 3K3 zone resistors enabled • The 3K3 zone resistor option is useful when installing the panel in a site prewired with 3K3 resistors • If Zone 8 is converted to a keyswitch input then a 2K2 monitoring resistor is always used P68E 3E RADIO KEY PANIC TOGGLES AUX1 Setting this option ON changes the action of the Radio Key Panic button so that the AUX1 output is toggled ON and OFF. (Each press on Panic toggles the state of AUX1 between ON and OFF). PROGRAM MODE LEVEL: Installer, Remote by PC FACTORY DEFAULT: OFF: Radio Key Panic to AUX1 disabled NOTES: • This option is useful for triggering external devices using Radio Key’s Panic button. E.g., lighting, garage doors PROGRAMMING SEQUENCE: P68E 3E toggles the option ON and OFF • When this option is selected ON, the Radio Key Panic function is disabled. P68E 3E OFF: Radio Key Panic triggers control panel Panic P68E 3E ON: Radio Key Panic toggles AUX1 P68E 4E RADIO KEY PANIC PULSES AUX1 Setting this option ON changes the action of the Radio Key Panic button so that the AUX1 output is pulsed ON for 2 seconds. (That is; momentary ON for 2sec). PROGRAM MODE LEVEL: Installer, Remote by PC If a 4 Button Key is used then this option can be used with the 4th key instead of the Panic key (using P68E 7E). This then allows the Panic key to still activate Panic reports. FACTORY DEFAULT: OFF: Radio Key Panic to AUX1 disabled NOTES: • When this option is selected ON, the Radio Key Panic function is disabled. PROGRAMMING SEQUENCE: • If P68E 3E and 4E are both selected ON, then 4E has priority. 34 If a 4 Button Key is used then this option can be used with the 4th key instead of the Panic key (using P68E 7E). This then allows the Panic key to still activate Panic reports. P68E 4E toggles the option ON and OFF P68E 4E OFF: Radio Key Panic triggers control panel Panic P68E 4E ON: Radio Key Panic pulses AUX1 E-TECH ET8 (V4) CONTROL PANEL – INSTALLER MANUAL PROGRAMMING P68E 5E RADIO KEY ARMING, UNSEALED ZONE WARNING Setting this option ON allows a 2 second SIREN warning if there is an unsealed zone in an Area Armed by a Radio Key. PROGRAM MODE LEVEL: Installer, Remote by PC FACTORY DEFAULT: PROGRAMMING SEQUENCE: OFF: Radio Key siren warning disabled P68E 5E toggles the option ON and OFF NOTES: P68E 5E OFF: Radio Key arming, siren warning disabled P68E 5E ON: Radio Key arming, siren warning enabled • P68E 6E 24HR ZONE FIRE SIREN SOUND This option changes the siren sound when a 24hr zone is triggered. PROGRAM MODE LEVEL: Installer, Remote by PC PROGRAMMING SEQUENCE: FACTORY DEFAULT: OFF: No 24hr Fire siren sound P68E 6E toggles the option ON and OFF NOTES: P68E 6E OFF: Fire siren sound disabled P68E 6E ON: Fire siren sound enabled • The keypad key sequence for FIRE (3 E) always outputs the FIRE siren sound P68E 7E 4th BUTTON RADIO KEY FOR AUX1 E-Tech 4 Button Radio Key only – this option changes P68E 3E and 4E to work with the 4th Button of a 4 Button Radio Key instead of the PANIC button. PROGRAM MODE LEVEL: Installer, Remote by PC FACTORY DEFAULT: PROGRAMMING SEQUENCE: OFF: 4th button for AUX1 disabled P68E 7E toggles the option ON and OFF NOTES: • RELATED OPTIONS: P68E 3E & 4E Radio Key Panic to AUX1 P68E 8E P68E 7E OFF: 4th button Radio Key for AUX1 disabled P68E 7E ON: 4th button Radio Key for AUX1 enabled QUIET CHIRPS ON ARM/DISARM Installer, Remote by PC This quietens the siren chirps that are made whenever keyswitch or radio key Arming or Disarming is used. FACTORY DEFAULT: (Arm/Disarm Chirps must be enabled at P64E 4E). PROGRAM MODE LEVEL: OFF: Quiet Chirps disabled NOTES: • RELATED OPTIONS: P64E 4E Arm/Disarm Chirps PROGRAMMING SEQUENCE: P68E 8E toggles the option ON and OFF P68E 8E OFF: Quiet Chirps disabled P68E 8E ON: Quiet Chirps enabled E-TECH ET8 (V4) CONTROL PANEL – INSTALLER MANUAL 35 OPTION No P69E DESCRIPTION . ARM1 pulse outpu ARM2 t pulse outpu Quiet t Monit or sir en 6 bee ps on Armin g Radio Key M onitor . Armin g . PROGRAMMING 1E 2E 3E 4E 5E 6E 7E 8E Miscellaneous options 2 ON = Factory default setting. P69E 1E ARM1 PULSE OUTPUT Installer, Remote by PC This option selects the ARM1 output to pulse on for 2 seconds whenever arming or disarming of Area1. FACTORY DEFAULT: (The ARM1 output normally toggles when arming/disarming). PROGRAM MODE LEVEL: OFF: ARM1 output toggles NOTES: Note also that when Arming with the P60E 8E option selected that the pulse will occur at the end of Exit Time. • This is useful as a Smoke Detector reset output with an optional external relay. PROGRAMMING SEQUENCE: P69E 1E toggles the option ON and OFF • RELATED OPTIONS: P60E 8E Delay ARM1/ARM2 outputs P69E 1E OFF: ARM1 output toggles P69E 1E ON: ARM1 output pulses P69E 2E ARM2 PULSE OUTPUT Installer, Remote by PC This option selects the ARM2 output to pulse on for 2 seconds whenever Arming or Disarming of Area2. FACTORY DEFAULT: (The ARM2 output normally toggles when arming/disarming). PROGRAM MODE LEVEL: OFF: ARM2 output toggles NOTES: Note also that when Arming with the P60E 8E option selected that the pulse will occur at the end of Exit Time. • This is useful as a Smoke Detector reset output with an optional external relay. PROGRAMMING SEQUENCE: P69E 2E toggles the option ON and OFF • RELATED OPTIONS: P60E 8E Delay ARM1/ARM2 outputs P69E 2E OFF: ARM2 output toggles P69E 2E ON: ARM2 output pulses P69E 3E QUIET MONITOR SIREN This option selects the ‘Quiet Siren’ sound in Monitor Mode. PROGRAM MODE LEVEL: Installer, Remote by PC The Quiet Siren sound is a continuous “beep beep beep” sound rather than the normal siren sound. FACTORY DEFAULT: OFF: Normal siren sound in Monitor Mode NOTES: • This does not affect the RESET output PROGRAMMING SEQUENCE: P69E 3E toggles the option ON and OFF P69E 3E OFF: Normal siren sound in Monitor Mode P69E 3E ON: Quiet Siren sound in Monitor Mode 36 E-TECH ET8 (V4) CONTROL PANEL – INSTALLER MANUAL PROGRAMMING P69E 4E 6 BEEPS ON ARMING Normally the keypad/s onboard SONALERT gives 3 beeps when the ET8 is Armed. Turning this option ON will give 6 keypad beeps when Arming. PROGRAM MODE LEVEL: Installer, Remote by PC FACTORY DEFAULT: PROGRAMMING SEQUENCE: OFF: Keypad gives 3 beeps on Arming P69E 4E toggles the option ON and OFF NOTES: • The keypad beeps on Arm/Disarm when Arming/Disarming by keypad, keyswitch or by Radio Key P69E 5E P69E 4E OFF: Keypad gives 3 beeps on Arming P69E 4E ON: Keypad gives 6 beeps on Arming RADIO KEY MONITOR ARMING Installer, Remote by PC Setting this option on allows a double press of a Radio Key OFF button to ARM the ET8 in MONITOR mode. FACTORY DEFAULT: (Requires two presses of the Radio Key OFF button within 4 seconds). OFF: Radio Keys cannot Arm Monitor Mode PROGRAMMING SEQUENCE: PROGRAM MODE LEVEL: NOTES: • P69E 5E toggles the option ON and OFF P69E 5E OFF: Radio Key Monitor Mode Arming disabled P69E 5E ON: Radio Key Monitor Mode Arming enabled E-TECH ET8 (V4) CONTROL PANEL – INSTALLER MANUAL 37 PROGRAMMING OPTION No DESCRIPTION FACTORY DEFAULT Telephone Number 1 - Primary Telephone Number 2 - Secondary Telephone Number 3 - Test Calls Telephone Number 4 - Callback for Up/download Follow Me Telephone Number - For Audible Dialling none none none none none DESCRIPTION FACTORY DEFAULT P72E Account Number 1 0000 P73E Account Number 2 0000 P70E P71E P80E P81E P00E OPTION No P70E, P71E TELEPHONE NUMBERS 1 & 2 The ET8 can dial up to 2 phone numbers when an event is to be transmitted to a remote location. Telephone numbers may be up to 15 digits long. PROGRAM MODE LEVEL: Installer, Remote by PC FACTORY DEFAULT: PROGRAMMING SEQUENCE: No telephone numbers NOTES: • If telephone number 2 is disabled, all calls are made on telephone number 1 and the setting of P87E 1E has no effect. P70E existing telephone number is displayed [ENTER NEW TELEPHONE No] E new telephone number is displayed EXAMPLE: To program Telephone No.1 to be 03 1234 1234: P70E 0312341234E • If telephone number 3 is disabled, all test calls are made on telephone number 1&2 SPECIAL FUNCTIONS FOR ALL TELEPHONE NUMBERS • Any keypress will stop the telephone number display sequence TO CLEAR A TELEPHONE NUMBER • RELATED OPTIONS: P87E 1E Alternate Primary/Secondary telephone numbers To clear a telephone number, enter the MEMORY key in place of the telephone number. Example, to clear a Telephone Number 1 press: P70E MEMORY E P86E 1E Disable dialler (still allows remote up/download if programmed) SPECIAL CHARACTERS (Applies to all telephone Numbers) Pauses, * (star) or # (hash) (VF digits) can be included in the dialling sequence by using the keys in the table below. P72E, P73E PROGRAM MODE LEVEL: Installer, Remote by PC FACTORY DEFAULT: SPECIAL CHARACTER KEY ENTRY PAUSE (1.6sec) * (Star) # (Hash) ARM Key MONITOR Key EXCLUDE Key DISPLAYED ON LCD DISPLAY 12 10 11 ACCOUNT NUMBER 1 & 2 Account numbers for identifying the panel to the Central Station. Area 1 Open/ Close reports will report on Account No.1 and Area 2 Open/Close reports will report on Account No.2. P72E Account No.1: 0000 P73E Account No.2: 0000 Zone Alarms can be assigned to report on either Account Number as set by Option P79E. NOTES: All miscellaneous events (eg. Tampers, Mains Fail) will report on Account No. 1. • RELATED OPTIONS: P79E Account No.2 zones PROGRAMMING SEQUENCE: P72E (or P73E) existing account number is displayed [ENTER NEW ACCOUNT No] E new account number is displayed EXAMPLE: To program Account No.1 to be 1239: P72E1239E 38 E-TECH ET8 (V4) CONTROL PANEL – INSTALLER MANUAL PROGRAMMING P80E TELEPHONE NUMBER 3 – TEST CALLS Phone Number 3 is used to send Test Calls. If it is not programmed then Test Calls are sent using Telephone No 1 & 2. PROGRAM MODE LEVEL: Installer, Remote by PC FACTORY DEFAULT: PROGRAMMING SEQUENCE: No telephone numbers P80E existing telephone number is displayed [ENTER NEW TELEPHONE No] E new telephone number is displayed NOTES: • RELATED OPTIONS: P89E 1E Enable test calls P83E Test call interval P84E Test call start delay EXAMPLE: To program Telephone No.3 to be 03 2468 1234: P70E0324681234E P81E TELEPHONE NUMBER 4 – CALLBACK Phone Number 4 is used for upload/download. PROGRAM MODE LEVEL: Installer, Remote by PC Prevents unauthorised up/download – the panel will dial the callback telephone number to commence an up/download session. FACTORY DEFAULT: No telephone numbers Up/download without callback is allowed by turning off option P90E 8E. NOTES: • RELATED OPTIONS: P90E 8E Enable Callback PROGRAMMING SEQUENCE: P81E existing telephone number is displayed [ENTER NEW TELEPHONE No] E new Telephone No.4 is displayed EXAMPLE: To program Telephone No.4 to be 02 8825 1234: P70E0288251234E P00E FOLLOW ME TELEPHONE NUMBER The Follow Me telephone number is only used in Audible Dialling mode. (P86E 3E, 4E, 5E or 6E are on). PROGRAM MODE LEVEL: User, Installer, Remote by PC The Follow Me telephone number can be programmed in User Program Mode. If the Follow Me number is programmed, then the primary & secondary numbers are ignored. FACTORY DEFAULT: No telephone numbers NOTES: • If the Follow Me telephone number is disabled, all audible format calls are made on telephone numbers 1 & 2. • RELATED OPTIONS: P86E 3E Audible DTMF format P86E 4E Audible Pulse format P86E 5E Contact ID + Audible DTMF P86E 6E Contact ID + Audible Pulse PROGRAMMING SEQUENCE: P00E existing telephone number is displayed [ENTER NEW TELEPHONE No] E new telephone number is displayed EXAMPLE: To program Telephone No.4 to be 02 8825 1234: P70E0288251234E E-TECH ET8 (V4) CONTROL PANEL – INSTALLER MANUAL 39 PROGRAMMING Zones OPTION No DESCRIPTION 1 P74E Report zone alarms ON ON ON ON ON ON ON ON 2 3 4 5 6 7 8 P76E Report zone restorals ON ON ON ON ON ON ON ON P78E Multiple zone alarms P79E Account No.2 zones ON = Factory default setting P74E REPORT ZONE ALARMS This option selects which zone inputs will send Alarm reports to the Central Station. PROGRAM MODE LEVEL: Installer, Remote by PC FACTORY DEFAULT: PROGRAMMING SEQUENCE: All zones repor t Alarms P74E [Zone No]E toggles the option ON and OFF NOTES: P74E 1E–8E OFF: Alarm repor ting disabled for that zone P74E 1E–8E ON: Alarm reporting enabled for that zone • 0E will turn all selections OFF MEMORY E will turn all selections ON P76E REPORT ZONE RESTORALS This option selects which zone inputs will send Restoral reports to the Central Station. Only zones that have previously sent an Alarm will send a Restoral. PROGRAM MODE LEVEL: Installer, Remote by PC FACTORY DEFAULT: PROGRAMMING SEQUENCE: All zones repor t Restorals P76E [Zone No]E toggles the option ON and OFF NOTES: P76E 1E–8E OFF: Restoral reporting disabled for that zone P76E 1E–8E ON: Restoral repor ting enabled for that zone • 0E will turn all selections OFF MEMORY E will turn all selections ON • RELATED OPTIONS: P82E 1E Send Restoral immediately P82E 2E Send Restoral after siren time P82E 3E Send Restoral on Disarm & seal P82E 4E Send Restoral on Disarm always P78E REPORT MULTIPLE ZONE ALARMS Zones selected for Multiple Zone Alarms will report each time the zone alarms and without a restore being sent. The number of reports is a maximum of 15. The number of alarms sent for each Multiple Zone Alarm can be reduced to 3 by using the swinger shutdown option P89E 4E. PROGRAM MODE LEVEL: Installer, Remote by PC FACTORY DEFAULT: No zones repor t Multiple Alarms NOTES: Zones not selected report only once, until reset by an opening or a valid code. • Only zones that have previously sent an Alarm will send a Restoral PROGRAMMING SEQUENCE: • 0E will turn all selections OFF MEMORY E will turn all selections ON • RELATED OPTIONS: P89E 4E Swinger shutdown P79E PROGRAM MODE LEVEL: Installer, Remote by PC FACTORY DEFAULT: All zones repor t Restorals NOTES: 40 P78E [Zone No]E toggles the option ON and OFF P78E 1E–8E OFF: Multiple Zone Alarms disabled for that zone P78E 1E–8E ON: Multiple Zone Alarms enabled for that zone ACCOUNT NO.2 ZONES Zones selected to be Account No.2 zones will report their Alarms, Restorals and Excludes on Client code 2. PROGRAMMING SEQUENCE: P79E [Zone No]E toggles the option ON and OFF P79E 1E–8E OFF: Multiple Zone Alarms disabled for that zone P79E 1E–8E ON: Multiple Zone Alarms enabled for that zone E-TECH ET8 (V4) CONTROL PANEL – INSTALLER MANUAL P75E P77E Report Misc. Alarms 1~8 ON ON ON ON Report Misc. Restorals 1~8 ON ON ON ON ON ON ON ON P92E P93E 8E DESCRIPTION 1E R adio Tamp er 2E R adio Panic 3E R adio Batte ry 4E S uper visio n Fa 5E P il anel Batte ry 6E M ains Fail 7E OPTION No 1E D ures s 2E M edica l 3E K /P & K/S P anic 4E F ire 5E P anel Tamp er 6E E xtern al Ta m 7E K per eypa d Tam per 8E E xit In stall mod e PROGRAMMING Report Misc. Alarms 9~14 ON ON ON ON Report Misc. Restorals 9~14 ON ON ON ON ON ON ON ON ON = Factory default setting. P75E, P92E REPORT MISCELLANEOUS ALARMS PROGRAM MODE LEVEL: Installer, Remote by PC REPORT MISCELLANEOUS ALARMS REPORT MISCELLANEOUS RESTORALS These options select which Miscellaneous alarms will trigger the dialler to send Alarm reports and Restoral reports to the Central Station. NOTES: Alarms (if enabled) are sent on activation. Restorals (if enabled) are sent on Opening. Mains Fail and Low Battery Restorals are sent when the power has been restored. • 0E will turn all selections OFF MEMORY E will turn all selections ON PROGRAMMING SEQUENCE: PxxE 1E–8E toggles the option ON and OFF P77E, P93E REPORT MISCELLANEOUS RESTORALS PROGRAM MODE LEVEL: Installer, Remote by PC FACTORY DEFAULT: see table NOTES: • Mains Fail and Low Battery Restorals are sent when the power has been restored 1. Duress 2. Medical 3. Keypad & K/Switch Panic 4. Fire 5. Panel Tamper 6. External Tamper 7. Keypad Tamper 8. Exit Install Mode 1E 2E ALARM 3E P75E 4E RESTORAL 5E 6E P77E 7E 8E 1E ALARM 2E P92E 3E 4E RESTORAL 5E P93E 6E OPTION No P82E DESCRIPTION T t f a o 9. Radio Tamper 10. Radio Panic (by User) 11. Radio Low Battery (by Device) 12. Supervision Fail 13. Panel Low Battery 14. Mains Fail Resto ral im media tely Resto ral af t er sire n time Resto ral on Disar m&s Resto eal ral on Disar m alw . ays . • 0E will turn all selections OFF MEMORY E will turn all selections ON MISCELLANEOUS ALARMS: . see table . FACTORY DEFAULT: 1E 2E 3E 4E 5E 6E 7E 8E Zone Restoral reporting options ON ON = Factory default setting. P82E 1E–4E RESTORAL REPORTING OPTIONS Installer, Remote by PC This option selects when the dialler sends zone Restoral reports. Only one of the following options may be selected. FACTORY DEFAULT: Restoral reporting options also apply to 24hr zones. PROGRAM MODE LEVEL: 4E, ON: Always send Restoral on Disarm NOTES: • RELATED OPTIONS: P76E Report zone restorals PROGRAMMING SEQUENCE: P82E 1E–4E toggles the option ON and OFF P82E 1E: Send Restoral immediately P82E 2E: Send Restoral after siren time P82E 3E: Send Restoral on Disarm & seal P82E 4E: Send Restoral on Disarm always E-TECH ET8 (V4) CONTROL PANEL – INSTALLER MANUAL 41 PROGRAMMING OPTION No P83E DESCRIPTION P83E Test Call Interval P84E Time Before Next Test Call DEFAULT NOTE 84 x2 = 168hrs (7 days) 6 x2 = 12hrs TEST CALL INTERVAL Test calls to the Central Station can be sent at intervals between 2 and 198 hours in 2 hour increments. PROGRAM MODE LEVEL: Installer, Remote by PC 84 (=168hrs =7 days) Programmable from 2 to 198 Hours. Enter a value between 1 and 99. (This is automatically multiplied by 2). NOTES: Test Calls must be enabled by option P89E 1E. FACTORY DEFAULT: • Enter a value from 1 to 99 PROGRAMMING SEQUENCE: • RELATED OPTIONS: P89E 1E Enable Test Calls P84E Time Before Next Test Call P83E existing Test Call Interval time is displayed [ENTER NEW TIME] E new Test Call Interval time is displayed EXAMPLE: To program daily test calls: P83E12E P84E TIME BEFORE NEXT TEST CALL This option sets the time before the next Test Call and is used to set the preferred time for Test Calls. Programmable from 2 to 198 Hours. Enter a value between 1 and 99. (This is automatically multiplied by 2). PROGRAM MODE LEVEL: Installer, Remote by PC FACTORY DEFAULT: 6 (=12hrs) EXAMPLES: NOTES: • Enter a value from 1 to 99 • If Test Calls are to start immediately, then the value is set to 0. PROGRAMMING SEQUENCE: OPTION No P85E . . . P84E existing Time Before Next Test Call is displayed (See note 3) [ENTER NEW TIME] E new Time Before Next Test Call is displayed A u to diallin g m et hod PULS E Dia lling a lw DTM F ay s diallin g alw a ys . • RELATED OPTIONS: P89E 1E Enable Test Calls P83E Test Call interval B/ Existing Installation: To reset the time that test calls are sent. E.g., Our example panel is sending test calls at 1am and you want to change it to 2am. If you are programming the panel at 6pm, enter P84E 4E (4 x 2 =8hrs. Therefore 6pm + 8hrs =2am). . • The Time Before Next Test Call is constantly updated. When viewed, the current value will be displayed (not the initially entered value). A/ New Installation: Set the time before the first test call. E.g., If you are programming the panel at 5pm and you want test calls to be sent at 1am. Enter P84E 4E (4 x 2 =8hrs. Therefore 5pm + 8hrs =1am). DESCRIPTION 1E 2E 3E 4E 5E 6E 7E 8E Dialling Method ON ON = Factory default setting. P85E 1E–3E PROGRAM MODE LEVEL: Installer, Remote by PC FACTORY DEFAULT: 1E, ON: Auto Dialling Method NOTES: • Only one option is allowed to be ON 42 DIALLING METHOD The dial format is determined by the detected Dial Tone. By default, if no dial tone is detected after looping the line then the dialler will attempt to dial regardless alternating between PULSE (Decadic) first and then DTMF dialling. PROGRAMMING SEQUENCE: P85E 1E–3E turns the option ON P85E 1E: Auto Dialling (PULSE or DTMF) P85E 2E: Pulse Dialling always P85E 3E: DTMF Dialling always E-TECH ET8 (V4) CONTROL PANEL – INSTALLER MANUAL Disab le dia ller Conta ct ID forma t Audib le DT MF fo rmat Audib le PU LSE f o rmat Conta ct ID + Au dible Conta DTMF ct ID + Au dible . PULS E . PROGRAMMING OPTION No P86E DESCRIPTION Reporting Formats 1E 2E 3E 4E 5E 6E 7E 8E ON ON = Factory default setting. P86E 1E DISABLE DIALLER Installer, Remote by PC This option disables the dialler even if telephone numbers and other dialler options are programmed. FACTORY DEFAULT: Up download or remote telephone access remain enabled. PROGRAM MODE LEVEL: Off: dialler enabled PROGRAMMING SEQUENCE: NOTES: • This option is useful for temporary disabling of the dialler without affecting other dialler options. P86E 1E turns the option ON P86E 1E ON: Dialler disabled • Only one option in the range P86E 1E—6E is allowed to be ON P86E 2E PROGRAM MODE LEVEL: Installer, Remote by PC FACTORY DEFAULT: ON: Contact ID format enabled NOTES: • Only one option in the range P86E 1E—6E is allowed to be ON P86E 3E PROGRAM MODE LEVEL: Installer, Remote by PC FACTORY DEFAULT: OFF NOTES: • Only one option in the range P86E 1E—6E is allowed to be ON CONTACT ID FORMAT This option enables the reporting of alarms to a Central station via telephone numbers 1 & 2 using Contact ID format. PROGRAMMING SEQUENCE: P86E 2E turns the option ON P86E 2E ON: Contact ID format enabled AUDIBLE DTMF FORMAT For Audible Monitoring to any telephone or mobile phone. The last digit of the Account number and the zone alarm are sent in Audible DTMF format. The message is repeated for 45 seconds or until kissed-off by the receiving telephone. PROGRAMMING SEQUENCE: P86E 3E turns the option ON P86E 3E ON: Audible DTMF format enabled P86E 4E PROGRAM MODE LEVEL: Installer, Remote by PC FACTORY DEFAULT: OFF NOTES: • Only one option in the range P86E 1E—6E is allowed to be ON • This is the best option to select for Audible Monitoring. AUDIBLE PULSE FORMAT For Audible Monitoring to any telephone or mobile phone. The last digit of the Account number and the zone alarm are sent in Audible PULSE format. The message is repeated for 45 seconds or until kissed-off by the receiving telephone. PROGRAMMING SEQUENCE: P86E 4E turns the option ON P86E 4E ON: Audible PULSE format enabled E-TECH ET8 (V4) CONTROL PANEL – INSTALLER MANUAL 43 PROGRAMMING P86E 5E CONTACT ID + AUDIBLE DTMF FORMAT For simultaneous Central Station and Audible Monitoring. PROGRAM MODE LEVEL: Installer, Remote by PC The alarm message will be sent to the Central Station on the Primary telephone number and then in audible DTMF format to the Follow Me telephone number. FACTORY DEFAULT: OFF PROGRAMMING SEQUENCE: NOTES: P86E 5E turns the option ON • Only one option in the range P86E 1E—6E is allowed to be ON P86E 5E ON: Contact ID + Audible DTMF format enabled P86E 6E CONTACT ID + AUDIBLE PULSE FORMAT For simultaneous Central Station and Audible Monitoring. PROGRAM MODE LEVEL: Installer, Remote by PC The alarm message will be sent to the Central Station on the Primary telephone number and then in audible PULSE format to the Follow Me telephone number. FACTORY DEFAULT: OFF PROGRAMMING SEQUENCE: NOTES: P86E 6E turns the option ON • Only one option in the range P86E 1E—6E is allowed to be ON P86E 6E ON: Contact ID + Audible PULSE format enabled CONTACT ID CODES TABLE The ET8 reports alarms to the Central Station using Contact ID dialler format. The message format is fixed as shown in the Contact ID Codes Table. The message takes the form of: AAAA Q XYZ GG CCC Suffix 44 – Account Number (P72E) – Event qualifier – Alarm type – Group or Area designation – Alarm number – Event checksum ALARM EVENT ACCOUNT NUMBER Q XYZ GG CCC Zones 1~8 Alarm AAAA Q 130 GG 001-008 k Duress Keyswitch Panic Keypad Panic Radio Key Panic Medical Alarm Fire Exit Install mode External Tamper Internal Tamper Keypad Tamper Radio Sensor Tamper Test Report AAAA AAAA AAAA AAAA AAAA AAAA AAAA AAAA AAAA AAAA AAAA AAAA Q Q Q Q Q Q Q Q Q Q Q Q 121 120 120 120 100 110 306 137 137 137 383 602 01 01 01 01 01 01 01 01 01 01 01 01 030 031 032 by User 033 034 035 040 041 042 by Device 063 k k k k k k k k k k k k Mains Fail Panel Battery Fail Open Close Cancel AAAA AAAA AAAA AAAA AAAA Q Q Q Q Q 301 309 402 402 406 01 01 GG GG GG 050 051 by User by User by User k k k k k Zones 1~8 Manual Exclude AAAA Zones 1~8 Auto Exclude AAAA Q Q 573 380 GG GG 001-008 001-008 k k E-TECH ET8 (V4) CONTROL PANEL – INSTALLER MANUAL SUFFIX OPTION No P87E DESCRIPTION Miscellaneous Dialling Options . . . 4 diall ing at tempt s . Split d ial Ph one N os. Chec k for dial to ne . PROGRAMMING 1E 2E 3E 4E 5E 6E 7E 8E ON ON ON = Factory default setting. P87E 1E SPLIT DIAL PRIMARY/SECONDARY PHONE NUMBERS This option selects the order in which Telephone numbers 1 & 2 are dialled. PROGRAM MODE LEVEL: Installer, Remote by PC PROGRAMMING SEQUENCE: FACTORY DEFAULT: P87E 1E toggles the option ON and OFF OFF: Alternate Dial P77E 1E OFF: Alternate Dial Dial Telephone No.1 on the first attempt. If no answer, dial Telephone No.2. Continue alternating until successful. NOTES: • RELATED OPTIONS: P87E 4E Number of Dialling attempts P87E 1E ON: Split Dial Dial Telephone No.1 for half of the call attempts. If unsuccessful, dial Telephone No.2 for the last half of call attempts. P87E 2E CHECK FOR DIAL TONE The dialler normally dials only if a dial tone is detected. The dialler can be forced to dial without a dial tone. Allows use on PABXs with non-standard dial tones. PROGRAM MODE LEVEL: Installer, Remote by PC FACTORY DEFAULT: ON: Dial only with dial tone PROGRAMMING SEQUENCE: NOTES: P87E 2E toggles the option ON and OFF P77E 2E OFF: Dial without dial tone P87E 2E ON: Dial only with dial tone P87E 4E NUMBER OF DIALLING ATTEMPTS Sets the number of dialling attempts when sending reports. PROGRAM MODE LEVEL: Installer, Remote by PC ON: allows a maximum of 4 dial attempts before a 5 minute sleep and 4 more retries if unsuccessful. FACTORY DEFAULT: ON: 4 dialling attempts NOTES: OFF: sets a maximum 10 dial attempts before a 5 minute sleep and 10 more retries if unsuccessful. • Sets the total number of dialling attempts. E.g. If 4 dialling attempts is selected, this means 2 attempts per telephone number. If all attempts fail the dialler waits for the next trigger event. The previously unsuccessful report will be included in the new message. • RELATED OPTIONS: P87E 1E Alternate dialling PROGRAMMING SEQUENCE: P87E 4E toggles the option ON and OFF P77E 4E OFF: Maximum 10 dialling attempts P87E 4E ON: Maximum 4 dialling attempts E-TECH ET8 (V4) CONTROL PANEL – INSTALLER MANUAL 45 AREA 1 Ope n/Clo se rep AREA or t 2 Ope n/Clo se rep Chirp or t Siren on kis s-off Flash Strob e on k iss-of Force f d Ope ning r epor t Delay Closin g rep or t Manu al Exc lude r epor t Auto Exclu de rep or t PROGRAMMING OPTION No P88E DESCRIPTION 1E 2E 3E 4E 5E 6E 7E 8E Open/Close reporting options ON ON ON ON = Factory default setting. P88E 1E PROGRAM MODE LEVEL: Installer, Remote by PC FACTORY DEFAULT: AREA1 OPEN/CLOSE REPORTS Enables or disables sending of AREA1 Open/Close reports. The User ID of the code used is included in the report. Keyswitch Arming and Shortcut Arming are identified as User 15. OFF: No AREA1 Open/Close repor ts PROGRAMMING SEQUENCE: NOTES: P88E 1E toggles the option ON and OFF P88E 1E OFF: No AREA1 Open/Close reports P88E 1E ON: AREA1 Open/Close reports enabled P88E 2E PROGRAM MODE LEVEL: AREA2 OPEN/CLOSE REPORTS Enables or disables sending of AREA2 Open/Close reports. Installer, Remote by PC FACTORY DEFAULT: PROGRAMMING SEQUENCE: OFF: No AREA2 Open/Close P88E 2E toggles the option ON and OFF NOTES: P88E 2E OFF: No AREA2 Open/Close reports P88E 2E ON: AREA2 Open/Close reports enabled P88E 3E PROGRAM MODE LEVEL: Installer, Remote by PC FACTORY DEFAULT: OFF: No Siren Chirp on kiss-off NOTES: • RELATED OPTIONS: P88E 4E Flash Strobe on kiss-off P88E 4E PROGRAM MODE LEVEL: Installer, Remote by PC FACTORY DEFAULT: OFF: No Strobe Flash on kiss-off NOTES: • RELATED OPTIONS: P88E 3E Siren Chirp on kiss-off 46 SIREN CHIRP ON KISS-OFF Selects a 2 Second Siren burst on a successful Closing report. This is used to give audible indication that the dialler has successfully sent the Arming report. PROGRAMMING SEQUENCE: P88E 3E toggles the option ON and OFF P88E 3E OFF: No Siren Chirp on kiss-off P88E 3E ON: Siren Chirp on kiss-off enabled STROBE FLASH ON KISS-OFF Selects a 2 Second Strobe on a successful Closing report. This is used to give visual indication that the dialler has successfully sent the Arming report. PROGRAMMING SEQUENCE: P88E 4E toggles the option ON and OFF P88E 4E OFF: No Strobe Flash on kiss-off P88E 4E ON: Strobe Flash on kiss-off enabled E-TECH ET8 (V4) CONTROL PANEL – INSTALLER MANUAL PROGRAMMING P88E 5E FORCED OPENING REPORT If Forced Opening Report is selected ON – when an alarm has been reset by a valid User Code (or Radio Key), the dialler will send an Opening report along with a restoral report for the zone or miscellaneous input which caused the alarm. PROGRAM MODE LEVEL: Installer, Remote by PC FACTORY DEFAULT: ON: Forced opening Repor ts enabled NOTES: PROGRAMMING SEQUENCE: • This option is used to indicate to the Central Station that an alarm has been reset by a valid user. P88E 5E toggles the option ON and OFF Usually used in cases where Open/Close reports are normally selected OFF. P88E 6E PROGRAM MODE LEVEL: Installer, Remote by PC FACTORY DEFAULT: OFF: Closing Repor ts sent on Arming NOTES: • RELATED OPTIONS: P88E 1E AREA1 Open/Close repor ts P88E 2E AREA2 Open/Close repor ts P88E 7E PROGRAM MODE LEVEL: Installer, Remote by PC FACTORY DEFAULT: ON: Manual Exclude Repor ts enabled NOTES: • RELATED OPTIONS: P88E 8E Auto Exclude Repor ts P88E 8E PROGRAM MODE LEVEL: Installer, Remote by PC FACTORY DEFAULT: ON: Auto Exclude Repor ts enabled NOTES: • P88E 7E Manual Exclude Repor ts P88E 5E OFF: No Forced opening Repor ts P88E 5E ON: Forced opening Reports enabled DELAY CLOSING REPORT If selected ON, Closing reports (if enabled) are sent at the end of Exit Time. Normally, Closing reports are sent immediately on Arming. PROGRAMMING SEQUENCE: P88E 6E toggles the option ON and OFF P88E 6E OFF: Closing Reports sent on Arming P88E 6E ON: Closing Repor ts sent at end of Exit Time MANUAL EXCLUDE REPORT Enables Manual Exclude Reports for Zones 1~8. Exclude Reports for 24hr zones are sent on exiting EXCLUDE mode. PROGRAMMING SEQUENCE: P88E 7E toggles the option ON and OFF P88E 7E OFF: No Manual Exclude Repor ts P88E 7E ON: Manual Exclude Reports enabled AUTO EXCLUDE REPORT Enables Auto Exclude Reports for Zones 1~8. Zones not sealed on Arming will be reported as Auto Excluded.. PROGRAMMING SEQUENCE: P88E 8E toggles the option ON and OFF P88E 8E OFF: No Auto Exclude Repor ts P88E 8E ON: Auto Exclude Reports enabled E-TECH ET8 (V4) CONTROL PANEL – INSTALLER MANUAL 47 OPTION No P89E . Enable Test C alls Mains Repo r t dela Listen y -in to dialle r Swing er shu tdown Line F ault M onitor Line F ault to AUX2 . PROGRAMMING DESCRIPTION 1E 2E 3E 4E 5E 6E 7E 8E Miscellaneous Reporting options ON ON ON ON = Factory default setting. P89E 1E PROGRAM MODE LEVEL: ENABLE TEST CALLS This option enables the reporting of dialler test calls to the Central station. Installer, Remote by PC FACTORY DEFAULT: PROGRAMMING SEQUENCE: ON: Test Calls enabled P89E 1E toggles the option ON and OFF NOTES: P89E 1E OFF: No Test Calls P89E 1E ON: Test Calls enabled • RELATED OPTIONS: P83E Test Call Interval P84E Time before next Test call P89E 2E PROGRAM MODE LEVEL: Installer, Remote by PC FACTORY DEFAULT: ON: Mains Fail report is delayed NOTES: MAINS REPORT DELAY This option allows Mains Fail reports to be delayed by one hour if the mains power has been off continuously for that time. Normally, the Mains Fail report is sent immediately the power fails. PROGRAMMING SEQUENCE: P89E 2E toggles the option ON and OFF P89E 2E OFF: Mains Fail reports immediately P89E 2E ON: Mains Fail report is delayed by 1 hour P89E 3E PROGRAM MODE LEVEL: Installer, Remote by PC FACTORY DEFAULT: OFF: No Listen–In NOTES: • For convenient and private Listen-In, temporarily connect a spare horn speaker to the Siren output. LISTEN-IN TO DIALLER This is a diagnostic feature for installers. Listen-In is turned on for a minimum of 4 minutes after exiting Program Mode. During Listen-In, the dialler message and other telephone tones can be heard through the Siren output (at low volume) while the dialler is sending reports. The 4 minute period is restarted whenever any key on the keypad is pressed. To turn Listen-In off, go back into Installer Program mode and toggle the option OFF. PROGRAMMING SEQUENCE: P89E 3E toggles the option ON and OFF P89E 3E OFF: No Listen-In P89E 3E ON: Listen-In enabled 48 E-TECH ET8 (V4) CONTROL PANEL – INSTALLER MANUAL PROGRAMMING P89E 4E SWINGER SHUTDOWN Installer, Remote by PC Limits the number of calls made by a zone alarm when Multiple Zone Alarms are enabled for that zone. FACTORY DEFAULT: If enabled, multiple reports are limited to three per zone. PROGRAM MODE LEVEL: ON: Swinger Shutdown enabled PROGRAMMING SEQUENCE: NOTES: • This prevents unnecessary multiple alarms reported to the Central station in cases, for example, where a door is ‘swinging’ in the wind. P89E 5E PROGRAM MODE LEVEL: Installer, Remote by PC FACTORY DEFAULT: OFF: No Line Fault Monitor NOTES: • RELATED OPTIONS: P89E 6E Line Fault to AUX2 P89E 6E PROGRAM MODE LEVEL: Installer, Remote by PC FACTORY DEFAULT: OFF: No Line Fault output NOTES: • RELATED OPTIONS: P89E 5E Line Fault Monitor P89E 4E toggles the option ON and OFF P89E 4E OFF: No Swinger Shutdown (unlimited multiple reports) P89E 4E ON: Swinger Shutdown enabled (maximum 3 reports per zone) LINE FAULT MONITOR When this option is enabled, the telephone line is regularly tested. If the telephone line is not found, the Line light will commence flashing. PROGRAMMING SEQUENCE: P89E 5E toggles the option ON and OFF P89E 5E OFF: No Line Fault Monitor P89E 5E ON: Line Fault Monitor enabled LINE FAULT TO AUX2 When this option is enabled, a telephone line fault condition will turn ON the AUX2 output. AUX2 will turn OFF when the telephone line is restored. PROGRAMMING SEQUENCE: P89E 6E toggles the option ON and OFF P89E 6E OFF: No Line Fault output P89E 6E ON: Line Fault to AUX2 enabled E-TECH ET8 (V4) CONTROL PANEL – INSTALLER MANUAL 49 Uploa d/Dow nload Direc t Con nect Remo te Arm ing Remo te Dis armin g Remo te AU X con trol Remo te Sta tus re por tin Remo g te Eve nt rep or ting Callba ck mo de PROGRAMMING OPTION No P90E DESCRIPTION 1E 2E 3E 4E 5E 6E 7E 8E Upload/Download options ON = Factory default setting. P90E 1E PROGRAM MODE LEVEL: Installer, Remote by PC FACTORY DEFAULT: OFF: No Remote Access NOTES: • RELATED OPTIONS: P91E Required Rings REMOTE ACCESS When selected On, this option allows the panel to be remotely upload/ downloaded by a remote computer or controlled by a remote telephone. When the option is Off, the panel will not answer incoming telephone calls, preventing any type of remote access. PROGRAMMING SEQUENCE: P90E 1E toggles the option ON and OFF P90E 1E OFF: No Remote Access P90E 1E ON: Remote Access enabled P90E 2E PROGRAM MODE LEVEL: Installer, Remote by PC FACTORY DEFAULT: OFF: No Direct Connect NOTES: • Remote Access must also be enabled • RELATED OPTIONS: P90E 1E Enable Upload/Download DIRECT CONNECT This allows a direct connection to be used between the ET8 telephone output and an on site computer with modem. A special E-TECH adapter is required when using this connection. Direct Connect simulates a telephone line ring and makes the ET8 connect immediately to the telephone line. PROGRAMMING SEQUENCE: P90E 2E toggles the option ON and OFF P90E 2E OFF: No Direct Connect P90E 2E ON: Direct Connect enabled ET8 DIRECT CONNECT Diagram Upload/download on site P90E 3E PROGRAM MODE LEVEL: Installer, Remote by PC FACTORY DEFAULT: OFF: No Remote Arming NOTES: • Remote Access must also be enabled • RELATED OPTIONS: P90E 1E Enable Upload/Download REMOTE ARMING Allows the remote Arming of the control panel using a standard DTMF telephone (or mobile phone) from anywhere in the world. PROGRAMMING SEQUENCE: P90E 3E toggles the option ON and OFF P90E 3E OFF: No Remote Arming P90E 3E ON: Remote Arming enabled • See page 59 for details on Remote Operation by telephone 50 E-TECH ET8 (V4) CONTROL PANEL – INSTALLER MANUAL PROGRAMMING P90E 4E PROGRAM MODE LEVEL: Installer, Remote by PC FACTORY DEFAULT: OFF: No Remote Disarming NOTES: REMOTE DISARMING Allows the remote Disarming of the control panel using a standard DTMF telephone (or mobile phone) from anywhere in the world. PROGRAMMING SEQUENCE: P90E 4E toggles the option ON and OFF P90E 4E OFF: No Remote Disarming P90E 4E ON: Remote Disarming enabled P90E 5E PROGRAM MODE LEVEL: Installer, Remote by PC FACTORY DEFAULT: OFF: No Remote AUX control NOTES: REMOTE AUX CONTROL Enables the remote turn ON/OFF of the AUX1 & AUX2 outputs using a standard DTMF telephone (or mobile phone) from anywhere in the world. PROGRAMMING SEQUENCE: P90E 5E toggles the option ON and OFF P90E 5E OFF: No Remote AUX control P90E 5E ON: Remote AUX control enabled P90E 6E PROGRAM MODE LEVEL: REMOTE STATUS REPORTING Enables Remote Status Reporting Installer, Remote by PC FACTORY DEFAULT: PROGRAMMING SEQUENCE: OFF: No Remote Status Repor ting P90E 6E toggles the option ON and OFF NOTES: P90E 6E OFF: No Remote Status Repor ting P90E 6E ON: Remote Status Reporting enabled P90E 7E PROGRAM MODE LEVEL: REMOTE EVENT REPORTING Enables Remote Event Reporting Installer, Remote by PC FACTORY DEFAULT: PROGRAMMING SEQUENCE: OFF: No Remote Event Repor ting P90E 7E toggles the option ON and OFF NOTES: P90E 7E OFF: No Remote Status Repor ting P90E 7E ON: Remote Status Reporting enabled P90E 8E PROGRAM MODE LEVEL: Installer, Remote by PC CALLBACK MODE Enables two methods of connecting by computer for remote upload/download. NO CALLBACK – Allows remote access by computer as long as the panel’s OFF: No Callback Account Number (P72E) is known. The panel answers on the 2nd incoming call. NOTES: WITH CALLBACK – The panel will answer the 2nd call, verify the caller, hang up • RELATED OPTIONS: P90E 1E Enable Upload/Download P81E Telephone Number 4, Callback and then make the Callback using Telephone Number 4. FACTORY DEFAULT: PROGRAMMING SEQUENCE: P90E 8E toggles the option ON and OFF P90E 8E OFF: No Callback P90E 8E ON: Callback Mode enabled E-TECH ET8 (V4) CONTROL PANEL – INSTALLER MANUAL 51 PROGRAMMING OPTION No P91E P91E DESCRIPTION Required Rings to answer DEFAULT NOTE 1 REQUIRED RINGS Installer, Remote by PC Sets the number of double-rings before an incoming call is answered. This is used for Remote Access. FACTORY DEFAULT: Programmable from 1 to 16 rings. Enter a value between 1 and 16. PROGRAM MODE LEVEL: 1 See below for a detailed description. NOTES: • RELATED OPTIONS: P90E 1E to 8E (All Remote Access options) PROGRAMMING SEQUENCE: P91E existing Required Rings value is displayed [ENTER NEW VALUE] E new Required Rings value is displayed EXAMPLE: To make Required Rings = 3: P91E3E P66666666E SEND DIALLER TEST REPORT PROGRAM MODE LEVEL: User Program Mode Send a Dialler Test Report in USER PROGRAM MODE. Obviously, at least one telephone number must be programmed (P70E). FACTORY DEFAULT: [not applicable] PROGRAMMING SEQUENCE: P66666666E (eight 6’s) Triggers dialler and sends test report to Central Station P77777777E SIREN TEST PROGRAM MODE LEVEL: Installer, User Program Mode Turn the Siren, Reset and Strobe Outputs On. Pressing P E will stop the Siren Test (and also exits Program Mode). FACTORY DEFAULT: [not applicable] PROGRAMMING SEQUENCE: P77777777E (eight 7’s) Triggers Siren, Reset, Strobe P88888888E PANEL RESET PROGRAM MODE LEVEL: Installer, User Program Mode This function resets the microprocessor. The effect is the same as powering down and powering up again. FACTORY DEFAULT: [not applicable] PROGRAMMING SEQUENCE: P88888888E (eight 8’s) Panel Reset 52 E-TECH ET8 (V4) CONTROL PANEL – INSTALLER MANUAL PROGRAMMING OPTION No These options allow selective restoring of various factory defaults. For example, you can default (clear) all the User Codes, without affecting any other programmed options. P95E DESCRIPTION DEFAULT P95E Clear Radio Devices not applicable P96E Clear Memory not applicable P97E Restore Factory Defaults not applicable P98E Clear User Codes not applicable P99E Program the Installer Code NOTE 000000 CLEAR RADIO DEVICES PROGRAM MODE LEVEL: Installer, Remote by PC This option clears all Radio Device Codes. (Except Radio Keys assigned to Radio Codes). Options P01E – P08E are defaulted (eg, Radio PIRs assigned to zones 1–8) FACTORY DEFAULT: [not applicable] PROGRAMMING SEQUENCE: P95E Clears Radio Device Codes P96E CLEAR MEMORY Enter P96E when in Installer Program mode to clear all events in the Alarm memory display. PROGRAM MODE LEVEL: Installer, Remote by PC PROGRAMMING SEQUENCE: P96E Clears Alarm Memory display FACTORY DEFAULT: [not applicable] P97E CLEAR PANEL OPTIONS This option restores ‘panel’ program options to their factory default values. PROGRAM MODE LEVEL: Installer, Remote by PC Defaults the options P00E, P26E to P93E, P99E. (This includes all options except User Codes, Radio Codes & Radio Devices). FACTORY DEFAULT: [not applicable] PROGRAMMING SEQUENCE: P97E Restores Factory Defaults NOTES: P98E CLEAR USER CODES PROGRAM MODE LEVEL: Installer, Remote by PC This option clears all User codes and Radio Codes (Radio Keys) and restores factory default codes. FACTORY DEFAULT: User Code 1: 123 All other codes: [blank] P09E–P10E are defaulted (Radio Codes assignment) P11E – P25E are defaulted (User Codes 1–15) NOTES: • This option DOES NOT clear the Installer Code. P99E PROGRAM MODE LEVEL: Installer, Remote by PC FACTORY DEFAULT: 000000 NOTES: PROGRAMMING SEQUENCE: P98E Clears User Codes PROGRAM THE INSTALLER CODE Programs the installer code. This code can be 3 to 6 digits long. Factory default installer code is 000000. PROGRAMMING SEQUENCE: P99E [Enter new code]E [Enter new code again]E (Unlike User Codes, the installer code is not displayed when programming) E-TECH ET8 (V4) CONTROL PANEL – INSTALLER MANUAL 53 E-TECH RADIO RADIO QUICK START PROGRAMMING RADIO KEYS: Select which User Codes 2–8 will be Radio Codes (P09E–P10E) Select the User Code (P12E–P25E) Press 1E The READY light will turn ON to indicate that the User Code is ready to accept the Radio Key Press the OFF button on the Radio Key to be programmed If the Radio Key is accepted, the READY light will turn off and 3 beeps will sound PROGRAMMING RADIO DEVICES (Radio PIRs etc): Select a zone to which the Radio PIR will be assigned (P01E–P08E) Press 1E The READY light will turn ON to indicate that the zone is ready to accept the Radio Device. Trigger the Radio Device If the Radio Device is accepted, the READY light will turn off, the ARMED light will turn on and 3 beeps will sound. E-TECH RADIO INTERFACE NOTES: • The E-Tech Radio Interface is normally installed inside the control panel box. • In cases where radio reception needs to be improved, the Radio Interface can be installed up to 50 metres away from the control panel. (Use 14/0.20 cable) • If the Radio Interface must be installed inside a metal enclosure, the antenna wire should protrude outside the enclosure. The E-Tech Radio Interface (100–200) is the optional radio receiver required to enable all radio functions. Connection to the control panel is via a 4 wire loom and plug supplied with the E-Tech Radio Interface. If the E-Tech Radio Interface is correctly installed, the ET8 keypad will flash the RADIO light ON when any radio signal is detected (from both programmed and nonprogrammed radio devices). E-TECH RADIO INTERFACE E-TECH ET8 CONTROL PANEL RED WHITE BLUE BLACK +12V DATA RSSI OV J2 RECEIVER • For best performance, the antenna wire should not be kept straight and not coiled, shortened or extended. Part No. 100–200 NOTES: SIGNAL STRENGTH • Signal strength of Radio Keys can be tested in USER PROGRAM Mode or INSTALLER PROGRAM Mode. • Signal strength of all other Radio Devices is tested in INSTALLER PROGRAM Mode. • PRESS 3E to test the signal strength of the selected transmitter ONLY. (Other devices will be ignored). 54 The higher the number displayed (and beeped) the stronger the signal received. TEST SEQUENCE: • PRESS 4E to test the signal strength of ANY E-Tech transmitter (including unprogrammed devices). WEAK SIGNAL (1 beep) The Signal Strength test can be used to test the radio signal from any E-Tech radio device. The strength of the radio signal received is displayed on the zone lights 1~8 and beeped by the keypad. Enter the option for the radio device to be tested For Radio Keys: options P12E~P25E. For all other radio devices: options P01E~P08E BEST SIGNAL (8 beeps) Press 3E Trigger the radio device • One of zone lights 1~8 will turn ON to indicate the signal strength from the transmitter • The Signal Strength display remains on until another command is entered • To clear the display and re-test the transmitter, simply press 3E again (or 4E to test any other transmitter) E-TECH ET8 (V4) CONTROL PANEL – INSTALLER MANUAL E-TECH RADIO DEVICES Signal types transmitted ON OF F E-TECH RADIO PANIC RADIO KEY 3 BUTTON RADIO PIR RADIO REED SWITCH RADIO SMOKE DETECTOR 100-665 100-664 100-663 100-662 100-203 ON button ON button yes yes yes OFF button yes yes yes yes yes SIGNAL TYPE RADIO KEY PENDANT ALARM RESTORAL LOWBA TT yes TAMPER SUPERVISION yes yes yes yes yes yes yes RADIO DEVICES – OPERATION ALARM: Any E-Tech Radio Device can operate on any zone 1–8 as programmed by P01E~P08E. The hardwired zones 1–8 continue to operate in parallel. Radio Keys can also operate on radio zones 1~8 for special purposes, but they should normally be used as Radio Codes. KEYSWITCH INPUT: A Radio Device programmed to Zone 8 will still work as an alarm even if the Zone 8 input operation has been changed to Keyswitch operation. The P60E 2E and 3E options only affect the Zone 8 terminal inputs. VIBRATION: Radio device zone signals IGNORE the P30E–P38E vibration sensor settings. TAMPER REPORT: Radio Device Tamper operation depends on the Armed State of the control panel. RADIO TAMPER: causes the keypad to continuously beep and also to flash the RADIO, TAMPER and the ZONE (identifying the detector) lights. Pressing any key on the keypad or sending a TAMPER RESTORE will clear this warning. LOW BATTERY REPORT: A low battery gives 10 beeps and flashes the RADIO & the BATTERY light. The ZONE light identifying the radio device is also ON. The flashing lights stop when any key on the keypad is pressed or a detector code with no low battery is received. Low Battery generates HISTORY and DIALLER reports ONCE only (until the low battery is fixed and a restore report is received). SUPERVISION: If a zone has the P65E option ON and a radio code has been programmed for that zone, then the supervision is active. This means that the radio detector does not need to have its SUPER enabled (via header link) for the SUPERVISED timeout to occur. (Useful as an inactivity alarm). A zone supervision failure always flashes the identifying ZONE light and the RADIO light. RADIO SUPERVISION The purpose of Radio Supervision is to verify the correct operation of E-Tech Radio PIRs. The Supervision signal from the Radio PIR tells the panel that the device has not been removed from radio range and is in working order. Non-SUPERVISION Radio PIRs can also be programmed and used with the ET8 SUPERVISION TIMERS. A non-SUPERVISION enabled Radio PIR will transmit signals to the ET8 only when it has detected an event. Obviously, there is no guaranteed signal period. In either case, when the allowed time limit is exceeded then a WARNING is first given (if programmed by P66E 3E), and then after 1 minute, the programmed RADIO SUPERVISION ALERTS are generated by the ET8. NOTE: Manually Excluding a Supervised Zone will also disable Radio Supervision for that zone. E-TECH ET8 (V4) CONTROL PANEL – INSTALLER MANUAL 55 E-TECH RADIO P01E ~ P08E RADIO DEVICE PROGRAMMING Each of the 8 zones of the ET8 can be a radio zone. Once programmed, zones can accept both Radio Devices and normal zone inputs simultaneously. PROGRAM MODE LEVEL: Installer, Remote by PC The optional 100–200 E-Tech Radio Interface is required for Radio Devices to operate. FACTORY DEFAULT: No Radio Devices programmed NOTES: A Radio Device is any type of E-Tech transmitter including Radio PIR, Radio Reed Switches, Radio Smoke Detector. • Radio Device programming is done by ‘learning’ the code by radio. • Radio Devices codes can only be deleted by keypad. • Some E-Tech Radio Devices send separate Alarm and Restore signals. • E-Tech Radio Keys (100–664), can also be programmed to operate on radio zones, but they are normally used to operate Radio Codes as described on page 57. • Late model E-Tech Radio PIRs (100–663) and Radio Reed Switches (100–662) send Supervision signals. PROGRAMMING RADIO DEVICES Up to 8 Radio Devices can be assigned, (one per zone). PROGRAMMING SEQUENCE – NO RESTORALS Suitable for 100–663 Radio PIR, 100–665 Radio Pendant, 100–203 Radio Smoke Detector. The ARMED light will be ON if a Radio Device is already programmed to the zone. Press 0E to delete. Press 1E The READY light will turn ON to indicate that the zone is ready to accept the Radio Device. Trigger the Radio Device A. If the Radio Device is accepted, the READY light will turn off, the ARMED light will turn on and 3 beeps will sound. B. If the READY light stays on and a warning beep sounds, the Radio Device is already assigned to another zone and must be cleared from that zone first. SUPERVISION RELATED OPTIONS: P65E Supervised Radio Zones P66E 1E–8E Radio Supervision Alerts P67E Radio Supervision Time P75E 12E Radio Supervision Fail Report EXAMPLE: To program a Radio PIR on zone 1: P01E 1E Trigger the Radio PIR (or simply connect the battery) • RELATED OPTIONS: P09E–P10E Programming Radio Keys RADIO DEVICES – OPTION TABLE Select a zone using P01E – P08E PROGRAMMING SEQUENCE – WITH RESTORALS Suitable for 100–662 Radio Reed Switch. Alarm the reed switch, ie., move the magnet away from the switch Leave the reed switch in the alarm condition and wait until radio transmission has stopped. Select a zone using P01E – P08E The ARMED light will be ON if a Radio Device is already programmed to the zone. Press 0E to delete. Press 1E The READY light will turn ON to indicate that the zone is ready to accept the Radio Device. Restore the reed switch (place the magnet next to the switch) A. If the Radio Device is accepted, the READY light will turn off, the ARMED light will turn on and 3 beeps will sound. B. The MEMORY light will turn on to indicate that this device sends Restorals. C. If the READY light stays on and a warning beep sounds, the Radio Device is already assigned to another zone and must be cleared from that zone first. EXAMPLE: To program a Radio Reed Switch with Restorals on zone 2: Alarm the reed switch P02E 1E Restore the reed switch DELETING A RADIO DEVICE: Use P01E to P08E to select the zone Press 0E to clear the device (3 beeps will sound) TIP: To prevent conflicting radio signals when programming Radio Devices, disable each device once you have finished programming it. (Remove the battery or open the RADIO link). Remember to enable all the devices when programming is completed. 56 E-TECH ET8 (V4) CONTROL PANEL – INSTALLER MANUAL E-TECH RADIO P09E, P10E RADIO CODES Each of the 15 User Codes, except for the Master Code, can be programmed to be Radio Codes. This allows up to 14 E-Tech Radio Keys to be used for Arming and Disarming of the panel. The optional 100–200 E-Tech Radio Interface is required for Radio Keys to operate. PROGRAM MODE LEVEL: Installer, Remote by PC FACTORY DEFAULT: No Radio Codes PROGRAMMING RADIO KEYS NOTES: • All User Codes can be Radio Codes except User Code 1 (Master Code) which is always a Keypad Code. • Each User Code 2–15 can be either a Radio Code or a Keypad Code (not both). • Radio Key programming is done by ‘learning’ the code by radio. Radio Keys can be assigned to take the place of User Codes 2 to 15. (User Code 1 is always a Keypad code.) PROGRAMMING SEQUENCE: At option P09E P09E, select which User Codes 2–8 will be Radio Codes At option P10E P10E, select which User Codes 9–15 will be Radio Codes Use P12E to P25E to select a User Code The User Code selected must already be assigned as a Radio Code by options P09E or P10E • Radio Codes can only be deleted by keypad in the case of a lost Radio Key. • Radio Keys are allocated to User Codes, so that Open/Close reports are identified by user number when the control panel is base station monitored. (If Open/Close reports are enabled) Press 1E The READY light will turn ON to indicate that the User Code is ready to accept the Radio Key. If a code is already programmed the READY light will not turn on and a warning beep will sound. To clear the code, press 0E, then go back to step 3. (0E clears any Keypad Codes and Radio Keys). Press the OFF button on the Radio Key to be programmed If the Radio Key is accepted, the READY light will turn off and 3 beeps will sound. If the READY light stays on and a warning beep sounds, the Radio Key is already assigned to another User Code and must be cleared from that User Code first. • Radio Codes cannot be made Arm Only • TIP: When adding Radio Keys, start at e.g., User Code 9. This will keep codes 1 to 8 free for use as Keypad Codes. EXAMPLE: To program a Radio Key at User Code 9: P10E 1E P19E1E then Press the OFF button on the Radio Key • RELATED OPTIONS: P01E–P08E Programming Radio Devices DELETING A RADIO CODE: Use P12E to P25E to select the User Code Press 0E to clear the code 3 beeps will sound CODE TABLE ASSIGN RADIO CODES User Codes * 2 3 4 5 6 7 8 P09E User Codes 2-8 * Note: User Code 1 is always a keypad code. User Codes 9 10 11 12 13 14 15 P10E User Codes 9-15 ENABLE AS A RADIO CODE OPTION No DESCRIPTION FACTORY DEFAULT User Code 1 P11E Master Code 123 User Code 2 P12E 2E User Code 3 P13E 3E User Code 4 P14E 4E User Code 5 P15E 5E User Code 6 P16E 6E User Code 7 P17E 7E User Code 8 P18E 8E User Code 9 P19E 1E User Code 10 P20E 2E User Code 11 P21E 3E User Code 12 P22E 4E User Code 13 P23E 5E User Code 14 P24E 6E User Code 15 P25E 7E Installer Code P99E CODE 100–664 Radio Key (Keypad Code only) P09E Installer Code E-TECH ET8 (V4) CONTROL PANEL – INSTALLER MANUAL P10E 000000 57 CENTRAL STATION MONITORING The ET8 control panel has an on-board digital dialler which can send detailed alarm messages to a Central Monitoring Station. CENTRAL STATION MONITORING MONITORED PREMISES TELEPHONE LINE MONITORING STATION The digital messages can include information about the zone/s which caused the alarm, tamper alarms, low battery or mains failure reports, and it can also (by user number) identify the users who Arm and Disarm the system. Central Station Monitoring is highly recommended and is the most effective method of monitoring your ET8 alarm system. Installers are welcome to contact E-Tech for further information about monitoring. AUDIBLE MONITORING AUDIBLE MONITORING FIXED TELEPHONE MONITORED PREMISES TELEPHONE LINE While Central Station Monitoring is recommended, the ET8 can also send audible alarm reports to any DTMF capable telephone. The types of alarms sent are listed in the Reporting Format Table. MOBILE TELEPHONE The basic audible message takes the form of: N [pause] A [pause] B [pause] N = The first digit of the Account Number, P72E. (N can be the digits 1–9. If P72E starts with 0, N is not sent). AUDIBLE MONITORING REPORTING FORMAT TABLE A = First digit of the Alarm identifier (See Reporting Format Table). B = Second digit of the Alarm identifier (See Reporting Format Table). DIGIT DIGIT A B ALARM MESSAGE EXAMPLE (AUDIBLE PULSE FORMAT P86E 4E) 1 2 3 4 5 6 7 8 - Zone 1 Zone 2 Zone 3 Zone 4 Zone 5 Zone 6 Zone 7 Zone 8 If the Account Number is 1234 and zone 5 alarm is reported: 2 1 Duress REPORTING SEQUENCE 2 2 2 2 2 Keyswitch Tamper/Panic Keypad Panic Radio Panic Medical alarm Fire alarm Exit from installer program mode When triggered by an alarm event the ET8 will call the Primary Telephone Number (or the Follow Me Telephone Number, if programmed) and at the end of the dialling of the last digit, it will wait for 5 seconds and then commence the audible message, the audible message will continue to repeat for 45 seconds or until it is kissed off by a DTMF tone. 2 2 3 4 5 6 7 3 3 3 3 3 3 1 2 3 4 5 6 External Tamper Internal Panel Tamper Keypad Tamper Radio Tamper Mains Fail Panel Battery Fail 4 1 RADIO Battery Fail 4 2 RADIO Supervision Fail beep [pause] beep beep beep beep beep 1 Beep 5 Beeps = zone 5 = 1st digit of the account number If there is more than one alarm message to transmit then after it has received the Kiss-off/ Acknowledge tone it will commence transmission of the next message. The ET8 should continue to do this until all alarm messages are transmitted and Kissed-off. ACKNOWLEDGE TONE The person receiving the call can then acknowledge the alarm by pressing the key on their telephone. Press the key for at least 2 seconds during pauses in the audible message. If the alarm is not acknowledged, the keypad’s LINE light will flash continuously until the panel is next Armed. ALARM EVENTS SENT The Reporting Format Table identifies the alarm events which can be programmed to be sent in Audible Format. Open/Close reports, Restorals and Exclusions (Isolates) are NOT sent in Audible Format, even if selected ON. 58 E-TECH ET8 (V4) CONTROL PANEL – INSTALLER MANUAL OPERATING THE ET8 BY TELEPHONE AUDIBLE FEEDBACK 3 BEEPS: • The User Code is valid • Successful Arming or Disarming • An Auxiliary output has been turned ON. 1 LONG BEEP: • ET8 is already Armed • Invalid code. Try again. 1 SHORT BEEP: • An Auxiliary output has been turned OFF. The ET8 will allow a user to call in to the panel, using a standard DTMF telephone, and remotely Arm or Disarm all areas and also turn on or off Aux 1 and Aux 2. SEQUENCE OF OPERATION. To maintain panel security, remote operations can only be activated after entering a valid user code. 2. Wait 10 seconds and then call the number again within 50 seconds. To operate the ET8 by telephone, you need a DTMF capable telephone, a valid User Code and you must know the Telephone number of the line to which the ET8 is connected. NOTES SUMMARY OF TELEPHONE COMMANDS Prepare to receive commands Arm Areas Disarm Areas Turn Aux 1 Output ON or OFF Turn Aux 2 Output ON or OFF Finished – hang up • If the ET8 does not receive commands for periods longer than 10 seconds it will assume that the call is finished and it will hang up. • If an alarm occurs which requires the ET8 to dial out while attempting remote control, the ET8 will treat the alarm as a priority, give a constant tone as a warning and then hang up. • When all remote control commands are finished press to force the ET8 to hang up. 1. Phone the ET8 telephone number and listen for the required number of rings (ring ring...ring ring) and then hang up. 3. The ET8 will answer the second call immediately, sound a beep for 2 seconds then, after a pause, it will sound a lower frequency tone. The ET8 is now ready to receive telephone commands. 4. Press the button on the telephone. This tells the ET8 that telephone commands will follow. The ET8 will respond with either 3 beeps if all OK (One long beep means try again). 5. Now enter a valid User Code (that is normally used for Arming or Disarming the ET8) followed by button. the The ET8 will respond with 3 beeps if it recognises the code or 1 long beep to signal the code was invalid and to try again. 6. Enter the required command. See: Summary Of Telephone Commands. 7. Press to finish. This tells the ET8 to hang up. Also hang up your telephone. E-TECH ET8 (V4) CONTROL PANEL – INSTALLER MANUAL 59 E-TECH ACCESSORIES MOTION DETECTORS E-Tech manufactures a range of high quality and efficient motion detectors - including passive infra-red detectors, dual technology / microwave and infra-red devices as well as ceiling mounted 360° detectors. 100-021 Quantum 100-226 Quantum Plus 100-210 Quantum Dual 100-048 Quantum 360 All E-Tech detectors are designed using the most modern technology and techniques that ensure superior reliability and performance. QUANTUM - 15m passive infra-red detector with selectable pulse count; suitable for domestic and commercial installations. PetAware model available. QUANTUM PLUS - 15m passive infra-red detector with selectable pulse count, temperature compensation and downward looking ‘creep’ zones. QUANTUM DUAL - 15m combination microwave and passive infra-red detector. This combination of detection technologies virtually eliminates the possibility of unwanted alarms but faithfully detects humans. PetAware model available. QUANTUM 360 - Ceiling mounted 360° passive infra-red detector with selectable pulse count and sensitivity. Provides 8 metre coverage mounted at standard 2.4 metre ceiling height. PET AWARE DETECTORS The E-Tech Quantum™ Pet Aware PIR and Pet Aware DUAL are able to discriminate between household pets and unwanted human intruders, allowing you to secure your home with your pets indoors. WARNING DEVICES The range of warning devices includes horn speakers, polytough siren covers, internal ‘screamers’ and satellite sirens with their own battery backup. CCTV The E-Tech range of Closed Circuit TV equipment includes Dome cameras, B/W or Colour cameras, Miniature hidden cameras, Monitors - even digital video recorders and remote telephone video systems. SWITCHES A variety of switches are available for protecting doors and windows. The line-up includes surface and flush mount reed switches, emergency buttons, roller door reed switches and the unique ETechensor™ vibration sensor for highly effective perimeter protection. 60 E-TECH ET8 (V4) CONTROL PANEL – INSTALLER MANUAL WIRELESS PRODUCTS RADIO ACCESSORIES Ask your installer about the range of E-Tech radio devices for the optional extra convenience of wireless remote control and wireless detection. Operating your E-Tech security system can be as convenient as opening your car door. The E-Tech Radio Key™ provides the benefits of separate ON, OFF and PANIC buttons in a slim, waterproof remote control. * E-Tech radio products require a E-Tech Radio Interface (100-200) to be fitted to the control panel. E-TECH RADIO PENDANT Fully waterproof pendant style transmitter can be used as a portable wireless Panic button. Supplied with a neckchain as well as wristwatch straps. Ideal for use as a medical alarm for the elderly or infirm. (Central Station Monitoring is especially recommended when used for medical alarm purposes). Includes long life lithium battery. E-TECH RADIO REED SWITCH E-Tech Radio Reed Switch for wireless door and window protection. Includes long life lithium battery. E-TECH RADIO KEYPAD A unique fully portable radio keypad. The E-Tech Radio Keypad provides totally wireless Arming/Disarming of the E-Tech ET8, D16 & D24 control panels. Also operates Monitor mode and Panic when used with the E-Tech D16, D24 panels. The E-Tech radio Keypad is suitable for use as a portable keypad or for adding an extra keypad in areas where it is not possible to install wires. E-TECH RADIO KEY 3 BUTTON Fully waterproof, ultra slim 3 button Radio Key for remote control of the control panel. With separate buttons for ON (Arm), OFF (Disarm) and PANIC functions. Includes long life lithium battery. E-TECH RADIO PIR E-Tech Radio PIR (Passive Infrared) motion detector for wireless motion detection. Pet Aware model also available Can be used in combination with E-Tech hardwired detectors in areas where it is not possible to install wires. Includes long life lithium battery. Also available, the 100-663PET radio Pet Aware model, which detects humans but is immune to household pets. E-TECH RADIO SMOKE DETECTOR Radio Smoke Detector using Ionisation smoke detection technology. With on board sounder. A single battery powers the smoke detector and the transmitter. Includes 9V lithium battery. E-TECH ET8 (V4) CONTROL PANEL – INSTALLER MANUAL 61 PROGRAMMING OPTIONS SUMMARY OPTION DESCRIPTION DEFAULT P00E Follow Me Tel. No. none PAGE 39 1E Monitor to RESET OP OFF P01E–P08E Enable Radio Devices 1–8 none 56 2E Monitor to STROBE OP OFF P09E 3E Monitor to SONALERT 4E Monitor to SIREN none none 57 P10E Enable Radio Keys 1–8 Enable Radio Keys 9–15 P11E User Code 1 (Master) 123 14, 15 OPTION P63E DESCRIPTION DEFAULT PAGE 2E Restoral after Siren Time OFF OFF 3E Restoral on Disarm & seal OFF OFF 4E Restore on Disarm always P83E Test Call Interval ON P84E Time before next Test Call 6=12 hours Entry Delay Time 1 20 sec 7E Day Mode to SONALERT OFF P27E Entry Delay Time 2 6=60 sec 8E Day Mode to SIREN OFF P28E Exit Delay Time 60 sec 1E 2sec Monitor Alarm OFF Normal Zone Sens 2E 2sec Day Alarm 16 all zones P31E–38E Vibration Sens. High–Low none P39E DoubleTrigger Zones none P40E Instant Zones P41E P42E 17, 18 3E Monitor Zones Entry Delay2 P64E 4E Radio Key Chirp & Flash 1E Auto Dialling, Pulse & DTMF 3E DTMF Dialling always OFF ON 1E Disable Dialler OFF ON 2E Contact ID format 29, 30 OFF 4E Audible PULSE Format OFF 5E Contact ID + Audible DTMF OFF OFF 6E Contact ID + Audible PULSE OFF OFF 1E Split Dial Pri/Sec Phone Nos. OFF Zones 3–8 6E Double Key Keypad Panic ON Entry Delay 1 Zones Zone 1 7E Keypad Fire Alarm Handover Zones Zone 2 8E Keypad Medical Alarm Entry Delay 2 Zones none Lockout Zones All zones P45E AREA 1 Zones All zones P46E AREA 2 Zones none P47E AREA1 Codes 1–8 All codes P48E AREA1 Codes 9–15 All codes P49E AREA2 Codes 1–8 P50E P65E Supervised Radio Zones 1E Supervision RESET output 20 P86E none 31 OFF 32, 33 ON 4E 4 Dialling attempts ON 1E AREA 1 Open/Close reports OFF 3E Supervision SONALERT OFF 2E AREA 2 Open/Close reports OFF 4E Supervision SIREN output OFF 3E Siren Chirp on Kiss–off OFF 5E Supervision AUX1 output OFF 4E Flash Strobe on Kiss–off OFF Code 1 6E Supervision AUX2 output OFF AREA2 Codes 9–15 none 7E Supervision SpeedUp x 6 OFF P51E Monitor Mode Zones none 8E Supervision SpeedUp x10 OFF P52E 24hr Zones none P53E Day Zones none P54E Reset OP Zones All zones P55E Strobe Zones All zones P56E Sonalert Zones All zones P57E Siren Zones P58E P59E P62E P67 Supervision Time 5E Forced Opening report 6E Delayed Closing Reports 24 hours 31 34, 35 7E Manual Exclude Reports ON 8E Auto Exclude Reports ON 1E Enable Test Calls ON 48, 49 OFF 2E Mains Report Delay 4E Radio Panic Pulses AUX1 OFF 3E Listen–In to Dialler 5E Radio Arm unseal warning OFF All zones 6E 24hr Zone Fire Siren OFF 5E Line Fault Monitor Aux 1 Zones none 7E 4th Button RadioKey AUX1 OFF 6E Line Fault to AUX2 OFF Aux 2 Zones none 8E Quiet chirps on Arm/Disarm OFF 1E Enable Up/Download OFF 2E Enable Direct Connect OFF ON P68E 1E ARM1 Pulse Output 24, 25 P89E 36, 37 OFF ON OFF 4E Swinger shutdown ON OFF 2E Ksw Monitor/Disarm OFF 2E ARM2 Pulse Output OFF 3E Enable Remote Arming OFF 3E Ksw Arm/Disarm OFF P69E 3E Quiet Monitor Siren OFF 4E Enable Remote Disarming OFF 4E 6 Beeps on Arming OFF 5E Enable Remote AUX control OFF 5E Radio Key Monitor Arm OFF 4E Tamper siren lockout 5E Duress to Reset OP ON OFF P90E P70E Telephone No.1 Primary none OFF P71E Telephone No.2 Secondary none 8E Delay Arm1,2 outputs OFF P72E Account No. 1 0000 P73E Account No. 2 0000 Report ZONE Alarms 1–8 All zones 40, 41 ON 2E Tamper to Strobe OP ON P74E 3E Tamper to Sonalert ON 4E Tamper to Siren ON P75E 1E Report Duress 2E Report Medical 5E KP Panic to Reset OP ON 6E KP Panic to Strobe Op ON 7E KP Panic to Sonalert ON 8E KP Panic to Siren ON 1E S/cut Memory display ON 2E S/cut Zone Exclude ON 3E S/cut Monitor Mode ON P76E 4E S/cut Keypad Panic 5E S/cut Area 1 Arm 7E Auto Exclude 2s Warn 8E Exit Time x 10 26 27, 28 OFF ON OFF ON OFF 38 P92E 5E Report Panel Tamper ON 6E Report External Tamper ON ON OFF OFF ON 3E Report K/P & K/S Panic 4E Report Fire OFF 7E Report Keypad Tamper 7E Enable Remote Event Report OFF 8E Enable Callback Mode OFF P91E Report misc. ALARMS 9–14 1E Tamper to Reset OP Report misc. ALARMS 1–8 ON Required rings to answer 1 52 1E Report Radio Tamper ON 2E Report Radio Panic by User ON 41 3E Report Radio Battery by device OFF 4E Report Supervision fail OFF 5E Report Panel Battery ON 6E Report Mains Fail ON P93E Report MISC. Restorals 9–14 OFF P95E Clear Radio Devices Report Zone Restorals 1–8 All zones P96E Clear Memory P77E Report MISC. Restorals 1–8 All on P97E Clear panel options P78E Report Multiple Zone alarms none P98E Clear User codes P79E Account No.2 Zones none P99E Set Installer code P80E Telephone No. 3 for Test Calls none 39 P81E Telephone No.4 for Callback none 39 8E Report Exit Install Mode 50, 51 6E Enable Remote Status report OFF 7E Auto KP display off 6E S/cut Area 2 Arm All on 41 53 000000 53 These options are available in User Program Mode. ALL options are available in Installer Program Mode ET8 (V4) Options Summary © 2001 E-Tech Security Products 62 ON 3E Radio Panic Toggles AUX1 22, 23 46, 47 OFF OFF 6E Auto Exclude Zones P61E 19 P88E 2E 3K3 Zone Resistors 1E Entry Beeps P60E P66E 45 P87E 2E Check for Dial Tone 2E Supervision STROBE output OFF 21 43, 44 ON 3E Audible DTMF format OFF 42 ON OFF ON P44E 84=168hrs P85E 2E Pulse Dialling always 5E 50Hz Mains Frequency P43E ON ON P26E 5 min P82E PAGE 41 5E Day Mode to RESET OP 6E Day Mode to STROBE OP Siren Reset Time DEFAULT OFF none P30E DESCRIPTION 1E Restoral immediately P12E–P25E User Codes 2–15 P29E OPTION 28 E-TECH ET8 (V4) CONTROL PANEL – INSTALLER MANUAL INSTALLATION RECORD Date purchased: Date installed: Installation Company: Telephone: E-TECH ET8 ALARM CONTROL PANEL Monitoring Company: ZONES DEVICE TYPE PIR, Reed switch, etc DESCRIPTION P74E Report (dialler) P57E SIREN OUTPUT P56E SONALERT OUTPUT P54E RESET OUTPUT P52E 24 HOUR Minutes P51E MONITOR P29E SIREN RESET TIME P46E AREA 2 Seconds P45E AREA 1 P28E EXIT DELAY TIME P40E INSTANT Seconds P42E HANDOVER P27E ENTRY DELAY TIME 2 ZONE ASSIGNMENT P43E ENTRY DELAY 2 Seconds P41E ENTRY DELAY 1 P26E ENTRY DELAY TIME 1 P55E STROBE OUTPUT Telephone: Entrance, bedroom1, etc 1 2 3 4 5 6 7 8 OPTION No CODE User Code 1 Master Code CODE HOLDER P11E User Code 2 P12E User Code 3 P13E User Code 4 P14E User Code 5 P15E User Code 6 P16E User Code 7 P17E User Code 8 P18E User Code 9 P19E User Code 10 P20E User Code 11 P21E User Code 12 P22E User Code 13 P23E User Code 14 P24E User Code 15 P25E AREA 1 AREA 2 RADIO KEY CODE (Y/N) (Keypad Code only) © 2001 E-Tech Security Products E-TECH ET8 (V4) CONTROL PANEL – INSTALLER MANUAL 63