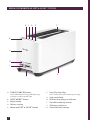
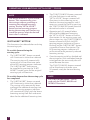
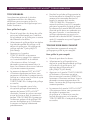
1
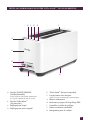
Breville Customer Service Center
US Customers
Canada Customers
Mail:
Mail:
Breville USA
19400 S. Western Ave
Torrance, CA
90501-1119
Breville Canada
2555, Avenue de l’Aviation
Pointe-Claire (Montreal)
Quebec H9P 2Z2
Phone: Customer Service
1 (866) BREVILLE
Phone: Customer Service
1 (866) BREVILLE
Email: Customer Service:
[email protected]
Email: Customer Service:
[email protected]
www.breville.com
Breville is a registered trademark of Breville Pty. Ltd. A.B.N. 98 000 092 928.
Copyright Breville Pty. Ltd. 2011.
Due to continued product improvement, the products illustrated/photographed
in this booklet may vary slightly from the actual product.
Model BTA630XL Issue - B11
the ‘Lift & Look’ ™ Touch
Instruction Book - Livret d’instructions
Suits all BTA630XL models
CONGRATULATIONS
on the purchase of your new
Breville ‘Lift & Look’™ Touch
Contents
4
Breville recommends safety first
7
Know your Breville
‘Lift & Look’™ Touch
9
Operating your Breville
‘Lift & Look’™ Touch
15
Care, cleaning & storage
17
One Year Limited Warranty
18
French
3
Breville recommends safety first
We at Breville are very safety conscious. We design and manufacture consumer products
with the safety of you, our valued customer, foremost in mind. In addition, we ask that
you exercise a degree of care when using any electrical appliance and adhere to the following precautions:
Important safeguards
Read all instructions
• Carefully read all instructions before
operating for the first time and save for
future reference.
• Remove and safely discard any
packaging materials and promotional
labels before using the toaster for the
first time.
• To eliminate a choking hazard for young
children, remove and safely discard the
protective cover fitted to the power plug
of this appliance.
• To protect against electrical shock, do
not immerse the power cord, power
plug or motor base in water or any other
liquid.
• Do not place the toaster near the edge
of a bench or table during operation.
Ensure the surface is level, clean and
free of water.
• Always operate the toaster on a stable,
heat resistant surface. Do not use on a
cloth-covered surface, near curtains or
other flammable materials.
• A fire may occur of the toaster is covered
or touching flammable materials,
including curtains, draperies, walls and
the like, when in operation.
• Do not allow hot surfaces of the toaster
to come in contact with countertops or
tables.
• Do not place the toaster on or near a hot
gas or electric burner, or where it could
touch any other source of heat.
• Do not allow the power cord to hang
over the edge of a table or counter, touch
hot surfaces or become knotted. Unwind
the power cord fully before use.
4
• Do not use the toaster on a sink drain
board.
• Do not move toaster while in operation.
• Ensure that bread to be toasted is the
correct size for the toaster and does not
protrude above the bread slice opening.
Ensure the bread is not too thick or
long that it will jam or wedge the bread
carriage.
• Do not place toast directly on top of
toasting slots to warm toast as this
may prevent correct air circulation and
damage the appliance.
• Do not touch hot surfaces. Toaster
surfaces are hot during and after
operation. To prevent burns or personal
injury, always use protective hot pads or
insulated oven mitts, or use handles or
knobs where available.
• Metal utensils such as knifes should not
be inserted into the toaster to remove
jammed toast, bagels or any other items
from the toaster. This can damage the
heating elements as well as lead to
electrocution.
• Do not attempt to dislodge food when
the toaster is plugged in.
• Oversized foods, metal foil packages, or
utensils must not be inserted into the
toaster as they may cause a fire or risk of
electric shock.
• Do not use the toaster without the slide
out crumb tray in place. Do not allow
crumbs to build up in the crumb tray.
Failure to clean the crumb tray regularly
may result in a fire hazard.
• To turn the toaster off, remove the power
plug from the power outlet.
PAge header.....
Breville
recommends safety first
• Always remove the power plug from
the power outlet if the toaster is not in
use, before attempting to move, before
cleaning, and when storing.
• Unplug from wall out when not in use
and before cleaning. Allow to cool before
putting on or taking off parts.
• Do not use harsh abrasive, caustic
cleaners or oven cleaners when cleaning
the toaster.
• Do not clean with metal scouring pads.
Pieces can break off and touch electrical
parts, creating a shock hazard.
• Strictly follow the care and cleaning
instructions described in this book.
• This appliance is for household use only.
Do not use the appliance for anything
other than its intended purpose as
described in this book. Do not use
outdoors. Do not use in moving vehicles
or boats.
• The use of attachments not sold or
recommended by Breville may cause fire,
electric shock or injury.
• Do not leave the toaster unattended
when in use.
• This appliance is not intended for use
by young children or infirm persons
without supervision. Young children
should be supervised to ensure that they
do not play with the appliance.
• Regularly inspect the power cord,
power plug and actual appliance for
any damage. Do not operate if damaged
in any way or after the appliance
malfunctions. Immediately cease use
of the appliance and visit www.Breville.
com or call Breville Customer Service at
1-866-BREVILLE for examination, repair
or adjustment.
• For any maintenance other than
cleaning, visit www.Breville.com or
call Breville Customer Service at
1-866-BREVILLE.
• This appliance is equipped with a
power cord having a grounding wire
with a grounding plug. The appliance
must be grounded using a 3-hole
properly grounded outlet. In the event
of an electrical short circuit, grounding
reduces the risk of electrical shock.
• If the appliance is of the grounded
type, the extension cord should be a
grounding 3-wire cord.
• If the power outlet is a standard
2-prong wall outlet, it is your personal
responsibility and obligation to have
it replaced with a properly grounded
3-prong wall outlet.
• Do not, under any circumstances, cut or
remove the third (ground) prong from
the power cord or use an adapter.
• Consult a qualified electrician if
the grounding instructions are not
completely understood, or if doubt exists
as to whether the appliance is properly
grounded.
5
Breville recommends safety first
BREVILLE ASSIST™ PLUG
Your Breville appliance comes with a unique
Assist™ Plug, conveniently designed with
a finger hole in the power plug for easy
and safe removal from the wall outlet. For
safety reasons it is recommended you
plug your Breville appliance directly into
its own electrical outlet on a dedicated
circuit separate from other appliances. If
the electric circuit is overloaded with other
appliances, your appliance may not function
properly. Use in conjunction with a power
strip or extension cord is not recommended.
SHORT CORD INSTRUCTIONS
WARNING
Never operate the toaster on its side.
Never add any food substance to the
bread, bagel or any other item prior
to toasting (such as butter, jelly or
marmalade). This may cause a fire
as well as lead to electrocution.
This toaster is for toasting bread,
bagels and toaster pastries only.
Placing other food items in the
toaster can cause a fire as well as
lead to electrocution.
Your Breville appliance is fitted with a short
power supply cord as a safety precaution to
prevent personal injury or property damage
resulting from pulling, tripping or becoming
entangled with a longer cord. Do not allow
children to use or be near this appliance
without close adult supervision. Longer
detachable power supply cords or extension
cords are not recommended but may be
used if care is exercised. If an extension cord
is used, (1) the marked electrical rating of
the cord set or extension cord should be at
least as great as the electrical rating of the
appliance, (2) the cord should be arranged
so that it will not drape over the countertop
or tabletop where it can be pulled on by
children or tripped over unintentionally
and (3) the extension cord must include a
3-prong grounding plug.
FOR HOUSEHOLD USE ONLY
SAVE THESE INSTRUCTIONS
6
KNOW
your Breville ‘Lift & Look’™ Touch
PAge header.....
Know
your Breville ‘Lift & Look’™ Touch
B C D
E
F
A
G
H
I
K
J
A. TOAST/CANCEL button
B.
C.
D.
E.
8
with motorized raising and lowering,
and toast ready sound alert
'A BIT MORE'™ button
Bagel setting
Defrost setting
Motorized 'LIFT & LOOK'™ button
F. Long Toasting Slots
extra wide with self centering carriage
G. Cool-touch body
H. LED toasting progress indicator
I. Variable browning control
J. Slide out crumb tray
K. Concealed cord storage
OPERATING
your Breville ‘Lift & Look’™ Touch
PAge header.....
Operating
your Breville ‘Lift & Look’™ Touch
Before first use, remove any packaging
material or promotional labels attached to
your toaster.
1. Insert the power plug into a 110/120V
power outlet. The TOAST/CANCEL
button surround will illuminate in white.
The LED toasting progress indicator
will illuminate in red from left to right,
then align to the selected browning
setting (indicated by the position of
the browning control slide). The toaster
will revert to stand-by mode after 30
seconds if a button is not pressed or the
browning control slide is not adjusted.
NOTE
When using the toaster for the first
time, we suggest toasting on the
maximum setting without bread.
The toaster may emit a thin smoke
or distinct odor on initial use. This
is normal and not detrimental to the
performance of the toaster.
2. Place 1 slice of bread, 1 bagel or half an
English muffin only, into each of the
toasting slots.
Ensure items for toasting are not
too large or too thick to fit in the
toasting slots.
3. Select the desired browning setting by
adjusting the browning control slide on
the front of the toaster. The browning
settings range from ‘1’ (lightest) to ‘5’
(darkest). The LED toasting progress
indicator will illuminate in red and
align to the selected browning setting
(as indicated by the position of the
browning control slide).
10
NOTE
When toasting bread for the first
time, it is suggested to toast on
browning setting ‘3’. Various types of
bread and personal preference may
require a different browning setting.
For example, raisin toast and white
light-textured breads may require
a lighter setting, while heavier
textured rye breads may require a
darker setting.
4. To start the toasting process, press the
TOAST/CANCEL button on top of the
toaster. The TOAST/CANCEL button
surround will illuminate in red and the
carriage will automatically lower into the
toasting slots which starts the toasting
cycle. As the carriage automatically
locks into position, the 'LIFT & LOOK'™
button surround will illuminate in white
and the LED toasting progress indicator
(above the selected browning setting)
will flash and start to gradually count
down (towards the left) indicating the
toasting progress.
5. The 'LIFT & LOOK'™ button can be
pressed up until 10 seconds before the
end of the toasting cycle to view the
browning of the bread. When selected,
the 'LIFT & LOOK'™ button surround
will flash and the LED toasting progress
indicator will remain steady (indicating
that the selected browning setting has
not been interrupted by the carriage
rising). The toasting recommences
immediately as the carriage lowers and
locks into position, and as indicated by
the 'LIFT & LOOK'™ button surround
illuminating and the LED toasting
progress indicator flashing.
PAge header.....
Operating
your Breville ‘Lift & Look’™ Touch
6. Approximately 10 seconds before the
end of the selected browning setting,
the 'LIFT & LOOK'™ button will cease
illumination. As the toasting stops and
the carriage rises, the TOAST/CANCEL
button surround will flash and the LED
toasting progress indicator will cease
flashing. The LED toasting progress
indicator will re-illuminate to the
previously selected browning setting.
7. Once the toasting cycle has completed
and the carriage has risen and locked
into the raised position, the toast ready
alert will sound. Remove the toast. The
TOAST/CANCEL button surround
will re-illuminate in white for up to 30
seconds, ready for the next toasting
cycle. The toaster will revert to stand-by
mode after 30 seconds.
NOTE
The toaster will revert to stand-by
mode after 30 seconds if a button is
not pressed or the browing control
slide is not adjusted.
The TOAST/CANCEL button
surround and LED toasting progress
indicator will cease illumination.
NOTE
The toaster will re-activate from
stand-by mode and the
TOAST/CANCEL button surround
and LED toasting progress indicator
will illuminate when:
A.Any of the buttons are pressed.
B. The browning control slide
is moved.
WARNING
Do not leave the toaster unattended
when in use as toast may jam.
In the unlikely event that bread,
bagels or toaster pastries become
jammed in the toasting slots, all the
buttons and the LED toasting progress
indicator will flash and the elements
will turn off. Remove the power plug
from the power outlet and allow the
toaster to cool completely before
carefully easing the bread out of the
slots. Take care not to damage the
heating elements.
TOAST/CANCEL button
The TOAST/CANCEL button surround will
illuminate in white for up to 30 seconds
when the appliance is turned on. The
toaster will revert to stand-by mode after
30 seconds if a button is not pressed or the
browning control slide is not adjusted.
• Press the TOAST/CANCEL button
once to lower the carriage and start the
toasting process.
The TOAST/CANCEL button surround
will then illuminate in red.
• Press the TOAST/CANCEL button
during operation to cancel the toasting
process or any other function. The
TOAST/CANCEL button illumination
will change from red to white and stay
illuminated for up to 30 seconds.
NOTE
Toasting can be stopped at any time
by pressing the TOAST/CANCEL
button located on the top of the
toaster. This will cancel the operation
and the carriage will move to the
raised position.
11
PAge header.....
Operating
your Breville ‘Lift & Look’™ Touch
NOTE
The toaster features a 'LIFT & LOOK'™
button. This automatically raises
the carriage without cancelling or
resetting the selected browning
setting. Use the 'LIFT & LOOK'™
button to view browning progress
during the toasting and, if necessary,
cancel the process when the desired
toast color is achieved.
'A BIT MORE'™ Button
This feature can be selected after or during
the toasting cycle.
To use this feature during the
toasting cycle:
1. The 'A BIT MORE'™ button surround
will illuminate in white when selected.
The toasting time will automatically
increase but will not illuminate more
of the LED toasting progress indicator.
The 'A BIT MORE'™ function can
be cancelled by pressing the 'A BIT
MORE'™ button again and the original
toasting cycle will continue.
To use this feature after the toasting cycle
has completed:
1. The 'A BIT MORE'™ button surround
will illuminate in white when selected.
The carriage will automatically lower
and begin the additional toasting time.
The LED toasting progress indicator
will automatically align with the lowest
browning setting then flash and count
down for the additional browning time.
12
2. The TOAST/CANCEL button surround
will also illuminate in red and the
'LIFT & LOOK'™ button surround will
illuminate in white allowing you to
check on the toasting progress and, if
necessary, cancel the cycle by pressing
the TOAST/CANCEL button when the
desired toast color is achieved.
3. Approximately 10 seconds before
the end of the additional browning,
the 'LIFT & LOOK'™ button will cease
illumination. As the toasting stops and
the carriage rises, the TOAST/CANCEL
button surround will flash, the LED
toasting progress indicator will cease
flashing and the 'A BIT MORE'™ button
surround will cease illumination. The
LED toasting progress indicator will
re-illuminate to the previously selected
browning setting.
4. Once the toasting cycle has finished and
the carriage has risen and locked into the
raised position, the toast ready alert will
sound. Remove the toast.
The TOAST/CANCEL button surround
will re-illuminate in white for up to
30 seconds, ready for the next toasting
cycle.
NOTE
The 'A BIT MORE button'™ can be
used with the TOAST, BAGEL and
DEFROST functions.
PAge header.....
Operating
your Breville ‘Lift & Look’™ Touch
BAGEL Button
This feature activates additional heat to
the middle heating elements to perfectly
toast the insides of your cut bagel without
burning the outside.
To toast bagels:
1. Place the cut bagel into the toasting
slots with the inside of the bagel facing
inwards as per the bagel markings above
the middle heating elements of the
toaster.
2. Select the desired browning setting by
adjusting the browning control slide on
the front of the toaster. The browning
settings range from ‘1’ (lightest) to ‘5’
(darkest).
3. Press the TOAST/CANCEL button
and the surround will illuminate in red
then press the BAGEL button and the
surround will illuminate in white. The
bagels will automatically lower into
the toasting slots. The middle and side
heating elements will automatically
adjust.
4. The 'LIFT & LOOK'™ button surround
will also illuminate in white allowing the
toasting progress to be checked and, if
necessary, cancel the cycle by pressing
the TOAST/CANCEL button when the
desired toast color is achieved.
5. Approximately 10 seconds before the
end of the selected browning setting,
the 'LIFT & LOOK'™ button will cease
illumination. As the toasting stops and
the carriage rises, the TOAST/CANCEL
button surround will flash and the LED
toasting progress indicator will cease
flashing. The LED toasting progress
indicator will re-illuminate to the
previously selected browning setting.
6. Once the toasting cycle has finished
and the carriage has risen and locked
into the raised position, the toast ready
alert will sound. Remove the bagels.
The TOAST/CANCEL button surround
will re-illuminate in white for up to 30
seconds, ready for the next toasting
cycle. The BAGEL button surround
will remain illuminated and should be
pressed once to cancel if a subsequent
toasting function is required. The
BAGEL button surround will cease to
illuminate after 30 seconds or when the
power plug is removed from the power
outlet.
DEFROST Button
This feature activates additional toasting
time required to toast frozen bread.
To toast frozen bread:
1. Place the bread into the toasting slots.
2. Select the desired browning setting
by adjusting the browning control
slide on the front of the toaster. The
browning settings range from ‘1’
(lightest) to ‘5’ (darkest).
3. Press the TOAST/CANCEL button and
the surround will illuminate in red then
press the DEFROST button and the
surround will illuminate in white. The
bread will automatically lower into the
toasting slots. The toasting time will
automatically increase.
4. The 'LIFT & LOOK'™ button surround
will illuminate in white allowing you to
check on the toasting progress and, if
necessary, cancel the cycle by pressing
TOAST/CANCEL button when the
desired toast color is achieved.
13
PAge header.....
Operating
your Breville ‘Lift & Look’™ Touch
5. Approximately 10 seconds before the
end of the selected browning setting,
the 'LIFT & LOOK'™ button will cease
illumination.
As the toasting stops and the carriage
rises, the TOAST/CANCEL button
surround will flash and the LED toasting
progress indicator will cease flashing.
The LED toasting progress indicator will
re-illuminate to the previously selected
browning setting.
6. Once the toasting cycle has finished
and the carriage has risen and locked
into the raised position, the toast ready
alert will sound. Remove the toast.
The TOAST/CANCEL button surround
will re-illuminate in white for up to
30 seconds, ready for the next toasting
cycle. The DEFROST button surround
will remain illuminated and should be
pressed once to cancel if a subsequent
toasting function is required. The
DEFROST button surround will cease
to illuminate after 30 seconds or when
the power plug is removed from the
power outlet.
14
'LIFT & LOOK'™ Button
This feature automatically raises and lowers
the carriage so you can check the toasting
progress without interrupting and/or
cancelling the toasting cycle.
To select this feature:
1. The 'LIFT & LOOK'™ button surround
will illuminate in white during the
toasting cycle and when using the
'A BIT MORE'™, BAGEL and DEFROST
features. You can press the
'LIFT & LOOK'™ button during the
toasting cycle to view the toasting
progress. If selected, the 'LIFT & LOOK'™
button surround will flash. The LED
toasting progress indicator will cease
to flash indicating that the selected
toasting cycle time has not been
interrupted. When the 'LIFT & LOOK'™
cycle has finished, the toasting cycle will
re-commence, indicated by the resumed
flashing of LED toasting progress
indicator.
2. Approximately 10 seconds before the
end of the selected browning setting,
the 'LIFT & LOOK'™ button will cease
illumination and cannot be activated
during this time.
CARE, CLEANING
& STORAGE
of your Breville ‘Lift & Look’™ Touch
PAge header.....
CARE,
CLEANING & STORAGE
Care and cleaning
1. Remove the power plug from the power
outlet and allow the toaster to cool
completely before cleaning.
2. To clean any crumbs from the toaster,
remove the crumb tray, located under
the control panel at the front of the
toaster, by pulling it outwards. Empty
and replace the crumb tray before using
the toaster again. Replace the crumb
tray by sliding it inwards until it locks
into position.
3. To remove any additional crumbs, turn
the toaster upside down over a trash bin
and shake crumbs free.
4. Wipe the outside of the toaster with a
slightly dampened soft cloth then polish
with a soft dry cloth to dry completely.
NOTE
Do not clean with metal scouring
pads. Pieces can break off the pad
and touch electrical parts creating an
electric shock hazard.
STORAGE
Remove the power plug from the power
outlet and allow the toaster to cool
completely before storing. Follow the
directions for cleaning and store in an
upright position on a flat surface on a bench
top or in an accessible cupboard.
Do not store anything on top of the toaster.
WARNING
Do not use the toaster without the
slide-out crumb tray in position. Do not
allow crumbs to build up in the crumb
tray. Failure to clean the crumb tray
regularly may result in a fire hazard.
16
ONE YEAR LIMITED WARRANTY
Subject to the conditions below, HWI
Breville warrants for two year from the date
of purchase that this Breville appliance is
free of defects in material and workmanship.
This warranty does not cover damages to
the appliance or to any of its parts that are
caused by abuse, misuse, neglect, wear and
tear, including damages caused by using
the appliance in a manner not contemplated
by the instruction manual, including use on
current or voltage other than that marked
on the product, or by failing to follow safety,
operating, care or cleaning instructions or
alteration or repair not authorized by HWI
Breville . Where applicable, this warranty
covers the repair and/or replacement of a
defective product at HWI Breville ’s option.
®
®
®
®
This warranty provides specified rights.
Consumers may also have other rights
which vary from state to state, or province
to province.
TERM OF WARRANTY:
The warranty extends for two year from the
date of original purchase by a consumer,
and does not apply to purchases by
retailers or distributors, or to purchases for
commercial use. If a replacement product is
sent, it will carry the remaining warranty of
the original product.
Please contact our Customer Service Center
at www.Breville.com or call the toll free
number below for instructions on the repair
and/or replacement of the appliance if a
covered defect occurs within the two year
warranty period.
DISCLAIMER:
This warranty covers the repair and/or
replacement of products. HWI Breville
expressly disclaims all responsibility for
consequential damages for incidental losses
caused by use of this appliance. Some states
or provinces do not allow this exclusion or
limitation for incidental or consequential
losses, so the foregoing disclaimer may not
apply to you.
®
Fitness and merchantability: any
warranty of merchantability or
fitness with respect to this product is
also limited to the two year limited
warranty period. The warranties set
forth herein are exclusive and not
other warranties, express or implied,
are made by HWI Breville or are
authorized to be made with respect to
the product.
®
If the appliance should become defective
within the warranty period, do not return the
appliance to the store. Please visit us online
at www.Breville.com or:
Toll free phone number:
USA:
1-866-BREVILLE (1-866-273-8455)
CANADA: 1-866-BREVILLE (1-866-273-8455)
Email:
USA:
CANADA:
[email protected]
[email protected]
CONDITIONS:
In order to be eligible for this warranty,
the consumer must purchase the Breville
appliance from an “Authorized Retailer” and
must provide proof that the product was
purchased within two year prior to making
any claim under the warranty. Registering
the product with HWI Breville , while
appreciated, is not required, and is not a
substitute for proof of purchase.
®
®
17
FÉLICITATIONS
pour l'achat de votre nouveau
‘Lift & Look’ Touch de Breville
MC
TABLE DES MATIÈRES
20 Breville vous recommande la
sécurité avant tout
24
Faites la connaissance de votre de
'Lift & Look' Touch de Breville
MC
26
Fonctionnement de votre
'Lift & Look' Touch de Breville
MC
32
Entretien, nettoyage & rangement
35 Garantie limitée d'un an
19
BREVILLE VOUS RECOMMANDE LA SÉCURITÉ AVANT TOUT
Chez Breville, la sécurité occupe une place de choix. Nous concevons et fabriquons des
produits destinés aux consommateurs sans jamais perdre de vue la sécurité de notre
précieuse clientèle. De plus, nous vous demandons d’être très vigilant lorsque vous util
sez un appareil électrique et de respecter les mesures de sécurité suivantes:
IMPORTANTES MESURES DE SÉCURITÉ
LISEZ TOUTES LES
INSTRUCTIONS
• Lisez attentivement toutes les
instructions avant d’utiliser cet appareil
pour la première fois et conservez-les
pour référence future.
• Retirez et disposez de tout
matériel d’emballage et étiquettes
promotionnelles avant d’utiliser le grillepain pour la première fois.
• Afin d’éliminer les risques de suffocation
chez les jeunes enfants, retirez et
disposez de l’enveloppe protectrice
recouvrant la fiche de l'appareil.
• Pour vous protéger contre les chocs
électriques, ne plongez pas le cordon
d’alimentation, la fiche ou le socle
motorisé dans l’eau ou tout autre liquide.
• Ne placez pas l’appareil sur le bord d’un
comptoir ou d’une table lorsqu’il est en
fonction. Assurez-vous que la surface
de travail est de niveau, propre et bien
asséchée.
• Utilisez toujours le grille-pain sur
une surface stable et à l'épreuve de la
chaleur. Ne l'utilisez pas sur une surface
recouverte de tissu, près des rideaux et
de tout autre matériel inflammable.
• Un incendie peut survenir si le grillepain est recouvert ou touche à du
matériel inflammable, incluant les
rideaux, draperies, murs et autres
lorsqu'il est en fonction.
• Ne laissez pas les surfaces chaudes du
grille-pain toucher au comptoir ou à la
table.
• Ne placez pas le grille-pain près d’un
brûleur au gaz ou électrique où à un
endroit où il pourrait toucher à une
source de chaleur.
20
• Ne laissez pas le cordon d’alimentation
pendre d’un comptoir ou d’une table,
toucher à des surfaces chaudes ou se
nouer. Déroulez-le complètement avant
l’usage.
• N'utilisez pas le grille-pain sur le plateau
d'égouttement du lavabo.
• Ne déplacez pas le grille-pain lorsqu'il
est en fonction.
• Assurez-vous que la tranche de pain
est de la bonne grosseur et n'excède
pas l'ouverture de la fente. La tranche
ne devra pas être trop épaisse ou trop
longue, car elle pourrait bloquer ou se
coincer dans le chariot.
• Ne placez pas la tranche de pain
directement sur le dessus de la
fente pour la faire réchauffer, car
cela empêchera l'air de circuler et
endommagera l'appareil.
• Ne touchez pas aux surfaces chaudes
de l'appareil, qui sont très chaudes
durant et après le fonctionnement. Afin
de prévenir les brûlures ou blessures
corporelles, utilisez toujours des
poignées isolantes ou des gants de
cuisine, ou des boutons quand cela est
possible.
• N'insérez jamais d'ustensiles métalliques
comme des couteaux pour retirer
une rôtie coincée, un bagel ou tout
autre aliment du grille-pain. Cela
peut endommager les éléments
chauffants et peut comporter un risque
d'électrocution.
• Ne tentez pas de dégager les aliments
du grille-pain lorsqu'il est branché.
BREVILLE
VOUS RECOMMANDE LA SÉCURITÉ AVANT TOUT
PAge header.....
• Des aliments trop gros, des emballages
métalliques ou des ustensiles ne doivent
pas être insérés dans le grille-pain, car
ils peuvent causer un risque d'incendie
ou d'électrocution.
• N'utilisez pas le grille-pain sans
le ramasse-miettes en place et ne
laissez pas les miettes s'y accumuler.
Omettre de nettoyer le ramasse-miettes
régulièrement peut entraîner un risque
d'incendie.
• Pour éteindre le grille-pain, débranchezle de la prise murale.
• Débranchez toujours le grille-pain de
la prise murale lorsqu'il n'est pas en
fonction, ou avant de le déplacer, le
nettoyer ou le ranger.
• Débranchez l'appareil s'il n'est pas
utilisé ou avant de le nettoyer. Laissez-le
refroidir avant d'y ajouter et de retirer
des pièces.
• N’utilisez pas de détergents abrasifs, de
nettoyants caustiques ou de nettoyants
pour le four pour nettoyer l’appareil.
• N'utilisez pas de tampons à récurer
métalliques. Des fils pourraient
se détacher et toucher aux pièces
électriques de l'appareil, causant un
choc électrique.
• Respectez à la lettre les consignes
d'entretien et de nettoyage décrites dans
ce livret.
• Cet appareil est conçu pour un usage
domestique seulement. Ne l’utilisez pas
à d’autres fins que celles prévues dans
ce livret. Ne l’utilisez pas à l’extérieur
ou dans un véhicule ou un bateau en
mouvement.
• L'utilisation d’accessoires non vendus
ou recommandés par Breville peut
entraîner un risque d’incendie, de choc
électrique ou de blessure.
• Ne laissez pas le grille-pain sans
surveillance lorsqu'il est en fonction.
• Cet appareil n’est pas conçu pour être
utilisé sans surveillance par de jeunes
enfants ou des personnes handicapées.
Surveillez les jeunes enfants pour qu’ils
ne jouent pas avec l’appareil.
• Vérifiez régulièrement si le cordon
d’alimentation, la fiche ou l’appareil
lui-même est endommagé. Ne faites
pas fonctionner l’appareil s’il est
endommagé de quelque façon que
ce soit ou s’il est dysfonctionnel.
Cessez immédiatement l’utilisation et
visitez www.Breville.com ou appelez
le Service à la clientèle de Breville ou
1-866-BREVILLE pour le faire examiner,
réparer ou ajuster.
• Pour tout entretien autre que le
nettoyage, visitez www.Breville.com
ou appelez le Service à la clientèle de
Breville ou 1-866-BREVILLE
• Cet appareil est muni d’un cordon
d’alimentation relié à la terre et d’une
fiche reliée à la terre. Il doit être branché
dans une prise de courant à trois trous
correctement reliée à la terre. Si un
court-circuit se produit, la mise à la terre
réduira les risques de choc électrique.
• Si l’appareil est relié à la terre, la corde
de rallonge doit être munie d’une fiche
reliée à la terre à 3 broches.
• Si la prise murale est standard à deux
trous, il en tient de votre responsabilité
et obligation de la faire remplacer par
une prise murale à 3 trous reliée à la
terre.
• Ne tentez en aucune circonstance
de couper ou de retirer la troisième
broche (mise à la terre) du cordon
d’alimentation ou d’utiliser un
adaptateur.
• Consultez un électricien qualifié si vous
ne comprenez pas les instructions de
mise à la terre ou si un doute existe
quant à la mise à la terre adéquate de
l’appareil.
21
BREVILLE VOUS RECOMMANDE LA SÉCURITÉ AVANT TOUT
FICHE ASSIST DE BREVILLE
MC
Votre appareil Breville est muni d’une
fiche exclusive AssistMC conçue de
façon à laisser passer un doigt pour un
retrait facile et sécuritaire de la fiche.
Par mesure de sécurité, il est conseillé
de brancher l’appareil dans une prise
individuelle séparée des autres appareils.
Une surcharge électrique peut altérer
le bon fonctionnement de l'appareil.
Il est déconseillé d’utiliser une barre
d’alimentation ou une corde de rallonge.
RECOMMANDATIONS SUR LE
CORDON D'ALIMENTATION
AVERTISSEMENT
Ne faites jamais fonctionner
le grille-pain sur le côté.
N'ajoutez jamais d'ingrédients au
pain, muffins ou bagels,
car cela pourrait causer un risque
d'électrocution ou d'incendie.
Ce grille-pain est conçu pour griller
uniquement le pain, les bagels et
les muffins. Si vous tentez de griller
d'autres aliments, cela pourrait
causer un risque d'électrocution ou
d'incendie.
L’appareil est muni d’un cordon
d’alimentation relativement court (6')
très sécuritaire qui réduit le risque de
blessures corporelles ou de dommages
pouvant être causés par le fait de tirer,
trébucher ou s’enchevêtrer dans le cordon.
Ne laissez pas les enfants utiliser ou être à
proximité de l’appareil sans surveillance.
Si vous utilisez une corde de rallonge: (1)
sa capacité électrique doit être équivalente
ou supérieure à la puissance en watts
de l’appareil; (2) la corde ne doit pas
pendre d’un comptoir, d’une table ou de
toute autre surface où de jeunes enfants
pourraient s’y suspendre ou trébucher; (3)
la corde doit est munie d’une fiche reliée à
la terre à trois broches.
USAGE DOMESTIQUE SEULEMENT
CONSERVEZ CES INSTRUCTIONS
22
FAITES LA
CONNAISSANCE
de votre ‘Lift & Look’ Touch de Breville
MC
FAITES LA CONNAISSANCE DE VOTRE 'LIFT & LOOK'MC TOUCH DE BREVILLE
B C D
E
F
A
G
H
I
K
J
A. Touche TOAST/CANCEL
(Griller/Annuler)
avec levier et descente motorisés
et signal sonore de fin de cycle
B. Touche 'A Bit More'
(Un peu plus)
C. Réglage pour bagel
D. Réglage pour pain congelé
MC
E. 'Lift & Look'MC (Lever & regarder)
F. Larges fentes très longues
G.
H.
I.
J.
K.
avec chariot à centrage automatique
Boîtier athermane
Indicateur progressif de grillage DEL
Contrôle variable de grillage
Ramasse-miettes amovible
Rangement pour le cordon
25
FONCTIONNEMENT
de votre ‘Lift & Look’ Touch de Breville
MC
FONCTIONNEMENT DE VOTRE 'LIFT & LOOK'MC TOUCH DE BREVILLE
Avant la première utilisation, retirez
tout matériel d'emballage ou étiquettes
promotionnelles du grille-pain.
1. Branchez la fiche dans une prise murale
de 110/120V. Le contour de la touche
TOAST/CANCEL s'illuminera en blanc.
L'indicateur progressif de grillage DEL
s'illuminera en rouge, de gauche à droite,
puis s'arrêtera au réglage choisi (indiqué
par la position du guide de contrôle de
grillage). Le grille-pain reviendra en
mode veille après 30 secondes, si la
touche n'a pas été enfoncée ou le guide
de contrôle de grillage n'a pas été réglé.
NOTE
Lorsque vous utilisez le grille-pain pour
la première fois, nous vous suggérons
d'utiliser le grillage maximum, mais
sans pain. Une légère fumée ou une
ODEUR particulière pourrait s'en
dégager. Cela est normal et ne nuit
aucunement au rendement du
grille-pain.
2. Placez 2 tranches de pain, 1 bagel ou la
moitié d'un muffin anglais dans chacune
des fentes du grille-pain.
Assurez-vous que les tranches ne sont
pas trop grandes ou trop épaisses, afin
qu'elles conviennent aux fentes.
3. Sélectionnez le réglage de grillage
désiré en réglant le guide de contrôle
de grillage sur le devant du grille-pain.
Les réglages vont de '1' (très pâte) à '5'
(très foncé). L'indicateur progressif de
grillage DEL s'illuminera en rouge et
s'arrêtera au réglage choisi
(tel qu'indiqué par la position du guide
de contrôle de grillage).
NOTE
Lorsque vous utilisez le grille-pain
pour la première fois, il est suggéré
d'utiliser le réglage '3'. Différents
types de pain, ainsi que vos goûts
personnels, peuvent exiger un
réglage différent. Par exemple, le
pain aux raisins et le pain blanc
plus léger nécessiteront un réglage
plus pâle, tandis que le pain plus
consistant exigera un réglage
plus foncé.
4. Pour démarrer le processus de grillage,
appuyez sur la touche TOAST/CANCEL
sur le dessus du grille-pain. Le contour
de la touche s'illuminera en rouge et le
chariot s'abaissera automatiquement
dans les fentes, ce qui fera démarrer le
cycle de grillage. Comme le charriot
se verrouille automatiquement, le
contour de la touche 'LIFT & LOOK'MC
s'illuminera en blanc et l'indicateur
de progression de grillage DEL
(au-dessus du réglage de grillage
sélectionné) clignotera et commencera
graduellement le compte à rebours (vers
la gauche), indiquant la progression du
grillage.
5. Vous pouvez appuyer sur la touche
'LIFT & LOOK'MC jusqu'à 10 secondes
avant la fin du cycle de grillage, pour
vérifier le degré de grillage du pain.
Lorsque la touche 'LIFT & LOOK'MC sera
sélectionnée, le contour clignotera et
l'indicateur progressif de grillage DEL
sera fixe (indiquant que le grillage
choisi a été interrompu par la levée du
chariot). Le grillage recommencera au
moment où le chariot s'abaissera et se
verrouillera, tel qu'indiqué par le contour
illuminé de la touche 'LIFT & LOOK'MC
et par l'indicateur progressif de grillage
DEL qui clignote.
27
FONCTIONNEMENT DE VOTRE 'LIFT & LOOK'MC TOUCH DE BREVILLE
6. Environ 10 secondes avant la fin du
cycle de grillage, la touche
'LIFT & LOOK' s'éteindra. Comme le
cycle de grillage est terminé et le chariot
relevé, le contour de la touche
TOAST/CANCEL clignotera et
l'indicateur de progression de grillage
DEL s'illuminera à nouveau au réglage
précédemment sélectionné.
MC
7. Une fois le cycle de grillage terminé
et le chariot relevé et verrouillé en
place, le signal sonore se fera entendre.
Retirez les rôties. Le contour de la
touche TOAST/CANCEL s'illuminera à
nouveau en blanc pour un maximum de
30 secondes, en préparation du prochain
cycle de grillage. Le grille-pain reviendra
en mode veille après 30 secondes.
AVERTISSEMENT
Ne laissez pas le grille-pain sans
surveillance lorsqu'il est en fonction,
car le pain grillé peut se coincer.
Dans le cas peu probable que le
pain, les bagels ou les muffins se
coincent dans les fentes, tous les
boutons et l'indicateur progressif
de grillage DEL clignoteront et les
éléments s'éteindront. Débranchez
l'appareil et laissez le grille-pain
refroidir complètement avant de
retirer délicatement le pain des fentes.
Prenez soin de ne pas endommager les
éléments chauffants.
NOTE
TOUCHE TOAST/CANCEL
Le grille-pain reviendra en mode
veille après 30 secondes, si aucune
touche n'a été enfoncée ou que le
guide de contrôle de grillage n'a pas
été réglé.
Le contour de la touche
TOAST/CANCEL et l'indicateur
de progression de grillage DEL
s'éteindront.
Le contour de la touche TOAST/CANCEL
s'illuminera en blanc pour un maximum
de 30 secondes quand l'appareil est mis en
marche. Le grille-pain reviendra au mode
veille après 30 secondes, si la touche n'est
pas pressée ou le guide de contrôle de
grillage n'est pas réglé.
• Pressez la touche TOAST/CANCEL
une fois pour abaisser le chariot et
enclencher le cycle de grillage.
Le contour de la touche TOAST/
CANCEL s'illuminera en rouge.
• Appuyez sur la touche TOAST/
CANCEL durant le fonctionnement pour
annuler le cycle de grillage ou toute
autre fonction. Le contour de la touche
TOAST/CANCEL passera du rouge
au blanc et restera illuminé jusqu'à 30
secondes.
NOTE
Le grille-pain se réactivera après le
mode veille, et le contour de la touche
TOAST/CANCEL et l'indicateur
de progression de grillage DEL
s'illumineront quand:
A.Une des touches est enfoncée.
B. Le guide de grillage est déplacé.
NOTE
Le grillage peut être interrompu
en tout temps en appuyant sur la
touche TOAST/CANCEL située sur le
dessus du grille-pain. Cela annulera
l'opération et le chariot se relèvera.
28
FONCTIONNEMENT DE VOTRE 'LIFT & LOOK'MC TOUCH DE BREVILLE
2. Le contour de la touche
NOTE
Le grille-pain est muni d'une
touche 'LIFT & LOOK'MC qui soulève
automatiquement le chariot sans
annuler ou réinitialiser le réglage
de grillage sélectionné. Utilisez la
touche 'LIFT & LOOK'MC pour voir
la progression durant le grillage et
annuler le cycle, si nécessaire, quand
le degré de grillage est atteint.
TOUCHE 'A BIT MORE'
MC
Cette fonction peut être sélectionnée après
ou durant le cycle de grillage.
Pour utiliser cette fonction durant le cycle
de grillage:
Le contour de la touche
'A BIT MORE'MC s'illumine en blanc lorsqu'il
est sélectionné. Le temps de grillage
augmentera automatiquement, mais
l'indicateur progressif de grillage DEL
ne s'illuminera pas plus. La fonction
'A BIT MORE'MC peut être annulée en
appuyant à nouveau sur la touche
'A BIT MORE'MC et le cycle de grillage
original continuera.
Pour utiliser cette fonction après la fin du
cycle de grillage:
1. Le contour de la touche A BIT MORE'MC
s'illuminera en blanc lorsque la touche
sera sélectionnée. Le chariot s'abaissera
automatiquement et commencera le
temps de grillage supplémentaire.
L'indicateur progressif de grillage DEL
s'alignera automatiquement au plus bas
réglage de grillage, puis clignotera et
amorcera le compte à rebours du temps
de grillage supplémentaire.
TOAST/CANCEL s'illuminera
en rouge et celui de la touche
'LIFT & LOOK'MC s'illuminera en
blanc, vous permettant de vérifier la
progression du grillage et, si nécessaire,
annuler le cycle en appuyant sur la
touche TOAST/CANCEL si le degré de
grillage est atteint.
3. Environ 10 secondes avant la fin du
grillage supplémentaire, le contour de
la touche 'LIFT & LOOK'MC s'éteindra.
Comme le cycle est terminé et que
le chariot se lève, le contour de la
touche TOAST/CANCEL clignotera,
l'indicateur progressif de grillage
cessera de clignoter et le contour de
la touche 'A BIT MORE'MC s'éteindra.
L'indicateur progressif de grillage
DEL s'illuminera à nouveau au réglage
sélectionné précédemment.
4. Une fois le cycle de grillage terminé et
le chariot relevé et verrouillé, le signal
sonore se fera entendre. Retirez le pain
grillé.
Le contour de la touche TOAST/
CANCEL s'illuminera à nouveau en blanc
jusqu'à 30 secondes, prêt pour un autre
cycle de grillage.
NOTE
La touche 'A BIT MORE'MC peut être
utilisée pour les fonctions TOAST,
BAGEL et DEFROST.
29
FONCTIONNEMENT DE VOTRE 'LIFT & LOOK'MC TOUCH DE BREVILLE
TOUCHE BAGEL
6. Une fois le cycle de grillage terminé et
Cette fonction génère de la chaleur
supplémentaire dans les éléments
chauffants centraux pour griller à la
perfection l'intérieur du bagel coupé sans
brûler l'extérieur.
Pour griller les bagels:
1. Placez le bagel dans les fentes du grille-
pain avec le côté coupé vers l'intérieur,
tel qu'indiqué sur le grille-pain au centre
des éléments chauffants.
2. Sélectionnez le grillage désiré en réglant
le guide de contrôle de grillage sur le
devant du grille-pain. Les réglages de
grillage vont de '1' (très pâle) à '5'
(très foncé).
3. Appuyez sur la touche
TOAST/CANCEL et le contour
s'illuminera en rouge. Puis appuyez
sur la touche BAGEL et le contour
s'illuminera en blanc. Le bagel
descendra automatiquement dans la
fente. Les éléments centraux et latéraux
s'ajusteront automatiquement.
4. Le contour du bouton 'LIFT & LOOK'MC
s'illuminera également en blanc, vous
permettant de vérifier la progression du
grillage et, si nécessaire, annuler le cycle
en appuyant sur la touche
TOAST/CANCEL si le degré de grillage
est atteint.
5. Environ 10 secondes avant la fin
du cycle de grillage sélectionné, le
contour du bouton 'LIFT & LOOK'
s'éteindra. Comme le cycle est terminé
et que le chariot se lève, le contour du
bouton TOAST/CANCEL clignotera et
l'indicateur progressif de grillage DEL
cessera de clignoter, puis s'illuminera
à nouveau au réglage sélectionné
précédemment.
MC
30
le chariot relevé et verrouillé, le signal
sonore se fera entendre. Retirez les
bagels. Le contour de la touche
TOAST/CANCEL s'illuminera à
nouveau en blanc jusqu'à 30 secondes,
prêt pour le prochain cycle de grillage.
Le contour de la touche BAGEL restera
illuminé et elle devra est enfoncée une
fois pour l'annuler, si une fonction de
grillage subséquente est requise. Le
contour de la touche BAGEL s'éteindra
après 30 secondes ou quand l'appareil
sera débranché.
TOUCHE POUR PAIN CONGELÉ
Cette fonction augmente le temps de
grillage pour griller le pain congelé.
Pour griller le pain congelé:
1. Placez le pain dans les fentes.
2. Sélectionnez le grillage désiré en
réglant le guide de contrôle de grillage
sur le dessus du grille-pain. Les
réglages de grillage vont de '1'
(très pâle) à '5' (très foncé).
3. Appuyez sur la touche TOAST/CANCEL
et le contour s'illuminera en rouge.
Pressez ensuite la touche DEFROST et
le contour s'illuminera en blanc. Le pain
descendra automatiquement dans les
fentes. Le temps de grillage augmentera
automatiquement.
4. Le contour de la touche 'LIFT & LOOK'MC
s'illuminera en blanc, vous permettant
de vérifier la progression
du grillage et, si nécessaire, annuler
le cycle en appuyant sur la touche
TOAST/CANCEL si le degré de grillage
est atteint.
FONCTIONNEMENT DE VOTRE 'LIFT & LOOK'MC TOUCH DE BREVILLE
5. Environ 10 secondes avant la fin du
cycle de grillage sélectionné, le contour
de la touche 'LIFT & LOOK' s'éteindra.
MC
Comme le grillage est terminé et que
le chariot se relève, le contour de la
touche TOAST/CANCEL clignotera et
l'indicateur progressif de grillage DEL
cessera de clignoter puis sera illuminé
à nouveau au réglage sélectionné
précédemment.
6. Une fois le cycle de grillage terminé et
le chariot relevé et verrouillé, le signal
sonore se fera entendre. Retirez le pain
grillé. Le contour de la touche
TOAST/CANCEL s'illuminera à
nouveau en blanc jusqu'à 30 secondes,
prêt pour le prochain cycle de grillage.
Le contour de la touche DEFROST
restera illuminé et elle devra être
enfoncée une fois pour annuler le cycle,
si une fonction de grillage subséquente
est requise. Le contour de la touche
DEFROST cessera d'être illuminé après
30 secondes ou quand l'appareil sera
débranché.
TOUCHE 'LIFT & LOOK'
MC
Cette fonction soulève et abaisse
automatiquement le chariot pour vous
permettre de vérifier la progression du
grillage sans interrompre ou annuler le cycle
de grillage.
Pour sélectionner cette fonction:
1. Le contour du bouton 'LIFT & LOOK'MC
s'illuminera en blanc durant le cycle
de grillage ou lorsque vous utilisez les
fonctions 'A BIT MORE' , BAGEL et
DEFROST. Vous pouvez appuyer sur la
touche 'LIFT & LOOK' durant le cycle
de grillage pour voir la progression
du grillage. Le contour de la touche
'LIFT & LOOK' clignotera, si elle est
sélectionnée. L'indicateur progressif
de grillage DEL cessera de clignoter,
indiquant que le temps de grillage
sélectionné n'a pas été interrompu.
Lorsque le cycle 'LIFT & LOOK' sera
terminé, le cycle de grillage reprendra,
comme indiqué par l'indicateur
progressif de grillage DEL clignotant.
MC
MC
MC
MC
2. Environ 10 secondes avant la fin du
cycle de grillage sélectionné, le contour
de la touche 'LIFT & LOOK' cessera
d'être illuminé et ne pourra pas être
activé durant cette période.
MC
31
ENTRETIEN, NETTOYAGE
& RANGEMENT
de votre ‘Lift & Look’ Touch de Breville
MC
ENTRETIEN, NETTOYAGE & RANGEMENT
ENTRETIEN, NETTOYAGE
& RANGEMENT
1. Débranchez le grille-pain de la
prise murale et laissez-le refroidir
complètement avant de le nettoyer.
2. Pour enlever les miettes du grille-pain,
retirez le ramasse-miettes logé sous le
panneau de contrôle sur le devant de
l'appareil, en le tirant vers l'extérieur.
Videz-le et replacez-le avant d'utiliser
à nouveau le grille-pain. Pour ce
faire, glissez le ramasse-miettes vers
l'intérieur jusqu'à ce qu'il se verrouille
en place.
AVERTISSEMENT
N'utilisez pas le grille-pain si le
ramasse-miettes n'est pas bien inséré
en place. Ne laissez pas les miettes
s'y accumuler. Omettre de nettoyer le
ramasse-miettes régulièrement peut
entraîner un risque d'incendie.
3. Pour dégager les miettes restantes,
retournez le grille-pain à l'envers audessus d'une poubelle et secouez-le.
4. Essuyez l'extérieur du grille-pain avec un
chiffon doux légèrement humecté, puis
polissez-le à l'aide d'un chiffon doux et
sec et asséchez correctement.
NOTE
N'utilisez pas de tampon à récurer
métallique. Des particules peuvent
s'en détacher et toucher aux éléments
chauffants, entraînant ainsi un risque
de choc électrique.
RANGEMENT
Débranchez le grille-pain de la prise murale
et laissez-le refroidir complètement avant
de le ranger. Respectez les consignes de
nettoyage et rangez l'appareil sur ses pieds
sur une surface unie, un comptoir ou une
armoire accessible.
Ne rangez aucun objet sur le dessus du
grille-pain.
33
NOTES
34
GARANTIE LIMITÉE D'UN AN
Sous réserve des conditions décrites
cidessous, HWI Breville garantit pendant
une période d’un an de la date d’achat que
cet appareil ne présente aucun défaut de
matériel ou de fabrication. Cette garantie
ne couvre pas les dommages à l’appareil
ou à quelqu’une de ses pièces causés
par l’abus,une utilisation inadéquate, la
négligence et l’usure normale de l’appareil,
y compris les dommages causés par une
utilisation autre que celle prévue dans ce
livret d’instructions, incluant l’utilisation de
courant électrique ou de voltage autre que
ceux décrits sur le produit, ou en omettant
de respecter les directives de sécurité, de
fonctionnement, de soin ou de nettoyage
de l’appareil, ou lors d’une modification
ou d’une réparation non autorisée par
HWI Breville . Si applicable, cette garantie
couvrira la réparation et/ou le remplacement
d’un produit défectueux, à la discrétion de
HWI Breville .
®
®
®
Cette garantie prévoit des droits spécifiques.
Les consommateurs peuvent aussi avoir
d'autres droits qui varient d'un État à un
autre, ou d'une Province à une autre.
TERME DE LA GARANTIE:
La garantie est en vigueur pendant
un an de la date d’achat original par
le consommateur, et ne s’applique pas
aux achats faits par des détaillants
ou des distributeurs, ou pour une
utilisation commerciale. Si un produit de
remplacement est acheminé, il portera
la garantie restante du produit original.
Veuillez contacter notre Centre de service à
la clientèle a www.Breville.com ou appeler
le numéro sans frais ci-dessous pour toute
information concernant la réparation et/
ou le remplacement de l’appareil, advenant
qu’un défaut couvert par la garantie
survienne à l’intérieur de la période de
garantie d’un an.
AVIS DE NON-RESPONSABILITÉ:
Cette garantie couvre la réparation et/ou le
remplacement de produits. HWI Breville
décline expressément toute responsabilité
quant aux dommages pouvant résulter des
pertes incidentes causées par l’utilisation de
cet appareil. Certains États ou provinces ne
permettent pas cette exclusion ou limitation
pour dommages accessoires ou indirects.
La présente dénégation peut donc ne pas
s'appliquer dans votre cas.
®
Aptitude et qualité marchande: toute
garantie de qualité marchande ou
d’aptitude relativement à ce produit
est également limitée à la garantie
limitée d’un an. Les garanties
stipulées aux présentes sont
exclusives et aucune autre garantie,
expresse ou tacite, n’est faite par
HWI Breville® ou autorisée à être
faite relativement au produit.
Si l’appareil devient défectueux durant la
période de garantie, ne le retournez pas au
magasin. Veuillez nous visiter en ligne à
www.Breville.com ou:
Numéro sans frais:
ÉTATS-UNIS: 1-866-BREVILLE
(1-866-273-8455)
CANADA: 1-866-BREVILLE
(1-866-273-8455)
Courriel:
ÉTATS-UNIS: [email protected]
CANADA: [email protected]
35