1
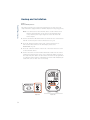
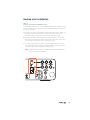
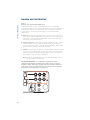
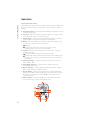
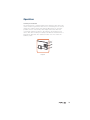
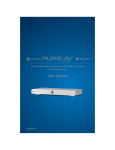
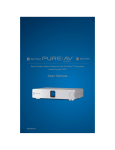
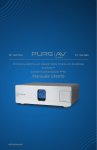
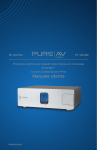
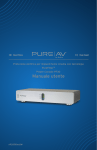
Clean Sound
Clear Picture
Home Theater Power Protection with PureFilter™ Technology
Power Console PF40
User Manual
AP21300-12
Table of Contents
Page
PureAV Power Console
Introduction ......................................................................................... 2
Safety Precautions ............................................................................. 3
Package Contents ............................................................................... 4
Power Console Features .................................................................... 5
Hookup and Installation
Step 1
(optional)
Mounting your Power
Console ................................................................ 7
Step 2
Remote AC Operation ....................................... 8
Step 3
Remote DC Operation ....................................... 9
Step 4
Connect Digital Components
to the Digital Filter .......................................... 10
Step 5
Connect Video Components
to the Video Filter ............................................. 11
Step 6
Connect Audio Components
to the Audio Filter............................................. 12
Step 7
Connect High-Current Audio Filter ............... 13
Step 8
Connect your Pay-Per-View/Phone Line ..... 14
Step 9
Connect your Coaxial Cables/DSS Lines ..... 15
Step 10
Connect your Broadband Ethernet Line ..... 16
Operation ...................................................................................... 1 7
Troubleshooting ........................................................................... 1 9
Glossary of Power Terms ............................................................ 2 1
Belkin Connected Equipment Warranty .................................... 22
1
Introduction
The Power Console is packed with innovative features to provide you with
the best home theater experience. Ordinary household AC power that is
delivered to your home is polluted with “noise” from many sources within
your home, including digital components and household appliances. The
Power Console’s advanced Phase 4 PureFilter Circuitry is optimized to
remove electrical noise and provide clean and clear power to all of your
valuable digital, audio, video, and high-current equipment. The multiphase
PureFilter Circuitry also provides true isolation between digital, audio,
video, and high-current components. This isolation prevents noise created
by components that are already connected to the Power Console from
contaminating other connected equipment. In addition, the Power Console
contains Advanced Overvoltage Protection, which automatically
disconnects power from your equipment when the input voltage reaches a
dangerous level, and restores power automatically when the voltage
returns to a safe level.
PureAV Power Console
Thank you for purchasing the PureAV Power Console PF40. The Power
Console is designed to clean, protect, and efficiently distribute power to
your valuable home theater system. The PureAV Power Console ensures
that every movie you watch and every album you hear is as clean and
clear as possible.
We also realize that the aesthetics of your system are very important. For
this reason we enlisted some of the top industrial designers in the country
to design the housing for the PureAV Power Console. The minimalist
styling of the Power Console combines function with a simplistic yet
elegant design and is a great complement to any system. The integrated
multifunction LCD combines all essential controls with a versatile voltage
and current monitor.
As you may know, your AC power source is not the only threat to the
safety of your equipment. This is why the PureAV Power Console has three
sets of coaxial connections to protect your coaxial-cable lines. The Power
Console also includes telephone jacks to protect Pay-Per-View lines and
broadband Ethernet jacks to protect data lines that stream digital content
to your home theater system.
Providing the ultimate home theater experience is the driving force behind
the PureAV brand, providing the clearest picture and cleanest sound from
your components to you. Thank you again for purchasing the PureAV
Power Console PF40.
Clear Picture – Clean Sound. PureAV.
2
Safety Precautions
PureAV Power Console
Warning – Grounding and Polarization
This product must be plugged directly into a grounded AC power outlet
(3-prong). Do not use a 3-to-2-prong adapter to defeat the grounding pin. Do
not plug or “daisy-chain” this product into other electrical products such as
surge protectors, power strips, or UPSes. Do not plug this product into an
extension cord. Failure to plug this product directly into a grounded outlet
may result in personal injury or damage to your equipment. Call a licensed
electrician if you are unsure if your AC outlets are properly grounded.
Warning – Rooftop Antennas and Satellite Dishes
If you use rooftop antennas, satellite dishes, or any other rooftop hardware
that connects to your PureAV Power Console, make sure that all the wires
leading from these components are properly grounded. This will protect
against voltage surges from lightning strikes or static charges.
Warning – Lightning Storm Protection
Although your PureAV Power Console is built to withstand large power
surges, we cannot guarantee that it will protect all of your equipment in the
event of a large lightning storm. In the event of a lightning storm, it is best
to unplug your Power Console from the wall. Once you have done this,
there is no need to unplug any of the equipment that is connected to the
Power Console.
Warning – Water and other Liquids: Shock Hazard
Do not use this product with aquariums or other water-related products.
Use indoors and in dry locations only. Do not operate the Power Console
if any liquid is spilled on or in the unit. Failure to follow these guidelines
could result in serious bodily injury or death.
Warning – Cleaning
Always unplug the Power Console before cleaning. It is only necessary to
clean the Power Console with a clean, dry cloth or duster. Do not use any
cleaning solutions, sprays, or water.
Warning – No User-Serviceable Parts Inside
If for any reason your Power Console is malfunctioning, do not attempt
to repair or dismantle the unit in any way. Unplug the unit and consult this
User Manual for warranty and service contact information.
Warning – Power Cord Safety
Do not route the Power Console’s AC power cord near heat sources.
This could damage the power cord and cause it to malfunction, creating
a shock hazard.
Do not route the Power Console’s AC power cord in heavy foot-traffic areas
where it could create a trip hazard (hallways, doorways, across room).
If the power cord is frayed, ripped, cut, or damaged in any way, please
discontinue use immediately and refer to the warranty section of this
Manual for instructions.
3
Package Contents
• User Manual
• Remote AC Control Cable
• Remote DC Control Cable (1/8" mini-plug cable)
• RJ45 Ethernet Patch Cable – For broadband connectivity
• RJ11 Phone Cable
• PureAV Coaxial Video Cable
• One sheet of PureAV cable labels
• One pair of rack-mount brackets and bag of assembly screws
PureAV Power Console
• PureAV Power Console PF40
• Warranty registration card
4
Power Console Features
1.
PureAV Power Console
Switched button – turns the power on and off to the Power Console’s
“switched” outlets
2. Auxiliary outlet – offers optimal connection for digital components
and is ideal for temporary connection of equipment such as
video/digital cameras, game consoles, or any device you wish to power
3. Central LCD Control – controls and monitors the Power Console’s vital
functions
4. Digital Filter – ensures optimum reduction of line noise and
interference to your digital components
5. Video Filter – ensures optimum reduction of line noise and
interference to your video components
6. Audio Filter – ensures optimum reduction of line noise and
interference to your audio components
7. HiCurrent™ Filter – delivers high current to power-hungry amplifiers
and receivers; optimized to filter out line noise to these components
1
2
3
5
Power Console Features
PureAV Power Console
8. Remote AC/DC trigger – allows for remote turn ON/OFF of switched
outlets on the Power Console (equipped with both AC and DC inputs)
9. Pay-Per-View/Phone Line Input/Output – protects Pay-Per-View,
phone, or DSL lines from dangerous power surges that can damage
your equipment; built-in splitter turns one line into two
10. Coaxial-Cable Line Input/Output – protects coaxial cable lines from
dangerous electrical disturbances that can travel down your coaxial
cable lines
11. Broadband Ethernet Input/Output – protects broadband Ethernet
lines used for digital media receivers, gaming, or broadband Internet
access from dangerous power surges
12. 15-Amp Circuit Breaker – offers safety of resettable circuit breaker
13. Ground – provides a grounding point for ungrounded components
9
10
12
13
4
5
6
7
8
11
6
Hookup and Installation
PureAV Power Console
Step 1 (optional)
Mounting your Power Console
The PureAV Power Console can be mounted to a standard AV equipment
rack or inside a cabinet equipped with an equipment rack.
A. Remove the brackets and mounting screws from the box.
B. Make sure that the Power Console is unplugged.
C. Align the bracket with the front of the Power Console for flush installation
in the rack.
D. Attach the bracket to the side of the Power Console with the screws
provided (Fig. 1). You must use a minimum of four screws to mount
each bracket.
E. Repeat steps C and D for installation of the bracket to the other side
of the Power Console.
F. Mount the Power Console to the equipment rack. Screws for mounting
the Power Console to the equipment rack are not provided as they
are made specifically for the particular equipment rack that you own.
Contact the manufacturer of the rack if you do not have the correct
mounting screws.
Figure 1
7
Hookup and Installation
This function allows you to turn your Power Console on and off via your
preamplifier or receiver equipped with a switched AC power outlet.
Note: You cannot turn off the switched outlets on the Power Console
with the switched button on the front of the unit when there
is any external power signal supplied to either the AC or DC
remote inputs.
To install the Remote AC Control Cable:
PureAV Power Console
Step 2
Remote AC Operation
A. Plug the female end of the included Remote AC Control Cable into the
“Remote AC IN” outlet located on the back of the Power Console. (Fig. 2a)
B. Press the “Remote” button on the front of the Power Console to turn
on the remote function. The LCD display should read “REMOTE ON”.
(Fig. 2b)
C. Press the “Switched” button on the front of the Power Console to turn
off the switched outlets.
D. Connect the 2-pronged male end of the Remote AC Control Cable into a
switched power outlet on a preamplifier or receiver. When you turn on
the receiver or preamplifier, the outlets on the Power Console that are
programmed as “Switched” will be turned on immediately and the
“Switched/ Delayed” outlets will come on after an 8 second delay.
Figure 2a
Figure 2b
8
Hookup and Installation
PureAV Power Console
Step 3
Remote DC Operation
This function allows you to turn your Power Console on and off via any
component that is equipped with a 3~30V DC output (low-voltage trigger out).
Note: You cannot turn off the switched outlets on the Power Console
with the switched button on the front of the unit when there
is any external power signal supplied to either the AC or DC
remote inputs.
A. Connect the Remote DC Control Cable (included) into the outlet labeled
“DC IN” on the rear panel of the Power Console. (Fig. 3a)
B. Press the “Remote” button on the front of the Power Console to
turn on the remote function. The LCD display should read
REMOTE ON. (Fig. 3b)
C. Press the “Switched” button on the front of the Power Console to turn
off the switched outlets.
D. Connect the other end of the Remote DC Control Cable into the 3~30V
output (low-voltage trigger out) on your component. When you turn on
the component, the outlets on the Power Console that are programmed
as “Switched” will be turned on immediately and the Switched/Delayed”
outlets will come on after an 8 second delay.
Figure 3a
9
Figure 3b
Hookup and Installation
The PureAV Power Console PF40 contains an isolated Digital Filter that is
optimized to clean and condition the power to all of your digital
components. The Digital Filter also filters out noise created by digital
components such as DVD players and isolates your digital components
from connected video, audio, and high-current audio components.
A. Attach PureAV power cord labels to each component’s power cord
before you plug the cord into the corresponding outlet on the Power
Console.
PureAV Power Console
Step 4
Connect Digital Components to the Digital Filter
B. Digital Video Recorder – Connect your digital video recorder power
cord to the outlet labeled “DVR”.
C. DVD – Connect your DVD power cord to the outlet labeled “DVD”.
D. Cable/Satellite – Connect your cable or satellite receiver power cord to
the outlet labeled “Cable/SAT”.
E. HDTV – Connect your HDTV power cord to the outlet labeled “HDTV”.
Note: You can connect any type of digital component into any of the Digital
Filter outlets. You are not limited to the components listed above.
10
Hookup and Installation
PureAV Power Console
Step 5
Connect Video Components to the Video Filter
The PureAV Power Console PF40 contains an isolated Video Filter that is
optimized to clean and condition the power to all of your video
components. The Video Filter also isolates your video components from
connected digital, audio, and high-current audio components. The video
filter outlets are "Always on" when the Power Console is plugged into a
live AC outlet.
A. Attach PureAV power cord labels to each component’s power cord
before you plug the cord into the corresponding outlet on the Power
Console.
B. TV – Connect your TV or monitor power cord to the outlet labeled
“TV/Monitor”.
C. VCR – Connect your VCR power cord to the outlet labeled “VCR”.
Note: You can connect any type of video component into any of the Video
Filter outlets. You are not limited to the components listed above.
11
Hookup and Installation
The PureAV Power Console PF40 contains an isolated Audio Filter that is
optimized to clean and condition the power to all of your audio
components. The Audio Filter also isolates your audio components from
connected digital, video, and high-current audio components. The audio
filter outlets are "Switched" and are controlled by the "Switched" button
the front of the Power Console.
A. Attach PureAV power cord labels to each component’s power cord before
you plug the cord into the corresponding outlet on the Power Console.
PureAV Power Console
Step 6
Connect Audio Components to Audio Filter
B. CD – Connect your CD player power cord to the outlet labeled “CD”.
C. Tape – Connect your tape player power cord to the outlet labeled “Tape”.
D. Auxiliary – This outlet can be used to connect any other audio
equipment you may have.
E. Receiver (Preamp) – Connect your receiver or preamp power cord to
the outlet labeled “Receiver”.
Note: You can connect any type of audio component into any of the Audio
Filter outlets. You are not limited to the components listed above.
12
Hookup and Installation
PureAV Power Console
Step 7
Connect High-Current Audio Filter (8 second delay)
These outlets are specifically designed to filter out AC line noise while
delivering maximum current to power-hungry amplifiers and other highcurrent audio components. The High-Current outlets are also equipped
with an 8 second delay. This allows your high-current amplifiers to turn on
last and turn off first, avoiding that annoying “thump” from getting to your
speakers and potentially damaging them.
A. Attach PureAV power cord labels to each component’s power cord
before you plug the cord into the corresponding outlet on the Power
Console.
B. AMP 1 – Connect your main amplifier power cord to the outlet labeled
“AMP 1”.
C. AMP 2 – Connect your secondary amplifier power cord to the outlet
labeled “AMP 2”.
Note: You can connect any type of high-current audio component into
any of the High-Current outlets. You are not limited to the
components listed above.
13
Hookup and Installation
Step 8
Connect your Pay-Per-View/Phone Line
Your PureAV Power Console comes equipped with Pay-Per-View/phone-line
protection with a built-in splitter. These are standard RJ11 phone jacks and
are labeled “Phone”.
A. Connect one end of your telephone cable to the wall outlet to which you
normally connect your phone line. Connect the other end of your
telephone cable to the Power Console phone jack labeled “IN”.
B. Connect one end of the PureAV phone cable (included) to the Power
Console Phone jack labeled “OUT”. Connect the other end of this cable
to the Pay-Per-View phone jack on your DSS receiver.
C. To connect a telephone – Connect one end of another phone cable to
the other Power Console Phone jack labeled “OUT”. Connect the other
end of this cable to the telephone you want to use.
Note: We have included labels for the Phone IN and Phone OUT lines if
needed for better organization.
14
Hookup and Installation
PureAV Power Console
Step 9
Connect your Coaxial-Cables/DSS Lines
Your PureAV Power Console comes with three pairs of coaxial-cable
connections to protect your system from dangerous electrical disturbances
that can travel down your coaxial-cables lines. You will need additional
coaxial cables to connect the Power Console to your home theater
components.
A. Cable TV – Connect the incoming cable television coaxial-cable line to
the connector labeled “Cable IN”. Connect one end of a second coaxial
cable to the connector labeled “Cable OUT”. Connect the other end of
this cable to your cable TV tuner.
B. Satellite (DSS) TV – Connect the incoming satellite television coaxialcable line to the connector labeled “SAT IN”. Connect one end of a
second coaxial cable to the connector labeled “SAT OUT”. Connect the
other end of this cable to your satellite TV tuner.
C. Antenna – Connect the incoming TV or Radio antenna cable line to the
connector labeled “Antenna IN”. Connect one end of a second coaxial
cable to the connector labeled “Antenna OUT”. Connect the other end
of this cable to your TV or radio equipment.
Note: We have included labels for the Coax IN and Coax OUT lines if
needed for better organization.
IMPORTANT WARNING – To sufficiently safeguard all of your
equipment from damage resulting from a power surge, all of your
incoming coaxial-cable lines should be properly grounded. Contact a
licensed electrician to verify that all of your cable lines are properly
grounded to a cold-water pipe or ground rod.
15
Hookup and Installation
Step 10
Connect your Broadband Ethernet Line
Your PureAV Power Console comes equipped with broadband Ethernet-line
protection. These are standard RJ45 Ethernet jacks and they are labeled
“Network”.
A. Connect one end of an RJ45 network patch cable to a network jack
(either directly to a router or wired network wall jack). Connect the
other end of the network patch cable to the Network jack labeled “IN”.
B. Connect one end of the broadband Ethernet cable (included) to the
Network jack labeled “OUT”. Connect the other end of this cable to the
networked device (digital media receiver, gaming console, etc.)
Note: We have included labels for the Network IN and Network OUT
lines if needed for better organization.
16
Operation
Central LCD Control Panel
PureAV Power Console
The PureAV Power Console PF40 is equipped with an advanced LCD Control
Panel. Most functions of the Power Console can be monitored from this
display.
A. PureFilter Indicator – indicates that the multiphase PureFilter circuitry
is functioning properly.
B. Voltmeter – displays the input voltage (the amount of voltage coming
from the AC wall outlet to the Power Console).
C. Current Meter – displays the output current (the amount of current
output [in Amps] from the Power Console’s outlet banks).
D. Wiring – indicates whether the AC outlet to which the Power Console
is connected is wired properly or cross-wired.
Wiring ok.
Hot and neutral wires are reversed. See page 20 of the
Troubleshooting section for more information.
E. Ground – Indicates if the Power Console is connected to a properly
grounded AC outlet.
Ground ok. The AC wall outlet is properly grounded.
Ground Fault. This indicates that the AC wall outlet is NOT properly
grounded. See page 20 of the Troubleshooting section from more
information.
F. Switched Indicator – indicates whether the “Switched” outlets are
switched ON or OFF.
G. Timed Delay Indicator – indicates that the delayed outlets are
switched ON after a delay.
H. Remote Indicator – indicates whether the Remote function is ON or
OFF (controlled with the “Remote” button).
I. Remote Button – switches the Power Console to Remote ON status
when pressed. (When in Remote ON status, the Power Console outlets
programmed as switched are turned ON/OFF via external remote
signal (see page 8.)
J. Dimmer Button – adjusts the brightness of the LCD Control Panel;
press it repeatedly to change the brightness level.
A
B
C
D
F
G
H
E
I
17
J
Operation
Auxiliary Power Outlet
The Power Console is equipped with a front auxiliary power outlet. This
outlet contains a digital noise filter and is a convenient place to connect
digital video cameras, digital still cameras, MP3 players, or any other
portable device in need of AC power. Simply remove the small door
covering the outlet by sliding it to the right (Fig. 4) and plug in your
device. This outlet is always live (always-on) when the Power Console is
plugged into AC power. The “Switched” button does not control the
auxiliary outlet.
Figure 4
18
Troubleshooting
Power Console is not providing power
PureAV Power Console
• Check to ensure that the Power Console is plugged into a properly
grounded AC wall outlet. Some outlets require a wall switch to be turned
on in order to deliver power to the outlet.
• Too many devices may be plugged into the Power Console, which are
overloading the unit and tripping the overload circuit breaker. The Power
Console is not designed to handle current loads larger than 15 Amps or
1800 watts. Try unplugging some devices and resetting the circuit
breaker located on the end of the Power Console.
To reset the circuit breaker: Wait at least 10 minutes after the
circuit breaker was tripped before attempting to reset the
breaker. Press in the button located next to the power cord on
the end of the unit to reset. Power should be restored to the
outlets on the Power Console.
• Your components may be plugged into a “Switched” outlet and the
outlet is not Switched On. Check to ensure that the Switched ON
indicator on the Control Panel is illuminated. If the light is not illuminated,
press the Switched button on the front of the Power Console unit until
the Switched ON indicator is illuminated. You should now have power to
all of the switched outlets.
• Your components may not be turned on. Power may be flowing from the
Power Console, but if the power switch on your component is not turned
on then your component cannot receive power. Turn on the power switch
on your component.
• The Power Console is designed to stop delivering power to all outlets
when the surge-protection circuitry is not functioning properly or is
expired. Call Belkin Customer Service for assistance.
• The Power Console may be defective. Call Belkin Customer Service
for assistance.
19
Troubleshooting
Ground Fault indicator is lit
• Check to make sure that the Power Console is plugged into a grounded
AC wall outlet. (3-prong AC outlets only. Do not use 2–3-prong adapters.)
• If the “Ground Fault” light is still lit, you have a ground-wiring problem.
Connecting the PureAV Power Console to an improperly grounded outlet
is not safe and will void all Belkin Corporation warranties. Unplug the
Power Console and consult an electrician to properly ground the outlet.
If the outlet is properly grounded and the “Ground Fault” indicator is still
lit, the Power Console may be malfunctioning. Please call Belkin
Customer Service for assistance.
PureAV Power Console
GROUND
Cross-Wired indicator is lit
WIRING
• Check to make sure that the Power Console is plugged into a grounded
AC wall outlet. (3-prong AC outlets only. Do not use 2–3-prong adapters.)
• This indicates that the hot and neutral (L–N) wires are reversed. Unplug
the Power Console and consult an electrician.
For all other technical questions or troubleshooting issues, please
contact Belkin Customer Service at 800-223-5546.
20
Glossary of Power Terms
PureAV Power Console
Alternating Current (AC): The current that is commonly flowing through
the electrical outlets in your home. It is an electrical current in the form of
a sine wave that oscillates up and down continuously.
Amp: An abbreviation for Ampere. This is a unit of electrical current.
Direct Current (DC): An electrical current flowing in one direction only.
DC current does not have a wave form.
Electromagnetic Interference (EMI): Electrical interference generated by
appliances and many other electrical components that cause degradation
of sound and picture quality in audio and video equipment.
Ground: A conducting object, such as a wire, that is connected to a
position of zero-voltage potential. Common connecting points are ground
rods or cold-water pipes that are connected to the Earth.
Joule Rating: A measure of electrical energy. The higher the joule rating,
the more electrical surges a device can absorb before failing.
Maximum Spike Current: The maximum current (in Amps) that can be
absorbed before failing. The higher the maximum spike current, the more
current a device can absorb without failing.
Radio Frequency Interference (RFI): Electromagnetic radiation, which is
emitted by electrical circuits carrying rapidly changing signals as a byproduct of their normal operation, and which causes interference or noise
to be induced in other circuits.
Spike: A very fast transient variation in voltage or current. Many small
transients, over time, cause components to wear and fail.
Surge: An increase in voltage or current significantly above the designated
level in a flow of electricity.
21
Belkin Connected Equipment Warranty
Belkin Corporation will repair or replace, at its option, any equipment
which is damaged by a transient voltage surge/spike or lightning strike, (an
“Occurrence”), while properly connected through a PureAV Power Console
to a properly wired AC power line with protective ground. If you are using an
AC PureAV Power Console that has phone, network, or coaxial protection,
the telephone line, network line, and coaxial-cable line must be properly
connected and installed, as determined by Belkin at its sole discretion.
PureAV Power Console
Belkin Corporation warrants to the original purchaser of any PureAV
Power Console for the life of the product, that the PureAV Power Console
shall be free of defects in design, assembly, material, or workmanship, and
will repair or replace, at its option, any defective product free of charge.
This Connected Equipment Warranty is a Limited Warranty, subject to the
limitations and exclusions set forth herein.
Belkin Corporation will spend, to repair or replace the damaged connected
equipment, at Belkin’s option, an amount equal to the fair market value of
the damaged equipment or the original purchase price of the equipment,
whichever is less, up to the maximum amount set forth below:
Model AP20800-10 up to a maximum of $350,000.00
Models AP21100-12, AP21300-12, AP41300-12 up to a maximum
of $500,000.00
The fair market value of the equipment shall be the current value of the
equipment specified in the most recent edition of the Orion Blue Book by
Orion Research Corporation, Roger Rohrs Publisher.
Belkin Corporation reserves the right to review the damaged PureAV
Power Console, the damaged equipment, and the site where the damage
occurred. All costs of shipping the PureAV Power Console and the
damaged equipment to Belkin Corporation for inspection shall be borne
solely by the purchaser. Belkin reserves the right to negotiate the cost of
repairs. If Belkin determines, in its sole discretion, that it is impractical to
ship the damaged equipment to Belkin Corporation, Belkin may designate,
in its sole discretion, an equipment repair facility to inspect and estimate
the cost to repair such equipment. The cost, if any, of shipping the
equipment to and from such repair facility and of such estimate shall be
borne solely by the purchaser. Damaged equipment must remain available
for inspection until the claim is finalized. Whenever claims are settled,
Belkin Corporation reserves the right to be subrogated under any existing
insurance policies the claimant may have.
All above warranties are null and void if: the PureAV Power Console in use
during the Occurrence is not provided to Belkin Corporation for inspection
upon Belkin’s request at the sole expense of the purchaser, Belkin
Corporation determines that the PureAV Power Console has been
improperly installed, altered in any way or tampered with, Belkin
Corporation determines that the damage did not result from the
22
Belkin Connected Equipment Warranty
PureAV Power Console
Occurrence or that no Occurrence in fact took place, the repair or
replacement of the damaged equipment is covered under a manufacturer’s
warranty, or Belkin Corporation determines that the connected equipment
was not used under normal operating conditions or in accordance with any
labels or instructions. All PureAV Power Consoles must be plugged directly
into the power source and must not be “daisy-chained” together in serial
fashion with other power strips, UPSes, other surge protectors or extension
cords. A 3–2-prong adapter may not be used. Any such installation voids
the warranty. The Belkin Connected Equipment Warranty only protects
against damage to properly connected equipment where Belkin Corporation
has determined, in its sole discretion, that the damage resulted from an
Occurrence, and does not protect against acts of God (other than lightning)
such as flood, earthquake, war, vandalism, theft, normal-use wear and tear,
erosion, depletion, obsolescence, abuse, damage due to low voltage
disturbances (i.e. brownouts or sags), non-authorized program, or system
equipment modification or alteration. *Please note: This product is not for
use with aquariums and all other water-related products. Use only indoors
and in dry locations.
This warranty contains the sole warranty of Belkin Corporation, there are
no other warranties, expressed or, except as required by law, implied,
including the implied warranty or condition of quality, merchantability or
fitness for a particular purpose, and such implied warranties, if any, are
limited in duration to the term of this warranty. Some states do not allow
limitations on how long an implied warranty lasts, so the above limitations
may not apply to you.
In no event shall Belkin Corporation be liable for incidental, special, direct,
indirect, consequential or multiple damages such as, but not limited to, lost
business or profits arising out of the sale or use of any PureAV Power
Console, even if advised of the possibility of such damages. This warranty
gives you specific legal rights, and you may also have other rights, which
may vary from state to state. Some states do not allow the exclusion or
limitation of incidental or consequential damage, so the above limitations
may not apply to you.
23
Belkin Connected Equipment Warranty
Belkin Corporation, 501 W. Walnut St., Compton CA 90220
Attn: Technical Support, or call (310) 898-1100, extension 2263, within 15
days of the Occurrence. Be prepared to provide the following information:
PureAV Power Console
This warranty is valid only for the original purchaser of the product. All
damage claims against the product must be made within 15 days from the
date of the Occurrence and must be accompanied by a receipt for the
damaged equipment or the warranty is void. Warranty is valid in USA,
Canada, Puerto Rico, and Bermuda. To file a claim against the Belkin
Connected Equipment Warranty, you must take the following steps: Contact
Belkin online at www.belkin.com and print our claim form or write to us at:
a. The part number of the PureAV Power Console.
b. The equipment that was connected to the PureAV Power Console at the
time of the Occurrence.
c. The equipment that was damaged during the Occurrence and the
extent of the damage.
d. The date of the Occurrence.
e. Where you purchased the PureAV Power Console.
f. When you purchased the PureAV Power Console.
g. Copy of original receipt.
h. Your Belkin Customer Service Representative will then instruct you on
how to forward your equipment, receipt, PureAV Power Console in use
during the “Occurrence” and how to proceed with your claim.
Please conveniently register your PureAV Power Console online on our
website at www.belkin.com.
Belkin Corporation • 501 West Walnut Street • Compton • CA • 90220
Tel: 310.898.1100 • Fax: 310.898.1111
24
Notes
PureAV Power Console
25
Notes
PureAV Power Console
26
belkin.com
pureav.com
Belkin Corporation
501 West Walnut Street
Compton • CA • 90220 • USA
Tel: 310.898.1100
Fax: 310.898.1111
Belkin Components B.V.
Starparc Building • Boeing Avenue 333
1119 PH Schiphol-Rijk • The Netherlands
Tel: +31 (0) 20 654 7300
Fax: +31 (0) 20 654 7349
Belkin Components, Ltd.
Express Business Park • Shipton Way
Rushden • NN10 6GL • United Kingdom
Tel: +44 (0) 1933 35 2000
Fax: +44 (0) 1933 31 2000
Belkin Ltd.
7 Bowen Crescent • West Gosford
NSW 2250 • Australia
Tel: +61 (0) 2 4372 8600
Fax: +61 (0) 2 4372 8603
© 2004 Belkin Corporation. All rights reserved. All trade names are
registered trademarks of respective manufacturers listed.
P74595