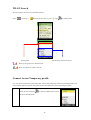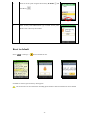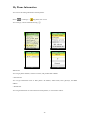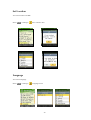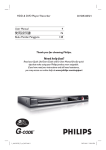
1
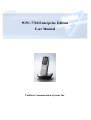
WPU-7700 Enterprise Edition
User Manual
UniData Communication Systems Inc.
COPYRIGHT NOTICE
UniData Communication Systems is registered trademarks of UniData Communication Systems Inc.
Other referenced trademarks are trademarks (registered or otherwise) of the respective trademark owners.
This document is confidential and proprietary to UniData Communication Systems Inc. No part of this
document may be reproduced, stored, or transmitted in any form by any means without the prior written
permission of UniData Communication Systems Inc.
Information furnished herein by UniData Communication Systems Inc., is believed to be accurate and
reliable. The authors have used their best efforts in preparing this material. These efforts include the
development, research, and testing of the theories and programs to determine their effectiveness.
However, UniData Communication Systems assumes no liability for errors that may appear in this
document, or for liability otherwise arising from the application or use of any such information or for any
infringement of patents or other intellectual property rights owned by third parties which may result from
such application or use. The products, their specifications, and the information appearing in this document
are subject to change without notice.
Printed in Korea
© 1998-2008 by UniData Communication Systems Inc. All rights reserved.
1
Manual Introduction
Ø
This user's manual contains items that you should follow in order to prevent any harm to yourself
and others, or damage to equipment, and to enable you to use this product safely. An explanation of
the markings and symbols used in this manual is provided below. Please understand these symbols
before reading the rest of this document.
Ø
Every care has been taken in the writing of this manual, but if you find any points of concern with
this manual, please notify us through one of our contact points.
Ø
Please understand that this company can not assume any responsibility for any damage or other pure
economic loss resulting from lost communications opportunities due to a breakdown of this product,
its incorrect operation, power failure or other external factors.
Ø
After sales service
■ We request that you write down in a memo or otherwise store any information that you yourself
have registered in this product.
■ This company has no obligation concerning changes to or loss of, any information and bears no
responsibility for this whatsoever.
■ During repairs for a breakdown, data created by the customer or loaded in from outside may
change or be lost.
■ This company takes no responsibility for this.
Ø
In case that this product is used for abnormal purpose, the guarantee will expire regardless of a time
of purchase.
2
■ Registered trademarks/copyrights
Ø
Ø
Ø
Ø
Windows is a registered trademark of the Microsoft Corporation in the United States and other
countries.
Windows XP is an abbreviation for the Microsoft Windows XP Home Edition operating
system and the Microsoft Windows XP Professional operating system.
Windows 2000 is an abbreviation for the Microsoft Windows 2000 Professional operating
system.
Other company names and product names are trademarks or registered trademarks of their
respective companies.
Any reproduction or copying of its content without prior permission is strictly forbidden.
The contents of this manual may be revised at any time without prior notice. For support information
about added functions, changes, etc., we recommend that you periodically visit the home page below for
updated information.
Our company's home page http://www.udcsystems.com/
■ Compliance Statement for FCC
THIS DEVICE COMPLIES WITH PART 15 OF THE FCC RULES.
Operation is subject to the following two conditions; (1) this device may not cause harmful interference,
and (2) this device must accept any interference received, including interference that may cause undesired
operation.
CAUTION: Changes or modifications not expressly approved by the party responsible for compliance
could void the user’s authority to operate the equipment.
NOTE: This equipment has been tested and found to comply with the limits for a Class B digital device,
pursuant to part 15 of the FCC Rules. These limits are designed to provide reasonable protection against
harmful interference in a residential installation. This equipment generates uses and can radiate radio
frequency energy and, if not installed and used in accordance with the instructions, may cause harmful
interference to radio communications. However, there is no guarantee that interference will not occur in a
particular installation. If this equipment does cause harmful interference to radio or television reception,
which can be determined by turning the equipment off and on, the user is encouraged to try to correct the
interference by one or more of the following measures:
- Reorient or relocate the receiving antenna.
- Increase the separation between the equipment and receiver.
- Connect the equipment into an outlet on a circuit different from that to which the receiver is connected.
- Consult the dealer or an experienced radio/TV technician for help
For body worn operation, this phone has been tested and meets FCC RF exposure guidelines when used
with an accessory that contains no metal and that positions the handset a minimum of 1.5cm from the
body. Use of other accessories may not ensure compliance with FCC RF exposure guidelines.
3
■ Compliance Statement for IC
Operation is subject to the following two conditions: (1) this device may not cause interference, and (2)
this device must accept any interference, including interference that may cause undesired operation of the
device.
The available scientific evidence does not show that any health problems are associated with using low
power wireless devices. There is no proof, however, that these low power wireless devices are absolutely
safe. Low power Wireless devices emit low levels of radio frequency energy (RF) in the microwave range
while being used.
Whereas high levels of RF can produce health effects (by heating tissue), exposure to
low-level RF that does not produce heating effects causes no known adverse health effects. Many studies
of low-level RF exposures have not found any biological effects. Some studies have suggested that some
biological effects might occur, but such findings have not been confirmed by additional research. WLAN
IP Phone (WPU7700) has been tested and found to comply with IC radiation exposure limits set forth for
uncontrolled equipment and meets
the RSS-102 of the IC radio frequency (RF) Exposure rules. The maximum SAR levels tested for WLAN
IP Phone (WPU7700) has been show to be 0.286 W/kg at Human Head and 0.351 W/kg at Body.
■ Caution concerning interference with 2.4Ghz wireless LAN
When communicating with a 2.4GHz LAN, be careful about the following.
Microwave ovens and other industrial, scientific, and medical equipment, as well as indoor wireless
stations (wireless stations requiring permits) and special low-power wireless stations (wireless stations
not requiring permits) used for identifying mobile units used in plant manufacturing line etc., as well as
amateur wireless stations (wireless stations requiring permits) operate in the frequency band used by this
product.
l
Before using this product, double check that no indoor wireless stations, special low-power wireless
stations for mobile unit identification, or amateur wireless stations are in operation in the vicinity.
l
If this product should cause harmful electromagnetic interference in an indoor wireless station for
identifying a mobile unit, quickly change the frequency used or stop emitting the electromagnetic
signal, then notify the store of purchase and consult with them about measures for avoiding
interference (for example, installing a partition wall).
l
Besides that, if this product should cause harmful electromagnetic interference in a special lowpower wireless station used for identifying a mobile unit, or in an amateur wireless station, or some
other problem occurs, please inquire at the store from which you made your purchase.
4
■ Built-in 2.4GHz band (IEEE802.11b / IEEE802.11g) wireless LAN functions
Usage frequency band
: Wireless equipment using the 2.4GHz band
Transmission method
: DSSS
Modulation
: DQPSK DBPSK CCK BPSK QPSK 16-QAM 64-QAM
Assumed interference distance
: 40 m max.
Frequency modulation advantages
: The entire bandwidth can be used to avoid the frequency bands
OFDM
of indoor wireless stations and special low-power wireless stations
used for identifying mobile units, as well as amateur wireless stations.
Because the 2.4GHz band frequency used in this product overlaps with medical equipment, microwave
ovens and other industrial and scientific equipment, as well as indoor wireless stations and special lowpower wireless stations for identifying mobile units used in plant manufacturing line etc., electromagnetic
interference is possible. Before starting to use this product, double check that no indoor wireless stations
or special low-power wireless stations are operating within the interference range of this product.
5
Safety Precautions
Since this is provided to make safe and right use of WPU-7700 to prevent any accidents or risks, be sure
to carefully read it, follow instructions, and keep it where it is easily noticed.
Warning
This mark is intended to warn users of the risk of a serious injury or death when they violate instructions.
Do not put WPU-7700 in heating appliances such as heaters and microwave ovens to dry them if
they are wet.
It can cause explosions, deformation, or troubles. In this case, free services shall not be provided.
Do not use WPU-7700 in places that are too hot or too wet (keep them indoors between 0 ℃ and +
50 ℃).
If they get wet with rain, have drinks spilled, or are used in extremely hot/wet places such as public sauna
bathroom, it can cause battery explosions.
Put WPU-7700 and chargers in places out of reach of children or pets.
If one puts batteries his or her mouth, or uses broken batteries, it can hurt his or her body, or cause
electric shocks.
Do not disassemble WPU-7700, or apply shocks to them as you please.
If they get damaged while you disassemble them, or inflict shocks on them, you cannot have free
services.
Be sure to use designated batteries and accessories only for WPU-7700 provided by our company.
If you use unauthorized batteries or accessories, it can reduce the life of WPU-7700, cause explosions, or
damage them. In this case, you cannot have free services.
6
Be careful for conductors such as necklaces, keys, and coins not to contact battery terminals (metal
section). Since short circuits can cause explosions, be careful for such events never to take place.
Neither throws batteries, which can inflict shocks on them, nor put them near to heating appliances
such as heaters and microwave ovens.
It can cause the leak of battery contents, or explosions.
Use standard chargers that obtained Unidata authentication for batteries.
Otherwise, batteries will have their life reduced, face explosions, or damage WPU-7700. In this case, free
services shall not be provided.
Refrain from the use of WPU-7700, and leave the power cord of chargers unplugged when
thunders and lightening are severe.
Thunderbolts can cause severe physical injuries, or fires.
Do not hold WPU-7700 to your ears to turn on the power.
It can cause hearing impairments, or physical injuries.
Do not look at the infrared window in a direct way when using remote control.
It can cause visual impairments.
Do not use chemical detergents such as benzene, thinner, and alcohol to clean WPU-7700.
It can cause fires.
Never push the power button when WPU-7700 are wet, nor touch WPU-7700, chargers, or power
cords with wet hands.
I can cause fires or electric shocks
Precautions
This mark is intended to caution users against violating instructions since it can cause a slight physical
injury or product damage.
7
Correctly install WPU-7700 in compliance with instructions.
Otherwise, it can cause an abnormal operation of WPU-7700, or reduce their life.
Be aware of radio interference.
Since this radio equipment can have radio interference, services related to life safety are not provided.
Do not install WPU-7700 in places exposed to direct sunlight, and on carpets or cushions.
It can cause fires or troubles.
Do not install WPU-7700 in narrow places with poor ventilation, or near heat sources.
It can cause fires or troubles.
Do not install WPU-7700 in places with much dust.
It can cause operational problems, or reduce phone life.
Install WPU-7700 on flat places, not on shelves or slopes.
Otherwise, it can hurt you, or cause troubles when they drop.
Since emergency calls are available only within call coverage, check in advance whether or not
calls are available.
Do not use WPU-7700 covered wrap or vinyl.
Coating can be removed.
Record and keep the information contained in WPU-7700 separately.
Since the important information stored in WPU-7700 can be removed due to unavoidable circumstances
such as users’ carelessness, maintenance, and product upgrade, please keep a record of important
information. Take note that manufacturer will not take responsibility for any damage from the loss of
information.
8
If batteries are not used for a long time, keep them at room temperature after charging.
If you want to use again after leaving them for a long time, it is recommended to use them after fully
charging.
Keep in mind that WPU-7700 can produce much heat while using for a long time.
Do not install WPU-7700 in heavily shaking places.
It can cause performance degradation, or reduce the life of products.
After using WPU-7700 for a long time, they can produce a weak sound due to their liquid crystal
protective vinyl covering the speaker.
If WPU-7700 are separated from AP or chargers for a long time, they cannot work due to battery
discharge.
9
INDEX
Manual Introduction................................................................................................................................... 2
Safety Precautions ....................................................................................................................................... 6
BASIC USAGE .......................................................................................................................................... 13
Names and functions of the KEY..................................................................................................... 13
Description of Icons .......................................................................................................................... 14
Basic Components ............................................................................................................................. 15
Battery Replacement......................................................................................................................... 15
Battery Charging Signal ................................................................................................................... 16
BASIC Function ........................................................................................................................................ 17
How to Turn On / Off ....................................................................................................................... 17
How to Enter Characters ................................................................................................................. 17
How to Enter Special Characters .................................................................................................... 18
Make Call ........................................................................................................................................... 18
Make Call the Received Number ..................................................................................................... 19
Make Call Using Speed Dial ............................................................................................................. 19
Pickup Call......................................................................................................................................... 19
Missed Call......................................................................................................................................... 19
Function on the Call .................................................................................................................................. 20
How to Mute ...................................................................................................................................... 20
Save Phone Number on Calling ....................................................................................................... 20
Memo .................................................................................................................................................. 21
Volume Control ................................................................................................................................. 21
Phone Book ................................................................................................................................................ 22
Search ................................................................................................................................................. 22
Add Phone Book ................................................................................................................................ 23
Save New Number ............................................................................................................................. 24
Speed Dial .......................................................................................................................................... 24
10
Group settings ................................................................................................................................... 25
Call History ........................................................................................................................................ 26
Call Time ............................................................................................................................................ 27
Message ...................................................................................................................................................... 28
Write Message ................................................................................................................................... 28
Inbox ................................................................................................................................................... 29
Outbox ................................................................................................................................................ 29
Draft ................................................................................................................................................... 29
Stored Message Box .......................................................................................................................... 30
Spam Message ................................................................................................................................... 30
Message Settings ................................................................................................................................ 31
Organizer ................................................................................................................................................... 32
Alarm/Wake-up Call......................................................................................................................... 32
Calendar ............................................................................................................................................. 34
D-Day.................................................................................................................................................. 34
Calendar ............................................................................................................................................. 35
World Time ........................................................................................................................................ 36
Ringtone ............................................................................................................................................. 37
Ring Sound Type ............................................................................................................................... 37
Sound Effects ..................................................................................................................................... 38
System Alerts ..................................................................................................................................... 38
Volumes .............................................................................................................................................. 39
Screen ......................................................................................................................................................... 40
Wall Paper ......................................................................................................................................... 40
Clock Calendar .................................................................................................................................. 40
Banner ................................................................................................................................................ 41
Set lighting ......................................................................................................................................... 42
Phone Setting ............................................................................................................................................. 43
Security .............................................................................................................................................. 43
11
Call block mode ................................................................................................................................. 45
WLAN Search ................................................................................................................................... 46
Connect to new Temporary profile ................................................................................................. 46
Reset to default .................................................................................................................................. 47
Call Forwarding ................................................................................................................................ 48
My Phone Information ..................................................................................................................... 49
Set Location ....................................................................................................................................... 50
Language ............................................................................................................................................ 50
Appendix A : Trouble Shooting Error Message .................................................................................... 51
Appendix B : Before going to Service Center ......................................................................................... 54
d
12
BASIC USAGE
Names and functions of the KEY
Key Name
Icon
Basic functions
Direction key
▲▼◄►
Used for menu viewing, Can be pressed up and down, left
and right
Left soft key
Right soft key
Submenu operation etc
Send key
Used for receiving and making calls
End key
Used to end a call and to switch the power ON/ OFF
Ok key
Used to confirm
AP search key
Used for searching Access Point
Alarm key
Alarm/ Wake up call
My menu key
Using user-defined function
Message key
Using message function
Google Service key
Using Google service
Mute key
Mute ON / OFF
Vibration key
Vibration ON / OFF
Clear key
Removing characters or figures entered, or moving to
previous screens
Lock key
Locks/ Unlocks button
13
Description of Icons
Avoid direct sunlight to prevent a poor view of WiFi phone screen.
The screen fades out automatically to reduce battery consumption.
Signal strength
Out of call coverage
Call trial or connection
Call not available
Setting bell volume
Setting to mute, displayed when the volume is set to “0”
Setting alarm/ morning calls
Receiving messages
Setting to call forwarding service
Remaining battery life (
:sufficient,
Being connected to network
14
: insufficient,
: none)
Basic Components
Please check whether the package includes all items as shown in the picture after purchasing the phone
set. If missing is found, contact your dealer immediately.
For safety in use, please purchase authentic products. If you want to purchase additional batteries or
chargers, contact your dealer.
Phone
Battery
Cradle
AC Adapter
Battery Replacement
Use ones authorized by the company when you replace batteries, following the figure below.
Battery insertion
Battery removal
Please turn off the power before removing battery from WiFi phone (a sudden power off can cause
troubles). If battery is inserted upside down, WiFi phone will not work.
15
Time Taking to Charge
Classification
Time
Standard model (1,300mA)
150 minutes
Battery Life
Successive use approximately 3 hours and 10 minutes
Successive standby approximately 40 hours
Successive use time and standby time of batteries are the estimates of the company’s laboratory,
which can be different from the figures in manual depending on the patterns they are used.
Battery Charging Signal
If batteries need charging, they display
, producing ringing sound. If the sound is produced, start
charging immediately.
16
BASIC Function
How to Turn On / Off
If you want to turn on the power, keep pressing
for 3 seconds or more.
If you want to turn off the power, keep pressing
for 3 seconds or more.
If abnormal works take place, or the power button does not work while using WiFi phone, start the
phone after removing and inserting the battery. Turn on the power after waiting for 5 seconds or more
when you restart the phone.
How to Enter Characters
Entering English Alphabets
Ex) If you want to enter “UNI”:
press
two times à press
times
17
two times à press
three
How to Enter Special Characters
If you want to create messages, press Menu à
1 to select sign entering mode.
Make Call
Press
after entering area code and phone number. If you selected wrong numbers, press
short press of
deletes one number, while a long press of
To finish calling, press
.A
deletes all numbers entered.
.
F
If you select Save after entering phone number, it will immediately be stored in phone book.
Send Message
You can send messages to the phone number entered. Entering phone number – press Menu button –
press
button – writing massage – Press
button
18
Make Call the Received Number
Press
button, select your desired phone number using
, and press
again. A maximum of
100 phone numbers incoming and outgoing can be stored in the call list.
Make Call Using Speed Dial
Make a long press of the Speed Dial desired to call. However, if the Speed Dial are 2 digits or more,
make a long press of the last one of the abbreviated numbers. You can press
after entering the
Speed Dial.
Since if the distance from AP becomes longer, noise can be made, call near to it.
Pickup Call
To receive incoming, press
. To finish calls, press
Missed Call
If you have missed call, press
, and the last one of those calls will be answered.
To see calls arrived in your absence from the call list, press
19
or
and
.
Function on the Call
How to Mute
You can make mute of transmission voice by selecting
The screen shows
Mute on after pressing Menu during calls.
icon if the function of Mute on works.
If you want to cancel, press
Mute off after pressing Menu again.
F
F
This is designed to prevent the other party from hearing when the noise around you is too much, or
you want the situation around you not to expose to the other party, while you can hear the other party.
Save Phone Number on Calling
You can store new numbers in the phonebook by selecting
Save Number after pressing Menu during
calls.
F
You can find the phone numbers stored by selecting Contacts during calls.
20
Memo
You can note something during call. The screen shows
memos by pressing
while you create memos. You can store the
. The memos stored can be found in the call list.
F
FF
F
Volume Control
You can adjust receiver volume by pressing
press
during calls. To go to the previous screen, either
or wait for 3 seconds.
Take note that if there are messages received while batteries are discharged or you are staying out
of call coverage during calls, a big sound can be heard depending on the bell volume set previously.
Some of the bell sounds downloaded can be harshly heard since they do not match the sound source
in WiFi phones. This does not come from any troubles in phones, and you can select and use other
sounds.
21
Phone Book
Search
You can search for phone numbers just by pressing Search in standby mode. If you want to call at the
phone number selected, press
. To see details, select your desired numbers by pressing
. You can
select search methods by pressing Menu.
Integrated Search: Select Menu and
(All) in turn. Go to the phone number to search using
after
entering some of name/phone number/e-mail (1 character or more). Total Deletion: Select Menu and
(Delete all), and then enter password.
Press
after selecting Yes/No using
.
F
Take note that if you select Delete all, all phone numbers stored will be removed.
The company provides 0000 as the default user password when customers purchase WiFi
phones.
22
Add Phone Book
A maximum of 500 phone numbers can be stored in the phone book. Enter the Menu à Contactsà
New Contacts
You can select the types of phone numbers for each, and if the numbers to be stored are 2 or more, a
representative number should be designated.
Save Phone Numbers
You can save phone numbers in the phone book by pressing Save after entering them in standby mode.
: Enter names
• A maximum of 8 characters a maximum of 16 characters for the English Alphabet can be entered.
: Designate groups.
: Enter phone numbers
• Press phone number types to classify.
: Mobile
: Home
: Office
: Fax
: Others
A maximum of 5 phone numbers can be entered.
You can designate abbreviated numbers by pressing Short.
: Enter e-mail information.
: Enter messenger information.
: Designate bell sounds.
: Enter memos.
• You can enter a maximum of 80 characters for the English Alphabet.
23
Save New Number
You can store phone numbers in the Contacts by pressing Save after entering them in standby mode.
FF
Speed Dial
This is a function that enters the most frequently used ones of those phone numbers stored in Contacts in
Speed dials, and easily get them later when users want to call at those phone numbers (numbers from 1 to
99 are provided).
Select Menu →Contacts→
Speed dial in turn.
You may set it after selecting your desired speed dial using
.
If speed dial have been designated, you can remove them by pressing Clear, or change them using.
24
Group settings
You can add or edit groups to store phone numbers. Select Menu → Contacts→
Group settings in
turn.
Name: Enter names of groups.
You can enter a maximum of 24 characters for the English Alphabet.
• Group Ringers: Set Ringers by group.
• Message Ringers: Set message alarms by group.
Those phone numbers set to groups produce selected Ringers. However, phone numbers set to both
group bell and personal bell produce personal bell.
25
Call History
You can check the latest calls. Select Menu, →Contacts→
Call history by pressing
Call history in turn. You can easily get
in standby mode.
: Display outgoing calls.
: Display incoming calls.
: Display calls in absence.
: Display memos during calls
: Display phone numbers with reception intercepted.
: Display call forwarding numbers.
For more details, select
in relevant Call history.
You can send messages, set incoming call interception, and delete all phone numbers in the list by
pressing
Menu.
26
Call Time
You can check call time and the number of messages sent. Select Menu → Contacts →
Call duration
in turn.
All calls: Display total call time of calls received and transmitted.
Dialed calls: Display call time of calls transmitted.
SMS sent: Display the number of messages sent.
Call time does not correspond to actual charges.
You can use this function by pressing Menu button and selecting Message or pressing
turn in standby mode.
27
and
in
Message
Write Message
Select Menu → Message →
Write Msg in turn.
You can get the latest phone numbers by entering phone number yourself or pressing Menu. Otherwise,
you can enter phone numbers, pressing Search and finding the numbers stored in Contacts.
To enter various expressions, you can select Symbol, ^.^, or My phrase, pressing Menu. You can select
whether or not to store after entering expressions.
You can send messages to a maximum of 10 persons at a time, but the charges will be imposed
in proportion to the number of added phone numbers.
28
Inbox
If new messages have arrived, WiFi phones let you know their arrival on new message notification
screen, and you can check those messages, pressing
. You can store a maximum of 100 messages
received. If the received messages are over 100 in number, they are deleted one by one starting with the
oldest ones.
Select Menu → Message →
Inbox in turn.
button after selecting your desired messages using
Press
.
Outbox
Messages sent can be stored up to 100 ones, and only successfully transmitted ones are stored.
Select Menu→ Message→
using
Outbox in turn. Press
button after selecting your desired messages
.
Draft
This is a function that messages in creation are automatically stored temporarily if calls arrive while
entering messages, or if you press Finish button.Messages in creation are stored up to 5 ones.
Select Menu → Message →
Draft in turn.
Select your desired messages using
.
If you want to edit messages in creation, press
pressing
button, modify expressions, and send messages,
button again, after selecting whether or not to store.
29
Stored Message Box
This is a function that separately preserves the messages received.
A maximum of 100 messages can be stored, and if the messages in store reach 100 in number, you should
delete the existing messages to store new ones.
Select Menu → Message →
Stored Msg. box in turn.
Spam Message
This is a function that intercepts unwanted messages. Select Menu → Message →
turn.
Select your desired item using
Spam Msg. in
.
Spam Message Box
It gives you the messages classified as spam. It can store a maximum of 10 messages. If the messages
received are over 10, they are automatically deleted one by one starting with the oldest.
Spam Number
Those messages coming from designated phone numbers are classified as spam. A maximum of 10
messages can be stored.
Spam Strings
Those messages containing designated character strings are classified as spam. You can enter a maximum
of 32 ones for the English Alphabet.
Spam Setting
You can set or cancel spam interception using this function.
30
Message Settings
Select Menu → Message →
Settings in turn.
My Phrase
You can enter your own expressions. A maximum of 10 expressions can be stored.
Display Type
This is a function that sets message reception indication.
It displays only the reception of messages.
You can set the details of received messages to be shown on the screen in a right way using this function.
Alert type
You can set the interval of message reception notifications, and select one of Clear, Once, and Every 2
minutes using
.
Message Alerts
You can set message reception sound, and select bell types using
.
Save Outbox
You can set the storage of transmitted messages.
If you select Yes/No, the transmitted messages will automatically/will not be stored in the outbox
Reset MsgBox
You can initialize message box. Enter password, select Message Box, using
31
, and press
button.
Organizer
Alarm/Wake-up Call
Select Menu → Organizer →
Alarm/Wakeup Call in turn.
Select Add for setting Alarm/Wakeup Call.
: Display the current time.
: Set alarm/wake-up calls. You can select one of Set Time, Every 10 min, Every 20 min, Every 30
min, Every 1 hour, and Clear using
.
: Display set alarm/wake-up call time. If you select Set Time, users can enter their desired time
themselves. Select hour/minute using
( ) and Afternoon ( ).
, and enter time using figure buttons. You can select Morning
: Set alarm/wake-up call setting period. You can select one of Once, Everyday, Mon-Fri, and MonSat using
.
: Set alarm/wake-up call Ringers.
: Set the number of alarm/ wake-up call rings.
You can select one of No repeat, 1 time, 3 times, 5 times, and 10 times using
.
: Set alarm/wake-up call ring interval with the number of rings.
You can select one of
.
Every 1 min, Every 3 min, Every 5 min, Every 10 min, and Every 15 min using
32
: Enter information on alarm/wake-up calls. It allows a maximum of 20 characters for the Korean
Alphabet, and a maximum of 40 characters for the English Alphabet.
A maximum of 10 alarm/wake-up calls can be set.
Display of Selected Menu Screen
Display the current setting status.
Display cancels status.
Menu includes Add, Delete, and Delete all of Alarm/Wakeup Calls.
If you set alarm/wake-up calls,
appears on standby screen. If the set time comes, alarm bell rings,
and the expression, message and current time of Alarm/wake-up Calls appears on the screen.
Press
or
and the bell sound will stop. Otherwise, if 1 minute passes, the alarm stops
automatically.
If the number of alarm/wake-up call rings was set, you can press
Postpone Alarm using
or
, and select Cancel or
. If the newly selected time comes, alarm bell rings again.
Select Menu → Message →
Write Msg in turn.
33
Calendar
You can select your desired date to see holiday/day and lunar date. It provides a solar calendar between
January 1970 and December 2020.
Select Menu → Organizer →
Calendar in turn.
If you select Today, the calendar will lead you to today’s date.
D-Day
You can set your D-day.
Select Menu → Organizer →
D-day in turn.
You can set your D-day, selecting Add.
34
: Set a specific day.
Enter information on D-day. You can enter a maximum of 8 characters for the Korean Alphabet, and
a maximum of 16 for the English Alphabet. If you do not enter information, it is not stored.
: Display the last D-day.
.
: Display the D-day not passed.
: Display the current D-day today.
A maximum of 10 D-days can be set.
Calendar
You can do simple figures using this function.
Select Menu →Organizer →
Press
Calculator in turn.
button after entering figures, arithmetic signs, and figures.
• You can enter figures up to 15 digits.
• Four fundamental rules of arithmetic can be applied in a consecutive way up to 10 times.
• Press
button, and you can enter figures from the start.
• Decimal points are represented by
• For negative numbers, use
(a maximum of 5 digits after decimal point can be entered.)
.
35
World Time
You can read date and time around the world using this function.
Select Menu → Organizer →
World time in turn.
You can set a country and a city using
If you set DST,
or List, and Set/Clear DST with Menu
is displayed on the cities, and set at 1 hour faster than standard time.
36
Organizer
Ringtone
You can set notification methods (bell sound or mute) for incoming calls.
Select Menu → Sounds →
Ringtone in turn.
Ringers: Produce Ringers.
Mute: Reception screen is displayed without Ringers.
Ringing louder: Ringers become louder.
Ring Sound Type
This is a function that sets bell sound types and volume.
Select Menu → Sounds →
Ringers in
turn.
• Types: Press
or Select to select bell types.
• Level: Press
37
or Level to set volume.
Sound Effects
You can set various Sound effects using this function.
Select Menu → Sounds →
Keytone sound
Sound effects in turn.
Set Sound effects that are produced
Press
or Type to select Keytone sound
when users press buttons
Keytone volume
Set Keytone volume.
Press
or Level to set Keytone volume
Power on Sound
Set Sound effects that are produced
Press
or Type to select Key tone sound
when turning on the power
Power on volume
Set power-on sound volume
Press
or Level to set Key tone volume
Power off Sound
Set Sound effects that are produced
Press
or Type to select Key tone sound
Press
or Level to set Key tone volume
when turning off the power
Power off volume
Set power-off sound volume
System Alerts
This is a function that sets or cancels battery warning sound, alarm sound, and call area change alarm
sounds
Select Menu → Sounds →
System alert in turn.
38
Low battery sound
This is a function that produces warning sounds when battery life is exhausted.
Press
Low battery volume
or Type to set/clear sounds
Set battery warning sound volume. Press
or Level to set battery warning
sound volume
Warning sound
This is a function of notifying that systems were set or operated. Press
or
Type to set/clear sounds
Warning volume
Set alarm sound volume. Press
Service area sound
This is a function of notifying that wireless LAN service areas have changed.
Press
or Level to set alarm sound volume
or Type to set/clear sounds
Volume of Call Area
Set the volume of call area change alarm sounds. Press
Change Alarm Sounds
volume of call area change alarm sounds.
or Level to set the
Volumes
You can set the volume of sounds heard during calls, and control the volume of receivers using this
function.
Select Menu → Sounds →
Press
or Level to set volumes.
Volumes in turn.
39
Screen
Wall Paper
You can set the standby screen to photos or picture that you like.
Select Menu → Screen →
Wallpaper in turn.
Select screens that you like using
, and press
.
Clock Calendar
You can select analogue clock, digital clock, and calendar.
Select Menu → Screen →
Clock /Calendar in turn.
Select your desired clock or calendar using
, and press
.
You can select View to see the current setting in advance, and change the location of clock or calendar
using
.
40
Banner
Select the expressions to be displayed on standby screen. You can set users’ own expressions or WiFi
phone number to be displayed, or cancel them.
Select Menu → Screen →
Banner in turn.
• Set: You can select Number, Clear, or Input text.
• Content: Enter expressions to be displayed.
• Align: You can set the location of expressions to left, center, or right.
• Font color: You can set the color of expressions to black, red, orange, yellow, green, blue, indigo, or
purple.
• Background color: You can set the background color of expressions to none, black, white, red, orange,
yellow, green, blue, indigo, or purple.
You can select View to see the current setting in advance, and change the location of expressions
using
.
41
Set lighting
You can set the lighting of screen.
Select Menu → Screen →
Set lighting in turn.
• LCD backlight
LCD lighting is on for the time set, and then goes out. You can select one of 5 seconds, 10 seconds, 20
seconds, 30 seconds, 1 minute, and 3 minutes, and Always.
• LCD brightness
You can set LCD screen brightness to 40 %, 60 %, 80 %, or 100 %, and it has been basically set to 80 %.
• Button lighting
Button lighting is on for the time set, and then goes out. You can select one of 5 seconds, 10 seconds, and
20 seconds, and it has been basically set to 5 seconds.
For power saving, the screen turns off automatically if there are no outside inputs. To turn it on again,
press a random key
42
Phone Setting
Security
If you select Menu →Settings →
Security in turn, password field appears.
The default user password of WiFi phones is 0000.
If you forgot your own password after changing passwords, you should have a measure against it
taken through your dealer. Be careful for the information stored in WiFi phones not to be deleted in this
process.
Specific functions of phone lock are as follows.
Lock call
It asks for your password whenever you try to call.
Lock
Contacts
It asks for your password whenever you try to use Contacts.
Lock
message
It asks for your password whenever you try to use Message.
43
Lock call history
It asks for your password whenever you try to use Call history.
Lock phone
If set to Main Lock, all information of WiFi phone is locked. Main Cancel is available only in Menu.
Lock PC Sync
Set passwords to be used for PC Sync connection.
Change Password
You can change your password into a new one. If you forgot the new one, contact your dealer.
Emergency Numbers
You can register emergency phone numbers at which you can call during main lock.
The following is standby screen when set to Main Lock.
If you select Unlock, password field appears. A correct entry of your password gives you temporary
cancel mode. If the screen turns off, or you turn off and on the power, the phone enters main lock mode
again.
If you select SOS, you can get phone numbers at which you can call on emergency.
If you press # button on standby screen, the phone enters main lock mode.
44
Call block mode
Select Menu →Settings →
Call block mode in turn.
If you select Call block mode, password entry field appears.
Enter phone numbers that you want to intercept.
You can enter a maximum of 3 phone numbers.
The intercepted phone numbers are shown in Call history.
45
WLAN Search
Search wireless LAN services around WiFi phones.
Select Menu →Settings →
WLAN Search in turn, or press
Saved profile
and
in standby mode.
Search results of WiFi networks
Have no encryption set in WiFi network
Have encryption set in WiFi network
Connect to new Temporary profile
It is only for the temporarily connected profile. The existing temporary profile will be disappeared if you
select another temporary profile. The profile will not be remained if you are rebooting the phone.
1
Press the AP search key
to search available WiFi Access
Points in Standby mode
46
2
Select an access point using the direction key ▲▼◄►
and
the OK key
3
Enter security and authentication type of WiFi access point.
Please refer to Security and TCP/IP
Reset to default
Select Menu → Settings →
Reset to default in turn.
If Default is selected, password entry field appears.
Be careful since all user information including phone numbers and call information can be deleted
47
Call Forwarding
WiFi phones provide a function of forwarding calls from the phone numbers hoped to be connected in
users’ absence or during calls.
Select Menu → Settings →
Call forwarding in turn.
• No answer: Incoming calls are forwarded to the preset number when there has been no answer during
your set time.
• Busy: Incoming calls are forwarded to the preset number when you are on another phone.
• Disable: All incoming calls are forwarded to the preset number.
Since this is WiFi phone’ internal function, the use of this function requires that its power is on.
48
My Phone Information
You can see the setting information of WiFi phones.
Select Menu → Settings →
My phone info. in turn.
You can enjoy various information using
.
•Phone info.
You can get phone numbers, software versions, and product MAC address.
• Network info.
You can get information such as WiFi phone’s IP address, subnet mask, basic gateways, and DNS
address.
• WLAN Info.
You can get information on AP connected to WiFi phones, or wire/wireless sharers.
49
Set Location
You can set location of GMT.
Select Menu → Settings →
Set Location in turn.
Language
You can set Language
Select Menu → Settings →
Language in turn.
50
Appendix A : Trouble Shooting Error Message
Take appropriate measures as shown below if the following error messages appear on WiFi phone screen.
Error Messages
101
Measures
You have been out of service coverage.
Move to places where wireless LAN services are available, and
select the function of wireless LAN search to check whether there
are AP or wire/wireless sharers around.
102
Connection to AP is not available.
WiFi phones use encryption key for security in wireless areas.
If AP is not used, check whether wire/wireless sharers in use
correspond to the encryption of WiFi phones.
You can find through the process of Wireless LAN Search,
Edition, and Set Encryption.
Most wire/wireless sharers used by customers have been
basically set to Not Use Security.
103
AP has rejected connection.
If wire/wireless sharers in use have been set to Limit Connectors
and the Number of Connectors, this message appears. Cancel the
function of connection limitation, or connect to AP. To be
connected to AP, press Wireless LAN Search, AP, and OK
buttons in turn.
104
Connection to AP is not available.
Since this message appears when you are out of call coverage,
move to places where AP services are available.
105
AP
does
not
support
802.1×
Certification.
Check whether wire/wireless sharers or access points in use
support 802.1× Certification. If they do, check whether they have
been set to 802.1× Certification. For more details, contact your
dealer.
106
AP does not respond to 802.1× Message.
This message appears when wire/wireless sharers or access points
fail to respond to the messages sent by WiFi phones in 802.1×
Certification. For more details, contact your dealer.
107
No route certificates
This message appears when WiFi phones have been set to a
certificate-based 802.1× type (TTLS, PEAP), and route
certificates have not been installed in WiFi phones. Thus, route
certificates should be installed in WiFi phones. For more details,
contact your dealer.
51
Error Messages
108
Measures
Wrong route certificate
This message appears when there are problems in the route
certificates installed WiFi phones. For more details, contact your
dealer.
109
Failed to be connected to AP since you
have wrong D or passwords (802.1×).
Check the 802.1× user account and password set in WiFi phones.
You can change them by pressing Wireless LAN Search, Edit, and
802.1× Certification buttons in turn.
110
802.1× Certification has exceeded the
This message appears when time is out in renewing 802.1×
limited time.
certification. Try reconnection to relevant wireless LAN profiles.
Still, if such a message continues to appear, contact your dealer.
111
AP has failed in 802.1× certification.
This message appears when wire/wireless sharers or access points
do not support the 802.1× certification type set in WiFi phones.
For more details, contact your dealer.
112
201
Failed
in
802.1×
certification
for
Failed in 802.1× certification for unknown reasons. For more
unknown reasons.
details, contact your dealer.
Cannot get Internet addresses.
1) Check the wire/wireless sharer in use corresponds to the
encryption setting. You can check it in Wireless LAN Search,
Edit, and Set Encryption.
2) Check whether it was set to DHCP in manual IP environment.
After changing to ‘Enter in Person’ in Wireless LAN Search, Edit,
and Set Encryption, enter IP addresses, subnet masks, and basic
gateways yourself.
202
Internet addresses conflict with other
1) If WiFi phones have been set to a fixed IP, change IP addresses.
devices.
Before changing IP addresses, check whether IP addresses that
you want to change are used with ping command in DOS window.
2) If WiFi phones have been set to variable IP, turn it on again
after turning off the power.
52
Error Messages
203
Measures
Wrong Internet address.
This message appears when users manually entered a wrong IP
address. Enter a correct IP address in Wireless LAN Search, Edit,
and Set Network.
301
Wrong
Internet
addresses
were
registered, or DNS Server does not
If the same message appears even after turning off the power and
turning it on again, contact your dealer.
respond
302
303
304
305
401
Failed to register with the Internet
If the same message appears even after turning off the power and
(unauthorized).
turning it on again, contact your dealer.
Failed to register with the Internet (user
If the same message appears even after turning off the power and
registration denied).
turning it on again, contact your dealer.
Failed to register with the Internet (users
If the same message appears even after turning off the power and
not found).
turning it on again, contact your dealer.
Failed to register with the Internet (for
If the same message appears even after turning off the power and
unknown reasons).
turning it on again, contact your dealer.
Internet connection difficulties
Check whether WiFi phones have been connected to AP.
You can check wireless LAN connection and network conditions
in Menu, Settings, and
using
402
Phone information repeatedly registered
My phone info.
If the same message appears even after turning off the power and
turning it on again, contact your dealer.
403
Phone information unregistered
If the same message appears even after turning off the power and
turning it on again, contact your dealer.
405
Encryption keys are in discord.
After finding the version of your WiFi phone, contact your dealer.
You can check your phone version in Menu, Settings, and
My
406
Failed to register with the Internet.
phone info..
If the same message appears even after turning off the power and
turning it on again, contact your dealer.
53
Appendix B : Before going to Service Center
WiFi phone cannot start
• Check whether it is correctly installed.
• Check whether battery is fully charged.
• Press the power button of WiFi phone.
• If it shows no response to that, remove battery, and install it again.
Newly purchased WiFi phone does not work
• Check whether it is correctly installed.
• Check whether it is connected to AP.
You can check it in Menu, Settings, and.
My phone info. and WLAN Info.
• Check whether it shows any error messages when the power of WiFi phone has been turned off and on.
• Check whether battery is fully charged.
WiFi phone shows poor call condition during calls
• Check whether it is too far from AP.
• Electric waves might have become weak due to obstacles such as walls, or electro magnetic disturbance
might have taken place. Turn off the power of AP, and on again in 3 seconds.
• If volume is low, adjust it properly using
.
The screen of WiFi phone is not clearly shown
• Adjust brightness using Menu, Screen,
Set lighting, and LCD Brightness.
54
WiFi phone bell does not ring
• Check whether phone is correctly installed.
• Check whether wireless LAN information includes the name of the LAN in Menu, Settings, and
My
phone info..
• Check whether WiFi phone battery has been charged.
• Check whether it is set to Mute in Menu, Sounds, and
Ringtone .
WiFi phone has charging troubles
• Check if charger interface is clean.
• If charging troubles continue to take place, contact your dealer.
Calls Are Not Made
If calls are not made on WiFi phones after installing AP, check Internet connection, and then the
following.
If WiFi phone screen displays
If WiFi phone displays
and
, check the following:
in signal strength, check if the wireless condition indicator of AP lights its
lamp, and turn off and on the power of WiFi phone after temporarily maintaining a distance of 1.5-3
meters between AP and WiFi phone. Still, if the problem continues, refer to the part of “Check Points by
Error Message” in page 50 of this manual.
If WiFi phone screen displays
If
and
, check the following:
is displayed even after turning off and on the power of WiFi phone, check if LAN cable is properly
connected to the Internet port of AP. Still, if the problem continues, refer to the part of “Check Points by
Error Message” in page 50 of this manual.
55
Battery Keeps turn-off and Lamp on the charger flickers, check the following:
The battery is full, but the phone
Separates the battery from the phone, and then, re-fits into the
keeps turn-off?
phone and turns it on. It still turn-off? Then, cleans a contact
terminal, re-fits into the phone and turns it on.
Lamp on the charger flickers?
Separates the battery from the charger, and then, re-fits into the
charger. It still flickering? Then, cleans a charging terminal and
charges the battery. (When the lamp doesn’t stop flickering, apply
to the service center.)
DO
NOT
USE
chemicals
or
Clean Battery procedures
detergent when you clean an alien
substance on a phone or charger.
Cleans it out of an eraser or a soft
patch only.
56