1
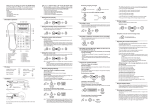
AM/FM PLL ALARM CLOCK RADIO
Visit our website at
www.ADT-DIGITAL.com
CE1500
What’s in the box
CE1500 AM/FM PLL Alarm Clock Radio
AC Power Adatpor
ADT Digital LLC
Instruction Manual
1
2
3
4
5
6
1
Connect the power
Warranty Card
Note: you can set the ALARM 2 by repeating the above
steps with the Alarm 2, Hour and Minute Button.
Connect the power
Instruction Manual
1. Plug the small end of the supplied power adaptor into the
DC IN jack at the back of the unit. Plug the adaptor body
into the standard AC wall socket (AC 120V 60Hz).
2. Remove the battery door and insert 2 pieces of AAA 1.5V
battery (not included) into the battery compartment (be sure
to observe the polarity) and then replace the battery door.
Set the clock
Use the alarm
Use the radio
Use the sleep timer
Use the aux in
AUX IN
Distributed by ADT Digital, LLC.
1900 Glades Road, Boca Raton, FL 33431
Copyright © 2014, ADT DIGITAL, LLC
Printed in China
CE1500_QSG_EN_V1.0
AUX IN jack
2
Please read this instruction manual before
operating your unit.
5
6
7
8
9
DC 6V
DC IN jack
10 11 12 13
4
3
2
1
1. Wake to Radio Indicator (Alarm 1)
2. Wake to Buzzer Indicator (Alarm 1)
3. PM Indicator
4. Snooze / Dimmer Button
5. AM/FM/AUX Button
6. Tune- / Hour Button
7. Tune+ / Minute Button
8. Radio Station / Memory / Time Set Button
9. Sleep Button
10. Volume- / Alarm1 Set Button
11. Volume+ / Alarm2 Set Button
12. Radio On-Off / Alarm Off Button
13. Antenna
14. LED Dispaly
15. Wake to Buzzer Indicator (Alarm 2)
16. Wake to Radio Indicator (Alarm 2)
17. Sleep Timer On Indicator
14
15
16
17
Battery compartment
(at the bottom of the unit)
Set the clock
TO SET THE CLOCK FOR THE FIRST TIME
1. You must switch off the radio before you set the clock.
2. Press and hold the “TIME SET” button until the display
begins to blink then release the button.
3. Press the Hour and Minute button to adjust the hour and
minute respectively. The PM indicator will light when the
hour is set in the PM.
4. Press the “TIME SET” button once to confirm the time
set.
Note: in future you can also adjust the time by pressing and
holding the ‘TIME SET’ Button for 2 seconds in clock mode
(radio off). The hour and minute digits will start to flash.
Then you can follow the step 3 to step 4 to adjust the time.
3
Use the alarm
6. Press the Alarm 1 Button for selection of how you want to
be awakened.
• A LED lights up at Clock symbol means a buzzer
sounds when the alarm time is reached.
• A LED lights up at Music Note symbol means
the radio will be switched on at the last set station
when the alarm time is reached.
7. You can turn off the alarm by pressing the Alarm 1 Button
repeatedly until no LED lights up at the symbols.
TO SET THE ALARM
You can set two alarms (ALARM 1 & 2) with the following
steps:
1. Turn the unit to Clock mode (radio off).
2. Press and hold the Alarm 1 Button for 2 seconds. The
hour and minute digits will start to flash.
3. Press the Hour Button to adjust the hour.
4. Press the Minute Button to adjust the minute.
5. Press the Alarm 1 Button for confirmation.
TO REVIEW THE ALARM
1. After the alarm has been set, you can review the alarm
time by pressing and holding the Alarm 1 or Alarm 2 button
for 2 seconds. The alarm time will be blinking on the display.
2. After 5 seconds, it will go back to normal time display.
TO STOP THE ALARM AND RESET THE ALARM READY
FOR THE NEXT DAY
1. Press the ALARM OFF button to stop the alarm.
2. The alarm will be automatically reset and gets ready for
the next day.
SNOOZE FUNCTION
1. Press the SNOOZE button when alarm rings. The alarm
will be silenced for 9 minutes and then sound again.
2. SNOOZE button can be pressed 6 times. Then the alarm
will stop automatically and gets ready for the next day.
DIMMER FUNCTION
Press the DIMMER button to adjust the brightness of LED
display.
4
Use the radio
TO TUNE THE RADIO TO DESIRED STATION MANUALLY
1. Press the ON/OFF button to turn on the radio.
2. Press the AM/FM button to select desired band.
3. Press and hold the Tune + or Tune – button for 2
seconds, the unit will scan upward or downward until a
station with strong signal is found and stops at this station.
4. You can adjust the frequency manually by pressing the
Tune + or Tune – button.
5. Press the Volume + or Volume - button to adjust the
volume to the desired level.
6. Press the ON/OFF button to turn off the radio.
PRESET RADIO STATION
1. Press the ON/OFF button to turn on the radio.
2. Press AM/FM button once to change from AM to FM
radio and vice versa.
3. Press and hold the Tune + or Tune – button for 2
seconds to search for a desired radio station.
4. Press and hold the PRE/M+ button for approximate 2
seconds, then the preset station number “P01” will be
displayed and flashes.
5. Press the PRE/M+ button to save it.
6. Press the PRE/M+ button to skip the preset station
number to “P02”.
7. Repeat step 2 to step 5 to save other stations. You
can save up to 10 AM and FM radio stations in the
memory.
TO LISTEN TO A PRESET RADIO STATION
1. Press the ON/OFF button to turn on the radio.
2. Press PRE/M+ button to skip to the radio station you
stored last time.
3. You can adjust the frequency manually by pressing
the Tune + or Tune – button.
5
Use the sleep timer
TO SET SLEEP TIMER
1. You must switch off the radio before you set the sleep
timer.
2. Press the SLEEP button once to activate the sleep
timer to 90 minutes with “90” in the LED display and
the radio is turned on.
3. Press the SLEEP button repeatedly to adjust the
sleep timer to 80, 70, 60, 50, 40, 30, 20, 10 minutes
and then OFF. “OFF” means to cancel the sleep timer
and turn the radio off.
4. When the sleep timer is counting down, press the
SLEEP button to display the remaining time.
5. If you want to change the sleep timer, press the
SLEEP button repeatedly to the new sleep time.
TO CANCEL SLEEP TIMER
1. When the sleep timer is counting down, press the
SLEEP button repeatedly until “OFF” is displayed.
2. Alternatively, press the ON/OFF button once to turn
off the radio.
6
Use the aux in
1. Plug one end of a standard 3.5mm stereo audio cable
into the earphone jack on your portable device and the
other end into the unit’s AUX IN jack.
2. Turn on the unit and play your portable device.
3. Turn off your portable device and unplug from the unit
after using.
SPECIFICATION
Power Supply
(AC Power Adaptor)
Input: AC 120V, 60Hz
Output: DC 6V, 200mA
Back-up Battery
3V (2 pcs AAA Size LR03 or R03
battery, not included)
Power Consumption
3W (max.)
Frequency Range
Of Radio
AM 530 - 1710 kHz
FM 87.5 - 108 MHz
Dimensions
7.0” x 4.6” x 3.3”
(179mm x 116mm x 84mm)
Weight
0.48 lb. (0.22 kg)
IMPORTANT: Due to the continued functioning of
revisions and improvements in the design of our products,
specifications are subject to change without notice.
WARNING: TO REDUCE THE RISK OF FIRE
OR SHOCK HAZARD, DO NOT EXPOSE THIS
PRODUCT TO RAIN OR MOISTURE.
CAUTION
RISK OF ELECTRIC SHOCK
DO NOT OPEN
C A U T I O N : TO PREVENT THE RISK OF ELECTRIC SHOCK,
DO NOT REMOVE COVER OR BACK. NO USER-SERVICEABLE
PARTS INSIDE. REFER SERVICING TO QUALIFIED
PERSONNEL.
This symbol is intended to alert you to the
presence of uninsulated dangerous voltage within
the product’s enclosure that might be of sufficient
magnitude to constitute a risk of electric shock.
Do not open the product’s case.
This symbol is intended to inform you that
important operating and maintenance
instructions are included in the literature
accompanying this product.
DRIPPING WARNING
The product shall not be exposed to dripping or
splashing and that no objects filled with liquids, such as
vases, shall be placed on the product.
VENTILATION WARNING
The normal ventilation of the product shall not be impeded
for intended use.
Class ll equipment symbol
This symbol indicates that the power adaptor has a double
insulation system.
FCC IMPORTANT
This device complies with part 15 of the FCC rules, operation
is subject to the following two conditions:
(1) this device may not cause harmful interference,
and (2) this device must accept any interference received,
including interference that may cause undesired operation.
This class[B] digital apparatus complies with canadian
ICES-003.
Cet appareil numérique de la classe B est conforme à la norme
NMB-003 du Canada.
Warning: Changes or modifications to this unit not expressly
approved by the party responsible for compliance could
void the user’s authority to operate the equipment.
FCC AND CANADIAN ICES
NOTE: This equipment has been tested and found to comply
with the limits for a Class B digital device, pursuant to part 15
of the FCC Rules. These limits are designed to provide reasonable
protection against harmful interference in a residential installation.
This equipment generates, uses and can radiate radio frequency
energy and, if not installed and used in accordance with the
instructions, may cause harmful interference to radio communications. However, there is no guarantee that interference will not
occur in a particular installation. If this equipment does cause
harmful interference to radio or television (which can be
determined by turning the equipment off), the user is
encouraged to try to correct the interference by one or more of the
following measures:
• Reorient or relocate the receiving antenna.
• Increase the separation between the equipment and receiver.
• Connect the equipment into an outlet on a circuit different from
that to which the receiver is connected.
• Consult the dealer or an experienced / TV technician for help.
NOTE: This digital apparatus does not exceed the Class B limits for
radio noise emissions from digital apparatus as set out in the radio
interference regulations of Industry Canada.
Le présent appareil numérique n’émet pas de bruits radio
-électriques dépassant les limites applicables aux appareils
numériques de Classe B prescrites dans le règlement sur le
brouillage radioélectrique édicté par Industrie Canada.
IMPORTANT SAFETY INSTRUCTIONS
1. Read Instructions - All the safety and operating instructions
should be read before the product is operated.
2. Retain Instructions - The safety and operating instructions
should be retained for future reference.
3. Heed Warnings - All warnings on the product and in the opera
-ting instructions should be adhered to.
4. Follow instructions - All operating and use instructions should
be followed.
5. Cleaning - Unplug this product from the wall outlet before
cleaning. Do not use liquid cleaners or aerosol cleaners.
Use a damp cloth for cleaning the exterior only. Do NOT
attempt to clean the inside.
6. Attachments - Do not use attachments not recommended
by the product manufacturer as they may cause hazards.
7. Water and Moisture - Do not use this product near water
- for example, near a bath tub, wash bowl, kitchen sink, or
laundry tub; in a wet basement, or near a swimming pool,
and the like.
8. Accessories - Do not place this product on an unstable cart,
stand tripod, bracket, or table. The product may fall, causing
serious injury to a child or adult, and serious damage to the
product. Use only with a cart, stand, tripod, bracket, or table
recommended by the manufacturer, or sold with the product.
Any mounting of the product should follow the manufacturer’s
instructions, and should use a mounting accessory
recommended by the manufacturer.
9. A product and cart combination should be
moved with care. Quick stops, excessive force,
and uneven surfaces may cause the appliance
and cart combination to overturn.
10. Ventilation - Slots and openings in the cabinet are provided
for ventilation and to ensure reliable operation of the
product and to protect it from overheating, and these
openings must not be blocked or covered. The openings
should never be blocked by placing the product on a bed,
sofa, rug, or other similar surface. This product should not
be placed in a built-in installation such as a bookcase or
rack unless proper ventilation is provided.
11. Power sources - This product should be operated only from
the type of power source indicated on the marking label. If
you are not sure of the type of power supply to your home,
consult your product dealer or local power company. For
products intended to operate from battery power, or other
sources, refer to the operating instruction.
12. Grounding or Polarization - This product may be equipped
with a polarized alternating current line plug (a plug having
one blade wider than the other). This plug will fit into the
power outlet only one way. This is a safety feature. If you
are unable to insert the plug fully into the outlet, try reversing
the plug. If the plug should still fail to fit, contact your electri
-cian to replace your obsolete outlet. Do not defeat the safe
-ty purpose of the polarized plug.
13. Power-Cord Protection - Power supply cords should be
routed so that they are not likely to be walked on or pinched
by items placed upon or against them, paying particular
attention to cords at plugs, convenience receptacles, and the
point where they exit from the product.
14. Lightning - For added protection for this product during a
lightning storm, or when it is left unattended and unused for
long periods of time, unplug it from the wall outlet and discon
-nect the antenna or cable system. This will prevent damage
to the product due to lightning and power-line surges.
15. Overloading - Do not overload wall outlets, extension cords,
or integral convenience receptacles as this can result in a
risk of fire or electric shock.
16. Object and Liquid Entry - Never push objects of any kind
into this product through openings as they may touch danger
-ous voltage points or short-out parts that could result in a
fire or electric shock. Never spill liquid of any kind on the
product.
17. Servicing - Do not attempt to service this product yourself
as opening or removing covers may expose you to danger
-ous voltage or other hazards. Refer all servicing to qualified
service personnel.
18. Damage Requiring Service - Unplug this product from the
wall outlet and refer servicing to qualified service personnel
under the following condition:
a) When the power-supply cord or plug is damaged,
b) If liquid has been spilled, or objects have fallen into the
product,
c) If the product has been exposed to rain or water,
d) If the product does not operate normally by following the
operating instructions. Adjust only those controls that are
covered by the operating instructions as an improper
adjustment of other controls may result in damage and will
often require extensive work by a qualified technician to
restore the product to its normal operation.
e) If the product has been dropped or damaged in any way, and
f) When the product exhibits a distinct change in performance
- this indicates a need for service.
19. Replacement Parts - When replacement parts are required,
be sure the service technician has used replacement parts
specified by the manufacturer or have the same characteristics
as the original part. Unauthorized substitutions may result in fire,
electric shock, or other hazards.
20. Safety Check - Upon completion of any service or repairs to
this product, ask the service technician to perform safety checks
to determine that the product is in proper operating condition.
21. Heat - The product should be situated away from heat
sources such as radiators, heat registers, stoves, or other
products (including amplifiers) that produce heat.
22. Unplug this apparatus during lighting storms or when unused
for long periods of time.
23. This appliance is not intended for use by persons (including
children) with reduced physical, sensory or mental capabilities,
or lack of experience and knowledge, unless they have been
given supervision or instruction concerning use of the appliance
by a person responsible for their safety.
24. Children should be supervised to ensure that they do not play
with the appliance.
25. Ensure children and babies do not play with plastic bags or any
packaging materials.
WARNINGS:
• To reduce the risk of fire or electric shock, do not expose this
apparatus to rain or moisture.
Avertissement: pour réduire le risque d’incendie ou de choc
électrique, ne pas exposer cet appareil sous la pluie et
l’humidité.
• The apparatus shall not be exposed to dripping or splashing
and that no objects filled with liquids, such as vases, shall be
placed on apparatus.
L’appareil ne doit pas être exposé aux écoulements ou aux
éclaboussures et aucun objet ne contenant de liquide, tel
qu’un vase, ne doit être placé sur l’objet.
• Where the MAINS plug is used as the disconnect device, the
disconnect device shall remain readily operable.
In order to disconnect the apparatus from the mains completely,
the main plug/ power adaptor should be disconnected from the
mains socket outlet completely.
La prise du secteur ne doit pas être obstruée ou doit être
facilement accessible pendant son utilisation. Pour être
complètement déconnecté de l’alimentation d’entrée, la prise
doit être débranchée du secteur.
BATTERY WARNINGS
• Use only the size and type of batteries specified.
• Be sure to follow the correct polarity when installing the batteries
as indicated in the battery compartment. Reversed batteries may
cause damage to the device.
• Do not mix different type of batteries together (e.g. Alkaline and
Carbon Zinc) or old batteries with fresh ones.
• If the device is not to be used for a long period of time, remove the
batteries to prevent damage or injury from possible battery leakage.
• Do not try to recharge batteries not intended to be recharged, they
can overheat and rupture (Follow battery manufacturer’s directions).
• Rechargeable batteries are to be removed from the product before
being charged.
• Rechargeable batteries are only to be charged under adult
supervision.
• Exhausted batteries are to be removed from the product.
• The supply terminals are not to be short-circuited.
• Battery shall not be exposed to excessive heat such as sunshine,
fire or the like.
TROUBLESHOOTING
Should any problem occurs with the unit, make the following
simple checks to determine whether or not servicing is required.
The unit does not turn on
• Connection of power is not proper
→ Plug the power adaptor into a working wall socket
FM band is too noisy
• Reception at the set location is poor or the antenna is not
extended
→ Extend the antenna fully and relocate your unit away from
metal surface
Alarm not functioning
• AM/PM time/alarm had not been set correctly
→ Please check the PM indicator
AM band has hiss disturbance
• Radio is disturbed by other electrical equipment
→ Move away from other electrical equipment
Display with hour digits flashing
• Back-up batteries are low during a power interruption
→ Remove old batteries and install new batteries
CARE AND MAINTENANCE
• Place the unit on a level surface away from sources of direct
sunlight, excessive heat caused by heating equipment, humidity,
rain or sand.
• Protect your furniture when placing your unit on a natural
wood and lacquered finish. A cloth or other protective material
should be placed between it and the furniture.
• Do not clean your unit by water directly. Clean the unit with a
soft, clean cloth slightly moistened with plain lukewarm water only.
• Stronger cleaning agents, such as Benzene, thinner or similar
materials can damage the surface of the unit.
• If you do not intend to use the set for a long time, withdraw the
power plug from the wall outlet. In addition to this, it is advisable
to remove the batteries from the clock radio. This will prevent any
danger of leakage and the clock radio will not be damaged.