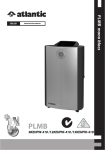
1
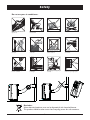
Owner’s
Manual
Portable Air Conditioner
CF14000E
It is important that you
read these instructions
before using your new
purchase and we strongly
recommend that you keep
them in a safe place for
future reference.
Innovative AutoDrain NanoMist Technology™
Patent Pending
Table of Contents
Thank You ……………………………………………………… 1
Safety Instructions …………………………………………… 1-2
Specifications …………………………………………………… 3
Parts
…………………………………………………………… 4
AutoDrain NanoMist Technology™ Assembly …………………… 5
Positioning ……………………………………………………… 6
Operation …………………………………………………… 7-8
Emptying the Water Container ………………………………… 9
Cleaning …………………………………………………………10
Installation of the Filters …………………………………………10
Storage……………………………………………………………11
Troubleshooting …………………………………………………12
Limited Warranty …………………………………………………14
Thank You!
Thank you for purchasing an AMCOR Portable Air Conditioner.
AMCOR is a leading brand in indoor air treatment. We would like you to enjoy the many benefits this
unit offers, so please read this manual carefully and take full advantage of the many advanced features
that your AMCOR Air Conditioner offers you.
AMCOR has specialized in complete indoor environment control, manufacturing
world-class heaters, air conditioners, dehumidifiers and air purifiers with innovative technology.
In designing these advanced products, we have listened carefully to our customers and have passed their
views on to our research and development laboratories.
We wish you many years of enjoyable use.
After reading this manual, please keep it in a safe place for future reference.
Read this entire instruction manual before use.
Please keep your receipt. Your receipt is your Proof of Purchase and is
necessary for warranty service.
Safety Instructions
IMPORTANT!
• The unit is designed for indoor operation.
• Rating: This unit must be connected to a 115V/60Hz grounded outlet.
• The installation must be in accordance with regulations of the country where the unit is used.
If you are in any doubt about the electrical installation, have it checked and if necessary modified by a
qualified electrician.
•
•
•
•
•
•
The air conditioner is safe. However, as with other electrical appliances, use it with care.
Keep out of the reach of children.
Do not clean the unit by spraying it or immersing it in water.
Do not insert any object into the openings of the unit.
Disconnect the unit from the outlet before cleaning the unit or any of its components.
Never connect the unit to an electrical outlet using an extension cord.
If an outlet is not available, one should be installed by a licensed electrician.
WARNING!
• Never operate this appliance if it has a damaged cord or plug. Do not lead the cord over sharp edges.
• A damaged supply cord should be replaced by the manufacturer, its service agent or a qualified person
in order to avoid a hazard.
• Any service other than regular cleaning or filter replacement should be performed by an authorized
service representative. Failure to do so could result in a loss of warranty.
1
Safety
Do not use your air conditioner:
If the power cable wires are
frayed or cut
When small children may be
left unattended
On a slope or uneven surface
Close to a heat source
This products is not made for
DIY repair
If there is a risk of liquid falling
on the unit
Inside unit exposed to the
weather outdoors
In a permanent very humid
environment
If an extension lead may
become overloaded
Where the power cable may
be damaged
Where it may be damaged by
chemicals
Where there is a risk of
interference by foreign objects
Reminder:
Waste electrical products must not be disposed of with household waste.
This product should be taken to our local recycling center for safe treatment.
2
Specifications
Model
CF14000E
Cooling Capacity (BTU/hr)
14,000
Cooling Power Consumption / Current
1150W/10.2A
Heating Power Consumption
Feature not available
on this model
Dehumidification in Cooling Mode
62 Pints / 24h
Moisture Removal in Heating Mode
N/A for this model
Power Supply
115V / 60Hz
Refrigerant
R22
Compressor
Rotary
Fan Speeds
2
Thermostat
62º - 90º F
Timer
1 - 12 Hours
Dimensions
12"W x 18"D x 30"H
Weight
63 lbs.
Subject to modifications without prior notice.
Please refer to the rating label for greater precision.
The cooling capacity of the unit may be affected by the height of your ceiling, quality of your
insulation,or number of windows in your room. There is no current testing statute for portable
air conditioningproducts in the United States, yet we have made every effort to design engineer
a superior qualityportable air conditioning unit that effectively and efficiently cools select areas
of the home or office.These portable air conditioning units are designed engineered to provide
supplemental air conditioning.To gain a better understanding of the performance capabilities of
your new Amcor portable AC unit,you can visit us online at:
www.amcorgroupusa.com/portableacdisclaimer
3
Parts
1
2
3
4
5
6
7
4
8
9
1. Handle
2. Control panel
3. Air outlet
10
4. Air inlet with filter
11
5. Exhaust hose
6. Power cord hanger
7. Exhaust air outlet
8. Water stopper (plug inside)
9. Casters
14
12
10. Adjustable Window Slide Bar
11. Flexible Drain Hose
13
12. Exhaust hose
16
13. IR Ergonomic Remote Control
15
14. Exhaust Hose Window
Slide Bar Connector
15. Insulation tape
16. Spiral water pipe with connector
4
AutoDrain NanoMist Technology™ Assembly
1
Stretch end of
the hose slightly.
2
Attach Window
Slide Bar
Connector to
Exhaust Hose by
twisting as shown.
3
5
Connect the
female half of the
quick connector
at the end of the
spiral water pipe
to the male part
in the hot air
outlet pipe.
4
Stretch end of
the hose slightly.
6
Assemble the hot
air hose on the
unit by screwing
in clockwise.
7
Unfold flexible
hose with attached
hose adapter
connector, and
snap into
Window Slide Bar.
5
8
Put spiral water
pipe into hot air
flexible hose.
Turn the
connector
90º clockwise
until it is locked
in place.
Clip on the
water atomizer
at the end of
the spiral pipe
to the holder.
Only
Required For
Disassembly.
In order to
unlock the quick
connector, push
the tab and turn
the connector
counterclockwise.
Positioning
This unit can easily be moved from one room to another. In doing so keep this in mind:
• The air conditioner must stand upright on an even surface.
• Do not position near bath, sink, or other permanent wet or damp area.
• Keep unit at least 18" from wall, curtains, draperies, to insure adequate air circulation.
2a
1
2b
Installing Exhaust Hose to Window Slide Bar
After assembling Innovative AutoDrain NanoMist Technology™ per instructions on page 5,
make sure hose is firmly attached to oval connecter that fits into window slide bar.
Snap hose connecter into window slide bar opening. See Illustration 1.
Extend window slide bar to fit your window opening, either vertical or horizontal,
depending on how the window opens. See Illustrations 2a-2b.
Important
The flexible exhaust hose can be extended from 12" to 60" for mounting.
This length has been designed especially according to the specifications of the
air conditioner.
Do not use an extension or exchange for a different hose as that may lead to
malfunctioning.
The exhaust air must flow freely, any blockage can lead to overheating of the air conditioner.
Take care to prevent any kink or bend in the exhaust hose.
6
Operation
1
2
LO
W
HI
5
P
COOL FAN
CO
M
ER
AT L
W UL
F
AU
TO
4
MODE
3
1. ON/OFF
Press the ON /OFF-button to switch the unit on or off.
2. Setting the Timer
Press the TIMER button, which will start the timer counter function.
Each press of the timer button will advance the timer setting by 1 hour, for setting 1-12
hours. If you pass the desired hour setting, you must advance the numbers completely
through 12, to start timer count from 1. When set, the TIMER LED will light up.
When the set hours have elapsed, the unit will turn off automatically.
The display will show the hour(s) remaining when you press the TIMER button.
By pressing the TIMER button but without turning the unit on, you can pre-set in how
many hour(s) the unit will switch on automatically.
3. Setting the Operating Mode
Select the required operating mode: COOL, FAN, or AUTO. The corresponding LED will lit.
In AUTO mode the unit will select cooling or fan depending on the ambient temperature.
4. Fan Speed
Select the fan speed, the corresponding LED will lit: LOW or HIGH.
5. Increase UP or DOWN
always shows the room temperature.
When the unit is ON, the display
Press button UP or DOWN to see the current set temperature and adjust if necessary,
in the range of 62ºF to 90ºF. After 8 seconds, the room temperature will be displayed.
Warning lights COMPRESSOR and WATER FULL
When the water container is full, the unit automatically stops, the warning light WATER FULL
will flash to signal that the container must be emptied (see page 9, “Emptying The Water
Container”).
When the unit is cooling, the compressor light will be on. If this light is off further cooling
is not needed at this time, or the compressor may be de-icing its coils.
The fan can still be on.
7
Operation
Remote control
The air conditioner responds to all signals that are sent by the remote
control. Two AAA-batteries are required to use the remote control.
Point the remote control hand set towards the control panel of the
unit and press the relevant button, the red LED on the hand set will flash
whenever a button is pressed.
Note: the air flow direction can not be adjusted with the remote control.
Air flow
Adjust the left-right direction of the outflowing air by turning
the roller on the front of the air outlet grill.
Adjust the up/down air flow by rotating the air outlet grill.
Important:
• The compressor will start approximately 3 minutes after the
unit is turned on (this will help prolong the life of the
compressor). After switching the unit off, please wait at least
3 minutes before turning the unit back on.
• The compressor will switch off when the room temperature
is lower than the set temperature. The fan will however
continue to work. When ambient temperature rises above
the set temperature, the cooling will resume.
8
Emptying The Water Container
This air conditioning does not require emptying of the water
container, except prior to season end storage.
This portable AC features the
Innovative AutoDrain NanoMist Technology™
Very little excess water should accumulate. During the process of
cooling, some of the water accumulated is actually used to cool the
unit internally, making it run more efficiently. Both this evaporative
technology and Innovative AutoDrain NanoMist Technology™ are
features not found in most portable air conditioners.
Switch off the unit and remove the plug
from the outlet.
• Position a flat container or dish on the floor
under the drain hole. Do not allow the water to
drip continuously into the container as it might
easily overflow.
• Remove the drain knob.
Rubber plug
• Remove the rubber plug, the water will flow in the
container. When this is nearly full, replace the plug to
stop the water flow and empty it. Repeat this process
until all water has been removed.
• Replace the rubber plug into the drain hole firmly,
the WATER FULL LED should not flash any longer.
• Replace the drain knob.
9
Drain knob
Cleaning
Always unplug the unit from the power supply (wall outlet) before
beginning the cleaning.
Housing
Use a soft, damp cloth to wipe the body clean. Never use strong
chemicals, oil-based products, detergents, chemically treated cloths or
other cleaning solutions. These could possibly damage the housing.
Filter
Use a vacuum cleaner or tap the filter lightly to remove loose dust
and dirt from the filters and then rinse them thoroughly under running
water (not warmer than 104°F).
Dry thoroughly before replacing.
Notice! Never operate the air conditioner without the filters.
Installation of Carbon Filter
It is recommended to replace an active
carbon filter at the start of the season.
• Remove the top filter frame from
the unit by pulling it out.
• Separate the fixer from the filter frame.
• Insert the active carbon filter into the
filter frame, underneath the tabs.
• Re-fit the filter frame inside the unit.
10
Storage
At the end of AC Season, this unit should be drained prior to
storage. Refer to “Emptying the Water Container” section
of this manual.
• Drain the condensed water (if any) completely.
• Clean or change the filter.
• Put the unit on a warm day in fan mode for a couple of hours to
ensure that the inside can dry out completely.
• Store the power cable as shown, protect the unit against dust (put
back into its original carton) and store in a dry place not accessible
for children.
• To protect the unit against dust, store in a dry place not accessible
by children.
• Do not stock heavy objects on top of the unit.
11
Troubleshooting
Never try to repair or dismantle the air condition yourself. Incompetent repairs result in
loss of warranty and can endanger the user and the property.
Problem
Cause
Solution
No power supply. Make sure the
The air
green light on the plug is lit.
conditioner does
Is the power light flashing?
not function.*
Is the water full LED lit?
The unit is in direct sunlight.
Windows or doors open, many
The air
people or a heat source in the room.
conditioner does
The filter is dirty.
not seem to
Air inlet or air outlet blocked.
perform.
Room temperature lower than the
selected value.
The unit is noisy. Unit stands uneven.
The compressor The overheat protection may be
does not work.
activated.
Distance too great.
The remote
Remote control signal not detected
control does not by the control panel.
function.
The batteries are drained.
Connect to a functioning outlet and switch on.
Empty the drain pan.
Close curtains.
Close doors and windows, place an extra air
conditioner.
Clean or replace the filter.
Remove the blockage.
Change temperature selection.
Set at the lowest possible setting: 62°F.
Place on an even, solid surface (less vibrations).
Wait 30 minutes until the temperature has
decreased, then turn on the unit again.
Make sure the remote control is correctly
aimed at the control panel.
Replace the batteries.
* If you plug in the Air Conditioner, and there is no green light on the plug,
press the reset button on the LCDI plug. The green light should be lit,
indicating that the air conditioner is getting power from the electrical outlet.
If the plug continues to trip (which is a USA national safety standard feature)
and the green light goes off, the cord may be damaged preventing you from
resetting the unit. For your safety, contact a licensed electrician.
12
RESET
Reset Button
Test Button
TEST
Green Light
Don’t forget to register your Amcor purchase online,
and view our broad selection of innovative products.
www.amcorgroupusa.com
13
Amcor, Inc. (“Amcor”) warrants the original retail purchaser (“Purchaser”) purchasing in the United
States that the Amcor product with which this warranty is enclosed is free from defects in materials
and workmanship.
Amcor’s sole obligation under this warranty is to replace, or at Amcor’s discretion, to repair, free
of charge, all defective parts, for a period of one (1) year from date of original purchase. (5 years for
Compressor Only) ANY IMPLIED WARRANTY OF MERCHANTABILITY IS SIMILARLY LIMITED
TO ONE (1) YEAR -(5 years for Compressor Only) FROM DATE OF ORIGINAL PURCHASE AND
NO ACTION BASED UPON ANY IMPLIED WARRANTY OF MERCHANTABILITY OR OTHERWISE MAY BE COMMENCED AFTER EXPIRATION OF ONE (1) YEAR -(5 years for Compressor
Only) FROM DATE OF ORIGINAL RETAIL PURCHASE. Some states do not allow limitations on
how long an implied warranty lasts, so the above limitation -(5 years for Compressor Only) may not
apply to you.
The provisions of this warranty shall not apply to any product which in Amcor’s judgment has been
(1) subject to misuse or neglect. (2) damaged in an accident. (3) used for a purpose for which it was
not designed, or (4) repaired or altered in any way that adversely affected its performance or reliability.
Do not attempt to “open unit”, except for filter replacement. Opening unit will void
manufacturers warranty.
To obtain warranty service, the defective product or part must be shipped or delivered to: Amcor
the Manufacturer. Shipping charges and insurance are only covered by Amcor during
first 30 day period after purchase, soley for defective product.
AMCOR NEITHER ASSUMES NOR AUTHORIZES ANY PERSON TO ASSUME FOR IT ANY
OTHER ( LIABILITY IN CONNECTION WITH ITS PRODUCTS, THERE ARE NO WARRANTIES
WHICH EXTEND BEYOND THE DESCRIPTION ON THE FACE HEREOF. NO RESPONSIBILITY
IS ASSUMED FOR INCIDENTAL OR CONSEQUENTIAL DAMAGES THAT MAY RESULT FROM
THE USE OF AN AMCOR PRODUCT, NOR FOR THE DAMAGES DUE TO ACCIDENT, ABUSE,
LACK OF RESPONSIBLE CARE, THE AFFIXING OF ANY UNAUTHORIZED ATTACHMENT,
LOSS OF PARTS, OR USE AT A VOLTAGE OTHER THAN SPECIFIED. Some states do not allow
the exclusion of limitation of incidental or consequential damages, so these limitations may not apply to you. Amcor disclaims all liabilities for defects or damages caused by use of replacement parts
obtained from or by service at any service center other than Amcor the Manufacturer.
This warranty gives you specific legal rights, and you may also have other rights which vary from state
to state.
Product: AMCOR Portable Air Conditioner
Model: CF14000E
Date Purchased:__________________________________ Production Code:________
QUESTIONS? Call 1-800-245-8646
www.amcorgroupusa.com
Dear Customer: Please keep this warranty for your record.
DO NOT return it.
14
913128080
03/2008
One Year Limited Warranty
(5 Years for Compressor Only)
Manual del
propietario
Unidad de aire acondicionado portátil
CF14000E
Es importante que lea
estas instrucciones antes
de utilizar su nuevo
producto y recomendamos
encarecidamente que las
conserve en un lugar seguro
para referencia futura.
Innovador Tecnologico desaguadero automatico de Niebla Fina™
Patente pendiente
Índice
¡Gracias! ………………………………………………………… 1
Instrucciones de seguridad …………………………………… 1-2
Especificaciones ………………………………………………… 3
Partes …………………………………………………………… 4
Ensamblaje del atomizador de agua ……………………………… 5
Posicionamiento ………………………………………………… 6
Funcionamiento ……………………………………………… 7-8
Vaciado del recipiente de agua …………………………………… 9
Limpieza …………………………………………………………10
Instalación de los filtros …………………………………………10
Almacenaje ………………………………………………………11
Identificación y resolución de problemas …………………………12
Garantía limitada …………………………………………………14
¡Gracias!
AMCOR es una marca destacada en el tratamiento del aire interior. Deseamos que usted disfrute los
numerosos beneficios brindados por esta unidad, así que por favor lea detenidamente este manual.
AMCOR se especializa en el control completo del medio ambiente interior y fabrica calefactores,
unidades de aire acondicionado, deshumidificadores y purificadores de aire de categoría mundial con
tecnología innovadora.
En el diseño de estos productos avanzados, hemos prestado mucha atención a nuestros clientes y hemos
indicado sus puntos de vista a nuestros laboratorios de investigación y desarrollo.
Le deseamos que disfrute de este producto durante muchos años.
Después de leer este manual, consérvelo en un lugar seguro para futuras referencias.
Lea este manual de instrucciones por completo antes de usar.
Guarde su recibo. Su recibo es su comprobante de compra y es necesario para el servicio
bajo garantía.
Instrucciones de seguridad
¡IMPORTANTE!
• La unidad está diseñada para operación en áreas interiores.
• Clasificación: Esta unidad debe conectarse a un tomacorriente de 115V / 60Hz conectado a tierra.
• La instalación debe ser de conformidad con los reglamentos del país donde se utiliza la unidad.
Si tiene dudas sobre la instalación eléctrica, pida a un electricista competente que la revise y la
modifique si es necesario.
• La unidad de aire acondicionado es segura. Sin embargo, al igual que otros artefactos eléctricos,
se debe usar con precaución.
• Mantenga este producto fuera del alcance de los niños.
• No limpie la unidad rociándola o sumergiéndola en agua.
• No inserte ningún objeto en las aberturas de la unidad.
• Desenchufe la unidad para limpiarla o limpiar cualquier componente.
• Nunca use un cable de extensión para conectar la unidad a un tomacorriente.
Si no hay un tomacorriente disponible, pida a un electricista autorizado o calificado que le instale uno.
¡ADVERTENCIA!
• Nunca opere esta unidad si tiene el cordón o el enchufe dañado.
No arrastre el cordón sobre bordes afilados.
• Un cordón de alimentación de energía dañado debe ser reemplazado por el fabricante,
su agente de servicio o una persona competente para prevenir un peligro.
• Cualquier servicio, salvo por la limpieza regular o el reemplazo del filtro, debe ser realizado
por un representante de servicio autorizado. De lo contrario, podría invalidarse la garantía.
1
Seguridad
No use la unidad de aire acondicionado:
Si los alambres del cable de
alimentación están pelados o
cortados
Cuando pudiese haber niños
pequeños desatendidos
En una superficie inclinada o
irregular
Cerca de una fuente térmica
Este producto no está
diseñado para que sea
reparado por el usuario
Si existe un riesgo de que caiga
líquido sobre la unidad
Si la unidad interior está
expuesta a las condiciones
climáticas exteriores
En un entorno muy húmedo
Si un conductor de extensión
pudiese estar sobrecargado
En un lugar donde el cable de
alimentación pueda resultar
dañado
Donde pueda ser dañado por
productos químicos
Donde exista un riesgo de
interferencia de objetos
extraños
Advertencia:
Los productos eléctricos residuales no deben desecharse con los residuos
domésticos. Este producto debe ser transportado a un centro de reciclaje local para que sea manejado sin riesgos.
2
Especificaciones
Modelo
CF14000E
Capacidad de enfriamiento
14,000 (BTU/hr)
Consumo de energía de
enfriamiento / corriente
Deshumidificación en modo de
enfriamiento
1150W/10.2A
62 Pintas / 24h
Fuente de alimentación
115V / 60Hz
Refrigerante
R22
Compresor
Giratorio
Velocidades del ventilador
2
Termostato
62º - 90º F
Reloj
1 - 12 Horas
Dimensiones
12" ancho x 18" profundidad x
30" altura
Peso
63 Libras
Sujeto a modificaciones sin previo aviso.
Consulte la etiqueta de clasificación para mayor precisión
OBSERVACIONES: La capacidad de enfriamiento de la unidad puede ser afectada
por la altura desu techo,la calidad del aislamiento utilizado o el número de ventanas
en la habitación. No existe unreglamento o estatuto vigente para productos de aire
acondicionadoportables en los Estados Unidos, no obstante hemos hecho todo esfuerzo
para diseñar yfabricar una unidad de aire acondicionadoportátil con calidad superior
que eficaz yeficientemente enfríe ciertas áreas de su hogar o su oficina.Estas unidades de
aireacondicionado portátil están diseñadas para proporcionar aire acondicionadoadicional.
Para tener un mejor entendimiento de las capacidades de funcionamiento de su
nuevaunidad de Aire Acondicionado Portátil Amcor, visite nuestra página de internet:
www.amcorgroupusa.com/portableacdisclaimer
3
Partes
1
2
3
4
5
6
7
4
8
9
1.
2.
3.
4.
5.
6.
10
11
7.
8.
9.
10.
14
12
11.
12.
13.
13
16
15
14.
15.
16.
4
Manivela
Panel de control
Salida de aire
Entrada de aire con filtro
Manguera de escape
Colgador del cable de alimentación
de energía
Salida de aire de escape
Tapón de agua (tapón interior)
Ruedas giratorias
Barra corrediza ajustable
para la ventana
Manguera de drenaje flexible
Manguera de escape
Unidad de control remoto infrarrojo
ergonómica
Adaptador de la Barra Corrediza
pra la Ventana
Cinta aislante
Tubería de Agua Espiral con Adaptador
Ensamblaje de la función AutoDrain NanoMist Technology™
1
3
5
7
Estire el extremo
de la mangera
levemente.
Conecte el
adaptador de la
barra corrediza
para la ventana
a la manguera
de escape girándola en la forma
mostrada.
2
Conecte la
mitad hembra del
conector rápido
en el extremo
de la tubería de
agua espiral a la
parte macho de la
tubería de salida
de aire caliente
4
Estire el extremo
de la mangera
levemente.
Ensamble la
manguera de aire
caliente en la
unidad atornillándola en sentido
del reloj.
Estire la
manguera flexible
con el adaptador
de la manguera
adjunto e instálela
a presión en la
barra corrediza
para la ventana.
5
6
8
Coloque la
tubería de agua
espiral dentro
de la manguera
flexible de aire
caliente.
Gire el conector
90 grados en
sentido del reloj
hasta ajustarlo
en posición.
Enganche el
atomizador
de agua en el
extremo de la
tubería espiral
al sujetador.
Paso requerido
solamente
para el
desmontaje.
Para desarmar
el conector
rápido, empuje
la lengüeta y gire
el adaptador
en contra del
sentido del reloj.
Posicionamiento
Esta unidad puede moverse de un cuarto a otro con facilidad. Al hacerlo, recuerde lo siguiente:
• La unidad de aire acondicionado debe mantenerse en posición vertical sobre una superficie plana.
• No la sitúe cerca del baño, lavabo u otra área permanentemente húmeda o mojada.
• Mantenga la unidad a una distancia mínima de 18 pulgadas de la pared o de las cortinas para garantizar
una adecuada circulación de aire.
2a
1
2b
Instalación de la manguera de escape en la barra corrediza para la ventana
Después de ensamblar la función Innovative AutoDrain NanoMist Technology™ según las instrucciones
de la página 5, asegúrese de que esté firmemente sujeto al adaptador ovalado que se ajusta a la barra
corrediza para la ventana.
Instale a presión el adaptador de la manguera en la abertura de la barra corrediza para la ventana.
Consulte la ilustración 1.
Extienda la barra corrediza para que se ajuste a la abertura de la ventana, ya sea vertical u horizontal,
dependiendo del modo de abrir la ventana. Consulte las ilustraciones 2a y 2b
Importante
La manguera de escape flexible puede extenderse de 12 a 60 pulgadas para el montaje.
Esta longitud se ha diseñado especialmente de conformidad con las especificaciones de la
unidad de aire acondicionado.
No utilice una extensión ni cambie a una manguera diferente que pueda producir una
avería.
El aire de escape debe circular libremente; un bloqueo puede producir recalentamiento de la unidad de
aire acondicionado. Tenga cuidado de no enrollar o doblar la manguera de escape.
6
Funcionamiento
1
2
LO
W
HI
5
P
COOL FAN
CO
M
ER
AT L
W UL
F
AU
TO
4
MODE
3
1. ENCENDIDO/APAGADO
Presione el botón ON /OFF (encendido/apagado) para encender o apagar la unidad.
2. Ajuste del reloj
Presione el botón del reloj para activar la función del contador del reloj. Cada vez que se presione el
botón del reloj, se avanza el ajuste 1 hora, con un intervalo de ajuste de 1 a 12 horas. Si pasa el ajuste
deseado, debe avanzar los números hasta el 12 para comenzar la cuenta del reloj desde 1. Una vez
ajustado, se encenderá el diodo luminiscente TIMER (reloj). Una vez que hayan transcurrido las horas
ajustadas, la unidad se apagará automáticamente. La pantalla mostrará las horas restantes cuando
presione el botón TIMER (reloj). Al presionar el botón TIMER (reloj) sin encender la unidad, puede
preajustar en cuántas horas la unidad se encenderá automáticamente.
3. Ajuste del modo de funcionamiento
Seleccione el modo de funcionamiento requerido: COOL (enfriamiento), FAN (ventilador) o AUTO.
Se encenderá el diodo luminiscente correspondiente. En modo AUTO, la unidad seleccionará enfriamiento o
ventilador dependiendo de la temperatura ambiente.
4. Velocidad del ventilador
Seleccione la velocidad del ventilador; se encenderá el diodo luminiscente
correspondiente: LOW (baja) o HIGH (alta).
5. Aumentar o reducir el ajuste de temperatura cuando la unidad está prendida,
siempre muestra la temperatura en la habitación.
el despliegue
Presione el botón UP (aumentar) o DOWN (reducir) para ver la temperatura ajustada y cambiarla si es
necesario - en el intervalo de 62°F a 90°F (1°F cada vez que se oprime el botón).
Después de 8 segundos, la temperatura del ambiente será mostrada.
Luces de advertencia COMPRESSOR (compresor) y WATER FULL (lleno de agua)
Cuando el recipiente de agua está lleno, la unidad se detiene automáticamente, la luz de advertencia
WATER FULL se encenderá y apagará en forma intermitente para señalar que se debe vaciar el recipiente
(consulte la página 9 “Vaciado del recipiente de agua”).
Cuando la unidad está enfriando, la luz compresor estará encendida. Si la luz está apagada, no se necesita
más enfriamiento por ahora o el compresor podría estar descongelando sus bobinas.
El ventilador puede continuar encendido.
7
Funcionamiento
Control remoto
La unidad de aire acondicionado responde a todas las señales transmitidas
por la unidad de control remoto. Se necesitan dos pilas AAA para usar la
unidad de control remoto. Apunte el control remoto hacia
el panel decontrol de la unidad y presione el botón correspondiente –
el diodo luminiscente rojo en la unidad de control remoto se encenderá y
apagará en forma intermitente cada vez que se presiona un botón.
Nota: La dirección de flujo de aire no puede ajustarse con la unidad
de control remoto.
Flujo de aire
Ajuste la dirección izquierda o derecha de la salida de aire
girando el rodillo delante de la rejilla de salida de aire.
Ajuste el flujo de aire de arriba/abajo girando la
parrilla de salida de aire.
Importante:
• El compresor se activará aproximadamente 3 minutos
después que se encienda la unidad (esto ayudará a prolongar
la vida útil del compresor). Después de apagar la unidad,
espere al menos 3 minutos antes de encenderla nuevamente.
• El compresor se apagará cuando la temperatura ambiente sea inferior a
la temperatura ajustada. Sin embargo, el ventilador continuará funcionando.
Se reanudará el enfriamiento cuando la temperatura ambiente aumenta por
encima de la temperatura ajustada.
8
Vaciado del recipiente de agua
Este Aire Acondicionado no requiere que se vacíe el
contenedor de agua, excepto antes de ser almacenado.
La unidad de aire acondicionado portátil brinda la función
Innovative AutoDrain NanoMist Technology™
El exceso de agua acumulada debe ser mínimo. Durante el proceso
de enfriamiento, parte del agua acumulada se utiliza para enfriar la
sección interna de la unidad para mejorar su eficiencia. Esta tecnología de
evaporación y la función Innovative AutoDrain NanoMist Technology™ no
se encuentran en la mayoría de las unidades de aire acondicionado.
Apague la unidad y retire enchufe de la
salida de corriente.
• Sitúe un recipiente plano o una bandeja en el suelo
debajo del agujero de drenaje. No deje que el agua
gotee en forma continua en el recipiente ya que
podría desbordarse fácilmente.
• Retire la perilla de drenaje.
• Quite el tapón de goma y fluirá agua al recipiente.
Cuando esté casi lleno, reinstale el tapón para
detener el flujo de agua y vacíela. Repita este
proceso hasta haber extraído el agua por completo.
• Reinstale firmemente el tapón de goma en el agujero de drenaje;
el diodo luminiscente WATER FULL dejará de encenderse y
apagarse en forma intermitente.
• Reinstale la perilla de drenaje.
9
Tapón
de goma
Perilla de
drenaje
Limpieza
Siempre desenchufe la unidad de la fuente de energia
(tomacorriente de pared) antes de iniciar la limpieza.
Cubierta
Limpie la cubierta de la unidad con un paño suave húmedo. Nunca use
productos químicos fuertes, productos a base de aceite, detergentes,
paños tratados con productos químicos u o productos de limpieza.
Estos podrían dañar la cubierta.
Filtro
Utilice una aspiradora o golpee suavemente el filtro para quitar el
polvo y residuos sueltos, luego enjuague bien el filtro con agua
(a una temperatura máxima de 104°F).
Seque bien el filtro antes de reinstalarlo.
¡Aviso!
Nunca opere la unidad de aire acondicionado sin los filtros.
Instalación de filtro de carbón
Se recomienda reemplazar el filtro de
carbón activo al inicio de la temporada de uso.
• Remueva el marco del filtro superior
jalándolo hacia afuera de la unidad.
• Separe el fijador del filtro del marco
del filtro.
• Inserte el filtro de carbón activo en el marco
del filtro, debajo de las lenguetas.
• Coloque de nuevo el marco del filtro
dentro de la unidad.
10
Almacenaje
Al final de la temporada de aire acondicionado, esta unidad debe
ser drenada antes de ser almacenada.
Consulte la sección “Vaciado del Recipiente de Agua” de
este manual.
• Drene por completo el agua condensada (en caso de haberla).
• Limpie o cambie el filtro.
• En un día templado coloque la unidad en modo de ventilador porun par de
horas para asegurar que el interior se seque por completo.
• Guarde el cable de energia en la forma mostrada, proteja la
unidad contra el polvo (colóquela en su caja original) y almacénela en un
lugar seco que no esté al alcance de los niños.
• No coloque objetos pesados sobre la unidad.
11
Identificación y solución de problemas
Nunca trate de reparar o desmantelar la unidad de aire acondicionado. Las reparaciones
incompetentes anulan la garantía y pueden poner en peligro al usuario y su propiedad.
Problema
Causa
Solución
Falta de energia. Asegúrese que la luz
verde en el enchufe esta encendida.
La unidad de aire
¿Se enciende y se apaga en forma
acondicionado
intermitente la luz de encendido?
no funciona.*
¿Esta el diodo luminiscente de agua
llena (WATER FULL) encendido?
La unidad está a la luz directa del sol.
Hay ventanas o puertas abiertas, hay
mucha gente o una fuente de calor
La unidad de aire en el cuarto.
acondicionado
El filtro está sucio.
parece no
La entrada o salida de aire está
funcionar
bloqueada.
La temperatura del cuarto es inferior
al valor seleccionado.
La unidad es
La unidad está desnivelada.
ruidosa.
El compresor no
funciona.
El control
remoto no
funciona.
Conecte la unidad a un tomacorriente
activa y enciéndala.
Vacíe el colector de drenaje
Cierre las cortinas.
Cierre las puertas y ventanas, instale una unidad
de aire acondicionado adicional.
Limpie o cambie el filtro.
Quite la obstrucción.
Cambie la selección de temperatura.
Ajuste al valor más bajo posible: 62°F.
Sitúela sobre una superficie sólida y pareja.
(menos vibraciones).
Espere 30 minutos hasta que la temperatura
La proteccion de sobre
haya disminuido, luego encienda nuevamente la
calentamiento esta activada.
unidad.
Demasiada distancia.
Asegúrese de que la unidad de control remoto
esté apuntando correctamente hacia el panel de
El panel de control no detecta la
señal de la unidad de control remoto. control.
Las pilas están agotadas.
Reemplace o cambie las baterías.
* Si conecta el aire acondicionado y la luz verde del enchufe no enciende en
presione el boton para restaurar (Reset) en el interruptor LCDI.
Conecte su aire acondicionado en toma de corriente y la luz debe de
encenderse, indicando que la unidad está recibiendo energía eléctrica.
Si el enchufe continua apagándose (lo cual es una característica estandar
de seguridad en los Estados Unidos), el cable puede estar dañado lo que
no permitirá que la unidad sea reiniciada. Por su seguridad, contacte a un
electricista calificado.
12
Botón para Restaurar
(Reset)
RESET
TEST
Botón de Prueba (Test)
Luz Verde
No olvíde registrar su producto en línea y
ver nuestra amplia selección de innovadores productos.
www.amcorgroupusa.com
13
Garantía Limitada por Un Año
(5 años únicamente para el compresor)
Esta garantía le otorga derechos legales específicos, y usted puede también tener otros derechos que
varían de estado a estado.
Producto: Unidad de aire acondicionado portátil
Modelo: CF14000E
Fecha de compra:______________________
Código del del Producto:_____________
¿PREGUNTAS? Llame al 1-800-245-8646 · www.amcorgroupusa.com
Por favor guarde esta garantía para su archivo.
NO la devuelva.
14
913128080
03/2008
Amcor, Inc. (“Amcor”) garantiza al comprador original del producto (“Comprador”) que lo compra en los Estados Unidos que el Producto Amcor con el que se incluye esta garantía está libre de
defectos en materiales y mano de obra.
La única obligación de Amcor bajo esta garantía es reemplazar, o a discreción de Amcor, reparar, sin
costo, todas las partes defectuosas, por un período de un (1) año a partir de la fecha de la compra
original -(5 años únicamente para el compresor).
CUALQUIER GARANTÍA IMPLÍCITA DE COMERCIABILIDAD ESTÁ SIMILARMENTE LIMITADAA
UN (1) AÑO -(5 AÑOS ÚNICAMENTE PARA EL COMPRESOR) A PARTIR DE LA FECHA DELA
COMPRA ORIGINAL Y NINGUNA ACCIÓN BASADA SOBRE NINGUNA GARANTÍA IMPLÍCITA DE COMERCIABILIDAD O DE OTRO TIPO PUEDE SER INICIADA DESPUÉS DE QUEEXPIRE
UN (1) AÑO -(5 AÑOS ÚNICAMENTE PARA EL COMPRESOR) DE LA FECHA DE LACOMPRA
ORIGINAL. Algunos estados no permiten limitaciones sobre qué tanto tiempo dura una
garantía implícita,así que la limitación -(5 años únicamente para el compresor) anterior puede no ser
aplicable a usted. Las estipulaciones de esta garantía no aplicarán a ningún producto el cual a juicio de
Amcor haya sido (1) sujeto a mal uso o negligencia. (2) dañado en un accidente. (3) usado paraalgún
propósito para el cual no fue diseñado, o (4) reparado o alterado de alguna manera que haya afectado
adversamente su desempeño o fiabilidad. No intente “abrir la unidad”, excepto para remplazar el filtro. El abrir la unidad cancelara la garantía del fabricante.
Para obtener el servicio de garantía, el producto o parte defectuosa debe ser enviada o entregada a:
Amcor, el fabricante. Los cargos de envío y seguro son sólo cubiertos por Amcor durante
el periodo de los primeros 30 días después de la fecha de la compra original, y exclusivamente para productos defectuosos.
AMCOR NI ASUME NI AUTORIZA A NINGUNA PERSONA A QUE ASUMA POR ELLA NINGUNA OTRA RESPONSABILIDAD EN CONEXIÓN CON SUS PRODUCTOS, NO HAY GARANTÍAS
QUE SE EXTIENDAN MÁS ALLÁ DE LA DESCRIPCIÓN EN EL TEXTO DE EL PRESENTE. NO SE
ASUME NINGUNA RESPONSABILIDAD POR DAÑOS INCIDENTALES O CONSECUENCIALES
QUE PUEDAN RESULTAR DEL USO DE UN PRODUCTO AMCOR, LOSDAÑOS DEBIDOS A
ACCIDENTE, ABUSO, FALTA DE CUIDADO RESPONSABLE NI POR FIJAR ACCESORIOS NO
AUTORIZADOS, PÉRDIDA DE PARTES O AL USARLO CON UN VOLTAJE
DIFERENTE DEL ESPECIFICADO. Algunos estados no permiten la exclusión de limitación de daños
incidentales o consecuenciales, así que estas limitaciones pueden no ser aplicables a usted.
Amcor rechaza cualquier responsabilidad por defectos o daños causados por el uso de partes de
repuesto obtenidas a través de o por un servicio en cualquier centro de servicio que no sea Amcor,
el fabricante.