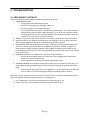
1
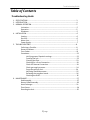
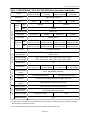
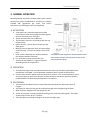
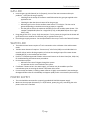
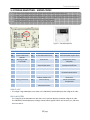
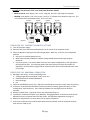
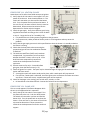
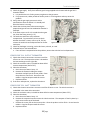
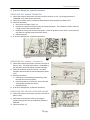
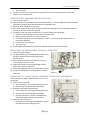
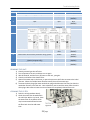
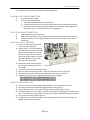
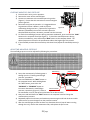
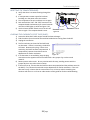
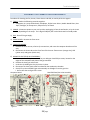
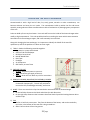
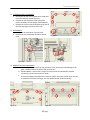
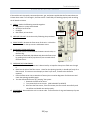
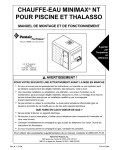
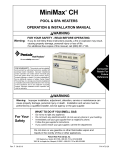
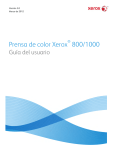
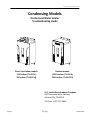
Troubleshooting Guide Condensing Models On‐Demand Water Heater Troubleshooting Guide Direct Vent Indoor models (520 Indoor (T‐H2‐DV), 320 Indoor (T‐H2S‐DV)) Outdoor models (520 Outdoor (T‐H2‐DV), 320 Outdoor (T‐H2S‐DV)) A.O. Smith Water Products Company 500 Tennessee Waltz Parkway Ashland City, TN 37015 Toll Free: 1‐877‐737‐2840 9/12/11 1| Page 321922‐000 Troubleshooting Guide Table of Contents Troubleshooting Guide 1. SPECIFICATIONS.…………………………………………………………………………………………………………3 2. INTRODUCTION……………………….………………………………….……..………………………………………4 3. NORMAL OPERATION……………………………………………………………………….…………………..……5 Activation……………….…………………………………….………………………………………….…….5 Operation..……………………………………………………………...……………………………………..5 Shutdown…………………………………………………….…….………….……….……………………….5 4. INSTALLATION….…………………………………………………………….……………………………………….….6 Venting……………………………………………………….……….…………………………………….……6 Gas Line………………………………………………….…………….…………………………………………6 Water Line………………………………………………….…………………..…….………………………..7 Power Supply…………………………………………………...……………………………………………..7 5. TROUBLESHOOTING………………………………………………………….....……………………………………8 Preliminary Checklist……………………………………………………………..…………………..…..8 General Problems…………………………………………………..…….…………………………………9 Error Codes……………………………………………………………………………….………………..…. 13 Procedures…………………………………………………………..………………………………………….22 Verifying proper Dipswitch settings……………………………………………….....…22 Draining the unit…………………………………………………..……………………………..23 Cleaning the filter………………………………………………….…………………………….23 Checking for a Cross Connection………………………………………………….………24 Check for Reverse Connection……………………………………………….…………….24 Check gas supply pressure……………………………………………….…………………. 24 Purge the gas line of air………………………………………………….………………….. 24 Adjusting manifold pressure……………………………………………….……………….25 Resetting the computer board……………………………………………….…………… 26 Checking the OHCF……………………………………………….……………………………. 26 6. MAINTENANCE……………………………………………………………….…..………………………………………27 Rod Assembly………………………………………………………………………………………………..…27 Burner & Rod Assembly………………..………………………………….…..……………….………..28 Heat Exchanger…………………………………………..……….…..….…………….………….…..…..31 Flow Sensor………………………………………………..……..….…………………………………………34 Descaling the Unit………………………………………..………….……………………………………...35 2| Page Troubleshooting Guide Table 1: SPECIFICATIONS ‐ 520 (T‐H2) / 320 (T‐H2S) Direct Vent Indoor* and Outdoor 520 Direct Vent Indoor (T‐H2‐DV) Model 520 Outdoor (T‐H2‐OS) Dimensions Combustion Water control 73 lbs. Max Operation 73 lbs. 199,000 Installation 13,000 Power vent Direct‐vent Outdoor Fan motor Max Min 71 lbs. 180,000 Min Direct‐vent Outdoor PWM turbo fan LP 4.9” WC Natural 3.6” WC LP 1.0” WC Natural 0.7” WC LP 4.6” WC Natural 2.8” WC LP 0.9” WC Natural 0.6” WC LP 4.3” WC Natural 2.5” WC LP 1.0” WC Natural 0.7” WC LP 3.6” WC Natural 1.9” WC LP 0.9” WC Natural 0.6” WC Flow rate 0.5 GPM to 9.0 GPM Available set temperatures Temperature on the unit settings 100°F to 185°F default: 120°F 100°F, 105°F, 110°F, 115°F, 120°F, 125°F, 135°F, 140°F, 145°F, 150°F, 155°F, 160°F, 165°F, 170°F, 175°F, 185°F Bypass valve Yes Thermistors Features 71 lbs. Combustion System Manifold Pressure** 320 Outdoor (T‐H2S‐OS) H25.6"×W18.5"×D12.4" Weight INPUT BTU/h 320 Direct Vent Indoor (T‐H2S‐DV) Remote controller model PCB model 4 thermistors (In, Out, Mixing, Exhaust) 3 thermistors (In, Out, Mixing) 4 thermistors 3 thermistors (In, Out, Mixing, Exhaust) (In, Out, Mixing) Part # 9007603005 (TM‐RE30) T‐H2 (Part #319143‐126) T‐H2S (Part #319143‐196) Indicators Red LED on PCB during operation & 3‐digit 7‐SEG LED Power supply control Surge absorber & Power ON‐OFF switch Freeze protection Ceramic heaters and Auto‐firing system Self‐combustion improvement Air‐Fuel Ratio Detection System Easy‐Link system Yes (Up to 4 units) Multiple‐system N/A N/A * The 520 Direct Vent Indoor (T‐H2‐DV) and 320 Direct Vent Indoor (T‐H2S‐DV) means the 520 Indoor (T‐H2‐DV) and 320 Indoor (T‐H2S‐DV) in the text. **The manifold pressure measurement is based on conditions without front cover. 3| Page Troubleshooting Guide 2. INTRODUCTION This manual provides the necessary information for troubleshooting the 520 (T‐H2) and 320 (T‐H2S) tankless water heaters. This manual will be effective in helping your troubleshooting needs as long as the instructions are followed in the intended order. Here is how to use this manual: • First refer to the 520 (T‐H2) and 320 (T‐H2S) Installation Manual as the primary source of information. Refer to it along side this manual throughout the troubleshooting process. • Before troubleshooting, if you are unfamiliar with how a tankless unit operates, read the Normal Operation section (p. 5). • To double‐check/troubleshoot a new installation, use the Proper Installation section (p. 6). • When beginning troubleshooting, first go through the Preliminary Checklist (p. 8); it is designed to fix the most common and frequent problems, and provide you with background information to help narrow down the information you need. • After the Preliminary Checklist, move to the Error Codes section (p. 13) if you have received an error code, or to General Problems (p. 9) if you have not received an error code. If you have any problems or questions regarding this equipment, or at any point become confused or uncomfortable with any of the procedures, consult with the technical service department or the local service agent. IMPORTANT • • WARNING Installation and service must be performed by a qualified installer (for example, a licensed plumber or gas fitter). Otherwise the warranty will be void. The installer/service agent (licensed professional) is responsible for correctly installing or servicing your water heater and for compliance with all national, state/provincial, and local codes. *For all units installed in the state of Massachusetts, it is required that the installer either be a licensed plumber or licensed gas fitter. GENERAL INSTALLATION GUIDELINES 1. 2. 3. 4. 5. Follow all local codes, or in the absence of local codes, follow the most recent edition of the National Fuel Gas Code: ANSI Z223.1/NFPA 54 in the USA or CAN/CSA B149.1 Natural Gas, Propane Installation Code in Canada. Properly ground the unit in accordance with all local codes or in the absence of local codes, with the National Electrical Codes: ANSI/NFPA 70 in the USA or CSA standard C22.1 Canada Electrical Code Part 1 in Canada. Carefully plan where you intend to install your water heater. Check the rating plate for the correct GAS TYPE, GAS PRESSURE, WATER PRESSURE and ELECTRIC RATING. *If this unit does not match your requirements, do not install. RATING PLATE If any problem should occur, turn off all hot water taps and turn off the gas. Then call a trained technician or the gas company. Figure 1 4| Page Troubleshooting Guide 3. NORMAL OPERATION Becoming familiar with how a tankless water heater normally operates may help to troubleshoot it. Assuming it is properly installed with appropriate gas, water, and electric connections, the following is how it should operate: 1) ACTIVATION a. A hot water tap is opened enough that the flow sensor detects a flow rate through the heater greater than the activation point of 0.5 gpm. b. The fan activates after flow is detected. c. The computer checks for any problems with the unit before startup. d. Igniter activates. You can hear the buzzing of the spark igniter. e. Main gas valve, proportional valve, and solenoid gas valves will open. You will hear a deep “clunk clunk” noise. Figure 2 f. Once a flame is detected, the red LED located on *The purpose of this diagram is to illustrate tankless water the computer board will activate. heater design concepts, and may not be accurate to the g. In a multi‐heater setup, the controller will unit’s physical description. activate the next heater in 2‐4 gpm increments, depending on the set temperature. 2) OPERATION a. The proportional gas valve will modulate based on the amount of hot water demanded and the temperature rise needed. The fan speed will modulate as well to create an efficient burn. b. You will notice that only partial sections of the burner will be lit. This is normal operation; there are three sections on the burner assembly, and the computer controls the amount of sections needed based on the flow rate and temperature rise required. 3) SHUTDOWN a. The heater will shut down when the water flow rate drops below the deactivation point of 0.4 gpm. b. The heater will close the main gas valve and solenoid gas valves, extinguishing the flame. c. When the flame disappears the red LED will turn off. d. The fan will increase in speed to purge the venting of any remaining exhaust gases. The length of post‐purge can last up to 1 ½ minutes. e. The heater goes into standby waiting for the process to begin again. 5| Page Troubleshooting Guide 4. INSTALLATION These guidelines are quick overviews on the main points of installation – For all installation details, refer to the 520 (T‐H2) or 320 (T‐H2S) Installation Manual that is packaged with every heater. Follow all codes pertaining to the installation of a gas appliance. VENTING OUTDOOR MODEL INSTALLATION: • • Outdoor installations fall under the Direct Vent Clearances published by ANSI Z223.1/NFPA 54 or CAN/CSA‐B149.1 Choose a location that meets all clearances required by code. The two most common are: o 1 ft. from any opening into the building, e.g. doors, windows, etc. o The top must be at least 3 ft. below a soffit, ventilated or non‐ventilated, or below an overhang. INDOOR MODEL INSTALLATION: • Refer to the following table for venting length maximums: Table 2 Diameter Max. No. of Elbow Max. Vertical & Horizontal (Total) Vent Length 3” 2 25 ft. 4” 5 50 ft. * For each 90 degree elbow added, deduct 5 ft. from max. vent • • • The venting may consist of Schedule 40 PVC, CPVC, ABS, or Category III Stainless Steel. In Canada, Plastic venting requires ULC S636 Certified materials. Direct Vent combustion air intake is very important. o Install the Direct Vent air intake opening in an area that is free of airborne debris (lint, grease, dust, flammable liquids, vapors, or chemicals). Dirty burner tray and sensors are a very common cause of the heater operating improperly. o Fresh air intake piping may be manifolded using the following equation: (new vent cross‐sectional area) = (number of heaters) x (5.65) DO NOT: o o o Common vent the exhaust of any tankless heater with any other heater or vented appliance. Terminate the exhaust into a chimney. An existing chimney may be used as a chase to run exhaust pipe all the way up and terminate to the outside. Reduce or increase the vent pipe diameter beyond what is specified in the installation manual. 6| Page Troubleshooting Guide GAS LINE • • • Incorrect gas type, NG (Natural) or LP (Propane), is one of the most common and simple problems. Verify the correct gas type by: o Checking that the stamp on the burner manifold matches the gas type supplied at the application site. o Checking the box that the unit comes in for the gas type. o Minimum gas line size for the tankless water heater is ¾ inch pipe. The size can be greater depending on the distance to the gas meter or regulator. o Size the pipe to deliver the maximum inlet BTU/hr for each tankless water heater. This number is 199,000 BTU/hour for a single 520 (T‐H2), or 180,000 BTU/hour for a single 320 (T‐H2S). Purge the gas line of air. See p. 23 for instructions. If air is present in the gas line the heater will go off with an error code for loss of flame [121] or ignition failure [111]. Check the gas supply pressures. See the Specification chart on p.1 next to the Table of Contents. WATER LINE • • • • • • The tankless water heater requires a ¾ inch connection to the cold water inlet and hot water outlet. Tankless water heaters all require a “Pressure only” relief valve (PRV) on each individual unit rated for 150 psi with a discharge capacity of at least the rated gas input of the water heater (199,000 BTU/h) to be installed per local code. Install a ¾” CSA/AGA approved isolation valve on each heater on all three inlets (Hot, Cold, Gas) for troubleshooting and maintenance procedures. Re‐circulation systems: o Minimum flow rate of 2.0 gpm through the system. o Air separator and air vent installed in the system. If sediment is known to be in the water supply, a Y‐strainer may be needed to pre‐filter contaminants prior to entering the heater’s cold water inlet screen. For areas with hard water, installing a water softener is highly recommended. Heat exchanger damage and failure due to scale buildup can happen rapidly and is not covered by the warranty. POWER SUPPLY • • The unit should be connected to a properly grounded 120 VAC 60 Hz power supply. Make sure that a proper disconnect (i.e. on/off switch, power plug, etc.) controlling the main power to the unit is installed. 7| Page Troubleshooting Guide 5. TROUBLESHOOTING 5.1 PRELIMINARY CHECKLIST Check all of these basic items before proceeding onto any other section: • GAS/WATER/ELECTRIC: o The gas supply valve should be fully open. o Verify the correct gas type is being used, NG or LP. o The water supply valve should be fully open. o The unit should be connected to a 120 VAC 60 Hz power supply. This can be verified by observing the computer board 3‐digit LED display. If it is not lit, the computer board is not being powered. Check to see if the ON/OFF switch below the fuse box is set to the on position, or if the fuse in the fuse box is blown. • REMOTE: If you are using a remote controller, the remote’s power button must be turned on. • HIGH ALTITUDE: Is your location at an altitude of over 3000 feet? This may cause a lack of air. See the high altitude procedure in the Troubleshooting Procedures section. • HARD WATER: What is the hardness of the water? A softener is always recommended, but if the water is above 7 grains of hardness or 70‐140ppm, one must be installed. If there is no water softener installed, existing installations will gradually accumulate scale buildup on the heat exchanger and cause a leak. Heat exchanger leaks due to hard water scale are not covered under the warranty. • NEW INSTALLATIONS: Is this installation a few years old or brand new? o A unit that has worked properly for a while but is now struggling may have become scaled up or contains a dirty burner. o A new installation is most likely installed or plumbed incorrectly. • EXTERNAL PROBLEM: Test whether the problem is within the unit or external to the unit (i.e. in the plumbing system) by attempting to run hot water locally through the pressure relief valve (PRV). o Does the heater ignite and remain running properly? Or does the heater shut down into an error code? If it runs fine through the PRV the plumbing system is at fault. NEXT STEP: Finally, check to see if the unit has an error code. The error code will be displayed on the 3‐ digit seven segment LED PCB at the center of the unit. (See figure 4) • If it is displaying an error code, proceed to the Error Codes section (p. 13). • If there is no error code, proceed to the General Problems section (p. 9). 8| Page Troubleshooting Guide 5.2 TROUBLESHOOTING ‐ GENERAL PROBLEMS Proceed to the Error Codes section if an error code is identified. For other common problems that do not involve an error code, see if the following items help: The water is not hot enough. The water is too hot. Temperature fluctuates when a fixture is opened. Unit does not ignite when water goes through it. It takes a long time to get hot water at the fixtures. The fan motor is still spinning after operation has stopped. Abnormal sounds come from the unit. Loss of pressure at all sinks when the dishwasher fills. Unit has power, gas, and water but does not turn on. Multiple Heater Setup (Easy‐Link) THE WATER IS NOT HOT ENOUGH • • • • • • • • Compare the flow and temperature at the pressure relief valve. o If the temperature and flow rate are correct at the PRV then the problem resides in the plumbing line, not in the tankless unit. Test the hot water temperature with a handheld thermometer to measure how far off the water temperature is from the set temperature. o The set temperature may be set too low. The temperature can be changed with the pushbuttons on the PCB or by the remote temperature controller, if one is installed. Check for cross plumbing between cold water lines and hot water lines. See the Procedures section (p. 24) for instructions. Unit may be hard water scaled. The scale acts as an insulator preventing the heat exchanger from transferring heat to the water. Contact a service agent. The unit may not be receiving enough gas. o The gas supply valve may not be fully open. o The gas line may be sized improperly. o The gas supply pressure may be too low. This may be caused by a malfunctioning gas supply regulator, so check to see if your regulator is working properly. Check to see that a check valve is installed between the pump discharge and the connection to the cold water supply. Inspect the check valve for proper operation. If there isn’t one installed, or if it is malfunctioning, cold water may be back‐feeding into the system. Double‐check for a 101 error code. A 101 error code will reduce the amount of gas input into the heater. Output temperature will be affected if air flow is impeded. o Check construction dust and debris in venting, such as dry wall. o If there is dust inside the cabinet, there will also be dust inside the burner and heat exchanger. See the procedure for cleaning the burner (p. 28). THE WATER IS TOO HOT • The set temperature may be set too high. The temperature can be changed with the pushbuttons on the PCB or by the remote temperature controller, if one is installed. 9| Page Troubleshooting Guide • • The flow adjustment valve could be obstructed due to hard water scale or debris, causing lower than expected water flow. Verify water flow with a graduated container or with the remote temperature controller, if one is installed. The output thermistor could be compromised. This component may be checked by entering the Diagnostics Mode on a remote controller, if one is installed. Turn power off to the unit and run cold water through it; check to see if the inlet and outlet temperatures read the same on the remote. For instructions on how to do this, refer to the Maintenance Sheet, packaged with every tankless water heater and located behind the front panel of the unit. TEMPERATURE FLUCTUATES WHEN A FIXTURE IS OPENED • • • • • • • • • Make sure the unit is installed properly using the Proper Installation section (p. 6) of this guide. Test whether the problem is within the unit or external to the unit (i.e. plumbing system) by attempting to run hot water locally through the PRV. o Does the heater ignite and remain running properly? Or does the heater shut down into an error code? Plumbing connections o Check for a cross connection (p. 24). o Problems with a recirculation system: Check that a check valve is installed between the pump discharge and the connection to the cold water supply. Check to see if the pump is operating properly. Check for air cavitation. The pump will be very hot or chattering. Check the directional indicator on the pump flange. Check the sizing of the pump – a minimum flow of 2 gpm is required. Check gas supply o Verify the gas supply lines are sized for the maximum Btu/h demand, as indicated in the Proper Installation section (p. 6) of this guide. If the gas supply line is shared with other appliances, it should be sized to account for those appliances as well. The heater will still try to run if the gas supply is undersized and has no way of directly determining if there is not enough gas. o For LP models, there may not be enough gas left in the propane tank. o Verify that the supply gas pressure is within specification, not only when the heater is in standby, but while the heater is running on maximum fire as well. o The gas supply pressure may be too low. This may be caused by a malfunctioning gas supply regulator. Venting o Verify that the exhaust venting is installed to manufacturer’s specification. o Verify that the vent run does not exceed the maximum limit (50 ft.) The filter on cold water inlet should be clean; look for signs of hard water scaling. If the clear tube from the proportional gas valve to the bottom of the combustion chamber is disconnected, fluctuations in temperature and/or very low flow to the fixtures may occur. On well systems or even on some city water systems, water pressure fluctuations (especially on low flow) of 8 to 10 psi will result in flow rate fluctuations, which will in turn result in minor temperature fluctuations. Flow sensor or water control valve may be compromised. Contact the technical service department. 10| Page Troubleshooting Guide UNIT DOES NOT IGNITE WHEN WATER GOES THROUGH IT • • • • • • • • • Is the flow rate over 0.5 gpm? See if the unit initiates when you increase demand of water being drawn through the unit (e.g. opening up more hot fixtures). Check that the gas line is open and is purged of air (p. 24). Check that the filter on the cold water inlet is clean (p. 23). Check for reverse connection and cross connection (p. 24). Problems with recirculation system o See that a check valve is installed between the pump discharge and the connection to the cold water supply. A malfunctioning or missing check valve will cause cold water to back‐feed into the system. If you use the remote controller, is the remote power button turned on? Check to see if the Computer board is receiving power. This can be verified by observing the computer board 3‐digit LED display. o If it is not lit, the computer board is not being powered. Check to see if the ON/OFF switch below the fuse box is set to the on position, or if the fuse in the fuse box is blown. If the fan does not initiate at all and it is verified there is power to the unit (see above), the flow sensor may not be working properly. Check the flow sensor for proper impeller functionality. Possible weak connection to power supply, either at the circuit breaker or wire nut. IT TAKES A LONG TIME TO GET HOT WATER AT THE FIXTURES • • The time it takes to deliver hot water from the unit to your fixtures depends on the length of piping between the two. The longer the distance or the bigger the pipes, the longer it will take to get hot water. If this is the case and you would like to receive hot water to your fixtures quicker, you may want to consider a hot water recirculation system. Problems with the recirculation system. o See that a check valve is installed between the pump discharge and the connection to the cold water supply. A malfunctioning or missing check valve will cause cold water to back‐feed into the system. THE FAN MOTOR IS STILL SPINNING AFTER OPERATION HAS STOPPED • This is normal. After operation has stopped, the fan motor keeps running from 5 to 50 seconds in order to re‐ignite quickly, as well as purge all the exhaust gas out of the flue. ABNORMAL SOUNDS COME FROM THE UNIT • • Check the fan for debris. Contact the technical service department. Figure 3 ‐ Fan Motor LOSS OF PRESSURE AT ALL SINKS DURING COMMERCIAL DISHWASHER FILLS • • • • Verify the capacity of the heater(s) versus the GPM demand of the dishwasher. Check the size of the supply lines to the dishwasher. Look for a water regulator on the dishwasher. Check the dishwasher rating plate to confirm the recommended supply water pressure. Unit may be hard water scaled. Scale can reduce pressure and flow of water through the unit; this can occur as quickly as a few months. 11| Page Troubleshooting Guide UNIT HAS POWER, GAS, AND WATER BUT DOES NOT TURN ON • • • For new unit installs, check to make sure the unit is not plumbed in backwards. o Shut off cold water feed only. o Open nearest hot water tap. Water flow should stop. If not there is a cold water cross connection. o Open Pressure Relief Valve. Water flow should stop. If not unit is plumbed in backwards. Clean the filter (p. 23). If the fan never initiates, check for a fouled water flow sensor (p. 34). EASY‐LINK SYSTEM SETUP (MULTIPLE HEATER SETUP) • Unit Numbering o Refer to the installation manual for proper setup. o The master unit will always be assigned number 1. The remaining units will be randomly assigned numbers 2‐4 (if there are 4 units in the Easy‐Link system). 12| Page Troubleshooting Guide 5.3 TROUBLESHOOTING ‐ ERROR CODES • • All units are self diagnostic for safety and convenience when trouble shooting. If there is a problem with the installation or the unit, it will display a numerical error code on the TM‐RE30 Remote Controller (if installed) or on the 3‐digit 7‐Seg LED at the center of the computer board to communicate the source of the problem. Consult the following chart for the cause of each error code. • 7‐Seg LED Figure 5 – TM‐RE30 (Optional) Figure 4 Table 3 – Error Codes Error Symptom Error 031 Incorrect Dipswitch 391 Settings 101 Warning for 991 441 Error Code 111 Ignition Failure 510 Symptom Air‐fuel Ratio Rod Failure Error 661 Symptom Abnormal Water Bypass Valve Flow Sensor 701 711 Proportional Valve / Computer Hi‐Limit switch / Overheat Cutoff Fuse False Flame Detection 121 Flame Loss 551 Abnormal Main and Solenoid Gas Valve Solenoid Valves 311 Output Thermistor 611 Abnormal Fan Motor 741 321 Inlet Thermistor 621 761 331 Mixing Thermistor 631 Exhaust Fan Motor (Indoor models only) External Pump 341 Exhaust Thermistor 651 Abnormal Flow Adjustment Valve 991 721 941 Remote Controller Communication Failure Communication Failure (Easy‐Link) Abnormal Exhaust Temperature Abnormal combustion SINGLE UNIT • The 3‐digit 7‐Seg LED displays error code, or the TM‐RE30 (if installed) displays the 3‐digit error code. EASY‐LINK SYSTEM The 7‐Seg LED of the individual unit with the error in question displays the whole 3‐digit error code. The TM‐RE30 (if installed) displays a 3‐digit number which signifies which unit has the error, and what the error code is. 13| Page Troubleshooting Guide Example: If Unit #2 has the “321” error code (inlet thermistor failure) • • Water heater #2: It will display “321” on the 7‐Seg LED, just like in the Single Unit example. TM‐RE30: It will display “232” on its screen. The first “2” indicates that Unit #2 has the error. The “32” indicates the first two digits of the “321” error code. Unit #1 MASTER unit Unit #2 SLAVE unit Unit #3 SLAVE unit Unit #4 SLAVE unit Figure 6 TM‐RE30 ERROR CODE 031: INCORRECT DIPSWITCH SETTINGS 1) Turn off the power supply. 2) Remove front cover and locate the dipswitches on the center of the computer board. 3) Check the dipswitch settings on the left and right banks. Refer to p. 22 for the correct dipswitch positions. a. Gas type is a common dipswitch error. b. Most other switches should be on default setting UNLESS the particular setup requires otherwise. c. Easy‐Link systems: The master heater shall have the number 10 dipswitch on the right bank in the ON position (left). The remaining heaters (the slave heaters) will have the number 10 dipswitch in the OFF position (right) and the communication wires will be attached to the slave in/out plugs. ERROR CODE 101: ABNORMAL COMBUSTION 1) Blockage in the airway. Check the following areas: a. Venting length obstruction (Birds’ nests, trash, etc.) b. Backflow preventer installed backwards c. Heat exchanger d. Fan 2) Check the manifold pressure (p. 25). Adjust the manifold pressure to the correct values if necessary. 3) If intake air is contaminated with dust, lint (laundry machine nearby), grease (kitchens), or other contaminants, clean the burner. See p. 28 on procedures for cleaning the burner & sensor assembly. 4) Weather related issues: high winds, frozen vent termination flap, etc. 5) Installations at altitudes around or over 3000 feet: Changing dipswitch 5 and 6 on the left bank of dipswitches on the computer board for FM+ modes. See dipswitch explanations on page 21. 6) Make sure all dipswitches are set properly for the type of installation. 7) If the cause of the 101 error code has been determined and solved, reset the computer board to clear the error code (p. 26). 14| Page Troubleshooting Guide ERROR CODE 111: IGNITION FAILURE Heater does not fire after three failed attempts at ignition. 1) Verify that the hi‐limit switch is not tripped. Turn the power off to the unit. Push the white button in. The switch will reset when you hear and feel the button click. Turn the power back on and test the heater. If the unit fires on, the cause of the hi‐limit trip must be determined. Please contact the technical service department for further technical support. 2) Check the gas supply. Verify that sufficient gas is being supplied to the heater and the gas line is clear of debris Figure 7 or any air. Purge the line of air if needed (p. 24). a. It is possible there is a faulty pressure regulator at the gas meter. b. For propane units, colder periods of the day result in a cold regulator and may cause this problem. 3) Verify that the gas supply pressure is within specifications when the heater is in standby and when the heater is running. 4) Check that the clear plastic tube connecting the proportional gas valve to the combustion chamber is attached. 5) The overheat cutoff fuse (OHCF) may have been compromised. For procedures on how to check whether the OHCF is intact, refer to p. 26. If the OHCF has been compromised, contact the technical service department for further assistance. 6) If flame comes on for only 1‐2 seconds before Figure 8 going out, clean the flame sensor (p. 27). 7) Check the igniter for a spark. The spark may be viewed through the sight glass located next to the igniter and flame sensor. a. A strong blue spark will remain steady and in place, while a weak spark will jump around. b. If no spark or a weak spark is observed, check the igniter wire connections and make sure these are secure. If these are secure, a replacement igniter will be required. 8) Check for blockages in the venting, such as bird nests, animals, or trash. a. PC Board fault or Gas Solenoid fault. Contact the technical service department. ERROR CODE 121: FLAME LOSS This error code appears if the flames disappear while the unit is still supposed to be in operation. 1) Verify that the hi‐limit switch is not tripped. Turn the power off to the unit. Push the white button. The switch will reset when you hear and feel the button click. Turn the power back on and test the heater. If the unit fires on, the cause of the hi‐limit trip must be determined. Please contact the technical service department for further technical support. Figure 9 15| Page Troubleshooting Guide 2) Check the gas supply. Verify that sufficient gas is being supplied to the heater and the gas line is cleared of debris. a. It is possible there is a faulty pressure regulator at the gas meter. b. For propane units, colder periods of the day result in a cold regulator and may cause this problem. 3) Verify that the gas supply pressure is within specifications when the heater is in standby and when the heater is running. 4) Check that the clear plastic tube connecting the proportional gas valve to the combustion chamber is attached. 5) If the flame comes on for 1‐2 seconds but then goes out, clean the flame sensor (p. 27). 6) The overheat cutoff fuse may have been compromised. For procedures on how to check whether the OHCF is intact, refer to p. 26. If it has, contact the technical service department for further Figure 10 assistance. 7) Check for blockages in venting, such as bird nests, animals, or trash. 8) PC Board fault or Gas Solenoid fault. a. If one of these is suspected to be the problem, contact the technical service department. ERROR CODE 311: OUTPUT THERMISTOR 1) Check that the wire connections are secure and free of burns or cuts. The output thermistor is located on the heat exchanger on the right side. 2) Check the resistance value; it should be about 9.0kΩ at room temperature (about 74°F). 3) Clean the thermistor. a. Drain the unit of water. See p. 23. b. Remove the fastener holding the output thermistor and pull out the sensor probe. Clean the probe to a silver finish. Do not lose the rubber o‐ring that wraps around this sensor. c. Replace and test. 4) If the error code persists, replace the thermistor. ERROR CODE 321: INLET THERMISTOR Figure 11 1) Check that the wire connections are secure and free of burns or cuts. The inlet thermistor is embedded in the water inlet connection. 2) Check the resistance value; it should be about 9.0kΩ at room temperature (about 74°F). 3) Clean the thermistor. a. Drain the unit of water. See p. 23. b. Remove the computer board to access the inlet thermistor. The computer is fixed in place by a single screw at the top of the board. c. Remove the screw, pull out the sensor probe. Clean the probe to a silver finish. Do not lose the rubber o‐ring that wraps around this sensor. d. Replace and test. 16| Page Troubleshooting Guide 4) If the error code persists, replace the thermistor. ERROR CODE 331: MIXING THERMISTOR 1) Check that the wire connections are secure and free of burns or cuts. The mixing thermistor is embedded in the water outlet connection. 2) Check the resistance value; it should be about 9.0kΩ at room temperature (about 74°F). 3) Clean the thermistor. a. Drain the unit of water. See p. 23. b. Remove the computer board to access the mixing thermistor. The computer is fixed in place by a single screw at the top of the board. c. Remove the screw, pull out the sensor probe. Clean the probe to a silver finish. Do not lose the red rubber o‐ring that wraps around this sensor. d. Replace and test. 4) If the error code persists, replace the thermistor. Figure 12 ERROR CODE 341: EXHAUST THERMISTOR 1) Check that the wire connections are secure and free of burns or cuts. The exhaust thermistor is embedded at the top center of the unit above the heat exchanger. 2) Check the resistance of the thermistor. The value should be about 10.75kΩ at room temperature (about 74°F). 3) Clean the thermistor. a. Remove the screw holding the thermistor plate, then pull out the sensor probe. b. Clean the probe to a silver finish. Do not lose the white gasket that seals this sensor. Figure 13 c. Replace and test. 4) If the error code persists, replace the thermistor. ERROR CODE 391: AIR‐FUEL RATIO ROD FAILURE 1) Check that the wire connections are secure and free of burns or cuts. 2) Check that the clear plastic tube connecting the proportional gas valve to the combustion chamber is attached. 3) Clean the AFR (p. 27). 17| Page Figure 14 Troubleshooting Guide ERROR CODE 441: FLOW SENSOR Part of an Easy‐Link system, the master unit signaled for an additional heater to activate and it did not. 1) Verify that water is being supplied to the heater in error. 2) Verify that the wires are connected to the computer board. 3) Check the inlet filter for any debris. See p. 23. 4) Check the flow sensor for debris. ERROR CODE 510: ABNORMAL MAIN AND/OR SOLENOID GAS VALVE Driving circuit fault for the main or solenoid gas valves. 1) If the hot water is shut off, but flames are still visible through the burner sight window, immediately shut off gas and power to the unit and contact the technical service department. 2) Check the wire connections to the gas valve assembly for burns or cuts. 3) If the unit was recently rebuilt, make sure that each gas valve wire is plugged into the proper place. 4) Verify that the supply gas pressure is within the specified limits. Too high of an inlet gas pressure may cause the main gas valve to jam or could be damaged. Figure 15 ERROR CODE 551: ABNORMAL SOLENOID GAS VALVE Driving circuit fault for the solenoid gas valve. 1) If the hot water is shut off, but flames are still visible through the sight glass, immediately shut off gas and power to the unit and contact the technical service department. 2) Check the wire connections to the gas valve assembly for burns or cuts. 3) If the unit was recently rebuilt, make sure that each gas valve wire is plugged into the proper place. 4) Verify that the supply gas pressure is within the specified limits. Too high of an inlet gas pressure may cause the main gas valve to jam or could be damaged. ERROR CODE 611: ABNORMAL FAN MOTOR Figure 16 Figure 17 1) Turn off power supply. 2) Check fan motor wiring for any breakages, burn marks on the PC board, or moisture. If moisture is found, allow connection to completely dry before turning power back on. 3) Check fan housing for water. If found, please dry the fan, then test heater. 4) To remove the fan motor. a. Turn off the power supply. 18| Page Figure 18 Troubleshooting Guide b. Move the computer board out of the way. This involves three screws and removing any restricting wires connected to the PCB. c. Locate the two Phillips head screws fitted at the top of the fan motor to the combustion chamber box. Two holes are located directly at the bottom of the casing that line up with the two screws. Using an 8” screwdriver, remove the screws. d. Slide the fan out towards the left. e. If signs of water are evident, water may have damaged the fan motor requiring replacement. 5) If the 611 error code still appears after all items have been checked, the PCB may need replacement. Contact the technical service department. ERROR CODE 621: ABNORMAL EXHAUST FAN MOTOR This error code applies to the Indoor models only. 1) Turn off power supply. 2) Check fan motor wiring for any breakages, burn marks on the PC board, or moisture. If moisture is found, allow connection to completely dry before turning power back on. 3) Check fan housing for water. If found, please dry the fan, then test heater. 4) To remove the fan motor. a. Turn off the power supply. b. Disconnect the fan motor clip near the fan. c. Locate and remove the four Phillips head screws around the fan motor to the combustion chamber box. d. The fan motor should be free to be removed. e. If signs of water or debris are evident, water may have Figure 19 damaged the fan motor requiring replacement. 5) If the 621 error code still appears after all items have been checked, the PCB may need replacement ERROR CODE 631: ABNORMAL EXTERNAL PUMP This error code occurs when there is a problem with the external pump connected to the PCB. Check to see whether the pump connected to the PCB works properly. ERROR CODE 651: ABNORMAL FLOW ADJUSTMENT VALVE 1) Turn off power supply. 2) Check that all wire connections are secure and free of burns. The flow adjustment valve is located behind the computer board and attached to the cold water inlet. 3) Check for water leakage from the valve. 4) Do a visual inspection of the PCB. Check for connection/breakage of wires and/or burn marks on the board. PCB may need to be replaced. Figure 20 5) The flow adjustment valve may need to be cleaned. To remove, follow the steps below: a. Remove the four waterway clips on each side of the valves. b. Slide the valve up off the inlet water connection. c. Check both ends of the valve for sediment or debris. Use a brush or descaling solution to remove the sediment. d. Re‐install the valve and clips. 19| Page Troubleshooting Guide e. Test the heater. 6) The water control valve may need to be replaced if the valve cannot be cleaned. Contact the technical service department. ERROR CODE 661: ABNORMAL WATER BYPASS FAULT 1) Turn off power supply. 2) Check that all wire connections are secure and free of burns. The flow adjustment valve is located behind the computer board and attached to the cold water inlet. 3) Check for water leakage from the valve. 4) Do a visual inspection of the PCB. Check for connection/breakage of wires and/or burn marks on the board. PCB may need to be replaced. 5) The bypass valve may need to be cleaned. To remove, follow the steps below: a. Remove the four waterway clips on each side of the valves. b. Slide the valve up off the inlet water connection. c. Check both ends of the valve for sediment or debris. Use a brush or descaling solution to remove the sediment. d. Re‐install the valve and clips. e. Test the heater. 6) The flow adjustment valve may need to be replaced if the valve cannot be cleaned. ERROR CODE 701: PROPORTIONAL GAS VALVE / COMPUTER 1) Turn off the power supply. 2) The proportional valve is located at the bottom of the gas valve assembly with a red and white wires connecting to it. 3) Check all wire connections and make sure they are secure and free of burns or cuts. 4) Inspect the PCB for connection/breakage of wires and/or burn marks on the board. 5) Verify that supply gas pressure is within specifications. 6) Contact the technical service department for further assistance. Figure 21 ERROR CODE 711: HI‐LIMIT SWITCH / OVERHEAT CUTOFF FUSE COMPROMISED This error code may appear instead of the “111” or “121” error codes. 1) Check the Hi‐Limit switch a. Visual inspection: Connection/breakage of wires. b. Normal: Less than 1Ω between blue & blue 2) Overheat Cutoff switch compromised a. Visual inspection: Connection/breakage of wires. b. Normal: Less than 1Ω between blue & blue c. Check for continuity. See the Troubleshooting: General Procedure section for instructions. 3) PCB and/or gas valve fault a. Driving circuit fault for gas solenoid valve. Inspect the PCB connection of the gas valve. 20| Page Figure 22 Troubleshooting Guide ERROR CODE 721: FALSE FLAME DETECTION 1) First and foremost, shut off all gas and power to the unit. The problem could be the flame sensor, but if it isn’t, this is a very dangerous situation. 2) Contact the technical service department for further assistance. ERROR CODE 741: MAIN REMOTE CONTROL PROBLEM This error code only occurs when there is a miscommunication between the temperature remote controller and water heater. 1) Check that all wiring is properly connected to the TM‐RE10 or TM‐RE30. 2) Verify that only a single TM‐RE10 or TM‐RE30 is installed. An incorrect remote or multiple remotes will result in this error code. If the TK‐RE02 is installed, code 74 will flash. 3) If you disconnect the remote from the heater with the power supply on, this error code will result. Turn off power before disconnecting the remote from the heater. 4) Check for any signs of power surges. ERROR CODE 761: COMMUNICATION FAILURE 1) This error code only occurs in a multiple heater setup, where there is a miscommunication between master and slave units for Easy‐Link systems. 2) This error code will only be displayed on the master heater. 3) This error indicates that the master unit has lost communication with the indicated heater. 4) Verify that there is power to the unit that has lost communication. 5) See the Installation Manual for proper communication cable setup. 6) Check for signs of power surges. ERROR CODE 941: ABNORMAL EXHAUST TEMPERATURE 1) 2) 3) 4) 5) Check for excessive vent length and for any blockage in the intake air and/or exhaust. Check for dust or lint in the burner and heat exchanger in contaminated installation areas. Check the manifold pressure. The exhaust fan motor may not be functioning properly. If the unit set temperature is above 140F and is in a recirculation system, contact the technical service department for a solution. ERROR CODE 991: ABNORMAL COMBUSTION 1) Refer to error code 101. 2) Contact the technical service department for further assistance if nothing has worked so far. The manifold gas pressure may need adjustment. 3) If you are sure that the problem has been solved, reset the computer board (p. 26). 21| Page Troubleshooting Guide 5.4 TROUBLESHOOTING – PROCEDURES Verifying proper Dipswitch settings p.22 Draining the unit p.23 Cleaning the filter p.23 Checking for a Cross Connection p.24 Check for Reverse Connection p.24 Check gas supply pressure p.24 Purge the gas line of air p.24 Adjusting manifold pressure p.25 Resetting the Computer Board p.26 Checking the OHCF p.26 VERIFYING PROPER DIPSWITCH SETTINGS: • Incorrect Dipswitch settings can cause a 031 error code. Figure 23 Table 4 – Left Bank of Dipswitches No. Function 1 Gas type 2 3 N/A 4 5 6 7 8 9 10 ON position Propane Natural Gas N/A OFF position Disable Disable N/A (Default) Disable (Default) Allow adjustments of fan motor speed Enable (Similar procedure to changing manifold pressure) FM+, FM++, FM+++ Fan motor for combustion No.5 OFF position ON position No.6 OFF position 0% +6% ON position +12% +18% Fan motor for exhaust (Indoor models only) No.5 OFF position ON position No.6 OFF position 0% +3.6% ON position +7.3% +11.4% INPUT‐ (Maximum gas input is reduced) ‐10% Max Disable Input (Default) Allow access to operation history EEPROM data Disable (Special purpose only) transfer (Default) N/A N/A N/A (Default) Type of water heater model Indoor Outdoor 22| Page Troubleshooting Guide Table 5 – Right Bank of Dipswitches No. Function 1 Change unit of displayed temperature 2 N/A ON position C N/A 3 N/A N/A 4 Activation of Individual operation mode Enable (Default) 7 The number of priority units for Easy‐link systems 8 Deactivation of the freeze protection firing system Two priority units Enable 9 Deactivation of the exhaust temperature control (Special purposes only) Master/Slave setting for Easy‐link systems OFF position F N/A (Default) N/A (Default) Disable 5 6 10 Enable Master One priority unit (Default) Disable (Default) Disable (Default) Slave (Default) DRAINING THE UNIT: 1) 2) 3) 4) 5) Close the manual gas shut off valve. Turn off power to the unit, and then turn on again. Wait 30 seconds, and then turn off power to the unit, yet again. Close the cold water inlet shutoff valve. Open all hot water taps in the house, or open the pressure‐relief valve to remove the initial pressure. When the residual water flow has ceased, close all hot water taps. 6) Unscrew the drain plugs (hot water outlet drain plug and cold water inlet filter) to drain the remainder of water out of the unit. Have a bucket or pan to catch the water from the unit’s drain plugs. Wait a few minutes to ensure all water has completely drained from unit. CLEANING THE FILTER: 1) Drain the unit (procedure above). 2) Check the water filter located within the cold inlet. With a tiny brush, clean the water filter of any debris which may have accumulated and reinsert the filter back into the cold water inlet. Figure 24 23| Page Troubleshooting Guide 3) Securely screw the filter back into place. Hand‐tighten only. CHECKING FOR A CROSS CONNECTION: 1) 2) Turn off cold water supply. Turn on all hot water fixtures. a. The water should eventually completely drain. b. If water continues to run, the fixtures and plumbing system needs to be checked. c. Cold water cross connections may be related to a recirculation pump application, a bad check valve, or missing check valve in the application. CHECK FOR REVERSE CONNECTION: 1) 2) 3) Close cold water supply at the inlet. Open the pressure‐relief valve; it should be installed on the hot side outlet of the unit. If water continues to run through the pressure‐relief valve, the system has a reverse connection. CHECK GAS SUPPLY PRESSURE: 1) Close the manual gas inlet shut off valve on the gas supply line. 2) Open a faucet. The unit should turn on and the gas in the pipe line should purge. Leave the faucet on to keep the unit running until it shuts down due to lack of gas, and then shut the faucet off. Ignore any error codes that may occur at this time. 3) Remove the screw for the pressure port located on the gas inlet shown Figure 25 on the right. 4) Connect a manometer to the pressure port. 5) Slowly re‐open the manual gas valve. Check to see that there are no gas leaks. 6) Open some of the fixtures that use the highest flow rate to turn on the unit. 7) Check the inlet gas pressure. Appropriate pressures are as follows: a. Natural gas: 5 – 10.5 inches W.C. b. Propane: 8 – 14.0 inches W.C. PURGE THE GAS LINE OF AIR: 1) 2) 3) 4) The unit should not be running during this procedure. Turn off power to the unit. Turn the gas valve to the off position (perpendicular to the gas line). Loosen the gas line on the unit side of the gas valve (at a flare fitting or union). Next open the gas valve very slightly until you can smell gas by wafting the air towards your nose. This means any air previously in the gas line has been removed and only gas remains. 5) Turn gas back off and re‐tighten gas line. 6) Turn gas back on and check for leaks. Spray water & dish soap mixture onto fittings. No bubbles means there are no leaks. 24| Page Troubleshooting Guide CHECKING MANIFOLD GAS PRESSURE: 1) Ensure that the unit is not in operation. 2) Remove the screw off the manifold port. 3) Connect a manometer to the manifold port using a tube (Figure 1). Ensure that this connection is secure enough to prevent gas leak. 4) Run water to activate its operation. It is suggested that a large amount of flow is drawn in order to prevent Figure 26 overheating during max burn. If presence of a gas leak is detected, immediately shut off the unit and inspect the tube/manifold connection; otherwise, proceed onto the next step. 5) To check the manifold gas pressure during maximum combustion, press and hold the “MAX” button on the computer board (see Figure 2). To check the manifold pressure during minimum combustion, press and hold the “MIN” button on the computer board. The desired pressures are listed in the specification table at the beginning of this manual. 6) If the manifold pressures do not match up with those listed, adjust the manifold pressure (p. 25). ADJUSTING MANIFOLD PRESSURE: The manifold gas pressure can be adjusted by following the procedures. WARNING Adjusting the manifold pressure can cause unexpected combustion conditions during operation, which can cause a health hazard, damage the 520 (T‐H2) or 320 (T‐H2S), and or shorten its lifespan. Therefore, changing the manifold pressure is not recommended unless there are very strong reasons to do so (e.g. high elevation installations), and with the consultation of the Technical Service Department. MAX button MIN button 1) Set up the manometer by following steps 1 through 4 on the “Checking manifold gas pressure” procedures. 2) Press and hold down the “MIN” button on the computer board. While holding down the “MIN” button, press either the “INCREASE” or “DECREASE” button to increase or decrease the manifold gas Increase button Decrease button pressure, respectively (Figure 2). Refer to Figure 27 the manometer to verify that pressure has been set to desired value. 3) Now press and hold down the “MAX” button on the computer board to change the maximum burn pressure. 4) Repeatedly adjust the minimum and maximum pressures again until both levels are stable and there are no more changes from the previous iteration. 5) After the manifold gas pressure has been set, deactivate the unit (stop all water running through the unit), remove the manometer tube, and replace the port screw. 25| Page Troubleshooting Guide RESETTING THE COMPUTER BOARD: 1) Verify that there is no water flowing through the unit. 2) If a temperature remote controller has been installed, turn the power off to the remote. 3) Turn off power to the unit, and then turn on again. 4) Push and hold the “INC” and “DEC” buttons on the computer board simultaneously for several seconds until the red LED lights up solid. See Figure 5.26. 5) Use the Power ON‐OFF switch to turn the unit off “Increase” button then on again. The computer board is reset. Figure 28 Red light “Decrease” button CHECKING THE OVERHEAT CUTOFF FUSE (OHCF): 1) 2) 3) 4) Locate the white OHCF which wraps around the heat exchanger. Find the white clip at the end of the two blue braided wires coming from the OHCF. Unplug the connection. Test for continuity at the end of the OHCF with an ohmmeter. If there is continuity, the OHCF is still intact. Reconnect the plug. If there is no continuity, the OHCF has been compromised. If compromised, contact the technical service department for further assistance. Figure 29 5) If an ohmmeter is not available, jump the plug connection on the opposite side of the OHCF with a wire, paper clip, or other metal material. 6) Restore power and test unit. Be very cautious with this step, avoiding contact with the jumper device or any other electrical wires. 7) If the unit fires up, it shows that the OHCF has been compromised and the problem was with the OHCF. If so, contact the technical service department for further assistance. If the unit does not fire up, it shows that the cause of the 111 or 121 error code is something else. Continue with the 111 or 121 error code sections of this guide for further troubleshooting. 26| Page Troubleshooting Guide 6. MAINTENANCE Become familiar with the components before attempting these procedures, utilizing the Installation Manual and referencing the component schematic on the last few pages of the manual. Safety is the most important part of this guide. These procedures must be done by a licensed competent technician. A.O. Smith is not liable for the actions of the technician if he/she fails to adhere to any or all safety procedures, specifically in regards to electrical and gas safety. CLEANING THE ROD ASSEMBLY 1) TOOLS ‐ Gather the following materials together: a. Sheet of 100 Grit Sandpaper b. #2 Philips Screw Driver c. Flashlight 2) POWER ‐ Disconnect power to your unit by either unplugging it from the wall outlet, or by the circuit breaker, depending on the setup. The 3‐digit LED on the PCB should not be lit. 3) FRONT COVER ‐ Remove the front cover. It is held on by two screws on the top corners of the tankless unit. 4) ROD ASSEMBLY – a. Locate the black, yellow, and orange wires located in the center of the unit. b. Remove the three Phillips head screws holding the panel in place. c. Pull the assembly out. Caution, all pieces are separate. Be careful to not lose the sight glass. 5) SENSORS – It is important to be very gentle with the sensor rods while cleaning them, as they will easily bend out of place. Their original position relative to the burner needs to be unaltered to function properly. a. Clean the flame sensor with 100 grit sandpaper, thoroughly to a bright finish. b. Clean the air fuel ratio rod with 100 grit sandpaper, thoroughly to a bright finish. 6) REASSEMBLE ‐ Reassemble the unit in reverse order – sight glass, gasket, rods, and metal cover. Key points to remember: a. Connect all 3 wires on front of burner. b. Inspect all of the gaskets. Figure 30 27| Page Troubleshooting Guide CLEANING THE COMBUSTION COMPONENTS Procedure for cleaning the fan, burner, Flame Sensor and AFR, as used by all Service agents. 1) TOOLS ‐ Gather the following materials together: a. A degreaser in a pump action bottle, Sandpaper, Philips Screw Driver, Needle‐Nosed Pliers, Duct Tape, Flashlight, Air Compressor, Shop Vacuum, 3x Towels 2) POWER ‐ Disconnect power to your unit by either unplugging it from the wall outlet, or by the circuit breaker, depending on the setup. The 3‐digit LED display will not be illuminated in standby mode 3) GAS ‐ Shut off the gas supply. 4) FRONT COVER ‐ Remove the front cover. 5) COMPUTER BOARD ‐ a. Remove the three screws, all wire clip connections, and move the computer board out of the way. b. Disconnect the three rods on the front face of the burner: flame sensor (orange wire), AFR (yellow wire) and igniter (black wire) 6) MANIFOLD PLATE/GAS VALVE ASSEMBLY ‐ a. Remove the manifold plate screws. They are wide pan head Philips screws, located on the edges of the stamped metal plate of the gas manifold b. Remove the brass gas valve screw. c. Undo the clip holding the Easy‐Link wires in place. d. Disconnect the clear plastic tube from beneath the combustion chamber e. Gently lift up the manifold & gas valve assembly to dislodge it from the gas inlet. i. Do not lose the small gas filter screen. Computer board: Manifold Plate/Gas Valve Assembly: Figure 31 Figure 32 28| Page Troubleshooting Guide 7) BURNER ASSEMBLY ‐ Now proceed to remove the burner assembly. a. Remove the five wide pan head Philips screws holding the burner to the combustion chamber. There are three at the top of the burner. There are two at the bottom of the burner to the back of the combustion chamber. Refer to Figure 6.4 for the location of these screws. b. Remove the burner. It may be hard to take out, so try the following: i. With pliers, grasp between the oval air vents in the front of the burner on the far left and pull firmly. Repeat on the right vent. ii. Now pull from the center and it should slide out readily. c. Inspect the gasket. (Minor surface tears are allowable. Major separations are not acceptable. Figure 33 8) CLEAN THE BURNER ‐ Use a safe degreaser. a. Protect the burner gasket from direct water pressure. IF the gasket becomes compromised, please contact the technical service department for further assistance. b. Thoroughly saturate the burner with the cleaning solution from the top, down through the slots, as well as the openings in the front of the burner until the burner is soaking wet. c. Let the burner sit for 5 minutes. d. Remove the burner from the solution. Set the burner in a sink in its normal upright position and wash the burner with a high flow of water down into the slots, starting at the back and moving forward. Again, ensure that no contact is made with the gaskets. e. Use compressed air to clear excessive water from the burner after rinsing. Inspect the gasket. (Minor surface tears are allowable. Major separations are not acceptable) 9) FAN ‐ The fan is probably coated with dust as well. a. Place a towel at the bottom of the heat exchanger to cover the square port to the fan. This towel will catch all the dust blown in the next step. b. Use compressed air to blow into the fan. It will rotate and dust will fly out of the fan housing into the towel above. 29| Page Troubleshooting Guide 10) 11) 12) 13) COMBUSTION CHAMBER ‐ Inspect the combustion chamber with a bright flashlight. a. Remove the exhaust venting from top of the unit for the DV model b. Place one towel at the bottom of the combustion chamber, protecting the discharge of the fan (fan port), as well as drape another towel covering the square opening of the combustion chamber (to prevent airborne debris) c. Turn on the shop vacuum and vacuum all of the dirt from the combustion chamber. d. At the same time, with the air compressor, blow air down through the top of the heat exchanger through the vent collar to remove additional contaminants. HEAT EXCHANGER ‐ If there is a white, crusty solid buildup in the heat exchanger, please contact the technical service department for further instruction. SENSORS – a. Clean the flame sensor and AFR with sandpaper, thoroughly to a bright finish. It is important to be very gentle with the sensor rods while cleaning them, as they will easily bend out of place. Their original position relative to the burner needs to be unaltered in order to function properly. REASSEMBLE ‐ Reassemble the unit in reverse order. Key points to remember: a. Inspect all of the gaskets. b. Be aware of the black O‐ring and mesh filter on the gas valve inlet. c. Reconnect the plastic tube from the gas valve to the bottom of the combustion chamber. d. Reattach all components that the manifold screws secure in their places. e. Reconnect all wires to the computer board and any other clips. f. Do not have any screws left over. 30| Page Troubleshooting Guide REPLACING THE HEAT EXCHANGER Contaminated air with a high level of dust, lint, sand, grease, aerosols or other contaminants, can become airborne and enter the air intake. The contaminants build up within the fan and burner assembly causing abnormal flame conditions due to lack of combustion air, damaging many components of the unit. Scale can build up from very hard water. Lime scale will form on the inside of the heat exchanger tubes readily at high temperatures. This scale prohibits heat from reaching the water which causes excessive heat within the heat exchanger copper, and it will eventually burn and leak. Along with changing the heat exchanger, it is important to identify the CAUSE of the need for replacement, and fix the problem so it does not occur again 1) TOOLS ‐ Gather the following materials together: a. Degreaser in a pump action bottle b. Sheet of 100 Grit Sandpaper c. #2 Philips Screw Driver d. Needle‐Nosed Pliers e. Duct Tape f. Flashlight g. Air Compressor h. Old Towels, at Least Three 2) PREPARE THE UNIT a. POWER ‐ Disconnect power to your unit. b. GAS ‐ Shut off the gas supply to the unit. c. WATER – Drain the unit. Refer to p. 23 for instructions. 3) REMOVE PC BOARD, MANIFOLD/GAS ASSEMBLY, BURNER a. Follow steps 1‐7 of the previous section, “Cleaning the Combustion Components”. This will tell you how to remove the PCB, manifold/gas assembly, and burner Figure 34 4) WIRES ‐ There are several wire clips that need to be removed to free the heat exchanger a. On the left side, disconnect the black and white clips with blue wires b. On the right side, disconnect the hot water thermistor black clip and the heating element white and blue clips. 5) FAN a. The fan is held in by two screws. They face the bottom of the heater, and can be reached by two holes in the bottom of the case with a long screwdriver. b. Slide it left to release it from the grooves. 31| Page Troubleshooting Guide 6) SECONDARY HEAT EXCHANGER a. Disconnect the top of the condensate P‐loop hose. Pinch the clamp to remove the hose. b. Remove the two clips from either side of the plastic secondary heat exchanger manifold pipes. c. Remove the seven screws around the perimeter of the heat exchanger, and then slide it out. 7) WATERWAYS a. Disconnect the small drain clip on the left. b. Remove the two clips below the water control Figure 35 valve. Figure 36 Figure 37 8) REMOVE THE HEAT EXCHANGER a. Remove the seven screws from the perimeter of the secondary heat exchanger front plate. Bend the tab on the left to slide the plate out. b. FOR DV MODEL: remove the 5 screws from the back of the combustion chamber connecting it to the exhaust fan air intake. c. The heat exchanger should be free to remove. (NOTE: the water control valve must be removed with the heat exchanger, the clips should already be disconnected) Figure 38 Figure 39 32| Page Troubleshooting Guide 9) REPLACE THE HEAT EXCHANGER COMPONENTS a. Remove and inspect the new heat exchanger making sure it is designed for the correct model and is not damaged at all. b. Install the following items from the old exchanger onto the new one: i. Water control valve ii. Overheat Cutoff Fuse iii. Freeze protection blocks iv. Plastic pressure port v. Hi‐Limit switch vi. Hot water thermistor 10) REASSEMBLE ‐ Reassemble the unit in reverse order. Key points to remember: a. All wires must be reconnected. Keep wires dangling out in front of the unit, never push them toward the back where they are not visible; you will forget about them. b. Inspect all of the gaskets. c. Be aware of the various O‐rings on the gas and water valves, along with the waterway clips. d. Reattach all extra components that the manifold screws secure in their places. e. Do not have any screws left over. 33| Page Troubleshooting Guide CHECKING THE FLOW SENSOR If the tankless unit is properly connected to water, gas, and power supplies but the fan motor does not initiate when water is run through it, the flow sensor is most likely not working properly and not telling the PC Board to initiate. 1) TOOLS ‐ Gather the following materials together: a. Degreaser in a pump action bottle b. #2 Philips Screw Driver c. Flashlight d. Old Towels, at least three Flow sensor Clips 2) PREPARE THE UNIT ‐ Drain the unit by following the procedures on p. 22. 3) FRONT COVER ‐ Remove the front cover of the unit. It is held on by three screws on the top corners and bottom center. 4) DISCONNECT FROM WATERWAY a. The flow sensor is located below the water control valve, on the front leg. b. Remove the waterway clips below and above the flow sensor by pushing on the tabs to pop them off, one on each side of the flow sensor. Figure 40 5) CHECKING THE FLOW SENSOR a. Check for functionality. Flow rate is determined by an impeller that spins as fluid runs through it. b. Blow into the inlet of the flow sensor. Listen for the spinning impeller; it should spin freely for a few seconds. If it comes to rest abruptly or doesn’t spin at all, it needs to be cleaned or replaced. c. Place the flow sensor into a container of lemon juice or another degreaser for 30 minutes and check the spinning capability again. d. Test the cleaned flow sensor by “jumping” the system: i. Reattach the flow sensor wires. ii. Turn power back on to the unit. (GAS SHOULD STILL BE OFF) iii. Blow into the flow sensor; if the fan initiates, the flow sensor successfully read the airflow and should now work properly. 6) REASSEMBLE ‐ Reassemble the unit in reverse order. Ensure that the O‐rings and waterway clips are all in place. 34| Page Troubleshooting Guide DESCALING THE UNIT Hard water is a severe problem for the copper coils inside heat exchangers. Heat exchanger failure due to scale buildup from hard water conditions is NOT covered by warranty. It is highly suggested that a scale inhibitor be installed before the cold water inlet after this procedure is done. 1) TOOLS ‐ Gather the following materials together: a. Pump: The pump should provide a minimum of 1GPM through the heater b. Cleaning Solution: Food grade citric acid, food grade phosphorus acid c. Water hoses d. Bucket 2) SETUP ‐ Disconnect power to the unit 3) WATERLINES – Assumes isolation valves with drain ports are installed a. Isolate the unit by closing the incoming/outgoing water isolation valves C and D. b. Connect hoses/pump to the drain ports of the isolation valves: Outlet of the pump to valve B, and another hose from Valve A to the bucket. 4) PUMP – a. Fill the bucket with 5 gallons of diluted solution. Dilution ratio depends on the cleaning solution used. b. Place the pump into the bucket if it is submersible, or use an inlet hose into the bucket Figure 41 if it is not submersible. 5) DESCALE a. Open valves A and B. b. Circulate descaling solution through the unit for 45 minutes. 6) CLEANSE THE SYSTEM – Flush the chemicals out of the heat exchanger with fresh water. a. Close valve A and B. b. Open valve D and run fresh water through the PRV for 15 minutes. c. Clean the filter after flushing the unit with fresh water. d. Once the unit is flushed and cleansed, close A and B, open C and D, and reconnect power to the unit. 321922‐000 35| Page