1
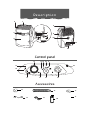
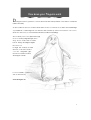
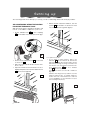
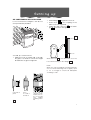
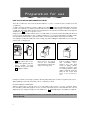
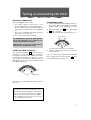
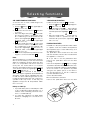
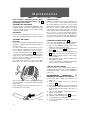
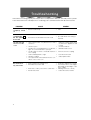
PA C 5 0
Use and maintenance manual
D
ear Customer,
Thank you for having purchased an appliance made by De’
Longhi, the international leader in portable air conditioning
units. Thanks to our years of experience all around the world
we are constantly improving the quality and performance
of Pinguino. We are confident that you will be satisfied with
your purchase and enjoy the cool comfort created by the
Pinguino for many years to come. You should spend some
time reading this instruction manual and keep it handy to
refer to in order to use your Pinguino efficiently.
2
De s c r i p t i o n
2
1
8
7
3
9
6
10
4
5
12
11
Control panel
16
18 19 20 21
24
13
14
15
17
22
23
Accessoires
25
26
28
29
27
31
30
I m p o r t a n t s a f e g u a rd s
• Use this appliance only as described in this instruction manual.
As with any electrical appliance, whilst the instructions aim to cover as
many eventualities as possible caution and common sense should be
applied when operating and installing this air conditioner.
• This appliance has been manufactured to cool and de-humidify
domestic environments and should not be used for other purposes.
• It is dangerous to alter or modify the unit's characteristics in any way.
• The appliance must be installed in line with the relevant national legislation.
• Should repairs be necessary, contact the nearest authorised Repair
Service Centre. Unauthorised servicing can be dangerous.
• This appliance is to be used by adults only; keep away from children.
• In the case that the power cable becomes damaged, this must be substituted only by specialised personnel authorised by the manufacturer.
• Always ensure the appliance is earthed. If you have any doubts check
with a qualified electrician.
• Avoid using extension leads with the unit.
• Before cleaning or maintenance operations, always unplug the unit
from the socket.
• Do not pull on or place strain on the power cable when moving the
appliance.
• The appliance should not be installed where the atmosphere may
contain combustible gases, oil or sulphur, or near heat sources.
• Do not rest hot or heavy objects onto the appliance.
• Remember to perform the descaling procedure at the end of each
season (see page 13). In areas where the water is particularly hard
(rich in minerals), the use of a commercial anti-lime product added to
the water is recommended. This can be requested from De’Longhi
LTD.
• Clean the filters at least once a week.
• Avoid using heaters near the unit.
• The unit should be transported in a vertical position. If this is not
possible secure the unit at an angle, do not lie horizontally.
• Before transporting the unit drain the condensation collecting-tray
and tank. After transportation, wait at least 1 hour before switching on
the unit.
• The packaging materials can be recycled. You are therefore recommended to place them in the special containers for differentiated
waste collection.
4
How does your Pinguino work
D
uring the summer, optimum comfort is achieved with a temperature of around 24 °C and 50%
relative humidity.
An air conditioner removes moisture and heat from the room where it is located. One advantage
of portable air conditioning units over fitted models is that they can be moved from one room to
another in the home or even transferred between different buildings.
The hot air in your room is passed through
a coil cooled by refrigerant gas, removing excess heat and moisture
before being discharged again
into the room.
In single unit models, a small
amount of this air is used to
cool the refrigerant gas,
then the hot and moist air is
discharged outside.
For more details, contact or
visit our Internet site
www.delonghi.com
5
Setting up
The following instructions will help you set up your air conditioning unit as efficiently as possible.
AIR CONDITIONING WITHOUT INSTALLATION
FOR INSTANT TEMPORARY USAGE
With just a few simple operations, Pinguino will
restore comfortable conditions in your room:
• With a double casement window, use the
suckers 28 provided to hold the two halves of the window together (fig. C).
• Fix the exhaust hose 26 to the coupling
10 on the back of the unit as shown in figure A.
1
2
C
A
For optimum results:
• Fix the window attachment 27 to the end
of the hose 26 .
• Place the unit near a window French window or door.
• Open the window, French window or door
slightly and place the window attachment
27 as shown in figure B.
B
• If you have a sash window, place the
bracket 31 on the window sill, extend the
bracket fully within the window frame, fix the
bracket by turning the wing nut and lower
the window onto the bracket. Insert the window attachment 27 of the exhaust
hose 26 into the slot,
then connect the hose to the air conditioner
(fig. C1).
Thanks to the wing nut, it’s possible to use the
window bracket also for sliding windows.
Position the hole of the bracket so to allow a
correct installation of the exhaust hose (see
the following instructions).
C1
6
Setting up
AIR CONDITIONING WITH INSTALLATION
For more efficient use Pinguino can also be
semi-permanently installed
30 cm
• Fit the flange 25 supplied to the hole.
• Fix the hose 26 to the coupling on the
back of the unit (figure A).
• Attach the end of the hose 26 to the flange 25 as shown in the figure E.
E
MAX 120 cm
30 cm
MIN 30 cm
To install, proceed as follows:
• Make a hole in a outside wall or through
the glass of a window. Check the height
and dimensions given in figure D
When the hose 26 is not attached, close the
hole with the bung on the flange 25 .
106
NOTE:
When the unit is installed semi-permanently,
we recommend leaving a door slightly open
(1 cm is enough) to ensure an adequate
exchange of air.
in a window
pane
D
in the
wood sill of
a window
in the wall: for
optimum results,
insulate the section of the wall
with
suitable
insulating material.
7
Pre p a ra t i o n f o r u s e
HOW TO USE THE AIRCONDITIONER WITH WATER
These air conditioners can use both air and water to cool the condenser (the hot part) of the air
conditioner.
To utilise the full potential of your air conditioner, the tank 6 needs to be filled with water. The water
is used. To increase the cooling power and reduce the noise level and energy consumption of the air
conditioner. The water that is used in then expelled from the machine as water vapour through the
exhaust hose 26 (it does not go into room).
Always use clean top water (which doesn’t contain salts). As a rule the water will usually last about 8
hours however this depends on the conditions within the room, such as temperature, humidity, insulation and aspect and number of people. In turbo mode the water will also be used more quickly.
You may also use the airconditioner on air cooling only (without filling the water tank . If you only require the lower cooling power.
2
A) To open the front panel
3 grip either side of the
panel and gently pull the
panel towards you and
upwards. Remove the tank
6 Lifting it forward.
B) Turn the tank upside down
and remove the plug,
remove the extendible
tube and fill the tank, leaving it on the ground.
C) After completing the filling procedure, replace
the
extendible
hose,
replace the cap and
screw it in tightly. Return
the tank to its place, with
the writing FRONT clearly
visible. Carefully hold the
panel in the centre and
lower to its closed position.
During the "water functioning" operation and in particularly silent locations (eg the bedroom) a
slight gurgling sound may be heard. This is completely normal.
IN HIGH HUMIDITY CONDITIONS
Water is extracted from the air in the room, this water is also used to cool the condenser. When
the humidity is particulary high an excess of water may buid up in the internal tank. This can be
drained by removing the bung from the drain hose 11 and draining into a suitable receptacle.
IMPORTANT: if the room temperature is 32°C or over the airconditioner must be operated with with
water in the tank.
8
Turning on and setting the timer
ELECTRICAL CONNECTION
Before plugging in check that:
• the mains supply corresponds to the
power supply shown on the rating plate;
• the socket and the mains lead correspond
to the power requirements of the appliance;
• the socket is suited to the plug, otherwise
have the socket replaced;
• the socket is properly grounded.
The manufactures cannot be held responsible for any damages due to failure in following normal safety procedures.
SETTING THE TIMER (if supplied)
The programmer/timer 16 , like all clocks,
must be set to the exact time. If for example
it is 4.00 pm. (16.00), turn the dial in a clockwise direction (following the direction of the
arrow) until the number 16 is lined up with the
triangular pointer (the arrows indicates 4:00
P.M. approximately ).
21
20
1) Set the operating times by pushing out the notches on the dial corresponding to the period
required (each notch represents 15 mins.)
2) Press the TIMER key 15 , the signal light
17 will come ON.
3) Make sure that the timer indicates the coroperating
time
Funzionamento
21
20
19
16
Replacement of the power cable must be
carried out by qualified personnel.
PROGRAMMED MODE
rect time (see instructions on setting).
4) Select the desired function as shown in the
chart overleaf.
N.B.: To override the programmed operating
times, simply press the ON/OFF key 15 (the
timer signal lamp ON will go out)
19
16
pointer
N.B.: Never turn the dial in an anti-clockwise
direction!
The timer is in effect, an electric clock
and works only if the plug is connected to
the power supply. Whenever the plug is
disconnected or there is a power failure,
the programmer stops (the clock is then
“slow”) and must be re-set.
9
Selecting functions
AIR CONDITIONING FUNCTIONS
VENTILATION/FILTRATION
To turn the unit on in air conditioning mode,
proceed as follows:
Rotate the function selector 22 clockwise.
1. Press the
button 14 (the signal light “I”
13 will come on).
2. Rotate the function selector 22 dial anticlockwise:
• Place the large star symbol
in line with
the reference mark to operate the unit in
air conditioning mode at maximum fan
speed (the signal light 24 will come on,
and then, after 3 minutes the signal light
18 will come on ).
• Place the small star symbol
in line with
the reference mark to operate the unit in
air conditioning mode at minimum fan
speed (the signal light 24 will come on,
and then, after 3 minutes the signal light
19 will come on ).
3. Now set the required temperature by rotating the room thermostat dial 23 .
Note
The temperature is not expressed in degrees.
We recommend that you turn the thermostat
dial to the maximum position. When the desired room temperature has been reached,
slowly turn the thermostat in a clockwise
direction until it arrives at the position where a
click can be heard. The signal lights 24 and
18 (or 19 ) will turn off.
The temperature selected in this way will
automatically be regulated and maintained,
and save energy. When regulating the thermostat, the air conditioning function is temporarily interrupted and the unit continues to
operate in fan only mode. In this way, the
appliance keeps the air temperature within
the room even.
Delay on Start Up
1. A special safety device will delay the start
of air conditionig by approximately 3 to 5
minutes when switching between functions or on initial start up.
2. You may also experience a slight delay
between changing from one function to
another.
10
• Press the
button 14 (the signal light “I”
13 will come on).
• Place the large symbol
in line with the
reference mark to operate the unit at maximum fan speed. (the signal light 21 will come
on).
• Place the small symbol
in line with the
reference mark to operate the unit at
minimum fan speed. (the signal light 20
will come on).
PURIFICATION FILTER
In addition to dust, this purification filter is able
to capture even the smallest sized particles
and impurities (up to 0.003 millimetres), such
as cigarette smoke.
The purification filter should never be used
with the dust filter, which is also included with
the appliance. Therefore:
A. If you wish to use the purification filter:
Remove the purification filter from the filter
housing;
Remove the aspiration grill 8 (fig. G on page
12) and the dust filter which is attached to this.
Remove the purification filter from its packaging.
Anchor the filter to the appliance by attaching the two plastic pieces on the filter to
the special supports on the air conditioner
(see the illustration below).
Set the dust filter aside.
B. If the dust filter is sufficient:
Remove the purification filter from the filter
Recommendations
RECOMMENDATIONS
Follow these recommendations to achieve
maximum efficiency from your air conditioning unit:
• Make sure there are no heat sources in the
room.
• Do not use outdoors.
• Close the doors and windows in the room
where the unit is functioning. The only
exception is in the case of installation through a hole in the wall or window. In this case,
you are recommended to allow a small
amount of air to enter through a door or
window to guarantee an adequate
exchange of air.
close doors and windows
window to guarantee an adequate
exchange of air.
• Protect the room from direct exposure to
the sun’s rays by drawing the curtains
and/or partially lowering the blinds so as
to maximise energy savings.
• Do not rest objects on the air conditioning
unit.
• Do not obstruct the air intake 8 or outlet
2
.
lower the blinds or draw the curtains
do not cover
• Make sure the unit is located on a level
floor. If necessary, place the two blocking
devices 29 under the front wheels .
11
Maintenance
Before cleaning or maintaining the unit, always
turn the unit off by releasing the button
14
and unplug from the mains .
CLEANING THE APPLIANCE
We recommend cleaning the appliance with
a slightly damp cloth then drying with a dry
cloth. For safety reasons, do not wash the air
conditioner with water.
Precautions
Never clean with benzene, alcohol or solvents. Never spray liquid insecticide or similar.
CLEANING THE FILTERS
Dust filter
Purification filter
Clean the external side of the purification filter once a week. Use a vacuum cleaner at
an intermediate power level. Never clean
the inside of the filter. Replace the purification
filter at the end of each season or in any
case, when it is no longer effective. The purification filter can be purchased in the store as
an accessory or at an Authorised Service
Centre as a replacement part. Alternatively,
the dust filter included with the appliance
may be used in place of the purification filter.
CLEANING THE RESORVOIR
All of the models are equipped with a dust filter able to capture the dust particles suspended in the air.
In order to maintain the effectiveness of your
air conditioner unaltered over time, remember to clean the dust filter every two weeks.
1. Remove the aspiration grill 8 , (see fig. F);
2. Remove the filter holder housing by detaching it from the external grill. To detach it,
press on the two wings found on the side of
the filter holder (see fig. G)
Use a vacuum cleaner to remove the dust
deposits on the filter. If the filter is very dirty,
5
It is recommended that you clean this at least
once a month using the following method:
• turn off the appliance and remove the
plug from the electrical outlet.
• open the front panel 4 and remove the
tank 6 .
• remove the bung from the drainage hose
11 which can be found at the back the
air conditioner and empty out the water
to a container.
• after draining off the water, replace the
drainage hose plug.
• remove the dirt by scrubbing gently with a
cloth where the tank is positioned.
START OF SEASON CHECKS
Check that the power cable and socket are
undamaged and that the earth installation is
efficient. Carefully observe the installation
2
1
instructions.
fig. F
immerse it in warm water, rinsing it thoroughly.
The temperature of the water should be kept
under 40°C.
After washing it, let the filter dry before reinserting it into the holder.
fig. G
12
RECOMMENDED
OPERATIONS
TO
PERFORM AT THE END OF THE SEASON
1) Proceed with scaling procedures (see
page 13).
2) Remove the water from the collection
reservoir 5 .
3) Operate the appliance in the ventilation
only mode for about half an hour in order
to thoroughly dry the inside of the air conditioner.
4) Turn off the appliance and remove the
plug from the outlet.
5) Remove the drainage hose 26 .
6) Clean the filter and dry it thoroughly before replacing it in the appliance.
7) Cover the appliance so that dust does
not build up.
De s c a l i n g
When the scale deposits become excessive
(on average, after about 400 hours of operation) or in any case, at least once each season, it is very important to proceed with the
decalcification of the appliance as described
below.
To remove the scale from the appliance, you
need:
• 250 ml of descaling liquid
30
• 750 ml of clean water
(corresponding to a diluted solution of 75%)
fig. H
Proceed as follows:
1) Remove the tank 6 from the appliance
and drain the water remaining in the collection reservoir 5 by using the drainage hose 11 (fig. H).
2) Close the drainage hose 11 . Pour 250 ml
of decalcifying liquid and 1 litre of clean
fig. I
water into the collection reservoir 5
which is found under the tank (fig. I), on
the bottom of the appliance.
3) Operate the air conditioner for about half
an hour.
4) After this, drain out all of the liquid remaining in the collection reservoir and rinse
thoroughly. During the rinsing process, the
drainage hose must be open and the
appliance functioning.
5) Unplug the appliance from the mains and
clean the collection reservoir thoroughly
with a clean cloth.
6) After cleaning the collection reservoir, the
air conditioner can be used normally.
IF TRACES OF SUDS CAN BE SEEN IN THE WATER WHEN THE MACHINE IS USED AGAIN AFTER IT HAS
BEEN CLEANED AS DESCRIBED ABOVE, THIS IS NORMAL HOWEVER, IF THERE ARE A LOT OF SUDS
RINSE THE APPLIANCE AGAIN THOROUGHLY TO REMOVE ALL TRACES OF CLEANING PRODUCT.
REQUEST ADDITIONAL QUANTITIES OF DECALCIFYING LIQUID FROM DE' LONGHI LTD.
ATTENTION:
The use of products other than De' Longhi could cause damage to the internal components of the
appliance and invalidate the terms of the warranty.
13
Troubleshooting
If the unit is not working properly, this may be due to small problems that you can easily resolve yourself.
Follow these instructions carefully before contacting your local Authorised Technical Service Centre.
PROBLEM
CAUSE
The air conditioner is •
completely turned •
off
the air conditioner is
on (signal light 13 )
•
but the appliance
doesn't start
The unit works but
does not cool the
room
•
•
plug in
wait
The teeth of the timer are in the rest mode
•
proceed with a new setting of
the timer
three minutes have not passed since it was •
turned on
•
•
windows open
a heat source is operating in the room (burner,
light, etc.) or there are a lot of people
the air outlet hose has come detached from
the coupling
thermostat adjusted too high
air filters clogged
the output of the unit is insufficient for the conditions or size of the room
•
•
•
14
it is not plugged in
there is no electricity
•
•
The unit works for
only a short time
REMEDY
•
•
wait three minutes (safety device) before the appliance start
cooling.
close the windows
eliminate heat sources
•
fit the hose in the coupling
•
•
lower the thermostat
clean/replace filters
•
•
there is a kink in the exsaust hose
the exsaust hose is blocked
•
•
•
•
there are too many curves in the outlet tube
the fan is blocked
•
•
position the exaust hose correctly
check there are no blockages
preventing the discharge of air
to the outside
rearrange the hose correctly
contact the Service Centre
Technical specification
TECHNICAL SPECIFICATION
Power supply
see rating plate
Max. absorbed power
in air conditioning
“
Refrigerating capacity
“
Refrigerant
“
Number of fan speeds
Max. air flow .
RECOMMENDED OPERATING CONDITIONS
Room temperature
21 ÷ 32°C
Dimensions:
• width
• height
• depth
2
3
370 m /h
580 mm
785 mm
435 mm
This appliance contains substances which, if released into the atmosphere, would damage the
ozone layer. Care should therefore be taken not to perforate the refrigerant circuit. At the end of
its working life, delivery the air conditioning unit to a special collection centre.
15
De
Via
Longhi
L.
31100
tel.
fax
S.p.A.
Seitz,
Tre v i s o
47
Italia
+39/04224131
+39/0422413647
w w w. d e l o n g h i . i t
5751005800/06.01