1
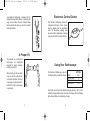
91-032-400 Instruction Manual
8/30/07
8:36 AM
Page 1
Table of Contents
Three-Year Warranty . . . . . . . . . . . . . . . . . . . . . . . . . . . . . . . . . . . . . . 1
Introduction . . . . . . . . . . . . . . . . . . . . . . . . . . . . . . . . . . . . . . . . . . . . 2-3
A Proper Fit . . . . . . . . . . . . . . . . . . . . . . . . . . . . . . . . . . . . . . . . . . . . . 3
Electronic Control Center . . . . . . . . . . . . . . . . . . . . . . . . . . . . . . . . . . 4
Using Your Stethoscope . . . . . . . . . . . . . . . . . . . . . . . . . . . . . . . . . . 4-8
Powering Up . . . . . . . . . . . . . . . . . . . . . . . . . . . . . . . . . . . . . . . . . . 5
Changing Modes . . . . . . . . . . . . . . . . . . . . . . . . . . . . . . . . . . . . . .5
Changing Volume . . . . . . . . . . . . . . . . . . . . . . . . . . . . . . . . . . . . .6
Auto Shut Off . . . . . . . . . . . . . . . .
. . . . . . . . . . . . . . . . . . . . . . .6-7
Powering Off . . . . . . . . . . . . . . . . . . . . . . . . . . . . . . . . . . . . . . . . .7
Memory Feature . . . . . . . . . . . . . . . . . . . . . . . . . . . . . . . . . . . . . . . 8
Replacing the Batteries . . . . . . . . . . . . . . . . . . . . . . . . . . . . . . . . . . . . 9
Replacing the Diaphragm . . . . . . . . . . . . . . . . . . . . . . . . . . . . . . . . . 10
Replacing the Eartips . . . . . . . . . . . . . . . . . . . . . . . . . . . . . . . . . . . . .11
ID Name Tag . . . . . . . . . . . . . . . . . . . . . . . . . . . . . . . . . . . . . . . . . . . 11
Care, Cleaning and Maintenance . . . . . . . . . . . . . . . . . . . . . . . . . . . 12
Troubleshooting . . . . . . . . . . . . . . . . . . . . . . . . . . . . . . . . . . . . . . . . . 13
Specifications . . . . . . . . . . . . . . . . . . . . . . . . . . . . . . . . . . . . . . . . . . . 14
91-032-400 Instruction Manual
8/30/07
8:36 AM
Page 3
Thank you for purchasing a MABIS Signature Electronic Stethoscope. Please
carefully read the operating and cleaning instructions to ensure that your new
stethoscope will provide years of durability and reliable performance.
Three-Year Limited Warranty
This MABIS Stethoscope is guaranteed to be free from manufacturing defects
for a period of three years from the date of purchase under normal use.
MABIS Healthcare determines that the unit failed to operate due to a manufacturing
defect, the unit will be repaired or replaced at
the option of MABIS Healthcare. Repair or replacement of the unit is the sole
remedy under this limited warranty. This warranty gives you specific legal
rights, which vary from state to state. As a condition of this warranty, the
enclosed warranty registration card must be completed and sent to us within
10 days of the purchase date.
This Limited Warranty constitutes MABIS Healthcare’s only responsibility and
obligation to repair and/or replace materials or components. We make no other
express or implied warranties, arising by operation of law or otherwise, or any
warranty of merchantability or fitness for a particular use or purpose whether
or not the use or purpose has been disclosed to MABIS Healthcare in specifications, drawings or otherwise, and whether or not MABIS Healthcare’s products are specifically designed and/or manufactured by MABIS Healthcare for
the buyer’s use or purposes, except for the limited warranty stated above.
MABIS will not be responsible for any indirect, incidental, special, consequential, or punitive damages or other loss, including, but not limited to, damage to
or loss of other property or equipment and personal injuries, whether to purchaser or others. MABIS shall in no event be liable to the purchaser for any
amount in excess of the cost of repair and/or replacement of the unit.
Your MABIS Signature Electronic Stethoscope offers state-of-the-art technology with volume amplification and sound filtering systems. Sounds that are
typically difficult to identify in standard stethoscopes can easily be heard.
Your Electronic Stethoscope is equipped with a built-in computer chip. Through
this chip, aphonic and resonance effects are eliminated. Audio frequency is
divided into three modes: Standard Bell, Diaphragm and Extended
Diaphragm. Additionally, the electronic amplifying system adjusts for eight different volumes.
The illustration below identifies the key parts to your Electronic Stethoscope.
Binaurals
Chestpiece
Diaphragm
Binaural Slider Button
Tubing
Binaural Slider Sleeve
Electronic
Control
Center
Mode Selection
1
Volume Control
2
91-032-400 Instruction Manual
8/30/07
8:36 AM
Your Electronic Stethoscope is designed with an
adjustable Binaural Slider Sleeve for controlling the
angle of the binaural. Press the Binaural Slider
Button and slide the sleeve up or down for comfort
and proper position.
Page 5
Electronic Control Center
Your Electronic Stethoscope features an
independent Electronic Control Center,
which is separate from the auscultation
head. This diminishes operating noise
caused by button manipulation, creating a
more precise method of sound collection.
A Proper Fit
The binaurals on your Electronic
Stethoscope are anatomically
designed for superior acoustics,
reliability and comfort.
Using Your Stethoscope
Your Electronic Stethoscope is set with
the following factory-set default settings:
When inserting into the ear canals,
make sure that the eartips are facing forward. In addition, the binaural end caps are embossed with “L”
(left) and “R” (right) to ensure proper positioning.
Mode
Volume Level
Memory Function
Auto-Shut Off
SETTING
Bell
4
ON
ON
At any time you can return to the default settings by pressing “-” and “+” simultaneously for approximately three (3) seconds. The Orange, Green and Yellow
lights will each flash once indicating the change.
3
4
91-032-400 Instruction Manual
8/30/07
8:36 AM
Page 7
Using Your Stethoscope
CHANGING VOLUME
POWERING UP
To turn the Electronic Stethoscope on:
1. Press the “+” button located at the bottom of the Control Center.
2. The green and orange lights will flash three (3) times.
3. The Mode and Volume level will be set at the setting previously used prior
to the Electronic Stethoscope being turned off.
CHANGING MODES
Frequency Modes are identified by the following lights:
Yellow
Orange
Green
Extended Range
Bell
Diaphragm
To change Modes:
1. Press the “M” button to select the next frequency mode.
2. Modes will change sequence as follows:
Eight (8) volume levels can be selected in each Mode.
Press the “+” button to raise volume level.
Press the “-” button to lower the volume level.
1. While in the Bell (Orange) Mode, the orange light will flash once to
indicate a change in the volume level.
2. While in the Diaphragm (Green) Mode, the green light will flash once to
indicate a change in the volume level.
3. While in the Extended (Yellow) Mode, the yellow light will flash once to
indicate a change in the volume level.
4. Adjust the volume to minimum (1) or maximum (8) by sound.
FUNCTION
BUTTON
PRESS BUTTON
VOLUME LEVELS
FLASHES
ADJUST
VOLUME
“+” or “-”
ONCE
1-8
MODE LIGHT
FLASHES
ONCE
Yellow Õ Green Õ Orange Õ Yellow
FUNCTION
BUTTON
PRESS
BUTTON
MODE change
“M”
Once
AUTO SHUT OFF
DISPLAY
FLASHES
Mode light
Yellow Õ Green Õ Orange Õ Yellow changes in
sequence
5
To extend the battery life, your Electronic Stethoscope comes with an auto-off
function that will automatically turn the unit off after approximately 100 seconds after the last keyed operation.
To deactivate this feature, press the “-” and “M” button simultaneously for
approximately three (3) seconds. The Yellow and Orange lights will flash three
(3) times to indicate that the auto-off feature has been disabled.
6
91-032-400 Instruction Manual
8/30/07
8:36 AM
Page 9
AUTO SHUT OFF (continued)
MEMORY FEATURE
The Electronic Stethoscope can be powered off by pressing the “M” button for
approximately three (3) seconds; however, it is recommended that you enable
the auto-off function prior to storing. To reactivate this feature, press the “-” and
“M” buttons simultaneously for approximately three (3) seconds. The Yellow
and Orange lights will flash twice to indicate that the auto-off feature has been
reactivated.
Your Electronic Stethoscope will automatically start in the most recently used
sound mode and volume level when it is turned on.
FUNCTION
BUTTON
Deactivate Auto
Shut Off
“-” and “M”
PRESS
BUTTON
YELLOW LIGHT
(EXTENDED
MODE)
ORANGE
LIGHT
(BELL MODE)
W
W
Approximately
3 seconds
To deactivate this feature, press the “+” and “M” buttons simultaneously for
approximately three (3) seconds. The Yellow and Green lights will flash three
(3) times to indicate that the memory feature has been disabled. Your
stethoscope will return to the factory default settings when you restart it.
GREEN LIGHT
(DIAPHRAGM
MODE)
Mode
Volume Level
Memory Function
Auto-Shut Off
Flashes 3 times consecutively
Reactivate Auto
Shut Off
“-” and “M”
W
Approximately
3 seconds
W
To restore the auto memory feature, press the “+” and “M” buttons
simultaneously for over three (3) seconds. The Yellow and Green lights will
flash two (2) times.
Flashes 2 times consecutively
FUNCTION
BUTTON
PRESS
BUTTON
Deactivate
Memory
“+” and “M”
Approximately
3 seconds
POWER OFF
Press the “M” button for approximately 3 seconds to turn the stethoscope off.
FUNCTION
BUTTON
PRESS
BUTTON
Power Off
“M”
Approximately
3 seconds
YELLOW LIGHT
ORANGE LIGHT
(EXTENDED
(BELL MODE)
MODE
W
W
SETTING
Bell
4
ON
ON
YELLOW LIGHT
(EXTENDED
MODE)
W
GREEN LIGHT
(DIAPHRAGM
MODE)
W
ORANGE
LIGHT
(BELL MODE)
GREEN LIGHT
(DIAPHRAGM
MODE)
W
Flashes 3 times consecutively
Reactivate
Memory
“+” and “M”
W
Approximately
3 seconds
W
Flashes 2 times consecutively
7
8
91-032-400 Instruction Manual
8/30/07
8:36 AM
Page 11
Replacing the Batteries
Replacing the Diaphragm
The batteries need to be replaced when the Yellow and Orange lights remain
illuminated when the Electronic Stethoscope is turned on. Replace the batteries with three (3) LR44 batteries or equivalent.
Under normal conditions, it is not necessary to remove the rim and diaphragm
for cleaning since the diaphragm can easily be cleaned with an isopropyl alcohol wipe. If, however, it is necessary to remove the rim and diaphragm, carefully follow these instructions:
To replace the batteries in your
Electronic Stethoscope:
1. Slide the battery cover away from
the chestpiece.
2. Remove the three (3) batteries
and properly dispose.
3. Insert three (3) new batteries with
the positive (+) side facing up.
4. Carefully slide the battery cap
into place.
Rim and Diaphragm Removal:
1. Using the palm of your hand, gently press down on the rim.
2. Twist the rim counterclockwise to remove both the rim and the diaphragm
(See diagram below).
Cleaning the Rim and Diaphragm:
1. Remove the diaphragm from the ring. The diaphragm can be cleaned with
mild soapy water or isopropyl alcohol.
2. Carefully wipe down the chestpiece with isopropyl alcohol, making sure
not to saturate the chestpiece. Excess moisture will damage the electrical
components inside the chestpiece and void your warranty.
NOTE: We recommend that you
remove the batteries if the Electronic
Stethoscope will not be used for an
extended period of time.
FUNCTION
Low
battery
YELLOW LIGHT
(EXTENDED
MODE)
ORANGE LIGHT
(BELL MODE)
W
W
GREEN LIGHT
(DIAPHRAGM
MODE)
FLASHES
3 times
9
Rim and Diaphragm
Reassembly:
1. Once the rim and
diaphragm are completely
dry, place the diaphragm
into the inside of the rim.
2. Position the rim and
diaphragm onto the
chestpiece. Twist the rim
clockwise to reattach it to
the chestpiece.
10
91-032-400 Instruction Manual
8/30/07
8:36 AM
Page 13
Replacing the Eartips
An extra pair of eartips are provided with your
Electronic Stethoscope. To replace eartips,
unscrew the tips and replace with the alternative pair.
Care, Cleaning and Maintenance
Note: Failure to follow these recommendations may result in reliability problems, cause damage to the internal components of your Electronic
Stethoscope and void your warranty. Internal damage may cause malfunction ranging from a slight decrease in auditory response to complete failure
of the Electronic Stethoscope.
• To extend the life of your Electronic Stethoscope, avoid extreme changes
in temperature, solvents and oils.
ID Name Tag
Your Electronic Stethoscope features a specially designed ID tag on the backside of the
Control Box. This offers the opportunity to
personalize your Electronic Stethoscope.
• Eartips, binaurals, plastic tubing, control box and chestpiece can be
cleaned with a soft cloth and isopropyl alcohol.
• Do not immerse your Stethoscope into any liquid or use high thermal
sterilization processes.
• Eartips should be removed for a more thorough cleaning.
• Use only LR44 batteries or equivalent.
• Do not disassemble or attempt to repair the Electronic Stethoscope.
• Recommended storage temperature conditions are -4°F - 140°F
(-20°C - 60°C) and 15% to 95% relative humidity.
• Recommended usage temperature conditions are -5°F - 60°F
(-21°C - 16°C) and 20% to 95% relative humidity.
11
12
91-032-400 Instruction Manual
8/30/07
8:36 AM
Page 15
Troubleshooting
CONDITION
Will not switch on.
Specifications
POSSIBLE
CAUSE
CORRECTIVE
ACTION
Dead batteries or
improperly installed
batteries.
Check batteries.
Replace all three (3)
batteries if necessary.
Name
and Model
Sound Amplifier
Storage Temperature
Latex-Free
Eartips
Dimensions
MABIS® Signature Electronic Stethoscope,
10-400-020
3 dB ±2% of each volume level
-4°F - 140°F (-20°C - 60°C) and
15% to 95% relative humidity
23°F - 140°F (-5°C - 60°C) and
20% to 95% relative humidity
This product does not contain any latex ingredients
Two pairs of screw-on plastic eartips are included
22” Y-tubing
Batteries
(3) LR44 or equivalent
Usage Temperature
Will not change modes.
Batteries are weak.
Replace all three (3)
batteries.
Device is ON, but
cannot hear sounds.
The volume may be set
too low.
Increase the volume
using the “+” button.
High background noise
The volume setting
may be too high.
Reduce the volume
using the “-” button.
It is difficult to hear
sounds.
Volume is set too low.
The stethoscope is set
in the wrong Mode.
Use the “+” button
to increase the volume.
Use the “M” button to
change the Mode.
The MABIS Signature Electronic Stethoscope meets the norms:
EN IEC 60601-01, EN EC 60601-1-2 (EMC), and EN IEC 60601-1-4
Production certified ISO9002/EN460002.ISO13488
13
The MABIS Signature Electronic Stethoscope is a medical appliance of class
CL 1 and complies with the relevant norms of the guideline MDD93/42/EEC.
Specifications subject to change without notice.
#91-032-400 08/07
©2007 MABIS Healthcare
14