1
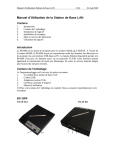
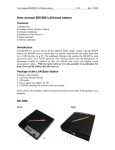
MULTILOGGER WIFI RECEIVER BS-1200 MANUAL BS-1200 WIFI © AREXX - HOLLAND V0613 -1- Table of Contents 1. Product description BS-1200 5 2. Hardware6 3. First network connection 7 4. BS-1200 webserver 10 APENDIX A. Firmware upgrade 21 B. Battery replacement21 C. Safety regulations22 AREXX and BS1200 multilogger are registered trademarks of AREXX Engineering - HOLLAND. © English translation (March 2013): AREXX Engineering (NL). This manual is protected by laws of Copyright. Any full or partial reproduction of the contents are forbidden without prior written authorization by the European importer. : AREXX Engineering - Zwolle (NL). Manufacturer and distributor cannot be held responible for any damage resulting from mishandling, mounting mistakes or disrespect of the instructions contained in the manual. Subject to changes without prior notice. More information and technical help see; WWW.AREXX.COM & www.multilogger.nl Manufacturerd for: AREXX Engineering © AREXX Engineering and Havinga Software -2- Impressum ©2013 AREXX Engineering Nervistraat 16 8013 RS Zwolle The Netherlands Tel.: +31 (0) 38 454 2028 Fax.: +31 (0) 38 452 4482 This manual is protected by laws of Copyright. Any full or partial reproduction of the contents are forbidden without prior written authorization by the European importer. Product specifications and delivery contents are subject to changes. The manual is subject to changes without prior notice. You can find free updates of this manual on http://www.arexx.com/ E-Mail: [email protected] “BS-1200 and Multilogger” are registered trademarks of AREXX Engineering. All other trademarks are the property of their owners. We are not responsible for the contents of external web pages that are mentioned in this manual! Information about limited warranty and responsibility The warranty granted by AREXX Engineering is limited to the replacement or repair of the BS-1200 and its accessories within the legal warranty period if the default has arisen from production errors such as mechanical damage or missing or wrong assembly of electronic components except for all components that are connected via plugs/sockets. The warranty does not apply directly or indirectly to damages due to the use of the BS-1200. This excludes claims that fall under the legal prescription of product responsibility. The warranty does not apply in case of irreversible changes (such as soldering of other components, drilling of holes, etc.) of the BS-1200 or its accessories or if the BS-1200 is damaged due to the disrespect of this manual. The warranty is not applicable in case of disrespect of this manual! In addition, AREXX Engineering is not responsible for damages of all kinds resulting from the disrespect of this manual! Please adhere above all to the „Safety recommendations“ in the BS-1200 manual. Please note the relevant license agreements on the CD-ROM! IMPORTANT Prior to using this BS-1200 receiver for the first time, please read this manua thoroughly up to the end. it explains the correct use and inform you about potential dangers. Moreover it contains important information that might not be obvious for all users. Important safety recommendation This module is equipped with highly sensitive components. Electronic components are very sensitive to static electricity discharge. Only touch the module by the edges and avoid direct contact with the components on the circuit board. -3- Symbols This manual provides the following symbols: The “Attention!” Symbol is used to mark important details. Neglecting these precautions may damage or destroy the module and/or additional components and additionally you may risk your own health or the health of other persons! The “Information” Symbol is used to mark useful tips and tricks or background information. In this case the information is to be considered as “useful, but not necessary”. Safety recommendations - Check the polarity of the power supply. Keep all products dry, when the product gets wet remove the power directly. Remove the power when you are not using the product for a longer period. Before taking the module into operation, always check it and its cables for damage. If you have reason to believe that the device can no longer be operated safely, disconnect it immediately and make sure it is not unintentionally operated. - Consult an expert if you are unsure about the function, safety or connection to the module. - Do not operate the module in unfavourable conditions. - This module is equipped with highly sensitive components. Electronic components are very sensitive to static electricity discharge. Only touch the module by the edges and avoid direct contact with the components on the circuit board. Normal use This product was developed as an WIFi receiver for the AREXX Multilogger system. It will only work together with other AREXX Multilogger sensors and products. It may be used indoors only. The product must not get damped or wet. Also be careful with condense when you take it from a cold to an warm room, give it time to adapt to the new conditions before you use it. Any use other than that described above can lead to damage to the product and may involve additional risks such as short circuits, fire, electrical shock etc. Please read all the safety instructions of this manual. -4- 1. PRODUCT DESCRIPTION BS1200 The BS1200 is a WIFI receiver station for the AREXX Multilogger system. Like the BS510 USB and BS1000 Lan receivers, the BS1200 receives AREXX sensor data via wireless transmission and sends these data via a WIFI Network interface to a PC. The WIFI link enables the BS1200 to send measured values wirelessly via the TCP/IP protocol. This interface allows the transmission of Messenger e-mails and HTTP requests as well. In addition to that, the built-in web server can display recent measurement values. You will have wireless WIFI access to this built-in web server with all other network items like a (Laptop) PC, smartphones and tablets. Contents of the package: - - - - BS-1200 WIFI multilogger receiver Power supply USB cable CD-ROM with all the necessary Software and manuals Warnings * * * * The right of return does not apply after opening the plastic bags containing parts and components. Read the manual thoroughly prior to mounting the unit. Be careful when handling tools. Do not assemble any items in presence of small children. They can get hurt with the tools or swallow small components and parts. * If the BS1200 gets wet, remove the power and dry all parts as thoroughly as possible. * Remove the power if the BS1200 will not be used for more than one week. -5- 1.2. Specifications: - - - - - Power supply : Consumption : Dimensions: WIFI transceiver USB connector 5V DC Approx.. 500 mA (LxWxH) : 220x165x45 mm 2. HARDWARE Fig.1. Top Fig.2. 2 1 3 Back A B 4 1. ON/OFF switch A. USB connector 2. Red LED B. DC connector 3. Blue LED 4. Green LED 2.1. Front and back panel On the front of the BS-1200 the on/off switch and three LEDs are possitioned. The function of the LEDs is: Red LED is on when the BS-1200 is on. Blue LED Flashes when the BS-1200 receives data from the sensors Green LED - Off: network and flash memory inactive - On: network inactive, active flash storage, - Flashing; short on and long out: active network, no flash storage - Flashing; long on and briefly out: active network, active flash storage -6- 2.2. Getting Started The BS-1200 comes with an adapter and USB cable. The adapter connects to the back 5V/±500mA. The USB cable can be used to connect to the BS-1200 directly to a PC, then BS-1200 will operates exactly the same as a BS510 receiver. You can also use the USB cable to flash the new firmware for a new software update. 3. First network connection This paragraph describes how to connect the BS-1200 to your local Wifi network. For this we need the networkconfig tool which can be found in the tools menu of the logger software (be sure you have the latest version). 2.1. General settings The BS1200 factory setting for Wifi is: security: none ssid: ssid Normally, you won’t have these settings, so we have to adjust the BS1200 to match your local Wifi settings. The settings can be set with the networkconfig tool; you can start it from the ‘tools’ menu of the temperature logger software. In short, you scan for a network, select it and set its passphrase. After pressing the write button a connection will made by the BS1200. Connect the BS1200 via usb to a pc with the latest temperature logger software. Start the networkconfig tool; the following dialog will be displayed: It shows empty network settings. When you press the read button, you obtain the current status of the bs1200. You will find the bs1200 is trying to connect (to the ‘ssid’ network), but a timeout is given since the attempt fails. Fig.3. Networkconfig tool -7- Fig.4. Networkconfig tool extra fields Note that some extra fields are displayed now concerning the Wifi-connection. (The tool detected that a Wifi-enabled module is accessed). Now we can scan for networks using the ‘scan’ button. Fig.5. Networkconfig tool Finished scan The status line will show the scan started, and after some seconds when the scan has finished. The SSID field is a combobox that will show a list with available networks, including the current ssid (‘ssid’ for now). -8- Fig.5. Networkconfig tool write Now the new info is saved in the BS1200 and it will initiate a new connection. As indicated on the screen we switch back to the ‘Read’ tab and click on the ‘Read’ button again. Fig.6. Networkconfig tool read When the module is connected, it shows ‘Wifi status: Connected’, and on top the message ‘Network configuration valid’. The obtained ipaddress and network name can be found on the display. Normally, you can use the networkname in the url field of your browser to access the bs1200. (Please prepend ‘http://’ before the networkname). If that is not working, the bs1200 should also be accessible by its ip address. -9- 4. BS-1200 WEBSERVER The obtained ipaddress and network name with the Networkconfigtool can be used to get access to the BS1200 webserver. Normally, you can use the networkname in the url field of your browser to access the BS1200. (Please prepend ‘http://’ before the networkname). If that is not working, the BS1200 should also be accessible by its ip address. Fig.7. Webbrowser The embedded Web server contains several pages with recent data. There is an administrative section available for various settings. The BS1200 web server can be found at the address given by the network name. Make sure that any firewall and/or browser blockades are removed which are applicable to the BS1200. The webbrowser start page shows for each sensor the most recent measurement (Fig.7). The value presented is the latest sensor measurement. The time display is formatted according to the default settings on the computer. The RSSI column gives an indication of the strength of the received radio signal. - 10 - Administration Fig.8. Administration We can reach the administrative part via the link at the top: ‘Admin’. After completing the user id and password (default is admin/admin) we get the Fig.8. screen. The current firmware version is listed in this screen. On the left there is a column with a number of links we briefly discuss: Network Fig.9. Network This window contains the same data that have already been explained in the NetworkConfig tool. You can update the settings via the Submit button, if necessary. - 11 - E-Mail Fig.10. E-Mail This page determines the data of the e-mail server address that is used to send Messenger records to an email address. The ‘From field’ defines the e-mail address of the sender that is used for the transmission of the messenger e-mail. In some cases, the username and the password must be entered. This can be done in the two lower fields. However, in most cases the user name and the password are not required. Sensors Fig.11. Sensor definitions The values of the incoming measurement are converted according to the sensor definition file. This defenition file is an XML file that contains the required parameter for the conversion. If new sensor types are added, the relevant definition file can be uploaded here so that the BS-1200 can use these indications for the operation. When you submit an empty file field, the default internal definition file is used. - 12 - Messenger Fig.11. Messenger The messenger is configured via a “Rule file” that is set up via a so-called, `Rule Editor` and which contains one or more messenger rules. These indications define actions that are triggered as sson as one or more conditions are met. The currently valid `Rule file` will be marked as “current version”. Further details are given in the description Rule Editor. When you submit an empty file field, the current rule file is erased, and no rules are applied. With the messenger software, you can send messages via e-mail and/or http. This message may contain the most recent data from a sensor. It can be set as an alarm and may be chosen in a way that only a meassege will be send if it meets certain conditions, for example the temperature is below 0 degrees Celsius. (In the BS-1000 and TL-09 also an buzzer will go on). - 13 - Time server Fig.11. Time server When starting the BS-1200, and at regular intervals (if configured), the time will be requested from an Internet time server. The clock in the BS-1200 will be synchronized with this time. The clock of the BS-1200 is powered by a button cell battery when the station is switched off. Therefore the BS-1200 receiver will always register new measurements data after switching on. This applies also for operation without PC or network link. The messenger function is based on the availability of the internal clock. This clock uses the standard time (UTC). The adjustment of the time zone is entered in minutes into the field “timezone offset”. The time indicated on the web pages of the BS-1200 is local time and based on the time parameters of teh PC in charge of the browser. Password The default password is ‘admin’ and can be changed on this page. - 14 - Recent Events The Recent Events screen shows a short summary of the most recent events that the BS-1200 has recorded. The results of the executed rule actions are indicated in lines per sensor. In addition to the executed rule actions, other events such as access to web pages and DHCP actions are recorded. - 15 - 5. Rule Editor The Rule-Editor is a tool for the creation of a rule-file that is used by the BS-1200 to control the built-in Messenger functions. The Messenger allows the start of one or more actions based on a incomming measurement value, if its associated condition is met. The available actions are the transmission of an e-mail, the transmission of a http request and the triggering of a built-in buzzer. You can define multiple lines simultaneously. A rule always consists of a condition and its associated action. If the measurement satisfies the condition, the action will be executed. Evaluation of condition and action always takes place within the context of the incoming measurement. Folowwing parameters are required depending on the type of action: For Email: • Name of the rule • Rule inhibition time • Condition for the rule • Email address • Email subject • Email message For HTTP request: • Name of thge rule • Rule inhibition time • Condition for the rule • HTTP request type: GET, POST or PUT • HTTP request url • HTTP request message For the buzzer: • Name of the rule • Rule inhibition time • Condition of the rule The inhibition time specifies the number of seconds that the rule remains inactive after the rule action is performed. - 16 - Conditions The condition is a logical expression that is evaluated within the context of the received measurement. The value of the measurement and its associated attributes will be evaluated as variables. The following variables are available: Variable Description $v Measurement value $q sensor type 1 = temperature (°C), 3 = RV% (%), 5 = CO2 (ppm) $i sensor $r rssi value (dBm) $h measurement time in hour $m measurement time in minutes $s measurement time in seconds $Y measurement time the year $M measurement time the month $D measurement time the day $S measurement time in seconds since 1-1-2000 UTC $c measurement day of the week (0=sunday, 1=mondat, etc...) $a(len) running average (len = length in seconds) $b(len) running minimum (len = length in seconds) $e(len) running maximum (len = length in seconds) $p(dt) Previous value. If dt=0, then the previous measurement value is given, otherwise, the interpolated value at the moment of dt seconds back in time is given. All time variables, except time $ S are UTC plus the time zone offset, is given in the Time server setting page. The time variables $ S is in UTC. The condition is structured like a logic expression. Following logical comparison operators can be used for the definition: (<, <=, >, > =, <>, == and !=), as well as the logical operators AND (&&), OR (| |), and NOT (!). Also the arithmetic operations +, -, *, /, and% (modulo) can be used. Moreover the expresion can be organised via the brackets “ „ and „ “. - 17 - Example Expression Description $v<10 results in true when the measurement falls below the value 10. $v<10 && $i=8297 results in true when the measurement of sensor 8297 falls below the value 10. ($v<-10 || $v>10)&&c==0 results in true when the measurement falss -10 or is bigger than 10, and the weekday is sunday. - 18 - The http message, email message and email subject text fields that can contain variables. The value of a variable will be replaced by text when the message text is set up. The list of variables is: Variabele Description $v measuement value $q sensor type 1 = temperature (°C), 3 = RV% (%), 5=CO2 (ppm) $i sensor id number $r rssi value (dBm) $h measurement time in hour $m measurement time in minutes $s measurement time in seconds $Y measurement time the year $M measurement time the month $D measurement time the day $S measurement time in seconden since 1-1-2000 UTC $w missing time of last measurement which could not be redirected to http server. Used for temp logger synchronization $t time string measurement time in hh:mm:ss format $d date string. measurement time in short date format $p(dt) Previous value. If dt=0, then the previous measurement value is given, otherwise, the interpolated value at the moment of dt seconds back in time is given. All time variables, except $w and $S, are in UTC plus the time zone offset given in the Time Server Setup page. The time variables w$ and $S are in UTC. The HTTP request message is url-encoded per default. This means that non-alphanumerical characters are converted into %hh-strings where „hh“ represents a hexadecimal figure. The lines ‘&&’ and ‘==’ are an exception: these are converted into ‘&’, and ‘=’ respectively. The message for the HTTP request is transmitted via the request header POST, or else added to the URL of the GET request. In that case, the separating sign ‘?’ is added between the URL and the message. - 19 - Example message: id == i && $ value == $ v In this example, a web server is programmed to decode the indicated string in two parameters ‘id’ and ‘value’. This method allows to supply up-to-date data from the BS1200 to a web page without a running a PC. This mechanism is also used for the update of the temperature logger. Flashed data A special xml page is implemented to let other software retrieve data from the BS1000. The page data.xml outputs flashed data within a given period. The page is called with 4 parameters: Parameter name Type Description A timestamp Start of period; number of seconds since 1-1-2000 B timestamp End of period; number of seconds since 1-1-2000 C integer Sensor id D integer Sensor type; 1=temperature, 3= RH%, 5=CO2 Example: http://log77.lan/data.xml?A=327682224&B=327685203&C=4096&D=1 This call would result in the following dataset: - 20 - APPENDIX - 21 - A. NEW FIRMWARE UPDATING Check if new software or firmware is available on www.arexx. com. You can easily download the new firmware and flash it into the BS-1200. Download the firmware and unzip this package to some directory - Please connect the BS1200 to the pc by usb. - Stop the temperaturemessenger service and the temperature service before continuing {ctrl-alt-del} (close all temperaturelogger programs, open windows task manager, check the ‘show processes from all users’, and end process of temperaturemessengerserver.exe and temperatureserver.exe). - run flash.bat - power off and on the BS1200 after flashing - Data in the BS1200 (settings and measurement data) should retain during flash. If flashing would fail(usually because the temperature logger services are still running), switch off and on the BS1200 and retry. B. Battery The BS1200 has a 3V Li CR2032 coin cell battery for powering the real time clock and the settings memory during power down. We advise to replace the battery every 3 years. Actual lifetime of the battery depends on operating temperature, quality of the battery and the period of time it stays powered off. When the BS1200 is powered on continuously, then a battery life of over 10-15 years can be expected. Fig.4. The coin battery cell is located at the centre of the circuit board of the BS1000. Unlike the BS510, the BS1200 starts logging as soon as the BS1200 is powered on. No further requirements are necessary. The only exception is the first time use or when the coin battery was removed: Then the clock must be set, before logging can start. This can be done via the USB port, connected to the temperature logger software, or by a remote time server via the network. - 22 - C. Safety regulations The safety regulations must be strictly observed: • When dealing with products that are in contact with an high electrical voltage all the valid safety regulations must be observed. • Consult a professional if your knowledge is not sufficient to connect to the BS1200 receiver. • When connecting the inputs and outputs of the receiver the system must be totally powerless! • Before using verify the BS1200 for visible damage If you think that safe use is not possible anymore, turn off the BS1200 immediately and contact an professional. • You can assume that safe use is no longer possible when: - The BS1200 is visibly damaged. - The BS1200 does not work anymore. • Due to the formation of condensation, the BS1200 may not be used anymore and should immediately be turned off. • When the BS1200 is moved from a cold to a warm room wait till all condence is vapourated • If the device is used for educational purposes, you ensure that all the work is take place under the supervision of professional staff. - 23 -