1
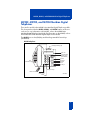
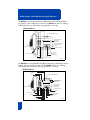
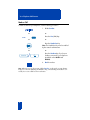
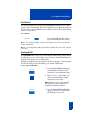
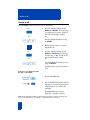
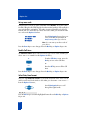
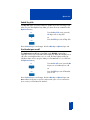
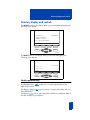
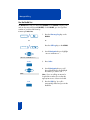
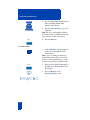
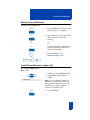
Nortel Knowledge Network
Meridian Digital
Telephones
M3902
M3903
M3904
Quick Reference Guide
Enterprise Voice Solutions Customer Documentation
Contents
M3902, M3903, and M3904 Meridian Digital Telephones
1
Your Telephone Call Features
3
Use Auto Dial ........................................................................................ 3
Make a Call .......................................................................................... 4
Make a call while on-hook ..................................................................... 5
Redial last number called ....................................................................... 5
Use Ring Again ..................................................................................... 6
Use Hot Line .......................................................................................... 7
Use Speed Call ...................................................................................... 7
Receive a call
9
Place a call on Hold ............................................................................... 9
Transfer a call ..................................................................................... 10
Handle multiple calls
11
Use Call Waiting ................................................................................. 11
Forward calls ...................................................................................... 11
Additional call features
13
Use Call Pickup .................................................................................... 13
Set up a Conference call ....................................................................... 14
Join a call ........................................................................................... 14
Activate Group Listening ...................................................................... 15
Options List
16
Select a language ................................................................................ 17
Change a Feature Key label ................................................................. 17
Adjust Screen contrast .......................................................................... 19
Adjust volume ...................................................................................... 19
Choose Ring type ................................................................................. 20
Select Call Log options ......................................................................... 20
Use Live dial pad ................................................................................. 21
Select Preferred name match ................................................................. 21
Set up area code ................................................................................. 22
i
Contents
Enable Call timer ................................................................................. 22
Select Date/time format ........................................................................ 22
Enable Key click ................................................................................... 23
Use Headset port on call ....................................................................... 23
Activate Headset port external alerter .................................................... 24
Use Call indicator light ......................................................................... 24
Set On hook default path ...................................................................... 25
Display diagnostics .............................................................................. 25
Control Group Listening ........................................................................ 26
Directory display and controls
27
Identify specialized keys ....................................................................... 27
Use Directory password protection ........................................................ 28
Manage Call Log
30
Use the Callers List ............................................................................... 30
Use the Redial List ................................................................................ 32
Use the Personal Directory
33
Access the Personal Directory ................................................................ 33
Add a Personal Directory entry ............................................................. 33
Add an incoming call ........................................................................... 35
Delete or edit a Personal Directory entry ................................................ 36
Delete your Personal Directory .............................................................. 37
Use the Personal Directory to make a call ............................................... 37
Use Card View .................................................................................... 38
Search for an entry .............................................................................. 38
Copy a number from the Redial List ....................................................... 39
Secure your telephone
ii
40
M3902, M3903, and M3904 Meridian Digital Telephones
M3902, M3903, and M3904 Meridian Digital
Telephones
There are five models in the M3900 Series Meridian Digital Telephone portfolio.
This document describes the M3902, M3903, and M3904 features and how to
use them. For user information on the M3901, refer to the M3900 Series
Meridian Digital Telephone User Guide. For information on the M3905, refer to
the M3905 Call Center Meridian Digital Telephone User Guide.
The M3902 has one Line (DN) Key and three Programmable Feature Keys
(self-labeled).
M3902 telephone
LCD Indicator
Message Waiting Light
One Line
Programmable
Feature Keys
(Self-labeled)
Options
Message
Transfer
Hold
LED
Handsfree Key
Goodbye
Navigation Keys
Volume Control Bar
LED
Mute
553-8624
1
M3902, M3903, and M3904 Meridian Digital Telephones
The M3903 has two Programmable Line (DN)/Feature Keys (self-labeled) with
two features or lines configured on each key. The M3903 also has four Soft Keys
(self-labeled) with up to three features programmed on each key.
M3903 telephone
LCD Indicator
Goodbye
Hold
Message Waiting Light
Programmable Line/
Feature Keys
(Self-labeled)
Programmable Feature
Keys (Self-labeled)
Copy
LED
Handsfree Key
Fixed Feature Keys
Shift
Applications
Navigation Keys
Volume Control Bar
LED
Headset
Mute
Options
Quit
Call Log
Message
553-8625
The M3904 has six Programmable Line(DN)/Feature Keys (self-labeled), with two
features or lines configured on each key. The M3904 also has four Soft Keys
(self-labeled) with up to three features programmed on each key.
M3904 telephone
LCD Indicator
Goodbye
Hold
Message Waiting Light
Programmable Line/
Feature Keys
(Self labeled)
Programmable
Feature Keys
(Self-labeled)
LED
Handsfree Key
Fixed Feature Keys
Volume Control Bar
Headset
Shift
Copy
LED
Mute
Options
Quit
Message
2
Applications
Navigation Keys
Directory Log
553-8626
Your Telephone Call Features
Your Telephone Call Features
Your M3900 Series Meridian Digital Telephone provides easy access to a wide
range of business features. Your system administrator assigns features to your
telephone and provides you with passwords and other codes as required.
This section describes the features available for your telephone and how to use
them.
Use Auto Dial
The Auto Dial feature allows the user to press one Feature Key (Auto Dial Key) to
dial a specific telephone number automatically. This feature must be enabled by
your network administrator.
To use Auto Dial:
1. Lift the handset.
AutoDial
2. Press the associated Auto Dial Key.
This automatically dials the number.
To display the Auto Dial number (M3903 and M3904):
Display
1. Press the Display Key.
AutoDial
2. Press the configured Auto Dial Key.
The number appears on the display.
Note: On the Meridian SL-100, press the
Auto Dial Key to display the number.
To store an Auto Dial number:
AutoDial
1. Press the Auto Dial Key, without lifting
the handset.
2. Dial the number to be stored on the
Auto Dial Key.
AutoDial
3. Press the Auto Dial Key again.
The number is stored on the key.
Note: To change the key label “AutoDial”, select Change feature key label from the
Options List menu. Please see “Change a Feature Key label” on page 17 for detailed
instructions.
3
Your Telephone Call Features
Make a Call
To make a call from your telephone, use the following procedure:
1. Lift the handset.
or
or
Press the Line (DN) Key.
2498
or
or
Press the Handsfree Key.
Note: The Handsfree Key must be enabled
by the network administrator
Headset
or
or
/
Press the Headset Key if you have a
headset connected to your telephone
(available on the M3903 and
M3904).
2. Dial the number.
Note: Whenever you see the message “Lift the handset.” in this guide, you may alternatively press a free Line (DN) Key, the Handsfree Key, or Headset Key (if a headset is connected). You receive a dial tone from each action.
4
Your Telephone Call Features
Make a call while on-hook
Leave the handset in the cradle while you dial a number.
To dial on-hook:
1. Press a Line (DN) Key.
2498
2. Dial the number when you receive a
dial tone.
3. Lift the handset to speak when the
called party answers, or if you are on
handsfree, begin to speak.
If the called number is busy:
Goodbye
Press the Goodbye Key to release the
line.
/
or
or
Press the Ring Again Key.
RingAgn
Redial last number called
The Last Number Redial feature allows you to automatically redial the last number
you dialed. This feature must be enabled by your network administrator.
To use Last Number Redial:
1. Lift the handset.
2. Press a Line (DN) Key.
2498
or
2498
2498
or
Press the Line (DN) Key twice.
The last number you dialed is
automatically redialed.
Note: On Meridian SL-100, press the £ Key twice.
5
Your Telephone Call Features
Use Ring Again
Use the Ring Again feature when you dial a number and receive a busy tone or
no answer. The Ring Again feature lets you know when the person you dialed is
available or has used their telephone. The feature notifies you when to redial your
party. The Ring Again feature automatically redials the number.
To use Ring Again:
1. Dial a number and receive a busy tone
or no answer.
RingAgn
Goodbye
/
or
2. Press the Ring Again Key.
3. Press the Goodbye Key.
or
Replace the handset.
Note: When the number you want to reach
is available, or the person has re-used
their set, you hear the Ring Again tone.
4. Lift the handset.
RingAgn
5. Press the Ring Again Key.
To cancel Ring Again before
notification:
RingAgn
6
Press the Ring Again Key a second
time.
Your Telephone Call Features
Use Hot Line
The network administrator can program a Hot Line Key that allows you to dial a
specific number automatically. The network administrator can apply other features
to the Hot Line, such as Call Redirection, so that the Hot Line call is answered by a
person—not a mail box.
To use Hot Line:
Hotline
Press the Hot Line Key. The Hot Line
Key automatically dials the number.
Note 1: If your main Line (DN) is a Hot Line, lift the handset. The Hot Line Key dials the
number automatically.
Note 2: On the Meridian SL-100, the Automatic Line (AUL) feature is the same as the Hot
Line feature.
Use Speed Call
The Speed Call feature allows you to automatically dial frequently called numbers
by entering a one, two, or three digit code. Contact your network administrator to
determine the capacity of your Speed Call list.
A telephone designated as a Speed Call Controller can program or edit the Speed
Call list. This feature must be enabled by your network administrator.
To store a Speed Call number:
SpcCtlr
1. Press the Speed Call Controller Key.
The triangular icon flashes, which
indicates it is in programming mode.
2. Dial a one, two, or three digit code
and associated telephone number
when the phone prompts.
Note: Dial the access code (if required)
followed by the internal, external, or
long-distance telephone number.
SpcCtlr
3. Press the Speed Call Controller Key
again to save the code and number.
The flashing icon turns off.
7
Your Telephone Call Features
To make a Speed Call:
1. Lift the handset.
SpcCtlr
or
SpcUsr
2. Press the Speed Call Controller Key or
the Speed Call User Key.
3. Dial the Speed Call code assigned to
the telephone number.
8
Receive a call
Receive a call
When you receive an incoming call, your telephone rings and the LCD indicator
flashes.
To answer a call:
Lift the handset.
or
or
Press the Handsfree Key located on
the left side of the handset.
or
or
Press the flashing Line (DN) Key when
using a headset.
2498
Place a call on Hold
Use the Hold feature when you are on the line with one party and a second call
comes in on a second line. You can answer the second call and retain the original
call by putting it on hold.
To place a call on hold:
Hold
/
Press the Hold Key. The LCD indicator
flashes beside the Line (DN) on hold.
Note 1: If Automatic Hold is enabled, the active call is automatically put on hold when you
answer the second call. On the Meridian SL-100, Automatic Hold is the default.
Note 2: The caller hears music, if music is configured on your system.
To retrieve a call on hold:
2498
Press the Line (DN) Key beside the
flashing LCD indicator.
9
Receive a call
Transfer a call
Use the Transfer feature to direct a call to a third party.
Trans
or
Transfer
/
1. Press the Transfer Soft Key (for the
M3903 and M3904). The other party
is on hold and you receive a dial tone.
The LCD indicator lights steadily.
or
Press the Transfer Fixed Key if using
the M3902.
2. Dial the number where you want to
transfer the call.
or
3. Press the Transfer Soft Key (for the
M3903 and M3904) again, when you
hear the ring, or after you talk to the
person at the transfer number.
or
/
Press the Transfer Fixed Key if you are
using the M3902.
Trans
Transfer
The LCD indicator goes from steady on
to off.
If the person you attempt to transfer
the call to is unavailable:
Goodbye
2498
/
1. Press the Goodbye Key.
2. Press the Line (DN) Key next to the LCD
indicator, to reconnect to the original
call (if the person you called is not
available).
The LCD indicator goes from a
flashing to a steady on indicator.
Note: On the Meridian SL-100, press the Transfer Key, dial the number, and hang up. If
you press the Transfer Key a second time, you get a three-way conference.
10
Handle multiple calls
Handle multiple calls
Use Call Waiting
The Call Waiting feature allows you to put your current call on hold while you
answer an incoming call. This feature must be enabled by your network
administrator.
To answer an incoming call while on
another call:
/
Hold
1. Press the Hold Key when you hear the
tone. The Call Waiting status icon
appears in the display.
2. Press the Call Wait Key (CWait for
M3902) to answer the call.
CallWait
To return to your first telephone call:
/
Hold
Goodbye
1. Press the Hold Key, if you want to put
the second call on hold.
or
or
/
Press the Goodbye Key to end the
second call.
2. Press the Line (DN) Key associated
with the first call.
2498
Forward calls
The Call Forward feature allows you to direct your calls to ring at another Line
(DN). If the telephone begins to ring, you cannot forward an incoming call in
progress.
To forward all your calls:
Forward
1. Press the Forward Key.
11
Handle multiple calls
2. Dial the number to which you want to
forward your calls.
Forward
3. Press the Forward Key again.
To change a previous Call Forward
number:
Forward
1. Press the Forward Key.
2. Dial the new forward number.
Forward
3. Press the Forward Key.
To cancel Call Forward:
Forward
Press the Forward Key.
To reinstate Call Forward to the same
number:
Forward
12
Forward
Press the Forward Key twice.
Additional call features
Additional call features
Use Call Pickup
The Call Pickup feature allows you to pick up a call from any telephone in the
same Pickup Group or another Pickup Group. This feature must be enabled by
your network administrator.
To answer a call in your own Call
Pickup Group:
1. Lift the handset.
Pickup
2. Press the Pickup Key.
To answer an incoming call in
another Call Pickup Group:
1. Lift the handset.
GrpPickup
2. Press the Group Pickup Key.
3. Dial the Pickup Group number of the
telephone that is ringing.
Note 1: The network administrator assigns the Pickup Group code.
Note 2: This feature is not applicable on the Meridian SL-100 system.
To answer a call at a specific
extension number within your Pickup
Group:
1. Lift the handset.
DNPickup
2. Press the DN Pickup Key.
Note 1: The Meridian SL-100 uses the Directed Call Pickup Feature Access Code (FAC).
Note 2: If the pickup DN is invalid, you receive an overflow burst tone, and the screen
displays Release and try again. Press the Goodbye Key.
13
Additional call features
Set up a Conference call
You can set up a conference call for three (or six) people (including yourself).
Contact your telephone network administrator to determine the maximum number
of people your system allows on a conference call, and how to enable this feature.
To set up a conference call:
Conf
1. Press the Conference Key while you
are on a call. The other party is on
hold and you receive a dial tone.
2. Dial the number of the person you
want to add to the conference.
Conf
3. Press the Conference Key when the
person answers. Everyone is able to
join the conversation.
If the person you attempt to add to
the conference is unavailable:
Goodbye
/
1. Press the Goodbye Key.
2. Press the Line (DN) Key with the
flashing icon to return to your original
call.
2498
Join a call
To connect a call on hold (on a
different line) to your current call:
Conf
1. Press the Conference Key.
2. Press the Key that has the caller you
want to connect to your current call.
2498
Conf
3. Press the Conference Key again.
The person on hold joins your
conversation.
14
Additional call features
Activate Group Listening
The Group Listening feature allows others to listen to a call through the speaker
while you are speaking through the handset. Group Listening must be enabled by
your network administrator. Please refer to “Control Group Listening” on page 26
for instructions on activating the Group listening option in the Options List.
To engage Group Listening while on
a call:
Press the Handsfree Key. Everyone hears
the caller over the speaker, but the caller
only hears what is picked up by the
handset.
Note: You must tell the caller that others are listening to the conversation, because the
Group Listening feature does not alert them that the conversation is being monitored.
15
Options List
Options List
The Options List allows you to customize certain characteristics of your phone.
Screen prompts take you step-by-step through procedures and keep you informed
on the status of the following settings: Language, Change feature key label,
Screen contrast, Volume adjustment, Ring type, Call log options, Live dial pad,
Preferred name match, Area code set-up, Call timer enable, Date/time format,
Key click enable, Headset port on call, Headset port external alerter and recorder
interface, Call indicator light, On hook default path, and Display diagnostics.
To change any option’s setting:
Options
/
1. Press the Options Key.
2. Use the Navigation Keys to move up
or down through the options list.
Select
3. Press the Select Key when the desired
option is highlighted.
4. Change the option’s settings. Refer to
the following pages for details. The
display also provides you with
information to adjust your selection.
Done
Quit
or
Options
5. Press the Done Key to save your
changes.
6. Press the Quit Key or Options Key to
exit.
/
Note: If you press the Quit Key or Options Key before you press the Done Key, you exit the
Options List without saving your changes.
16
Options List
Select a language
The display is available in multiple languages. After you select Language. . . from
the Options List menu,
1. Use the Navigation Keys to highlight
the desired language (e.g., German).
Deutsch
Select
2. Press the Select Key.
Press the Done Key to save changes. Press the Quit Key or Options Key to exit.
Change a Feature Key label
You can change the name on the Programmable Line/Feature Keys (self-labeled).
These keys are located on both sides of the top portion of the display area.
To change a Feature Key label:
1. Use the down Navigation Key to
highlight Change feature key label.
Change feature key label
Select
2. Press the Select Key.
This action takes you to the Feature
Key menu and highlights Change
feature key label.
Select
3. Press the Select Key again.
The prompt asks you to select the key
you want to change.
AutoDial
4. Press the Programmable Line/Feature
Key whose label you want to change,
(e.g., AutoDial).
17
Options List
5. Press the Dial Pad Key that is printed
with the first letter in your new label.
Press the key until the correct character
appears.
Case
6. Use the Case Key to change the case
of the letter, as needed.
7. Press the right Navigation Key once to
move the cursor (so you can enter the
next letter) when the desired letter
appears.
8. Repeat steps 5, 6, and 7 until you
have changed the entire label.
Press the Done Key to save changes. Press the Quit Key or Options Key to exit.
Note: For a detailed example of using the dial pad to enter text into your M3900 Series
telephone, please see “Add a Personal Directory entry” on page 33.
To restore one key label:
1. From the Feature Key menu, use the
down Navigation Key to highlight
Restore one key label.
Restore one key label
Select
Purchasing
2. Press the Select Key.
3. Press the Programmable Line/Feature
Key (self-labeled) that you want to
restore to the original label (e.g.,
Purchasing).
Press the Done Key to return to the Options List menu. Press the Quit Key or
Options Key to exit.
Note: You cannot change the label on the primary DN. You can press the Shift Key, if the
label you want to change is on the second layer of the Programmable
Line/Feature Keys (self-labeled).
18
Options List
Adjust Screen contrast
The Screen contrast option allows you to adjust the contrast of the display on your
telephone. After you select Screen contrast from the Options List menu;
Lower
From the Contrast screen, press Lower to
decrease the display contrast level.
or
Higher
or
Press Higher to increase the display
contrast level.
Press the Done Key to save changes. Press the Quit Key or Options Key to exit.
Adjust volume
Note: After you select Volume adjustment. . . from the Options List menu, a list
of adjustable items for your telephone model appears. It is recommended that you
adjust these parameters while you are on a telephone call so that you can judge
the impact of the changes your are making.
To adjust the Ringer volume:
1. Select Ringer from the Volume menu.
Ringer
Lower
or
Higher
2. Press Lower to decrease the ringer
volume.
or
3. Press Higher to increase the ringer
volume.
Press the Done Key to save changes. Press the Quit Key or Options Key to exit.
Use the procedure above to adjust the volume on the following items:
Buzzer
Headset listen
Speaker
Headset talk
Handset listen
Handsfree listen
Headset sidetone
Note: Headset sidetone (M3904 only) is
the sound of your own voice that you hear
in the headset speaker.
19
Options List
Choose Ring type
The Ring type option allows you to choose from among the various ringing
sounds available for your telephone model. After you select Ring type. . . from
the Options List menu;
1. Use the Navigation Keys to scroll
through the list of ring types.
Ring type 3
Play
2. Press the Play Key to sample a ring
tone.
Select
3. Press the Select Key to activate the
desired ring type (M3903 and
M3904).
Press the Done Key to save changes. Press the Quit Key or Options Key to exit.
Select Call Log options
Call Log options (on the M3903 and M3904) provides a choice of logging all
incoming calls, logging only the unanswered calls, or not logging any calls. The
Call Log holds up to 10 different incoming entries for the M3903 and up to 100
for the M3904. After you select Call log options from the Options List menu;
From the Log options menu, use the
Navigation Keys to highlight and
select either:
Log all calls
or
Log unanswered calls
Log all calls
or
Log unanswered calls
Note: New call indication must be set
to On, if you want Call Log notification.
Press the Done Key to save selection. Press the Quit Key or Options Key to exit.
20
Options List
Use Live dial pad
The Live dial pad option (available on the M3094) allows you to press any dial
pad key to automatically access a dial tone. After you select Live dial pad from
the Options List menu;
On
or
Off
From the Live dialpad screen, press
the On Key to turn on Live dial pad.
or
Press the Off Key to turn off Live dial
pad.
Press the Done Key to save changes. Press the Quit Key or Options Key to exit.
Select Preferred name match
The Preferred name match option (available on the M3904) displays the names
of incoming and outgoing callers as stored in your Personal Directory, if the
telephone number matches the one stored in your directory. This option allows you
to personalize the displayed names for incoming and outgoing calls. After you
select Preferred name match from the Options List menu;
On
or
Off
From the Name match screen, press
the On Key to turn on Preferred name
match.
or
Press the Off Key to turn off Preferred
name match.
Press the Done Key to save changes. Press the Quit Key or Options Key to exit.
21
Options List
Set up area code
Using the Area code set-up option (available on the M3904), causes the Callers
List and Calling Line ID (CLID) display show the number/extension followed by the
area code/prefix in parenthesis. This makes it easier to identify local calls and
internal calls. You can define up to three area codes. After you select Area code
set-up from the Options List menu
1st Code: 408
2nd Code:
3rd Code:
Use the Navigation keys to place your
cursor in the first line and enter an
area/country code of your choice.
Note: You can enter up to three codes of
your choice.
Press the Done Key to save changes. Press the Quit Key or Options Key to exit.
Enable Call timer
The Call timer enable option measures how long you are on each call. After you
select Call timer enable from the Options List menu;
On
From the Call timer screen, press the
On Key to turn on the Call timer.
or
Off
or
Press the Off Key to turn off the Call
timer.
Press the Done Key to save changes. Press the Quit Key or Options Key to exit.
Select Date/time format
There are eight Date/time formats. Four formats are based on the 12 hour clock
and four are based on the 24 hour clock. After you select Date/time format. . .
from the Options List menu;
Use the Navigation Keys to scroll
through the eight formats.
Format 3
Press the Done Key to select the highlighted format. Press the Quit Key or Options
Key to exit.
22
Options List
Enable Key click
The Key click option causes the handset or speaker to produce a clicking sound
when you press the telephone keys. After you select Key click enable from the
Options List menu;
On
From the Key click screen, press the
On Key to turn on Key click.
or
or
Off
Press the Off Key to turn off Key click.
Press the Done Key to save changes. Press the Quit Key or Options Key to exit.
Use Headset port on call
The Headset port on call option (available on the M3904) requires that a
lamp-type accessory be connected to the headset port. When the Headset port on
call option is activated and the user is on a call, the lamp lights providing an
indication that a call is in progress. After you select Headset port on call from
the Options List menu;
On
From the On call screen, press the On
Key to turn on Headset port on call.
or
or
Off
Press the Off Key to turn off Headset
port on call.
Press the Done Key to save changes. Press the Quit Key or Options Key to exit.
Note: Additional equipment is required to implement this option. For more information
please contact your Nortel Networks distributor.
23
Options List
Activate Headset port external alerter
When the Headset port external alerter option (available on the M3904) is
activated, it supports a visual or audible alerter and/or recorder device. This
device plugs into the Headset port, which is located on the bottom of the
telephone. After you select Headset port ext alerter from the Options List
menu;
On
or
Off
From the Ext alerter screen, press the On
Key to turn on Headset port external
alerter.
or
Press the Off Key to turn off Headset port
external alerter.
Press the Done Key to save changes. Press the Quit Key or Options Key to exit.
Note: Additional equipment is required to implement this option. For more information
please contact your Nortel Networks distributor.
Use Call indicator light
You can control the incoming call indicator light (available on the M3904). After
you select Call indicator light from the Options List menu;
On
From the Indicator screen, press the
On Key to turn on Call indicator light.
or
or
Off
Press the Off Key to turn off Call
indicator light.
Press the Done Key to save changes. Press the Quit Key or Options Key to exit.
24
Options List
Set On hook default path
The On hook default path option (available on the M3903 and M3904)
automatically opens the voice path on either the Headset or on Handsfree when
you press a Line (DN) Key. After you select On hook default path from the
Options List menu;
From the On hook path menu, use the
Navigation Keys to highlight and
select either:
Handsfree selected
or
Headset selected
Handsfree selected
or
Headset selected
Press the Done Key to save selection. Press the Quit Key or Options Key to exit.
Display diagnostics
The Display diagnostics option tests the functionality of your telephone’s display
screen and indicator lights. This option also provides information on the firmware
currently in use on your M3900 series telephone. After you select Display
diagnostics from the Options List menu;
Use the up or down Navigation Keys
to scroll through the list and view the
changing display screens.
Press the Done Key to return to the Options List menu. Press the Quit Key or
Options Key to exit.
25
Options List
Control Group Listening
The Group Listening feature enables you to talk on the handset to one party while
other people listen to the conversation on your telephone’s speaker. The network
administrator must enable this feature. After you select Group listening from the
Options List menu;
On
From the Group listening screen, press
the On Key to turn on Group listening.
or
or
Off
Press the Off Key to turn off Group
listening.
Press the Done Key to save changes. Press the Quit Key or Options Key to exit.
Note 1: The Group listening selection will not appear in the Options List menu of your
telephone unless this feature has been activated by your network administrator.
Note 2: This feature does not have a tone to inform the party on the other end of the call
that the conversation is being monitored. You must tell the other party that others are
listening to the conversation.
26
Directory display and controls
Directory display and controls
The M3904 has a three line display. When you press the Directory/Log Key, the
following screen appears:
Directories
08/12 5:48
Select a directory
Callers = Calls In
Dir = Personal Directory
Call Log
Dir
Quit
Redial
Passwd
Copy
553-9080
The M3903 has a one line display. When you press the Call Log Key, the
following screen appears:
08/12 5:48
01 Call Log
Callers List
Select
Quit
Copy
553-9079
Identify specialized keys
The Navigation Keys
application functions.
The Copy Key Copy /
Personal Directory.
enable you to scroll through the features and
copies incoming or outgoing call numbers into your
The Quit Key Quit ends an active application, which does not affect the status of
the calls currently on your telephone.
27
Directory display and controls
Use Directory password protection
You can password protect your Call Log, Redial list, and Personal Directory.
Note: Password protection is only available on the M3904.
To enable password protection:
Directory/Log
/
1. Press the Directory/Log Key.
2. From the Directories menu, use the
Navigation Keys to highlight
Password Administration.
Password Administration
Select
3. Press the Select Key. The Passwd
Admin menu appears with Password
enabled: OFF highlighted.
Select
4. Press the Select Key again to select
Password enabled: OFF.
On
5. Press the On Key to enable password
protection.
6. Dial the password.
Enter
7. Press the Enter Key.
8. Dial (enter) the password again to
confirm your password.
28
Directory display and controls
Enter
9. Press the Enter Key.
Press the Done Key to save changes. Press the Quit Key or Directory/Log Key to
exit.
To disable Personal Directory
password:
Directory/Log
/
1. Press the Directory/Log Key.
2. Dial the password.
Enter
3. Press the Enter Key.
4. Use the Navigation Keys to highlight
Password Administration.
Password Administration
Select
5. Press the Select Key. The Passwd
Admin menu appears with Password
enabled: ON highlighted.
Select
6. Press the Select Key again to select
Password enabled: ON.
Off
7. Press the Off Key to disable password
protection.
Press the Done Key to save changes. Press the Quit Key or Directory/Log Key to
exit.
29
Manage Call Log
Manage Call Log
The Call Log records the name and number of incoming and outgoing calls and
can be password protected on the M3904. You can activate Call Log to record all
calls, record only the unanswered calls, or record no incoming calls.
The Callers List stores incoming calls, and the Redial List stores outgoing calls in
order of date and time received/made. The oldest call is stored at the top of the
list. The newest call is stored at the bottom of the list.
The M3904 Call log list holds up to 100 entries for incoming and 20 entries for
outgoing calls. The M3904 can copy a number from the Callers List or Redial List
and store it in the Personal Directory.
The M3903 Call log list holds up to 10 entries for incoming and 5 entries for
outgoing calls.
Use the Callers List
To access your Callers List:
Directory/Log
Call Log
/
1. Press the Directory/Log Key on the
M3904.
or
or
/
Press the Call Log Key on the M3903.
2. Use the Navigation Keys to highlight
Call Log (Callers List).
Call Log (Callers List)
Select
30
3. Press the Select Key.
Manage Call Log
New
or
Old
4. Press the New Key to go to the top of
the new calls list.
or
Press the Old Key to go to the top of
the old calls list.
To make a call from the Callers List:
1. Use the Navigation Keys to scroll
through the Callers List and highlight
the number you want to call.
Note: If you are calling an external or
long distance number, you will need to edit
the number to add the access codes
required by your system to make an
external or long distance call.
2498
Dial
2. Press the Dial Key to call the number
selected. You leave the Callers List
when you make the call.
To exit the Callers List without
making a call:
Quit
Directory/Log
Call Log
Press the Quit Key
or
or
/
Directory/Log Key (M3904)
or
or
/
Call Log Key (M3903)
31
Manage Call Log
Use the Redial List
The Redial List records your last twenty (M3904) or five (M3903) outgoing calls
and can be password protected (M3904). On the M3904, you can copy these
numbers to your Personal Directory.
To access your Redial List:
Directory/Log
Call Log
/
1. Press the Directory/Log Key on the
M3904.
or
or
/
Press the Call Log Key on the M3903.
2. Use the Navigation Keys to highlight
Call Log (Redial List).
Call Log (Redial List)
Select
3. Press Select.
4. Use the Navigation Keys to scroll
through the Redial List and highlight
the number you want to call.
2637
Note: If you are calling an external or
long distance number, be sure that the
appropriate access codes are included.
Dial
32
5. Press the Dial Key. Your call is
automatically dialed and you exit the
Redial list.
Use the Personal Directory
Use the Personal Directory
The M3904 Personal Directory provides a personalized directory of names and
telephone numbers. The Personal Directory allows you to add, delete, search, and
edit entries and can be password protected. The Personal Directory holds up to
100 entries (an entry is one name and one telephone number). You can add a
directory entry by copying the entry from your Callers List or Redial List. You can
also add entries with the “Add New” Key or by using the Personal Directory PC
Utility application. The Personal Directory PC Utility uses an accessory cartridge to
connect your PC and your M3904 telephone. You can create a directory on your
Personal Computer and transfer it to your M3904 telephone.
Access the Personal Directory
Directory/Log
/
Select
1. Press the Directory/Log Key.
2. Press the Select Key in the Directories
menu to select Personal Directory.
Add a Personal Directory entry
After accessing your Personal
Directory:
AddNew
1. Press the Add New Key.
2. Dial the new name.
Example:
To enter the name Chris:
1. Dial the name using the key pad.
33
Use the Personal Directory
¤¤¤
››
‡‡‡
›››
‡‡‡‡
2. Press the dial pad key with the desired
letter repeatedly until that letter
appears on the display.
3. Press the right arrow key to go to the
next letter.
Note: The cursor automatically advances
to the next position, if a different-from-last
key is pressed, or after a short pause.
Next
4. Press the Next Key.
To enter the number:
1. Use the dial pad to enter the telephone
number associated with the name
entered above.
Note: If you are adding an external or
long distance number, be sure to include
the access codes required by your system
to make an external or long distance call.
Done
Quit
or
Directory/Log
34
/
2. When you have finished entering all of
the digits, press the Done Key to save
the changes.
3. Press the Quit Key or the
Directory/Log Key to exit.
Use the Personal Directory
Add an incoming call
/
Copy
Dirctry
Next
or
Clear
Next
1. Press the Copy Key. The displays
shows the message Copy to?.
2. Press the Directory Key.
3. Press the Next Key to copy the
incoming call without editing the
name. Edit the number,if required (see
note for step 4), and go to step 6.
or
Press the Clear Key to make changes
to the name before saving. Add the
name using the dial pad, Delete, and
Case Keys as needed.
4. Press the Next Key. Make changes to
the telephone number if required
Note: If you are copying an external or
long distance number, be sure to add the
access codes required by your system to
make an external or long distance call.
Done
Quit
or
Directory/Log
5. Press the Done Key to save the entry in
your directory.
6. Press the Quit Key or the
Directory/Log Key to exit.
/
Note: You can edit the name or number before or after you save to the directory.
35
Use the Personal Directory
Delete or edit a Personal Directory entry
To delete a Personal Directory entry:
1. Use the Navigation Keys to highlight
the entry you want to edit or delete.
Delete
Yes
2. Press the Delete Key to delete the
currently highlighted entry in your
Personal Directory.
3. Press the Yes Key to confirm the
deletion.
To edit a Personal Directory entry:
Edit
1. Press the Edit Key to change the
telephone number or name.
2. Use the Navigation Keys to highlight
the character you want to change.
3. Use the dial pad to enter the desired
changes. Refer to“Add a Personal
Directory entry” on page 33 for an
example of how to use the dial pad to
enter names.
Next
4. Press the Next Key. Edit the number if
necessary.
Done
5. Press the Done Key to save the
changes.
Quit
or
Directory/Log
36
/
6. Press the Quit Key or the
Directory/Log Key to exit.
Use the Personal Directory
Delete your Personal Directory
To delete your Personal Directory:
DelList
1. Press the Delete List Key. The message
Delete all entries? appears.
Yes
2. Press the Yes Key if you want to delete
all the entries in your Personal
Directory.
or
or
No
Press the No Key if you want to return
to the top of the Personal Directory
with no changes made.
Quit
or
Directory/Log
3. Press the Quit Key or the
Directory/Log Key to exit.
/
Use the Personal Directory to make a call
To use the Personal Directory to
make a call:
1. Use the up or down Navigation Keys
to highlight the desired name or
number.
Purchasing
Dial
Note: If you are dialing an external or
long distance number, be sure that your
directory entry includes the access codes
required by your system to make an
external or long distance call.
2. Press the Dial Key.
37
Use the Personal Directory
Use Card View
The Card View feature provides additional information about the Personal
Directory entry.
To look at the Card View:
1. Highlight the name.
2. Press the right Navigation Key.
To dial from Card View:
1. Use the Navigation Keys to show the
name and number of the currently
selected entry in the Card View.
Note: If you are dialing an external or
long distance number, be sure that your
directory entry includes the access codes
required by your system to make an
external or long distance call.
Dial
2. Press the Dial Key to place the call.
To exit Card View:
1. Press the left Navigator Key to leave
the Card View and return to the
selected name.
Search for an entry
You can search for a particular entry in your Personal Directory.
To search for an entry:
1. Use the Navigation Keys to scroll
through the Directories menu and
highlight Personal Directory.
Personal Directory
Select
38
2. Press the Select Key.
Use the Personal Directory
3. Use the dial pad to enter the first letter
of the name your are seeking. For
example, press ¤ twice to go to the
first entry that begins with the letter
“B”.
Copy a number from the Redial List
You can copy a number from the Redial List to the Personal Directory.
To copy a number from the Redial
List:
1. Use the Navigation Keys to highlight
the name and number in your Redial
List that you want to copy to your
Personal Directory.
2498
Copy
/
Dirctry
Next
or
Clear
Next
2. Press the Copy Key.
3. Press the Directory Key when the
prompt asks Copy to?
4. Press the Next Key to copy the
incoming call without editing the
name. Edit the number, if required (see
note for step 5), and go to step 6.
or
Press the Clear Key to make changes
to the name before saving. Add the
name using the dial pad, Delete, and
Case Keys as needed.
5. Press the Next Key. Make changes to
the telephone number, if required
Note: If you are copying an external or
long distance number, be sure that your
directory entry includes the access codes
required by your system to make an
external or long distance call.
Done
6. Press the Done Key. The entry is saved
to your Personal Directory and you
are returned to the Redial List.
39
Secure your telephone
Secure your telephone
You can lock your telephone with a password to prevent unauthorized use of your
telephone. Note: The Meridian SL-100 does not support this feature.
To lock your telephone:
1. Lift the handset.
2. Dial the Lock Flexible Feature Code
(FFC) and your Electronic Lock
Password.
Note: If you perform this operation from someone else’s telephone, dial your Line (DN).
Goodbye
/
3. Press the Goodbye Key.
To unlock your telephone:
1. Lift the handset.
2. Dial the Unlock Flexible Feature Code
(FFC) and your Electronic Lock
Password.
Note: If you perform this operation from someone else’s telephone, dial your Line (DN).
Goodbye
/
3. Press the Goodbye Key.
To change your password:
1. Lift the handset.
2. Dial the Password Change Flexible
Feature Code (FFC) and your current
password. Dial your new password
twice (for verification).
Goodbye
40
/
3. Press the Goodbye Key.
Title to and ownership of Meridian SL-1 software shall at all times
remain with Nortel Networks. Meridian SL-1 software shall not be
sold outright and the use thereof by the customer shall be subject
to the parties entering into software agreements as specified
by Nortel Networks.
Information contained in this document is subject to change.
Nortel Networks reserves the right, without notice, to make
changes in equipment design or program components as progress
in engineering, manufacturing or technology may warrant.
Reordering number:NT2F81AA A0779733
(c/o 15 each per package P0903628)
Internal Manufacturing part number:
P0903628
Issue 2.00
Printed in Canada
February 2000
www.nortelnetworks.com