1
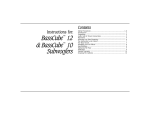
This is the operation guide for the Crate BV300H.
READ IT.
Then get ready for the Ride of your Life!
Contents:
A Message from the People Behind the BV300H
The Front Panel - Input & Channel 1
. . . . . . . . .3
. . . . . . . . . . . . .4
The Front Panel - Channel 2
. . . . . . . . . . . . . . . . .5
The Front Panel - Channel 3
. . . . . . . . . . . . . . . . .6
The Front Panel - Effects Loop, Eek & Ugh
. . . . . . . . . .7
The Rear Panel - Footswitch, Speaker Outputs, Slave Out . . . .8
The Rear Panel - Effects Loop, Bias, AC Power
. . . . . . . .9
Some Suggested Settings . . . . . . . . . . . . . . . . . . .10
The Block Diagram . . . . . . . . . . . . . . . . . . . . . .11
Technical Specifications
. . . . . . . . . . . . . . . . . .12
CAUTION
PRECAUCION
ATTENTION
RISK OF ELECTRIC SHOCK
DO NOT OPEN
RIESGO DE CORRIENTAZO
NO ABRA
RISQUE D'ELECTROCUTION
NE PAS OUVRIR
WARNING: TO REDUCE THE RISK OF FIRE OR ELECTRIC SHOCK, DO NOT EXPOSE
THIS APPARATUS TO RAIN OR MOISTURE. TO REDUCE THE RISK OF ELECTRIC
SHOCK, DO NOT REMOVE COVER. NO USER-SERVICEABLE PARTS INSIDE. REFER
SERVICING TO QUALIFIED SERVICE PERSONNEL.
PRECAUCION: PARA REDUCIR EL RIESGO DE INCENDIOS O DESCARGAS ELECTRICAS, NO PERMITA QUE ESTE APARATO QUEDE EXPUESTO A LA LLUVIA O LA HUMEDAD. PARA DISMINUOIR EL
RIESGO DE CORRIENTAZO. NO ABRA LA CUBIERTA. NO HAY PIEZAS ADENTRO QUE EL USARIO
PUEDO REPARAR DEJE TODO MANTENIMIENTO A LOS TECHNICOS CALIFICADOS.
ATTENTION: PROTÉGEZ CET APPAREIL DE LA PLUIE ET DE L'HUMIDITÉ AFIN D'ÉVITER TOUT
RISQUE D'INCENDIE OU D'ÉLECTROCUTION. POUR REDUIRE D'ELECTROCUTION NE PAS ENLEVER
LE COUVERCLE. AUCUNE PIECE INTERNE N'EST REPRABLE PAR L'UTILISATEUR. POUR TOUTE
REPARATION, S'ADRESSER A UN TECHNICIEN QUALIFIE.
IMPORTANT SAFETY INSTRUCTIONS
• READ, FOLLOW, HEED, AND KEEP ALL INSTRUCTIONS AND WARNINGS.
• DO NOT OPERATE NEAR ANY HEAT SOURCE AND DO NOT BLOCK ANY VENTILATION OPENINGS ON THIS APPARATUS. FOR PROPER OPERATION, THIS UNIT REQUIRES 3”
(75CM) OF WELL VENTILATED SPACE AROUND HEATSINKS AND OTHER AIR FLOW PROVISIONS IN THE CABINET.
• DO NOT USE THIS APPARATUS NEAR SPLASHING, FALLING, SPRAYING, OR STANDING LIQUIDS.
• CLEAN ONLY WITH LINT-FREE DAMP CLOTH AND DO NOT USE CLEANING AGENTS.
• ONLY CONNECT POWER CORD TO A POLARIZED, SAFETY GROUNDED OUTLET WIRED TO CURRENT ELECTRICAL CODES AND COMPATIBLE WITH VOLTAGE, POWER, AND
FREQUENCY REQUIREMENTS STATED ON THE REAR PANEL OF THE APPARATUS.
•
•
•
•
•
•
PROTECT THE POWER CORD FROM DAMAGE DUE TO BEING WALKED ON, PINCHED, OR STRAINED.
UNPLUG THE APPARATUS DURING LIGHTNING STORMS OR WHEN UNUSED FOR LONG PERIODS OF TIME.
ONLY USE ATTACHMENTS, ACCESSORIES, STANDS, OR BRACKETS SPECIFIED BY THE MANUFACTURER FOR SAFE OPERATION AND TO AVOID INJURY.
THIS APPARATUS DOES NOT OPERATE NORMALLY AND REQUIRES SERVICE WITH ANY PHYSICAL DAMAGE FROM IMPACT OR ANY EXPOSURE TO MOISTURE.
SERVICE MUST BE PERFORMED BY QUALIFIED PERSONNEL.
OUR AMPLIFIERS ARE CAPABLE OF PRODUCING HIGH SOUND PRESSURE LEVELS. CONTINUED EXPOSURE TO HIGH SOUND PRESSURE LEVELS CAN CAUSE PERMANENT HEARING IMPAIRMENT OR LOSS. USER CAUTION IS ADVISED AND EAR PROTECTION IS RECOMMENDED IF UNIT IS OPERATED AT HIGH VOLUME.
EXPLANATION OF GRAPHICAL SYMBOLS:
EXPLICACION DE SIMBOLOS GRAFICOS:
EXPLICATION DES SYMBÔLES GRAPHIQUES:
"DANGEROUS VOLTAGE"
=
“VOLTAJE PELIGROSO”
"DANGER HAUTE TENSION"
"IT IS NECESSARY FOR THE USER TO REFER TO THE INSTRUCTION MANUAL"
=
“ES NECESARIO QUE EL USUARIO SE REFIERA AL MANUAL DE INSTRUCCIONES.”
"REFERREZ-VOUS AU MANUAL D'UTILISATION"
2
A Message from the People Behind the BV300H:
You now own the finest lead guitar amplifier in the world. The Crate BV300H was designed to
fulfill the needs of the professional musician. It is equally at home in the studio, in the
club, or on the big stage. This amplifier has been designed with key features to finely
sculpt its sound into YOUR sound. The BV300H uses premium materials and workmanship and is
made entirely in the U.S.A. It includes a full 5 year warranty on parts and labor and a 90
day warranty on tubes. Unlike some other amplifiers which only sound good when turned up,
the BV300H delivers the same awesome tone at low volumes that it does at high stage levels.
This is due to our unique power amplifier that produces the same sweet, warm juicy tone at
ANY level. 3 watts or 300 watts, the tone is consistent, strong and powerful.
Don’t let the 300W rating scare you. All amplifiers can benefit from added headroom. 300
watts allows the player to hear the detail and dynamics of the sound much better. The sound
is like nothing you have ever heard before. Imagine palm muting the low strings and actually
hearing the full dynamic. Many players don’t even know what this sounds like because their
amplifiers are underpowered. Have you ever started to turn your amplifier up louder only to
have the tone change, get flubby, fart out…. Lack of headroom. The only way to describe it
is to experience it.
Coupled with its massive power amplifier is a state of the art 3 channel preamp. Switching is
accomplished via momentary switches that provide instant access to each of the 3 channels.
A classic design originally used for bass or guitar, Channel 1 is full of dynamic headroom
and tonal versatility. It utilizes a clean, punchy preamplifier section with classic high
and low tone EQs and a 5-position midrange selector to further dial in your tone.
Channel 2 has a classic british tonality that will be familiar to most players. The warmth
and crunch of a naturally overdriven power amp is captured powerfully by this channel. Touch
sensitivity and dynamics are emphasized in this traditionally voiced preamp. This channel
provides creamy-smooth overdrive, with a slight compression effect.
Channel 3 is the power driver. It delivers the goods in a forceful, aggressive manner with
the slightest amount of tube compression. Voiced quite a bit harder than Channel 2, Channel
3 is like a sledgehammer pounding away.
Rounding out the front panel controls are a pair of power amp feedback controls, Eek and
Ugh. Use them for tuning the amplifier to different cabinets or rooms.
The rear panel consists of an array of speaker outputs, 1/4" and Neutrik Speakon®, slave
output with level control, bias controls and test points, and the effects loop with level
controls - switchable for series or parallel operation. The loop can be engaged from the
front panel switch or the supplied BVFS4 footswitch.
Speakon® is a registered trademark of Neutrik U.S.A.
3
THE FRONT PANEL - Input, Channel 1:
8 7 6 5 4 3 2
1.Input Jack: 1 Meg Ohm input impedance 1/4”
input jack – plug your guitar in here.
2.Channel 1 Select Switch: When you want to
use Channel 1, press this switch. The green LED
above this switch lights up when Channel 1 is
selected. The BV300H uses instant access switching – when the footswitch (#28, rear panel) is
connected, either the front panel channel select
switches or the footswitch will select the
desired channel.
3.Gain: Use this control to adjust the input
gain for Channel 1. Towards the “–” side gives
you tight, dynamic clean tones. Towards the “+”
side you’ll get more crunch. Using a circuit
that was originally used for the bass or guitar, the gain is mild, yet thick & punchy. (A
humbucker will push the preamp intensely into
compression.)
1
provides a range of 38dB at 5kHz.
5.Mid Freq Select: Use this control to select
the frequency where the Mid control takes
effect – 300Hz, 700Hz, 1kHz, 1.5kHz, or 3kHz.
6.Mid: Use this control to adjust the midrange
level for Channel 1. The Mid control gives you
10dB of boost or 22dB of cut at whatever frequency the Mid Freq control (#6) is set to. The
Mid control is a peak/dip style filter.
7.Level: Use this control to adjust the output
level of Channel 1. Along with the Gain control
(#3), you can get the right blend of dynamics
for your playing style.
8.Bass: Use this control to adjust the low end
level for Channel 1. The Bass control provides
24dB of boost or cut at 50Hz.
4.Treble: Use this control to adjust the top
end level for Channel 1. The Treble control
4
THE FRONT PANEL - Channel 2:
15 14 13 12 11 10 9
9.Channel 2 Select Switch: When you want to
use Channel 2, press this switch. The amber LED
above this switch lights up when Channel 2 is
selected. The BV300H uses instant access switching – when the footswitch (#28, rear panel) is
connected, either the front panel channel select
switches or the footswitch will select the
desired channel.
10.Gain: Use this control to adjust the input
gain for Channel 2. Towards the “–” side gives
you the classically British warm crunch. Towards
the “+” side gives you creamy smooth overdrive
with a touch of compression.
11.Treble: Use this control to adjust the top
end level for Channel 2. The Treble control
provides 12dB of boost or cut at 2kHz.
12.Mid Boost Select: Use this control to add
a 4~5dB boost from the low end up to the
midrange frequency selected: 250Hz, 500Hz,
750Hz, or 1kHz. There is, of course, no boost
when this control is at the “off” position.
13.Mid: Use this control to adjust the
midrange output level for Channel 2. The Mid
control gives you 10dB of boost or cut at
750Hz.
NOTE: The Mid Boost Select (#12) uses a different circuit than the Mid control (#13).
14.Level: Use this control to adjust the output level of Channel 2. Use this control along
with the Gain control (#10) to get the sound
you’re looking for on Channel 2.
15.Bass: Use this control to adjust the low
end level for Channel 2. The Bass control provides 20dB of boost or cut at 50Hz.
5
THE FRONT PANEL - Channel 3:
22 21 20 19 18 17 16
16.Channel 3 Select Switch: When you want
to use Channel 3, press this switch. The red
LED above this switch lights up when Channel 3
is selected. The BV300H uses instant access
switching – when the footswitch (#28, rear
panel) is connected, either the front panel
channel select switches or the footswitch will
select the desired channel.
17.Gain: Use this control to adjust the input
gain for Channel 3. Towards the “–” side gives
you a punchy tube sound perfect for aggressive
rhythm playing. Towards the “+” side and you’re
asking for some seriously aggressive tones!
18.Treble: Use this control to adjust the top
end level for Channel 2. The Treble control
provides 25dB of boost or cut at whatever frequency the High Freq control (#19) is set to.
19.High Freq Select: Use this control to
choose the frequency where the High control
takes effect – 10kHz, 8kHz, 6kHz, 4kHz or 2kHz.
20.Mid: Use this control to adjust the
midrange level for Channel 3. The Mid control
provides 20dB of boost or cut at 1.2kHz.
21.Level: Use this control to adjust the output level of Channel 3. Use this control along
the Gain control (#17) to get the sound you’re
looking for on Channel 3.
22.Bass: Use this control to adjust the low
end level for Channel 3. The Bass control provides 18dB of boost or cut at 100Hz.
6
THE FRONT PANEL - Effects Loop, Eek & Ugh:
27
26
23.Loop Switch: When you want to engage the
rear panel effects loop, press this switch. The
blue LED above this switch lights up when the
effects loop is active. This can be used as a
“boost” feature – see the “Hot Tip” on page
9. The BV300H uses instant access switching –
when the footswitch (#28, rear panel) is connected, either the front panel loop switch or
the footswitch will activate the effects loop.
24.Eek!: This is your high frequency
power amp damping control. This is used to
add definition and edge to your sound. The
Eek! control helps to compensate for dark
rooms and/or speaker cabinets.
25 24 23
26.Standby Switch: Use this switch to
put the amplifier into “Stand By” mode the tube filaments are still turned on, but
the high voltage is deactivated.
NOTE: The Power switch must be turned on
for at least ONE MINUTE before you turn
on the Standby switch (#26).
27.Power Switch: Use this switch to turn
the amplifier on and off.
25.Ugh!: This is your low frequency power
amp damping control. This is used to control and shape the low end. Towards the “–”
side tightens up the bass and controls the
speaker cones better. Towards the “+” side
makes it more “thumpy” and allows the speaker
cones to move easier.
7
THE REAR PANEL - Footswitch, Speakers, Slave Out:
BIG WARNING:
IT MAY BE TEMPTING,
BUT NEVER PLUG
YOUR HEADPHONES
INTO THE SPEAKER
OUTPUT JACKS OF A
300 WATT AMPLIFIER!
28
29
28.Footswitch Jack: Use this jack to
connect the BVFS4 four-button footswitch to
the amplifier. This allows you to switch
channels and turn the effects loop on and
off - by remote foot control. Connect one
end of the supplied footswitch cable* to
this jack, the other end to the footswitch.
29.Speaker Output Jacks: Use these
jacks to connect your speaker cabinet(s) to
the amplifier. The wiring for the Speakon®
jacks is Pin 1+ = hot, Pin 1– = ground.
All six Speaker Output jacks are wired in
parallel, which lets you connect the amp to
a bunch of cabinets.
The minimum gauge of the wiring used for
these connecting cables should be 16GA!
30.Impedance Switch: Use this switch to
match the amplifier to the total impedance
of your speaker cabinets. Use the following
chart and make sure that this switch is at
the proper setting before playing!
*NOTE: You MUST use a
5-wire MIDI cable when
connecting the BVFS4
to the amplifier for
proper operation of
the footswitch.
30 31 32
IMPEDANCE
O F CABINETS
16 ohms
16 ohms
8 ohms
8 ohms
4 ohms
33 34 35 36 37
NUMBER OF
CABINETS
8
4
4
2
2
TOTAL
IMPEDANCE
2 ohms
4 ohms
2 ohms
4 ohms
2 ohms
31.Slave Out Jack: Use this jack to connect the amp to a slave amplifier, PA amp,
or recording console. The signal at the
Slave Out jack is an attenuated version of
the signal at the Speaker Output jacks.
NOTE: The
capable of
equipment.
control is
signal at the Slave Out jack is
potentially damaging certain
Make sure the Slave Out Level
all the way down before connect-
ing anything to the Slave Out jack. Then
slowly increase the Level control!
Never use the Slave Out if the
amplifier is not connected to a
speaker cabinet!
32.Slave Out Level: Use this knob to
adjust the output level of the Slave Out
signal (#31).
The BVFS4 footswitch - select channels
& turn the effects loop on and off
with just a tap of your foot!
8
THE REAR PANEL - Effects Loop, Bias, AC Power:
1 32
37
33 343835 36 37
33.Effects Loop Send Level: Use this
knob to adjust the level of the Effects
Loop Send signal (#34). Some effects are
picky as to what they like for an input
level, so use this knob to get them to
smile.
34.Effects Loop Send Jack*: When connecting the amp to an external effects
device, use this jack to send the signal
to the Input jack of the effect.
35.Series/Parallel Switch: Use this
switch to configure the effects loop in
series or in parallel with the signal path.
Certain effects sound better one way than
the other.
36.Effects Loop Return Jack*: When
connecting the amp to an external effects
device, use this jack to return the signal
from the output of the effects device back
into the amplifier.
37.Effects Loop Return Level: Use this
knob to adjust the level of the Effects
Loop Return signal (#36). Some effects have
hotter outputs than others, so use this
knob to adjust the return signal level for
the best level of effect.
38
39
4038
38.Bias Controls: Authorized Service
personnel use this section to work their
magic on the amplifier. Like it says on
the amp: Don’t mess with the Bias!
Your Authorized Crate Service Center will
have all the information needed to re-bias
your amplifier if and when it becomes necessary.
39.Fuse: The fuse helps protect the
amplifier against damage from faulty AC
line voltages and other possible problems.
If the amp stops working, check the fuse.
If the fuse is blown, replace it ONLY with
the exact same size and type as indicated!
If the problem persists, contact your
Authorized Crate Service Center.
40.AC Inlet Jack: Insert the female end
of the power cord firmly into this jack.
The grounded power cord should only be
plugged into a grounded power outlet that
meets all applicable electrical codes and
is compatible with the voltage, power, and
frequency requirements stated on the rear
panel. Do not attempt to defeat the
safety ground connection!
* H O T T I P ! If you connect a signal cable from
the Effects Loop Send jack (#34) to the Effects
Loop Return jack (#36), the loop level control
adjust the amount of boost engaged - up to 6dB in
the series mode, up to 9dB in the parallel mode!
9
Some Suggested Settings:
Chug Rhythm (Humbucker):
Bluesy Stang:
Sparkling Clean:
Metal Sound:
Rock Sound:
Spitty Gain (Humbucker):
Evil Thoughts:
Chunk (Humbucker):
Bluesy Tone (Strat):
As Sick As It Gets:
10
The Block Diagram:
V1
V1
V2
V2
GAIN
LEVEL
BASS TREBLE
INPUT
V1–V8 = 12AX7
V9–V10 = 12AU7
V11–V16 = 6550A
MID
300
3k
1.5k 1k 700
V3
V6
V6
V7
GAIN
LEVEL
SEND
RETURN
BASS MID TREBLE
OFF
1k
750 500 250
V4
V4
V5
EFFECTS
LOOP
V5
GAIN
LEVEL
BASS MID TREBLE
10k
2k
4k 6k 8k
1+
1-
V9
V10
V11
V13
V15
1+
IMPEDANCE
SELECTOR
V8
V9
EEK!
V10
V12
V14
SPEAKON
SPEAKER
OUTPUTS
V16
1-
1/4"
SPEAKER
OUTPUTS
UGH!
LEVEL
SLAVE
OUT
11
Technical Specifications:
OUTPUT POWER RATING
300 Watts RMS @ 5% THD, 4 ohm load, 120 VAC
SIGNAL TO NOISE RATIO
75dB Typical
GAIN
Channel 1
Channel 2
Channel 3
80dB
105dB
105dB
Channel 1
Channel 2
Channel 3
LOW
24dB range @ 50Hz
20dB range @ 50Hz
18dB range @ 100Hz
MID
+10/-22dB @ EQ Switch
10dB range @ 750Hz
20dB range @ 1.2kHz
EQ SWITCH
300,700,1k,1.5k or 3kHz
+4~5dB @ 250,500,750 or 1KHz
2k, 4k, 6k, 8k or 10kHz
HIGH
38dB range @ 5kHz
12dB range @ 2kHz
25dB range @ EQ Switch
EQs
EEK!
6dB @ 5kHz
UGH!
5dB below 250Hz
PREAMP TUBES
(8) 12AX7A, (2) 12AU7
POWER TUBES
(6) 6550A
POWER REQUIREMENTS
120 VAC, 60 Hz, 600VA
100/115 VAC, 50/60 Hz, 600VA
230 VAC, 50/60 Hz, 600VA
SIZE A N D WEIGHT
30”W x 12-1/2” H x 11”D, 80 lbs.
Specifications and information subject to change without notice.
The BV300H is covered with heavy duty Tolex® - wipe it clean from time to time with a soft damp cloth.
Declaration Of Conformity
#35, Effective 01-01-2001
Manufacturer’s Name:
Production Facility:
Production Facility:
Shipping Facility:
Office Facility:
SLM Electronics
11880 Borman Drive, St. Louis, MO 63146, USA
700 Hwy 202 W, Yellville, AR 72687, USA
1400 Ferguson Ave., St. Louis, MO 63133, USA
1400 Ferguson Ave., St. Louis, MO 63133, USA
Product Type:
Audio Amplifier
Complies with Standards:
LVD:
Safety:
EMC:
92/31/EEC, 93/68/EEC, & 73/23/EWG
EN60065
EN55013, EN55020, EN55022, EN61000-3-2,
& EN61000-3-3
Supplementary information provided by:
SLM Electronics - R & D Engineering
1901 Congressional Drive, St Louis, MO 63146, USA
Tel.: 314-569-0141, Fax: 314-569-0175
www.crateamps.com
©2002 SLM Electronics • A division of St. Louis Music, Inc. • 1400 Ferguson Avenue • St. Louis, MO 63133
47-329-01 • 07/02