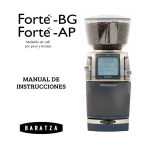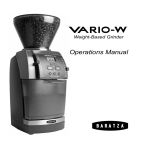
1
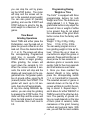
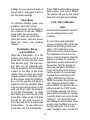
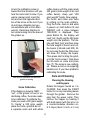
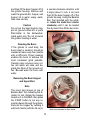
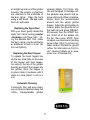
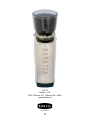
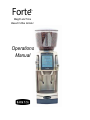
Forte
TM
Weight and Time
Based Coffee Grinder
Operations
Manual
Forte
Thank you for purchasing the FortéTM or the
FortéTM Brew Grinder. With the FortéTM, it is
easier than ever to grind by weight or time
in an industrial setting. Below are detailed
descriptions of the features that make the
FortéTM stand out from all other grinders.
Note: the FortéTM will be used when talking
about the grinder and it applies to the FortéTM
BREW GRINDER (BG) as well unless otherwise noted.
Precision, commercial-quality,
task specific ceramic and steel
burrs.
The ceramic burrs we use on the FortéTM are
manufactured in Germany by MAHLKÖNIG.
They are designed to cover a full range of
grind, from espresso to French press. The
materials used are made with the highest
industry standard and are designed with the
equal care. Ceramic burrs remain sharp for a
life time unless a stone or other foriegn object comes in contact with them.
The Steel burrs that are used in the FortéTM
BG are manufactured in Switzerland by DITTING. They are manufactured to the highest
standards in the industry. The range of grind
is strictly limited to manual brewing (they will
not do espresso grind).
Time or Weight-Based Grinding,
for extreme accuracy (and ease) in
dosing.
The FortéTM can be used as a fully integrated time or weight-based grinder. Using
the touch screen you can change whether
you want to grind by time or by weight. The
built-in precision load cell provides accurate
1
TM
weighing, while grinding to within (+/-) 0.2
of a gram. The time-based dosing allows
for grinding directly into your porta filter.
Innovative software allows for automatic
conversion from weight-based dosing to
time-based dosing.
Innovative grind adjustment
system.
Macro and Micro adjustments are quickly
and repeatedly achievable with the intuitive FortéTM adjustment system. The
range of grind and the accuracy of the
settings gives more functionality and
precision to users. The FortéTM-BG has
260 distinct settings to fine tune the perfect particle size for all manual brewing.
The FortéTM has 260 distinct settings that
ranges from espresso to French press.
Quiet drive system.
The FortéTM houses a high torque DC motor with a belt drive transmission. The industrial drive belt provides for a smooth,
quiet operation, and thermal disconnection of motor and burrs. The motor is able
to effortlessly handle long duty cycles.
Additionally, the FortéTM possesses an
automatically resettable thermal safety
circuit that protects the motor from overheating.
Table of Contents
Introduction .......................................................................................... 1
Table of Contents ................................................................................. 2
Parts Identification ............................................................................... 3
Safety Information ................................................................................ 4
Initial operation .................................................................................. 5
Macro and Micro Grind Adjustment ................................................ 5
Weight Based Grinding Operation .................................................. 6
Time Based Grinding Operation ..................................................... 7
Programming Dosing Weights or Time............................................ 7
Sleep Mode .................................................................................... 8
PortaHolder
TM
Setup and Installation .............................................. 8
Forté Burr Calibration ................................................................... 8
TM
Scale Calibration ........................................................................... 9
Care and Cleaning .............................................................................. 9
Cleaning the Housing and Hopper................................................... 9
Cleaning the Burrs .......................................................................... 10
Removing the Bean Hopper and Upper Burr ................................. 10
Replacing the Upper Burr and Bean Hopper .................................. 11
Replacing the Bean Hopper ........................................................... 11
Automatic Cleaning ......................................................................... 11
Warranty and Service .......................................................................... 12
Grinding Notes .................................................................................... 13
Baratza Contact Information ............................................................... 14
2
Forte
TM
Parts Identification
Hopper lid
Whole bean hopper (300 grams)
Micro grind adjustment lever
Macro grind adjustment lever
Programable preset buttons (3)
Grind weight adjustment buttons (2)
Ground coffee bin (125 gram capacity)
cutaway to show Weight Platform
Weight platform
Ceramic burr
(FortéTM Brew Grinder)
Steel burr
(FortéTM)
Portaholder
3
TM
Before First Time Use
Prior to using your Forté for the
first time, wash the bean hopper
and ground coffee bin in warm
soapy water and allow them to dry
thouroughly before use. See the
section on Care and Cleaning for
instructions on how to remove and
reinstall these parts.
to be performed only by authorized
service centers. An improperly repaired grinder is a source of risk to
the user and voids the warranty.
Baratza will not accept any liability
for damage or injury if the grinder
is used for anything other than its
intended purpose or if it is improperly operated or repaired. All warranty claims will be void.
TM
Important Safety Information
Please read the information below
very carefully. It contains important tips for the use, safety, maintenance and care of the Forté .
Please keep these operating instructions for future reference.
Do not operate the grinder with a
damaged cord or plug. Turn off
and unplug the grinder if it malfunctions in any way. Do not leave
your grinder unattended while
turned ON.
TM
Caution
Turn off and unplug the grinder
from the electrical outlet before
cleaning. To unplug, grasp plug
and to remove it from the outlet never pull on the cord. Keep your
grinder out of the reach of children.
Do not immerse the grinder, the
plug or the cord in water or any
other liquid.
Your new Forté is rated for either
120 VAC or 230 VAC. Please confirm the voltage of your Forté on
the nameplate attached to the bottom of the grinder. The 120 VAC
Forté can be used from 100 to
130 VAC and the 230 VAC Forté can be used from 200 to 240
VAC. Please ensure your supply
voltage range matches the nameplate voltage on your Forté . Only
clean the grinder housing with a
dry or slightly damp cloth. Do not
use this grinder for anything other
than grinding whole roasted coffee
beans. Disassemble the grinder
only as directed in the Care and
Cleaning section of this manual.
If you cannot remedy a malfunction, please visit www.baratza.
com for assistance. Repairs are
TM
TM
TM
TM
TM
4
to the OPEN position. Center the
ground coffee bin in front of the
grinder and slide it in onto the load
cell platform. Press WEIGHT, then
press TARE. The display should
now read 00.0. Press button 1,
then press START.
Initial Operation
Place the Forté grinder on a level surface. With the hopper lid in
place, mount the hopper on the
grinder housing by lining up the
two small tabs at the base of the
hopper with the two slots inside
the collar on the top of the grinder.
The Hopper Guard Open/Closed
lever is oriented toward the back
of the grinder.
TM
Setting the Macro and Micro
Grind Adjustment
Note
Partially ground coffee beans may
remain between the burrs when the
grinder is turned off. When making
ANY grind adjustment the grinder
must be running. After a macro or
micro adjustment is made, allow
5 grams of coffee to pass through
the grinder to receive the desired
grind.
Micro
Macro
Adjustment A-Z
Adjustment 1-10
Insert the bean hopper then rotate
clockwise to lock in place.
Turn the hopper clockwise until the
back tab lines up with the small
notch in the colar. There will be a
destinct increase in friction as the
hopper locks in place. Insert the
power plug into an AC outlet. Pour
the desired quantity of roasted,
whole coffee beans into the hopper. Replace the lid and turn the
Hopper Guard counter-clockwise
The FortéTM must be running when
grind adjustment are made.
5
Grind Adjustments (cont.)
Move the Macro lever (right side)
up or down to the desired grind
size. Set the Micro adjustment lever (left side) to the middle of the
scale.
Weight-based
Grinding Operations
Select WEIGHT, then insert the
ground coffee bin on the load cell
and press TARE then press one
of the preset buttons (1, 2, 3).
The screen will show the pre-programmed grind weight in grams.
Press START to begin grinding.
While grinding, the screen will dis-
Grind a small amount of coffee into
the bin by pressing WEIGHT, then
M (manual), and then the START
button. Press STOP after 5 grams
of coffee have been ground. Check
the particle size. If the particle size
is close to what you desire, use the
Micro lever to fine tune the grind
size. If the particle size needs a big
change, then adjust the Macro lever to a new position.
The full range on the Micro scale
is equal to one “click” or position change on the Macro scale.
When both levers are moved UP,
it produces a smaller particle size
and when both levers are moved
DOWN it produces a larger particle
size. The actual grind size for a
particular setting will vary depending on many factors including; the
degree of roast (light vs. dark),
freshness, humidity, the type of
bean, and bean oil content. With
use you will become accustomed
to determining the correct settings
for various beans, taste, and brewing styles.
All Weight and Time settings are made
using the touch screen.
play in real-time, the weight of coffee in the grounds bin. When the
screen reaches the programmed
weight (+/- 0.2 gram), the motor will
stop and the screen will show the
actual weight in the grounds bin for
3 seconds, then the screen will reset to the programmed weight. The
grinder will only allow a maximum
of 120 grams to be ground at one
time. At any time during grinding,
6
Programming Dosing
Weights or Time
The Forté is equipped with three
programmable buttons for both
Weight and Time. The buttons are
simply labeled 1, 2, 3. These programmable buttons only adjust the
amount of time or weight of coffee
to be ground, they do not adjust
the coarseness of the grind. Each
button comes from the factory with
a preset:
Weight: 1=15g, 2=30g, 3=60g.
Time: 1=10s, 2=15s, 3=30s.
You can easily program more or
less grinding weight or time as follows: 1.Press the up or down arrow buttons to adjust the grams or
seconds. Press and hold the (up or
down) arrow for two seconds to
advance grams or seconds more
quickly, hold for five more seconds
and it will advance even faster.
2. Once you have reached the
desired Weight or time setting,
press the corresponding button
(1, 2, or 3) and hold for 3 seconds.
The selected amount of grams or
seconds shown on the top of the
screen will blink to confirm the setting is stored. 3. Repeat steps 1
and 2 above for either WEIGHT or
TIME for each of the other two buttons. The quantity of ground coffee you need depends on the type
of burrs (steel or ceramic), bean,
coarseness of the grind, brewing
method and personal taste. With
use, you will find the most suitable
you can stop the unit by pressing the STOP button. The motor
will stop and the screen will reset to the selected preset weight.
You can also press M (manual)
grinding, and use the START and
STOP buttons to grind to the desired weight to a maximum of 120
grams.
TM
Time Based
Grinding Operations
Select TIME and either place the
PortaHolder™ over the load cell, or
place the ground coffee bin on the
load cell. Press the desired button
(1, 2, or 3). The screen will show
the corresponding Programmed
grind time in seconds. Press
START button to begin grinding.
While grinding, the screen will
count down the seconds to 0.0.
When the screen reaches 0 seconds, the motor will stop and the
display will reset again to the programmed time. For greater quantities of ground coffee, press the M
(manual) button then START. The
grinder will count up to 55 seconds, then shut off automatically.
At any time during MANUAL operation, you can stop the grinding
by pressing the STOP button. The
motor will stop and the screen will
show the total amount of seconds
for 3 seconds, then it will reset to
0.0.
7
Press TIME and the desired preset
dose button, then press START.
The grinder will run for the preset
dose time and stop automatically.
settings for your personal taste. If
the grinder is unplugged it will retain the stored settings.
Sleep Mode
To minimize standby power consumption, the Forté will go
into “sleep mode” automatically after 5 minutes of non-use. While in
sleep mode, the screen goes
blank. To “wake up” your Forté ,
press any button. Once the screen
lights up, select your grinding
method.
Forté Burr Calibration
TM
TM
Note
All directional indications assume
you are looking down on the
machine.
TM
A 2 mm Allen head calibration
screw is located in the round hole
behind the discharge chute (see
photo). This calibration screw
allows the user to easily fine tune
the calibration of the burr in the
finer or coarser direction while the
grinder is running. To make the
adjustment, empty all beans from
the grinder. Turn the grinder on
and lower the Macro and Micro
levers all the way to the bottom.
Let the grinder run long enough
to expel any remaining ground
coffee. With the bin removed,
TARE the grinder. Now press any
one of the preset buttons then
press START. The grinder will run
until you press the STOP button
or 3 minutes elapses. For a finer
grind, while the grinder is running,
move the Macro arm up to the top
(setting 1). You should not hear
any change in motor speed. Now
slowly move the Micro arm up to
the top (setting A). If the motor
hasn’t started to slow, use the tool
PortaHolder™ Set-up
and Installation
Place the PortaHolder™ on a flat
surface and check to see if your
porta filter fits onto the two steel
bars and sits level. The steel support bars can be adjusted vertically by loosening the two Phillips
screws on the back of the Porta
Holder. Once you have the correct
vertical position for the bars, tighten the screws. Insert the PortaHolder™ into the grinder and press it
rearward until fully installed. Make
sure not to put any pressure on the
load cell. Then insert the porta filter into the PortaHolder™ by lifting
the handle up so the front lip of the
porta filter slides under and gets
hooked by the hook bracket on
the under side of the funnel shape
Porta-Holder™. To use, insert your
porta filter into the PortaHolder™.
8
coffee beans until the scale reads
200 grams (total weight of bin and
coffee beans). Keep your “200
gram weight” handy. Now unplug
the Forté and make sure there
is nothing on the scale platform.
Plug the Forté back in and while
it powers on hold buttons M and
WEIGHT until a value between
1500-3000 is displayed. Then
press Button M, the display will
read “cal”. Gently set the 200 gram
weight onto the platform. The display will flash “pas” and then show
the total weight of the bin and coffee beans (it should read 200). After removing the bin the ON screen
will show 0.0. Empty the beans.
Then press start to bring the grinder to the “home screen” then place
the bin back on scale and press
tare (T). The scale is now calibrated . Please e-mail us at support@
baratza.com if you have problems
calibrating the scale.
to turn the calibration screw in
toward the finer direction until you
hear the motor start to slow. If you
want a coarser grind, insert the
tool and turn the opposite direction of the arrow on the tool. If you
do not have a Baratza tool you
can substitute with a 2mm Allen
wrench. Determine direction to
turn while looking from the base of
the grinder up.
TM
TM
Care and Cleaning
Use the burr calibration tool while the
grinder is running.
Cleaning the Housing
and Hoppers
Rotate the Hopper Guard so it is
CLOSED, then press the START
button to run any remaining beans
through the grinder. Remove the
plug from the power outlet. Then
remove the hopper by twisting it
with both hands (with the lid on) in
a counterclockwise direction until it stops (about ¼ inch, or 4 cm)
Scale Calibration
If the display is showing “EEE”,
“out”, or the grinder is over or underdosing coffee, the scale needs
to be calibrated. To calibrate the
scale you need a 200 gram weight.
To “create” a 200 gram weight,
place the Forté grounds bin on
a separate scale and add whole
TM
9
and then lift the bean hopper off of
the grinder housing. Remove and
wash the grounds bin, hopper, and
hopper lid in warm soapy water,
then rinse and dry.
a counter-clockwise direction until
it stops (about ¼ inch, 4 cm) and
then lift the bean hopper off of the
grinder housing. Using the Baratza
Burr Tool included with the grinder, rotate the metal burr carrier
clockwise until it can be twisted
free by hand, then lift the burr carri-
Caution
Do not put the bean hopper, hopper lid, ground coffee bin, or porta
filter-holder in the dishwasher.
Hand wash only. Do not immerse
the grinder housing in water.
Cleaning the Burrs
If the grinder is used daily, the
burrs (steel or ceramic) should be
cleaned at least every few months
with a stiff brush. Proper cleaning
enables the burrs to achieve the
most consistent grind possible.
Cleaning also removes some coffee oils which will stale and degrade the flavor of the ground coffee. Do not wash the burrs with
water.
Turn burr clockwise to remove
Removing the Bean Hopper
and Upper Burr
Note
The icons and arrows on top of
Baratza Burr Tool indicating the direction to turn. Rotate the Hopper
Guard so it is CLOSED, then press
the START button to run any remaining beans through the grinder.
Remove the hopper by twisting it
with both hands (with the lid on) in
Steel burr mounted on burr carrier
10
cleaning tablets. Full Circle™ tablets are designed to dislodge coffee particles and absorb and remove odors and coffee oil residue.
Simply place the recommended
amount into the empty grinder
hopper. Adjust the grind setting to
Coarse, place the grounds bin on
the load cell and press WEIGHT,
M (manual) then the START button. Grind all of the tablets into
the bin, then press STOP. Once
complete we recommend grinding
some coffee (4 tbs.) to remove any
tablet residue. Discard the ground
coffee. For information on Full Circle™ cleaning tablets go to www.
urnex.com. or baratza.com.
er straight up and out of the grinder
housing. The ceramic or steel burr
are mounted to the underside of
the burr carrier. Clean the burrs
using a stiff brush. Do not wash
the burrs with water.
Replacing the Upper Burr
With your hand, gently thread the
upper burr carrier turning counter
-clockwise until finger tight . Using the Baratza Burr Tool, rotate
the burr carrier counter-clockwise
an additional 1/8 inch or 2 mm. (do
not over tighten).
Replacing the Bean Hopper
To replace the bean hopper line
up the two small tabs on the base
of the hopper with their respective slots in the top of the grinder
housing and insert the hopper into
the grinder. Once the hopper is
in place rotate it clockwise until it
clicks to a stop (about ¼ inch or 4
cm).
Automatic Cleaning
A thorough, fast, and easy cleaning can be accomplished using Full
Circle™, biodegradable, grinder
11
Warranty and Service
International Warranty
Information
Go to: www.baratza.com for warranty information on grinders sold
outside the United States.
U.S. and Canadian Warranty
Information
Limited Warranty for Baratza
Grinders is 1 year. This warranty
covers all defects in materials or
workmanship (parts and labor) including free ground transportation
to and from our repair facility within
US and Canada. This warranty
does not apply to: improper use,
lack of cleaning, abuse, normal
wear and tear, lack of proper adjustment, foreign objects (stones,
screws, etc) in the beans, or uses
outside the intended use of grinding whole roasted coffee beans. If
your grinder fails within one year,
e-mail [email protected] or
call 425-641-1245. If the problem
cannot be solved over the phone
and the problem is determined to
be a warranty issue, then Baratza
will deliver an identical or comparable replacement to your door,
free of charge and arrange to have
your “failed” grinder returned to us.
When you receive your replacement grinder, use the carton and
packing material and shipping label to return your “failed” grinder by
dropping if off at any UPS pickup
locations. If the grinder is outside
US or Canada the customer is responsible for the shipping of the
grinder for repair.
Proof of Purchase
and Product Registration
You can register your grinder at
www.baratza.com.
Registration
will enable us to contact you in the
unlikely event of a product safety
notification and assist us in complying with the provisions of the
Consumer Product Safety Act. The
serial number is located on the
bottom of the grinder. Please keep
your sales receipt that shows the
date of purchase.
For repairs or Questions
e-mail: [email protected]
For parts and information go to:
www.baratza.com
For all other inquiries call:
425-641-1245
12
Grinding Notes
13
© 2013
Baratza, LLC
3923-120th Ave. S.E. Bellevue, WA. 98006
www.baratza.com
rev: 062713
14