1
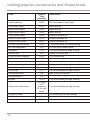
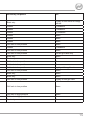
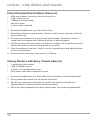
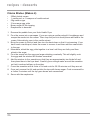
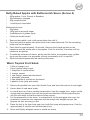
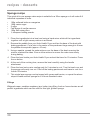
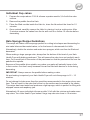
®
halo
health fryer
instruction booklet
selection of recipes included
product safety
IMPORTANT SAFETY INSTRUCTIONS.
READ CAREFULLY AND KEEP FOR FUTURE REFERENCE
This product must not be used by children under the age of 8.
This product can be used by children aged from 8 years and
above if they are continuously supervised.
This product can be used by other persons who require
supervision, provided:
• they are familiar with the hazards associated with the
product, and,
• they receive instruction by a competent person on how to
safely use the product.
Keep the product and its cord out of reach of children aged
less than 8 years. Cleaning and user maintenance must not be
done by children.
This product must be positioned on a stable surface with the
handles positioned to avoid the spillage of hot liquids.
Surfaces of the product are liable to get hot during use.
Never operate the product by means of an external timer or
separate remote-control system.
If the supply cord is damaged, it must be replaced by the
manufacturer, its service agent or similarly qualified persons in
order to avoid a hazard.
2
!!Never use this appliance for anything other than its intended use. This appliance is for
household use only. Do not use this appliance outdoors.
!!Always ensure that hands are dry before handling the plug or switching on the
appliance.
!!Always use the appliance on a stable, secure, dry and level surface.
!!Ensure the appliance is switched off and unplugged from the supply socket if it is
left unattended, when it is not in use or before cleaning. Never leave the appliance
unattended when it is in use.
!!Always allow the appliance to fully cool down before cleaning or storing.
!!Do not use the appliance if it has been dropped, if there are any visible signs of
damage or if it is leaking.
!!Never immerse any part of the appliance or power cord and plug in water or any other
liquid.
!!Never let the power cord hang over the edge of a work top, touch hot surfaces or
become knotted, trapped or pinched.
!!Do not touch the external surfaces of the appliance during use as they may become
very hot.
!!Only use spares or accessories that are recommended by the manufacturer.
3
parts
1. Lid
2. Halogen heater and fan assembly
3. Lid release button
4. Display
5. Timer setting button
6. On/off button
7. Paddle
8. Oil measure
(approximately equal to 15ml)
9. Dual height wire rack
10. Removable non-stick bowl
11. Detachable bowl handle
12. Bowl roller assembly
4
q
w
e
r
t
y
u
i
o
a
s
d
Due to our policy of continuous improvement, the actual product may differ slightly from the one illustrated in these instructions.
5
before first use
Never immerse any part of the fryer body, power cord or plug in water or any
other liquid. Before assembling or disassembling your fryer, ensure it is unplugged
and all parts are cool.
Unpack the appliance and remove all packaging, promotional materials and stickers.
Remove all printed documents. Wash the removable bowl, paddle, measuring spoon, wire
rack and bowl handle in hot soapy water. Rinse then dry all of the parts. Wipe the body
and lid with a damp cloth only—see page 16 for cleaning instructions.
Assembling the paddle
1. Push the handle firmly into the hole in the paddle until it clicks. Once assembled, do
not try to remove the handle from the paddle otherwise it may be damaged.
Fitting the bowl roller assembly
The bowl roller assembly must be fitted the correct way up as shown in figure 1 below.
Two of the wheel axles are stamped with the word ‘UP’. These must face upwards when
the roller is correctly fitted. If, during use, the bowl makes excessive noise or fails to
rotate properly, make sure that the bowl roller assembly is fitted the right way up.
1. Place the bowl roller assembly centrally into the bottom of your Halo Health Fryer.
2. Place the bowl into the body of your fryer as shown in figure 2 below.
q
UP
w
6
bowl handle
During cooking the removable bowl rotates so only use the handle to remove
the bowl after cooking has finished. Remember the bowl will be very hot! Don’t set
the bowl down on a surface that may be damaged by heat.
After cooking, you can use the detachable bowl handle to remove the bowl and its
contents safely.
1. Place the bowl handle over the lip of the removable bowl
2. Lower the handle onto the bowl
3. Slide the lever forwards. The handle will grip the bowl. Let the lever return to its rest
position.
4. Lift the bowl out of the fryer body.
5. To release the bowl, press the button on the handle.
6. Lift the handle off the rim of the bowl.
q
w
r
e
t
y
7
cooking chips
Always use your fryer on a stable, secure, dry and level surface.
Allow adequate space above and on all sides for air circulation.
Do not allow the appliance to touch any flammable material during use (such as
curtains or wall coverings).
Care is required when using the appliance on surfaces that may be damaged by
heat. The use of an insulated pad is recommended.
Your Halo fryer can be used to cook fresh or frozen chips, however, for the healthiest
option, we suggest you try our perfect homemade chips on page 17.
Cooking chips uses the paddle to ensure even cooking. Foods such as mushrooms,
diced potatoes, etc. can also be cooked using the paddle.
1. Press the lid release button and open the lid.
2. Fit the removable bowl then fit the paddle onto the spindle in the bowl.
3. Add the chips to the bowl. Distribute the chips evenly over the bottom of the bowl and
don’t exceed the MAX indicator line on the bowl.
4. Add the recommended quantity of oil to the chips using the cooking oil measure.
Spread the oil evenly over the chips. Please refer to our cooking popular,
convenience and frozen foods guide on page 14-15.
5. Close the lid and plug your fryer into a suitable mains supply and switch the socket
on. Your fryer will beep, the display will light up blue and after a second or two will
show 00.
Use the TIME button to enter the desired cooking time in minutes. If you keep your
finger on the TIME button, the time will increase quickly. When you are near the
desired time, make single presses of the button.
If you make a mistake press and hold the on/off button until your fryer beeps and the
display once again shows 00. Re-enter the time as described above.
6. Press the on/off button and the display will turn orange, the halogen heater will
illuminate and the fan will start. The timer will start to count down in minutes until 1
minute remains when it will count down in seconds.
7. When the cooking time has ended, your fryer will beep and the halogen heater will
turn off. The fan will continue running until you open the lid.
Notes
During cooking, you may open the lid at any time by pressing the lid release button.
Doing this will switch off the halogen heater and the fan but the timer will continue to
count down. Closing the lid will restart cooking. If you have had the lid open for some
time, you may need compensate with additional cooking time after the original time has
elapsed.
During cooking, the halogen heater will switch on and off from time to time. This is normal
and allows your Halo Health Fryer to maintain an even cooking temperature.
8
w
q
e
r
MAX
MAX
t
y
9
other cooking methods
Your Halo Health Fryer comes complete with a dual height rack that can be used for a
variety of foods e.g. sausage, chicken, chips, fish, etc. Foods can also be cooked directly
in the removable bowl with or without the paddle. Use whichever method gives you the
best results.
1. The rack can be used either way up to bring food closer to, or further from the
halogen heater.
2. Press the release button and open the lid. Place the rack into the removable bowl
whichever way up you require.
3. Place the food on the rack. The rack and food will rotate during cooking so make
sure that the food will not touch any part of the halogen heater/fan assembly or other
part of the lid when it is closed.
4. If required, add oil evenly over the food.
5. Close the lid and plug your fryer into a suitable mains supply and switch the socket
on. Your fryer will beep, the display will light up blue and after a second or two will
show 00.
Use the TIME button to enter the desired cooking time in minutes. If you keep your
finger on the TIME button, the time will increase quickly. When you are near the
desired time, make single presses of the button.
If you make a mistake press and hold the on/off button until your fryer beeps and the
display once again shows 00. Re-enter the time as described above.
6. Press the on/off button and the display will turn orange, the halogen heater will
illuminate and the fan will start. The timer will start to count down in minutes until 1
minute remains when it will count down in seconds.
7. When the cooking time has ended, your fryer will beep and the halogen heater will
turn off. The fan will continue running until you open the lid.
Notes
During cooking, you may open the lid at any time by pressing the lid release button.
Doing this will switch off the halogen heater and the fan but the timer will continue to
count down. Closing the lid will restart cooking. If you have had the lid open for some
time, you may need to readjust the cooking time.
During cooking, the halogen heater will switch on and off from time to time. This is normal
and allows your Halo Health Fryer to maintain an even cooking temperature.
10
q
w
LOW POSITION
HIGH POSITION
e
t
r
y
11
guide to oils and fats
Using your Halo Health Fryer to cook food will help you to reduce the amount of oil
needed in some recipes, which may benefit your diet.
The table below lists some of the more widely available, popular oils. All of them can be
used in your Halo Health Fryer. However, for best results, we recommend Vegetable or
Rapeseed oil.
Oil Type
Use
Vegetable oil
Shallow, deep and stir frying.
Rapeseed oil (often called vegetable oil)
Shallow, deep and stir frying.
Corn oil
Shallow, deep and stir frying.
Sunflower oil
Shallow, deep and stir frying.
Olive oil
Shallow and stir frying. Marinades,
dressings, drizzling.
Sesame oil
Shallow, deep and stir frying. Marinades,
drizzling.
Peanut oil (often called ground nut oil)
Shallow and stir frying. Dressings. Adds a
nutty flavour.
Grape Seed oil
Shallow, deep and stir frying.
•
You can also use low calorie cooking spray in your Halo Health Fryer
•
Always ensure that the ingredients are evenly coated with oil.
12
guide to potatoes
There is nothing quite like a plate of homemade chips—especially with your Halo Health
Fryer doing all the hard work for you.
Did you know there are hundreds of varieties of potatoes grown around the world with
about 80 different varieties grown commercially in the UK. Potatoes are usually divided
into two cateorgories:
Floury potatoes – These are generally lighter in colour, with a drier feel, perfect for
homemade chips and jacket potatoes. Well known varieties are King Edward, Maris Piper
and Rooster.
Waxy potatoes – These are moist, firm and translucent and hold their shape well—great
in salads. Examples of these include Charlotte and Jersey Royals
When choosing potatoes for our recipes, it’s worth buying the right type to achieve the
best results. Many potatoes can be used for a variety of purposes. For example, the King
Edward potato can be used for both homemade chips and our Dauphinoise recipe.
Usage
Variety
Homemade chips, cajun-style potatoes,
roast potatoes
Maris Piper, King Edward, Sante, Rooster,
Romano
Dauphinoise
Charlotte, Desiree
Jacket potatoes
Maris Piper, King Edward
13
cooking popular, convenience and frozen foods
Food
Approx.
Time
(minutes)
Instructions
Jacket potatoes
50-55
Prick and space evenly apart
1kg of fresh chips
40-55
Wash and dry
800g of fresh chips
30-35
Wash and dry
500g of fresh chips
30-35
Wash and dry
1kg of frozen chips
35-40
Shake off excess ice
800g of frozen chips
25-30
Shake off excess ice
500g of frozen chips
25-30
Shake off excess ice
Chicken legs/drumsticks
30-35
Turn occasionally for even browning
Stir fried vegetables
8-10
Cut into evenly sized pieces
Sausages
10-12
Turn once halfway through cooking
Salmon fillet
8-10
Lightly oil the grill rack
Frozen chicken nuggets
18-20
Turn occasionally
Frozen breaded scampi
12-15
Turn occasionally
Frozen fish fingers
10-12
Turn once halfway through cooking
Lamb cutlets/chops/leg steaks
15-25
Turn once halfway through cooking
15
Turn once halfway through cooking
12-15
Turn once halfway through cooking
Turkey/chicken breast
Pork chops
Uncooked prawns
Cooked prawns
Burgers
Steak, beef sirloin/rump
6-8
Wash, peel and de-vein
3-5
16-19
Turn once halfway through cooking
5-6 (rare)
8-10
(medium)
12-14 (well
done)
Turn once halfway through cooking
Cheese on toast
7
Cook toast first then add cheese
Grilled bacon
8
Turn over halfway through cooking to brown
Individual frozen chicken pie
14
15-20
Accessory Required
Oil
Bowl only
Lightly oil the skins for crispy
results
Paddle
1 measure
Paddle
1 measure
Paddle
½ measure
Paddle
None
Paddle
None
Paddle
None
Grill rack in low position
None
Paddle
1 measure
Grill rack in low position
None
Grill rack in low position
Oil the grill rack only
Bowl only
None
Bowl only
None
Grill rack in low position
None
Grill rack in low position
None
Grill rack in low position
Lightly oil the grill rack
Grill rack in low position
None
Bowl only
None
Bowl only
None
Grill rack in low position
Lightly oil the grill rack
Grill rack in low position
None
Grill rack in high position
None
Grill rack in high position
None
Bowl only
None
15
care and cleaning
Always unplug your Halo Health Fryer and allow it to cool completely before
cleaning it.
NEVER immerse the body, power cord or plug in water or any other liquid.
Never use harsh abrasive cleaners or cleaning materials.
•
Inside the lid, carefully wipe any oil spatter from the halogen heater/fan assembly
cover with kitchen paper. Wipe over the outer body and lid with a clean, slightly damp
cloth and dry.
•
Wash the rack, paddle, cooking oil measure, removable bowl and bowl handle by
hand in warm soapy water using a cloth, sponge or brush. Dry completely before use
or storage.
•
The rack, paddle, cooking oil measure and removable bowl may be washed in a
dishwasher.
16
recipes - side dishes and snacks
For a guide to cooking popular, convenience and frozen foods, see page 14-15.
When necessary, this symbol
oil measure.
will show you how much oil to add using the supplied
Perfect Homemade Chips (Serves 4)
•
•
•
800g of potatoes (Floury potatoes such as Maris Piper or King Edward are the best)
1
of vegetable oil
Salt to serve
1. Fit the paddle into your Halo Health Fryer.
2. Peel the potatoes and chip them into approximately 11-13 mm wide chips with a
sharp knife.
3. Rinse them twice to remove the starch and completely cover them with water until
you are ready to cook them.
4. When you are ready to cook them, drain the chips and pat them dry to remove the
excess moisture.
5. Place them in the bowl and drizzle one tablespoon of oil over them.
6. Set the timer for about 30 to 35 minutes and cook them until they are golden and
crisp. Sprinkle with salt and serve hot.
Cajun-Style Potatoes (Serves 4)
•
•
•
•
•
•
800g of small potatoes, skins left on but well washed
3
of olive oil
1 clove garlic, crushed
1 tablespoon of Cajun spices
2 tablespoons of plain flour
Salt and freshly ground black pepper
1. Fit the paddle into your Halo Health Fryer.
2. Cut the potatoes into chunky-style chips 15-20mm wide with a sharp knife. Rinse
them twice to remove the starch then completely cover with water until you are ready
to cook them.
3. When you are ready to cook them, drain and pat the potatoes dry with kitchen paper.
4. Coat them with two tablespoons of the olive oil and the crushed garlic.
5. Mix together the flour and Cajun spices and toss the potatoes in this mixture so they
are well coated.
6. Place the potatoes in the bowl and pour the remaining olive oil over them.
7. Cook for 35 to 40 minutes until they are golden and crisp.
17
recipes - side dishes and snacks
Perfect Roasted New Potatoes (Serves 4)
•
•
•
•
•
800g new potatoes, halved but with the skins still on
2
of light olive oil
1 teaspoon of mixed herbs
Salt and Pepper
2 garlic cloves, unpeeled
1. Remove the paddle from your Halo Health Fryer.
2. Parboil the potatoes for approximately 15mins or until they are softened on the hob,
then pat them dry.
3. Place the new potatoes into a large mixing bowl and add 1 tablespoon of the oil,
mixed herbs and season with a generous amount of salt and pepper.
4. Mix the contents of the bowl using your fingers or a spoon until the potatoes are well
coated. Be careful to not break the potatoes up too much.
5. Place the potatoes in the bowl. Gently crush the unpeeled garlic and add the pieces
evenly to the potatoes.
6. Drizzle with the remaining oil and cook for 15-20mins.
Cheesy Nacho’s with Spicy Tomato Salsa (V)
•
•
•
•
1 large bag of plain nachos
100g of cheddar cheese
½ green chill, deseeded and sliced
Sour cream, salsa and Guacamole to serve
1. Remove the paddle form your Halo Health Fryer and lightly oil the removable bowl.
2. Evenly scatter the nachos over the bottom of the bowl.
3. Sprinkle the nachos with cheese and the green chilli and then cook them for
approximately 2-3 minutes until the cheese has melted.
4. Serve the nachos topped with the spicy tomato salsa, sour cream and guacamole.
18
Stuffed Jacket Potatoes with Cheese and Bacon (Serves 4)
•
•
•
•
•
•
•
•
•
•
8 small or 4 medium jacket potatoes, cleaned with the skins still on
200g of bacon rashers, trimmed and cut into strips
100g Emmental cheese, grated
2 shallots, diced
75ml milk
25g butter
Salt and Pepper
Worcestershire Sauce
2 tablespoons of flat leaf parsley
1
of oil
1. Remove the paddle from your Halo Health Fryer.
2. Prick the potatoes all over and add to the removable bowl along with the oil.
3. Cook for 55-60 minutes or until they are soft when they are squeezed. Once they are
finished remove the potatoes from your fryer. Carefully slice them in half lengthways.
Wear oven gloves and be careful not to tear the skin. Set to one side to cool then fit
the paddle into your Halo Health Fryer.
4. Add the bacon, shallots and a dash of oil and cook for 10 mins or until cooked and
golden in colour.
5. Meanwhile, wearing oven gloves remove the potato from the skins using a
tablespoon and add to a large mixing bowl. Set the potato skins to one side.
6. Add the milk, butter and ¾ of the cheese to the bowl and season to taste. Use a fork
to mash it together until it is smooth. Then add the bacon and onions and carefully
stir in.
7. Spoon the mixture back into the potato skins and sprinkle with the remaining cheese
and a dash of Worcestershire sauce.
8. Remove the paddle from your Halo Health Fryer then gently place the potatoes back
into the bowl and cook for a further 10 minutes until the cheese turns crispy and
golden.
19
recipes - side dishes and snacks
Gratin Dauphinoise (Serves 4)
•
•
•
•
•
•
•
500g waxy potatoes (e.g. Charlotte, Desirée or King Edward)
1 garlic clove, crushed
150ml full fat milk combined with 130ml double cream
Pinch of freshly grated nutmeg
25g butter
Salt and freshly ground black pepper
50g freshly grated parmesan cheese
1. Remove the paddle from your Halo Health Fryer.
2. Peel the potatoes and slice them very thinly. Place them in a bowl of water for a few
seconds to remove some of the starch then pat them dry on kitchen paper.
3. Layer half of the potatoes along the bottom of the bowl slightly overlapping each
potato with the next. Pour half of the milk and cream mixture onto the potatoes.
Season this layer with salt and pepper and a sprinkle of the garlic.
4. Layer the remaining potatoes on top of the last layer then pour the remaining milk
and cream mixture over the potatoes. Season with salt and pepper, sprinkle with the
remaining garlic and the parmesan cheese.
5. Cut the butter into cubes and dot over the potatoes and add a sprinkle of the nutmeg.
6. Cook for approximately 50 minutes until the top is golden and potatoes are softened.
Tomato and Pesto Bruschetta (serves 2)
•
•
•
•
•
•
•
•
2 medium sized ciabatta
4 ripe tomatoes
Handful of fresh basil leaves
50g of pine nuts
50g of parmesan
1 clove of garlic
Squeeze of lemon juice
2
of olive oil
1. Remove the paddle from your Halo Health Fryer. Place the rack into the bowl at its
low height so the food is furthest away from the halogen heater.
2. Place the ciabatta on its side and carefully cut it in half lengthways as you would a
sandwich. Place the tomatoes in a pan of boiling water to remove the skins and chop
them into chunks.
3. To make the pesto blend together the remaining ingredients in a food processor or
mini chopper.
4. Lightly oil the rack and place the ciabatta so the flat side is facing upwards.
5. Coat the top of each ciabatta slice with the chopped tomato and pesto, and a drizzle
of olive oil. Cook for 5-10 minutes until golden.
20
recipes - fish and seafood dishes
Szechuan King Prawns
This recipe has a delicious marinade which, ideally, should be allowed to infuse the
prawns for 2-3 mhours before cooking. Why not prepare this recipe in advance to make
the most of its oriental flavours.
•
•
1lb /450g Tiger king prawns, deveined, legs removed, shells removed (tails intact)
2
of groundnut oil
For the marinade
• 2 spring onions, roughly chopped
• 2 x 1 inch pieces of root ginger, peeled and crushed
• 50g of mangetout
• 1 teaspoon of sesame oil
• 3 tablespoon of Sake (rice wine)
• 1 teaspoon of sugar
• 6 tablespoons of soy sauce
• 1 dried red chilli, seeded and crushed
1. Fit the paddle into your Halo Health Fryer.
2. Combine all of the marinade ingredients in a mixing bowl and add the king prawns.
Stir until the prawns are well coated then cover the bowl with cling film. Leave to
marinate in the fridge for 2-3 hours.
3. Add the prawns to your Halo Health Fryer removable bowl along with the remaining
marinade and the groundnut oil and cook for 5 minutes. The prawns are cooked
when they turn pink.
4. Serve immediately.
Tip: soak the prawns in a bowl of cold water with half a peeled onion before marinating.
This will make them softer when cooked!
21
recipes - fish and seafood dishes
Breaded Haddock Goujons with Lemon Mayonnaise (Serves 4)
•
•
•
•
•
•
•
•
•
•
•
4 boned haddock fillets, skins removed
200g white bread crumbs
75g plain flour
Salt and freshly ground pepper
2 eggs, beaten
2
of sunflower oil
300ml mayonnaise
3 teaspoons of lemon juice
2 teaspoons of finely grated lemon zest
1 clove garlic, crushed
2 tablespoon of fresh chopped parsley
1. Fit the paddle into your Halo Health Fryer.
2. Using a sharp knife, carefully slice the haddock fillets into 2cm wide strips.
3. Place the bread crumbs, eggs and flour separately into individual dishes, season the
flour and sprinkle the bread crumbs with the herbs.
4. Place the haddock into the flour dish and toss until coated, shake of the excess and
then dip into the beaten egg. Next add the fish to the bread crumbs and toss until
completely coated.
5. Next roll each piece of fish between the palm of your hand and a flat surface to
smooth out the goujon.
6. Add the goujons leaving a gap between each. Drizzle the goujons with the sunflower
oil and cook for approximately 6-7 minutes or until golden.
7. To make the lemon mayonnaise, mix the mayonnaise with the lemon juice, lemon
zest, garlic and herbs and spoon into ramekins.
8. Serve the goujons with the dip and a salad of your choice.
22
Baked Salmon with a Parmesan Crust (Serves 4)
•
•
•
•
•
•
•
4 fresh water salmon fillets, boned
2 slices of bread, 1 or 2 days old is the best
2 cloves of garlic
50g parmesan cheese
1 tablespoon of fresh basil
1 tablespoon of fresh parsley
Salt and freshly ground black pepper
1. Remove the paddle from your Halo Health Fryer and insert the rack at its low height
so the food is furthest away from the halogen heater. Lightly oil the rack.
2. Place the bread, garlic, parmesan cheese and herbs into a food processor or mini
chopper and process into a fine bread crumb consistency.
3. Place the salmon fillets onto the grill rack, skin side down, and lightly brush with olive
oil. Cook the fillets for 5-7 minutes, depending on the thickness.
4. Open the lid and cover the top of each salmon fillet with the bread crumb mixture and
season to taste.
5. Cook for another 5 minutes until the fish becomes flaky and the topping is golden.
23
recipes - chicken dishes
Pan Roasted Chicken Wrapped in Parma Ham with
Mediterranean Vegetables
•
•
•
•
•
•
•
•
•
•
•
2 chicken breasts, skin removed
Zest of one lemon
4 slices of Parma ham
1 garlic clove, crushed
1 courgette, sliced
1 aubergine, sliced
½ can of chopped tomatoes
½ a red pepper, sliced
½ a yellow pepper, sliced
50g of mozzarella (optional)
Handful of torn basil leaves
1. Remove the paddle from your Halo Health Fryer and insert the rack at its low height
so the food is furthest away from the halogen heater.
2. Cut each chicken breast in half lengthways, and add some lemon zest to each
breast. Wrap the breast in two slices of Parma ham and secure it by pressing it
together well.
3. Lightly oil the rack and place the chicken on it.
4. Cook them for approximately 10 minutes, turning if you desire halfway through.
5. When the time has elapsed carefully remove the rack using oven gloves as this will
be very hot.
6. Place the vegetables, garlic and tomatoes in the bowl and drizzle generously with
olive oil. Cook for a 10 minutes.
7. Add the chicken to the bowl with the vegetables and cook for a further 10 minutes.
8. Two minutes before the end of cooking, dot the mozzarella cheese in and around the
vegetables and chicken and let it melt before serving.
9. Serve scattered with the torn basil leaves. Warm ciabatta bread makes an ideal
accompaniment.
24
Sweet Chilli Chicken Stir Fry with Egg Fried Rice (Serves 4)
•
•
•
•
•
•
•
•
•
•
•
•
1
of sesame oil
4 skinless and boneless chicken breasts, cut into very thin strips
100g oyster mushrooms, roughly sliced
5 spring onions, sliced in 2cm pieces diagonally
½ red pepper, sliced
1 chilli, seeds removed and thinly sliced
225g can of water chestnuts
100g cashew nuts
2 garlic cloves, chopped
4 tablespoons of sweet chilli sauce
50ml chicken stock
1cm piece of ginger
Rice
• 200g long grain rice
• 4 x medium eggs
• Soy sauce
• ½ a lemon
1. Fit the paddle into your Halo Health Fryer.
2. Rinse the rice and boil it in a pan with a dash of olive oil (this prevents the rice from
sticking together). Allow it to cook for 10 minutes or until tender. Once the rice is
cooked, drain and immediately rinse it under cold water. Set the rice to one side.
3. Meanwhile, add the chicken and sesame oil to the fryer bowl and cook for 10 minutes
or until golden. Then, add the garlic, chilli, ginger, sweet chilli sauce and chicken
stock and cook for a further 5 minutes or until the sauce begins to thicken.
4. Next, add the mushrooms, onions, water chestnuts and cashew nuts and cook for 8
minutes.
5. Whilst cooking make the egg fried rice.
6. Heat some olive oil in a large frying pan on a high heat. Once hot, crack the eggs into
the base of the pan. Add a generous splash of soy sauce to the egg.
7. Using a wooden spoon briskly swirl round the egg to break it up into pieces. Add the
rice to the pan and stir.
8. Add another generous splash of olive oil and the juice of half a lemon. Stir until
combined.
9. Serve the egg fried rice with the chicken stir fry.
25
recipes - chicken dishes
Creamy Chicken Korma with fragrant rice (Serves 4)
Rice
• 300g Basmati rice
• 4 Cardamom pods, cracked
• 1 bay leaf
Curry
• 1
of olive oil
• 4 chicken breasts, cubed
• 1 white onion, sliced
• 2 cloves of garlic, sliced
• 1cm piece of ginger, finely sliced
• 1 teaspoon of Garam Masala
• 200ml chicken stock
• 100ml coconut milk
• 2 heaped tablespoon of toasted sliced almonds
• 1 tablespoon of toasted sliced almonds to garnish
1. Fit the paddle into your Halo Health Fryer.
2. First, boil the rice in a pan along with the cardamom pods and bay leaf for 10 minutes
or until the rice is tender.
3. Whilst the rice is cooking add the oil and chicken to your Halo Health Fryer and cook
for 12 minutes or until the chicken is cooked through.
4. Next, add the onion, garlic, ginger and Garam Masala and cook for a further 3
minutes.
5. Add the stock, coconut milk and almonds the cook for a further 6 minutes so the
flavours infuse.
6. Serve the Korma with the rice and sprinkle with the toasted almonds to garnish.
26
Piri Piri Chicken Wings (Serves 4)
This recipe uses a fiery marinade, for less heat, reduce the amount of chillies. It is also
ideal to prepare this dish 24 hours in advance. This allows the marinade to intensify on
the chicken, producing a spicy Portuguese favourite!
•
800g chicken wings, slashed both sides
Marinade
•
•
•
•
•
•
•
•
•
10 small red chillies
1 ½ teaspoon dried oregano
1 teaspoon paprika
150ml red wine vinegar
200 ml olive oil
3 cloves of garlic, finely chopped
Juice of 1 lime
2 tablespoon brown sugar
¼ teaspoon salt
1. Using a food processor or mini chopper, combine all the marinade ingredients and
blend until smooth.
2. Place the chicken wings and the marinade together into a suitable resealable
container and mix well to coat the chicken. Leave overnight if possible, stirring
occasionally to keep the chicken coated.
3. Remove the paddle from your Halo Health Fryer.
4. Carefully remove the chicken from the marinade and place evenly into the bowl.
5. Set the timer for 30 minutes, turning the chicken half way through cooking.
6. Serve with toasted pitta bread, green salad and tomato salsa.
27
recipes - beef and lamb dishes
Braised Sausage in Red Wine (Serves 4)
•
•
•
•
•
•
•
•
•
•
•
•
1
olive oil
1 tablespoon of flour
6 Good quality pork sausages, cut into 1½ inch pieces
100g bacon rashers, sliced into thin strips
200g shallots, peeled
300ml red wine
1 x 400g can of chopped tomatoes
160g button mushrooms
1 bay leaf
2 garlic cloves, crushed
1 tablespoon of fresh thyme, stalks removed
Salt and freshly ground black pepper
1. Remove the paddle from your Halo Health Fryer.
2. Add the sausages, bacon and onions to the removable bowl and cook for 10-12
minutes until they are browned.
3. Next add the flour and gradually stir in the wine.
4. Add the remaining ingredients and cook for a further 20 minutes.
28
Quick Beef Stroganoff with Fuselli Pasta
•
•
•
•
•
•
•
•
•
•
•
•
•
•
•
1
of olive oil
1 lb of lean thin steak, cut into strips
1 onion, halved then sliced
1 clove of garlic, crushed
100g button mushrooms
1 red pepper, sliced
100ml red wine
2 teaspoons of Worcestershire Sauce
150ml beef stock
2 teaspoon of Dijon mustard
2 teaspoon of freshly chopped parsley
1 teaspoon of tomato puree
30g plain flour
110ml soured cream
300g Fuselli pasta
1. Fit the paddle into your Halo Health Fryer
2. Add the pasta to a pan of boiling water along with the olive oil and stir well. Leave to
cook for approximately 8-10 minutes or until it is tender. Drain well.
3. Whilst the pasta is cooking add the oil, steak, onions, garlic and pepper to the fryer
bowl and cook for 6 minutes until the onions are softened and the steak begins to
brown.
4. Sprinkle the flour over the beef and gradually add the stock and wine.
5. Add the remaining ingredients except the pasta, stir well and cook for a further 8-10
minutes. Serve with the pasta.
29
recipes - beef and lamb dishes
Beef and Caramelized Red Onion Burgers (Makes 4)
•
•
•
•
•
•
400g of good quality minced beef
1 small red onion, finely chopped
1 teaspoon of brown sugar
1 teapoon of dried mixed herbs
1 egg, beaten
Handful of coriander leaves, chopped
To serve Bread rolls, cheese slices, sliced tomatoes, lettuce and ketchup
1. Remove the paddle from your Halo Health Fryer and insert the rack at its low height
so the food is furthest away from the halogen heater.
2. In a frying pan gently sauté the chopped red onion on a low/medium heat with the
olive oil and brown sugar for 5 minutes. Remove from the heat and set aside.
3. Work the mince together in a bowl with the caramelized onions and the beaten egg.
You want to combine the mixture so that all the ingredients are mixed but don’t make
it too mushy and soft.
4. Stir in the chopped coriander and the dried herbs. Season to taste.
5. Take a handful of the mixture and form it into a burger shape. The mixture should
make about 4 burgers. The thicker they are, the longer they will take to cook through.
6. Lay each burger on a board that has been covered in cling film and then cover them.
7. Put them in the fridge to chill for approximately 1 hour. This will help them to maintain
their shape while cooking.
8. When you are ready to cook the burgers, place them on the grill rack.
9. Cook for 8 minutes on one side then turn them over with a spatula, being careful as
your fryer will be hot. Cook them for a further 8-9 minutes until they are thoroughly
cooked through
10. Serve the burgers on the bread rolls with cheese, tomato, lettuce and ketchup.
30
Spicy Lamb Burgers (Serves 4)
•
•
•
•
•
•
•
•
•
400g of lean lamb mince
½ red onion, finely chopped
1 egg, beaten
1 tablespoon of mango chutney
Handful of fresh coriander leaves, chopped
½ red chilli, deseeded and chopped
1 garlic clove, crushed
½ teaspoon of cumin
½ teaspoon of ground coriander
To serve
• 4 x mini Ciabattas
• Mint, chopped
• Thick greek yogurt
• 1 cucumber, finely chopped
1. Remove the paddle from your Halo Health Fryer and insert the rack at its low height
so the food is furthest away from the halogen heater.
2. In a bowl work together the lamb mince with the beaten egg.
3. Stir in the mango chutney, coriander leaves, chilli, garlic and the spices.
4. Work the mixture together with spoon and then pat the mixture into burger shapes.
5. Place them on a cling film lined tray and cover. Chill them in the fridge for
approximately 1 hour.
6. Lightly oil the grill rack. Place four of the burgers onto the rack and brush the tops
with olive oil.
7. Cook for approximately 9 minutes on one side. Carefully flip the burgers over with a
spatula.
8. Cook for a further 8-9 minutes until they are thoroughly cooked through.
9. In bowl mix together the Greek yogurt, chopped cucumber and the mint.
10. Place the ciabatta under a grill for 1-2 minutes until it is toasted. Serve the lamb
burgers on the ciabatta topped with the yogurt dressing.
31
recipes - vegetable dishes
Basic Mushroom Risotto (Serves 2 as a main meal or 4 as a
starter) (V)
•
•
•
•
•
•
•
•
•
•
2
of olive oil
1 onion, finely chopped
2 cloves of garlic
300g of risotto rice (Arborio)
1 litre of vegetable stock
150ml of dry white wine
Salt and freshly ground pepper
150g of cooked mushrooms
40g of freshly grated parmesan
25g butter, diced
1. Fit the paddle into your Halo Health Fryer.
2. Pour in the olive oil and add the garlic and the onion and close the lid. Cook for
approximately 5 minutes until the onions are golden.
3. Add the rice and cook for a further minute. Add the wine and 500ml of the stock
stirring well. Season to taste.
4. Cook for approximately 30 minutes.
5. Halfway through cooking add the remaining 500ml of stock.
6. Continue cooking for approximately 30 to 35 minutes until the rice is tender.
7. When the rice is ready, stir in the parmesan cheese, cooked mushrooms and the
butter. Set the timer to cook for another 2 minutes
Variations: Try adding additional ingredients halfway through cooking such as cooked
bacon, asparagus spears, peas, smoked haddock or chicken.
32
Roasted Asparagus with Parmesan (Serves 4) (V)
•
•
•
•
•
•
400g fresh Asparagus
2
of olive oil
1 teaspoon of freshly ground pepper
1 teaspoon of sea salt
1 tablespoon of balsamic vinegar
30g of parmesan cheese, freshly grated
1. Fit the paddle into your Halo Health Fryer.
2. Wash and trim the asparagus, so that the hard stalk end is removed.
3. Place the asparagus into the bowl and pour over the olive oil and balsamic vinegar
4. Sprinkle with freshly ground pepper and sea salt
5. Cook for 10-15 minutes until the stalks are tender
6. Serves with the parmesan cheese sprinkled over
Goats Cheese Stuffed Mushrooms (Serves 4) (V )
•
•
•
•
•
•
•
4 large flat mushrooms
1½
of olive oil
½ red onion, finely chopped
4 tablespoons of white bread crumbs
2 cloves of garlic, crushed
50g of goat’s cheese, crumbled
Freshly ground black pepper
1. Remove the paddle to your Halo Health Fryer. Lightly oil the removable bowl.
2. Mix together half of the oil with the onions, bread crumbs, garlic and crumbled goat’s
cheese with some freshly ground pepper in a bowl
3. Place the mushrooms flat in the fryer bowl and spoon the goat’s cheese mixture over
the top.
4. Drizzle a little of the remaining oil over the top and cook for 10-15 minutes.
33
recipes - desserts
Crème Brulee (Makes 4)
•
•
•
•
•
•
250ml double cream
1 vanilla pod, or 1 teaspoon of vanilla extract
50g caster sugar
3 free-range egg yolks
Brown sugar for the topping
Raspberries to decorate
1. Remove the paddle from your Halo Health Fryer
2. Pour the cream into a saucepan. If you are using a vanilla pod split it lengthways and
scrape the seeds into the cream. Then chop the pod into small pieces and add to the
cream. Alternatively, pour in the vanilla extract.
3. Bring the cream to the boil and then turn the heat down so that it is simmering. If you
have used a vanilla pod, strain the cream to remove it and then add the cream back
to the pan.
4. Meanwhile, whisk the egg yolks together in a bowl until they are frothy and then
whisk in the sugar.
5. Pour the cream into the eggs and sugar whisking constantly. This will slightly cook
the eggs and the mixture will thicken somewhat.
6. Add the mixture to four ramekins so that they are approximately two thirds full and
then place them in the fryer bowl. Carefully pour enough water around the ramekins
so that it reaches halfway up the sides.
7. Cover the ramekins with a circle of foil and cook for 30-35 minutes until they are set.
8. Once set, remove the foil and sprinkle the tops with brown sugar. Cook uncovered for
a further 5 minutes until the top goes brown and caramelized.
9. Serve with the raspberries.
34
Nutty Baked Apples with Butterscotch Sauce (Serves 4)
•
•
•
•
500g apples, Cox’s, Russet or Braeburn
50g hazelnuts, chopped
50g unsalted butter
1 vanilla pod, de-seeded
Butterscotch sauce
• 30g butter
• 100g light muscovado sugar
• 2 tablespoons of golden syrup
• 142ml pot double cream
1. Remove the paddle, coat it with some butter then refit it.
2. Core and peel the apples then place then in the removable bowl. Dot the remaining
butter around the apples.
3. Cook them for approximately 15 minutes. Remove the lid and sprinkle on the
hazelnuts and the vanilla pod on the apples. Cook for a further 3 minutes until the
hazelnuts are golden.
4. To make the butterscotch sauce, gently heat the butter, muscavado sugar, golden
syrup and the cream in a saucepan, stirring occasionally until it is smooth.
5. Serve the baked apples with the sauce poured over.
Warm Tropical Fruit Salad
•
•
•
•
•
•
•
•
100ml of orange juice
30g of golden caster sugar
1 teaspoon of vanilla extract
1 orange, zested
1 ripe mango, peeled and de-stoned
1 pineapple, prepared
2 ripe peaches or nectarines, de-stoned
2 passion fruits (pulp and seeds)
1. Remove the paddle from your Halo Health Fryer and insert the rack at its low height.
2. Have a bowl of iced water ready.
3. In a small pan on a low to medium temperature, heat the orange juice, sugar, vanilla,
orange zest and passion fruit until the sugar has dissolved. Quickly place the pan
into the cold water so that the mixture forms a syrup.
4. Cut the prepared fruit into slices. It is attractive to cut the pineapple into rings, the
peaches or nectarines into segments and the mango into wedges but you can
prepare the fruit any way you like.
5. Place the fruit in the fryer bowl and coat it with the syrup and peppercorns. Cook for
approximately 5 minutes until softened and juicy.
6. Serve with thickly whipped cream or vanilla ice cream.
35
recipes - desserts
Sponge recipe
This quick all-in-one sponge cake recipe is suitable for a 25cm sponge or it will make 6-8
individual cupcakes or buns.
•
•
•
•
•
•
100g softened butter or margarine
100g castor sugar
2 eggs
Few drops of vanilla essence
100g Self raising flour
½ teaspoon baking powder
1. Place the ingredients into a bowl and using a hand mixer whisk all the ingredients
together until a light creamy mixture is achieved.
2. Remove the paddle from your Halo Health Fryer and line the base of the bowl with
baking parchment. Cut a hole in the centre of the parchment large enough to fit over
the paddle drive spindle (approx. 40 mm).
3. Using a spatula, spread the cake mixture over the base of the bowl ensuring the
mixture reaches the sides. Even out the mixture to ensure the cake rises evenly
during baking.
4. Place the bowl inside your Halo Health Fryer and set the timer for 15 minutes. Press
the on button.
5. At the end of the cooking time, remove the bowl carefully using the handle
attachment.
6. Place the bowl onto a wire cooling rack for 5 minutes to cool. Turn the bowl over and
the sponge will easily turn out. Peel off the baking parchment and leave to cool for a
further 30 minutes.
7. This single layer sponge can be topped with cream and berries, or repeat the above
steps to make another sponge for a Victoria Sandwich cake.
Fillings
Whipped cream, seedless raspberry jam, butter icing filling, fresh or frozen berries are all
perfect ingredients which can be used for this light, golden sponge.
36
Individual Cup cakes
1. Prepare the recipe above. Fill 6-8 silicone cupcake moulds ½ full with the cake
mixture.
2. Remove the paddle from the Halo
3. Place the filled moulds inside the Halo tin, close the lid and set the timer for 10
minutes.
4. Once cooked, carefully remove the Halo tin, placing it onto a cooling wire. After
5 minutes remove the cakes from the tin and cool for a further 15 minutes before
decorating.
Halo Sponge Recipe Guidelines
This recipe will make a 25cm sponge perfect for cutting into shapes and decorating for
mini cake bites and decorated cakes, or for the base of a homemade fruit trifle.
Alternatively, double the mixture and make two sponges, which can then be filled and
decorated.
When making a large sponge cake, always line the bottom of the bowl of your Halo
Health Fryer with baking parchment. This will ensure the cake turns out perfectly each
time. Cut a small hole in the centre of the parchment so that the parchment fits over the
paddle drive spindle.
Because of the paddle drive spindle, any cakes you make will naturally have a hole
in their centre—but don’t worry because this can be filled with berries or fruits during
decorating.
IMPORTANT: Always remove the paddle before making a cake.
No pre-heating is required; your Halo Health Fryer will cook the sponge in 12 – 15
minutes.
Do not attempt to bake more than the quantities recommended in the recipe at any one
time. This will result in the cake that’s burnt on the surface and uncooked in the centre.
This recipe has been tested and produces a light sponge, which is perfect for filling with
whipped cream and raspberry jam.
Alternatively, fill some individual silicone moulds ½ full with the mixture and make some
cup cakes. Your Halo Health Fryer bakes 6 large cup cake size buns in 10 minutes
37
connection to the mains supply
This appliance must be earthed.
This appliance is fitted with either a moulded or rewirable BS1363, 13 amp plug. The fuse
should be rated at 13 amps and be ASTA approved to BS1362.
If the fuse in a moulded plug needs to be changed, the fuse cover must be refitted. The
appliance must not be used without the fuse cover fitted.
If the plug is unsuitable, it should be dismantled and removed from the supply cord
and an appropriate plug fitted as detailed below. If you remove the plug it must not be
connected to a 13 amp socket and the plug must be disposed of immediately.
The wires of the mains lead are coloured in accordance with the following code:
GREEN/YELLOW = EARTH
BLUE = NEUTRAL
BROWN = LIVE
The wire which is coloured GREEN/YELLOW must be connected to the terminal in
your plug which is marked with an E or by the earth symbol ( ) or coloured GREEN or
GREEN /YELLOW.
The wire which is coloured BLUE must be connected to the terminal in your plug which is
marked with the letter N or coloured BLACK.
The wire which is coloured BROWN must be connected to the terminal in your plug which
is marked with the letter L or coloured RED.
If any other plug is used, a 13 amp fuse must be fitted either in the plug or adaptor or at
the distributor board.
Plug should be BS1363 approved
Fit a 13 Amp Fuse
GREEN/YELLOW
(Earth)
BLUE
(Neutral)
13 Amp
Fuse
BROWN
(Live)
Ensure that the outer sheath of the cable
is firmly held by the clamp
38
after sales service
These appliances are built to the very highest of standards. There are no user serviceable
parts. Follow these steps if the unit fails to operate:
1. Check the instructions have been followed correctly.
2. Check that the fuse has not blown.
3. Check that the mains supply is functional.
If the appliance will still not operate, return the appliance to the place it was purchased for
a replacement. To return the appliance to the Customer Service Department, follow the
steps below:
1. Pack it carefully (preferably in the original carton). Ensure the unit is clean.
2. Enclose your name and address and quote the model number on all correspondence.
3. Give the reason why you are returning it.
4. If within the guarantee period, state when and where it was purchased and include
proof of purchase (e.g. till receipt).
5. Send it to our Customer Service Department at the address below:
Customer Service Department
Jarden Consumer Solutions (Europe) Limited
Middleton Road
Royton
Oldham
OL2 5LN, UK.
Telephone: 0161 621 6900 Fax: 0161 626 0391
e-mail: [email protected]
39
guarantee
Please keep your receipt as this will be required for any claims under this guarantee.
This appliance is guaranteed for 1 year after your purchase as described in this
document.
During this guaranteed period, if in the unlikely event the appliance no longer functions
due to a design or manufacturing fault, please take it back to the place of purchase, with
your till receipt and a copy of this guarantee.
The rights and benefits under this guarantee are additional to your statutory rights, which
are not affected by this guarantee. Only Jarden Consumer Solutions (Europe) Ltd. (“JCS
(Europe)”) has the right to change these terms.
JCS (Europe) undertakes within the guarantee period to repair or replace the appliance,
or any part of appliance found to be not working properly free of charge provided that:
•
you promptly notify the place of purchase or JCS (Europe) of the problem; and
•
the appliance has not been altered in any way or subjected to damage, misuse,
abuse, repair or alteration by a person other than a person authorised by JCS
(Europe).
Faults that occur through, improper use, damage, abuse, use with incorrect voltage, acts
of nature, events beyond the control of JCS (Europe), repair or alteration by a person
other than a person authorised by JCS (Europe) or failure to follow instructions for use
are not covered by this guarantee. Additionally, normal wear and tear, including, but not
limited to, minor discoloration and scratches are not covered by this guarantee.
The rights under this guarantee shall only apply to the original purchaser and shall not
extend to commercial or communal use.
If your appliance includes a country-specific guarantee or warranty insert please refer
to the terms and conditions of such guarantee or warranty in place of this guarantee or
contact your local authorized dealer for more information.
Jarden Consumer Solutions (Europe) Ltd.
Middleton Road
Royton
Oldham
OL2 5LN
UK
40
weee
Waste electrical products should not be disposed of with Household waste. Please
recycle where facilities exist. E-mail us at enquiries [email protected] for further
recycling and WEEE information.
41
42
43
VDF065_VDF084_Iss_5
04/13
93381-4