1
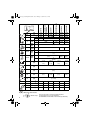
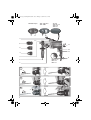
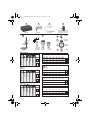
17026969_0610 SB_Bauk10.book Seite 1 Freitag, 18. Juni 2010 9:42 09
Made in Germany
SB 710
SBE 701 SP
SBE 710
SBE 751
SBE 900 Impuls
SBE 1000
SBE 1100 Plus
ENG
POL
Originalbetriebsanleitung................. 5
Original instructions......................... 11
Notice originale................................ 16
Oorspronkelijke gebruiksaanwijzing... 22
Istruzioni originali............................. 28
Manual original ................................ 34
Manual original ................................ 40
Bruksanvisning i original.................. 46
Alkuperäiset ohjeet .......................... 51
Original bruksanvisning ................... 56
Original brugsanvisning ................... 61
Instrukcją oryginalną ....................... 67
Πρωττυπο οδηγιών χρήσης ........... 73
Eredeti használati utasítás............... 80
Оригинальное руководство по эксплуатации . 86
170 26 9690 - 0610
SB 710
SBE 701 SP
SBE 710
SBE 751
SBE 900 Impuls
SBE 1000
SBE 1100 Plus
17026969_0610 SB_Bauk10.book Seite 2 Freitag, 18. Juni 2010 9:42 09
P1
W
710
710
750
900
1000
1100
P2
W
420
420
450
550
620
660
0-800
0-900
0-2700
0-2800
15
n1
/min
1
1000
2
3100
0-1000
0-3100
1
600
800
800
900
2
1800
2300
2700
2800
51000
53000
16
(5/8“)
16
(5/8“)
n2
/min
ø max.
mm
(in)
2
s max.
/min.
bpm
2
ø max.
mm
(in)
ø max.
mm
(in)
20
(3/4“)
59000
1
40 (1 9/16“)
2
25
(1“)
13
(1/2“)
1
8
(5/16“)
2
1,5-13
(1/16“1/2“)
1,0-13
(1/32“1/2“)
1,5-13
(1/16“1/2“)
1,0-13
(1/32“1/2“)
2,7
(5.9)
2,8
(6.1)
b
mm
(in)
G
UNF
(in)
1/2“-20
H
mm
(in)
6,35
(1/4“)
m
kg
lbs
D
mm
(in)
ah,ID/kh,ID
m/s2
18/1,5
18/1,5
18/1,5
18/1,5
18/1,5
18/1,5
ah,D/kh,D
m/s2
4/1,5
4/1,5
4/1,5
4/1,5
4/1,5
4/1,5
LpA/KpA
dB(A)
100 / 3
100 / 3
100 / 3
100 / 3
100 / 3
100 / 3
LWA/KWA
dB(A)
111 / 3
111 / 3
111 / 3
111 / 3
111 / 3
111 / 3
2,5
(5.5)
2,6
(5.7)
43
(1 11/16“)
EN 60745
2006/42/EG, 2004/108/EG
Volker Siegle
2
Director Innovation, Research and Development
Responsible Person for Documentation
© 2010 Metabowerke GmbH, 72622 Nürtingen, Germany
17026969_0610 SB_Bauk10.book Seite 3 Freitag, 18. Juni 2010 9:42 09
SBE 900 Impuls
1
min
8
SBE 1100 Plus
SBE 1000
SB 710
SBE 701 SP
SBE 710
SBE 751
1
min
9
8
10
7
L
0
R
6
5
11
12
13
4
3
1
min
2
SBE 701 SP
SBE 710
SBE 751
1
A
-3-
-1-2-
B
-1-
-3-
-2-
C
-2-
3
-1-
-3-
8
17026969_0610 SB_Bauk10.book Seite 4 Freitag, 18. Juni 2010 9:42 09
A
B
D
C
l = 1,2 m
6.23598
6.31078
50 x 20 mm: 6.31110
60 x 30 mm: 6.31111
60 x 40 mm: 6.31112
6.27608
F
E
a=80 mm
b=80 mm
6.27106
6.00890
a=100
b=100
6.12001
a=86
b=80
6.12003
G
6.30554
H
6.30552
6.30553
I
6.30550
6.30551
J
6.31281
SBE 900 Impuls
ø
mm
4
G
6
E
8
E
10
D
13
C
16
20
30
40
SBE 701 SP
SBE 710
SBE 751
SBE 900 Impuls
G
F
E
D
G
4
F
F
F
F
F
F
F
F
F
A
B
C
D
E
F
G
1000 1200 1500 1800 2100 2400 2700
300 400 500
600
700 750
800
±50 ±40 ±30 ±20 ±15 ±10 ±10
B
C
D
E
F
700 1000 1500 2000 2500 3100
F
F
F
F
F
F
F
F
F
F
F
F
F
F
F
250 350 500
650
800 1000
±50 ±40 ±30 ±20 ±15 ±10
%
SBE 1000
A
B
C
D
E
F
G
1000 1200 1500 1800 2100 2400 2700
300 400 500
600
700 750
800
±50 ±40 ±30 ±20 ±15 ±10 ±10
G
E
E
D
C
G
F
E
D
G
%
SBE 701 SP
SBE 710
SBE 751
A
ø
mm
4
F
F
6
E
F
8
E
E
10
D
D
13
C
F
16
20
30
40
SBE 1100 Plus
SBE 1000
ø
mm
4
6
8
10
13
16
20
30
40
F
F
F
F
F
F
F
F
F
F
F
F
F
F
F
F
F
F
F
F
F
%
SBE 1100 Plus
A
B
C
D
E
F
G
450 700 1000 1500 2000 2500 2800
150 200 350
500
600 750
900
±50 ±40 ±30 ±20 ±15 ±10 ±10
%
17026969_0610 SB_Bauk10.book Seite 5 Freitag, 18. Juni 2010 9:42 09
DEUTSCH
D
Originalbetriebsanleitung
Sehr geehrter Kunde,
vielen Dank für das Vertrauen, das Sie uns beim Kauf Ihres neuen Metabo Elektrowerkzeugs
entgegengebracht haben. Jedes Metabo Elektrowerkzeug wird sorgfältig getestet und unterliegt den
strengen Qualitätskontrollen der Metabo Qualitätssicherung. Die Lebensdauer eines Elektrowerkzeugs
hängt aber in starkem Maße von Ihnen ab. Beachten Sie bitte die Informationen dieser
Gebrauchsanleitung und der beiliegenden Dokumente. Je sorgsamer Sie Ihr Metabo Elektrowerkzeug
behandeln, umso länger wird es zuverlässig seinen Dienst erfüllen.
Inhalt
1
2
3
4
5
6
7
8
9
10
11
12
13
14
15
Konformitätserklärung
Bestimmungsgemäße Verwendung
Allgemeine Sicherheitshinweise
Spezielle Sicherheitshinweise
Überblick
Besondere Produkteigenschaften
Inbetriebnahme
Benutzung
Tipps und Tricks
Reinigung, Wartung
Störungsbeseitigung
Zubehör
Reparatur
Umweltschutz
Technische Daten
1 Konformitätserklärung
Wir erklären in alleiniger Verantwortlichkeit, dass
dieses Produkt mit den auf Seite 2 angegebenen
Normen und Richtlinien übereinstimmt.
2 Bestimmungsgemäße
Verwendung
Die Schlagbohrmaschine ist geeignet zum Bohren
ohne Schlag in Metall, Holz, Kunststoff und
ähnlichen Materialien und zum Schlagbohren in
Beton, Stein und ähnlichen Materialien. Darüber
hinaus ist die Maschine zum Gewindeschneiden
und zum Schrauben geeignet (nicht SB 710).
Für Schäden durch nicht bestimmungsgemäßen
Gebrauch haftet allein der Benutzer.
Allgemein anerkannte Unfallverhütungsvorschriften und beigelegte Sicherheitshinweise
müssen beachtet werden.
3 Allgemeine
Sicherheitshinweise
WARNUNG – Zur Verringerung eines
Verletzungsrisikos Betriebsanleitung
lesen.
WARNUNG Lesen Sie alle Sicherheitshinweise und Anweisungen. Versäumnisse
bei der Einhaltung der Sicherheitshinweise und
Anweisungen können elektrischen Schlag, Brand
und/oder schwere Verletzungen verursachen.
Bewahren Sie alle Sicherheitshinweise und
Anweisungen für die Zukunft auf.
Lesen Sie vor der Benutzung des Elektrowerkzeugs die beiliegenden Sicherheitshinweise
und die Gebrauchsanleitung aufmerksam und
vollständig durch. Bewahren Sie alle beiliegenden
Dokumente auf und geben Sie Ihr Elektrowerkzeug
nur zusammen mit diesen Dokumenten weiter.
4 Spezielle
Sicherheitshinweise
Beachten Sie die mit diesem Symbol
gekennzeichneten Textstellen zu Ihrem
eigenen Schutz und zum Schutz Ihres
Elektrowerkzeugs!
Tragen Sie Gehörschutz bei der Benutzung von
Schlagbohrmaschinen. Die Einwirkung von Lärm
kann Gehörverlust bewirken.
Benutzen Sie den mit dem Gerät gelieferten
Zusatzhandgriff. Der Verlust der Kontrolle kann
zu Verletzungen führen.
Halten Sie das Gerät an den isolierten
Griffflächen, wenn Sie Arbeiten ausführen, bei
denen das Einsatzwerkzeug verborgene
Stromleitungen oder das eigene Netzkabel
treffen kann. Der Kontakt mit einer
spannungsführenden Leitung kann auch metallene
Geräteteile unter Spannung setzen und zu einem
elektrischen Schlag führen.
Stecker aus der Steckdose ziehen, bevor
irgendeine Einstellung oder Wartung
vorgenommen wird.
5
17026969_0610 SB_Bauk10.book Seite 6 Freitag, 18. Juni 2010 9:42 09
D
DEUTSCH
Vermeiden Sie unbeabsichtigtes Anlaufen: stets
Schalter entriegeln, wenn der Stecker aus der
Steckdose gezogen wird, oder wenn eine
Stromunterbrechung eingetreten ist. Nicht
erforderlich bei SBE 1000, SBE 1100 Plus (mit
Wiederanlaufschutz).
Überzeugen Sie sich, dass sich an der Stelle, die
bearbeitet werden soll, keine Strom-, Wasseroder Gasleitungen befinden (z.B. mit Hilfe eines
Metallsuchgerätes).
Kleinere Werkstücke müssen so gesichert werden,
dass sie beim Bohren nicht vom Bohrer
mitgenommen werden können (z.B. durch
Einspannen in einen Schraubstock oder durch
Festspannen auf dem Werktisch mit
Schraubzwingen).
Nicht an das sich drehende Werkzeug fassen!
Späne und Ähnliches nur bei Stillstand der
Maschine entfernen.
Metabo S-automatic Sicherheitskupplung. Bei
Ansprechen der Sicherheitskupplung sofort die
Maschine ausschalten! Klemmt oder hakt das
Einsatzwerkzeug, wird der Kraftfluss zum Motor
begrenzt. Wegen der dabei auftretenden hohen
Kräfte die Maschine immer mit beiden Händen an
den vorgesehenen Handgriffen festhalten, einen
sicheren Stand einnehmen und konzentriert
arbeiten.
Die Metabo S-automatic Sicherheitskupplung darf
nicht als Drehmomentbegrenzung verwendet
werden.
Achtung beim harten Schraubfall (Einschrauben
von Schrauben mit metrischem oder Zoll-Gewinde
in Stahl)! Der Schraubenkopf kann abgerissen
werden, bzw. es können hohe Rückdrehmomente
am Handgriff auftreten.
Stäube von Materialien wie bleihaltigem Anstrich,
einigen Holzarten, Mineralien und Metall können
gesundheitsschädlich sein. Berühren oder
Einatmen der Stäube können allergische
Reaktionen und/oder Atemwegserkrankungen des
Benutzers oder in der Nähe befindlicher Personen
hervorrufen.
Bestimmte Stäube wie Eichen- oder Buchenstaub
gelten als krebserzeugend, besonders in
Verbindung mit Zusatzstoffen zur Holzbehandlung
(Chromat, Holzschutzmittel). Asbesthaltiges
Material darf nur von Fachleuten bearbeitet
werden.
- Benutzen Sie möglichst eine Staubabsaugung.
- Sorgen Sie für gute Belüftung des
Arbeitsplatzes.
- Es wird empfohlen, eine Atemschutzmaske mit
Filterklasse P2 zu tragen.
Beachten Sie in Ihrem Land gültige Vorschriften für
die zu bearbeitenden Materialien.
6
5 Überblick
Siehe Seite 3 (bitte ausklappen).
1 Schaltknopf für Gangwahl
2 Zusatzgriff / Zusatzgriff mit
Vibrationsdämpfung *
3 Bohrtiefenanschlag
4 Zahnkranz-Bohrfutter *
5 Schnellspann-Bohrfutter Futuro Plus *
6 Schnellspann-Bohrfutter Futuro Top *
7 Schaltschieber (Bohren/Schlagbohren)
8 Stellrad zur Drehzahlvorwahl *
9 Stellrad für Drehmomentbegrenzung und
Impulsfunktion *
10 Elektronik-Signal-Anzeige *
11 Drehrichtungsumschalter *
12 Feststellknopf für Dauereinschaltung
13 Schalterdrücker
* ausstattungsabhängig
6 Besondere
Produkteigenschaften
Metabo S-automatic Sicherheitskupplung:
Klemmt oder hakt das Einsatzwerkzeug, wird der
Kraftfluss zum Motor begrenzt. Wegen der dabei
auftretenden hohen Kräfte die Maschine immer mit
beiden Händen an den vorgesehenen Handgriffen
festhalten, einen sichereren Stand einnehmen und
konzentriert arbeiten.
Abschaltkohlebürsten:
Bei vollständig abgenutzten Kohlebürsten schaltet
die Maschine automatisch ab. Bei SBE 1100 Plus:
Eine Leuchtdiode warnt, bevor die Kohlebürsten
vollständig abgenutzt sind.
Wiederanlaufschutz:
(SBE 1100 Plus, SBE 1000)
Der Wiederanlaufschutz verhindert ein
unbeabsichtigtes Anlaufen der Maschine nach
erneutem Netzanschluss bzw. bei
Spannungswiederkehr nach Netzausfall.
Überlastschutzanzeige:
(SBE 1100 Plus)
Die Überlastschutzanzeige warnt bei Überlastung
der Maschine.
Metabo Impuls-Funktion:
(SBE 900 Impuls)
Für kinderleichtes Ein- und Ausdrehen
festsitzender Schrauben, selbst bei beschädigten
Schraubenköpfen. Für blitzsauberes Anbohren
ohne Anzukörnen, ob in Fliesen, Alu oder anderen
Materialien.
17026969_0610 SB_Bauk10.book Seite 7 Freitag, 18. Juni 2010 9:42 09
DEUTSCH
Elektronische Drehmomentbegrenzung:
(SBE 900 Impuls)
Beim Eindrehen von kleinen Schrauben und beim
Gewindeschneiden mit Gewindebohrern mit
geringem Durchmesser kann das Drehmoment auf
einen der auszuführenden Arbeit entsprechenden
Wert reduziert werden.
D
Hinweis: Beim Schlagbohren mit hoher Drehzahl arbeiten: An Schaltknopf (1) den 2.
Gang einstellen.
8.4
Gang wählen
Den gewünschten Gang durch Verdrehen des
Schaltknopfes (1) wählen.
7 Inbetriebnahme
Umschalten nur bei auslaufender Maschine (kurz
Ein-/Ausschalten).
Vergleichen Sie vor Inbetriebnahme, ob die
auf dem Typenschild angegebene
Netzspannung und Netzfrequenz mit den Daten
Ihres Stromnetzes übereinstimmen.
7.1
Klemmring durch Linksdrehen des
Zusatzhandgriffs (2) öffnen. Zusatzhandgriff auf
Spannhals der Maschine aufschieben.
Bohrtiefenanschlag (3) einschieben.
Zusatzhandgriff so weit nach vorne schieben, dass
er sich verdrehen lässt. Im gewünschten Winkel
wieder zurückziehen und kräftig festziehen.
8 Benutzung
Bohrtiefenanschlag verstellen
Zusatzhandgriffs (2) lösen. Bohrtiefenanschlag (3)
auf die gewünschte Bohrtiefe einstellen und
Zusatzhandgriff (2) wieder festziehen.
8.2
2. Gang (hohe Drehzahl) z.B. zum Bohren,
Schlagbohren
Montage des Zusatzhandgriffs (2)
Aus Sicherheitsgründen stets den
mitgelieferten Zusatzhandgriff verwenden.
8.1
1. Gang (niedrige Drehzahl, hohes
Drehmoment) z.B. zum Schrauben, Bohren
Drehrichtung, Transportsicherung
(Einschaltsperre) einstellen
(nicht SB 710)
8.5
Am Stellrad (8) die maximale Drehzahl vorwählen.
Empfohlene Drehzahlen zum Bohren siehe Seite 4.
8.6
1 = Beim Erreichen eines niedrigen
Drehmoments kommt der Motor zum
Stillstand
6 = Beim Erreichen eines hohen Drehmoments
kommt der Motor zum Stillstand
+ = Bohrstufe eingestellt - keine
Drehmomentbegrenzung (für max.
Drehmoment)
8.7
Impulsfunktion einschalten
(SBE 900 Impuls)
Am Stellrad (9) einstellen.
= Impuls-Funktion ständig eingeschaltet
+
8.8
8.3
Drehmomentbegrenzung einstellen
(SBE 900 Impuls)
Am Stellrad (9) einstellen (Stellung 1 - 6). Beim
Erreichen des vorgewählten Drehmoments kommt
der Motor zum Stillstand.
Drehrichtungsumschalter (11) nur bei
Stillstand des Motors betätigen.
Siehe Seite 3 (bitte ausklappen):
R = Rechtslauf eingestellt
L = Linkslauf eingestellt
0 = Mittelstellung: Transportsicherung
(Einschaltsperre) eingestellt
Drehzahl vorwählen
(nicht SB 710)
= Impuls-Funktion aus (zum Bohren)
Ein-/Ausschalten, Drehzahl verändern
Bohren, Schlagbohren einstellen
Schieber (7) betätigen.
= Schlagbohren eingestellt
= Bohren ohne Schlag eingestellt
Hinweis: Schlagbohren und Bohren nur bei
Rechtslauf.
Einschalten, Drehzahl: Schalterdrücker (13)
drücken.
Die Drehzahl kann am Schalterdrücker durch
Eindrücken verändert werden.
Durch den elektronischen Sanftanlauf
beschleunigt die Maschine kontinuierlich bis
7
17026969_0610 SB_Bauk10.book Seite 8 Freitag, 18. Juni 2010 9:42 09
D
DEUTSCH
zur vorgewählten Drehzahl (ausstattungsabhängig).
Bei weichem Werkzeugschaft muss eventuell nach
kurzer Bohrzeit nachgespannt werden.
Zum Ausschalten Schalterdrücker loslassen.
Dauereinschaltung: Bei gedrücktem
Schalterdrücker (13) den Feststellknopf (12)
eindrücken und Schalterdrücker loslassen.
Zum Ausschalten Schalterdrücker (13) erneut
drücken und dann loslassen.
Bei Dauereinschaltung läuft die
Maschine weiter, wenn sie aus der Hand
gerissen wird. Daher die Maschine immer mit
beiden Händen an den vorgesehenen
Handgriffen festhalten, einen sicheren Stand
einnehmen und konzentriert arbeiten.
8.9
Werkzeugwechsel SchnellspannBohrfutter Futuro Top (6)
Siehe Abbildungen A, Seite 3.
Bohrfutter öffnen: Haltering festhalten und mit
der anderen Hand Hülse in Pfeilrichtung -1drehen.
Einsatzwerkzeug spannen: Einsatzwerkzeug -2so tief wie möglich einsetzen. Haltering festhalten
und mit der anderen Hand die Hülse kräftig in
Pfeilrichtung -3- bis zum Anschlag drehen.
8.10 Werkzeugwechsel SchnellspannBohrfutter Plus (5)
Siehe Abbildungen B, Seite 3.
Bohrfutter öffnen:
Haltering festhalten und mit der anderen Hand
Hülse in Pfeilrichtung -1- drehen.
Das nach dem Öffnen des Bohrfutters eventuell
hörbare Ratschen (funktionsbedingt) wird durch
das Gegendrehen der Hülse ausgeschaltet.
Bei sehr fest geschlossenem Bohrfutter:
Netzstecker ziehen. Das Bohrfutter mit einem
Gabelschlüssel am Bohrfutterkopf festhalten und
Hülse kräftig in Pfeilrichtung -1- drehen.
Einsatzwerkzeug spannen:
- Einsatzwerkzeug -2- so tief wie möglich
einsetzen.
- Haltering festhalten und mit der anderen Hand
die Hülse in Pfeilrichtung -3- drehen, bis der
spürbare mechanische Widerstand überwunden
ist.
- Achtung! Werkzeug ist jetzt noch nicht
gespannt! So lange kräftig weiterdrehen (dabei
muss es "klicken"), bis kein Weiterdrehen mehr
möglich ist - erst jetzt ist das Werkzeug sicher
gespannt.
8
8.11 Werkzeugwechsel ZahnkranzBohrfutter (4)
Siehe Abbildungen C, Seite 3.
Bohrfutter öffnen: Zahnkranz-Bohrfutter mit
Bohrfutterschlüssel öffnen -1-.
Einsatzwerkzeug spannen: Einsatzwerkzeug -2so tief wie möglich einsetzen und mit
Bohrfutterschlüssel gleichmäßig in allen 3
Bohrungen festspannen -3-.
8.12 Bohrfutter abschrauben
Schnellspann-Bohrfutter Futuro Top (6)
(Siehe Abbildung X auf vorletzter Seite)
Bohrfutter mit zwei Gabelschlüsseln abschrauben.
Schnellspann-Bohrfutter Futuro Plus (5)
(Siehe Abbildungen Y auf vorletzter Seite)
Sicherungsschraube herausdrehen. Achtung
Linksgewinde!
Bohrspindel mit einem Gabelschlüssel festhalten.
Bohrfutter durch leichten Schlag mit einem
Gummihammer auf einen eingespannten
Sechskantschlüssel lösen und abschrauben.
Zahnkranzbohrfutter (4)
(Siehe Abbildungen Z auf vorletzter Seite)
Sicherungsschraube herausdrehen. Achtung
Linksgewinde!
Bohrspindel mit einem Gabelschlüssel festhalten.
Bohrfutter durch leichten Schlag mit einem
Gummihammer auf den eingesteckten
Bohrfutterschlüssel lösen und abschrauben.
9 Tipps und Tricks
Bei tiefen Bohrungen den Bohrer von Zeit zu Zeit
aus der Bohrung ziehen, um das Gesteinsmehl
oder Späne zu entfernen.
Fliesen und andere spröde Materialien ohne
Schlag bohren. Impuls-Funktion (nur
SBE 900 Impuls) zum Anbohren ohne Ankörnen
einschalten.
Zum Schrauben kann das Bohrfutter
abgeschraubt werden. Schrauber-Bit direkt in den
Innensechskant der Spindel einsetzen. Bei
angebrachter Bit-Spannbuchse (Best.-Nr.
6.31281) wird der Schrauber-Bit gehalten.
Zum Gewindeschneiden (nicht SB 710),
Gewindebohrer etwas ölen. Geringe Drehzahl und
ersten Gang wählen. Im Rechtslauf einschneiden,
anhalten, im Linkslauf herausdrehen.
17026969_0610 SB_Bauk10.book Seite 9 Freitag, 18. Juni 2010 9:42 09
DEUTSCH
10 Reinigung, Wartung
Schnellspannbohrfutter reinigen:
Nach längerem Gebrauch das Bohrfutter mit der
Öffnung senkrecht nach unten halten und
mehrmals ganz öffnen und schließen. Der
angesammelte Staub fällt aus der Öffnung. Die
regelmäßige Anwendung von Reinigungsspray an
den Spannbacken und Spannbackenöffnungen
wird empfohlen.
D
D Lamellenschleifrad
E Bohrständer
F Maschinenschraubstock
G Stahldraht-Pinselbürste
H Stahldraht-Topfbürste
I Stahldraht-Rundbürste
J Bit-Spannbuchse
Zubehör-Komplettprogramm siehe
www.metabo.com oder Hauptkatalog.
13 Reparatur
11 Störungsbeseitigung
Sollte sich der Schalterdrücker (13) nicht
eindrücken lassen, überprüfen, ob der
Drehrichtungsumschalter (11) vollständig auf
Position R oder L steht (nicht SB 710).
SBE 900 Impuls: Wird bei eingeschalteter
Maschine das Stellrad (9) von Impulsfunktion auf
Drehmomentbegrenzung gestellt, schaltet sich die
Maschine automatisch ab. Maschine aus und
wieder einschalten.
Reparaturen an Elektrowerkzeugen dürfen nur
durch eine Elektrofachkraft ausgeführt werden!
Reparaturbedürftige Metabo Elektrowerkzeuge
können an die auf der Ersatzteilliste angegebenen
Adressen eingesandt werden.
Bitte beschreiben Sie bei der Einsendung zur
Reparatur den festgestellten Fehler.
14 Umweltschutz
Elektronik-Signalanzeige (10)
Schnelles Blinken - Wiederanlaufschutz
(SBE 1000, SBE 1100 Plus)
Bei Spannungswiederkehr nach Netzausfall läuft
die noch eingeschaltete Maschine aus
Sicherheitsgründen nicht wieder von alleine an.
Die Maschine aus- und wiedereinschalten.
Langsames Blinken - Kohlebürsten abgenutzt
(SBE 1100 Plus)
Die Kohlebürsten sind fast vollständig abgenutzt.
Bei vollständig abgenutzten Kohlebürsten schaltet
die Maschine automatisch ab. Die Kohlebürsten
beim Kundendienst wechseln lassen.
Dauerleuchten - Überlast
(SBE 1100 Plus)
Bei einer länger andauernden Überlastung der
Maschine wird die Leistungsaufnahme begrenzt
und dadurch eine weitere unzulässige Erwärmung
des Motors vermieden.
12 Zubehör
Verwenden Sie nur original Metabo Zubehör.
Wenn Sie Zubehör benötigen, wenden Sie sich
bitte an Ihren Händler.
Zur Auswahl des richtigen Zubehörs teilen Sie dem
Händler bitte den genauen Typ Ihres
Elektrowerkzeugs mit.
Siehe Seite 4.
A Metabox
B Winkel-Bohr- und Schraubvorsatz
C Biegewelle
Metaboverpackungen sind 100% recyclingfähig.
Ausgediente Elektrowerkzeuge und Zubehör
enthalten große Mengen wertvoller Roh- und
Kunststoffe, die ebenfalls einem Recyclingprozess
zugeführt werden können.
Diese Gebrauchsanleitung ist auf chlorfrei
gebleichtem Papier gedruckt.
Nur für EU-Länder: Werfen Sie Elektrowerkzeuge nicht in den Hausmüll! Gemäß Europäischer Richtlinie 2002/96/EG über
Elektro- und Elektronik-Altgeräte und Umsetzung
in nationales Recht müssen verbrauchte Elektrowerkzeuge getrennt gesammelt und einer umweltgerechten Wiederverwertung zugeführt werden.
15 Technische Daten
Erläuterungen zu den Angaben auf Seite 2.
Änderungen im Sinne des technischen Fortschritts
vorbehalten.
P1
P2
n1*
n2*
ø max
s max
b
G
H
m
D
=
=
=
=
=
=
=
=
=
=
=
Nennaufnahme
Abgabeleistung
Leerlaufdrehzahl
Lastdrehzahl
maximaler Bohrdurchmesser
maximale Schlagzahl
Bohrfutter-Spannweite
Bohrspindelgewinde
Bohrspindel mit Innensechskant
Gewicht
Spannhalsdurchmesser
9
17026969_0610 SB_Bauk10.book Seite 10 Freitag, 18. Juni 2010 9:42 09
D
DEUTSCH
Schwingungsgesamtwert (Vektorsumme dreier
Richtungen) ermittelt entsprechend EN 60745:
ah, ID = Schwingungsemissionswert
(Schlagbohren in Beton)
= Schwingungsemissionswert
ah, D
(Bohren in Metall)
Kh,ID,Kh,D= Unsicherheit (Schwingung)
Der in diesen Anweisungen angegebene
Schwingungspegel ist entsprechend einem in
EN 60745 genormten Messverfahren gemessen
worden und kann für den Vergleich von
Elektrowerkzeugen miteinander verwendet
werden. Er eignet sich auch für eine vorläufige
Einschätzung der Schwingungsbelastung.
Der angegebene Schwingungspegel repräsentiert
die hauptsächlichen Anwendungen des
Elektrowerkzeugs. Wenn allerdings das
Elektrowerkzeug für andere Anwendungen, mit
abweichenden Einsatzwerkzeugen oder
ungenügender Wartung eingesetzt wird, kann der
Schwingungspegel abweichen. Dies kann die
Schwingungsbelastung über den gesamten
Arbeitszeitraum deutlich erhöhen.
Für eine genaue Abschätzung der
Schwingungsbelastung sollten auch die Zeiten
berücksichtigt werden, in denen das Gerät
abgeschaltet ist oder zwar läuft, aber nicht
tatsächlich im Einsatz ist. Dies kann die
Schwingungsbelastung über den gesamten
Arbeitszeitraum deutlich reduzieren.
Legen Sie zusätzliche Sicherheitsmaßnahmen
zum Schutz des Bedieners vor der Wirkung von
Schwingungen fest wie zum Beispiel: Wartung von
Elektrowerkzeug und Einsatzwerkzeugen,
Warmhalten der Hände, Organisation der
Arbeitsabläufe.
Typische A-bewertete Schallpegel:
LpA
= Schalldruckpegel
= Schallleistungspegel
LWA
KpA, KWA = Unsicherheit (Schallpegel)
Gehörschutz tragen!
Messwerte ermittelt gemäß EN 60745.
Maschine der Schutzklasse II
* Energiereiche hochfrequente Störungen können
Drehzahlschwankungen hervorrufen. Diese
verschwinden wieder, sobald die Störungen
abgeklungen sind.
Die angegebenen technischen Daten sind
toleranzbehaftet (entsprechend den jeweils
gültigen Standards).
10
17026969_0610 SB_Bauk10.book Seite 11 Freitag, 18. Juni 2010 9:42 09
ENGLISH
ENG
Original instructions
Dear Customer,
Thank you for the trust you have placed in us by buying a Metabo power tool. Each Metabo power tool
is carefully tested and subject to strict quality controls by Metabo's quality assurance. Nevertheless, the
service life of a power tool depends to a great extent on you. Please observe the information contained
in these instructions and the enclosed documentation. The more carefully you treat your Metabo power
tool, the longer it will provide dependable service.
Contents
1
2
3
4
5
6
7
8
9
10
11
12
13
14
15
Declaration of Conformity
Specified Use
General Safety Instructions
Special Safety Instructions
Overview
Special Product Features
Initial Operation
Use
Tips and Tricks
Cleaning, Maintenance
Troubleshooting
Accessories
Repairs
Environmental Protection
Technical Specifications
1 Declaration of Conformity
We, being solely responsible, hereby declare that
this product conforms to the standards and directives specified on page 2.
2 Specified Use
The impact drill is suitable for drilling, without
impact, in metal, wood, plastic and similar materials and for impact drilling into concrete, stone
and similar materials. In addition, the machine is
suitable for thread tapping and screwdriving
(except SB 710).
The user bears sole responsibility for any damage
caused by improper use.
Generally accepted accident prevention regulations and the enclosed safety information must be
observed.
3 General Safety Instructions
WARNING – Reading the operating
instructions will reduce the risk of injury.
WARNING Read all safety warnings and
instructions. Failure to follow all safety warnings and instructions may result in electric shock,
fire and/or serious injury.
Keep all safety instructions and information for
future reference.
Before using the power tool, carefully read through
and familiarise yourself with all the enclosed safety
information and the Operating Instructions. Keep
all enclosed documentation for future reference,
and pass on your power tool only together with this
documentation.
4 Special Safety Instructions
For your own protection and for the
protection of your power tool, pay
attention to all parts of the text that are
marked with this symbol!
Wear ear protectors when using impact drills.
Exposure to noise can cause hearing loss.
Use the additional handle supplied with the
tool. Loss of control can cause personal injury.
Hold the power tool by insulated gripping
surfaces, when performing an operation where
the cutting accessory may contact hidden
wiring or its own cord. Cutting accessory
contacting a “live” wire may make exposed metal
parts of the power tool “live” and could give the
operator an electric shock.
Pull the plug out of the plug socket before any
adjustments or servicing are performed.
Avoid inadvertent starts by always unlocking the
switch when the plug is removed from the mains
socket or in case of a power cut. This is not necessary in the case of SBE 1000, SBE 1100 Plus (with
restart protection).
Ensure that the spot where you wish to work is free
of power cables, gas lines or water pipes (e.g.
using a metal detector).
Smaller workpieces must be secured such that
they are not carried along with the drill bit when
drilling (e.g. by clamping in a vice or on a work
bench with screw clamps).
Keep hands away from the rotating tool! Remove
chips and similar material only when the machine
is not in operation.
Metabo S-automatic safety clutch. When the
safety clutch responds, switch off the machine
immediately! If the tool jams or catches, the power
supply to the motor is restricted. Due to the strong
force which can arise, always hold the machine
11
17026969_0610 SB_Bauk10.book Seite 12 Freitag, 18. Juni 2010 9:42 09
ENG
ENGLISH
with both hands using the handles provided, stand
securely and concentrate.
The Metabo S-automatic safety clutch must not be
used for torque control.
Caution must be exercised when driving screws
into hard materials (driving screws with metric or
imperial threads into steel)! The screw head may
break, or a high reverse torque may build up on the
handle.
Dust from material such as paint containing lead,
some wood species, minerals and metal may be
harmful. Contact with or inhalation of the dust may
cause allergic reactions and/or respiratory
diseases to the operator or bystanders.
Certain kinds of dust are classified as carcinogenic
such as oak and beech dust especially in conjunction with additives for wood conditioning (chromate, wood preservative). Material containing
asbestos must only be treated by specialists.
- Where the use of a dust extraction device is
possible it shall be used.
- The work place must be well ventilated.
- The use of a dust mask of filter class P2 is
recommended.
Follow national requirements for the materials you
want to work with.
5 Overview
See page 3 (please unfold).
1 Thumbwheel for gear selection
2 Additional handle / Additional handle with
vibration damping *
3 Depth stop
4 Geared chuck*
5 Futuro Plus keyless chuck *
6 Futuro Top keyless chuck*
7 Slide switch (drilling/impact drilling)
8 Speed preselection setting wheel*
9 Setting wheel for setting torque control and
impulse function *
10 Electronic signal indicator*
11 Rotation selector switch *
12 Locking button for continuous activation
13 Trigger switch
* depending on equipment
6 Special Product Features
Metabo S-automatic safety clutch:
If the tool jams or catches, the power supply to the
motor is restricted. Due to the strong force which
can arise, always hold the machine with both
12
hands using the handles provided, stand securely
and concentrate.
Auto-stop carbon brushes:
If the carbon brushes are completely worn, the
machine switches off automatically. SBE 1100
Plus: An LED lights up before the carbon brushes
wear out completely.
Restart protection:
(SBE 1100 Plus, SBE 1000)
Restart protection prevents the unintentional startup of the machine when it is reconnected to the
mains or when power returns following a power
failure.
Overload protection display:
(SBE 1100 Plus)
The overload protection display indicates if the
machine is overloaded.
Metabo impulse function:
(SBE 900 Impuls)
For effortless driving and removal of stubborn
screws, even with damaged heads. For spotlessly
clean drilling without a centre punch - in tiles,
aluminium or other materials.
Electronic torque control:
(SBE 900 Impuls)
When driving small screws and when thread
tapping with taps of small diameter, the torque
may be reduced to a value appropriate to the work
being carried out.
7 Initial Operation
Before plugging in, check that the rated
mains voltage and mains frequency, as
stated on the rating label, match with your power
supply.
7.1
Assembly of additional handle (2)
For safety reasons, always use the additional
handle supplied.
Open the clamping ring by turning the additional
handle (2) counter-clockwise. Push the additional
handle onto the collar of the machine. Insert depth
stop (3). Slide the additional handle far enough
forward so that it can be turned. At the desired
angle, pull it back and tighten firmly.
8 Use
8.1
Adjusting depth stop
Release additional handle (2). Set depth stop (3) to
the desired drilling depth and retighten additional
handle. (2)
17026969_0610 SB_Bauk10.book Seite 13 Freitag, 18. Juni 2010 9:42 09
ENGLISH
8.2
Setting direction of rotation, transport
lock (switch-on lock)
(except SB 710)
Do not activate the rotation selector switch
(11) unless the motor has completely
stopped.
See page 3 (please unfold).
R = Clockwise setting
L = Counter-clockwise setting
0 = Central position: transport lock setting
(switch-on lock)
+ = Drill setting - not torque control (for max.
torque)
8.7
Setting up drilling, impact drilling
= Impulse function always switched on
+
The electronic soft start means that the
machine accelerates continuously until the
preselected speed is reached (depends on
equipment).
= Normal drilling without impact
Note: Impact drilling and drilling, only in clockwise direction
Selecting a gear
Release the trigger to switch off.
Continuous activation: While pressing on the
trigger (13), press in the locking button (12) and
then release the trigger. To switch off, press
and release the trigger (13) again.
In continuous operation, the machine
continues running if it is forced out of
your hands. Therefore, always hold the
machine with both hands using the handles
provided, stand in a safe position and concentrate.
Select the desired gear by turning the thumbwheel
(1).
Change speed only when the machine is in the
process of running down (briefly switch it on and
off).
1st gear (low speed, high torque) e.g. for
screwdriving, drilling
2nd gear (high speed) e.g. for drilling, impact
drilling
8.5
Preselect speed
(except SB 710)
Use the setting wheel (8) to preselect the
maximum speed. See page 4 for recommended
drilling speeds.
8.6
Setting up torque control
(SBE 900 Impuls)
Set using setting wheel (9) (position 1 - 6). When
the preselected torque is reached, the motor
stops.
1 = When a low torque is reached, the motor
stops.
6 = When a high torque is reached, the motor
stops.
Switching on/off, changing speed
The speed can be changed by pressing in the
trigger.
= Impact drilling
8.4
= Impulse function off (for drilling)
Switching on, speed: press the trigger (13).
Press the slide switch (7).
Note: When impact drilling, use a high speed:
Select 2nd gear on thumbwheel (1).
Switching on impulse function
(SBE 900 Impuls)
Set using setting wheel (9).
8.8
8.3
ENG
8.9
Tool change with Futuro Top keyless
chuck (6)
See illustrations A on page 3.
Opening the chuck: Grip the retaining ring and,
using the other hand, rotate the sleeve in the direction of the arrow -1-.
Clamping the tool: Insert tool -2- as far as it will
go. Grip the retaining ring and, using the other
hand, firmly rotate the sleeve as far as it will go in
the direction of the arrow -3-.
8.10 Tool change with Plus (5) chuck
See illustrations B on page 3.
Opening the drill chuck:
Grip the retaining ring and, using the other hand,
rotate the sleeve in the direction of the arrow -1-.
The grating sound (depending on function) which
may be heard after opening the drill chuck is
13
17026969_0610 SB_Bauk10.book Seite 14 Freitag, 18. Juni 2010 9:42 09
ENG
ENGLISH
stopped by turning the sleeve in the opposite
direction.
If the chuck is very tightly secured, disconnect
from mains. Hold the chuck using an open-end
spanner at the flats on its head, and turn the sleeve
vigourously in the direction of the arrow -1-.
Clamping the tool
- Insert the tool -2- as far as it will go.
- Grip the retaining ring and, using the other hand,
rotate the sleeve in the direction of the arrow -3until the mechanical resistance which can be felt
is overcome.
- Caution! The tool is not yet fully clamped!
Keep turning the sleeve (it must "click" when
turning) until it cannot be turned any further only now is the tool securely clamped.
In the case of a soft tool shank, retightening may
be required after a short period of drilling.
8.11 Tool change with a geared chuck (4)
See illustrations C on page 3.
Opening the chuck: Opening a geared chuck with
the chuck key -1-.
Clamping the tool: Insert tool -2- as far as it will
go and tighten equally in all 3 bores using the
chuck key -3-.
9 Tips and Tricks
In the case of deep bores pull the drill bit out of the
bore from time to time in order to remove the stone
dust or shavings.
Drill tiles and other brittle materials without impact.
Switch on the impulse function (SBE 900 Impuls
only) for drilling without a centre punch.
The drill chuck can be removed for screwdriving.
Insert screwdriver bit directly into the spindle's
hexagon socket. If a bit clamping bush (order no.
6.31281) is fitted, the screwdriver bit is held in
position.
For thread tapping (except SB 710), apply some oil
to the tap. Select a low speed and the first gear.
Start cutting in clockwise direction, stop and turn
out in counter-clockwise direction.
10 Cleaning, Maintenance
Cleaning the keyless chuck:
After prolonged use hold the chuck vertically, with
the opening facing down, and fully open and close
it several times. The dust collected falls from the
opening. Regular use of cleaning spray on the jaws
and jaw openings is recommended.
11 Troubleshooting
8.12 Unscrewing the chuck
Futuro Top keyless chuck (6)
(see illustration X on second to last page)
Unscrew the drill chuck with two open-end spanners.
Futuro Plus keyless chuck (5)
(see illustrations Y on second to last page)
Undo the locking screw. Caution! Left-handed
thread!
Grip the drill spindle using an open-end spanner.
Insert an Allen key into the chuck, tap on it with a
rubber hammer to loosen the chuck, and then
unscrew.
Geared chuck (4)
(see illustrations Z on second to last page)
Undo the locking screw. Caution! Left-handed
thread!
Grip the drill spindle using an open-end spanner.
Insert the chuck key into the chuck, tap on it with
a rubber hammer to loosen the chuck, and then
unscrew.
14
If it is not possible to press in the trigger (13), check
if the rotation selector switch (11) is fully at position
R or L (except SB 710).
SBE 900 Impuls: If the setting wheel (9) is moved
from impulse function to torque control while the
machine is switched on, the machine switches off
automatically. Switch the machine off and then
back on again.
Electronic signal display (10)
Rapid flashing - restart protection
(SBE 1000, SBE 1100 Plus)
When power is restored after a power failure, the
machine - which is still switched on - will not start
by itself for safety reasons. Switch machine on and
off again.
Slow flashing - carbon brushes worn
(SBE 1100 Plus)
The carbon brushes are almost completely worn. If
the brushes are completely worn, the machine
switches off automatically. Have the brushes
replaced by an authorised service centre.
Permanently lit - overload
(SBE 1100 Plus)
If the machine is subject to continuous overloading
for longer periods, the power input to the machine
is limited. This prevents additional unauthorised
heating of the motor.
17026969_0610 SB_Bauk10.book Seite 15 Freitag, 18. Juni 2010 9:42 09
ENGLISH
12 Accessories
Use only genuine Metabo accessories.
If you need any accessories, check with your
dealer.
The dealer needs to know the exact model of your
power tool in order to select the correct accessory.
See page 4.
A Metabox
B Angle drilling and screwdriving attachment
C Flexible shaft
D Flap sanding wheel
E Drill stand
F Machine vice
G Steel-wire end brush
H Steel-wire cup brush
I Steel-wire wheel brush
J Bit clamping bush
For the complete range of accessories, see
www.metabo.com or refer to the main catalogue.
13 Repairs
Repairs to electrical tools must be carried out by
qualified electricians ONLY!
Any Metabo power tool in need of repair can be
sent to one of the addresses listed in the spare
parts list.
When returning the device for repair, please
enclose a description of the fault.
14 Environmental Protection
Metabo's packaging can be 100% recycled.
When they reach the end of their service life, power
tools and accessories contain considerable
amounts of valuable raw and plastic materials,
which can be recycled.
These instructions are printed on chlorine-free
bleached paper.
Only for EU countries: Never dispose of
power tools in your household waste! In
accordance with European Guideline 2002/
96/EC on used electronic and electric equipment
and its implementation in national legal systems,
used power tools must be collected separately
and handed in for environmentally compatible
recycling.
15 Technical Specifications
Explanatory notes on the information on page 2.
ENG
Changes due to technological progress reserved.
P1
P2
n1*
n2*
ø max
s max
b
G
H
m
D
=
=
=
=
=
=
=
=
=
=
=
Rated input
Power output
No-load speed
Load speed
Max. drill diameter
Max. impact rate
Chuck capacity
Drill spindle thread
Drill spindle with hexagon socket
Weight
Collar diameter
Vibration total value (vector sum of three
directions) determined in accordance with EN
60745:
= Vibration emission value (impact
ah, ID
drilling into concrete)
ah, D
= Vibration emission value (drilling into
metal)
Kh,ID,Kh,D= Uncertainty (vibration)
The vibration level specified in these instructions
has been measured using a procedure standardised in EN 60745 and can be used for comparing
power tools with one another. It is also suitable for
a provisional estimate of the vibratory load.
The specified vibration level applies to the main
applications of the power tool. However, if the tool
is used for other applications, with different accessories or is poorly maintained, the vibration level
may vary. This may significantly increase the vibratory load over the entire working period.
An accurate estimate of the vibratory load should
also take into account the times when the tool is
shut down or when it is running but not actually in
use. This may significantly reduce the vibratory
load over the total working period.
Identify additional safety measures to protect the
operator from the effects of vibration such as:
maintain the tool and the accessories, keep the
hands warm, organisation of work patterns.
A-effective perceived sound levels:
LpA
= Sound pressure level
= Acoustic power level
LWA
KpA, KWA = Uncertainty (sound level)
Wear ear protectors!
Measured values determined in conformity with
EN 60745.
Machine in protection class II
* Energy-rich, high-frequency interference can
cause fluctuations in speed. The fluctuations
disappear, however, as soon as the interference
fades away.
The technical specifications quoted are subject to
tolerances (in compliance with the relevant valid
standards).
15
17026969_0610 SB_Bauk10.book Seite 16 Freitag, 18. Juni 2010 9:42 09
F
FRANÇAIS
Notice originale
Cher client,
merci de la confiance que vous nous avez témoignée en achetant un outil électrique Metabo. Tous les
outils électriques Metabo sont testés avec soin et font l'objet de contrôles qualité très stricts effectués
par le Service Qualité Metabo. Mais c'est vous qui avez la plus grande influence sur la durée de vie de
votre outil électrique. Veuillez respecter les informations contenues dans ces instructions d'utilisation et
dans les documents ci-joints. En prenant grand soin de votre outil électrique Metabo, vous en
augmenterez la durée de vie et en garantirez le bon fonctionnement.
Sommaire
1
2
3
4
5
6
7
8
9
10
11
12
13
14
15
Déclaration de conformité
Utilisation conforme à la destination
Consignes générales de sécurité
Consignes de sécurité particulières
Vue d'ensemble
Particularités du produit
Mise en service
Utilisation
Conseils et astuces
Nettoyage, maintenance
Dépannage
Accessoires
Réparations
Protection de l'environnement
Caractéristiques techniques
1 Déclaration de conformité
Nous déclarons sous notre propre responsabilité
que ce produit est conforme aux normes et directives indiquées page 2.
2 Utilisation conforme à la
destination
La perceuse à percussion sert à percer sans
percussion dans le métal, le bois, le plastique et
matériaux assimilés et pour percer avec percussion dans le béton, la pierre et matériaux assimilés.
En outre, l'outil sert pour le taraudage et le vissage
(pas SB 710).
L'utilisateur sera entièrement responsable de tous
dommages résultant d'une utilisation non
conforme à la destination de la machine.
Il est impératif de respecter les consignes
générales de protection contre les accidents ainsi
que les consignes de sécurité ci-jointes.
16
3 Consignes générales de
sécurité
AVERTISSEMENT – Lire la notice d'utilisation afin d'éviter tout risque de blessure.
AVERTISSEMENT Lire toutes les consignes de sécurité et instructions. Le nonrespect des consignes de sécurité et des instructions peut être à l'origine d'un choc électrique,
d'un incendie et/ou de blessures graves.
Conserver toutes les consignes de sécurité et
instructions.
Avant d'utiliser l'outil électrique, lire attentivement
et entièrement les instructions de sécurité ainsi
que le mode d'emploi ci-joints. Conservez les
documents ci-joints et veillez à les remettre obligatoirement avec l'appareil à tout utilisateur
concerné.
4 Consignes de sécurité
particulières
Pour des raisons de sécurité et afin de
protéger l'outil électrique, respectez les
passages de texte marqués de ce
symbole !
Porter une protection auditive lors de l'utilisation d'une perceuse à percussion. Le bruit est
susceptible de provoquer une perte de capacité
auditive.
Utiliser la poignée complémentaire fournie
avec l'outil. En cas de perte de contrôle, il y a un
risque de blessures.
Lors d'opérations où l'accessoire risque de
rencontrer des conducteurs électriques non
apparents, voire son câble d'alimentation, tenir
l'outil exclusivement par les côtés isolés des
poignées. Le contact avec un conducteur électrique sous tension peut également mettre les
parties métalliques de l'outil sous tension et provoquer un choc électrique.
Débrancher le cordon d'alimentation de la prise de
courant avant toute opération de réglage ou de
maintenance.
17026969_0610 SB_Bauk10.book Seite 17 Freitag, 18. Juni 2010 9:42 09
FRANÇAIS
Eviter les démarrages intempestifs : la gâchette
doit toujours être déverrouillée lorsque l'on retire le
connecteur de la prise ou après une coupure de
courant. Non requis pour les modèles SBE 1000,
SBE 1100 Plus (avec protection antidémarrage).
Vérifier que l'emplacement sur lequel intervenir ne
comporte aucune conduite électrique, d'eau ou
de gaz (par ex. à l'aide d'un détecteur de métaux).
Les pièces à usiner plus petites doivent être assurées de sorte à ne pas pouvoir être emportées par
le foret lors du perçage (par exemple lors du
serrage dans un étau ou sur l'établi avec des serrejoints).
Ne pas toucher l'outil lorsque la machine est en
marche ! Eliminer sciures de bois et autres uniquement lorsque l'outil est à l'arrêt.
Débrayage de sécurité Metabo S-automatic. En
cas de déclenchement du débrayage de sécurité,
arrêter immédiatement la machine !Si un outil de
travail est coincé ou accroché, la transmission
d'effort au moteur est limitée. Comme cette situation génère des efforts importants, veiller à
toujours bien maintenir la machine avec les deux
mains au niveau des poignées, à prendre un bon
équilibre et à travailler de manière concentrée.
Le débrayage de sécurité Metabo S-automatic ne
doit pas servir à limiter le couple.
Attention pour les vissages en force (avec des vis
à pas métrique ou en pouces sur de l'acier) !
Risque d'arrachement de la tête de vis ou d'apparition de couples de réaction élevés sur la poignée.
Les poussières de matériaux tels que les peintures
au plomb, certains types de bois, de minéraux et
de métaux peuvent s'avérer nocives pour la santé.
Toucher ou inhaler ces poussières peut entraîner
des réactions allergiques et/ou des maladies
respiratoires chez l'utilisateur ou les personnes se
trouvant à proximité.
Certaines poussières provenant par exemple du
chêne ou du hêtre sont considérées comme
cancérigènes, particulièrement lorsqu'elle sont
associées à des adjuvants de traitement du bois
(chromate, produit de protection du bois). Seuls
des spécialistes sont habilités à traiter les
matériaux contenant de l'amiante.
- Utiliser le plus possible un système d'aspiration
des poussières.
- Veiller à une bonne aération du site de travail.
- Il est recommandé de porter un masque antipoussières avec filtre de classe 2.
Respecter les directives nationales en vigueur
relatives aux matériaux à traiter.
5 Vue d'ensemble
Voir page 3 (à déplier).
1 Sélecteur de vitesse
F
2 Poignée supplémentaire / poignée supplémentaire avec amortissement des vibrations*
3 Butée de profondeur
4 Mandrin à clé *
5 Mandrin automatique Futuro Plus *
6 Mandrin automatique Futuro Top *
7 Interrupteur coulissant perçage avec/sans
percussion
8 Molette de présélection du régime *
9 Molette de limitation du couple et
fonctionnement par impulsion *
10 Témoin électronique *
11 Commutateur du sens de rotation *
12 Bouton de marche continue
13 Gâchette
* suivant équipement
6 Particularités du produit
Débrayage de sécurité Metabo S-automatic :
Si un outil de travail est coincé ou accroché, la
transmission d'effort au moteur est limitée.
Comme cette situation génère des efforts
importants, veiller à toujours bien maintenir la
machine avec les deux mains au niveau des poignées, à prendre un bon équilibre et à travailler de
manière concentrée.
Charbons de sécurité :
Dès l'usure complète des charbons de contact, la
machine s'arrête automatiquement. SBE 1100
Plus : Une diode lumineuse est activée avant que
les charbons ne soient complètement usés.
Protection contre le redémarrage :
(SBE 1100 Plus, SBE 1000)
La protection contre le redémarrage empêche que
la machine se remette en marche accidentellement après avoir été rebranchée sur le secteur, ou
en cas de réalimentation après une coupure de
courant.
Témoin de surcharge :
(SBE 1100 Plus)
Le témoin de surcharge s'active lorsque la
machine est en surcharge.
Fonctionnement par impulsion Metabo :
(SBE 900 Impuls)
Pour un alésage et un vissage faciles des vis grippées, même à tête abimée. Pour un perçage
propre sans pointe de centrage dans le carrelage,
l'aluminium ou autres matériaux.
Limitation électronique du couple :
(SBE 900 Impuls)
Le couple peut être réduit à la vitesse correspondant au travail à exécuter, qu'il s'agisse de visser
17
17026969_0610 SB_Bauk10.book Seite 18 Freitag, 18. Juni 2010 9:42 09
F
FRANÇAIS
les petites vis ou de tarauder avec des mandrins
de petit diamètre.
7 Mise en service
Avant la mise en service, vérifier que la
tension secteur et la fréquence secteur indiquées sur la plaque signalétique correspondent
aux caractéristiques du réseau de courant.
7.1
Montage de la poignée supplémentaire
(2)
Remarque : Pour tous perçages avec ou sans
percussion, la rotation à droite est obligatoire.
Remarque : Le perçage avec percussion
s'effectue à vitesse élevée : régler le
sélecteur (1) sur la 2ème vitesse.
8.4
Sélection de la vitesse
Choisir la vitesse désirée en tournant le sélecteur
(1).
Commuter seulement lorsque la machine s'arrête
(connecter/déconnecter rapidement).
Pour des raisons de sécurité, toujours utiliser
la poignée supplémentaire qui est comprise
dans la livraison.
1ère vitesse (vitesse de rotation faible,
moment de couple élevé) p. ex. pour visser,
percer
Ouvrir l'anneau de serrage en tournant la poignée
(2) vers la gauche. Faire coulisser la poignée sur le
collier de la machine. Introduire la butée de profondeur (3). Glisser la poignée supplémentaire jusqu'à
ce qu'elle puisse pivoter. Une fois l'angle souhaité
atteint, tirer dessus et la serrer fortement.
2ème vitesse (vitesse de rotation élevée) p.
ex. pour percer avec ou sans percussion
8 Utilisation
8.1
8.5
Présélection de la vitesse
(pas SB 710)
Avec la molette de réglage (8), présélectionner la
vitesse maximale. Voir les vitesses conseillées
pour le perçage à la page 4.
Réglage de la butée de profondeur
Desserrer la poignée supplémentaire (2). Régler la
butée de profondeur (3) à la profondeur de
perçage voulue et resserrer la poignée supplémentaire (2).
8.6
8.2
1 = Une fois un faible couple atteint, le moteur
s'arrête
Réglage du sens de rotation / sécurité
de transport (protection contre tout
enclenchement intempestif)
(pas SB 710)
S'assurer que le moteur est à l'arrêt avant
d'actionner le commutateur du sens de rotation (11).
Sur la molette (9), régler (position 1 - 6). Une fois le
couple présélectionné atteint, le moteur s'arrête.
6 = Une fois un couple élevé atteint, le moteur
s'arrête
+ = Position de perçage réglée, aucune limitation
de couple (pour couple max.)
Voir page 3 (à déplier).
R = Réglé sur sens de rotation à droite
L = Réglé sur sens de rotation à gauche
0 = Centre : sécurité de transport (protection contre tout enclenchement intempestif)
8.7
8.3
+
Réglage du perçage avec/sans percussion
Réglage de la limitation du couple
(SBE 900 Impuls)
Activation du fonctionnement par
impulsion
(SBE 900 Impuls)
Faire le réglage sur la molette (9).
= Fonctionnement par impulsion en marche
en permanence
= Fonctionnement par impulsion à l'arrêt
(pour le perçage)
Actionner le coulisseau (7).
= Perçage avec percussion réglé
= Perçage sans percussions réglé
18
8.8
Marche/arrêt, réglage de la vitesse
Marche, vitesse : appuyer sur la gâchette (13).
17026969_0610 SB_Bauk10.book Seite 19 Freitag, 18. Juni 2010 9:42 09
FRANÇAIS
La vitesse peut être modifiée par une pression
sur la gâchette.
Grâce au démarrage électronique en douceur,
l'outil accélère en continu jusqu'à la vitesse
présélectionnée (suivant équipement).
Pour désactiver, relâcher la gâchette.
Marche continue : Lorsque la gâchette (13) est
enfoncée, presser le bouton (12) et relâcher la
gâchette. Pour désactiver, appuyer de
nouveau sur la gâchette (13), puis relâcher.
Lorsque l'outil est en position de marche
continue, il continue de tourner s'il
échappe des mains. Afin d'éviter tout comportement inattendu de l'outil, le tenir avec les
deux mains au niveau des poignées, veiller à
un bon équilibre et travailler de manière
concentrée.
8.9
Changement d'outil avec le mandrin
automatique Futuro Plus (6)
Voir figures A, page 3.
Ouvrir le mandrin : Tenir la bague de serrage et
tourner la douille avec l'autre main dans le sens de
la flèche -1-.
Tendre l'embout : Insérer l'outil de travail -2- le
plus profondément possible. Tenir la bague de
serrage et tourner énergiquement la douille avec
l'autre main dans le sens de la flèche -3- jusqu'à la
butée.
8.10 Changement d'outil avec le mandrin
automatique Plus (5)
Voir les figures B, page 3.
Ouvrir le mandrin :
Tenir la bague de serrage et tourner la douille avec
l'autre main dans le sens de la flèche -1-.
Le cliquètement que l'on entend éventuellement
après avoir ouvert le mandrin (bruit dû au
fonctionnement) disparaîtra si l'on tourne la douille
dans le sens contraire.
Au cas où le mandrin est complètement bloqué :
Débrancher le cordon d'alimentation. Maintenir le
mandrin au niveau de la tête avec une clé à fourche
et tourner la douille avec force dans le sens de la
flèche -1-.
Tendre l'embout :
- Insérer l'outil de travail -2- le plus profondément
possible.
- Tenir la bague de serrage et tourner la douille
avec l'autre main dans le sens de la flèche -3jusqu'à ce que la résistance mécanique perceptible soit dépassée.
F
- Attention ! L'outil n'est alors pas encore serré
! Continuer à tourner avec force (on doit
entendre un "clic") jusqu'à ce que l'on ne
puisse plus tourner du tout - ce n'est que
maintenant que l'outil est véritablement serré.
En cas d'utilisation d'outils souples, il faudra éventuellement resserrer après avoir effectué de courts
travaux de perçage.
8.11 Changement d'outil avec le mandrin à
clé (4)
Voir les figures C, page 3.
Ouvrir le mandrin : Ouvrir le le mandrin à clé avec
la clé à mandrin -1-.
Tendre l'embout : Insérer l'outil de travail -2- le
plus profondément possible et le serrer avec
la clé à mandrin homogènement dans
les 3 perçages -3-.
8.12 Dévissage du mandrin
Mandrin automatique Futuro Top (6)
(Voir figure X sur l'avant-dernière page)
Dévisser le mandrin de perçage à l'aide de deux
clés à fourche.
Mandrin automatique Futuro Plus (5)
(Voir figures Y sur l'avant-dernière page)
Desserrer la vis de freinage. Attention filet à
gauche !
Maintenir la broche de perçage avec une clé à
fourche. Décoller le mandrin en tapotant légèrement avec un maillet en plastique sur une clé six
pans insérée dans le mandrin, puis dévisser.
Mandrin à clé (4)
(Voir figures Z sur l'avant-dernière page)
Desserrer la vis de freinage. Attention filet à
gauche !
Maintenir la broche de perçage avec une clé à
fourche. Décoller le mandrin en tapotant légèrement avec un maillet en plastique sur la clé de
mandrin insérée dans le mandrin, puis dévisser.
9 Conseils et astuces
En cas de perçages profonds, il faut retirer de
temps en temps le foret du trou pour éliminer les
poussières de pierre ou les sciures de bois.
Les carrelages ainsi que les matériaux cassants
sont à percer sans percussion. Mettre le
fonctionnement par impulsions (uniquement SBE
900 Impuls) en route pour percer sans pointe de
centrage.
19
17026969_0610 SB_Bauk10.book Seite 20 Freitag, 18. Juni 2010 9:42 09
F
FRANÇAIS
Le mandrin de perçage pourra être dévissé pour
les opérations de vissage. Placer alors l'embout de
vissage directement dans l'alésage à six pans de
la broche.Si une douille de serrage d'embouts
(disponible comme accessoire : réf. de cde
6.31281) a été installée, l'embout de vissage sera
maintenu en place.
Graisser légèrement le foret pour le taraudage (pas
SB 710). Sélectionner une vitesse de rotation
faible et la première vitesse. Faire une entaille en
rotation à droite, bloquer, sortir en tournant vers la
gauche.
10 Nettoyage, maintenance
Nettoyage du mandrin autoserrant :
Après une utilisation prolongée du mandrin, tenir
celui-ci en position verticale, ouverture vers le bas,
l'ouvrir entièrement et le refermer, puis recommencer plusieurs fois de suite. La poussière qui
s'était accumulée tombera alors par l'ouverture. Il
est conseillé d'utiliser régulièrement un spray de
nettoyage pour les mâchoires de serrage.
11 Dépannage
Lorsque la gâchette (13) ne se laisse pas enfoncer,
vérifier si le commutateur de sens de rotation (11)
est complètement en position R ou L (pas SB 710).
SBE 900 Impuls : Lorsque l'outil est en marche, si
la molette (9) du fonctionnement par impulsion est
réglée sur la limitation du couple, l'outil s'éteint
automatiquement. Arrêter et redémarrer la
machine.
12 Accessoires
Utiliser uniquement des accessoires Metabo.
Si des accessoires sont nécessaires, s'adresser
au revendeur.
Pour pouvoir sélectionner les accessoires appropriés, indiquer le type exact de l'outil électrique au
distributeur.
Voir page 4.
A Metabox
B Tête de perçage d'angle et de vissage
C Arbre flexible
D Meule à lamelles
E Support de perçage
F Etau
G Brosse pinceau en fil d'acier
H Brosse boisseau en fil d'acier
I Brosse métallique circulaire
J Douille de serrage pour embouts
Voir gamme complète des accessoires sur
www.metabo.com ou dans le catalogue principal.
13 Réparations
Les travaux de réparation sur les outils électriques
ne peuvent être effectués que par un spécialiste !
Les outils Metabo à réparer peuvent être expédiés
à l'une des adresses indiquées sur la liste des
pièces de rechange.
Prière de joindre à l'outil expédié une description
du défaut constaté.
Témoin électronique (10)
Clignotement rapide - Protection contre le redémarrage
(SBE 1000, SBE 1100 Plus
Quand la tension revient après une coupure de
courant, la machine ne redémarre pas d'ellemême pour des raisons de sécurité. Arrêter la
machine et la redémarrer.
Clignotement lent - Charbons usés
(SBE 1100 Plus)
Les balais de charbon sont presque complètement
usés. Lorsque les balais seront complètement
usés, la machine s'arrêtera automatiquement Faire
remplacer les charbons par le service après-vente.
Allumage permanent - surcharge
(SBE 1100 Plus)
En cas de surcharge prolongée de la machine, la
puissance absorbée est réduite, ce qui permet
d'éviter une surchauffe excessive du moteur.
20
14 Protection de
l'environnement
Les emballages Metabo sont recyclables à 100 %.
Les outils et accessoires électriques qui ne sont
plus utilisés contiennent de grandes quantités de
matières premières et de matières plastiques de
grande qualité pouvant être également recyclées.
Ce mode d'emploi est imprimé sur du papier
blanchi sans chlore.
Pour les pays européens uniquement : Ne
pas jeter les appareils électriques dans les
ordures ménagères ! Conformément à la
directive européenne 2002/96/CE relative aux
déchets d'équipements électriques ou électroniques (DEEE), et à sa transposition dans la législation nationale, les appareils électriques doivent
être collectés à part et être soumis à un recyclage
respectueux de l’environnement.
17026969_0610 SB_Bauk10.book Seite 21 Freitag, 18. Juni 2010 9:42 09
FRANÇAIS
F
Porter un casque antibruit !
15 Caractéristiques
techniques
Commentaires sur les indications de la page 2.
Sous réserve de modifications allant dans le sens
du progrès technique.
P1
P2
n1*
n2*
ø max
s max
b
G
H
m
D
=
=
=
=
=
=
=
=
=
=
=
Puissance absorbée
Puissance débitée
Vitesse à vide
Vitesse en charge
Capacité de perçage maximale
Cadence de frappe maxi
Capacité du mandrin
Filet de la broche de perçage
Broche à six pans creux
Poids
Diamètre du collet
Valeurs de mesure calculées selon EN 60745.
Outil de la classe de protection II
* Les perturbations haute fréquence de forte
énergie peuvent provoquer des variations de
vitesse de rotation. Ces variations cessent dès la
disparition des perturbations.
Les caractéristiques indiquées sont soumises à
tolérance (selon les normes en vigueur correspondantes).
Valeurs totales de vibration (somme vectorielle
triaxiale) déterminées conformément à la
EN 60745 :
ah, ID = Valeur d’émission de vibration
(perçage avec percussion dans le
béton)
= Valeur d’émission de vibrations
ah, D
(perçage dans le métal)
Kh,ID,Kh,D= Incertitude (oscillation)
Le niveau de vibration indiqué dans les présentes
instructions est mesuré selon un procédé
conforme à la norme EN 60745 et peut servir à
comparer les différents outils électriques. Il est
également approprié pour réaliser une estimation
provisoire de l'amplitude de vibration.
Le niveau d'oscillation indiqué correspond aux
applications principales de l'outil électrique. Par
ailleurs, le niveau d'oscillation peut dévier si l'outil
électrique est utilisé dans d'autres applications,
avec des outils de travail différents ou avec une
maintenance insuffisante. Cela peut entraîner une
augmentation sensible de l'amplitude de vibration
sur la durée totale de travail.
Pour estimer de manière exacte l'amplitude de
vibration, il faut également tenir compte des temps
d'arrêt ou de marche à vide de l'outil. Cela peut
entraîner une réduction sensible de l'amplitude
d'oscillation sur la durée totale de travail.
Définir les mesures de sécurité supplémentaires
relatives à la protection de l'utilisateur contre les
effets de vibration,
telles que : maintenance de l'outil électrique et des
outils de travail, maintien des mains au chaud,
organisation du travail.
Niveaux sonores types A
LpA
= Niveau de pression acoustique
= Niveau de puissance sonore
LWA
KpA, KWA = Incertitude (niveaux sonores)
21
17026969_0610 SB_Bauk10.book Seite 93 Freitag, 18. Juni 2010 9:42 09
X
Y
Z
93
17026969_0610 SB_Bauk10.book Seite 94 Freitag, 18. Juni 2010 9:42 09
Metabowerke GmbH,
72622 Nürtingen, Germany
www.metabo.com