1
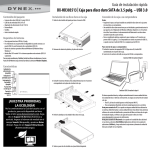
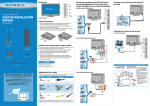
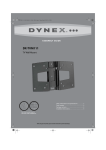
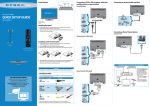
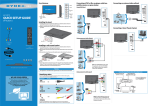
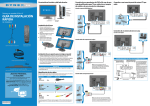
Quick Setup Guide
DX-HD303513 | USB 3.0 - 3.5" SATA HDD Enclosure
Package contents
Installing your hard drive in the enclosure
Connecting the enclosure to your computer
•
•
•
•
•
•
1 Remove the two screws from the panel with the USB connector.
Notes:
• Make sure you that have installed the hard drive into the enclosure before
connecting the enclosure to your computer.
• A new hard drive must be initialized and partitioned before it appears in
Windows Explorer or on your Mac desktop. Refer to your hard drive
manufacturer’s documentation, or see your online User Guide.
• For optimal performance, make sure that your laptop or PC has USB 3.0 ports
(
). If your computer does not have USB 3.0 capability, you can plug the
USB 3.0 cable into any available USB 2.0 port, but it will only run at USB 2.0
speeds.
USB 3.0 3.5" Serial ATA hard drive enclosure
Hi-speed USB 3.0 A - B cable
12V/2A AC power adapter
Screwdriver
Screws
Quick Setup Guide
System requirements
• One 3.5" Serial ATA hard drive.
• PC or Macintosh computer with an available USB 3.0 port. (You can connect to
a USB 2.0 port, but it will only run at USB 2.0 speeds).
• Supports Microsoft Windows XP, Windows Vista, and Windows 7 operating
systems.
• Supports Mac OS X version 10.4 or higher operating system (USB 2.0 only).
For best performance and reliability, install the latest updates and service packs
(SP) for Windows (go to the Start menu and select Windows Update).
2 Remove the plastic end cap and circuit board.
To connect the enclosure to your computer:
1 Plug the smaller USB 3.0 (Micro-B type) connector on the USB cable (provided)
into the port on the enclosure.
2 Plug the other end of the cable into a USB port on your computer.
USB 3.0 B type male connector
Features
Power indicator
(yellow)
Activity indicator
(blue)
On/Off switch
USB 3.0
B type port
12V DC in port
3 Connect your hard drive’s SATA connector to the corresponding connector on the
enclosure circuit board.
USB 3.0 A type male connector
WE ARE GOING GREEN!
A copy of your User Guide is not provided
in the box but is available online.
Go to www.dynexproducts.com, then click
Support & Service. Enter your model number
in the Search field, then press Enter.
Click Support/Downloads.
4 Gently slide the drive tray, with drive attached, into the enclosure.
5 Replace the two screws on the left-side panel.
The operating system automatically detects and sets up the new drive.
If the drive is correctly detected, a new drive letter is assigned to the enclosure.
• For PCs, the new drive letter appears in My Computer.
• For Macintosh computers, the new drive letter appears on the desktop.
Note for PC users: If you do not see an additional drive in your system, you might
need to format the new drive. For further assistance please refer to the
troubleshooting guide included on the reverse of this quick setup guide, or refer to
the online users guide at www.dynexproducts.com for more information.
Note for Macintosh users: If you do not see an additional drive in your system,
select Disk Utilities from the Utilities folder, then select the external enclosure
and format the drive to meet your requirements.
Disconnecting the enclosure from your computer
Troubleshooting
Legal notices
To disconnect the enclosure while your PC is running:
Note: If a drive window is open or the hard drive enclosure is active, close any
associated windows before trying to remove the enclosure.
1 Right-click the Safely Remove Hardware icon (located near the clock on the
taskbar).
2 Select the drive you want to unplug, then click STOP.
3 When Windows notifies you that it is safe to do so, unplug the enclosure from
your computer.
To disconnect the enclosure while Mac OS X is running:
1 Drag the USB icon into the TRASH.
2 Unplug the enclosure.
I do not see the enclosure/additional drive in my system
• Make sure the drive is functioning. A drive that does not work in a laptop will
more than likely not work with this enclosure either. When you connect the
enclosure to the PC, listen to hear if the drive has spun up (it may be very faint).
Contact your hard drive manufacturer or PC manufacturer for information on
testing your hard drive.
• Make sure that the USB cable is connected firmly to your enclosure and computer.
• Make sure that the USB cable is not broken or damaged in some way.
• Open the enclosure and make sure that all of the connections are securely
fastened.
• Make sure the power adapter is connected to the enclosure and plugged in. The
enclosure will not work without the power adapter.
• Windows may not be able to recognize the partition on the hard drive because it
is damaged or not a valid format. You can initialize, partition, and format
unrecognized drives by using the Disk Manager (Windows users) or Disk
Utilities (Mac Users).
CAUTION: Doing this will erase any existing data on the drive. If the drive is
damaged and you wish to recover the data, continuing WILL overwrite the existing
information.
• If using a new hard drive, have you formatted and partitioned the hard drive? If
not, see “Partitioning and formatting a new hard drive” on page 5. If the hard
drive is not formatted and partitioned, Windows will not assign a drive letter.
• There are some computers that have difficulty starting with a USB hard drive
connected. Unplug the hard drive, then restart your computer. Once started,
connect the hard drive.
The data transfer between computer and device is slow
• Your system may be operating at USB 2.0 speeds due to an incorrect driver
installation of the USB 3.0 adapter card. Or you may have a system that does not
support USB 3.0. If your system includes a PCIe slot, you can achieve SuperSpeed
USB transfer rates by installing a USB 3.0 PCIe adapter card.
• Make sure the enclosure is connected to a USB 3.0 or 2.0 port. Transfer speeds are
optimal/best with your hard drive enclosure if you are using USB 3.0 ports.
• Data throughput is greatly affected by the type and location of data on the disk. A
few very large files will copy much faster than many small files since the larger
files are more likely to be arranged sequentially on the disk.
• Magnetic Hard Disk Drives operate at speeds slower than the USB 3.0’s maximum
data transfer rate. Your transfer speeds will be faster on USB 3.0 than on USB 2.0,
but will still be limited by the physical disk’s throughput.
For additional troubleshooting information, see your online User Guide at
www.dynexproducts.com.
FCC Part 15
This device complies with Part 15 of the FCC Rules. Operation of this product is
subject to the following two conditions: (1) this device may not cause harmful
interference, and (2) this device must accept any interference received, including
interference that may cause undesired operation.
This equipment has been tested and found to comply within the limits for a class B
digital device, pursuant to Part 15 of the FCC Rules. These limits are designed to
provide reasonable protection against harmful interference in a residential
installation. This equipment generates, uses, and can radiate radio frequency
energy and, if not installed and used in accordance with the instructions, may cause
harmful interference to radio communications. However, there is no guarantee that
interference will not occur in a particular installation. If this equipment does cause
harmful interference to radio or television reception, which can be determined by
turning the equipment off and on, the user is encouraged to try to correct the
interference by one or more of the following measures:
• Reorient or relocate the receiving antenna.
• Increase the separation between the equipment and receiver.
• Connect the equipment into an outlet on a circuit different from that to which the
receiver is connected.
• Consult the dealer or an experienced technician for help.
FCC warning
Changes or modifications not expressly approved by the party responsible for
compliance with the FCC Rules could void the user’s authority to operate this
equipment.
Canada ICES-003 statement
This Class B digital apparatus complies with Canadian ICES-003.
Formatting the hard drive on your PC
Caution: Formatting is only required for a new hard drive. Do not format a drive
that contains valuable data that you want to save.
To format the hard drive on your PC:
1 Click Start, then click Control Panel.
2 Click Performance and Maintenance (in Windows 7, click System and
Security), then click Administrative Tools.
3 Click Computer Management, then click Disk Management from the menu
on the left side of the screen.
4 Click on the new drive (identifiable via the model number or drive capacity), then
click on the Action tab at the top of the screen.
5 Go to All Tasks, then click Format from the menu.
6 Select the file system and other choices you want, then click OK.
For information about partitioning a new hard drive, see your online User Guide at
www.dynexproducts.com.
Formatting the hard drive on a Mac
Caution: Formatting is only required for a new hard drive. Do not format a drive
that contains valuable data that you want to save.
To format the hard drive:
1 Click Disk Utility (under Applications).
2 Select the new hard drive you are trying to install.
3 Click the Erase tab.
4 Choose a volume format and assign a name to the new drive, then click Erase.
For additional help consult your owner’s manual.
One-year limited warranty
For complete warranty, visit www.dynexproducts.com.
Contact Dynex:
For customer service call 1-800-305-2204
www.dynexproducts.com
© 2012 BBY Solutions, Inc. All Rights Reserved.
DYNEX is a trademark of BBY Solutions, Inc. Registered in some countries. All other products and
brand names are trademarks of their respective owners.
Specifications
For specification information, see your online User Guide at
www.dynexproducts.com.
ENGLISH 12-0301