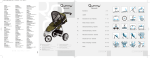
1
3-Wheeler Instructions for use & Warranty www.quinny.com Congratulations on the purchase of this Quinny Buzz pushchair. Quinny represents high-quality products that are not only beautiful; they are also thoroughly practical, safe and comfortable. Please read this instruction manual carefully. This will enable you to make the best use of the capabilities of this pushchair and will ensure both your own safety and comfort and that of your child. We hope that you will enjoy this Quinny Buzz. Dorel CONTENTS 1 IMPORTANT: KEEP FOR FUTURE REFERENCE 2 SAFETY INSTRUCTIONS 3 PRODUCT DESCRIPTION 4 PREPARING FOR USE / UNFOLDING AND FOLDING / DISMANTLING 4.1 Preparation for use 4.2 Folding and Unfolding 5 PLACING YOUR CHILD IN THE QUINNY BUZZ 5.1 General 5.2 Adjusting the length of the belt 5.3 Adjusting the length of the shoulder belt 6 CLEANING AND MAINTENANCE 6.1 General 6.2 Cleaning the Quinny Buzz seats (comfort cushion and XL seat) 6.3 Maintaining the Quinny Buzz tyres 7 Weight and dimensions 8 SEPARATING WASTE 9 WARRANTY 10 QUESTIONS Disclaimer: The utmost care was exercised in designing and compiling this instruction manual. We cannot, however, offer any guarantees with regard to the completeness and correctness of the information contained herein. 2 1 IMPORTANT: KEEP FOR FUTURE REFERENCE 2 SAFETY INSTRUCTIONS - WARNING Please read this instruction manual carefully and keep it for future reference. If these instructions are not followed, the safety of your child may be severely endangered. - WARNING A child’s safety is your responsibility. - WARNING It can be dangerous to leave your child unattended. - WARNING Always set the parking brake on the pushchair when you are standing still. - WARNING Always secure your child with the safety harness as soon as your child can sit up unassisted. - WARNING Always secure your child with the safety harness! Ensure the harness is adjusted correctly to fit your child. - WARNING Do not hang anything from the handlebar. This will make the pushchair less stable and will increase the risk of tipping over. - WARNING Keep all small parts like the tyre valve caps away from children. Your child could swallow them and they therefore pose a choking hazard. Also keep the hand pump out of the reach of children. - WARNING Prevent the danger of suffocation and keep plastic bags out of the reach of children. - WARNING This product is not suitable for jogging or in-line skating behind the pushchair. - WARNING Check to make sure that all locks are secured before each use in order to avoid getting anything jammed between parts. - WARNING Before each use check that the carrycot, adapters and/or seats are installed correctly and securely locked. - WARNING The black tyres may leave marks on some smooth floors (particularly synthetic laminates, parquet and linoleum). - WARNING The raincover should not be used indoors. - Use the Quinny Buzz for only one child at a time. - The Quinny Buzz is suitable for children from birth to age 4 (maximum of 15 kg). - When being used from birth, we recommend that the Quinny Buzz is used together with a Dreami carrycot or Maxi-Cosi baby car seat. - The Quinny Buzz seat is not suitable for use in a car. Use a Maxi-Cosi baby/child car seat for this purpose. - The Quinny Buzz comes with two seats; a so called comfort cushion for children up to about the age of 18 months and an XL seat for children of about 18 months and older. - This frame unfolds automatically through means of a gas spring. Make sure that the transport lock is always used! Do not put your fingers on or in the mechanism and only lift the handlebars slightly to activate the gas spring. - Keep your child and your fingers/hands away from moving/folding parts when unfolding or adjusting the Quinny Buzz. - Never lift the Quinny Buzz or use escalators or stairs when your child is sitting or lying in the pushchair. - Inspect and clean the Quinny Buzz frequently. - Do not remove the logos from the fabric cover. This will avoid damaging the fabric cover. English English DEAR PARENTS - Prevent the danger of suffocation and keep plastic bags out of the reach of children. - Only use original parts and accessories that have been endorsed by the manufacturer. Do not make any modifications to the product. Contact your supplier or importer if you have any complaints or problems. Quinny Buzz Approved in accordance with BS 7409:1996 Type of pushchair Body weight Age Stroller with carrycot max. 9 kg From birth to approx. 6 months Stroller with a Maxi-Cosi baby car seat max. 13 kg From birth to approx. 12 months Stroller seat max. 15 kg Approx. 3,5 years 3 PRODUCT DESCRIPTION XL seat Sun canopy Shopping bag Adapters Handlebar adjustment button Handlebar Quinny Buzz pushchair insert Comfort cushion Adjustment and release button Quinny Buzz insert Belt pad Safety bar Safety bar release button Safety harness Connection points Foot support adjustment Lock button for folding Transport hook Footrest Front wheel module Raincover Rear wheel Front fork Swivel wheel block Front wheel Brake Accessoires: -Quinny Dreami carrycot -Maxi-Cosi baby car seat - Footmuff - Shopping basket - Parasol and parasol clip - Season set (mosquito net and wind and draught shield) - All terrain tyres - Front wheel unit 3 2 3 4 6 7 8 English English 1 P 2 1 5 2 1 9 10 11 12 1 1 2 4 P REPARING FOR USE / UNFOLDING AND FOLDING / DISMANTLING Please note: the left and right sides are as seen from the handlebar/back. 4.1 Preparation for use Fitting the wheels 1. Insert the axle of the rear wheels into the Quinny Buzz frame until it ‘clicks’ (Fig. 1). 2. Push the front fork into the frame until it ‘clicks’ (Fig. 2). 3. Check that the wheels are properly secured. Unfolding the frame The Quinny Buzz has a unique mechanism, which results in the automatic unfolding of the frame. The temperature of the environment may somewhat affect the workings of this mechanism; in case of cool or freezing temperatures the Quinny Buzz may unfold slower than usual (room temperature). - Warning: do not touch any moving parts with your hands as the frame unfolds. 4. Push the transport hook near the right rear bar to the side and pull the handlebar up (Fig. 3). 5. The frame automatically unfolds. The handlebar clicks into the locking device (Fig. 4). Adjusting the handlebar height - Push the adjustment button in and slide the handlebar to the desired height. The handlebar will lock with a ‘click’ (Fig. 5). 4 2 13 14 15 Parking brake - Note: always use the parking brake, even when standing still for only a few moments! 1. Push down on the red pedal (P) to set the parking brake on the Quinny Buzz (Fig. 6). 2. Push down on the other pedal to release the brake of the Quinny Buzz. Adapters The adapters and the corresponding connection points are marked with an L (left) and an R (right). 1. M ake sure that connection points are facing directly upwards, if necessary adjust using silver button in connection point (Fig. 7). 2. Slide adapter into connection point (Fig. 8). 3. Check to make sure everything is secure. 4. Place the Dreami (Fig. 9). For further use see the instructions for the carrycot. 5. P lace the Maxi-Cosi baby car seat (Fig. 10). For further use see the Maxi-Cosi baby car seat instruction manual. 6. R emove the adapter by pressing in the button (on the inside) and pull the adapter from the Quinny Buzz frame (Fig. 11). Quinny Buzz pushchair seat unit The Quinny Buzz seat is suitable for children from birth (maximum of 15 kg). If your child is not yet able to sit up unassisted, use the reclining position only. - Note: the pushchair seat unit can only be fitted when the adapters have been removed. 16 1. Lower the Quinny Buzz seat onto the Quinny Buzz frame until it ‘clicks’ (Fig. 12). A_Buzz3 Page_1 Placing the Quinny Buzz seat & adjusting the seat Rearward facing 1. The Quinny Buzz seat can now be adjusted to two positions: a sitting position and a reclining position. Push the adjustment/release buttons on both sides downwards and tilt the Quinny Buzz seat into the desired position (Fig. 13). 2. The Quinny Buzz seat can also be placed in a forward-facing position (Fig. 14). 3. The Quinny Buzz insert can now be adjusted to three positions: a sitting position, a semi-reclining position and a reclining position. Push the adjustment/release buttons on both sides downwards and tilt the Quinny Buzz insert into the desired position (Fig. 15). IMPORTANT: When positioning and adjusting the Quinny Buzz seat check that the adjustment/release buttons are locked on both sides. Removing the Quinny Buzz insert 1. Push the adjustment/release buttons on both sides downwards and lift the Quinny Buzz seat from the Quinny Buzz frame position (Fig. 16). Locking the swivel wheel It is advisable to lock the swivel wheel into a fixed position when driving the pushchair straight ahead for a longer period. 1. Push the swivel wheel lock downwards and turn the wheel into the backward position until you hear a ‘click’. The front wheels are now locked into their fixed position. 2. To unlock the swivel wheel, push the swivel wheel locks upwards (Fig. 17). Sun canopy 1. Clip the sun canopy onto the frame of the Quinny Buzz seat. Check that the sun canopy is properly secured. The sun canopy is height adjustable (Fig. 18). 2. To remove the sun canopy push the clips off the frame. 3. There is a special sun shade for extra protection. Unfold the sun shade from under the sun canopy towards the outside (Fig. 19). Raincover 1. Place the transparent raincover over the sun canopy and hook it over the underside of the footrest (Fig. 20). 2. The sun canopy is height-adjustable (Fig. 21). With the sun canopy at its lowest setting: close the snaps on the foot section (Fig. 22). 3. The (double) zipper in the rain cover can be opened for extra ventilation (Fig. 23). 5 English English 5 PLACING YOUR CHILD IN THE QUINNY BUZZ Quinny Buzz Box 1. Hook the bag onto the furthest bar at the back. This shopping bag when placed between the rear wheels has a carrying capacity of a maximum of 5 kg (Fig. 24). -N ote: Use the storage features only as directed and do not exceed the maximum weight limit. 4.2 Folding and unfolding Folding 1. If you want to fold the Quinny Buzz with the pushchair seat still attached, this is only possible when the seat is placed in the forward-facing position and the seat-back is in the reclined position (Fig. 28). We recommend that the pushchair seat is always removed before you fold up the pushchair. 2. Set the brake on the Quinny Buzz. 3. Collapse the sun canopy (Fig. 25). 4. Push in the adjustment button and slide handlebar in (Fig. 26). 5. Always stand beside the front wheel. Push in the (left) “ribbed” control button. Simultaneously slide the (right) control button with “arrows” in the direction of the arrows with your thumb and then press this button. While keeping both buttons pressed, pull the frame downward at an angle in the direction of the front wheel (Fig. 27). 6. P ush the Quinny Buzz frame as far as possible downward so that the handlebar can be clicked into the transport hook (Fig. 28). - Note: The transport hook must always be clicked into the frame for security when the Quinny Buzz is folded up or stored! This prevents the Quinny Buzz from unfolding itself during transport. - Note: Prevent your fingers from getting jammed! Do not place your fingers between the transport hook and the frame. If you want to fold the frame even smaller: 7. Remove the seat before you start folding the Quinny Buzz. 8. Remove the wheels if necessary. Removing the wheels 1. R ear wheels: press the release button and pull the rear wheels out of the Quinny Buzz frame (Fig. 29). 2. F ront wheel: press the release button and pull the front fork out of the tube of the Buzz frame (Fig. 30). 5.1 General 5.3 Adjusting the length of the shoulder belt - Note: engage the brake on the Quinny Buzz before placing your child in the Quinny Buzz seat. Ensure that the safety harness is open. 1. Slide the buckle sections together and click them into the buckle so that the lap belt and the shoulder belts are fastened to the crotch strap (Fig. 31). The shoulder belts can be set to 2 heights (Fig. 35). 1. Loosen shoulder belt hook and remove the belt pad (Fig. 36). 2. At the top, slide the cord of the comfort seat or the XL seat out of the top edge of the Quinny Buzz seat (Fig. 37). 3. Pass the loops of the shoulder belts through the required opening in the comfort cushion or the XL seat (Fig. 38). 4. Replace the belt pads over the shoulder belts. Attach hooks to the loop of the Quinny Buzz seat. Slide the belt pad up over the shoulder belt. Secure with the press-stud (Fig. 39). 5. At the top, slide the cord of the comfort cushion or the XL seat into the top edge of the Quinny Buzz seat (Fig. 40). 5.2 Adjusting the length of the belt The length of the belt can be adjusted in different ways to match the size of your child. 1. Using the loop: loosen the belt pads and secure the hook to the desired height within the loop of the Quinny Buzz seat (Fig. 32). Reattach the belt pads. 2. Using the clasps: loosen the belt pads and lengthen or shorten the belts using the clasps (upper and/or lower) (Fig. 33). Reattach the belt pads. 3. There are D-rings for attaching an additional safety harness. The standard for this type of harness is BS EN: 13210 / BS 6684 (Fig. 34). -N ote: If you do not press in the buttons far enough whilst folding the frame, you will hear a snapping sound. To prevent this, you should press the button with the arrows more firmly, before moving it forwards. 6 7 English English 6 CLEANING AND MAINTENANCE 1 WARNING -C heck regularly to make sure that the Quinny Buzz functions properly. This is essential for your child’s safety. - For reasons of safety, always use original parts. - In the event of damage have your retailer check and/or repair your Quinny Buzz before using it. - After cleaning never use Vaseline or fat as lubricants; this attracts dirt and grime. Preferably use a dry Teflon spray. -C lean the frame, the fabric cover and the shopping bag regularly using a damp cloth. Do not use abrasive cleaners. Safety bar 1. Click the safety bar into the openings on the Quinny Buzz pushchair seat (Fig. 41). 2. To remove the safety bar, press the buttons and pull the safety bar forward. The safety bar can be swung open by releasing it on one side (Fig. 42). - Note: Always secure your child with the restraining straps. Footrest 1. The footrest and legrest on the Quinny Buzz insert is adjustable. Upwards: place footrest in required position. Downwards: press footrest adjustment buttons on both sides and move support downwards (Fig. 43). - Note: never allow your child to stand or sit on the footrest. 6.1 General - During rain always use the raincover to protect the fabric cover. - After use, dry the pushchair with a soft, absorbent cloth. -R emove the detachable wheels once a month, then clean the axles and treat them with a dry Teflon spray. -N ever use the pushchair in seawater. After use on the beach, clean the wheels and the frame thoroughly with water to prevent rusting/corrosion. 1 1. Open safety harness (Fig. 44). 2. Unfasten the shoulder belt snap and hook and remove the belt pad. 3. Loosen all snaps on the bottom of the seat (Fig. 45). 4. Loosen the Velcro straps on the bottom of the seat. Remove the belt buckle through the opening of the seat (Fig. 46). 5. Slide the cord of the seats out of the edges of the Quinny Buzz seat. Start with the foot section and work towards the head section (Fig. 47). 6. Pull the lap belt of the Quinny Buzz seat through the holes of the seats and remove the loops from the shoulder belts from the openings of the seat (Fig. 48). Both the comfort cushion and the XL seat must be washed by hand (maximum 30º). Do not use a drier. Also see washing instructions. During washing the seats may become somewhat deformed. You can push the seats back into their original shape. The replacement of the comfort cushion is accomplished in the reverse order. 8 2 49 6.2 Cleaning the Quinny Buzz seats (comfort cushion and XL seat) 2 50 51 Installing the XL seat 1. Pull the beading on the XL seat completely through the vertical edge at the top. Start on the left side and switch from right to left until it is completely in place. Make sure to also pull it through the top edge (Fig. 49). 2. Pull the beading through the horizontal edge at the top (Fig. 50). 3. Pull the XL seat completely downwards and pull the beading through the bottom edge (Fig. 51). 4. Secure the belt buckle, Velcro and belt pad. 6.3 Maintaining the Quinny Buzz tyres Buzz XL - Make sure that all tyres are properly inflated and that their pressure is consistent. This gives the pushchair a smoother ride and prevents damage to (and squeaking of) turning and hinged parts. - Inflate the rear tyres to a maximum pressure of 26 PSI/1.8 Bar. The tyres are fitted with a ‘car tyre valve’. They can be inflated using the pump supplied (in shopping bag). The valves on the rear wheels can be easily accessed from the inside of the wheel. - A punctured inner tube can be repaired in the same way as a bicycle tyre. Loose inner tubes can be purchased via your supplier. - Always deflate the tyres when taking the Buzz on an aircraft, as the air pressure difference could cause the tyres to burst. - The tyres may leave black marks on some surfaces, particularly smooth floors like parquet, synthetic laminates and linoleum. 9 9 WARRANTY 10 QUESTIONS With the environment in mind, we request that you separate the packaging waste of the Quinny Buzz. In addition, waste at the end of the service life of the Quinny Buzz (product parts) should be separated. We guarantee that this product was manufactured in accordance with the current European safety requirements and quality standards which are applicable to this product, and that this product is free from defects in workmanship and material at the time of purchase. During the production process the product was subjected to various quality checks. If this product, despite our efforts, shows a material/ manufacturing fault within the warranty period of 24 months (with normal use as described in the user instructions), we will comply with the warranty terms and conditions. In this case please contact your dealer. For extensive information on applying the warranty terms and conditions, you can contact the dealer or look on our website: www.quinny.com. Should you have any questions, please contact your supplier or importer (see the back of the instruction manual). Please have the following information at hand: - Serial number from the sticker on the bottom of the frame. - Age, height and weight of your child. 7,77 kg 1 3,67 kg 2 3 64cm 4 17cm 31cm 85cm 68cm 82cm 5 The warranty is not valid in the following cases: - In case of a use or purpose other than described in the manual. Packaging 60cm 64cm Keep plastic wrapping material out of reach of your child in order to avoid the risk of suffocation. 6 English 8 SEPARATING WASTE WARNING 11,44 kg 101,5cm English 7 Weight and dimensions Cardboard box Paper waste - If the product is submitted for repair through a dealer that is not authorized by us. Plastic bag Residual waste - If the product is not supplied to the manufacturer with the original purchase receipt (via the retailer and/or importer). Fabric cover Residual waste - If repairs were carried out by third parties or a dealer that is not authorized by us. Plastic parts In the appropriate container Metal parts Container for metal Pneumatic tyres Residual waste Tether Container for polyester Products parts - If the defect is the result of improper or careless use or maintenance, negligence or impact damage to the fabric cover and/or frame. - If the parts show normal wear and tear that may be expected from daily use of a product (wheels, rotating and moving parts etc.) Date of effect: The warranty becomes effective on the date the product is purchased. Warranty term: The warranty period applies for a period of 24 consecutive months. The warranty only applies for the first owner and is not transferable. What to do in case of defects: After purchasing the product, keep the purchase receipt. The date of purchase must be clearly visible on the receipt. Should problems or defects arise please contact your retailer. Exchanging or taking back the product cannot be requested. Repairs do not give entitlement to extension of the warranty. Products that are returned directly to the manufacturer are not eligible for warranty. This Warranty Clause conforms to European Directive 99/44/EG of 25 May 1999. 10 11 www.quinny.com DRU0662 United Kingdom Dorel U.K. Hertsmere House Shenley Road Borehamwood, Hertfordshire WD6 1TE www.dorel.co.uk Tel. 01842 763 281 Fax 01842 762 062 [email protected]