Transcript
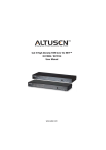
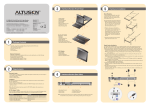
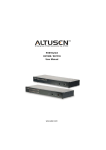
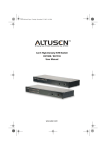
4
3. A login page appears.
KH1508i/KH1516i Unit (Rear View)
1
2
3
4
5
4
5
KH1508i
6
Online Registration
International:
• http://support.aten.com
North America:
• http://www.aten-usa.com/product_registration
KH1508i/KH1516i Cat 5 High-Density KVM Over the NET™
Quick Start Guide
®
© Copyright 2010 ATEN International Co., Ltd. www.aten.com
Altusen and the Altusen logo are trademarks of ATEN International Co., Ltd.
All rights reserved. All other trademarks are the property of their respective owners.
This product is RoHS compliant
PAPE-1214-Y00G Printing Date: 09/2010
4. Provide a valid Username and Password (set up by the KH1508i / KH1516i administrator), then Click Login to
continue.
1
1
Technical Phone Support
International:
• 886-2-8692-6959
China:
• 86-10-5255-0110
Japan:
• 81-3-5323-7178
Korea:
• 82-2-467-6789
North America:
• 1-888-999-ATEN Ext: 4988
United Kingdom:
• 44-8-4481-58923
2
3
4
5
3
6
7
1. Power Socket
5. Daisy Chain Port
3. LAN Port (10/100Mbps LED)
7. KVM Port Section
4. PON Port
2
6. Local Console Port Section
Package Contents
5
The KH1508i / KH1516i package consists of:
1 KH1508i or KH1516i Cat 5 High-Density KVM Over the NET™
1 Power Cord
1 Firmware Upgrade Cable
1 Rack Mount Kit
1 Foot Pad Set (4 pcs.)
1 User Manual
1 Quick Start Guide
7
Hardware Installation 1
Rack Mounting
The KH1508i / KH1516i can be mounted in a 19" (1U) racks. The mounting brackets can screw into either the front or the
back of the unit so that it can attach to the front or the back of the rack. To rack mount the unit:
1. Remove the screws at the front or the rear, as shown in the diagram below.
Local Console Operation
When setting up your KH1508i / KH1516i installation for the first time, we recommend doing it from the local console.
Local console operation offers a menu driven On Screen Display (OSD) to handle computer control and switching
operations.
All procedures start from the OSD Main Screen. To pop up the Main Screen, tap [Scroll Lock] twice.
The login screen appears:
Phillips head hex
M3x6
2
Requirements
9
Hotkey Operation Mouse Setup
In addition to being able to access and control the devices on your installation via the OSD, the KH1508i / KH1516i
also supports port control directly from the keyboard with the use of hotkey combinations.
All Hotkey operations begin by invoking Hotkey Mode. Invoking Hotkey Mode takes three steps:
1. Hold down the Num Lock key;
2. Press and release the minus key;
3. Release the Num Lock key: [Num Lock] + [-];
Hotkey summary table:
After invoking Hotkey Setting Mode, key in one of the following keys to perform the corresponding function:
Phillips head hex
M3x6
Key
Function
[T] [n] [Enter]
Sets the Auto Scan interval to n seconds - where n is a number from 1 - 255.
[Port ID] [Enter]
General
• For best results, we recommend that the computers used to access the KH1508i / KH1516i have at least a P III 1
GHz processor, and that their screen resolution is set to 1024 x 768
• For best results, we recommend an Internet connection speed of at least 128 kbps
• Browsers must support 128 bit data encryption
• To run the Windows client, you must have DirectX 8.0 or higher installed
• To run the Java client, you must have Sun’s Java 2 (1.4 or higher) installed
• To run the Log Server, you must have the Microsoft Jet OLEDB 4.0 (or higher) driver installed
Enter a valid Username and password to continue.
Note:
1. The default username is administrator; the default password is password. The first time you log in, you must use these
defaults. For security purposes, we strongly recommend that you change the default password to something unique.
2. Usernames and passwords cannot be managed from the local console. User management is handled via remote
administration.
2. Screw the mounting brackets into the sides of the unit at the front or the rear, as shown in the diagram below.
After you successfully log in, a screen similar to the one below appears:
Phillips head hex
M3x8
• A VGA, SVGA, or multisync monitor capable of the highest resolution that you will be using on any computer in
the installation.
• A PS/2 style mouse
• A PS/2 style keyboard
KVM Adapter Cables
Phillips head hex
M3 x 8
• Cat 5e/6 cable is required to connect the KH1508i / KH1516i to one of the KVM Adapter Cables.
• The following KVM Adapter Cables are required for use with the KH1508i / KH1516i:
3. Slide the unit into the front or rear of the rack and secure it to the rack.
6
1 & 2
1 & 2
3
4
5
6
7
1. Plug your Local Console’s keyboard, monitor, and mouse into the unit’s Console Ports. Each port is color coded
and marked with an appropriate icon to identify itself.
Note: The KH1508i / KH1516i does not support distances that exceed 20m between itself and the local monitor.
2. Use Cat 5e/6 cable to connect any available KVM port to a KVM Adapter Cable that is appropriate for the
computer you are installing.
Note: The KH1508i / KH1516i does not support distances that exceed 40m between itself and the KVM Adapter
Cable.
3. Connect the KVM Adapter Cable to the computer. Plug the connectors on the KVM Adapter Cable into the
appropriate ports of the computer you are installing.
4. Plug the LAN, WAN or Internet cable into the KH1508i/KH1516i's RJ-45 socket.
5. Plug the female end of the power cord into the KH1508i / KH1516i's Power Socket; plug the male end into an
AC power source.
6. Turn on the power to the KH1508i / KH1516i.
After the KH1508i / KH1516i is powered up, you can turn on the computers.
3
1. Port Selection Switches
2. Port LEDs
3. Reset Switch
4. Firmware Upgrade Recovery Switch
4
5
6
7
5. Firmware Upgrade Port
6. Power LED
7. Station ID LED
F1 GOTO
GOTO allows you to switch directly to a port either by keying in the port's Name, or its
Port ID.
F2 LIST
This function lets you broaden or narrow the scope of which ports the OSD displays (lists)
on the Main OSD Screen.
F3 SET
This function allows the Administrator and each User to set up their own working
environment.
F4 ADM
It allows the Administrator to configure and control the overall operation of the OSD.
F5 SKP
This function enables you to easily skip backward or forward, switching the console focus
from the currently active KVM Port to the previous or next available one.
F6 IP
This function allows you to select whether to assign the KH1508i / KH1516i’s IP address
dynamically (DHCP), or to give it a fixed IP address. Press [Enter] to toggle between the
choices.If you toggle DHCP Enable to Off, specify the IP, Mask, and Gateway in the
appropriate fields.Press [Esc] to exit after you have finished with your choice.
Hardware Installation 2
Single Station Installation
KH1508i / KH1516i Unit (Front View)
[←] or [→] or [↑] or [↓]
[B]
Invokes Auto Scan Mode.
Invokes Skip Mode and Switches computer access depending on which Arrow
was pressed.
Toggles the Beeper On or Off.
Mouse Setup
Sun / Linux Systems:
Open a terminal session and issue the following command:
* Sun: xset m 1
* Linux: xset m 0
The following equipment must be installed on the computers:
• A VGA, SVGA or multisync port
• A Type A USB port and USB host controller (for USB KVM Adapter Cable Connection, see below)
• 6-pin mini-DIN keyboard and mouse ports (for PS/2 KVM Adapter Cable Connection, see below)
Module
KA9520
KA9570
KA9130
KA9170
KA9140
[A]
Windows Systems:
Note: You must use the generic mouse driver supplied with Windows.
* XP / Server 2003 -- middle position; Enhance pointer precision: off
* 2000 / ME -- Mouse motion: middle position; Acceleration: off
* NT / 98 / 95 -- Mouse speed: slowest
Computers
Function
Connect to devices with PS/2 ports
Connect to devices with USB ports
Connect to Sun Legacy systems (with 13W3 port)
Connect to Sun USB systems
Connect to serial based devices
Switches access to the computer that corresponds to that Port ID.
The following mouse setting procedures should be performed on each computer connected to the KH1508i/KH1516i.
Console
3
After you have successfully logged in, the KH1508i / KH1516i Main Webpage appears with the General dialog box
displayed. You can click the Windows Client button (or Java Client button) to activate the browser-based Windows
Client OSD (or Java Client OSD).
KH1516i
2. Power Switch
1
2
7
F7 SCAN
Pressing [F7] invokes Auto Scan Mode.
F8 LOUT
Pressing [F8] logs you out of OSD control of the computers, and blanks the Console screen.
OSD Port Selection
To bring the KVM focus to a port, Double Click it, or move the Highlight Bar to it then press [Enter].
10
Specifications
Function
Computer Connections
Port Selection
Console
Ports
Connectors
Switches
LEDs
8
Browser Operation
An On Screen Display (OSD) interface governs remote KH1508i / KH1516i administration as well as user
configuration and port switching operations. The OSD can be accessed either with a Windows-based client or a
Java-based client. In order to perform remote operations, you must first log in via an Internet browser to connect to
the KH1508i / KH1516i.
To log in from an Internet browser:
1. Open the browser and specify the IP address of the KH1508i / KH1516i in the URL bar.
Note: If you don’t know the IP address, get it from the KH1508i / KH1516i administrator.
2. When the Security Alert dialog box appears, accept the certificate.
Emulation
Video
Direct
Max.
Keyboard
Video
Mouse
KVM Ports
Daisy Chain Ports
Power
LAN
PON
Reset
Power
Port Selection
F/W Upgrade
On Line
Selected
Power
Station ID
Link
10/100Mbps
Keyboard/Mouse
Local
Remote
Scan Interval
I/P Rating
Power Consumption
Operating Temp.
Environment Storage Temp.
Humidity
Housing
Physical
Weight
Properties
Dimensions (L x W x H)
KH1508i
KH1516i
8
16
128 (via Daisy Chain)
256 (via Daisy Chain)
OSD, Hotkey, Pushbutton
1 x 6-pin Mini-DIN Female (Purple)
1 x HDB-15 Female (Blue)
1 x 6-pin Mini-DIN Female (Green)
8 x RJ-45 Female
16 x RJ-45 Female
1 x DB-25 Male (Black)
1 x 3-prong AC Socket
1 x RJ-45 Female
1 x DB-9 Male (Black)
1 x Semi-recessed Pushbutton
1 x Rocker
8 x Pushbutton
16 x Pushbutton
1 x Slide
8 (Green)
16 (Green)
8 (Orange)
16 (Orange)
1 (Blue)
2 x 7-segment (Orange)
1 (Green)
1 (Orange/Green)
PS/2;USB(PC,Mac,Sun);Serial
1600 x 1200@60Hz (30m)
1280 x 1024@75Hz
1–255 Seconds
100–240V AC; 50/60Hz
120V/12W; 230V/12W
0–50° C
-20–60° C
0–80% RH; Non-condensing
Metal
2.80 kg
43.72 x 16.10 x 4.40 cm (19"/ 1U)
* All specifications are subject to change without notice.