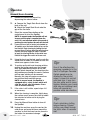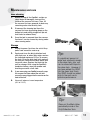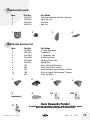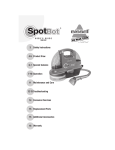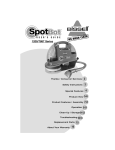
1
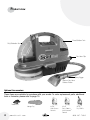
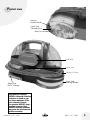
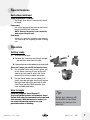
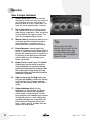
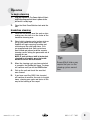
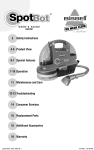
SpotBot
USER’S GUIDE
1200/7887/12U9 Series
3
Safety Instructions
4-5 Product View
6-7 Special features
7-10 Operation
11 Maintenance and Care
12-13 Troubleshooting
14 Consumer Services
15 Replacement Parts
15 Additional Accessories
16 Warranty
®
Thank you for buying a BISSELL SpotBot
We’re glad you purchased a BISSELL SpotBot. Everything
we know about floor care went into the design and construction of this
powerful, high-tech home vacuuming system.
Your BISSELL SpotBot is well made, and we back it with a limited one year warranty. We also stand behind it with a knowledgeable, dedicated Consumer
Services Department, so, should you ever have a problem, you’ll receive fast,
considerate assistance.
My great-grandfather invented the floor sweeper in 1876. Today, BISSELL is a
global leader in the design, manufacture, and service of high quality homecare
products like your BISSELL SpotBot.
Thanks again, from all of us at BISSELL.
Mark J. Bissell
President and Chief Executive Officer
22
www.bissell.com
800.237.7691
IMPORTANT SAFETY INSTRUCTIONS
When using an electrical appliance, basic precautions should be observed, including the following:
Read all instructions before using your SpotBot™
WARNING: To reduce the risk
of fire, electric shock, or injury:
■ Use indoors only.
■ Use only BISSELL cleaning products intended for
use in this appliance.
■ Do not use for any purpose other than described
in this User’s Guide.
■ Use only manufacturer’s recommended attachments.
■ Do not handle SpotBot plug or appliance with
wet hands.
■ Do not put any object into appliance openings or use
■
■
■
■
■
■
■
■
■
■
■
■
■
■
■
with blocked openings. Keep free of dust, lint, hair,
and anything that may reduce air flow.
Do not expose hair, loose clothing, fingers or body
parts to openings or moving parts.
Keep appliance on a level surface.
Be extra careful when cleaning stairs.
Do not allow to be used as a toy. Close attention is
necessary when used by or near children.
Do not pick up hot or burning objects, such as
cigarettes matches or hot ashes.
Do not pick up flammable or combustible materials (lighter
fluid, gasoline, kerosene, etc.) or use in the presence of
explosive liquids or vapor.
Do not pick up toxic material (chlorine bleach,
ammonia, drain cleaner, gasoline, etc.).
Do not use appliance in an enclosed space filled
with vapors given off by oil based thinner, some
moth proofing substances, flammable dust, or
other explosive or toxic vapors.
Do not pull or carry by cord, use cord as a handle,
close door on cord, pull cord around sharp corners
or edges, run appliance over cord, or expose cord
to heated surfaces.
Do not use with damaged cord or plug.
Turn off all controls before unplugging.
Unplug from outlet when not in use and before
conducting maintenance and troubleshooting.
Do not use SpotBot if it is not working as it
should, has been dropped, damaged, left outdoors
or dropped into water. Have it repaired at an
Authorized Service Center.
Unplug by grasping the plug, not the cord. Do not
unplug by pulling on cord.
Always connect to a properly grounded outlet; see
grounding instructions.
www.bissell.com
■ Do not use without tanks in place.
■ Do not use a flammable or combustible liquid to
clean a floor.
■ Do not modify the 3-prong grounded plug.
SAVE THESE
INSTRUCTIONS
GROUNDING
INSTRUCTIONS
This appliance must be connected to a grounded
wiring system. If it should malfunction or break
down, grounding provides a safe path of least
resistance for electrical current, reducing the risk of
electrical shock. The cord for this appliance has an
equipment-grounding conductor and a grounding
plug. It must only be plugged into an outlet that is
properly installed and grounded in accordance with
all local codes and ordinances.
Grounded
Outlets
Grounding Pin
WARNING:
Improper
connection of the equipment-grounding
conductor can result in a risk of electrical
shock. Check with a qualified electrician or
service person if you aren’t sure if the
outlet is properly grounded. DO NOT
MODIFY THE PLUG. If it will not fit the
outlet, have a proper outlet installed by
a qualified electrician. This appliance is
designed for use on a nominal 120-volt
circuit, and has a grounding attachment
plug that looks like the plug in the drawing
above. Make certain that the appliance is
connected to an outlet having the same
configuration as the plug. No plug adapter
should be used with this appliance.
This model is for household use only.
800.237.7691
3
Product view
Clean/Solution Tank
Dirty/Collection Tank
Flex Hose Clip
Spray Trigger
Vacuum Flex Hose
Release Button
Optional Accessories:
These items are available for purchase with your model. To order replacement parts, additional
tools or formulas, please refer to page 15.
TurboBrush®
4
www.bissell.com
Storage Tray
64 oz.
Little Green®
Formula
32 oz.
Pet & Odor &
Stain Removal™
Formula
32 oz.
Oxy GEN2®
800.237.7691
Product view
Vacuum
Suction Nozzles
Hands Free
Cleaning Brush
Spray Tip
Cord Wrap
Power Cord
Vacuum Flex Hose
Tough Stain
™
Brush Storage
Hands Free
Cleaning Window
Keep plenty of genuine
BISSELL Advanced Cleaning
Formulas on hand so you
can clean whenever it fits
your schedule. Always
use genuine BISSELL deep
cleaning formulas. NonBISSELL cleaning solutions
may harm the machine and
void the warranty.
www.bissell.com
800.237.7691
5
Special features
Front view
Clean/solution tank
Is located to the right of the unit when you
are facing the unit.
Automatic Smart System™ control paneI
Located in the center of the unit and is where
you will begin selection of the smart cleaning
cycle you would like to use (detailed
instructions on page 9).
Dirty/collection tank
Looking at the front of the unit, the dirty/
collection tank is on the left side.
Vacuum flex hose
Wraps around the center of the unit. This
serves as the travel path for dirty water and
formula that is suctioned up into the dirty/
collection tank.
Spray trigger
When cleaning in the manual mode, press
the spray trigger to release water and
formula onto the area to be cleaned.
Underside view
Handsfree cleaning brushes
Provides cleaning action when using the surface
stain or set-in handsfree cleaning cycles.
Spray tip
Water and solution are dispensed here when
cleaning in the handsfree mode.
Vacuum suction nozzles
Provides suction path when using the
handsfree cleaning cycles.
Back view
Handsfree cleaning brushes
Provides an area to see the handsfree
cleaning action.
Flex hose clip
Is attached to the unit and is a guide for the
vacuum flex hose.
6
www.bissell.com
800.237.7691
Special features
Back view continued
Tough Stain Brush™ Storage
The Tough Stain Brush is conveniently stored
on board.
Power cord
Has a three-prong plug and stores on the back of
the unit around the oval cord wrap.
NOTE: Unwrap the power cord completely
before operating the unit.
Cord wrap
Serves as a guide for the power cord storage.
The cord wrap can be gently pushed in during
use.
Operation
Getting ready
1. To fill the clean tank:
A
B
A. Remove the clean tank by lifting it straight
up and then away from the unit.
B. Unscrew the cap at the bottom of the clean tank.
There are 2 ways you can fill and use the tank:
2. For common stains such as dirt, grime, pet,
or oily stains, use the fill lines on the left
side of the tank and fill with Little Green
formula (trial sizes included) and water.
2
3
3. For dye based stains such as coffee, fruit
juices, cola and red wine, use the fill lines on
the right hand side of the unit and fill with
Little Green and Oxy GEN2 formulas (trial
sizes included) and water.
How to begin
Using the Automatic Smart System™
Your new SpotBot features an Automatic Smart
System that takes the guesswork out of spot and
stain cleaning. With the touch of a button, you
can select the cleaning cycle to use your
preferred method of cleaning.
www.bissell.com
Tip:
Before spot cleaning with
the SpotBot's Handsfree
feature, dry vacuum the
area first.
800.237.7691
7
Operation
How to begin continued
1. Surface Stain Cycle This cycle has been
designed for stains that are on the surface of
your carpeting and have not had time to
penetrate deep in to your carpet fibers. This
cycle will run for approximately 3 minutes.
2. Set-In Stain Cycle Use on stains that have
had a period of time to set-in and penetrate
deep into your carpet fibers. These are typically
the most difficult stain types to remove. This
cycle runs for approximately 6 minutes.
3. Manual / Hose By selecting this option you can
clean spots and stains manually on surfaces
such as upholstery, car interiors, stairs or
wherever you have a need to clean manually.
4. Pause/Resume Is used to check the
status of a cleaning cycle (Surface Stain or
Set-In). If you hit the Pause button once, it
pauses the cleaning cycle it is currently in.
By pressing it one more time to Resume,
you will pick up in the cleaning cycle
where you left off.
Tip:
Some spots and spills
require that you pick up the
chunky debris with a rag
or towel before you begin
cleaning in the Handsfree or
Manual cycles.
5. Heater (ProHeat models only) The SpotBot
ProHeat gives you the ability to raise the
water temperature for improved cleaning
performance based on your cleaning needs.
After pressing the heater button, the ring
around the button will illuminate to indicate
the heater is turned on.
6. Stop By depressing the Stop button, you
will stop your SpotBot in either the Surface
or Set-In stain cycle. To begin cleaning
again, you will need to select one of the 2
cycles.
7. Status Indicators Much like the
dishwasher in your kitchen, the Status
Indicators will instruct you regarding
status within a cleaning cycle. You will
hear changes in the sound of the machine
at different points in a cycle. When your
selected cleaning cycle is complete, the
Finish light will illuminate and you will
hear a “beep” every 5 seconds until you
depress the stop button.
8
www.bissell.com
800.237.7691
Operation
To begin cleaning
1. Plug your SpotBot in. The Power light will illuminate instructing you that there is power to the
unit and it is ready to go.
2. Place the filled Clean/Solution tank onto the
unit.
Handsfree cleaning
1. Place the unit directly over the spot or stain,
making sure the stain is in the center of the
handsfree cleaning area.
2. Select which cleaning cycle (surface stain or
set-in) you would like to begin with. Your
SpotBot will begin spraying, brushing and
suctioning up the spots and stains, in its
pre-programmed cycle. Both cycles have
been tested and proven to deliver superior
cleaning results, taking the guesswork out of
cleaning for you.
NOTE: If your unit has a built in heater (not
standard on all models) press the heater
button to turn on the heat feature.
3. When the cleaning cycle you have selected
is complete, the SpotBot will beep. The beep
will continue until you hit the STOP button.
4. Pick up the unit and check the area that
Tip:
Some difficult stains may
require that you run the
cleaning cycle a second
time.
was cleaned.
5. If you have used Oxy GEN2, this chemical
will continue to work for the next six to eight
hours, cleaning your spots and stains all the
way to the backing of the carpet.
www.bissell.com
800.237.7691
9
Operation
Manual/hose cleaning
1. Remove the hose from the unit by
depressing the release button.
1
2a
2b
3
2. a. Remove the Tough Stain Brush from the
back of the unit.
b. Attach the Tough Stain Brush onto the
grip of the flex hose.
3. Select the manual/hose button on the
control panel to start the SpotBot.
NOTE: In manual mode, the SpotBot will not
turn on until the grip is removed from the
unit. If it is not removed within 30 seconds of
pushing the start button, the unit will shut off.
4. If your unit has a built in heater (not standard on
all models) press the heater button to turn on the
heat feature. Begin cleaning by holding the tool
no more than six inches above the soiled surface.
Depress the spray trigger for about 5 seconds
to apply the cleaning solution to the soiled area.
Release the trigger. Be careful not to over wet.
5. Using the brush on the tool, gently scrub the
soiled area for about 30 seconds or until the
soiled area appears to be clean.
6. To suction up the dirt and cleaning solution,
position the suction nozzle over the cleaned
area, apply downward pressure on the tool,
and pull nozzle toward you. You should see the
dirty solution pass through the nozzle. Continue
until no more solution can be removed.
Normally, this step will require no more than
one minute of back and forth passes.
NOTE: In manual mode, the SpotBot is
equipped with a safety feature which will
shut the unit off after 30 minutes. Press
start to resume cleaning.
7. If the stain is still visible, repeat steps 4-6
as necessary.
Tip:
One of the effective stain
removing ingredients in Oxy
Gen2 is Hydrogen Peroxide.
Certain people may be
affected by the product
when it comes into contact
with their skin; it may turn
the skin white and/or cause
tingling. Washing your hands
after use and applying hand
lotion will remove any
possible white discoloration.
8. When the cleaning is complete, lightly drag
the suction nozzle across the stain for about
two minutes to further aid in drying the
cleaned area.
9. Press the Manual/Hose button to turn off
the SpotBot.
10. Unplug the machine, wrap the cord on the
10
cord wraps and wrap the hose around the
machine so that the wand can be placed in
the holder for convenient storage.
www.bissell.com
Tip:
Check upholstery stuffing
before cleaning. Colored
stuffing may bleed through
the fabric when it becomes
wet.
800.237.7691
Maintenance and care
Hose cleaning
1. Before turning off the SpotBot, suction up
clean water to thoroughly rinse out the
inside of the vacuum flex hose. Then, lift
the vacuum flex hose upwards to drain any
remaining water into the dirty tank.
2. Disconnect the cleaning tool from the
vacuum flex hose by pushing down on the
button lock and pulling straight off (do not
twist tools to remove them).
3. Once the tool is removed from the vacuum
flex hose it can be cleaned by rinsing under
clean running water.
Storage
1. Unplug the power Cord from the outlet. Wrap
power cord around the cord wrap.
2. Empty and rinse the dirty/collection tank
after each use, or when dirty water reaches
the indicated maximum fill line. To remove
the tank, lift up the dirty tank latch and pull
the tank out. Dump out the dirty water and
rinse with clean. Replace the tank into the
unit for storage. After using the SpotBot’s
handsfree feature, wipe the window and
brushing area with a soft cloth.
3. If you were using your SpotBot manually, wrap
the vacuum flex hose around the unit and
secure the spray trigger into the receiver on the
front of the unit.
Tip:
If a significant amount of
water and solution(s) remain
in the clean tank, your unit
can be stored with liquid in
the clean tank. However, if
you have added Oxy GEN2
into the clean tank, fresh
Oxy GEN2 should be added
prior to the next use to
optimize performance.
4. Store unit indoors at room temperature
(40° to 110°F).
Tip:
Clean out the Black Valve
periodically inside of the
Dirty/Collection Tank.
www.bissell.com
800.237.7691
11
Troubleshooting
Handsfree Cleaning
Cleaner will not run
Possible Causes
Remedies
1. Power cord not plugged in.
1. Check electrical plug.
2. Blown fuse/tripped breaker.
2. Replace household fuse or
reset breaker.
3. The unit is not sitting flat on the carpeting.
3. Remove what is obstructing the
floors surface.
4. Vacuum Flex Hose is not snapped
4. Check to make sure the Vacuum
into place securely. Flex Hose is snapped into place.
Unusual or Odd Noise
Possible Causes
Remedies
1. Clean/Solution tank is out of fluid. 1. Fill Clean Solution Tank.
Reduced or No Spray
Possible Causes
Remedies
1. Spray Tip clogged.
1. Clean Spray Tip.
2. Clean/Solution tank is out of fluid.
2. Fill Clean/Solution Tank.
3. Clean/Solution tank is not inserted
3. Gently press the Clean/Solution
into the unit securely. Tank until you see “bubbles”
coming from the base of the tank.
No Suction
Possible Causes
Remedies
1. Tank is full.
1. Empty tank.
2. Dirty/Collection tank latch is not down.
2. Push latch down, securely
into place.
3. Black Valve on the Dirty/Collection 3. Replace Black Valve into Dirty/
Tank is missing. Collection tank.
12
www.bissell.com
800.237.7691
Troubleshooting
Manual/Hose Cleaning
Cleaner will not run
Possible Causes
Remedies
1. Power cord not plugged in.
1. Check electrical plug.
2. Blown fuse/tripped breaker.
2. Replace household fuse or
reset breaker.
3. Hose not removed from receiver.
3. Remove Hose.
Unusual or Odd Noise
Possible Causes
Remedies
1. Clean/Solution tank is out of fluid. 1. Fill Clean Solution Tank.
Reduced or No Spray
Possible Causes
Remedies
1. Spray Tip clogged on Tough Stain Brush.
1. Clean Spray Tip.
2. Clean/Solution tank is out of fluid.
2. Fill Clean/Solution Tank.
3. Clean/Solution tank is not inserted
3. Gently press the Clean/Solution
into the unit securely. Tank until you see “bubbles”
coming from the base of the tank.
No Suction
Possible Causes
Remedies
1. Tank is full.
1. Empty tank.
2. Dirty/Collection tank latch is not down.
2. Push latch down, securely
into place.
3. Black Valve on the Dirty/Collection 3. Replace Black Valve into Dirty/
Tank is missing. Collection tank.
Thank you for selecting a BISSELL product.
If you should happen to need assistance during assembly or operation, call 1-800-237-7691.
Please do not return this product to the store.
www.bissell.com
800.237.7691
13
BISSELL Consumer Services
For information about repairs or replacement parts, or questions about your warranty, call:
BISSELL Consumer Services
1-800-237-7691
Monday - Friday
Saturday
8 a.m. — 10 p.m. ET
9 a.m. — 8 p.m. ET
Or write:
BISSELL HOMECARE, INC
PO Box 3606
Grand Rapids MI 49501
ATTN: Consumer Services
Or visit the BISSELL website - www.bissell.com
When contacting BISSELL, have model number of cleaner available.
Please record your Model Number: ___________________
Please record your Purchase Date: ___________________
NOTE: Please keep your original sales receipt. It provides proof of date of purchase in the event
of a warranty claim. See Warranty on page 16 for details.
Please register your new BISSELL product at
www.bissell.com/productregistration
14
www.bissell.com
800.237.7691
Replacement parts
Item
Part No.
Part Name
1
2
3
4
203-6643 203-6644 203-6645 000-0000 Clean Tank Assembly (includes Cap/Insert)
Clean Tank Cap
Dirty Tank
Hose Clip
2
1
3
4
Additional assessories
Item
1
2
3
4
5
6
7
8
9
10
11
Part No.
Part Name
497 499 797 799 801
64 oz. Little Green® Formula
32 oz. Little Green® Formula
64 oz Pet Odor & Stain Removal™ Formula
32 oz Pet Odor & Stain Removal™ Formula
32 oz Oxy GEN2®
203-6651 203-6652 203-6653
203-6654
203-6655
203-6647 3" Tough Stain Brush
TurboBrush®
4” Upholstery Tool
6” Wide Stair Tool
Spraying Crevice Tool
Storage Tray
1
2
3
4
5
6
7/8
9/10
11
www.bissell.com
Earn Rewards Points!
To qualify you for discounts, rebates, and other BISSELL perks.
Visit www.bissell.com/rewards to learn more.
800.237.7691
15
Warranty - BISSELL SpotBot
This warranty gives you specific legal rights, and you may also have other rights which may vary from state
to state. If you need additional instruction regarding this warranty or have questions regarding what it may
cover, please contact BISSELL Consumer Services by E-mail, telephone, or regular mail as described below.
Limited One Year Warranty
Subject to the *EXCEPTIONS AND EXCLUSIONS identified below, upon receipt of the product BISSELL
Homecare, Inc. will repair or replace (with new or remanufactured components or products), at BISSELL’s
option, free of charge from the date of purchase by the original purchaser, for one year any defective or
malfunctioning part.
See information below on "If your BISSELL product should require service".
This warranty applies to product used for personal, and not commercial or rental service. This warranty does not apply to
fans or routine maintenance components such as filters, belts, or brushes. Damage or malfunction caused by negligence,
abuse, neglect, unauthorized repair, or any other use not in accordance with the User's Guide is not covered.
NOTE: Please keep your original sales receipt. It provides proof of date of purchase in the event
of a warranty claim.
If your BISSELL product should require service:
Contact BISSELL Consumer Services to locate a BISSELL Authorized Service Center in your area.
If you need information about repairs or replacement parts, or if you have questions about your warranty,
contact BISSELL Consumer Services.
Website or E-mail:
www.bissell.com
Use the “Customer Services” tab.
Or Call:
BISSELL Consumer Services
1-800-237-7691
Monday - Friday 8 a.m. - 10 p.m. ET
Saturday 9 a.m. - 8 p.m. ET
Or write:
BISSELL Homecare Inc.
PO Box 3606
Grand Rapids MI 49501
ATTN: Consumer Services
BISSELL HOMECARE, INC. IS NOT LIABLE FOR INCIDENTAL OR
CONSEQUENTIAL DAMAGES OF ANY NATURE ASSOCIATED WITH THE
USE OF THIS PRODUCT. BISSELL’S LIABILITY WILL NOT EXCEED THE
PURCHASE PRICE OF THE PRODUCT.
Some states do not allow the exclusion or limitation of incidental or
consequential damages, so the above limitation or exclusion may not apply to you.
*EXCEPTIONS AND EXCLUSIONS FROM THE TERMS OF THE LIMITED WARRANTY
THIS WARRANTY IS EXCLUSIVE AND IN LIEU OF ANY OTHER WARRANTIES EITHER
ORAL OR WRITTEN. ANY IMPLIED WARRANTIES WHICH MAY ARISE BY OPERATION
OF LAW, INCLUDING THE IMPLIED WARRANTIES OF MERCHANTABILITY AND
FITNESS FOR A PARTICULAR PURPOSE, ARE LIMITED TO THE ONE YEAR DURATION
FROM THE DATE OF PURCHASE AS DESCRIBED ABOVE.
Some states do not allow limitations on how long an implied warranty lasts, so the
above limitation may not apply to you.
NOTE: Please keep your original sales receipt. It provides proof of
date of purchase in the event of a warranty claim
16
www.bissell.com
©2009 BISSELL Homecare, Inc
Grand Rapids, Michigan
All rights reserved. Printed in China
Part Number 120-4100
Rev 1/09
Visit our website at:
www.bissell.com
800.237.7691