1
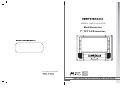
MODEL : LMP701 D IVX SD
Multifunction
7" TFT LCD monitor
MODE
P/N:910-07303004A
I
L
WARNING
Thank you for purchasing this multifunction DVD player. Please read this manual carefully
before operating your player and keep it handy for future reference. It will be helpful to
you if you encounter any operational problem.
WARNING : To reduce the risk of fire or electric shock, do not expose this
appliance to rain or moisture.
Dangerous high voltages are present inside the enclosure.
Do not open the cabinet. Refer servicing to qualified personnel only.
ATTENTION: To prevent electric shock, match wide blade of plug to
wide slot, and fully insert.
LASER:
This Digital Versatile Disc Player employs a Laser System.
To ensure proper use of this product, please read this owner's manual
carefully and retain for future reference. Should the unit require maintenance,
contact an authorized service location see service procedure.
Use of controls, adjustments or the performance of procedures
other than those specified may result in hazardous radiation
exposure.
To prevent direct exposure to laser beam, do not try to open
the enclosure.
CAUTION
RISK OF ELECTRIC SHOCK. DO NOT OPEN
To reduce the risk of electric shock, do not remove cover (or back).
No user serviceable parts are inside. Refer servicing to qualified
service personnel.
MACROVISION
NOTICE:
This product incorporates copyright protection technology that is protected
by method claims of certain U.S. patents and other intellectual property rights owned by
Macrovision Corporation and other rights owners. Use of this copyright protection
technology must be authorized by Macrovision Corporation, and is intended for home
and other limited viewing uses only unless otherwise authorized by Macrovision
Corporation. Reverse engineering or disassembly is prohibited.
Apparatus Claims of U.S. Patent Nos. 4,631,603; 4,577,216; 4,819,098 and 4,907,093
licensed for limited viewing uses only.
FCC NOTICE:
This equipment has been tested and found to comply with the limits for a Class B digital
device. Pursuant with the FCC Rules, Part 15. These limits are designed to provide
reasonable protection against harmful interference in a residential installation.
FCC Caution:
Visible and invisible laser radiation when open and interlocks
defeated.
DO NOT STARE INTO BEAM
LASER
To assure continued compliance, (example-use only shielded interface cables when
connecting to computer or peripheral devices) any changes or modifications not expressly
approved by the party responsible for compliance could void the user's authority to
operate this equipment.
Manufactured under license from Dolby Laboratories.
"Dolby" and the double-D symbol are trademarks of Dolby Laboratories.
Type:
Semiconductor laser GaAIAs
Wave length:
650 nm/780nm
Output Power:
5 mW
Beam divergence:60 degree
WARNING:
To reduce the risk of fire or electric shock, do not expose this appliance to rain
or moisture.
CAUTION:
Use of controls or adjustments or performance of procedures other than those
specified may result in hazardous radiation exposure.
1
2
Introduction
Table of Contents
WARNING
1-2
Table of Contents
3
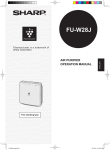
The DVD video player (With DVD Cartridge) can play discs with the following marks.
Mp3 Audio CDs (12cm disc)
DVDs (12cm disc)
Introduction
4
Accessories
5-6
Precautions
7-8
Parts Designation
9-12
Audio/Video Connections
13-15
Using the remote control
16
Caution
17
Basic Operation Procedures of the Player
18-20
Operation procedure of the Remote Control
21-24
Operation procedure of the Battery
25-27
SET UP
28
USB 1.1 / MP3 /JPEG/DivX(MP4) Operation
29-32
Troubleshooting
33-34
MP4
Video CDs (12cm disc)
Audio CDs (12cm disc)
DVDs sold globally are typically encoded to restrict their use to specific locations.
That is, a DVD assigned a specific 'Region Code' can only be played within the areas
specified in that Region Code.
The DVD Region Code can usually be found on the back of the DVD's package.
It is therefore important that you make sure that the DVD(s) you are buying are
compatible with your DVD player.
Region 1: USA, Canada, U.S. Territories
2 Region 2: Japan, Europe, South Africa, Greenland and the Middle East
(including Egypt)
3 Region 3: South East Asia (including Hong Kong, S. Korea and Taiwan)
4 Region 4: Australia, New Zealand, Pacific Island, Central America , Mexico,
Specifications
35
Sale package
36
South America, and the Caribbean
5 Region 5: Eastern Europe (Russia and the former Soviet Union), the Indian
subcontinent, Africa and Mongolia
6 Region 6: China
7 Region 7: Reserved
8
ALL
3
Structured Audio
Region 8: Special international venues (airplanes, cruise ships, etc.)
Region 0 or This designation indicates that the individual DVD can be played
All Region worldwide, i.e. in Regions 1 - 6 DVD players. However, PAL discs
must be played in a PAL-compatible unit and NTSC discs must be
played in an NTSC-compatible unit
4
Accessories
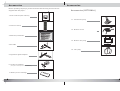
Accessories
Before operating the player, please check that the following accessories are
supplied with the player:
Accessories (OPTIONAL)
Multifunction
7" TFT L CD monitor
1.User's manual (this manual)
MENU
ON
OFF
11. LCD monitor prop
2. Remote control
12. Monitor mount
3.Warranty Certificate.
13. Monitor carry bag
4.AV cable
14. Carry bag
5.Cigaretter lighter adapter
6. AC/DC 12v adapter
(This produce actually serves as the standard .)
7. Battery 2.5hr cartridge
5
6
Precautions
Precautions
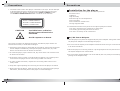
1. The laser beam used in this player is harmful to the eyes. Do not attempt
to disassemble the player. Refer servicing to qualified personnel only.
This Compact Disc player is classified as a CLASS 1 LASER product.
The CLASS 1 LASER PRODUCT label is located on the exterior .
CLASS 1 LASER PRODUCT
KLASSE 1 LASER PRODUKT
LUOKAN 1 LASER LAITE
CAUTION
Invisible laser radiation
when open and interlocks
defeated.
Avoid exposure to beam.
Installation for the player
1.Avoid locations where the player would be exposed to:
.Excessive dust
.Vibration
.High humidity
.Extreme high or low temperature
.Direct sunlight
.Direct heat from a heat souce
.Strong magnetic field
2.Condesation-Moisture may form on the optical pickup lens when:
.The unit is moved from a cold spot to a warm spot.
.The heating system has just been turned on.
.The unit is cooled by an air conditioner.
AC/DC Power Adapter
1.Use this player only with the supplied AC/DC power adapter. Using with other
AC/DC power adapters could damage the player.
The shock of impact can damage the player. Install the player where it is
flat and will not fall, or be kicked or banged.
2. Should any solid object to liquid fall into the player, disconnect the AC/DC
Power adapter immediately, and wipe the player with a soft, dry cloth.
Never use solvents such as Alcohol or benzene.
3.To clean the player, wipe it with a soft, dry cloth. Never use solvents such
as Alcohol or benzene.
2.Do not touch the AC/DC power adapter with wet hands. Doing so could result
in an electrical shock.
3.When the player is not being used for a prolonged period of time, disconnect
the AC/DC adapter from a wall outlet.
4.Do not pull the AC/DC adapter out of the wall by the cord, always removed by
pulling on the adapter body.
4. If thunder comes or other unusual situation happens, turn off the power
and remove the plug from the outlet. Plug in after one minute.
5. In case of electrical shock, inspect the connecting cable. Never use a
faulty cable.
6. Keep the original package for returning for service the player if needed.
7. Before moving the player, make sure any disc is removed from the player
Otherwise, the disc and parts of the player could be damaged.
7
8
Parts Designation
Parts Designation
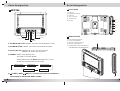
LEFT SIDE
1.
2.
3.
4.
5.
6.
USB 1.1
Earphone output
Volume
A/V out jack
Coaxial out
DC IN
1
2
3
4
5
MODE
6
POWER ON/OFF
RIGHT SIDE
EJECT
PLAY / STOP
NEXT
PREV
1.POWER ON/OFF: PRESS THE"ON" KEY AND WAIT 3 SEC.
2.POWER STOP: PRESS THE "OFF" KEY AND WAIT 3SEC.
1.
2.
3.
4.
5.
Left & Right speaker
Color LCD display
Remote control sensor
Slot-In DVD Player
Card Reader (For VDA730D-1)
(SD/MS/MMC/CF INTERFACE)
5
3.PLAY/STOP: PRESS THE "PLAY" KEY OF PLAYING.
PRESS THE "STOP" KEY OF STOP.
4.MODE: PRESS THE "MODE" KEY.
.
TO SWITCH PLAYER MODE.
EACH PRESS OF THE MODE BUTTON WILL CYCLE
2
THROUGH THE MODES AS FOLLOWS:
BRIGHTNESS
CONTRAST
ROTATION
5.
(PREV) AND
SATURATION
16:9 / 4:3
(NEXT): THE SETTING VALUE INCREASE /
DECREASE OF SELECTED MENU ITEMS.
9
3
1
4
10
Parts Designation
Parts Designation
The button
on the
remote
Remote control
The instructions in this page described the functions on the Remote Control.
1
2
3
1
POWER
Control the power ON or standby mode.
2
PBC
Playback control for VCD 2.0 format disc.
3
NTSC/PAL
NTSC, and PAL TV mode selection.
4
EJECT
To eject a disc.
5
A-B
Replaying point A to point B when selected.
6
REPEAT
Replaying 1 track or all track of disc.
7
4
8
POWER
PBC
NTSC/PAL
EJECT
1
2
REPEAT
4
5
5
3
9
/ PROGRAM
1
9
A-B
/ GOTO
10
6
2
3
4
5
6
7
8
9
0
+10
ZOOM
6
11
10
0
12
PROGRAM
13
DISPLAY
SB
CH-
VOL.
17
33
35
SF
MUTE
+
PREV
PLAY
NEXT
STEP
FB
STOP
FF
PAUSE
16
15
20
18
24
SUBTITLE
AUDIO
ANGLE
22
23
25
26
29
30
11
28
MODE
NAVI
RADIO
Select the desired channel with the number button
directly.
Enlarge the picture on screen.
RETURN
SETUP
System setup key.
13
DISPLAY
Using the on-screen display.
14
- / SB
Play video disc backward in slow motion. (
-
15
+ / SF
Play video disc forward in slow motion.
+ Keep to mould group GPS)
MUTE
PREV
Jump to previous track.
18
PLAY
Start playback.
19
NEXT
Jump to next track.
20
STEP
27
32
31
(
Keep to mould group GPS)
Shut off all audio output.
17
Forward only plays one picture forward when push button.
Fast backward key. It can choose:
VCD: 2X, 4X backward speed.
DVD: 2X, 4X, 8X backward speed.
Fast forward key. It can choose:
VCD: 2X, 4X forward speed.
DVD: 2X, 4X, 8X forward speed.
21
FB
22
FF
23
STOP
Stop the playing function.
24
PAUSE
Only plays one picture when push button.
19
21
ROOT
Keep to mould group GPS)
12
16
34
CH+
ENTER
14
8
+10
SETUP
11
7
9
ZOOM
Keep to mould group GPS )
DIRECTION KEYS (UP/DOWN/LEFT/RIGHT/ENTER)
ENTER
CH-
8
(
Programming the tracks playing order. (
CH+
GOTO
7
Jump to select chapter/ time.
25
ROOT
Return to root menu.(DVD)
26
SUBTITLE
27
AUDIO
28
ANGLE
Selecting subtitles.
Language/Audio track selection;
VCD: stereo, right or left.
DVD: selecting a language.
Selecting the camera angle.
29
MODE
Switch player mode and AV in mode. (TV)
30
NAVI
Navigate main menu.
31
RADIO
Switch right or left audio channel
32
RETURN
Return to main menu.(VCD)
33
"+" "-" VOL.
To control the volume.
34
CH+
(Keep to mould group TV )
35
CH-
(Keep to mould group TV )
(Keep to mould group GPS )
(Keep to mould group TV )
12
Audio/Video Connections
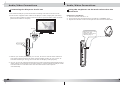
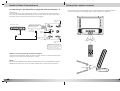
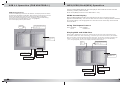
Connecting the Player to the TV set
Audio/Video Connections
Using the earphones on the main unit and on the
panel unit
1.Turn OFF the Player's power first before making connections to the TV set.
2.Connect the supplied video cable to the player's video output jack (left side).
(Be sure yellow cable to player's and TV's yellow jack and white cable to white
jack and red cable to red jack)
Panel unit's earphone:
1. Set the volume control to "0"
2. Connect the plug of earphones to the player's "PHONES" jack.
3. Adjust the volume control on the panel to the desired sound level.
A/V IN
Video R
L
Earphone plug on the
panel unit, the
speakers will be shut
off when plug in.
A/V OUT
1. Before you use the player with your TV set, be sure to set the video switch to
the position that matches the video system (NTSC or PAL) of your TV set. If
the switch setting is wrong, the TV set will not display video properly.
2. If your TV set can switch between the two-video systems automatically set the
Video switch on the player to the auto position. In this setting the player reads
the Information recorded on the disc and selects the video system
automatically.
13
14
Audio/Video Connections
Using the remote control
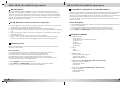
Connecting to an amplifier equipped with a Dolby AC-3
Dolby AC-3
You can still enjoy the excitement of Surround Sound even if A/V receiver
does not offer Dolby Digital decoding. If your A/V receiver has a Dolby AC-3
decoded,refer to the following connection diagram.
The remote control will operate from a linear distance of approximate 5
meters and within a horizontal and vertical range of 30 degrees.
Rear speaker
(right)
Rear side of unit
Amplifier equippde
with a Doby AC-3
to coaxial Audio out
to coaxial
Audio input
Center
speaker
Front speaker
(left)
coaxial cable
30
0
30
0
Rear speaker
(left)
Connect one or two rear
speakers. The output sound
from the rear speakers will
be monaural even if you
connect two rear speakers.
POWER
PBC
NTSC/PAL EJECT
A-B
2
3
4
5
6
7
8
9
1
REPEAT
GOTO
ZOOM
0
PROGRAM
+10
SETUP
DISPLAY
ENTER
SB
With a received equipped with Dolby Digital
Connect the equipment. Refer to that receiver's owner's manual and set the
receiver so you can enjoy Dolby AC-3 sound.
SF
MUTE
PREV
PLAY
NEXT
STEP
FB
STOP
FF
PAUSE
ROOT
SUBTITLE AUDIO
TV/CATV RETURN
RESET
ANGLE
SCAN
NOTE
Be sure to set Digital Audio Output of this DVD player to PCM/RAW from the
SETUP menu when you enjoy sounds of Dolby AC-3 using this connection.
0
30
0
30
15
16
CAUTION
Basic Operation Procedures of the Player
1. Use the player will be danger when you press over 18 0 .
2. Don't rock the machine violently.
This section will tell you how to play the disc.
1. Turn "POWER ON" .
2. Hold the disc facing label side.
Insert the disc, the player will be suck automatically.
1
2
18
0
3. After the player recognizes the disc, the player begins to play the disc.
4. During play:
a. Press "PAUSE" button to freeze playing temporarily and press "PLAY ( )"
button for starting to play again.
b. Press "STOP ( )"button to stop playing.
c. Press "NEXT ( )"button to jump to next track.
d. Press "PREV ( )" button to jump to previous track.
e. Press "F.F. ( )" button to play the disc in fast forward mode.
f. Press "F.B. ( )" button to play the disc in fast backward mode.
5. During stop:
a. Press "PLAY (
b. Press "STOP(
c. Press "NEXT (
D. Press "PREV (
3.Don't put this battery such opposite direction.
)" button to start playing disc.
)" button to stop playing.
)" button to select next track.
)" button to select previous track.
6. To extract the disc, press "EJECT" button to stop the player and the disc
will be ejected automatically.
7. To turn the player off.
PLAYBACK
Getting ready to play
Turn on the television and set the video source to connect to DVD player.
* Turn on the audio device connected to the DVD player. If no other audio
amplifier connected, your TV is the audio device.
1. Turn on the power switch of the DVD player. Press power
button on the remote control.
2. Load a disc with the label side front.
3. Your player should automatically play the disc. If the disc does not begin
to play, press button to start.
17
18
Basic Operation Procedures of the Player
Stop Playback
Press on the remote control or STOP on the unit
When stop is pressed during playback, the DVD player remembers the place at
which playback stopped.
To resume play from the point where it stopped just press play.
To clear the point to be resumed, press stop again during stop.
Pause Playback
Press on the remote during playback. Press PLAY button to resume normal
playback.
Basic Operation Procedures of the Player
CHANGING THE ANGLE
Press the ANGLE button while playing back a scene recorded with multiple
angles. If your DVD disc is not recorded with multiple angles, press ANGLE
button will not have any effect.
CHANGING THE AUDIO/LANGUAGE
Press the AUDIO button during playback, you can select different options of
language and sound recording system from those included on the DVD
videodisc.
LOCATING A TITLE, SUBTITLE OR TRACK
Playing at Fast Speed
Press F.F.( ) or F.B.( ) button during playback.
The playback speed changes each time you press the F.F. or F.B. Button.
Playback in Slow Motion
Press the SLOW button (S.B. or S.F.) during playback
The playback speed becomes 1/2, 1/4, or 1/8 of the normal speed each time
you press the SLOW button (S.B. or S.F.).
Note: During fast playback or slow motion playback, the sound is muted.
To resume normal playback, press PLAY.
REPEAT PLAYBACK
Repeat a Title, Subtitle, or Track
1. Select the title, Subtitle, or track you want to repeat.
2. Press the REPEAT button.
Repeat a Section Between Point A and B
1. During playback, press REPEAT A-B button on the remote control at the
starting point of the section you want to repeat. (Point A)
2. Press REPEAT A-B button again at the ending point of the section you want
to repeat. (Point B)
3. Press REPEAT A-B button again to cancel the A-B repeat function.
Press TITLE button and use number keys or
buttons to locate your desired
sections. This DVD player also allows using SKIP NEXT or PREV button
repeatedly to display the requested title or track.
SELECTING SUBTITLES
You can select a preferred subtitle from those included on the DVD videodisc
by pressing SUBTITLE button during playback. Use arrow keys to move cursor
to ON or OFF position and press SUBTITLE again to change it.
Step play:
This function enables you to view frames in sequence.
1. Press the STEP button during play, a frame is displayed on the screen with
no sound.
2. Press the STEP button a second time, the player displays the next frame
one frame at a time in sequence.
3. Pressing the "PLAY ( )" button during step play, normal play will resume.
MUTE button:
Press the MUTE button will shut off the audio output
ZOOM FUNCTION
Press ZOOM on the remote control during playback. The picture around the
center of the screen is enlarged to 4 times. Press ZOOM again to return to
normal. During zoom playback, you can press
to move the enlarged
picture.
19
20
Basic Operation Procedures of the Player
On Screen Display (OSD)
* Using the Display Feature (compatible with DVD, MP3/JPEG discs)
1. Loading and playing DVDs (two pages)
Press Display button once to show the first page:
“Disc Type, Title * / * (the playing title / total titles), Chapter * /
* (the playing chapter / total chapters),
Elapsed Time of the Disc”.
Press the button again to show the second page:
“Language * / * (the serial number of playing language / the amount of
optional languages) or Off,
Language Type, Audio Type, Subtitle * / * (the serial number of
playing subtitle / the amount of optional
subtitles) or Off, Angle * / * (the serial number of playing angle
/ the amount of optional angles) or Off”.
Press the button for the third time, the display menu fades out.
Number Buttons: (0,1,2,3,4,5,6,7,8,9,+10)
If the Time or Track number selection is larger than 10. Enter the number
using the following procedure: (For example, to select number 16)
1. Press the +10 button once, then "1-" is shown on the display.
2. Press the 6 button, then "16 " is shown on the display.
GO TO button:
Press the GO TO button during the PBC is off will display the time XX: XX and
press the "PLAY ( )" button which indicate the assigned location to play.
Press the LANGUAGE button only during the SVCD/CVD discs (This means the
special China standard spec.) is playing and support4 languages for choice.
Press the SUBTITLE button only during the SVCD/CVD discs (This invokes the
special China standard spec.) that supports a 4 character title on the screen
and cancels the SUBTITLE mode.
Basic Operation Procedures of the Player
Programmed Play:
At first, press the STOP button and then press the PROGRAM button which P
XX:XX (Program No.):(Track No.) display in the screen:
1. Enter the first selection/track that you want to play, you do this by pressing
The corresponding number of the selection/track on the numeral pad of the
Remote control.
2. For multiple selections repeat step 1.for as many selections/tracks that you
desire.
3. After making all of your selections, press the "PLAY ( )" button, the disc
playing will be in the order that you selected.
SETUP button
Press the Setup button, the main setup menu appears.
.. When the main menu displayed, the DVD system will auto pause.
1. SYSTEM SETUP allows you to change SCREEN SAVER, RATING, DEFAULT.
RATING The Rating feature is a rating limit system, like movie ratings.
It works with DVD discs that have been assigned a rating.
This helps you control the types of DVDs that your family watches.
..There are two rating options: NO ADULT and KID SAFE.
..Select the VIEW ALL option to cancel the rating limit.
The default setting is VIEW ALL.
Notes: .. If the password option is locked, you cannot set the ratings limit;
the rating limit doe not work when the password option unlocked.
2. LANGUAGE SETUP gives you options to change OSD LANGUAGE option ,
AUDIO LANG option, SUBTITLE LANG option, MENU LANG option.
The language setup options are illustrated below:
Highlight the OSD LANGUAGE option, and press the Arrow buttons to
choose the OSD language you prefer.
Press Enter to confirm, and it will display OSD in that language;....
3. Highlight the AUDIO OUT option, and press the Arrow buttons to choose
the audio output mode you prefer. Press Enter to confirm;
4. The video setup options are illustrated below:
BRIGHTNESS Use the Up and Down arrow button to move the scroll and
adjust the brightness, CONTRAST Use the Up and Down arrow button to
move the scroll and adjust the contrast, HUE Use the Up and Down arrow
button to move the scroll and adjust the hue.
SATURATION Use the Up and Down arrow button to move the scroll and
adjust the saturation.
21
22
Basic Operation Procedures of the Player
Operation procedure of the Battery
5. The speaker setup options are illustrated below: Use the Up and Down
arrow button to move the scroll and adjust the saturation.
6. T h e v i d e o s e t up op t i o ns ar e i l l us t r a t e d b e low :
D Y N A M IC R A NG E : W h e n " L I NE O U T " i s s el ec t ed , c h o o s e t h i s s et t i n g t o
ad j u st t h e l i n e o ut ra t i o a nd g e t d i ffe r e nt ef f ec t . I f a d j u s t i n g t o F U L L , t h e
audio s ignal p eak v alue will be the minimum; while adjusting to OFF,
maximum.
DUAL MONO (LEFT + RIGHT) Choose this option to setup the L and R
mono output mode; There are four modes in this option: STEREO,
MONO L, MONO R, and MIX MONO; It is mainly used in karaoke mode.
RECHARGEABLE BATTERY INSTALLATION AND USE
This DVD player utilizes one set of long-life ( Li-lon or Ni-MH ) batteries.
Such batteries pack a high storage capacity and low level of degradation.
The latter means that the batteries can also be recharged when only partly
spent.
Please fully charge the battery prior to first use.
If you plan not to use the battery for an extended period of time (say one
week or longer), we recommend that you first fully charge the battery and
store it away properly. For longer periods of storage, please recharge the
battery at east once every two months to maintain the battery in its best
condition.
Under no circumstances should you short out the battery, store the
battery in a metal container, or leave it in a humid or damp environment.
Store the battery in an airtight container if possible.
1
2
The provided Li-lon or Ni-MH battery can be recharged about 400 times.
Each full recharge takes about 3~4 hours, which can then power the player
for around 2.5~3 hours. Power consumption depends on the
operations of the player, for instance, brightness of the screen, volume
level, etc. all effect power consumption.
During recharge the light next to the DC power input will light up red.
When the light turns green this indicates that the battery is fully charged,
or defect. Please note that with a completely empty battery the red
charging indicator light might take 30 second to 1 minute to light up.
This is nothing to be concerned about.
3
5
23
4
6
Once the battery is fully recharged, the light will turn green. At this point
you can remove the wall plug and cease charging. During recharge the
Ni-MH battery will become warm, (Li-lon battery won't become warm)
but this is nothing to be concerned about.
Please don't put the battery near the heat.
After some time the battery will gradually get weaker. When the time the
battery can power the player is shortened noticeably, especially when it
cannot broadcast even for a moment just after recharge, the battery life
has come to an end. In such an event you can purchase a new battery
from your distributor.
24
Operation procedure of the Battery
PRECAUTIONS RELATED TO BATTERY RECHARGE
(1) Once the battery has been fully spent, please immediately recharge it
(regardless of whether you plan to use the battery power again soon)
in order to maximize battery life.
(2) To charge the battery, please connect the power jack directly into the
battery casing. Initially a red light should light up.
Once fully charged this light will turn green and charging operations
may cease.
(3) When the battery is already completely empty, the red charging
indicator light might take 30 second to 1 minute to light up.
Operation procedure of the Battery
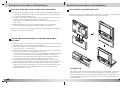
ATTACHING THE BATTERY PACK
1.Match the hooks of the battery pack into the holes on the rear of the player.
2.Turn the lock wheel until the battery pack be locked tight.
C LO
CK
Please note that when the AC power supply jack is plugged into the player,
the battery pack is being charged.
OP
USING AND MAINTAINING YOUR RECHARGEABLE
BATTERY
(1) Please make sure you always use only the AC transformer included with
the DVD player to recharge the player batteries.
(2) Recharge effectiveness will degrade when environmental temperatures
drop below 10 0 C or exceed 35 0 C.
(3) Please remove battery from the player and store properly if the player
is not to be used for an extended period of time.
For periods of two months or more, please recharge the battery at least
once every two months to avoid irreparable damage to the battery.
If the battery is left attached to the player for an extended period of
time, please recharge the battery at least every two weeks.
(4) Avoid unnecessary recharging fully charged batteries. Remove the
battery from the transformer once the indication light has turned green.
(5) When charging the full battery is continued for a period of time, the
battery can become overcharged. The temperature of the battery will
rise and activate the internal protection circuit, which results in a
temporary power cut off.
25
EN
C LO
CK
ATTENTION:
The product that you have purchased contains a rechargeable. At the end
of it's useful life, under various state and local laws, it may be illegal to
dispose of this battery into the municipal waste stream. Check with your
local solid waste/ officials for details in your area for recycling options or
proper disposal.
26
USB 1.1 Operation (FOR VDA730D-1)
MP3/JPEG/DivX(MP4) Operation
USB Storage Device
Insert an MP3/JPEG/DivX CD, the DVD player will initialize the disc and the
directory (folder) will be shown .
Note: DivX(MP4) function is for VDA730D-1 only.
Insert the USB Storage Device into the USB slot, and the player will auto search
the directories saved MP3 / JPEG files. After searching, it will auto go to the first
directory saved MP3 files )to the disc containing both mp3 and jpeg files;
To the disc containing single type of files, it will auto go to the first directory(
and play the first song in the directory )"01:" is highlighted(.
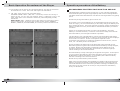
The screen displays as the picture below:
When an MP3/JPEG/DivX disc is inserted into the unit, the menu screen
appears automatically. You can use the menu screen to change folders and files.
The system plays the songs,photos or movies in the order they were burned
onto the disc.
Using The Repeat Feature
Current MP3/JPEG file name .
If a JPEG file playing the name
should be * jpg .
Current
directory
name
MENU Screen Display
DVD: CHAPTER
TITLE
VCD: REPEAT 1
REPEAT ALL
Playing MP3 and JPEG discs
The slide bars will be
moved down while
file moves.
Place a MP3 / JPEG disc into the tray, and the player will auto search the directories
saved MP3 / JPEG files. After searching, it will auto go to the first directory saved MP3
files (to the disc containing both mp3 and jpeg files; To the disc containing single type
of files, it will auto go to the first directory) and play the first song in the directory
("01:"is highlighted).The screen displays as the picture below:
Current MP3/JPEG file name .
If a JPEG file playing the name
should be * jpg .
Current
directory
name
File Switch Region:
Displays the file type of the
playing and the switching.
The playing file is a MP3/
WMA music .
The slide bars will be
moved down while
file moves.
The playing file
is a video file.
The playing file is a JPEG
BMP or JIF picture.
File Switch Region:
Displays the file type of the
playing and the switching.
The playing file is a MP3/
WMA music .
The playing file
is a video file.
The playing file is a JPEG
BMP or JIF picture.
27
28
MP3/JPEG/DivX(MP4) Operation
MP3 Playback
MP3 is the abbreviation for MPEG-1 layer 3. MP3 format conforms to the
International standard for MPEG-1 layer3, or in other words, the third level
of sound compression. When digital sounds, (music) is compressed to MPEG1 layer 3, a single Compact Disc (CD) can store more than 10 hours of playing
time or approximately 150 song titles. The quality of MP3 sounds is similar to
that of a standard CD recording.
Using Remote Control to select song titles
1. Put the MP3 disc into the disc compartment and close the cover, then wait
for the player to complete detecting the disc.
2. Press the Number Buttons direct to select the song title desired.
3. If the song title number is below the numeral 9, then press Number Buttons
0 - 9.
4. If the song title number is above the numeral 10, then press+10 and the
numeral desired.
5. For example: The No. 106 song title is to be selected:
Press +10 button ten times, then press 6. The number desired will be
shown on the screen. Press "PLAY ( )" button to start the song title.
JPEG Playback
With this DVD player you can view Kodak picture CDs and JPEG pictures for
viewing on the screen.
Basic Playback
1. Load a Kodak picture CD or a JPEG picture CD. After few seconds,
the player starts to display the menu screen automatically.
2. You can select a picture to view by pressing play key or it's
corresponding number corresponding to the order of the picture.
This player will begin to display the slide show from the selected picture.
To stop slide show, press the STOP button.
3. Press PAUSE to pause the slide show.
4. Press NEXT and PREVIOUS to view the next or previous picture.
5. Press > or < key to rotate the picture by 90 degree.
MP3/JPEG/DivX(MP4) Operation
DivX(MPEG-4) Playback (FOR VDA730D-1)
MPEG-4 is an ISO/IEC standard developed by MPEG (Moving Picture Experts
Group), MPEG-4 is a very efficient digital video compression standard,
which can compress MPEG-2 video into about one eighth of its original size.
Most video stream medias base on this technology, such as DivX,
and so on. DivX is the most popular digital video technology in the video
communication.
Basic Playback
1. Load a DivX CD. After few seconds, the player starts to display the menu
screen automatically.
2. You can select a DivX movie to view by pressing play key or it's
corresponding number corresponding to the order of the files.
3. Press NEXT and PREVIOUS to view the next or previous movie.
SUPPORT FORMAT
1. PHOTO Viewer
- JPEG format
- Resolution up to 2048*1536 pixels
- Zoom in/out
- Rotate
- EXIF display
- Slideshow
2. Music
- MP3
- Audio CD
3. MPEG1 Video
- DAT and MPG file support
- 352*240 @ 30fps
- MPEG1 audio layer II
4. MPEG4 Video (For MP4 VDA730D-1 Model only)
- MP4 and AVI file support
- 320*240 @ 30fps
- AAC audio
5. DivX Video (For MP4 VDA730D-1 Model only)
- AVI file support
- 640*480 @ 30fps
- MP3 audio
29
30
Troubleshooting
Troubleshooting
If it appears that your DVD-Video player is faulty, first consult this checklist.
It may be that something simple has been overlooked. Under no
circumstances should you try to repair the player yourself, as this will
invalidate the warranty. Only qualified service personnel can remove the
cover or service this player.
BUTTONS DO NOT WORK
.
Unplug the player from power outlet and reconnect after a few seconds.
NO POWER
. Check if the on/off button.
. Check if power plug is properly connected.
. Check if there is power at the AC outlet by plugging in another appliance.
NO PICTURE
. Check if the TV is switched on.
. Select the correct AV input on the TV.
. Check the video connection.
. Check if channel selector is set to AV on the TV.
(See your TV manual for instructions).
DISTORTED PICTURE
. Check the disc for fingerprints and clean with soft cloth, wiping from center
to edge.
. Sometimes a small amount of picture distortion may appear. This is not a
malfunction.
COMPLETELY DISTORTED PICTURE
. The disc is not formatted to the TV-set used (PAL/NTSC).
NO COLOUR IN PICTURE
. The disc is not formatted to the TV-set used (PAL/NTSC).
. Ensure DVD player is not connected through VCR.
DISC CANNOT BE PLAYED
. Ensure the disc is label side up.
. Clean the disc.
. Check if the disc is defective by trying another disc.
. Due to the reason of incapability, our MP3 function cannot read some discs.
NO SOUND
. Check audio connections.
. If using a HiFi amplifier, try another sound source.
. Check that DTS is selected in the Audio Menu if a DTS disc is played.
. Ensure that there is a DTS decoder connected when selecting DTS.
NO RETURN TO START-UP SCREEN WHEN DISC IS REMOVED
. Check to see if the program requires another disc to be loaded.
. Reset by unplugging the player from the power, then connect the power
again.
THE PLAYER DOES NOT RESPOND TO THE REMOTE CONTROL
. Aim the remote control directly at the sensor on the front of the player.
. Avoid all obstacles, which may interfere with the signal path.
. Inspect or replace the batteries.
NO AUDIO AT DIGITAL OUTPUT
. Check the digital connections.
. Check the Digital Out menu to make sure that the digital output is correctly
set.
. Check if the audio format of the selected audio language matches your
receiver capabilities.
31
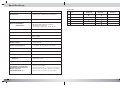
Before calling for service, it is advisable to refer to the troubleshooting
table below:
Symptoms
Possible causes
Remedies
No color LCD display
Main power switch is "OFF"
Switch the Main power to"ON"
No startup logo of
DVD Player
DVD Player's power switch
did not "ON"
Switch the Main power and
Player's power to "ON"
No sound from the
color LCD speakers
Color LCD's volume control
is in the minimum position Turn the volume up
Low Battery indicator
is on
Battery charge is low
Connect the DC adapter to
charge the battery
Disc is loaded incorrectly
Disc is loaded incorrectly
Disc is dirty
Clean the disc
Disc is scratched or warped
Replace the disc
Disc cannot be played
Video cable is disconnected Connect the cable firmly
Nothing is displayed
on the TV screen
Sound is not heard
from the speakers
Input selector on the TV set Adjust the TV set input selector
so that the TV received video
is set improperly
signals from DVD player
Audio cable is disconnected Connect the cable firmly
Input selector on the
Set the selector properly
amplifier is set improperly
THIS PRODUCT COMPLIES WITH DHHS RULES 21 SUBCHAPTER J PARTS 1040-10 AND 1040-11 AT DATE OF
MANUFACTURE.
Manufactured under license from Dolby Laboratories. " Dolby " and the double-D symbol are trademarks of
Dolby Laboratories. Confidential Unpublished Works. C 1992-1997 Dolby Laboratories, Inc. All rights reserved.
Apparatus Claims of U.S. Patent Nos. 4,631,603.4,577,216.4,819,098, and 4,907,093 licensed for limited
viewing uses only
This device complies with part 15 of the FCC Rules. Operation is subject to the following two conditions :
(1) This device may not cause harmful interference, and (2) this device must accept any interference
received, including interference that may cause undesired operation.
Software License and Copyright Notice
All software that is supplied as part of this equipment is protected by copyright laws and international copyright treaties, as well as other
intellectual property laws and treaties. This software is licensed, not sold and is intended for use on this device only. All title and
copyrights in and to the software (including but not limited to any images, photographs, animations, video, audio, music, text, instructions,
code and "applets" incorporated into the software) are owned by HAMG SHING Technology Group or its suppliers. You may not reverse
engineer, decompile, or disassemble this software for any purpose. No part of this software may be copied, reproduced, loaned, rented,
leased or transmitted in any form or by any means electronic or mechanical, without the express written permission of HAMG SHING
Technology Group
HAMG SHING Technology Group .. All rights reserved.
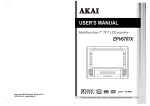
Specifications
Sell for ms
Specifications
Items
Dimension
208mm(W) x158mm(D) x 30mm(H)
Weight
800g (with DVD)
LCD Screen (16:9)*
Model : VDA730D /
VDA730D-1
7" 16:9 WIDE-TYPE TFT DISPLAY
RESOLUTION 1440(H) x 234(V)
Response time 30ms
0
0
0
0
View angle (U/D/L/R) 40 /55 /60 /60
Disc Physical Format
8/12cm DVD, VCD , CD
Video System
NTSC / PAL
Video Decompression
Module
1
MPEG 2
2
MPEG 4
3
DVD (Slot-In DVD player)
4
Card Reader
5
USB 1.1
VDA730D
VDA730D-1
Optional
MPEG-2 (ISO / IEC-13818), MPEG-1, JPEG
MP3 / CDDA
Video Output
Composite
Audio Output
2-Channel Stereo Analog Audio out
/ coaxial out
Power Consumption
<15 Watt (Charge Mode<30 watt)
IR Remote Control
38KHZ
Effective Range
5 meters
No. Of keys
48
Battery
CR2025 x 1.3V
Operation Condition
ITEM
0
0
5 C~+50 C , 15%~85%RH
-CompactFlash Card (CFI/ CFII)
CardReader support the
following types of Flash
Memory Cards
(FOR VDA730D-1)
33
(Capacity up to 256MB)
-MultiMedia Card (MMC) ( Capacity up to 256MB )
-Secure Digital Card (SD) ( Capacity up to 256MB )
-Memory Stick (MS) ( Capacity up to 256MB )
34
35
36
37
38