1
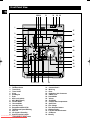
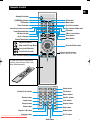
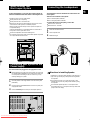
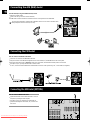
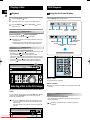
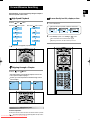
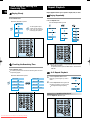
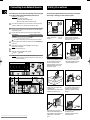
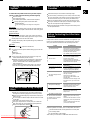
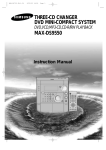
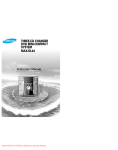
THREE-CD CHANGER
DVD MINI-COMPACT SYSTEM
DVD,VCD,MP3-CD,CD-R/RW PLAYBACK
MAX-DS9550
Instruction Manual
Downloaded From Disc-Player.com Samsung Manuals
Safety Warnings
GB
CLASS 1 LASER PRODUCT
CLASS 1 LASER PRODUCT
KLASSE 1 LASER PRODUKT
LUOKAN 1 LASER LAITE
KLASS 1 LASER APPARAT
PRODUCTO LASER CLASE 1
This Compact Disc player is classified as a CLASS 1
LASER product.
Use of controls adjustments or performance of procedures
other than those specified herein may result in hazardous
radiation exposure.
CAUTION-INVISIBLE LASER RADIATION WHEN OPEN
AND INTER LOCKS DEFEATED, AVOID EXPOSURE TO
BEAM.
CAUTION
RISK OF ELECTRIC SHOCK.
DO NOT OPEN
CAUTION:
TO REDUCE THE RISK OF ELECTRIC SHOCK,
DO NOT REMOVE REAR COVER, NO USER
SERVICEABLE PARTS INSIDE, REFER SERVICING TO QUALIFIED SERVICE
PERSONNEL.
WARNING: TO REDUCE THE RISK OF FIRE OR
ELECTRIC SHOCK, DO NOT EXPOSE
THIS APPLIANCE TO RAIN OR MOISTURE.
CAUTION: TO PREVENT ELECTRIC SHOCK, MATCH
WIDE BLADE OF PLUG TO WIDE SLOT,
FULLY INSERT.
This symbol indicates that dangerous voltage constituting of a risk of electric shock is present within
this unit.
This symbol indicates that there are important operating and maintenance instructions in the owners
manual accompanying this unit.
DVD (Digital Versatile Disc) offers fantastic audio and video, thanks to Dolby Digital
VIDEO
1
~ 6
surround sound and MPEG-2 video compression technology. Now you can enjoy these
realistic effects in the home, as if you were in a movie theater or concert hall.
DVD players and the discs are coded by region. These regional codes must match in order
for the disc to play. If the codes do not match, the disc will not play.
The Region Number for this player is given on the rear panel of the player.
(Your DVD player will only play DVDs that are labeled with identical region codes.)
Playable Discs
Disc Type
Mark (Logo)
Recorded Signals
Disc Size
12cm
Audio + Video
DVD
8cm
VIDEO
COMPACT
Audio + Video
VIDEO-CD
DIGITAL VIDEO
COMPACT
Audio
AUDIO-CD
DIGITAL AUDIO
Downloaded From Disc-Player.com Samsung Manuals
Max. Playing Time
Approx. 240 min. (single-sided)
Approx. 480 min. (double-sided)
Approx. 80 min. (single-sided)
Approx. 160 min. (double-sided)
12cm
74 min.
8cm
20 min.
12cm
74 min.
8cm
20 min.
Thank you for buying this
SAMSUNG mini-compact system.
Contents
Please take time to read these instructions.
They will allow you to operate your
system with ease and take full advantage
of its features.
SAFETY WARNINGS ................................................................ 2
TAPE DECK
INSTALLING YOUR MINI-COMPACT SYSTEM
Listening to a Cassette ........................................................ 23
Front Panel View .................................................................. 4
CD Synchro Record Feature ................................................ 23
Remote Control .................................................................... 5
Recording a Compact Disc .................................................. 23
Rear Panel View.................................................................... 6
Recording a Radio Programme ............................................ 24
Where to Install Your Mini-Compact System ........................ 7
Copying a Cassette (Dubbing) ............................................ 24
Connecting your System to the Power Supply ...................... 7
Selecting the Cassette Playback Mode (Deck 2 Only) ........ 24
Connecting the Loudspeakers .............................................. 7
Tape Counter........................................................................ 24
Connection of the subwoofer (optional) ................................ 8
OTHER FUNCTIONS
Connection of the TV monitor and VCR (optional) ................ 8
Timer Function...................................................................... 25
Connection for better sound .................................................. 9
Cancelling the Timer ............................................................ 25
Insert Remote Batteries.......................................................... 9
3D.Sound Function .............................................................. 26
Connecting the AM (MW) Aerial .......................................... 10
Mute Function ...................................................................... 26
Connecting the FM Aerial .................................................... 10
Selecting a Sound Mode ...................................................... 26
Connecting the SW Aerial (option) ...................................... 10
Power Surround Function .................................................... 26
Demo/Dimmer function ........................................................ 11
Setting the System to Switch off Automatically .................... 27
NTSC/PAL Selection Method ................................................ 11
S.Bass Level function .......................................................... 27
Setting the Clock .................................................................. 11
Connecting Headphones ...................................................... 27
CD-PLAYER
Microphone Function (option) .............................................. 27
Playing a Disc ...................................................................... 12
Connecting to an External Source........................................ 28
Selecting a Disc in the CD changer...................................... 12
RECOMMENDATIONS
DVD Playback ...................................................................... 12
FOR
USE
Safety Precautions .............................................................. 28
Forward/Reverse Searching ................................................ 13
Cleaning Your Mini-Compact System .................................. 29
Slow Playback/Checking the Remaining Time...................... 14
Precautions When Using Compact Discs ............................ 29
Repeat Playback .................................................................. 14
Precautions When Using Audio Cassettes .......................... 29
Using Disc Menu/Title .......................................................... 15
Before Contacting the After-Sales Service .......................... 29
Program Playback ................................................................ 15
Technical Specifications ...................................................... 30
Selecting the Audio Language/Subtitle Language ................ 16
Reference ............................................................................ 31
Various DVD Functions ........................................................ 17
MP3 Playback ...................................................................... 17
System Setup ...................................................................... 19
Setting up the Language Features ...................................... 21
TUNER
Searching for and Storing the Radio Stations .................... 21
Selecting a Stored Station.................................................... 22
Improving Radio Reception .................................................. 22
Symbols
Press
Downloaded From Disc-Player.com Samsung Manuals
Push
Important
Note
GB
Front Panel View
GB
3433 32
31
30
29 28
1
27
2
26
3
4
25
5
6
24
7
8
23
9
22
10
21
11
12
20
19
13 14 15 16
1.
2.
3.
4.
5.
6.
7.
8.
9.
10.
11.
12.
13.
14.
15.
16.
17.
Program
FM Mono/Stereo
Timer/Clock
Timer On/Off
Sleep
Standby/On
Echo
MIC Level (option)
MIC1,MIC2(option)
Counter Reset
Reverse Mode
Cassette Deck 1
Record/Pause/PAL/NTSC
TAPE Normal Speed Dubbing
Deck 1/2
CD Synchro Recording
Search Function buttons
Downloaded From Disc-Player.com
Samsung
Manuals
Tuning Mode
or Stop
button
17
18
18.
19.
20.
21.
22.
23.
24.
25.
26.
27.
28.
29.
30.
31.
32.
33.
34.
Demo/Dimmer
Cassette Deck 2
Multi Jog
Enter
Headphone Jack Connector
S.Bass Level
Sound Mode
Volume
3D.SOUND
Compact Disc Compartment
Open/Close
Disc Change
Disc Selection buttons
Window Display
Function Selection buttons
CD Repeat
Memory
Remote Control
GB
Standby/On button
TUNER(Band) button
DVD button
Timer On button
DVD
TUNER
AUX
Mute
AUX button
Mute button
Band
Timer On
Mono/ST
Disc Skip
Open/Close
Power
Surround
3D Sound
S.Bass
EQ
Deck 1/2
Counter
Reset
Menu
Sleep
Mono/ST(mono/stereo) button
Power Surround button
3D Sound button
Open/Close button
Disc Number Skip button
EQ button
DVD/CD/TUNER
S.Bass Level button
Sleep button
Deck 1/2 button
Down
Tuning
Up
Menu button
Counter Reset button
Play/Pause button
Stop button/Tuning Mode
Direction/Enter button
Enter
Tuning Preset/CD Skip button
Tuning Up/Down/CD Search button
Volume
Volume Control buttons
TAPE
Speaker output volume control
TAPE Function buttons
To open the cover of the remote
control, push the top of the cover,
then slide downward.
Setup
Title
Number(0~9) buttons
Setup button
Title button
Return
Return button
Remain button
Angle button
Repeat button
Zoom button
Remain
Audio
Subtitle
Angle
Zoom
Program
Clear
Repeat
Repeat
Go To
Display
Slow
Step
Subtitle button
Clear button
Display button
Step button
Repeat A↔B button
Audio button
Program button
Go To button
Downloaded From Disc-Player.com Samsung Manuals
Rear Panel View
GB
1
2
3
4
5
6
7
8
9
11
10
1. SW AERIAL CONNECTOR TERMINAL (option)
2. DIGITAL OUT JACK
3. AM AERIAL CONNECTOR TERMINAL
4. FM AERIAL CONNECTOR TERMINAL
5. S-VIDEO OUT
6. VIDEO OUT
7. AUDIO OUT
8. AUX INPUT
9. MAIN SPEAKER CONNECTOR TERMINALS
10. VOLTAGE SELECTOR(option)
11. SUB WOOFER PRE OUT
Downloaded From Disc-Player.com Samsung Manuals
Where to Install Your
Mini-Compact System
Connecting the Loudspeakers
GB
To take full advantage of your new mini-compact system, follow these installation instructions before connecting the unit.
The loudspeaker connector terminals are located on the rear
of the system.
There are four terminals on the system:
Install the system on a flat, stable surface.
Never place this unit on carpeting.
Never place this unit in an outdoor area.
Maintain an open space of approximately 6 inches (15 cm) on the
sides and rear of the system, for ventilation purposes.
Make sure that you have enough room to open the compact disc
compartment easily.
Place the loudspeakers at a reasonable distance on either side of
the system to ensure good stereo sound.
Direct the loudspeakers towards the listening area.
For optimum performance, make sure that both speakers are placed
at an equal distance above the floor.
Two for the left speaker (marked L)
Two for the right speaker (marked R)
To achieve the correct sound quality, connect the:
Red wire to the + terminals
Black wire to the – terminals
1
2
3
Press and hold the terminal tab.
Insert the speaker cord.
Release the finger.
L
R
Connecting your System to the
Power Supply
The main lead must be plugged into an appropriate socket.
Before plugging your system into a main socket, you must check
the voltage setting (OPTIONAL). If the voltage of the socket does
not correspond to the setting on the rear of the unit, you may
seriously damage your system.
1
Check the position of the voltage selector on the rear of the system
(OPTIONAL).
2
Plug the main lead (marked AC Cord on the rear of the system) into
an appropriate socket.
3
Press the On/Standby button to switch your mini-compact system on.
Downloaded From Disc-Player.com Samsung Manuals
Directions in Installing Speaker
Installation in a place near heating apparatus, under direct lay of
light or with high humidity may cause performance degradation
of the speaker.
Do not install on the wall or on a high place of pole or other
unstable place to prevent any safety accident caused by falling
of the speaker.
Do not take the speaker apart from TV or computer monitor.
The speaker near the TV or computer monitor may influence the
quality of the screen display.
Connection of the subwoofer (optional)
GB
The subwoofer generates low-pitched tones.
(Ex. Explosion, the sound of spacecraft flying, the sound of pondering, etc.)
Connect the subwoofer (not supplied)
Connect the subwoofer cord to the SUBWOOFER IN and SUB WOOFER PRE OUT terminal.
Plug the AC Cord on the rear of the SUBWOOFER into an appropriate socket.
SUBWOOFER
IN
Connection of the TV monitor and VCR (optional)
The following show examples of connections commonly used to connect the DVD player with a External Source.
(Example : TV, VCR, DAT CD-RW, etc)
TV monitor
VCR
LINE IN
LINE OUT
LINE IN
Audio cord
S-Video
Composite video (Supplied)
• When S-VIDEO is connected, S-VIDEO has priority.
Downloaded From Disc-Player.com Samsung Manuals
Audio cord
Connection for better sound
GB
Connecting to an amplifier with Dolby Pro Logic support.
DVD/CD Digital Out Jack
This unit can output DVD/CD digital sound signals
through this jack. Use an optical cable to connect digital
audio equipment. (DAT deck, MD recorder, etc.).
Remove the dust cap (1) from the DVD/CD DIGITAL OUT
jack. Then, connect an optical cable plug to the DVD/CD
DIGITAL OUT jack.
DIGITAL OUT
When the DVD/CD DIGITAL OUT jack is not being used
Attach the supplied dust cap.
While playing a DTS disc, no sound is
reproduced. In this case, connect to an
external amplifier.
OPTICAL INPUT
Insert Remote Batteries
1
Remove the battery cover on the back of the remote by
pressing down and sliding the cover in the direction of
the arrow.
2
Insert two 1.5V AAA batteries, paying attention to the
correct polarities (+ and –).
3
Replace the battery cover.
Follow these precautions to avoid leaking or cracking cells:
• Place batteries in the remote control so they match the polarity:(+) to (+)and (–)to (–).
CAUTION • Use the correct type of batteries.Batteries that look similar may differ in voltage.
• Always replace both batteries at the same time.
Do not Manuals
expose batteries to heat or flame.
Downloaded From Disc-Player.com•Samsung
Connecting the AM (MW) Aerial
GB
The AM aerial (for long and medium waves) can be:
Placed on a stable surface
Fixed to the wall (you must first remove the base)
The AM aerial connector terminals are located on the rear of the system and are marked AM .
To avoid noise interference, check that the loudspeaker wires do not run close to the aerial wires.
Always keep them at least 2 inches (5 cm) away.
Connecting the FM Aerial
How to connect a COAXIAL TYPE aerial.
Connect a 75Ω antenna to the FM antenna terminal.
Plug the connector on the FM aerial supplied into the coaxial socket (75Ω) marked FM on the rear of the system.
Follow the instructions given on Page 21 to tune into a radio station, and determine the best position for the aerial.
If reception is poor, you may need to install an outdoor aerial.
To do so, connect an outdoor FM aerial to the FM socket on the rear of the system using a 75Ω coaxial cable (not supplied).
Connecting the SW Aerial (OPTION)
How to connect a WIRE TYPE aerial.
Spread the SW aerial out and attach the ends to a wall, in
the position providing the best reception.
If reception is poor (e.g. distance from transmitter too
great, walls blocking the radio waves, etc.), install an outdoor aerial.
Downloaded From Disc-Player.com Samsung Manuals
Demo/Dimmer function
Setting the Clock
GB
All functions available on the system can be viewed on the
display and the display's brightness can be switched between
"on" and "off".
1
Press the Demo/Dimmer button.
Result: All functions available on the system appear on the front
panel display.
Your system is equipped with a clock which allows you to
turn your system on and off automatically. You should set
the clock:
When you purchase the mini-compact system
After a power failure
After unplugging the unit
For each step, you have a few seconds to set the required
options. If you exceed this time, you must start again.
Each of these are explained in detail in this guide. Please refer
to the relevant section.
2
Press the Demo/Dimmer button again.
Result: The Dimmer function is selected and the display darkens.
Press the Demo/Dimmer button once again to brighten the front
panel display.
3
1
2
Switch the system on by pressing On/Standby.
3
Press Enter on the front panel.
Result: The hour flashes.
4
To...
Turn the Multi Jog knob to the...
Increase the hours
Decrease the hours
Right
Left
A display brightness control can only be performed while the
system power is on.
Press Timer/Clock twice.
Result: CLOCK is displayed.
5
When the correct hour is displayed, press Enter on the front panel.
Result: The minutes flash.
6
To...
Turn the Multi Jog knob to the...
Increase the minutes
Decrease the minutes
Right
Left
7
When the correct time is displayed, press Enter on the front panel.
Result: The clock starts and is displayed, even when the system is
in standby mode.
You can display the time, even when you are using another
function, by pressing Timer/Clock once.
You can also use
/
buttons to instead Multi Jog
knob in step 4,6.
NTSC/PAL Selection Method
ccording to a DISC or TV, Press the REC/Pause button on the front
panel.
Set the system to standby(power off) mode, press the REC/Pause button
on the front panel.
Result: Each time the REC/Pause button is pressed, the following
appears in the display:
NTSC
PAL
2
1
3,5,7
4,6
Downloaded From Disc-Player.com Samsung Manuals
Playing a Disc
DVD Playback
GB
Using the On-Screen Display
Playback
1
2
Press the Open/Close(
3
Press the Play/Pause(
close the disc tray.
Press the Display button on the remote.
) button.
Place a disc gently into the tray with the disc's label facing up.
) button or Open/Close(
) button to
T1/2
VIDEO
DVD indicator
C 1/8
TITLE indicator
Pausing Playback
Press the Play/Pause (
) button during playback.
To resume, press the Play/Pause (
) button again.
TITLE ELAPSED
indicator
DOLBY
KOR
VIDEO
Depending on the disc, the initial disc information screen may
look disc to disc.
When playing a DVD containing MPEG format, video may not
be reproduced correctly and you may get picture distortion.
CHAPTER
indicator
00:00:00
KOR 1/3
D I G I T A L
OFF
1/1
ANGLE indicator
SUBTITLE LANGUAGE
REPEAT indicator
indicator
AUDIO LANGUAGE DISC TYPE indicator
indicator
Stopping Playback
Press the Stop (
) button during playback.
During playback, when the Stop ( )button is pressed, the position is stored
in the memory, and
STOP is shown on the display.
When the Play/Pause (
) button or Return button is pressed
subsequently , playback resumes from the position at which it was stopped.
If the Stop ( ) button is pressed a second time, the resume play' memory
function is canceled, and
STOP is shown on the display. When the
Play/Pause (
)button is pressed, playback starts from the beginning.
The On-Screen Display disappears.
1,3
What is a Title?
3
A movie contained in a DVD disc.
What is a Chapter?
Selecting a Disc in the CD changer
Each Title on a DVD disc is divided into several smaller sections called
"chapters".
The CD function is automatically selected when DISC SKIP is
pushed.
To select a specific disc, press the corresponding Disc (1, 2, 3) button
on the front panel or Disc Skip on the remote control, until the
required disc indicator flashes.
If you use the Disc (1, 2, 3) function when listening to the
radio or to a tape, the system switches automatically to the
DVD/CD mode.
If the disc selected is not loaded, the next disc is played automatically.
Downloaded From Disc-Player.com Samsung Manuals
Turning the sound off temporarily?
Press the Mute button during playback.
This operation may be useful when you need to greet the guests or
answer the telephone.
If the player is left for more than 3 minutes in pause mode,
it will stop.
Forward/Reverse Searching
Forward/Reverse Searching
GB
During playback, you can search quickly through a chapter or
track for a specific scene or tune.
To move directly to a title, chapter, or time
High-Speed Playback
Press the
and
Each time the
button is pressed
1
button.
Each time the
Press the Go To button.
button is pressed
Each time the button is pressed, it repeats as shown below.
X2
X2
VIDEO
TITLE
X4
X4
X8
X8
2
T1/2
C 1/8
00:00:00
VIDEO
T1/2
C 1/8
00:00:00
CHAPTER
Press Number(0~9) button or the Left/Right (
VIDEO
TIME
/
T1/2
C 1/8
:
) button.
Each The desired scene is located and then played.
PLAY
PLAY
playback (reverse playback) is possible on DVDs.
Skipping through a Chapter
Press the
and
button.
Each time the button is pressed during playback, it moves to the
next or previous chapter and plays it.
However, you cannot skip forward or backward through consecutive the chapters.
SEARCH
SEARCH
Playing Frame by Frame
Press the Step button.
The picture moves forward one frame each time the button is pressed.
No sound is heard during high-speed playback and step motion.
Downloaded From Disc-Player.com Samsung Manuals
00:00:00
:
Depending on the disc, the Title function may not work.
Slow Playback/Checking the
Remaining Time
GB
Repeat Playback
Repeat playback allows you to repeat a chapter, title, or track.
Playing Slowly
Playing Repeatedly
Press the Slow button.
Press the Repeat button.
Each time the Slow button is pressed
Each time the Repeat button is pressed
SLOW 1/2
DVD
DVD
SLOW 1/4
VCD
The slow playback speed
changes and the selections
(1/2X, 1/4X, 1/8X, 1/16X and
normal play) are repeated.
PLAY
Checking the Remaining Time
Repeat playback operation is not possible with version 2.0 VCD
discs if PBC is turned on.
To operate this feature, press the MENU button, and then select
"PBC OFF".
Press the Remain button.
For checking check the total time and the remaining time of a title or
chapter being played.
A↔B Repeat Playback
Each time the Remain button is pressed
TITLE TIME
TRACK TIME
REMAIN TIME : TITLE
REMAIN TIME : TRACK
CHAPTER TIME
DISC TIME
REMAIN TIME : CHAPTER
REMAIN TIME : DISC
DVD
1
Press the Repeat A↔B button at the
beginning (A) of the segment you want to
review.
2
Press the Repeat A↔B button again at the
end (B) of the segment you want to review.
The segment will begin repeating.
To return to normal playback
Press the Repeat A↔B button again.
Downloaded From Disc-Player.com Samsung Manuals
Using Disc Menu/Title
Program Playback
GB
To Select the Disc Menu
You can use the menus for the audio language, subtitle language, profile, etc. DVD menu contents differ from disc to disc.
Use this function with video and music CDs to play the tracks
in a particular order.
To Program Tracks in a particular order
1
Press the Menu button during playback.
1
The Menu Screen appears.
Press the Program button.
2
3
Use the Up/Down ( /
the different features.
) or Left/Right(
/
) button to access
Press the Enter button.
PROGRAM MENU SELECT : ENTER
TITLE CHAPT
1
2
3
4
5
PREVIOUS
When playing a VCD version 2.0, you can operate it using PBC
On/Off function.
PLAY :
2
The selected item will play.
NEXT
FINISH : PROGRAM
Press the Enter button then use the Number buttons to select the
desired title.
You can use also just the
Left/Right ( / / / ) button.
PROGRAM MENU SELECT : ENTER
TITLE CHAPT
1
1
2
3
4
5
PREVIOUS
PLAY :
3
TITLE CHAPT
6
7
8
9
10
TITLE CHAPT
6
7
8
9
10
NEXT
FINISH : PROGRAM
Press the Enter button, then use the Number buttons to select the
desired chapter.
PROGRAM MENU SELECT : ENTER
You can use also just the
Left/Right ( / / / ) button.
TITLE CHAPT
1
2
1
2
3
4
5
PREVIOUS
PLAY :
4
PROGRAM MENU SELECT : ENTER
TITLE CHAPT
1
1
2
2
3
4
5
PREVIOUS
Press the Title button.
For DVDs containing multiple titles, you can view the title of each
movie.
Depending on the disc, this function may either not work at all, or
may work differently.
PLAY :
5
NEXT
FINISH : PROGRAM
Press the Enter button.
The selected track number is
programming and the cursor moves
to the next number.
Using the Title Menu
TITLE CHAPT
6
7
8
9
10
TITLE CHAPT
6
7
8
9
10
NEXT
FINISH : PROGRAM
At this time, you can continue programming if you want to.
When programming more than NEXT
10 tracks, select and then press
the Enter button.
The program selection screen
where you can program up to
10 additional tracks appears.
PROGRAM MENU SELECT : ENTER
TITLE CHAPT
1
2
1
1
2
2
1
7
3
2
3
4
2
4
5
PREVIOUS
PLAY :
6
7
8
9
10
TITLE CHAPT
4
1
6
2
3
4
5
5
1
2
NEXT
FINISH : PROGRAM
To Playback the Tracks in the Programmed Order
Press the Play/Pause (
) button.
To Cancel the Programming
Press either the Program button or Stop (
Downloaded From Disc-Player.com Samsung Manuals
) button.
Program Playback (Cont’d)
Selecting the Audio
Language/Subtitle Language
GB
Selecting the Audio Language
To Change the Program
1
2
Press the Up/Down (
changed.
/
) button to select the track number to be
Press the Enter button to select the title or chapter to be changed.
The cursor moves to the next number when the Enter button is
pressed again.
3
Depending on the number of languages recorded on a DVD disc,
a different audio language (KOREAN, ENGLISH, JAPANESE, etc.) is
selected each time the button is pressed.
KOR
Press the Clear button and then press the Number buttons.
You can use also just the Left/Right (
4
Press the Audio button.
/
VIDEO
) button.
KOR 1/3
OFF
1/1
ENG 2/3
Press the Enter button.
JAP 3/3
The cursor moves to the number below.
5
Repeat steps 1-4 above to change the program.
Depending on the disc, DTS or DIGITAL PRO LOGIC can be selected.
Selecting the Subtitle Language
To delete the entire Program
Press the Stop (
) button twice during playback.
Press the Stop (
) button once when in the Stop mode.
Press the Open/Close ( ) button on the main unit.
The disc tray will open and then close. The program will then be deleted.
When you have entered a wrong number
Press the Clear button.
When you want to delete a selection during programming, select
the track (or chapter, or title) to be deleted and then press the Clear
button.
You can program or change particular tracks for VCD or CD
discs in the same manner.
Downloaded From Disc-Player.com Samsung Manuals
Press the Subtitle button.
Depending on the number of languages recorded on a DVD disc,
a different subtitle language (KOREAN, ENGLISH, JAPANESE, etc.) is
selected each time the button is pressed.
To make the subtitles disappear, select "OFF".
VIDEO
KOR 1/3
KOR 1/1
OFF
1/1
ENG 2/3
JAP 3/3
OFF
The word
INVALID appears on the TV screen!
If this message appears on the TV screen while buttons are
being operated, that operation is not possible with that particular disc.
Depending on the disc, the audio or subtitle language function may not work.
Various DVD Functions
MP3 Playback
GB
To enlarge an image
This system is incorporated with an MP3 decoder. You can
play back MP3 tracks (files)recorded on CD-Rs,CD-RWs,and
CD-ROMs.
Press the Zoom button.
Starting Playback
Images can be enlarged 2x and 4x.
During DVD playback, press the Zoom button to zoom in 2X/4X/normal, in that order.
Press (
/
/
/
It is recommended to turn on your TV when playing back an MP3 disc.
) to move the enlarged portion you want to watch.
1
2
Press the Open/Close(
) button to load a disc.
Press the Play/Pause(
) button.
After detecting the disc, playback starts.
The on-screen bar and the contents recorded on the MP3 disc will
be shown on the TV if it is turned on.
Selecting the desired Screen Angle
Press the Angle button.
This function only works with discs on which multiple angles have been
recorded.
1
During playback, press the Angle button to select the desired angle in
1/3, 2/3, 3/3, normal, in that order.
OFF
1/3
2
2/3
3/3
To stop during playback
Press the Stop (
) button.
What is MP3?
MP3 is an abbreviation of Motion Picture Experts Group (or
MPEG) Audio Layer 3. MP3 is simply a file format with a
data compression ratio of 1:10 (128 Kbps*).
That means,by using MP3 format, one CD-R or CD-RW can
contain 10 times as much data volume as a regular CD can.
*Bit rate is the average number of bits that one second of
audio data will consume. The measuring unit used is Kbps
(1000 bits per second).
To get a better audio quality, choose a higher bit rate. The
most popular bit rate for encoding (recording)is 128 Kbps.
Downloaded From Disc-Player.com Samsung Manuals
MP3 Playback (Cont’d)
MP3 Playback (Cont’d)
GB
To go off the on-screen bar
Press the Display button.
Each time you press the button, the on-screen bar appears in
sequence.
Operations Using the On-Screen Display
It is recommended to turn on your TV when playing back an MP3
disc.
When the loaded MP3 disc is recognized, the following on-screen display appears on the TV screen.
(The contents of this on-screen display varies according to the disc —
the way MP3 tracks were recorded on the disc.)
Button
ENTER,
▲/ ▼
MP3 File Compatibility
This system can only read MP3 files that are recorded in
the format that is compliant with ISO 9660 Level 1 or
Level 2.
The system can read or play MP3 files only with the
extension code —“.mp3 ”.
ID3*tags cannot be shown on the display.
*An MP3 file can contain file information called “ID3 Tag ”
where its album name, performer, rack title, etc. are
recorded. There are two versions —ID3v1 (ID3 Tag version 1)and ID3v2 (ID3 Tag version 2).
CD-R/RW playback compatibility
Your DVD player can also play CD-R and CD-RW discs
recorded in digital audio format. When recording your own
CD-R or CD-RW discs, make sure that the recording session is properly terminated, or they will not be playable.
(Depending on disc properties and recording quality,
some CD-R/RW may not be playable.)
CD-RW has a lower reflection rate than CD-R media and
consequently it will take a longer to read CD-R discs.
CD-RW discs recorded at high speed tend to be difficult
for the DVD player to read. If the recording speed for the
CD-RW disc is not predetermined, write it at low speed.
Downloaded From Disc-Player.com Samsung Manuals
To do
Start playback or go into a directory.
Select a track or directory.
MP3 Playback (Cont’d)
System Setup
GB
Repeating Playback
You can use the DVD player's Setup function to select the TV
screen ratio, rating limit, or digital output mode.
On an MP3 disc, Repeat A↔B cannot be used.
You can enjoy only repeat play.
Press the Repeat button.
The indication corresponding to the selected mode appears on the TV
screen.
To Set up the System
1
From the stop mode, press the Setup button.
LANGUAGES
Each time you press the button, repeat mode changes as follows:
SYSTEM
OSD LANGUAGE
ENGLISH
AUDIO
CHINESE
CHINESE
CHINESE
SUBTITLE
MENU LANGUAGE
: Move
2
REPEAT:RANDOM
: All tracks recorded on the disc will be played once at
REPEAT:ONE
: Current track will be repeated.
REPEAT:DIR
: Tracks in the current directory will be repeated.
REPEAT:DISC
: All tracks on the disc will be repeated.
REPEAT OFF
: Repeat play is canceled.(Normal play is resumed.)
Setup : Exit
Press the Left/Right (
/
LANGUAGES
SYSTEM
TV SCREEN
RATING LEVEL
DIGITAL OUTPUT
: Move
3
Press the Up/Down (
4:3 LB
OFF
BITSTREAM
Setup : Exit
/
LANGUAGES
TV SCREEN
RATING LEVEL
DIGITAL OUTPUT
: Move
4
) button to select the system.
) button to select the desired item.
SYSTEM
4:3 LB
OFF
BITSTREAM
Setup : Exit
Press the Enter button or Right (
) button.
Move to the detailed items.
Then press the Left (
LANGUAGES
TV SCREEN
RATING LEVEL
DIGITAL OUTPUT
: Move
5
SYSTEM
4:3 LB
OFF
BITSTREAM
Setup : Exit
Press the Up/Down ( / ) button to select the desired sub-item
and then press the Enter button.
LANGUAGES
SYSTEM
TV SCREEN
4:3LB
LB
4:3
OFFPS
4:3
16:9
RATING LEVEL
DIGITAL OUTPUT
: Move
Downloaded From Disc-Player.com Samsung Manuals
) button to return to the previous step.
Setup : Exit
To End the System Setup
Press the Setup button again.
System Setup (Cont’d)
GB
TV SCREEN(TV SCREEN RATIO)
Select when you want to watch a 16:9 screen ratio DVD movie on a TV
with a 4:3 ratio screen.
DIGITAL OUTPUT
BITSTREAM
LANGUAGES
TV SCREEN
LANGUAGES
SYSTEM
TV SCREEN
RATING LEVEL
DIGITAL OUTPUT
: Move
4:3 LB
OFF
BITSTREAM
Setup : Exit
4:3LB
You can see the full 16:9 picture, but black bars will
appear at the top and bottom of the screen.
4:3PS
You can only view the central portion of the 16:9 screen.
16:9
You can view in wide screen but the top and bottom of
the picture will be cut off.
However if the movie is recorded in 4:3 ratio, you cannot view the full
16:9 picture with the above functions.
RATING LEVEL
The Rating Level function works in conjunction with DVDs which have been
assigned a rating, to help control the type of DVD that your family watches.
LANGUAGES
SYSTEM
TV SCREEN
RATING LEVEL
DIGITAL OUTPUT
: Move
Select RATING LEVEL, then press the Enter button.
2
Use the number(0~9) buttons to input a 4digit password.
4:3 LB
OFF
BITSTREAM
Setup : Exit
LANGUAGES
SYSTEM
TV SCREEN
4:3 LB
RATING LEVEL
DIGITAL OUTPUT
BITSTREAM
: Move
The player’s password is set to "7890" by default.
Setup : Exit
LANGUAGES
SYSTEM
TV SCREEN
4:3 LB
RATING LEVEL
DIGITAL OUTPUT
: Move
1
3
Use the Up/Down ( / ) button to select
either RATING LEVEL or NEW PASSWORD,
and then press the Enter button.
There are up to 8 rating levels on a disc.
Setup : Exit
If LEVEL 6 is selected, a disc which contains
rating LEVEL 7 and above cannot be played.
If you select NEW PASSWORD, the
screen changes and enables you to enter
the new password.
Press Return Button to return to the previous
level.
When the rating level password has been forgotten
While the player is in the stop mode, hold the Normal Dubbing button
down on the main unit for more than 5 seconds.
"INITIAL" appears on the display and all default settings will return
to Factory Preset.
Downloaded From Disc-Player.com Samsung Manuals
RATING LEVEL
DIGITAL OUTPUT
: Move
SYSTEM
Select this if Dolby Digital 5.1 CH
connections have been made.
Sends a digital signal that
carries the Dolby Digital 5.1 or
DTS multichannel information
to your external decoder.
4:3 LB
OFF
BITSTREAM
Setup : Exit
LPCM
Select this otherwise.
Sends a linear PCM(Pulse
Code Modulation), or 2 channel
stereo signal, to your A/V
receiver.
Searching for and Storing the Radio
Stations
Setting up the Language Features
GB
Using the DVD player's Setup function, you can customize the
Menu Language, Subtitle Language, and Disc Menu Language.
To set up the language feature
1
Press the Setup button from the stop mode.
LANGUAGES
SYSTEM
OSD LANGUAGE
ENGLISH
AUDIO
CHINESE
CHINESE
CHINESE
SUBTITLE
MENU LANGUAGE
: Move
2
Press the Up/Down (
Setup : Exit
/
) button to select the desired item.
LANGUAGES
You can store up to:
15 FM stations
15 AM stations
15 FM stations
8 MW stations
7 LW stations
15 FM stations
5 MW stations
5 SW1 stations
5 SW2 stations
1
2
3
ENGLISH
AUDIO
CHINESE
CHINESE
CHI NESE
SUBTITLE
MENU LANGUAGE
: Move
(PLAYER MENU LANGUAGE)
AUDIO
(AUDIO LANGUAGE)
SUBTITLE
MENU LANGUAGE
(SUBTITLE LANGUAGE)
(option)
Select the TUNER function by pressing TUNER .
Select the required frequency band by pressing TUNER (Band)
again on the front panel or TUNER (Band) on the remote control.
Result: The appropriate indication is displayed:
FM
AM(MW)
LW(OPTION)
SW1, SW2(OPTION)
4
Setup : Exit
OSD LANGUAGE
(option)
Switch the system on by pressing On/Standby.
SYSTEM
OSD LANGUAGE
(option)
Frequency Modulation
Medium Wave
Long Wave
Short Wave
To search for a
station...
Press Tuning Mode on the front panel
or on the remote control
Manually
One or more times until MANUAL is
displayed.
One or more times until AUTO is
displayed.
(DISC MENU LANGUAGE)
Automatically
3
Press the Enter button or Right (
) button.
Move to the language features.
Then press the Left (
LANGUAGES
SYSTEM
ENGLISH
AUDIO
CHINESE
CHINESE
ENGLISH
: Move
4
) button to return the previous step.
OSD LANGUAGE
SUBTITLE
MENU LANGUAGE
ENGLISH
ENGLISH
AUDIO
CHINESE
CHINESE
CHINESE
FRENCH
SUBTITLE
MENU LANGUAGE
: Move
6
Adjust the volume by:
Turning the Volume knob on the front panel
or
Pressing the VOL. + or – buttons on the remote control
7
Select the FM stereo or mono mode by pressing Mono/ST.
SYSTEM
OSD LANGUAGE
GERMAN
Setup
: Exit
JAPANESE
Select the station to be stored by:
Turning the Multi Jog knob to the right or to the left to increase or
decrease the frequency respectively
or
Pressing Tuning Down or Up on the remote control
To scroll through the frequencies faster when searching
manually, hold down the Tuning Mode Down or Up buttons.
The automatic search procedure may stop on a frequency that
does not correspond to a radio station. If this happens, use the
manual search mode.
Setup : Exit
Press the Up/Down ( / ) button to select the desired language
and then press the Enter button.
LANGUAGES
5
6
2,3
1
5
7
5
Press Return Button to return to the previous
level.
To End the Language Features Setup
Press the Setup button again.
Downloaded From Disc-Player.com Samsung Manuals
4
5
Searching for and Storing the Radio
Stations (continued)
Selecting a Stored Station
GB
8
If you do not want to store the radio station found, revert to Step 4
and search for another station.
Otherwise:
a Press Memory.
Result: The PRGM is displayed for a few seconds.
b Press Tuning Down and Up or turn Multi Jog to assign a programme number between 1 and 15.
9
You can listen to a stored radio station as follows:
1
2
3
c Press Memory to store the radio station.
Result: PRGM is no longer displayed and the station is stored.
4
To store any other radio frequencies required, repeat Steps 3 to 8.
5
Switch the system on by pressing On/Standby.
Select the TUNER function by pressing TUNER .
Select the required frequency band by pressing TUNER (Band) on
the remote control or TUNER (Band) again on the front panel.
Press
,
button on the front panel of the unit, or the
,
button on the remote control until “PRESET” is displayed.
Turning Multi-jog on the front panel left or right until the desired
station is found or press
,
to select the desired station.
or
Select the desired station by pressing the station number stored,
using the
,
button on the remote control.
Result: The desired station is now received.
The PROGRAM function can be used to assign a new station to
an existing programme number.
1
8
4
2,3
8
8
4
8
In Tuner mode
In manual tuning mode, you can use Multi Jog or
/
button to manual search a radio station.
During Tuner auto searching, press
button to stop auto
searching.
In Preset tuning mode, you can use Multi Jog or
button to search a stored radio station.
Improving Radio Reception
/
You can improve the quality of radio reception by:
Rotating the FM or AM(MW) aerial
Testing the positions of the FM and AM(MW) aerials before fixing them
permanently
If reception from a specific FM radio station is poor, press Mono/ST
on the remote control to switch from stereo mode to mono. The quality of the sound will be improved.
Downloaded From Disc-Player.com Samsung Manuals
CD Synchro Record Feature
Listening to a Cassette
(This function is not available during playback of an MP3-CD.)
GB
Always treat your cassettes with care; refer, if necessary, to
the section entitled “Precautions When Using Audio Cassettes”
on page 29.
1
2
3
Switch the system on by pressing the On/Standby button.
4
Insert the pre-recorded cassette with the open edge of the tape facing downward.
5
Close the deck by pushing on it until it clicks into place.
Result: Depending on the deck selected, the 1 or 2 indication is
displayed in front of the counter number.
Select the TAPE function by pressing TAPE.
Open either cassette deck 1 or 2 by pushing and releasing the deck
cover where Push Eject ( ) is written.
If you insert a cassette in both decks, the system selects the
deck in which you inserted the second cassette.
6
You can record a compact disc on a cassette in two different ways:
Synchronised recording
Direct recording
This feature enables you to synchronize the start of the
recording with the start of the disc or track of your choice.
1
2
3
4
5
6
Switch the system on by pressing On/Standby.
7
To stop...
Recording and playing the compact disc
Insert a blank cassette in Deck 2.
Select the CD function by pressing DVD/CD on the front panel.
Load a compact disc.
Select the required disc.
Select the required track and press CD Synchro or press CD
Synchro directly to start recording at the beginning of the disc.
Result: “REC” and “CD SYNC” are displayed and recording starts.
Press ...
If you have inserted two cassettes, press Deck 1/2 on the front panel
or directly the Deck 1/2 button on the remote control to select the
cassette to be played.
Result: Depending on the deck selected, the TAPE 1 or TAPE 2 indication is displayed.
7
8
DECK 1 and DECK 2
DECK 2 only
6
7
When the cassette is stopped, select one of the following functions
as required.
Recording a Compact Disc
Main Unit
To...
Rewind the cassette
Fast-forward the cassette
Press ...
The direct recording mode enables you to start recording with
any track on the compact disc.
You can only record on cassettes in Deck 2.
You do not need to adjust the volume, as it has no effect on the recording.
Remote Control
To...
Rewind the cassette
Fast-forward the cassette
9
3
1
To listen to...
Press ...
Side A
TAPE (
)once
Side B
TAPE (
)twice
Result: The cassette starts playing.
Press ...
To...
Press...
Stop the playback or search
1
2,7
1
2
3
4
5
6
Switch your system on by pressing On/Standby.
7
Press the REC/Pause.
Result: REC is displayed .
8
Press the
to start playing the track.
Result: The track is recorded on the cassette.
9
When you have finished recording, press TAPE
control or
on the front panel to stop recording.
Insert a blank cassette in Deck 2.
Select the CD function by pressing DVD/CD on the front panel.
Load the compact disc.
Select the required disc.
Select the required track on the compact disc and press
on the front
panel or
on the remote control to set the compact disc player to Pause
mode.
6
8
9
8
1
7
Downloaded From Disc-Player.com Samsung Manuals
3,6,8
9
on the remote
Selecting the Cassette Playback
Mode (DECK 2 only)
Recording a Radio Program
GB
You can record a radio program of your choice.
You can only record on cassettes in Deck 2.
You do not need to adjust the volume, as it has no effect on
the recording.
1
2
3
4
Your mini-compact system has three cassette playback modes
which enable you to listen to both sides of a cassette
automatically.
Press Reverse Mode until the appropriate symbol is displayed.
When the display indicates... The mini-compact system plays back...
Switch the system on by pressing Standby/On.
Insert a blank cassette in Deck 2.
One side of the selected cassette and
then stops.
Select the TUNER function by pressing TUNER.
Select the radio station that you wish to record by pressing Tuning
One side of the cassette.
The other side of the cassette and then
stops.
or
on the remote control or by press the
or Up on the front panel.
Both sides of the cassette indefinitely until
you press stop.
5
Press REC/Pause.
Result: “REC” is displayed in red and recording starts.
6
To stop recording, press
/
Down
.
3
1
5
6
4
4
Copying a Cassette (Dubbing)
Tape Counter
You can copy a cassette from Deck 1 to Deck 2.
Two options are available:
Normal speed dubbing
You do not need to adjust the volume, as it has no effect on the
recording.
Take care not to insert the tape to be copied in Deck 2, as it will
be erased when you start recording.
1
2
3
4
Switch your system on by pressing Standby/On.
Insert a blank cassette in Deck 2.
Insert the tape to be copied in Deck 1.
To copy a cassette at...
Press...
Normal speed
Dubbing
Result: The appropriate indications are displayed and the cassette in
Deck 1 is copied to the cassette in Deck 2.
5
To stop dubbing, press
.
1
4
5
Downloaded From Disc-Player.com Samsung Manuals
When playing a cassette, a counter is displayed to enable you
to take note of the counter value at the start of each track
and thus start playback at the beginning of the track to which
you wish to listen.
The counter is only displayed when a cassette is being played.
Before starting to record a cassette for which you wish to take note of
the counter values at the beginning of each track, reset the counter
by pressing Counter Reset.
Timer Function
GB
The timer enables you to switch the system on or off at specific times.
Example: You wish to wake up to music every morning.
2
If you no longer want the system to be switched on or off automatically, you must cancel the timer.
4,5,7
1,9
Before setting the timer, check that the current time is correct.
For each step, you have a few seconds to set the required
options. If you exceed this time, you must start again.
1
2
3
4
5
6
7
8
9
6
Switch the system on by pressing On/Standby.
3,4,5,6,7,8
6
TIMER is displayed.
Press Timer/Clock until
Press Enter on the front panel.
Result: ON TIME is displayed (instead of the equalizer symbols) for
a few seconds, followed by any switch-on time already set;
you can set the timer switch-on time.
Set the timer switch-on time.
a
Set the hour by tuning the Multi Jog knob to the right or to the left.
b
Press Enter on the front panel.
Result: The minutes flash.
c
Set the minutes by tuning the Multi Jog knob to the right or to
the left.
d
Press Enter on the front panel.
Result: OFF TIME is displayed (instead of the equalizer symbols)
for a few seconds, followed by any switch-off time already
set; you can now set the timer switch-off time.
To set the timer function
You may use Multi Jog or
step 4,5,6,7.
/
buttons to adjust in
Set the timer switch-off time.
a
Set the hour by tuning the Multi Jog knob to the right or to the left.
b
Press Enter on the front panel.
Result: The minutes flash.
c
Set the minutes by tuning the Multi Jog knob to the right or to
the left.
d
Press Enter on the front panel.
Result: VOL XX is displayed, where XX corresponds to the
volume already set.
Press Tuning Down and Up to adjust the volume level and press
Enter on the front panel.
Result: The source to be selected is displayed.
Turn the Multi Jog knob to select the source to be played when the
system switches on.
If you select...
You must also...
TAPE (cassette)
Insert a recorded cassette in one of the
decks before setting the system to standby.
TUNER (radio)
a Press Enter on the front panel.
b Select a preset station by tuning the
Multi Jog knob to the right or to the left.
CD (compact disc)
Load one or more compact discs.
Press Enter on the front panel to confirm the timer.
Press On/Standby to set the system to standby mode.
Result:
is displayed to the bottom left of the time, indicating that
the timer has been set. The system will switch on and off
automatically at the required times.
If the timer switch on and off times are identical, the word ERROR is
displayed.
Downloaded From Disc-Player.com Samsung Manuals
Cancelling the Timer
After having set the timer, it will start automatically as shown
by the TIMER indication on the display. If you no longer wish
to use the timer, you must cancel it.
You can stop the timer at any time (system on or in standby mode).
To...
Press Timer On...
Cancel the timer
Once.
Result:
is no longer displayed.
Restart the timer
Twice.
Result:
is displayed again.
3D Sound Function
Selecting a Sound Mode
GB
3D Sound Function reproduces the sense of wider perspective and more realistic sound effect beyond what
conventional stereo can normally provide, resulting in a
strong sense of presence, as if you were in the middle of
it all.
Press the 3D SOUND button.
Result: “3D SOUND” appears on the display,You can select 3D SOUND
ON and OFF.
This function is only available during playback of an CD.
Mute Function
You can turn the sound off temporarily on your system.
Example: You wish to answer a telephone call.
1
2
Press Mute.
To switch the sound back on (at the same volume as before), press
Mute again or the Volume buttons.
Your mini-compact system is equipped with a preset equalizer
that allows you to choose the most appropriate balance
between treble and bass frequencies, according to the type of
music you are listening to.
Press EQ on the front panel or on the remote control until the sound mode
is selected.
To obtain a...
Select...
Normal balance (linear)
Balance suitable for pop music
Balance suitable for rock music
Balance suitable for classic music
Balance suitable for hall
Balance suitable for live
Balance suitable for cinema
PASS
POP
ROCK
CLASSIC
HALL
LIVE
CINEMA
Power Surround Function
Your mini-compact system is equipped with the function
of Power Surround .
The function of Power Surround amplifies bass and
improves high key or bass twice as much for you to
appreciate powerful real sound.
To select Power Surround
Press Power Surround button on the front panel,“P,SURR”
is displayed.
To cancel this function, press Power Surround button again and
“OFF” is displayed for a few seconds.
Downloaded From Disc-Player.com Samsung Manuals
Setting the System to Switch off
Automatically
Connecting Headphones
GB
While listening to a compact disc or a cassette, you can
set the system to switch off automatically
Example: You wish to go to sleep to music.
You can connect a set of headphones to your mini-compact
system so that you can listen to music or radio programmers
without disturbing other people in the room. The earphones
must have a 3.5 ø jack or an appropriate adapter.
1
Press Sleep.
Result: playback starts and the following indications are displayed:
Connect the headphones to the Phones jack on the front panel.
Result: The loudspeakers are no longer used to output the sound.
2
Press Sleep one or more times to indicate how long the system
should continue playing before it switches off:
Prolonged use of headphones at a high volume may damage
your hearing.
90 MIN
At any time, you can:
Check the remaining time by pressing Sleep
Change the remaining time by repeating Steps 1 and 2
3
To cancel SLEEP function, press Sleep one or more times until OFF
is displayed.
Microphone Function(option)
The microphone enables the user to mix in his or her
vocals to sing-along with the music.
Preparation
Plug the microphone with a 6.3ø mic jack into
microphone terminal.
Super Bass Sound
Your mini-compact system has a bass amplification function
called S.Bass (Super Bass Sound). This function makes the
sound more powerful and real.
1
Turn S.Bass Level knob on the front panel or press the S.BASS
Level button on the remote control.
Press the button on the remote control repeatedly to select
➞“OFF ➞ S-BASS1 ➞ S-BASS 2 ➞ S-BASS3 ➞ S-BASS4”.
or turn the knob on the front panel repeatedly to select
-
2
-
-
1
Turn the Mic Level knob to adjust the MIC1, MIC2 volume.
2
Press Echo button to select ECHO1,ECHO2,ECHO OFF.
The Power Surround function is not available if plugging the
Microphone into Mic jacks.
-
You can select the level of low tones you desired.
2
1
Downloaded From Disc-Player.com Samsung Manuals
Connecting to an External Source
Safety Precautions
GB
The auxiliary input can be used to take advantage of the sound quality
of your mini-compact system when listening to other sources.
Examples: A television
A video disc player
A DAT or DCC cassette player
A Hi-Fi stereo video cassette recorder
The following diagrams illustrate the precautions to be taken
when using or moving your mini-compact system.
To connect the external source, the source must have an audio
output. In addition, you need an RCA connection cable.
1
Set the system to standby mode and disconnect it and the external
source from the main.
2
Connect the audio cable to the rear of the mini-compact system.
Connect the...
Red jack
White jack
To the connector marked...
R (right)
L (left)
Ambient operating conditions:
Ambient temperature
5°C-35°C
Humidity
10-75%
Do not expose the unit to direct sun
radiation or other heat sources.
This could lead to overheating and
malfunction of the unit.
Do not place potted plants or vases
on top of the unit. Moisture entering
the unit could lead to dangerous
electric shock and can cause
equipment damage. In such events
immediately disconnect the main
plug from the socket.
During thunderstorms, disconnect
the main plug from the socket.
Main voltage peaks due to lightning could damage the unit.
For optimum sound quality, do not invert the right and left channels.
3
Plug the system back into the main socket and press On/Standby to
switch it on.
4
5
6
Select the AUX source by pressing AUX on the front panel.
Result: AUX is displayed.
Switch the external source on.
Adjust the volume and balance as required:
Volume
Equalizer
Example: You can watch a film and take advantage of stereo sound
provided that the original sound track is in stereo, (as if you
were in a cinema).
VOLUME
UP
DOWN
3
4
Downloaded From Disc-Player.com Samsung Manuals
Remove the batteries from the
remote control, if not used for any
extended periods.
Leaking batteries can cause serious
damage to the remote control.
When using headphones, take care
not to listen at excessive volumes.
Extended use of headphones at
high volumes will lead to hearing
damage.
Do not place heavy items on the
main lead. Main cable damage can
lead to damage of the equipment (fire
hazard) and can cause electric
shock.
Do not remove any equipment panels.
The inside of the unit
contains live components, which
cause electric shock.
Cleaning Your Mini-Compact
System
Precautions When Using Audio
Cassettes
GB
To obtain the best possible results from your mini-compact
system, you must clean the following elements regularly:
The outer casing
The compact disc player
The cassette players (heads, rollers and drive capstans)
Check that the tape in the cassette is sufficiently taught.
To prevent erasing a cassette that you wish to keep, remove the safety
tab on the upper edge of the cassette. To record a cassette, where the
tab has been broken, simply cover the opening with adhesive tape.
When you have finished playing a cassette, always put it back in its case.
Store your cassettes in a clean place, out of direct sunlight, where
they will not be exposed to high temperatures.
Avoid using 120-minute cassettes as they place unnecessary strain
on the tape mechanism.
Always unplug the system from the wall outlet:
Before cleaning it
If you are not going to be using it for a long time
Outer Casing
Clean the outer casing regularly using a soft cloth and a light detergent. Do
not use abrasive powders, liquids or aerosol cleaners. Never let any liquids
get into the system.
Before Contacting the After-Sales
Service
Compact Disc Player
1
2
Before playing a compact disc, clean it with a special CD cleaning
agent. Do not use the same cleaning agents as for vinyl LP records.
Carefully wipe the disc from the centre outward.
Regularly clean the player with a special cleaning disc (available from
your local dealer).
Tape Decks
Press Push Eject(
1
2
It always takes a little time to become familiar with a new appliance. If you
have any of the problems listed below, try the solutions given. They may
save you the time and inconvenience of an unnecessary service call.
Problem
) to open the cassette deck.
Use a cotton bud and a special cassette cleaning agent to clean the:
Head (1)
Rollers (2)
Drive capstans (3)
If you will not be using the remote control for a long time,
remove the batteries to prevent corrosion.
Although your system is very hard-wearing, it should not be
used in an excessively dusty environment or subjected to
shocks or extreme heat (close to heating appliances or in
direct sunlight, etc.).
If the unit emits an unpleasant odor when in use, unplug it
from the main supply and contact the after-sales service.
The system does not work
G
E
N
E
R
A
L
The Timer does not work
System still doesn’t work, even after following steps above.
3
D
The compact disc player does not
start playing
2
Precautions When Using Compact
Discs
Handle your compact discs with care. Always hold them by
the edges to avoid leaving fingerprints on the shiny surface.
When you have finished playing a compact disc, always put it
back in its case.
Do not fix paper or adhesive tape to the discs and do not write
on the label.
Clean them with a special-purpose cloth.
Store your compact discs in a clean place, out of direct sunlight, where they will not be exposed to high temperatures.
Always use compact discs marked
.
• The main lead is not correctly plugged into a
wall socket or the wall socket is not switched on.
• The remote control batteries need replacing or
the polarity has not been respected.
• The On/Standby button has not been pressed.
• The volume has been completely turned down.
• The correct function (TUNER, CD, TAPE,
AUX) has not been selected.
• You have connected a set of earphones.
• The loudspeaker wires have been disconnected.
• The MUTE button has been pressed.
• The timer has been stopped by pressing
TIMER ON/OFF.
• Press the 3D SOUND button for 5 seconds
in power ‘OFF’(standby), the system is
returned the original position (RESET)
C
1
There is no sound
Checks/Explanation
C
A
S
S
E
T
T
E
S
R
A
D
I
O
The tape does not start playing
• The CD function has not been selected.
• The disc has been inserted face down or is
either dirty or scratched.
• The laser sensor is dirty or dusty.
• The system has not been installed on a flat,
horizontal surface.
• Condensation has formed in the player; leave
the system in a warm, airy room for at least
one hour.
• The TAPE function has not been selected.
• The cassette has not been inserted correctly.
• The cassette player has not been closed.
• The tape is either slack or broken.
The volume falls off
• The audio heads are dirty.
• The rollers or drive capstans are dirty.
• The tape is worn.
The cassette is not erased correctly
There is excessive wow and flutter
• The TUNER function has not been selected.
• The radio frequency has not been correctly
selected.
• The aerial has been disconnected or is not facing the right way. Turn it until you find the best
orientation.
• You are in a building that blocks radio waves;
you must use an outside aerial.
Reception is poor or no radio stations are received at all
COMPACT
DIGITAL AUDIO
If the above guidelines do not allow you to solve the problem, take a note of:
The model and serial numbers, normally printed on the rear of the system
Your warranty details
A clear description of the problem
Then contact your local dealer or SAMSUNG after-sales service.
Downloaded From Disc-Player.com Samsung Manuals
Technical Specifications
GB
SAMSUNG strives to improve its products at all times. Both the design specifications and these user
instructions are thus subject to change without notice.
RADIO
LW (option)
Usable sensitivity
SW (option)
Usable sensitivity
AM (MW)
Signal/noise ratio
Usable sensitivity
Total harmonic distortion
FM
Signal/noise ratio
Usable sensitivity
Total harmonic distortion
50 dB
10 dB
0.5 %
COMPACT DISC PLAYER
Capacity
Frequency range
Signal/noise ratio
Distortion
Channel separation
Disc sizes
3 discs
20 Hz - 20 KHz (± 1 dB)
90 dB (at 1 KHz) with filter
0.05 % (at 1 KHz)
80 dB
Diameter: 120 or 80 mm. Thickness: 1.2 mm
TAPE DECK
Frequency range
Signal/noise ratio
Channel separation
Erasing effect
125 Hz ~ 8 KHz
40 dB
30 dB
45 dB
AMPLIFIER
Output power (6Ω)
Channel separation
Signal/noise ratio
70W/CH RMS (total harmonic distortion: 10 %)
45 dB
75 dB
GENERAL
Dimensions
270 (W) x 320 (H) x 340 (D) mm
Downloaded From Disc-Player.com Samsung Manuals
60 dB
40 dB
40 dB
54 dB
2%
Reference
Note on Terminology
ANGLE
CHAPTER
NUMBER
Recorded onto some DVD discs are scenes which have been simultaneously shot from a number
of different angles (the same scene is shot from the front, from the left , from the right , etc.). With
such discs, the Angle button can be used to change the angle of view for specific scenes.
These numbers are recorded on DVD discs. A Title is subdivided into many
sections, each of which is numbered, and specific parts of the video can be
searched quickly using these numbers.
DVD
A high-density optical disc on which high-quality pictures and sound have been recorded by means of digital
signals. Incorporating a new video compression technology (MPEG-2) and high-density recording technology,
a DVD disc comprises two 0.6 mm thick discs bonded together.
PCM
An acronym for Pulse Code Modulation - another name for digital audio.
PBC
(PLAYBACK
CONTROL)
This is recorded on a video CD (version 2.0). Selected scenes or information can
be chosen from the menu displayed on the TV monitor.
REGION NUMBER
Both the DVD player and DVD discs are encoded with a region number. If the
region number on the DVD disc does not correspond to the region number of
the DVD player, the player cannot play the disc.
SUBTITLES
Translated appearing at the bottom of the screen. A DVD disc can contain up
to 32 subtitle languages.
TITLE NUMBER
TRACK NUMBER
VIDEO CD
These numbers are recorded on DVD discs. When a disc contains two or
more movies, these movies are numbered as Title 1, Title 2, etc.
These numbers are assigned to the tracks which are recorded on video and
audio CDs. They enable specific tracks to be located quickly.
Contains recordings of pictures and sound whose quality is roughly
comparable to that of video tape.
This player also supports video CDs with playback control (version 2.0).
You can enjoy 5.1 (or 6) channels of high fidelity digital sound from various
digital input sources such as laser discs, DVD, CD etc.
DTS provides a realistic, clear surround sound that has not previously been
available from conventional surround sound.
5.1 (or 6) Channel Digital Surround sound reproduced from DVDs and LDs
recorded as a digital signals (with
disc marking). With better sound
quality, dynamic range, and directionality than the traditional Dolby surround
technology, you can enjoy the dynamic realistic sound.
PRO LOGIC
Downloaded From Disc-Player.com Samsung Manuals
A 4 channel analog sound reproduced from a program source such as a videoPRO LOGIC mark. You can enjoy a more realistic, robust
tape or LD with the
sound unavailable from regular stereo sources.
THIS APPLIANCE IS MANUFACTURED BY:
ELECTRONICS
Downloaded From Disc-Player.com Samsung Manuals
AH68-01393J