1
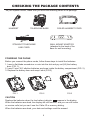
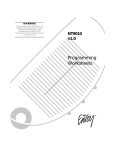
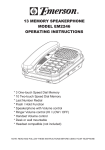
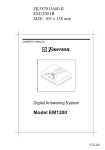
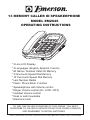
13 MEMORY CALLER ID SPEAKERPHONE
MODEL EM2646
OPERATING INSTRUCTIONS
* 3 Line LCD Display
* 3 Languages (English, Spanish, French)
* 60 Name / Number Caller ID Memory
* 3 One-touch Speed Dial Memory
* 10 Two-touch Speed Dial Memory
* Last Number Redial
* Flash / Phone Book Function
* Speakerphone with Volume control
* Ringer Volume control (HI / LOW / OFF)
* Handset Volume control
* Desk or wall mountable
* Electronic Hold
TO USE THE CALLER ID FEATURE OF THIS PHONE, YOU MUST
SUBSCRIBE TO CALLER ID SERVICE FROM YOUR PHONE COMPANY,
AND REMEMBER TO INSTALL BATTERIES
NOTE: READ AND FOLLOW THESE INSTRUCTIONS BEFORE USING YOUR TELEPHONE
IMPORTANT SAFETY INSTRUCTIONS
When using your telephone equipment, basic safety precautions should always be followed
to reduce the risk of fire, electric shock and personal injury, including the following:
1.Read and follow all instructions and warnings.
2.Unplug this product from the wall outlet before cleaning. Do not use liquid cleaners or
aerosol cleaners. Use a slightly dampened cloth only.
.
3.Do not use this product near water, for example, near a bathtub, wash bowl, kitchen sink,
or laundry tub, in a wet basement, or near a swimming pool.
4.Do not place this product on an unstable cart, stand or table. The product may fall, causing
serious damage to the phone.
5.Slots and openings in back or bottom of the phone are for ventilation, and should not be
blocked or covered. The openings should never be blocked by placing the product on the
bed, sofa, rug, or other similar surface. This product should never be placed near or over a
radiator, heat register or a built-in installation such as a bookcase or cabinet unless proper
ventilation is provided.
6.Never push objects of any kind into this product through cabinet slots as they may touch
dangerous voltage points or short out parts that could result in risk of fire or electric shock.
Never spill liquid of any kind on the product.
7.To reduce the risk of electric shock, do not take this telephone apart. When service or
repair work is required, take it to a qualified service representative, opening or removing
covers may expose you to dangerous voltage or other risks. Incorrect reassembly can
cause electric shock when the appliance is subsequently used.
8.Unplug this product from the wall outlet and refer servicing to qualified service personnel
under the following conditions:
A. When the cord or plug is damaged or frayed.
B. If liquid has been spilled into the product.
C. If the product has been exposed to rain or water
.
D. If the product does not operate normally by following the operating instructions. Adjust
only those controls that are covered by the operating instructions because improper
adjustment of other controls may result in damage and will often require extensive work
by a qualified technician to restore the product to normal operation.
E. If the product has been dropped or the cabinet has been damaged.
F. If the product exhibits a distinct change in performance.
9.Avoid using a telephone (other than a cordless type) during an electrical storm. There may
be a remote risk of electric shock from lightning.
10.Do not use the telephone to report a gas leak in the vicinity of the leak.
11.Do not allow anything to rest on the telephone cord. Do not locate this product where the
cord will be damaged by persons walking on it.
12.Never install telephone wiring during a lightning storm.
13.Never install telephone jacks in wet locations unless the jack is specially designed for wet
locations.
14.Never touch uninsulated telephone wires or terminals, unless the telephone line has been
disconnected at the network interface.
15.Be careful when installing or modifying telephone lines.
CAUTION: TO REDUCE THE RISK OF FIRE, ELECTRIC SHOCK
AND PERSONAL INJURY, DO NOT OPEN CABINET.
1
BATTERY SAFETY INSTRUCTIONS
CAUTION: TO REDUCE THE RISK OF FIRE OR PERSONAL INJURY, READ AND
FOLLOW THESE INSTRUCTIONS.
1.Use only the following type and size of batteries: 3 size “AA” alkaline batteries
(not included).
2.Do not dispose of the batteries into a fire. The cells may explode. Check with local
codes for possible special disposal instructions.
3.Do not open or mutilate the batteries. Released electrolyte is corrosive and may cause
damage to the eyes or skin. It may be toxic if swallowed.
4.Exercise care in handling batteries in order not to short the battery with conducting
materials such as rings, bracelets and keys. The battery or conductor may over heat and
cause burns.
5.Do not attempt to recharge the batteries that are used with this product. The batteries
may leak corrosive electrolyte or explode.
6.Do not attempt to rejuvenate the batteries identified for use with this product by heating
them. Sudden release of the battery electrolyte may cause burns or irritation to eyes or
skin.
7.All batteries should be replaced at the same time. Mixing fresh and discharged batteries
could increase internal cell pressure and rupture the batteries.
8.When inserting batteries into this product, the proper polarity or direction must be
observed. Reverse insertion of batteries may result in leakage or explosion.
9.Remove the batteries from this product if the product will not be used for a long period of
time (several months or more) since during this time the batteries could leak, damaging
the product.
10.Discard weak or dead batteries as soon as possible since they are more likely to leak
in the product. Batteries should be replaced when the display gets dim or if the Low
Battery Indicator appears in the
. display
11.Do not store this product in high temperature areas. Batteries that are stored in a
freezer or refrigerator for the purpose of extending shelf life should be protected from
condensation during storage and defrosting. Batteries should be stabilized at room
temperature prior to use after cold storage.
12. Installation of batteries should only be done by an adult for safety.
SAVE THESE INSTRUCTIONS
2
IMPORTANT TELEPHONE COMPANY&
FCC INFORMATION
Your telephone equipment is approved for connection to the Public Switched Telephone
Network and is compliance with part 68, FCC Rules and Regulations and the Technical
Requirements for Telephone Terminal Equipment published by ACTA.
1. Notification to the Local Telephone Company
On the bottom of this equipment is a label indicating, among other information, the
US number and Ringer Equivalence Number (REN) for the equipment. You must,
upon request, provide this information to your telephone company.
The REN is useful in determining the number of devices you may connect to your
telephone line and still have all of these devices ring when your telephone number is
called. In most (but not all) areas, the sum of the REN of all devices connected to one
line should not exceed 5. To be certain of the number of devices you may connect to
your line as determined by the REN, you should contact your local telephone company.
A plug and jack used to connect this equipment to the premises wiring and telephone
network must comply with the applicable FCC Part 68 rules and requirements adopted
by the ACTA. A compliant telephone cord and modular plug is provided with this
product. It is designed to be connected to a compatible modular jack that is also
compliant. See installation instructions for details.
Notes
* This equipment may not be used on coin service provided by the telephone company.
* Party lines are subject to state tariffs, and therefore, you may not be able to use your
own telephone equipment if you are on a party line. Check with your local telephone
company.
* Notice must be given to the telephone company upon permanent disconnection of
your telephone from your line.
* If your home has specially wired alarm equipment connected to the telephone line,
ensure the installation of this product does not disable your alarm equipment.
If you have questions about what will disable alarm equipment, consult your telephone
company for a qualified installer.
2. Rights of the Telephone Company
Should your equipment cause trouble on your line which may harm the telephone
network, the telephone company shall, when possible, notify you that temporary
discontinuance of service may be required. Where prior notice is not possible and the
circumstances warrant such action, the telephone company may temporarily
discontinue service immediately. In case of such temporary discontinuance, the
telephone company must: (1) promptly notify you of such temporary discontinuance;
(2) afford you the opportunity to correct the situation; and (3) inform you of your right
to bring a complaint to the Commission pursuant to procedures set forth in Subpart E
of Part 68, FCC Rules and Regulations.
The telephone company may make changes in its communication facilities, equipment,
operations or procedures where such action is required in the operation of its
business and not inconsistent with FCC Rules and Regulation. If these changes are
expected to affect the use or performance of your telephone equipment, the phone
company must give you adequate notice, in writing, to allow you to maintain
un-interrupted service.
3
IMPORTANT TELEPHONE COMPANY&
FCC INFORMATION
FCC NOTES
This device complies with Part 15 of the FCC Rules. Operation is subject to the
following two conditions: (1) This device may not cause harmful interference, and (2)
This device must accept any interference received, including interference that may
cause undesirable operation.
WARNING:
Changes or modifications to this unit not expressly approved by the party responsible
for compliance could void the user’s authority to operate the equipment.
NOTE:
This equipment has been tested and found to comply with the limits for a Class B digital
device, pursuant to Part 15 of the FCC Rules. These limits are designed to provide
reasonable protection against harmful interference in a residential installation. This
equipment generates, used in accordance with the instructions, may cause harmful
interference to radio communication. However, there is no guarantee that interference
will not occur in a particular installation. If this equipment does cause harmful
interference to radio or television reception, which can be determined by turning the
equipment of f and on, the user is encouraged to try to correct the interference by one
or more of the following measures:
- Reorient or relocate the receiving antenna.
- Increase the separation between the equipment and receiver.
- Connect the equipment into an outlet on a circuit different from that to which the
receiver is connected.
- Consult the dealer or an experienced radio / TV technical for help.
Thank you for purchasing an Emerson phone product, Your Emerson telephone is
designed to provide many years or trouble free performance .Please follow the safety
and operating instructions below.
CAUTION: When using telephone equipment ,
there are basic safety instructions that should
always be followed .Refer to the IMPORTANT
SAFETY INSTRUCTIONS provided with this
product and save them for future reference.
4
CONNECTING YOUR TELEPHONE
HANDSET
WALL JACK
REAR
Connect the straight line cord to the
jack at the REAR of the telephone
and WALL JACK
5
Connect the coil cord to the jacks
at the bottom of the HANDSET
and side of the TELEPHONE
CHECKING THE PACKAGE CONTENTS
As you unpack this set, make sure you have the following items in the package.
HANDSET
TELEPHONE BASE
COILED HANDSET CORD
WALL MOUNT ADAPTOR
(attached to the back of the
base for wall mounting)
STRAIGHT TELEPHONE
LINE CORD
POWERING THE PHONE
Before you connect the phone cords, follow these steps to install the batteries:
1. Insert a flat blade screwdriver or coin into the slot and pry out (lift) the battery
door (FIG. 1).
2. Insert 3 size “AA” alkaline batteries as shown inside the battery compartment (FIG. 2).
3. Replace the battery door and snap it shut (FIG.3)
FIG.1
FIG.2
FIG.3
CAUTION
Replace the batteries when the low battery indicator
appears in the display.
When the batteries are dead, the display will still function, and you can still make
or receive calls, but you can’t use the Caller ID or memory dialing.
When the batteries are dead, your date and settings could be erased.
6
OPTIONS MENU
To enter the Options Menu:
1. Press and hold the dial/menu button until “Options Menu” is shown in the display.
2. Use the up/down buttons to scroll through the options below, and press the dial/menu
button to select the desired option you wish to set:
• Set Language
• Local Area Code
• Set Time/Date
• Set Flash Time
• LED Contrast
• Set Tone/Pulse
• Exit Options
3. Use the up/down buttons to adjust the setting, and press the dial/menu button to confirm
and set.
NOTE: It is important to set the Area code so that the telephone can distinguish local or long
distance calls when dialing from the Caller ID list.
NOTE: Time and Date will automatically set when you recieve the first or second Caller ID
phone call.
VOLUME CONTROL AND RINGER SETTINGS
Adjust the handset volume
Slide the HANDSET VOLUME control to NORM or LOUD
Adjust the speakerphone
volume
Slide the SPEAKERPHONE VOLUME control: MIN/MAX
(on the right side of the phone).
Adjust the ringer level
HI - Rings loud on incoming calls.
LO - Ring volume is lowered on incoming calls.
OFF - No ringing on incoming calls.
MAKING CALLS
1. Pick up the handset or press the speaker button to get a dial tone.
2. Dial your call.
3. To end the call, replace the handset on the base or press the speaker button again.
ANSWERING CALLS
1. After the phone rings, pick up the handset or press the speaker button.
2. To end the call, replace the handset on the base or press the speaker button again.
HOLD FUNCTION
Press the hold button to temporarily put a caller on hold without disconnecting the call.
FLASH
Use the flash button for Call Waiting and Three Way Calling services.
NOTE: Call Waiting and Three Way Calling are services provided by your local telephone
company.
LAST NUMBER REDIALING
1. Pick up the HANDSET or press the speaker button.
2. Press the redial button. The last dialed number appears in the display and is
automatically dialed.
7
PAUSE FUNCTION
Example: In an office where you need to dial a 9 first to get an outside line.
Dial the number 9 and press the redial button, and then dial the phone number. You will
see a “P” displayed for pause. You may also store this into memory.
STORING PHONE NUMBERS INTO MEMORY
1. Press the store button, “Store Number” will be shown in the display.
2. Dial the phone number you want to store.
3.
For (3) one-touch dialing:
.
For (10) two-touch dialing:
Press one of the 3 one-touch
Press the memo button, and then press one of
speed dial buttons (M1 to M3). the dialing keys (0 to 9) to store a phone number in.
4. The stored number and the location will be shown in the display.
5. Repeat steps 1 to 4 to store numbers into other memory locations.
NOTE: When the batteries are dead or removed for more than five minutes, the stored
numbers may be erased.
MEMORY DIALING
1. Pick up the handset or press the speaker button.
2.
For (3) one-touch dialing:
For (10) two-touch dialing:
Press one of the 3 one-touch
Press the memo button, and then press one of
speed dial buttons (M1 to M3). the dialing keys (0 to 9).
3. The phone will dial the number you stored into that memory.
BOOK
To store phone numbers in your telephone’s Phone Book:
1. Press the book button.
2. Use the up or down buttons to choose “ADD”.
3. Press the book button to confirm.
4. Enter the information using the keypad and the up/down buttons, and press the book
button to confirm.
To look up stored phone numbers:
1. Press the book button.
2. Choose “SEARCH” and press the book button.
2. Use the up/down buttons to search entries.
NOTE: To delete an entry, press the delete button twice.
8
CALLER ID SYSTEM
This telepphone automatically displays an incoming caller’s name and telephone number
together with the date and time of the call. It records up to 60 calls and stores the data in
Memory.
IMPORTANT: You must subscribe to the Caller ID service from your local telephone
company to utilize this feature.
VIEWING THE CALLER ID LIST
You can look through the data (calls) in the Caller ID list to check the numbers and names
of the calls received.
1. Press the down button to view your calls from the newest call.
2. Press the up button to view calls from older calls to newer ones.
NOTE: When the batteries are weak, the low battery indicator
is displayed. Change
the batteries as soon as possible; otherwise the Caller ID list may be erased.
CALLING BACK FROM THE CALLER ID LIST
1. Display the phone number you want to call back using the up or down button.
2. Press the dial/menu button.
3. Pick up the handset or press the speaker button, the phone will dial the number
displayed.
STORING THE PHONE NUMBERS FROM THE CALLER ID LIST
1. Display the phone number you want to store.
2. Press the store button
3.
For (3) one-touch dialing:
For (10) two-touch dialing:
Press one of the 3 one-touch
Press the memo button, and then press one of
speed dial buttons (M1 to M3). the speed dial memories (0 to 9).
DELETING THE DATA FROM THE CALLER ID LIST
To delete the Caller ID memory one by one
’
1. Display the call you want to delete.
2. Press the delete button, the display will show “DELETE CALL?”, press the delete
button once more, the display changes to show the next or previous call, and the data is
deleted.
To delete ALL the Caller ID memories
1. When the phone is not in use, press the delete button and hold for 3 seconds, the
display shows “DELETE ALL?”
2. Press the delete button once more, the display changes to “NO CALLS” and all the
Caller ID memories (including the new call memories) are deleted.
9
TROUBLESHOOTING
PROBLEMS
CHECK
The Caller ID display does not
show the caller’s information.
The Caller ID unit will not function until you have
subscribed to Caller ID service from your local
telephone company. Call your local telephone
company to have Caller ID service installed on your
phone line. Check your phone line connections.
Also, fresh batteries MUST be installed. Make sure
all your phone line connections are secure and
correct.
If it is a private call or a blocked call, the caller’s
name and/or phone number will not appear in
the display. (You will see time & date of call plus
some dashes or the words “UNAVAILABLE” or
“PRIVATE CALL”.)
No dial tone.
Is any plug disconnected from the modular phone
jack ?
Is any jack improperly wired? Use another phone to
test the jack.
Phone does not work.
Are all cords connected properly? Are all 3 “AA”
batteries installed? Make sure they are installed
according to the polarity shown.
Phone does not ring.
RINGER may be set to OFF?
Slide to HI or LO position.
Cannot dial.
Check the menu TONE / PULSE setting.
You may only have PULSE service. Set TONE/
PULSE to the PULSE setting.
Cannot store numbers into
memory.
No batteries are installed or batteries are weak or
installed up-side-down.
Caller ID does not work.
The Caller ID display gets dim
or is blank.
Make sure the Caller ID service is active.
Check if the phone is connected to a working wall
jack. Check if all line cord connections are correct
and secure.
Reset the contrast level of the LCD display .
Check if batteries are properly installed.
Check if you have received the first Caller ID
record. If you have received the first Caller ID
record, your batteries may be weak.
Make sure the handset coil cord is connected
Static noise on line or cannot
hear calling party or calling party properly,or replace the handset coil cord.
cannot hear you.
10
TROUBLESHOOTING
PROBLEMS
LINE REDIAL does not work.
Feedback or squealing when
using SPEAKERPHONE.
CHECK
Check if “P” shows in the display. Since the redial
button has combined function (pause function), the
phone may have been paused. Just press the
HOOK switch.
Volume is too high. Reduce the SPEAKERPHONE
VOLUME control setting.
Cannot erase all records in
memory
To erase ALL call records, make sure the phone
is not in use, press the delete button and hold
for 3 seconds, the display will show “DELETE
ALL?”, press the delete button again.
Caller ID displays words like
CO IS IS ZONE,CODIGO
C
DE AREA
or HORA or APPEL or TEMPS.
Your language is set for French or Spanish. Refer
to page 7 “ Options Menu” to change the language
setting to English
Memory Dialing does not work.
Check if you have stored the numbers correctly
by pressing that memory location button(s). Also
numbers can only be stored when fresh batteries
are installed correctly
Handset falls out of phone
base when wall mounted.
Handset clip was not installed properly for wall use.
Caller’s information is not
registered to the Caller ID
memory.
The caller may have an unlisted or blocked number
to prevent Caller ID identification, or it may be an
overseas call or you may have noise on the line
during that call.
Message Waiting does not
work.
Check with your telephone company
if this service
.
is available and if you have subscribed for it.
Pressing a memory button
does not display number.
Your memory button has no stored number .
Please store the number again. Press the store
button, dial the number and press the memory
locations you want.
11
Southern Telecom TM LIMITED WARRANTY
In the unlikely event that this product is defective, or does not perform properly , you may within ninety
(90) days from your original date of purchase return it to the authorized service center for repair or
exchange.
TO OBTAIN WARRANTY SERVICE:
- Provide proof of the date of purchase within the package (Dated bill of sale)
- Prepay all shipping costs to the authorized service center, and remember to insure your return.
- Include a return shipping address (no P.O. Boxes), a telephone contact number, and the
defective unit within the package. Describe the defect or reason you are returning the product.
Your product will be repaired or replaced, at our option, for the same or similar model of equal value
if examination by the service center determines this product is defective. Products received damaged,
as a result of shipping will require you to file a claim with the carrier.
The shipping address of the authorized service center is:
Southern Telecom Inc.
ATTN: Returns Department
14-C 53rd Street
Brooklyn, NY 11232
Should you have any questions or problems concerning this product, please contact our customer
service department via email at [email protected].
To obtain service after the warranty period, please email [email protected] with product
information, date of purchase and nature of the problem. Customer service will reply to the email with
service instructions.
Warranty service not provided
This warranty does not cover damage resulting from accident, misuse, abuse, improper installation or
operation, lack of reasonable care, and unauthorized modification.
This warranty is voided in the event any unauthorized person opens, alters or repairs this product.
All products being returned to the authorized service center for repair must be suitably packaged.
Limitation of Warranty:
• THE WARRANTY STATED ABOVE IS THE ONLY WARRANTY APPLICABLE TO THIS PRODUCT.
ALL OTHER WARRANTIES, EXPRESS OR IMPLIED (INCLUDING ALL IMPLIED WARRANTIES
OF MERCHANTABILITY OR FITNESS FOR A PARTICULAR PURPOSE) ARE HEREBY
DISCLAIMED. NO VERBAL OR WRITTEN INFORMATION GIVEN BY SOUTHERN TELECOM INC.
IT’S AGENTS, OR EMPLOYEES SHALL CREATE A GUARANTY OR IN ANY WAY INCREASE THE
COPE OF THIS WARRANTY.
• REPAIR OR REPLACEMENT AS PROVIDED UNDER THIS WARRANTY IS THE EXCLUSIVE
REMEDY OF THE CONSUMER, SOUTHERN TELECOM INC. SHALL NOT BE LIABLE FOR
INCIDENTAL OR CONSEQUENTIAL DAMAGES RESULTING FROM THE USE OF THIS PRODUCT
OR ARISING OUT OF ANY BREACH OF ANY EXPRESS OR IMPLIED WARRANTY ON THIS
PRODUCT. THIS DISCLAIMER OF WARRANTIES AND LIMITED WARRANTY ARE GOVERNED
BY THE LAWS OF THE STATE OF NEW YORK. EXCEPT TO THE EXTENT PROHIBITED BY
APPLICABLE LAW, ANY IMPLIED WARRANTY OF MERCHANTABILITY OR FITNESS FOR A
PARTICULAR PURPOSE ON THIS PRODUCT IS LIMITED TO THE APPLICABLE WARRANTY
PERIOD SET FORTH ABOVE.
• SOME STATES DO NOT ALLOW THE EXCLUSION NOR LIMITATION OF INCIDENTAL,
CONSEQUENTIAL DAMAGES, OR LIMITATIONS ON HOW LONG AN IMPLIED WARRANTY LASTS
SO THE ABOVE LIMITATIONS OR EXCLUSION MAY NOT APPLY TO YOU.
THIS WARRANTY GIVES YOU SPECIFIC LEGAL RIGHTS, AND YOU ALSO MAY HAVE OTHER
RIGHTS THAT VARY FROM STATE TO STATE.
Manufactured by: AIT Inc., Brooklyn NY, 11232
Emerson and the G-Clef logo are registered trademarks of Emerson Radio Corp.,
Parsippany, New Jersey USA