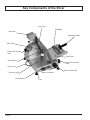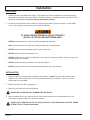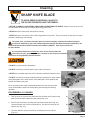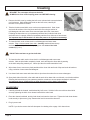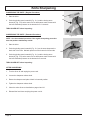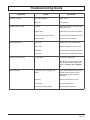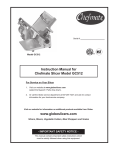
1
Model #: Serial #: Model C10 Instruction Manual for Globe Chefmate Slicer Models C9, C10, and C12 For Service on Your Slicer 1. Visit our website at www.globeslicers.com (select the Support / Parts drop down). 2. Or call the Globe service department at 937-297-7247 and ask for contact information for your local service company. Visit our website for information on additional products available from Globe. www.globeslicers.com Slicers, Mixers, Countertop Cooking Equipment, Meat Choppers & Scales - IMPORTANT SAFETY NOTICE This manual contains important safety instructions which must be strictly followed when using this equipment. Index ATTENTION OWNERS AND OPERATORS....................................................................................................... 3 KEY COMPONENTS OF THE SLICER............................................................................................................. 4 GLOBE CHEFMATE SLICER SAFETY TIPS..................................................................................................... 5 INSTALLATION.................................................................................................................................................. 6-7 OPERATING INSTRUCTIONS........................................................................................................................... 8 CLEANING......................................................................................................................................................... 9-10 KNIFE SHARPENING........................................................................................................................................ 11-12 SIMPLE MAINTENANCE AND REPAIR............................................................................................................. 13-14 TROUBLESHOOTING GUIDE........................................................................................................................... 15 LIMITED SLICER WARRANTY.......................................................................................................................... 16 GLOBE FOOD EQUIPMENT CO. 2153 DRYDEN RD. DAYTON, OH 45439 Toll Free: 800-347-5423 PHONE: 937-299-5493 FAX: 937-299-4147 E-MAIL: [email protected] WEBSITE: www.globeslicers.com © Globe Food Equipment Company, 2010 Printed in the U.S.A. Page 2 7-2010 Attention Owners and Operators Globe’s equipment is designed to provide safe and productive processing of food products as long as the equipment is used in accordance with the instructions in this manual and is properly maintained. Importantly, unless the operator is adequately trained and supervised, there is a possibility of serious injury. Owners of this equipment bear the responsibility to make certain that this equipment is used properly and safely, strictly following all the instructions contained in this manual and the requirements of local, state or federal law. Owners should not permit anyone to touch this equipment unless they are over 18 years old, are adequately trained and supervised and have read and understood this manual. Owners should also ensure that no customers, visitors or other unauthorized personnel come in contact with this equipment. Please remember that Globe cannot anticipate every circumstance or environment in which its equipment will be operated. It is the responsibility of the owner and the operator to remain alert to any hazards posed by the function of this equipment, particularly the sharp knife blade and all moving parts. If you are uncertain about a particular task or the proper method of operating this equipment, ask your supervisor. This manual contains a safety tips section listing a number of precautions to follow to help promote safe use of this equipment. Throughout the manual you will see additional warnings to help alert you to potential hazards. Warnings affecting your personal safety are indicated by: or Warnings related to possible damage to the equipment are indicated by: Make certain the instruction manual is available for easy reference by any operator. Globe has put a warning label in the English language on its slicers. Spanish warning labels are available upon request to Globe. If the warning label or manual becomes misplaced, damaged, illegible or if you require additional copies, please contact your nearest representative or Globe directly. Please remember that this manual or the warnings do not replace the need to be alert, to properly train and supervise operators and to use common sense when using this equipment. Page 3 Key Components of the Slicer Knife Cover Endweight Sharpener Endweight Handle Slicer Table Knife Cover Release Knob Food Chute Slice Deflector Food Chute Release Knob Power Cord Model C10 Shown Receiving Area On/Off Switch Page 4 Feet Slice Thickness Dial Globe Chefmate Slicer Safety Tips SHARP KNIFE BLADE TO AVOID SERIOUS PERSONAL INJURY: • NEVER touch this slicer without training and authorization from your supervisor or if you are under 18 years old. Read this instruction manual first. • ONLY install the slicer on a level nonskid surface that is nonflammable and is located in a clean, well-lighted work area away from children and visitors. • ALWAYS ground slicer utilizing proper power source. • NEVER TOUCH KNIFE. Keep hands and arms away from all moving parts. • NEVER OPERATE the slicer without the knife cover securely installed. • NEVER put hand into the chute arm opening on the right side of the slicer. • ONLY USE FOOD CHUTE HANDLE to push food chute during slicing. • ONLY USE THE ENDWEIGHT, NOT YOUR HAND, to hold food products when slicing. Never put your hand on or around food chute when slicer is on. • DO NOT CATCH SLICES WITH YOUR HAND. Let slices drop onto the receiving area. • BEFORE CLEANING, SHARPENING, SERVICING, OR REMOVING ANY PARTS, always turn the slicer off, turn the slice thickness dial clockwise until it stops, remove the food chute and unplug the power cord. • USE ONLY GLOBE CHEFMATE SLICER ACCESSORIES properly installed. Page 5 Installation UNPACKING 1. Unpack the slicer immediately after receipt. If the machine is found to be damaged, save the packaging material and contact the carrier within fifteen (15) days of delivery. Immediately contact your source of the equipment. You have no recourse to damage after fifteen (15) days. 2. You should receive with the slicer, rubber feet, warranty card, and an instruction manual. Contact Globe or your local supplier if you did not receive all of these materials. TO AVOID SERIOUS PERSONAL INJURY PROPERLY INSTALL SLICER IN ADEQUATE WORK AREA • ALWAYS install equipment in a work area with adequate light and space. • ONLY operate the slicer on a solid, level, nonskid surface that is nonflammable. • NEVER operate slicer with a damaged power cord or power plug. • NEVER operate slicer with an extension cord. • NEVER bypass, alter, or modify this equipment in any way from its original condition. Doing so may create hazards and will void warranty. • NEVER operate slicer without the knife cover securely installed. • NEVER operate slicer without the warning label attached (see page 4 for location). INSTALLATION 1. Read this manual thoroughly before installation and operation. DO NOT proceed with installation and operation if you have any questions or do not understand anything in the manual. Contact your local representative or Globe first. 2. Remove the slicer from the corrugated box. 3. Make sure the rubber feet are firmly tightened. NEVER USE SLICER WITHOUT RUBBER FEET INSTALLED. 4. Select a location for the slicer that has a level, solid, nonskid surface that is nonflammable and is in a well-lit work area that is away from children and visitors. USE AT LEAST TWO PEOPLE TO LIFT THE SLICER UP TO THE OPERATING LOCATION. NEVER ATTEMPT TO LIFT THE SLICER ALONE. Page 6 Installation THIS MACHINE IS PROVIDED WITH A THREE-PRONG GROUNDING PLUG. THE OUTLET TO WHICH THIS PLUG IS CONNECTED MUST BE PROPERLY GROUNDED. IF THE RECEPTACLE IS NOT THE PROPER GROUNDING TYPE, CONTACT AN ELECTRICIAN. DO NOT UNDER ANY CIRCUMSTANCES CUT OR REMOVE THE THIRD GROUND PRONG FROM THE POWER CORD OR USE ANY ADAPTER PLUG (Fig. 7-1 and Fig. 7-2). 5. Inspect the slicer to ensure all parts have been provided. 6. Make sure the knife cover and knife sharpener are in place. 7. Make sure the warning label is properly positioned and legible and the instruction manual is available near the slicer. 8. Complete warranty card and mail to Globe or register online at www.globeslicers.com/warranty.asp. 9. Clean the slicer using the procedures outlined in the cleaning section (pages 9 and 10) prior to using the slicer. 10. Contact your local representative or Globe directly if you have any questions or problems with the installation or operation of this slicer. Figure 7-1 Correct Figure 7-2 INCORRECT Page 7 Operating Instructions SHARP KNIFE BLADE TO AVOID SERIOUS PERSONAL INJURY: • NEVER touch this slicer without training and authorization from your supervisor or if you are under 18 years old. Read this instruction manual first. • NEVER operate the slicer without the knife cover securely installed. Keep hands and arms away from all moving parts. • ONLY USE THE ENDWEIGHT HANDLE to push the food chute during slicing. • ONLY USE THE ENDWEIGHT HANDLE, NOT YOUR HAND, to hold food products when slicing. Never put your hand on or around food chute when slicer is on. • DO NOT CATCH SLICES WITH YOUR HAND. Let slices drop onto the receiving area. • BEFORE CLEANING, SHARPENING, SERVICING OR REMOVING ANY PARTS, always turn slicer off, turn the slice thickness dial clockwise until it stops, unplug power cord and remove food chute. SLICER OPERATION 1. With the slicer turned off, pull the food chute completely towards you and place the food product onto the food chute. Slice only boneless, unfrozen product with the slicer. Use the endweight to hold the food product in place. 2. Make sure all knobs are tightened prior to using the slicer. 3. Rotate the slice thickness dial counterclockwise to the desired slice thickness. After slicing is complete, always turn the slice thickness dial clockwise until it stops to close the slicer table. 4. Turn slicer on. DO NOT hold the food product with your hand. CAUTION: Always be aware of where you put your hands when operating the slicer. The endweight handle is the only part of the slicer you should touch while slicing. 5. Use the endweight handle to manually push the food chute back and forth. The endweight handle is the only part of the slicer you should touch while slicing. Do not catch slices with your hand. Let slices drop onto the receiving area. If a product needs to be adjusted during slicing, ALWAYS pull the endweight all the way towards you, turn the slicer off and close the slicer table prior to adjusting the product and the endweight. 6. After the last slice stroke, pull the food chute all the way towards you. Turn the slicer off and turn the slice thickness dial clockwise until it stops to close the slicer table. 7. Now you can unload and load food product from the food chute. Page 8 Cleaning SHARP KNIFE BLADE TO AVOID SERIOUS PERSONAL INJURY TO THE SLICER OPERATOR AND CUSTOMERS: • BEFORE CLEANING, SHARPENING, SERVICING OR REMOVING ANY PARTS, always turn slicer off, turn the slice thickness dial clockwise until it stops and unplug power cord. • NEVER attempt to clean slicer with the knife running. • NEVER attempt to remove the knife or knife ring guard from the slicer. They must remain on the slicer for proper operation, sharpening, and cleaning. The entire slicer, including removable parts, must be thoroughly cleaned and sanitized using the procedures identified by your local health department and the ServSafe Essentials published by the National Restaurant Association Educational Foundation (NRAEF). Visit www.servsafe.com for more details. It is extremely important to sanitize the slicer and to closely follow the instructions on your quaternary sanitizer container to ensure proper sanitation is achieved to kill potentially harmful bacteria. • DO NOT put components in dishwasher. Figure 9-1 • DO NOT hose down, pressure wash or pour water on the slicer. • NEVER use a scrubber pad, steel wool or abrasive material to clean the slicer. • DO NOT use bleach, products containing sodium hypochlorite or other caustic/ strong detergents on the slicer base or removable parts. These products will discolor and destroy the parts. Slicer components are easily disassembled without the use of special tools. It may be desirable to wear non-cutting safety gloves during the cleaning operation. Figure 9-2 DISASSEMBLY & CLEANING 1. Turn the slicer off, turn the slice thickness dial clockwise until it stops so the table covers the knife’s edge and unplug the power cord. 2. Remove the food chute by rotating the food chute release knob (Fig. 9-1) counterclockwise until it comes completely off. Pull the food chute off the support arm (Fig. 9-2). 3. The slice deflector can be removed by loosening the screw knobs #1 (Fig. 9-3). #1 #2 Figure 9-3 Page 9 Cleaning BE ALERT. The next steps will expose the knife. ALWAYS turn slicer off and unplug power cord BEFORE cleaning. 4. Remove the knife cover by rotating the knife cover release knob counterclockwise until it releases. While holding the knobs on the knife cover, carefully lift the knife cover upward to remove. 5. Take the food chute and knife cover to a three compartment sink. Soak, clean and scrub all surfaces of the food chute and knife cover using a solution of mild detergent and warm water. Rinse removed parts with fresh, clean water. Following the instructions on your quaternary sanitizer label, soak the food chute and knife cover in a proper solution of quaternary sanitizer for a minimum of two minutes. An important step to kill bacteria is to allow the parts to air dry before reassembly! 6. To clean the knife, soak a clean cloth in a mild detergent and warm water solution. Ring out excess water from cloth. Carefully wash and rinse the top and bottom (underside) of the knife by wiping from the center of the knife outward (Fig. 10-1). Figure 10-1 DO NOT allow moisture to get into knife hub. 7. To clean the slicer table, soak a clean cloth in a mild detergent and warm water solution. With the slicer table completely closed, scrub and wipe the slicer table by starting at the knife and pulling towards you. Never wipe the slicer table towards the knife. 8. Wipe down slicer to remove any food particles with a clean cloth and brush. Wipe and scrub all surfaces using a solution of warm water and detergent. 9. Use clean fresh warm water and clean cloth to wipe down the entire slicer to remove detergent. 10. Spray both sides of the knife, slicer table and the entire slicer base with a non-bleach, non-chlorine sanitizer following the instructions on your quaternary sanitizer container to ensure proper sanitation is achieved. An important step to kill bacteria is to allow the parts to air dry before reassembly! REASSEMBLY 1. Carefully reinstall the cleaned, sanitized and dry knife cover. Hold the knife cover with one hand while securely tightening the knife cover release knob with the other hand. 2. Place the cleaned, sanitized, and dry food chute back onto the chute arm. Tighten the food chute release knob securely to prevent any “play” between the food chute and the chute arm. 3. Plug in power cord. NOTE: If you wish to remove the knife sharpener for cleaning refer to page 14 for instructions. Page 10 Knife Sharpening SHARP KNIFE BLADE TO AVOID SERIOUS PERSONAL INJURY: • NEVER touch rotating knife. • ALWAYS keep hands clear of all moving parts. • ALWAYS turn the slicer off, turn the slice thickness dial clockwise until it stops and remove the food chute before sharpening. • NEVER sharpen slicer unless all guards are installed. WHEN AND HOW OFTEN TO SHARPEN THE KNIFE 1. Symptoms of a dull knife are excess waste or a “tail” on the unsliced portion remaining in the food chute. 2. The knife needs to be sharpened periodically to provide consistent slices and maximum food product yield. Sharpening the knife lightly every few days is more effective than heavy sharpening at less frequent intervals. PREPARING TO SHARPEN 1. Turn the slicer off and turn the slice thickness dial clockwise until it stops so the slicer table covers the knife’s edge. 2. Remove food chute from the slicer. 3. Clean and dry both sides of the knife before sharpening, following instructions for knife cleaning on pages 9 and 10. 4. Loosen the sharpener release knob by turning it counterclockwise several times (Fig. 11-1). Figure 11-1 BE ALERT. The next step will expose the knife. 5. Lift the sharpener cover up (Fig. 11-1), rotate it clockwise (Fig. 11-2) and lower it into position with the knife fitting between the two stones (Fig. 11-3). 6. Tighten the sharpener release knob (Fig. 11-1) to secure the sharpener. Figure 11-2 Figure 11-3 Page 11 Knife Sharpening SHARPENING THE KNIFE - (Regular Procedure) #2 1. Start the slicer. #1 2. Push the grinding stone button #2 (Fig. 12-1) and the honing stone button #3 (Fig. 12-2) at the same time so both stones make contact with the knife. Maintain pressure on the buttons for 5-10 seconds. TURN SLICER OFF before inspecting. SHARPENING THE KNIFE - (Extended Procedure) Figure 12-1 NOTE: Use the extended procedure if the regular sharpening procedure does not produce satisfactory results. 1. Start the slicer. 2. Push the grinding stone button #2 (Fig. 12-1) so the stone sharpens the back side of the knife. Maintain pressure on the button for 30 seconds. 3. Push the grinding stone button #2 (Fig. 12-1) and the honing stone button #3 (Fig. 12-2) at the same time so both stones make contact with the knife. Maintain pressure on the buttons for 5 seconds. TURN SLICER OFF before inspecting. AFTER SHARPENING 1. Turn the slicer off and unplug the power cord. 2. Loosen the sharpener release knob. 3. Rotate the sharpener and place it back in its stored position. 4. Tighten the sharpener release knob. 5. Clean the entire slicer as described on pages 9 and 10. 6. Reinstall the food chute and plug the power cord in. Page 12 #3 Figure 12-2 Simple Maintenance and Repair SHARP KNIFE BLADE TO AVOID SERIOUS PERSONAL INJURY: • ALWAYS turn off slicer and unplug slicer before servicing. • NEVER touch this slicer without training and authorization from your supervisor. • ALWAYS keep hands clear of rotating knife and moving parts. • DO NOT tamper with, bypass, or remove any safety devices, guards or switches. • ALWAYS turn off slicer and turn slice thickness dial completely clockwise after each use. LUBRICATION Various slicer parts need to be lubricated periodically using Globe oil. Globe oil is a light, tasteless, odorless mineral oil that will not contaminate or impart odors or taste to sliced food products. DO NOT USE VEGETABLE OIL TO LUBRICATE SLICER. VEGETABLE OIL WILL DAMAGE THE SLICER! Food Chute Slide Rod It is necessary to lubricate the food chute slide rod with Globe oil if the food chute becomes difficult to push. 1. Close the slicer table, unplug the slicer and remove the food chute. 2. Tilt the slicer on its end. Remove the feet and bottom enclosure to access the round slide rod. 3. Put several drops of Globe oil on the round slide rod (Fig. 13-1) towards the top of the rod. Slide Rod 4. Reattach bottom enclosure and feet before tilting the slicer back to its normal position. 5. Push the food chute arm back and forth several times to distribute the oil onto the slide rod. 6. Reinstall the food chute. Figure 13-1 7. Plug the slicer in. Page 13 Simple Maintenance and Repair DO NOT USE VEGETABLE OIL TO LUBRICATE SLICER. VEGETABLE OIL WILL DAMAGE THE SLICER! Sharpener Shafts It is necessary to lubricate the sharpener shafts with Globe oil weekly. 1. Loosen the sharpener release knob and pull the sharpener up to remove it (Fig. 14-1). 2. Put several drops of Globe oil on the shaft behind each sharpening stone (Fig 14-2). Main Shaft Sharpener Release Knob Figure 14-1 3. Push both sharpener buttons a couple of times to distribute the oil onto the shafts. 4. Put several drops of Globe oil on the main shaft (Fig. 14-1), place the sharpener back into position and tighten the sharpener release knob. 5. Wipe off any excess oil that drips onto the slicer. NOTE: The sharpener and stones can be cleaned with warm water and a brush. Allow it to air dry. If the sharpener or stones are cleaned it is very important that all sharpener shafts are lubricated with Globe oil afterwards! Figure 14-2 Shafts Endweight Slide Rod The endweight slide rod should be lubricated weekly or when excessive drag is felt with a few drops of Globe oil. Endweight Slide Rod 1. Apply a few drops of Globe oil to the slide rod (Fig. 14-3). 2. Slide the endweight up and down to distribute the oil. Figure 14-3 Globe recommends that an authorized Globe service company perform all adjustments and major maintenance. By adequately maintaining your slicer, it will provide years of dependable service. Page 14 Troubleshooting Guide SYMPTOM Slicer will not start Ragged cuts-poor yield Metal rubbing knife Hard to push food chute CAUSE SOLUTION Slicer not plugged in Plug in slicer Switch off Turn switch on Dull knife Sharpen knife-make sure knife and stones are clean Chipped knife Sharpen or have new knife installed Knife-slicer table gap too wide Call for service to adjust slicer table Knife too small Have a new knife installed Knife cover Tighten knife cover release knob Food chute Tighten or adjust food chute knob Endweight Have defective endweight replaced Slicer table Call for service to adjust slicer table No lubrication Turn off and unplug unit. Take off feet, bottom enclosure and lubricate slide rod thoroughly with Globe oil. DO NOT use vegetable oil! Hard to sharpen Stones dirty, wet or clogged with grease Clean stones with warm water and a brush. Allow stones to air dry. Lubricate shafts with Globe oil afterwards. Knife dirty Clean top and bottom of knife Worn stones Have stones replaced Stones not properly aligned Have sharpener adjusted Page 15 Limited Slicer Warranty Globe Food Equipment Company (“GFE”) warrants to the original purchaser of new equipment that said equipment, when installed in accordance with our instructions within North America and subjected to normal use, is free from defects in material or workmanship for a period of 1 year from installation or 18 months from actual shipment date, whichever date occurs first. THIS WARRANTY IS IN LIEU OF ALL OTHER WARRANTIES, WHETHER EXPRESSED OR IMPLIED. GFE EXPRESSLY DISCLAIMS ANY IMPLIED WARRANTY OF MERCHANTABILITY OR EXPRESSED OR IMPLIED WARRANTY OF FITNESS FOR A PARTICULAR PURPOSE. GFE’S OBLIGATION AND LIABILITY UNDER THIS WARRANTY IS EXPRESSLY LIMITED TO REPAIRING AND REPLACING EQUIPMENT WHICH PROVES TO BE DEFECTIVE IN MATERIAL OR WORKMANSHIP WITHIN THE APPLICABLE WARRANTY PERIOD. All repairs pursuant to this Warranty will be performed by an Authorized Designated GFE Service Location during normal working hours. IN NO EVENT SHALL GFE BE LIABLE FOR INCIDENTAL OR CONSEQUENTIAL DAMAGES TO BUYER OR ANY THIRD PARTY, INCLUDING, WITHOUT LIMITATION, LOSS OF PROPERTY, PERSONAL INJURY, LOSS OF BUSINESS OR PROFITS OR OTHER ECONOMIC LOSSES, OR STATUTORY OR EXEMPLARY DAMAGES, WHETHER IN NEGLIGENCE, WARRANTY, STRICT LIABILITY, OR OTHERWISE. This warranty is given only to the first purchaser from a retail dealer. No warranty is given to subsequent transferees. This warranty does not cover product failures caused by: failure to maintain, neglect, abuse, damage due to excess water, fire, normal wear, improper set up and use. Periodic maintenance including lubrication and sharpening are not covered. This warranty is not in force until such time as a properly completed and signed installation/warranty registration or an online registration form has been received by GFE within 30 days from the date of installation. Register online at www.globeslicers.com/warranty.asp. THE FOREGOING WARRANTY PROVISIONS ARE A COMPLETE AND EXCLUSIVE STATEMENT BETWEEN THE BUYER AND SELLER. GFE NEITHER ASSUMES NOR AUTHORIZES ANY PERSONS TO ASSUME FOR IT ANY OTHER OBLIGATION OR LIABILITY IN CONNECTION WITH SAID EQUIPMENT. Example of items not covered under warranty, but not limited to just these items: Page 16 1. 2. 3. 4. 5. 6. 7. 8. 9. Acts of God, fire, water damage, burglary, accident, theft. Freight damage. Improper installation or alteration of equipment. Use of generic or after market parts. Repairs made by anyone other than a GFE designated servicer. Lubrication. Expendable wear parts, knife, stones, rubber boots, blown fuses, lamps. Cleaning of equipment. Misuse or abuse.