1
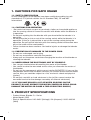
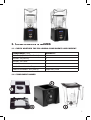
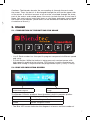
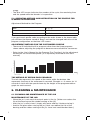
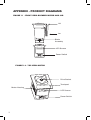
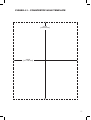
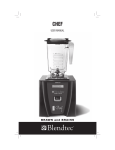
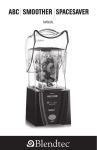
Q-SERIES
MANUAL
User’s Manual for the Blender Q-Series
Table of Contents
Cautions for Safe Usage. . . . . . . . . . . . . . . . . . . . . . . . . . . . . . . . . 4
Product Specifications. . . . . . . . . . . . . . . . . . . . . . . . . . . . . . . . . . 4
Components & Names. . . . . . . . . . . . . . . . . . . . . . . . . . . . . . . . . . 5
Installation & Cautions . . . . . . . . . . . . . . . . . . . . . . . . . . . . . . . . . . 6
Usage. . . . . . . . . . . . . . . . . . . . . . . . . . . . . . . . . . . . . . . . . . . . . . . . . 7
Cleaning & Maintenance . . . . . . . . . . . . . . . . . . . . . . . . . . . . . . . . 8
Warranty & Trouble Shooting. . . . . . . . . . . . . . . . . . . . . . . . . . . . . 9
Appendix – Product Diagrams (Designs) ��������������������������������� 12
2
3
1. CAUTIONS FOR SAFE USAGE
1-1. SAFETY CERTIFICATION
All the components of the blender have been certified according to such
standards as ETL (which satisfies the UL Standard 763.), CE and NSF
International
R
1-2. CAUTIONS FOR OPERATION
• . Be careful not to put any part of your body, clothes or household appliance
into the running socket or come into contact with blades while the blender is
in operation.
• Do not put anything into the blender with your hand while the blender is in
operation.
• Do not place the jar into or out of the running socket while the blender is in
operation. (If the jar is placed into or out of the running socket during the
operation, the part which interlocks with the running socket will become worn
out or the motor will be overloaded.)
• Failure to observe above cautions can lead to injuries or damage the blender
motor.
1-3. PREVENTION OF DAMAGES TO THE POWER CORD
• Do not use a damaged cord or plug.
• Do not use an extension cord with the product.
• Always pull out the power cord when changing the location of the blender or
cleaning the blender.
1-4. NEVER REPAIR THE ELECTRONIC UNIT BY YOURSELF.
• You can get shocked when dismantling the motor of the blender.
• You cannot receive the warranted service after you dismantle the motor of
the blender.
• Do not use the components which are not sold by BLENDTEC. (If you use the
components which have not been certified, you cannot receive the warranted
service. Also, you could be subject to a fire, an electric shock and physical
injuries.)
• Do not put a metallic or hard substance in the jar.(You cannot receive the
warranted service for the damage caused by an external substance)
1-5. IF YOU HAVE SPILLED A LOT OF WATER OR SYRUP ON THE
PRODUCT, DO NOT OPERATE THE MOTOR. (WATER OR SYRUP COULD
DAMAGE THE MOTOR OR CAUSE A FIRE OR ELECTRIC SHOCK.)
2. PRODUCT SPECIFICATIONS
• Product Name: Blender Q – Series
• Motor Model: ICB5
• Electric Specifications: 220~240V (Voltage) / 9A (Ampere) / 2000~2200W
(Watt)
4
3. COMPONENTS & NAMES
3-1. CHECK WHETHER THE FOLLOWING COMPONENTS ARE PRESENT.
COMPONENT (unit)
QUANTITY
Main Body (Blender Q – Series)
1
Blender Jar (JAR-2)
1
Blender Jar Cover
1
User’s Manual
1
User’s Manual for the Program
1
Additional Blender Jars (JAR-2)
Separately Sold
3-2. COMPONENT NAMES
5
1 - Built-in Noise-Absorbing Case
5 - Noise-Preventing Case Cover
2 - Lower Case
6 - Lower Case Cover
3 - Noise-Preventing Case
7 - Motor
4 - Jar
• The Blender Q-Series products can be easily assembled or dismantled by
anyone.
(You can assemble or dismantle the products without using any special tool.)
• Visit our Internet homepage (http://aspenkorea.com) in regard to the user’s
manual for assembling or dismantling the products. www.aspnekorea.com
4. INSTALLATION & CAUTIONS
4-1. INSTALLATION ON THE COUNTER (A Stand Type)
• Use the power outlet within 1.2m. (Use one power outlet per one blender.)
• Install the blender on the flat and dry place.
• Avoid a wet place when installing the blender. (For example, avoid the place
next to the sink. Install the blender on the open place to avoid sealing off the
vent of the blender.)
4-2. INSTALLATION ON THE SHELF (An In-Counter Type) (Refer to the
pictures on Page 15 and Page 16.)
• The thickness of the upper part of the shelf must be less than 19mm. (When
the thickness of the upper part of the shelf is more than 19mm, the vent of
the motor can be sealed off.)
• When installing more than two blenders, the distance between the centers of
the blenders must be between 356mm and 406mm.
• Use the power outlet within the distance of 1.2m. (When installing the
blender, use one power outlet for one blender.)
• Install the blender on the flat and dry place.
• Avoid a wet place when installing the blender. (For example, avoid the place
next to the sink.)
6
Cautions: The blender absorbs the surrounding air through the vent under
the motor. Then, the hot air is discharged through the vent on the upper side
of the motor. A sufficient amount of air must be circulated through the lower
part of the motor. and cooled down. You must circulate the hot air and cool it
down. You must not put such light items as vinyl bags and paper cups around
the motor of the blender. (Such items can be absorbed in the motor for the
circulation of the air.)
5. USAGE
5-1. COMPOSITION OF THE BUTTONS FOR USAGE
• 1 to 5: Each number has the specific program composed of different speed
and cycle.
• P-Pulse Button: While the button is being pressed, constant power with
high speed is applied to the mixture. (This button is mainly used when an
additional mixing is required after the programmed cycle (1 to 5) is used.)
5-2. BLUE LCD INDICATING SCREEN
Indication of the CurrentlyEstablished Program
Number of the Current
Usage
The Blender Q-Series products have three basic built-in program profiles.
Multi
Multi-purpose Program Profile
Smoothie
Smoothie Program Profile
Coffee
Coffee Program Profile
• The Blue LCD screen indicates the diagnosis of errors and the number of
7
usage.
• The Blue LCD screen indicates the number of the cycle, the remaining time
and the speed while the blender is in operation.
5-3. OPERATING METHOD AND INSTRUCTION ON THE PROFILE FOR
Q-SERIES APPLICATIONS
Adjustment Method for the Program
Multi
3-P-3
Smoothie
3-P-2
Coffee
3-P-1
If you push each profile code according to the order shown in the above table,
you will hear the buzzer sound of ‘Beep’ and see the changed indication of the
program configuration on the blue LCD screen.
ADJUSTMENT METHOD FOR THE CUSTOMIZED PROFILE
• There are 30 individual built-in programs other than the three programs
shown above, adjusting the program to become more suitable for consumers.
• Refer to the ‘User’s Manual for the Program Plus Functions’ for the adjustment
method for the customized profile. (It is separately attached on the user’s
manual.)
S
P
E
E
D
TIME IN SECONDS
THE METHOD OF SEEING EACH PROGRAM
The left side represents the speed of the motor, while the bottom side
represents the time of the movement in seconds. Example => It moves for 14
seconds in total with the speed shown by the height of the programmed bargraph for each second.
6. CLEANING & MAINTENANCE
6-1.CLEANING AND MAINTENANCE OF THE JAR
MAINTENANCE OF THE JAR
• When the jar is not used, do not put water in the jar. (Water can reduce the
life of the bearing and the rubber-sealing of the jar.)
• After the jar is used, clean it simply with water and dry it before storing it.
• Avoid a hot place when storing the jar. (Heat can reduce the life of the
bearing and the rubber-sealing of the jar, since heat could harden them.)
8
CLEANING OF THE JAR
• Put 1L of hot water and .25ml of detergent (kitchen detergent etc.) in the jar.
• Close the lid of the jar tightly. Put the jar on the motor and push the P-button
(Pulse-button) for about 15 seconds.
• Clean the detergent on the jar and the cover with clean water.
• Do not use the dish sponge when cleaning the detergent. Use a soft piece of
dishcloth or ordinary cloth to wipe out the detergent.
CAUTIONS FOR THE USAGE OF THE DISHWASHER
• When using the dishwasher to clean the jar, put the jar in the top part.
• You can use the jar of the blender in the dishwasher with the maximum
temperature of 104 Celsius degrees (or 220 Fahrenheit degrees).
Do not keep the jar of the blender for more than five minutes under the water.
(When the bearing part of the jar is continuously contacted with water, its
lifecycle can be reduced.)
6-2. CLEANING OF THE MOTOR OF THE BLENDER Q-SERIES
IN-COUNTER BLENDERS (ICB)
1. Make sure the main power switch is off and motor is unplugged before
cleaning.
2. When necessary, wipe the metal top and sides of the blender base clean
with a damp rag. Mild cleaners like WINDEX® may be used.
3. Remove the rubber gasket and clean as necessary.
4. If needed, the drive socket can be cleaned using a toothpick or cotton swab.
CLEANING TIPS AND CAUTIONS
• Do not use abrasives or stiff brushes to clean the blender base, jar, or sound
enclosure as this will dull or scratch the surface.
• Do not use a water jet of any kind to clean the blender base.
• NEVER submerge the blender motor in water—THIS WILL VOID WARRANTY.
7. WARRANTY & TROUBLE SHOOTING
7-1. WARRANTY
• Warranty for the Motor
ABC
1 year or 20000 cycles
Q-Series
1 year or 15000 cycles
SpaceSaver
1 year or 10000 cycles
[The one which comes earlier between the period of 1 year and the number of
15000 cycles (in case of Q-Series) according to the purchasing or selling date
is used.]
• WARRANTY FOR THE JAR: The following warranty conditions are applied
for the breakdown of the jar and the internal bearings.
(The model number of the jar is under the NSF logo of the jar.)
• BLADE: The stainless-steel blade is subject to the warranty when it is broken
during the lifecycle of the jar. As it is used over and over, the blade can
9
become blunt, but there is no problem with the mixing power. (The blade is
not sharp.)
• RUNNING SOCKET: The running socket (Refer to Figure 1.2) is subject to
the warranty during the lifecycle of the product.
• The warranty is applied from the delivery date or the purchasing date when
the purchasing certificate is submitted. (The apparent defect or the damage
caused by misuse is not subject to the warranty.)
7-2. SOLUTIONS FOR POTENTIAL PROBLEMS
WHEN THE MOTOR OF THE BLENDER DOES NOT ROTATE, CHECK THE
FOLLOWING CONTENTS.
• Check whether the main power switch on the lower part of the front is on or
not.
• Check whether the power switch of the fuse box in your house or store is on
or not.
• Pull out the power cord and put it in the outlet again.
• Check whether the LCD screen shows light. (If there is no light, there would
be not enough power for the micro-processor or it would be broken. In such a
case, you must have your product fixed.)
WHEN THE LEVEL OF NOISE FOR THE BLENDER HAS INCREASED
GREATLY IN COMPARISON WITH THE INITIAL LEVEL.
• When the bearing of the jar has been worn out and its lifecycle has been
ended, the level of noise becomes great. (Replace the jar. If you are still in the
warranted period, you can have your defected product replaced.)
• When there is a scratching sound coming from the motor, the lifecycle of the
component of the internal brush has been ended. (You can make an inquiry
at the repairing center of our blender products and have your product or
component replaced.)
• If a loud sound is heard when operating the jar after pulling it out the motor,
you can make an inquiry at the repairing center of our blender products.
WHEN THERE IS SOMETHING WRONG WITH THE MOTOR OF THE
BLENDER, CHECK THE LCD SCREEN. (When there is something wrong with
the motor of the blender, an error message appears on the LCD screen.)
• When ‘OVERTEMP’ appears on the LCD screen: The motor is overheated. In
such a case, the motor can be operated again when the internal temperature
of the motor is decreased to the one for the possible operation. (Pull out
the power cord and cool the motor down for 20 minutes before operating it
again.)
• When ‘OVERLOAD’ appears on the LCD screen: The motor is overloaded.
Keep the switch turned off for 10 seconds. After checking the factors which
disrupt the movement among the blades of the jar, operate it again.
• (If ‘OVERLOAD’ still appears on the LCD screen, or the moving sound is
different from the previous one, have your product repaired.)
• When ‘LOW VOLTAGE’ appears on the LCD screen: There is not enough
power supplied by the motor. Turn off the motor and solve the cause for the
low voltage. (Such a problem usually occurs when the power extension is
used for one power outlet.)
THERE IS A LUMP OR PIECE OF ICE LEFT STILL AFTER THE BLENDING
10
PROCESS IS EXECUTED. DOES THIS MEAN THAT THERE IS A PROBLEM
WITH THE MOTOR?
• Such a situation is caused by the incomplete blending process due to the
hollowing phenomenon.
• When the blending process is executed, all the small pieces of ice generated
at the initial stage become instantly cooled down and prevented from being
mixed. As a result, the ice is not ground. When cool materials are put in
the jar of the blender, an air bag is established (a hollowing phenomenon),
preventing the contents from being mixed well or causing the ice left
untouched.
SOLUTION: Such a problem is solved when the amount of ice is reduced or
more liquid is added to make the temperature of the cool substance used for
cooking become more than -12 Celsius degrees. Remove 2oz of ice (one or
two ice cubes) or add 1oz of liquid.
• By reducing the amount of ice or adding more liquid, the proportion for the
instant cooling process can be reduced, mixing the contents smoothly.
• A/S Repair Method
• You can have your product fixed by personally visiting the office of
Aspenkorea.com Co., Ltd.
• When it is difficult for you to personally visit our office, you can send your
product requiring a repair to us through the postal service.
• When other problems occur, you can contact us through the methods shown
below to have your product fixed.
OFFICIAL IMPORTER: ASPENKOREA.COM CO., LTD.
Internet Homepage: http://aspenkorea.com/
TEL: 02-322-7980
FAX:02-322-6570
11
APPENDIX - PRODUCT DIAGRAMS
FIGURE 1.1 - FRONT VIEW: BLENDER MOTOR AND JAR
Lid
Jar
Blade
Assembly
LCD Screen
Power Switch
FIGURE 1.2 - TOP VIEW: MOTOR
Drive Socket
Touchpad
Motor Housing
LCD Screen
Power Switch
12
9.35”
(237.49 mm)
SIDE VIEW
(OPEN ENCLOSURE)
9.35”
(237.49 mm)
SIDE VIEW
FRONT VIEW
18.41”
(467.62 mm)
9.29”
(235.96 mm)
18,41”
(467.62 mm)
22.51”
(571.75 mm)
FIGURE 2.1 - ABOVE COUNTERTOP
(65.78 mm)
2.59”
13
14
8.97”
(227.8 mm)
SIDE VIEW
8.49”
(215.6 mm)
FRONT VIEW
10.24”
(260 mm)
10.24”
(260 mm)
3.03”
(77 mm)
SIDE VIEW
(OPEN ENCLOSURE)
8.00”
(203.2 mm)
14.37”
(365 mm)
FIGURE 3.1 - IN - COUNTER
FIGURE 4.1 - COUNTERTOP HOLE TEMPLATE
5-7/8”
(149.22 mm)
4-3/8”
(111.125 mm)
15
1206 South 1680 West
Orem, UT 84058
801-222-0888
www. blendtec.com
OWN-CE-010 Korean English Manual Q-Series v1 Sep 10