1
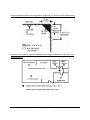
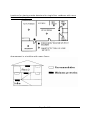
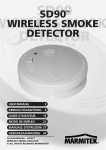
Wireless Smoke
Detector
(Type 3)
Operating Instructions
Version 1.2
For Marmitek alarm installations of the
types:
Homeguard MS8000,
Security Systems: MS9470, MS9480
Security Systems: MS9770, MS9780
Base Stations: SC2700, SC2800
Please read these instructions fully and completely before initial
commissioning; they contain information for the correct installation
of this innovative radio smoke alarm.
© 2003 Convia GmbH, Germany
All rights reserved. This handbook must not be reproduced in any form, even in excerpts, or
duplicated or processed using electronic, mechanical or chemical procedures without written
permission of the publisher. This handbook may contain mistakes and printing errors. The
information in this handbook is regularly checked and corrections made in the next issue.
We accept no liability for technical mistakes or printing errors, or their consequences. All
trademarks and patents are acknowledged.
Modifications due to technical improvements may be made without prior notification
Please report manual- errors to manual@convia- gmbh.de
Page 2 of 12
Table of contents:
Chapter:
Page:
1. General and function ...................................................................... 4
2. Intended use ................................................................................ 4
3. Safety- and maintenance- references ................................................ 5
4. Installation places.......................................................................... 5
5. Installation................................................................................... 8
6. Registering the smoke detector with the base systems/stations of the
types: „MS9470“, „MS9770“, „MS9480“, „MS9780“, „SC2700“, „SC2800“.. 10
7. Registering the smoke detector with the base station of the type
„Homeguard MS8000“...................................................................... 11
8. Final assembly ............................................................................ 12
9. Convia smoke detector - technical data............................................ 12
Page 3 of 12
1. General and function
The optical smoke alarm is available as an optional extra for the Marmitek
security systems of the types: Homeguard MS8000, security system
MS9470/MS9480/MS9770/MS9780, Marmitek security system base station
SC2700, SC2800.
It can detect incipient low temperature fires and open fires with smoke
development and should be in installed every room. The smoke detector
operates according to the dispersed light principle. For this a light transmitter
and receiver are arranged in a measuring chamber in such a way that the
transmitter light does not fall directly on the receiver. The development of
smoke causes the light to be dispersed by smoke particles and picked up by
the receiver. In contrast to many products on the market no radioactive
substance is necessary for the optical smoke detection.
The smoke detector will impress you owing to the following features:
•
Monitoring of rooms for the development of smoke
•
Integrated signal transmitter
•
Alarm transmission even for non-activated alarm unit
2. Intended use
The radio smoke detector is intended for signaling of smoke in interiors with
optical and acoustic warning as well as signaling by radio over distances up
to 30 meters (free field range; in combination with Homeguard the rage is
reduced because of the worse receiver of the Homeguard).
It does not sense gas, heat or flame!
The equipment may not be modified under any circumstances (otherwise all
warranty claims have been void!).
Page 4 of 12
3. Safety- and m aintenance- references
•
Never open the equipment. It contains no parts to be waited. In the
event of an error please give the smoke detector to your dealer.
•
Operate the equipment only in interiors and avoid the influence of
dust, strong draft of air and direct sun light.
•
Clean the equipment with a dry linen cloth, which can be easily
dampened.
•
Never use any kind of cleaning agents.
•
The system may not be kept / operated within the access range by
children. It i s not a toy!
4. Installation places
Smoke detectors should be installed in accordance with the NFPA Standard
74 (National Fire Protection Association, Batterymarch Park, Quincy, MA
02169).
In principle it is advisable to install several smoke detectors in the building
and/or in the dwelling.
In any case at least one smoke detector should be installed in each floor of
buildings with more than one floor.
Only like that a punctual and thus effective warning is possible when a fire
begins.
In any case one smoke detector must be installed in the way from the
sleeping area to the exit (corridor and/or staircase).
Also take care that the smoke detector can be loudly heard through a closed
door from the sleeping room! (Otherwise you will not be waked up during a
fire alarm!).
Page 5 of 12
Recommended best and acceptable locations to mount smoke detectors:
Locations for placing smoke detectors for single residence with only one
sleeping area:
Page 6 of 12
Locations for placing smoke detectors for single floor residence with more
than one sleeping area:
Arrangement in a building with many floors :
Page 7 of 12
The smoke detector should be installed in the centre of the room, on the
ceiling, or for a sloping roof at the highest point, as smoke rises and gathers
in this area. This guarantees the earliest possible alarm warning.
Smoke alarms should be installed in all rooms, but not directly above the
cooking area in the kitchen or the bath, where dust concentrates.
Ensure that the smoke detector is not installed directly on or in the vicinity of
large metal objects as they can affect the radio range.
5. Installation
Please follow these steps to install the Convia smoke detector:
•
At the place where you are going to install the detector, draw a
horizontal line six inches long.
•
Remove the mounting
counterclockwise.
•
Place the bracket so that the two longest hole slots are aligned on the
line. In each of keyhole slots, draw a mark to locate a mounting plug
and screw.
•
Remove the bracket.
bracket
from
Page 8 of 12
your
unit
by
rotating
it
•
Using a 3/16-inch (5mm) drill bit, drills two holes at the marks and
insert plastic wall plugs. Put the detector away from getting plaster
dust on it when you drill holes for mounting.
•
Using the two screws and plastic wall plugs (all supplied) attach the
bracket to the wall.
•
Line up the slot of the bracket
and the detector. Push the
detector onto the mounting
bracket and turn it clockwise
to fix it into place. Pull
outward on the detector to
make sure it is securely
attached to the mounting
bracket.
•
Do not insert the battery at this stage (9V). Please follow the steps of
the next chapter before you insert the battery.
•
How to install the battery:
•
The smoke detector requires an alkaline battery
•
Match terminals on the end(s) of the battery with oppos ite terminal
connectors on the detector. Be sure to insert the alkaline battery in
the position shown on the detector.
•
When terminals are properly matched, push battery firmly in until it
snaps and cannot be shaken loose.
The smoke detector will not work until you insert the battery
properly!
Page 9 of 12
6. Registering the smoke detector with the base
stations of the types „MS9470“, „MS9770“,
„MS9480“, „MS9780“, „SC2700“, „SC2800“.
Carry out the following steps:
(Every time you press a key you hear a short confirmation beep)
1. Open the lid on the right side of the base station.
2. Set the mode switch to the INSTALL position. All indicators of occupied
zones come on.
3. Place the battery (9V) in the correct polarity in the battery holder of the
smoke detector. Puch the test button on the detector to trigger the
alarm. The smoke alarm sends a radio signal to the base station:
The LED on the sensor illuminates briefly, the base station emits a short
signal tone as confirmation of reception.
4. (If you are using more than one smoke detector you have to follow these
steps only once.)
5. Reset the mode switch to the RUN1 or RUN2 position. Zone indicators go
out.
Now the smoke detector is registered and ready to be used.
In the case of a fire emergency the smoke detector sends the alarm signal to
the Marmitek alarm installation (it does not matter whether the base station
is set to arm or disarm. The alarm will be triggered in both cases!)
Page 10 of 12
7. Registering the smoke detector with the base
station of the type „Homeguard MS8000“
Carry out the following steps:
(Every time you press a key you hear a short confirmation beep)
1. Open the lid of the Homeguard.
2. Key in your PIN-code (factory default: 0000). If the code is correct you
will hear a longer confirmation beep. The green LED should start to flash.
(Otherwise you did not key in the correct PIN-code.)
3. Press the 1 key to set the Homeguard to learning-mode.
4. Place the battery (9V) in the correct polarity in the battery holder of the
smoke detector. The smoke alarm sends a radio signal to the base
station: The LED on the sensor illuminates briefly, the base station emits
a short signal tone as confirmation of reception.
5. (If you are using more than one smoke detector you have to follow these
steps only once.)
6. Press the 1 key again to leave the learning-mode.
Now the smoke detector is registered and ready to be used.
In the case of a fire emergency the smoke detector sends the alarm signal to
the Marmitek alarm installation (it does not matter whether the base station
is set to arm or disarm. The alarm will be triggered in both cases!)
Page 11 of 12
8. Final assembly
The lower sect ion of the smoke detector is attached to the bracket already
mounted on the ceiling and turned clockwise to the stop.
9. Convia smoke detector - technical data
Frequency:
Modulation:
Range:
Alarm:
Power supply:
Operating temperature:
Air moisture:
433.92 MHz
AM
Up to 30 meters (Free field. In combination with
Homeguard the range is reduced)
85 dB
9V-Blockbattery, Alkaline-Type
10 to 45 degrees (Celsius)
< 95% rel. air moisture
© 2003 Convia GmbH
Burgemeisterstr.34
12103 Berlin
GERMANY
http://www.convia-gmbh.de
Please report manual- errors to manual@convia- gmbh.de
Page 12 of 12